1
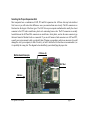
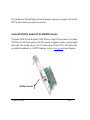
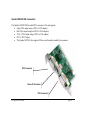
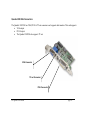
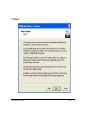
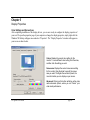
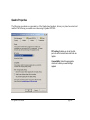
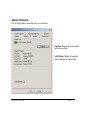
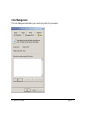
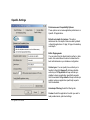
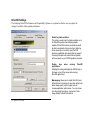
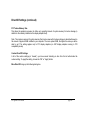
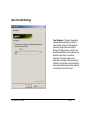
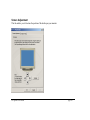
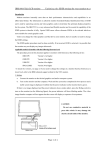
PNY Quadro Professional Graphics Accelerators User Manual Quadro4 XGL Series Quadro4 NVS Series PNY Technologies, Inc. 299 Webro Road Parsippany, NJ 07054 (USA) PNY Technologies Europe Z.A.C du Phare Rue Joseph Cugnot, BP-181 33708 Merignac Cedex (France) Table of Contents Chapter 1 Introduction ....................................................... 3 Chapter 2 Hardware Installation ....................................... 5 Chapter 3 Software Installation ....................................... 15 Chapter 4 nVidia nView Installation ............................... 17 Chapter 5 Display Properties ........................................... 36 Chapter 6 MAXtreme ....................................................... 56 Chapter 7 POWERdraft ................................................... 58 Chapter 8 QuadroView ..................................................... 60 Chapter 9 Technical Specifications .................................. 62 Chapter 10 Support ............................................................ 66 Limited Liability The information contained in this manual has been validated at the time of manual production. The manufacturer reserves the right to make any changes, additions and revisions to the product described in this manual at any time and without notice. Consequently, PNY Technologies, Inc. assumes no liability for damages incurred directly or indirectly from errors, omissions or discrepancies between the product and the manual. Copyright Copyright PNY 2002 All rights reserved. No reproduction of this document in any form is permitted without prior written authorization from PNY Technologies, Inc. Trademarks All registered trademarks are the property of their respective owners. PNY Quadro User Manual page 2 Chapter 1 Introduction Congratulations on the purchase of your Quadro graphics accelerator board from PNY Technologies. You are now the owner of a state-of-the-art graphics accelerator that was designed for professional 3D and 2D applications, and offers features and functionality beyond any other card in its class. We recommend that you read through this User Guide before installing your accelerator board to ensure a proper installation. Minimum System Requirement • IBM® or 100% PC compatible with genuine Pentium® III or AMD Athlon® class processor or higher • One available AGP 2.0 compliant slot or better, or one available PCI slot (as required for your specific card) • Windows® XP, 2000 or Windows® NT4.0. (Service Pack 5 or 6) • 128 MB system memory • 20 MB of available disk space for full installation • CD-ROM or DVD-ROM drive • VGA or DVI-I compatible monitor Package Contents Please check your package, which contains the items below. If you find any damaged or missing items, please contact your dealer. • Graphics board • Adapters or cables • CD-ROM: software drivers for Windows® 2000, XP, NT4.0, DirectX 8.1® • Installation Guide PNY Quadro User Manual page 3 Before You Begin • Before installing the Display driver, make sure your Windows® /2000/ XP or NT was installed in VGA mode and functions properly. • To use an AGP graphics card with Windows® NT4.0, you may need to re-install NT with Service Pack 5 (SP5) or Service Pack 6 (SP6) before installing the AGP card. • If you are running Windows® NT4.0, please note that some drivers are not compatible with earlier releases of Windows® NT. Consult your dealer or local support to ensure you have the most recent releases for Windows NT and the drivers. IMPORTANT Uninstalling Your Existing VGA Driver • Remove your existing Display Driver using the Add/Remove Icon in ‘Control Panel’ • Shut down your computer. • Remove your existing video card • NOTE: If your system (motherboard) has an onboard graphics controller, please contact the system vendor on how to properly disable it. PNY Quadro User Manual page 4 Chapter 2 Hardware Installation IMPORTANT Static electricity can severely damage electronic parts. Please take these precautions when installing your graphics card: • Before touching any electronic parts, discharge the static electricity from your body by touching the internal metal frame of your computer while it is unplugged. • Do not remove a card from the anti-static container it shipped in until you are ready to install it. Whenever you remove a card from your computer, always make sure to place it back in its container. • Do not let your clothing touch any electronic parts.. • When handling a card, hold it by its edges, and avoid touching its circuitry. Preparing Your Computer for Installation Prior to working on your computer, make sure the power of the computer and any attached equipment such as a monitor or printer is turned off. Unplug your computer and remove the cover. Remove your current graphics card. For systems with ‘On-Board 3D Graphics’, there is no graphics card to remove. Some systems may require you to disable your ‘On-Board 3D Graphics’. Consult your PC users’ manual or vendor manual on how to properly do this. PNY Quadro User Manual page 5 Selecting the Proper Expansion Slot Most computers have a combination of AGP, PCI and ISA expansion slots. All these slots may look similar at first, however you will notice their differences once you examine them more closely. The ISA connectors are black and are the largest of the three types. The AGP slot on your computer motherboard is usually the closest connector to the CPU and is made from a plastic of a contrasting brown color. The PCI connectors are usually located between the AGP and ISA connectors are made from a white plastic, and are the same connector type that most Sound or Modem Cards are connected. If you are still unsure which connectors are AGP and PCI, consult your system manual to help you identify them. Plugging your graphics card into an incorrect slot could damage the card, your computer, or both. Do not try to force a card into a slot that does not accommodate it, as it is probably the wrong slot. The diagram below should help you in identifying the proper slot. Motherboard Example PCI Slots (5) AGP Slot ISA Slot PNY Quadro User Manual page 6 Inserting Your Graphics Card Remove the back of the PC cover for the slot you intend to use and save the screw for the mounting bracket of your new PNY Quadro graphics card. Position the Quadro graphics card over the expansion slot that coincides with the type (AGP or PCI) of card purchased. Push the card firmly and evenly until it’s fully seated into the slot. Replace the screw to secure the bracket of the graphic’s card to the computer chassis. Replace the cover of your computer. PNY Quadro User Manual page 7 Plug your Monitor or Flat Panel Display cable into the appropriate connector on your graphic card. All cables MUST be connected before your computer is powered on. Quadro4 550 & 580 XGL, Quadro4 200, 280 & 400 NVS Connectors The Quadro4 200/280 NVS and the Quadro4 550/580 XGL have a single LFH 60-pin connector. The Quadro4 400 NVS has two LFH 60-pin connectors. Each LFH connector can support two monitors, using the supplied splitter cable. Your card ships with one VGA+VGA splitter cable per LFH port. DVI-I + DVI-I splitter cables are available at an additional cost. Visit PNY Technologies’ web site at www.pny.com for more information. LFH 60-pin connector PNY Quadro User Manual page 8 Quadro4 750 XGL Connectors The Quadro4 750 XGL has both VGA and DVI-I connectors. These connectors support: • Single VGA output • Dual VGA output (using a DVI-I to VGA adapter) • Single DVI-I output • VGA + DVI-I output • The Quadro4 750 XGL also supports 3D stereo out through a standard 3-pin connector. PNY Quadro User Manual page 9 VGA Connector Stereo 3D Connector DVI-I Connector PNY Quadro User Manual page 10 Quadro4 900/980 XGL Connectors The Quadro4 900/980 XGL has dual DVI-I connectors. This card supports: • Single VGA output (using a DVI-I to VGA adapter) • Dual VGA output (using two DVI-I to VGA adapters) • VGA + DVI-I output (using a DVI-I to VGA adapter) • DVI-I + DVI-I output • The Quadro4 900 XGL also supports 3D stereo out through a standard 3-pin connector DVI-I Connector Stereo 3D Connector DVI-I Connector connector. PNY Quadro User Manual page 11 Quadro4 380 XGL Connectors The Quadro4 380 XGL has VGA,DVI-I & TV out connectors and supports dual monitors. This card supports: • VGA output • DVI-I output • The Quadro4 380XGL also supports TV out VGA Connector TV out Connector DVI-I Connector PNY Quadro User Manual page 12 Chapter 3 Software Installation Did you Uninstall your existing VGA driver? • If yes, proceed with Chapter 3. • If No, go back to Chapter 1 ‘Uninstalling Your VGA Driver’, complete the process and then continue with Chapter 3. Installing the Standard Graphics Adapter (VGA) Driver. • Power up you computer and launch Windows®, 2000, XP or NT. • The Building Driver Database dialog box will appear as the Windows® operating system builds the database. • When the Add New Hardware Wizard appears, click Next. • Choose Search For The Best Driver For Your Device, and click Next. • Make sure that all of the four choices are left blank. If not, un-check the applicable box. Then click Next. • Windows® is now ready to install the Standard Graphics Adapter driver. Click Next to continue. • Click Finish. Windows® will install the Standard Graphics Adapter driver. • You will now be prompted to re-start your computer. Click Yes. Installing Quadro Graphics Drivers 1. Insert the PNY Quadro CD-ROM into the CD-ROM drive. 2. For Windows®, 2000/XP go to PNY CD-ROM directory: Drivers /WIN 2K-XP double click on the Set-up Icon and follow the screen instructions. 3. For Windows® NT go to PNY CD-ROM directory: Drivers /WIN NT4 double click on the Set-up Icon and follow the screen instructions. 4. For Windows®, 2000 DirectX Drivers go to PNY CD-ROM directory: Drivers/DirectX8.1/Win2K double click on the DXGINTENG.EXE and follow the screen instructions. PNY Quadro User Manual page 13 Chapter 4 nVidia nView Installation About NVidia nView nVidia’s nView is a desktop utility designed to give you an easier way of managing multiple displays and enhancing your desktop. Once you install the nVidia drivers and reboot, the nVidia nView wizard will appear. You can either choose to install it or cancel the nView setup. Each screen will give you a brief description of the options nView will enable. Detailed documentation of nView is available on the Installation CD in the manuals/user/nView folder. 1st Screen: PNY Quadro User Manual page 14 2nd Screen: PNY Quadro User Manual page 15 3rd Screen: PNY Quadro User Manual page 16 4th Screen: PNY Quadro User Manual page 17 5th Screen: PNY Quadro User Manual page 18 6th Screen: PNY Quadro User Manual page 19 7th Screen: PNY Quadro User Manual page 20 8th Screen: PNY Quadro User Manual page 21 9th Screen: PNY Quadro User Manual page 22 10th Screen: PNY Quadro User Manual page 23 11th Screen: PNY Quadro User Manual page 24 12th Screen: PNY Quadro User Manual page 25 13th Screen: PNY Quadro User Manual page 26 14th Screen: PNY Quadro User Manual page 27 Using nView Desktop Manager: Once nView is setup, you can access the nView Desktop manager and adjust different settings to how you wish. There are a total of 5 options to go through: Profiles, Windows, Effect, Hot Keys and Desktops. Profiles: PNY Quadro User Manual page 28 Windows: PNY Quadro User Manual page 29 Effects: PNY Quadro User Manual page 30 Hot Keys: PNY Quadro User Manual page 31 Desktops: PNY Quadro User Manual page 32 Chapter 5 Display Properties Color Settings and Screen Area After completing installation of the display drivers, you are now ready to configure the display properties of your card. To open the properties page of your computer or change the display properties, simply right-click the Windows XP desktop wallpaper area and select “Properties”. The “Display Properties” windows will appear on your screen as shown below. Colors: Displays the current color setting for the monitor. To use a different color setting, click the arrow, and then click the setting you want. Screen area: Displays the current screen area setting for the monitor. Drag the slider to specify the screen area you want. The higher the number of pixels, the more information you can display on your screen. Advanced: Clicking on this button will bring up the video cards advanced options, where you can “tweak” your video cards performance. PNY Quadro User Manual page 33 Quadro Properties The following screenshots are representative of the Quadro based products, but may vary based on actual card installed. The following screenshots were taken using a Quadro4 900 XGL. DPI setting: Enables you to set the dots per inch so that screen items and fonts are legible. Compatibility: Select the appropriate choice as to when you want settings applied. PNY Quadro User Manual page 34 Adapter Information This tab displays adapter information and system information. Properties: Shows driver version number and resource settings. List All Modes: Displays the supported monitor resolutions and refresh rates. PNY Quadro User Manual page 35 Monitor The Monitor tab displays the identification and refresh rate information for the connected monitor. Properties: Shows driver version number for the monitor. PNY Quadro User Manual page 36 Troubleshoot The Troubleshoot tab enables you to adjust the level of hardware acceleration when attempting to solve problems with your system. PNY Quadro User Manual page 37 Color Management The Color Management tab enables you to load color profiles for your monitor. PNY Quadro User Manual page 38 Graphic’s Card Specific Settings This tab enables you to make adjustments to settings specific to your accelerator card. Display driver version numbers and other key information on your card are displayed. Additional Properties: Brings up the subsequent dialogs to adjust your driver settings for optimal performance and quality. NVIDIA on the Internet: Connects to NVIDIA’s web site for the most current information and software downloads. PNY Quadro User Manual page 39 Antialiasing Settings This tab will allow you to manually or automatically select the antialiasing mode to be used with your 3D applications You can allow applications to adjust the antialiasing mode, or manually override and select the type of antialiasing your desire. PNY Quadro User Manual page 40 OpenGL Settings Performance and Compatibility Options: These options can increase application performance in OpenGL 3D applications. Default color depth for textures: This option determines the color depth of textures used by default in OpenGL applications: 16 bpp, 32 bpp or the desktop color depth. Buffer flipping mode: You can select from the block transfer method, or Autoselect. Auto-select allows the driver to determine the best method based on your hardware configuration. Vertical sync: You can specify how vertical sync is handled in OpenGL.Always off will always disable vertical sync. Off by default will keep vertical sync disabled, unless an application specifically requests that it be enabled. On by default will keep vertical sync enabled, unless an application specifically requests that it be disabled. Anisotropic Filtering: Select the filtering rate Custom: Select the application for which you want to load predetermined, optimized settings. PNY Quadro User Manual page 41 Direct3D Settings The following Direct3D Performance and Compatibility Options are explained so that the user may adjust the settings if needed to obtain optimal performance. Enable fog table emulation This option is used to turn fog table emulation on or off. Direct3D specifies that a display adapter capable of Direct3D hardware acceleration should be able to implement either vertex fog or table fog. Some games do not correctly query the D3D hardware capabilities and expect table fog support. Choosing this option will ensure that such games will run properly on your NVIDIA graphics processor. Display logo when running Direct3D applications Enabling this setting will display the NVIDIA logo in the lower corner of the screen while running Direct3D applications. Mipmapping: Allows you to adjust the LOD (Level of Detail) bias for mipmaps. A lower bias will provide better image quality, while a higher bias will increase application performance. You can choose from five preset bias values, varying from “Best Image Quality” to Best Performance. PNY Quadro User Manual page 42 Direct3D Settings (continued) PCI Texture Memory Size This allows the graphics processor to utilize up to specified amount of system memory for texture storage (in addition to the memory installed on the display adapter itself). Note: The maximum amount of system memory that can be reserved for texture storage is calculated based on the amount of physical RAM installed in your computer. The more system RAM, the higher the value you will be able to set. This setting applies only to PCI display adapters (or AGP display adapters running in PCI compatibility mode). Custom Direct3D Settings A list of the custom settings (or “tweaks” ) you have saved. Selecting an item from the list will activate the custom setting. To apply the setting, choose the “OK” or “Apply” button. More Direct3D brings up the following dialog box. PNY Quadro User Manual page 43 More Direct3D Settings Texel Alignment: This option changes the hardware texture addressing scheme for texels (texture elements). Changing these values will change where texel origin is defined. The default values conform to the Direct3D specifications. Some software may expect the texel origin to be defined elsewhere. The image quality of such applications will improve if the texel origin is redefined. Use the slider control to adjust the texel origin anywhere between the upper left corner and the center of the texel. PNY Quadro User Manual page 44 Overlay Controls Brightness, Contrast, Hue and Saturation Control allows the adjustment of the quality of video or DVD playback on your monitor. You can independently control the brightness, contrast, hue and saturation to achieve optimal quality when playing back videos or DVD movies on your computer. Video Overlay Zoom: Enables the controls to zoom in on a specific area of the video output. PNY Quadro User Manual page 45 Desktop Utilities Quick Tweak lets you add the NVIDIA Quick Tweak icon to the Windows taskbar. The icon allows you to apply any of the custom Direct3D, OpenGL or color settings “On the fly” from a convenient popup menu. The menus also contain items for restoring default settings and accessing the Display Properties dialog. Desktop Manager enables enhanced multidisplay functionality. Complete Desktop Manager documentation is located on the Quadro CD. PNY Quadro User Manual page 46 nView nVidia nView is an extremely flexible system for managing multiple displays as a single desktop space. Complete nView documentation is located on the Software Installation CD in the nView directory. nView Modes allows you to control the relative position of multiple displays. Detect Displays is used to have your Quadro card recognize the displays that are connected. Device Settings gives you access to ‘Color Correction’ and ‘Screen Adjustment’ dialog boxes. PNY Quadro User Manual page 47 Color Correction Digital Vibrance gives you more control over color separation and intensity, resulting in brighter cleaner images in all of your applications. Active Color Channel allows you to select the color channel controlled by the sliders. You can adjust the red, green or blue channels individually or all three channels at once. Brightness, Contrast and Gamma Controls: allow you to adjust the selected color channel. The color correction controls help you to compensate for variations in luminance between a source image and its output on a display device. This is useful when working with image processing applications to help provide more accurate color reproduction of images. Also many 3D-accelerated games may appear too dark. Increasing the brightness and/or gamma value equally across all channels will make these games appear brighter. Automatically apply these settings at startup will automatically restore the color adjustments you have made when Windows is restarted. Note: If your computer is running on a network, the color will be adjusted after you have logged on to Windows. PNY Quadro User Manual page 48 Device Selection This tab enables you to select the output display device (monitor or digital flat panel) depending on which devices your display adapter supports. Detect Displays is used to have your Quadro card recognize the displays that are connected. Device Adjustments gives you access to ‘Screen Adjustment’ and ‘Display Timing’ dialog boxes. PNY Quadro User Manual page 49 Screen Adjustment This tab enables you to fine tune the position of the desktop on your monitor. PNY Quadro User Manual page 50 Display Timing This tab enables you to fine tune the position of the desktop on your monitor. Auto-Detect allows Windows to receive the proper timing information directly from the monitor itself. This is the default setting. Note that some older monitors may not support this feature. General Timing Formula or GTF is a standard used by the newer hardware. Discrete Monitor Timings or DMT is an older standard still in use on some hardware. Enable this option if your hardware requires DMT. PNY Quadro User Manual page 51 Digital Flat Panel The options on this tab allow you to determine the placement of the image on your flat panel display when running at resolutions lower than the maximum resolution supported. PNY Quadro User Manual page 52 Chapter 6 MAXtreme Introduction MAXtreme is a 3D driver that is specifically optimized for use with the PNY Quadro4 XGL Series, Quadro2 Series and Quadro DCC workstation graphics cards. Together, this driver and your new graphics hardware enhances the capabilities of the interactive renderer in several applications from Discreet, including: • 3ds max 4 • 3D Studio MAX Release 3 • 3D Studio VIZ Release 3i • 3D Studio VIZ Release 3 Using Stereo shutter glasses, you can also use the MAXtreme Stereo feature to view your drawings and animations in true stereo. Installing MAXtreme One of the applications listed above must already be installed on your computer before you install and run MAXtreme. The MAXtreme Setup program automatically installs the version of MAXtreme (Release 3 or Release 4) that is compatible with your installed version of the 3D Studio MAX/VIZ application. (MAXtreme 4 works with 3ds max 4 but is not compatible with 3D Studio MAX 3.) The MAXtreme SETUP directory on your CD contains the following files: Readme.txt contains important release notes Setup.exe installation program for Windows (all others) files required for installation PNY Quadro User Manual page 53 Before you system: • • • • • install and use this driver, you must have the following components fully functional on your Windows NT 4.0 or Windows 2000/XP operating system A PNY Quadro workstation graphics card Windows 2000/XP Display Driver or Windows NT 4.0 Display Driver (Version 6.49 or higher) AutoCAD already installed "Write access" to the 3D Studio MAX/VIZ main directory and the Windows system directory From the MAXtreme directory, click the Setup.exe icon and follow the instructions that appear in the subsequent prompts. The Help file (MAXtreme*.chm) will be installed during MAXtreme installation in the 3D Studio Help directory. NOTE: If the installation program stops processing and generates an error message, run the program when logged in with Administrator privileges. For additional information about MAXtreme, view the Readme.txt file in the MAXtreme directory. Uninstalling MAXtreme 1. From the Windows desktop, click Start > Settings > Control Panel > Add/Remove Programs. 2. Click the "Add/Remove Programs" icon. 3. Click " MAXtreme" from the list. 4. Click the "Change/Remove" button. 5. Follow the instructions from the InstallShield program to complete uninstallation. PNY Quadro User Manual page 54 Chapter 7 POWERdraft Introduction POWERdraft is designed to enhance the performance and features of the following applications when used in conjunction with a PNY Quadro4 XGL Series, Quadro2 Series or Quadro DCC workstation graphics card: • AutoCAD 2002/2000/2000i • AutoCAD Architectural Desktop Version 2/3.3 • Autodesk Mechanical Desktop 4/5/6 For detailed information on the features of POWERdraft, refer to the online Help file. Installing POWERdraft The driver Setup directory contains the following files: important notes about using this software • README.TXT Windows help files in English • LANG15EN.HLP installation program for Windows • SETUP.EXE files needed by SETUP • (all others) Before you system: • • • • • install and use this driver, you must have the following components fully functional on your Windows NT 4.0 or Windows 2000/XP operating system A PNY Quadro workstation graphics card Windows 2000/XP Display Driver or Windows NT 4.0 Display Driver (Version 6.49 or higher) AutoCAD already installed "Write access" to the AutoCAD main directory and the Windows system directory PNY Quadro User Manual page 55 To install POWERdraft: 1. Make sure AutoCAD is not running. 2. Start SETUP.EXE from the POWERdraft installation directory. The driver is installed in a separate driver directory. SETUP creates a program group containing the following icons: • "POWERdraft Help" opens the online Help file. • "Configure POWERdraft" configures POWERdraft as the AutoCAD display driver. • "Configure Original Driver" configures the AutoCAD original display driver (WHIP). NOTE: The two Configure icons only work when AutoCAD is not running. 3. Use these icons to configure either POWERdraft or the original driver shipped with AutoCAD (WHIP) as the actual display driver for AutoCAD. After Setup has completed successfully, POWERdraft is already configured. When POWERdraft is configured, the POWERdraft logo will appear when AutoCAD starts up. Uninstalling POWERdraft To uninstall POWERdraft from your computer 1. From your Windows desktop, click Start > Settings > Control Panel. 2. Click "Add/Remove Programs". 3. Click "POWERdraft" from the list. 4. Click the "Change/Remove" button. 5. Follow the instructions from the InstallShield program to complete uninstall. PNY Quadro User Manual page 56 Chapter 8 QuadroView Introduction NVIDIA QuadroView is an add-on 3D viewing application designed as a stand alone application or for use with any of the following applications when used in conjunction with a PNY Quadro4 XGL Series, Quadro2 Series or Quadro DCC workstation graphics card: • AutoCAD 2002/2000/2000i • AutoCAD Architectural Desktop Release 2/2i • Mechanical Desktop Release 4/5/6 NOTE: QuadroView can also be run in stand-alone mode The NVIDIA QuadroView directory contains the following files: Readme.txt important information about QuadroView Setup.exe installation program for Windows (all others) files required by SETUP Installing QuadroView Before you install and use NVIDIA QuadroView (Version 2.04), you must have the following components fully functional on your system: • Windows NT 4.0, Windows 2000 or Windows XP operating system • A PNY Quadro workstation graphics card • Windows NT 4.0 Display Driver or Windows 2000/XP Display Driver • If you are using QuadroView within another application, such as AutoCAD, that application must already be installed on your computer. • If you are using QuadroView stereo features, depending on the stereo mode you are using, you may need any combination of shutter glasses, stereo monitor, and colored filter glasses. PNY Quadro User Manual page 57 To install QuadroView, click the Setup.exe icon in the QuadroView directory and follow the prompts from the InstallShield program. NOTE: If the installation program stops processing and generates an error message, try to run the installer after logging in with Administrator privileges. Starting QuadroView To start QuadroView in stand-alone mode… From your Windows desktop, click Start > Programs > NVIDIA Corporation > QuadroView 2.04 > QuadroView To start QuadroView from an AutoCAD application… Please refer to the QuadroView online Help for Demand Load Configuration. Uninstalling QuadroView To uninstall QuadroView, follow these steps: 1. From the Windows desktop, click Start > Settings > Control Panel > Add/Remove Programs. 2. Click the "Add/Remove Programs" icon. 3. Click "QuadroView" from the list. 4. Click the "Change/Remove" button. 5. Follow the instructions from the InstallShield program to complete uninstallation. PNY Quadro User Manual page 58 Chapter 9 Technical Specifications Display Modes Table Resolution Colors Vertical Refresh Rate 640x480 8/16/32 bits 60Hz to 240Hz 800x600 8/16/32 bits 60Hz to 240Hz 1024x768 8/16 bits 60Hz to 240Hz 1024x768 32 bits 60Hz to 200Hz 1152x864 8/16 bits 60Hz to 200Hz 1152x864 32 bits 60Hz to 170Hz 1280x960 8/16 bits 60Hz to 170Hz 1280x960 32 bits 60Hz to 150Hz 1280x1024 8/16 bits 60Hz to 170Hz 1280x1024 32 bits 60Hz to 150Hz PNY Quadro User Manual page 59 Display Modes Table (continued) Resolution Colors Vertical Refresh Rate 1600x900 8/16 bits 60Hz to 150Hz 1600x900 32 bits 60Hz to 120Hz 1600x1200 8/16 bits 60Hz to 120Hz 1600x1200 32 bits 60Hz to 100Hz 1920x1080 8/16 bits 60Hz to 100Hz 1920x1080 32 bits 60Hz to 85Hz 1920x1200 8/16 bits 60Hz to 100Hz 1920x1200 32 bits 60Hz to 85Hz 1920x1440 8/16 bits 60Hz to 85Hz 1920x1440 32 bits 60Hz to 75Hz 2048x1536 8/16 bits 60Hz to 75Hz 2048x1536 32 bits 60Hz PNY Quadro User Manual page 60 Digital Flat Panel Supported Modes Resolution Colors 640x480 8/16/32 bits 800x600 8/16/32 bits 1024x768 8/16/32 bits 1280x1024 8/16/32 bits Please check the PNY Quadro Web Site at: http://www.pny.com/quadro for LCD flat pannel displays that have been certified. PNY Quadro User Manual page 61 Chapter 10 Support PNY Technologies provides ‘Live Technical Support’ 5 days a week from 10:00 am to 7:00 pm Monday thru Pacific Standard Time. Our Automated Technical Support System is designed to provide help with common day-to-day graphic card issues. It’s available 24 hours a day, 7 days a week. For additional help you may visit the PNY Tech Support website at http://www.pny.com PNY’s Replacement Warranty PNY Technologies, Inc. (“PNY”), manufacturer of your newly purchased PNY graphics card (the “product”), warrants the product to be free from defects in materials and workmanship for three-years (upon completion of a registration form on PNY’s website) of the product as sold to the original purchaser (“purchaser”), subject to all the terms and conditions hereunder. This warranty is not assignable. PNY’s sole obligation under this warranty is to replace the product with like or similar product. This warranty applies only on the condition that the product has been installed, maintained and operated under conditions of normal use and in accordance with the installation guide provided herewith. The provisions of this warranty shall not apply if, in PNY’s judgment, the product has been subject to misuse or neglect, improper installation, damaged in an accident, or repaired or altered in any way that adversely affects its performance or reliability. THIS WARRANTY IS IN LIEU OF ANY OTHER WARRANTIES, EITHER EXPRESS OR IMPLIED, INCLUDING WITHOUT LIMITATION ANY WARRANTIES OF MERCHANTABILITY OR FITNESS FOR A PARTICULAR PNY Quadro User Manual page 62 PURPOSE OR TITLE AGAINST INFRINGEMENT, WHICH OTHER WARRANTIES ARE EXPRESSLY EXCLUDED AND DISCLAIMED. PNY SHALL NOT BE LIABLE FOR LOSS OF PROFITS OR ANY SPECIAL, INCIDENTAL OR CONSEQUENTIAL DAMAGES WHICH PURCHASER MAY SUSTAIN, EVEN IF PNY HAS BEEN ADVISED OF THE POSSIBILITY OF SUCH LOSSES OR DAMAGES. IN NO EVENT SHALL PNY’S LIABILITY EXCEED THE PURCHASE PRICE OF THE DEFECTIVE PRODUCT. SOME STATES DO NOT ALLOW THE EXCLUSION OR LIMITATION OF INCIDENTAL OR CONSEQUENTIAL DAMAGES, SO THESE LIMITATIONS MAY NOT APPLY TO YOU. THIS WARRANTY GIVES YOU SPECIFIC LEGAL RIGHTS AND YOU MAY ALSO HAVE OTHER RIGHTS, WHICH VARY FROM STATE TO STATE. THIS WARRANTY SHALL NOT BE EXTENDED, ALTERED OR VARIED EXCEPT BY A WRITTEN INSTRUMENT DULY SIGNED BY PNY. Warranty coverage requires proof of purchase documentation evidencing the date of purchase (sales receipt or invoice). To obtain warranty service, phone PNY at 1-800-234-4597. The information in this document is subject to change without notice. PNY Quadro User Manual page 63 FCC Information This equipment has been tested and found to comply with the limits for a Class B digital device, pursuant to Part 15 of the FCC Rules. These limits are designed to provide reasonable protection against harmful interference in a residential installation. This equipment generates radio frequency energy, and if not installed and used in accordance with the instructions, may cause harmful interference to radio or television reception, which can be determined by turning the equipment off and on. The user is encouraged to try to correct the interference by one or more of the following measures: • Reorient the receiving antenna. • Increase the separation between the equipment and receiver. • Connecting the equipment to an outlet on a circuit different from that to which the receiver is connected. • Consult the dealer or an experienced radio/TV technician for help. This device complies with Part 15 of FCC Rules. Operation is subject to the following two conditions: (1) This device may not cause harmful interference and, (2) this device must accept any interference received, including interference that may cause undesired operation. Notice to user: Changes or modifications to this product not approved by the party responsible for FCC compliance could void your authority to operate this equipment. In order for an installation of this product to maintain compliance with the limits for a Class B device, shielded cables must be used for the connection of any devices external to this product. To the judgment of the products with regard to electromagnetic compatibility according following regulations: EN 50081-1 (EN55022 class B) EN 50082-1 (IEC 801 Part 2, 4 / ENV 50140 / ENV 50141) PNY Quadro User Manual page 64