1
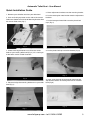
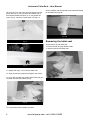
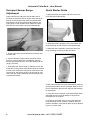
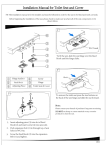
Automatic Toilet Seat User Manual Automatic Toilet Seat - User Manual Thank you for ordering the Sensor Toilet Seat. Through daily use you will discover it’s many benefits. Included Parts (Fig.1) • 2x Metal screws • 2x Rectangular washers • 2x Adjustment brackets • 2x Large fastener (try to use these first) • 2x Large plastic bolt cap (use these with the large fastener) • 2x Small plastic bolt cap (not shown: use these with the small fastener) • 2x Small fastener (not shown: use these only if the large fastener doesn’t fit) • 2x Hexagonal metal bolt • 1x Rechargeable battery • 1x A/C Adapter charger • 1x User manual • 1x Sensor toilet seat with attached mounting bracket (you will need 1x Phillips head screwdriver) Warning: do not sit on lid cover! 2 www.fw3group.com • tel: 01404 814292 Automatic Toilet Seat - User Manual Quick Installation Guide 1. Remove your old toilet seat from your toilet bowl 2. Push and hold grey button on the side of the Sensor Toilet Seat. Release and slide off Mounting Bracket from the Sensor Toilet Seat (Fig 1). 5. Place adjustment brackets onto the mounting bracket 6. Put the rectangular metal washer onto the adjustment brackets 7. Put the hexagonal metal bolts onto the plastic bolt caps (Fig.4) Fig. 1 Fig. 4 3. Check if the large fasteners can fit into the screw holes of your existing toilet bowl (Fig.2). If it is too big to fit the holes use the smaller fasteners. 8. Put the plastic bolt caps onto the fastener (Fig.5) Fig. 5 Fig. 2 4. Place and align the mounting bracket on to your toilet bowl (Fig.3) 9. Insert screw through the rectangular metal washer, adjustment brackets and through the hole in the toilet bowl (Fig.6) Fig. 6 Fig. 3 www.fw3group.com • tel: 01404 814292 3 Automatic Toilet Seat - User Manual 10. Insert and turn the screw into the fastener and the plastic bolt cap as you hold them from below (Fig.7). The fastener bottom will open up as you tighten the screw (Fig.8). Leave this screw loose until step 12 After installation the sensor toilet seat should be aligned to the toilet bowl (Fig.10) Fig. 10 Removing the toilet seat Fig. 7 To remove the sensor toilet seat: 1. Push and hold the grey release button. 2. Slide out the Sensor Toilet Seat. Fig. 8 11. Repeat the steps 7 and 8 for the other side. 12. Align the mounting bracket and tighten the screws. 13. Push and hold the grey button while sliding the sensor toilet seat onto the bracket (Fig.9) Fig. 9 14. Inset battery into the battery chamber. 4 www.fw3group.com • tel: 01404 814292 Fig. 11 Automatic Toilet Seat - User Manual Specifications Sensor Ranges: • Front sensor when cover is closed: 10 to 15 cm • Top sensor when cover is opened: 5 to 10 cm • Occupant sensor in the centre of the cover: adjustable 45 to 100 cm • Occupant motion sensor in the centre of the cover: fixed 120° detection angle. • Note: second occupant motion sensor – 120° horizontally and vertically Sensor positions: • Front sensor: 45 ° angle upward • Top sensor: points straight up • Occupant sensor: points horizontally • Motion sensor: 120° horizontally Note: the sensors are the latest “beam” type infrared sensor. Simply break the beam as you approach ( it will activate quickly). DO NOT wave at the sensors as they will not activate in order to prevent unintentional opening. www.fw3group.com • tel: 01404 814292 5 Automatic Toilet Seat - User Manual Occupant Sensor Range Adjustment Use the dial on the side of the sensor toilet seat to increase or reduce the sensor range. Lower the range enough so the infrared beam does not mistake bathroom fixtures for an occupant and fails to close, and high enough so the infrared sensor detects the occupant during use and does not close unintentionally. Quick Starter Guide 1. Approach within the range of the front sensor, the cover will open automatically. 2. When the cover is opened, put the hand within the range of the top sensor to lift the seat automatically. 3. When the seat is opened put the hand within the range of the top sensor to put the seat down 1. Turn the dial all he way to the left to turn off the sensor toilet seat. 2. Turn the dial to the right to hear and feel a click to turn on the sensor toilet seat. Immediately after the dial has passed the click it is set to the shortest sensor range (18 inches). 3. To increase the sensor range, gradually turn the dial to the right. If the cover or seat remains open for several minutes, even without an occupant or movement in the sensor range, the sensor range is set too high for your room size: you should reduce the sensor range by turning the dial to the left. 4. Both seat and cover will close automatically after the occupant and motion sensors no longer detect an occupant or movement (the blue LED light will stop blinking) for 30 seconds. 5. If only the cover is opened, it will automatically close after both sensors no longer detect an occupant or movement for 15 seconds. 6. To open or close the seat put your hand within the range of the top sensor, at least 2 seconds after the previous activation. The seat will open or close depending on it’s current state. 6 www.fw3group.com • tel: 01404 814292 Automatic Toilet Seat - User Manual Charging the Battery When the sensor toilet seat is working abnormally or the opening speed of the cover and seat is slower then normal, the battery may need to be charged. The rechargeable battery is located in the battery compartment on the top of the back of the toilet seat. To charge: If you have an electric output near the toilet seat you can charge the battery while it is in the battery compartment without turning off the power. Simply plug the charger into the A/C plug-in hole located next to the sensor dial. The LED light on the A/C adaptor will turn from RED to GREEN when the battery is fully charged. 4. The LED light on the A/C adaptor will turn from RED to GREEN when the battery is fully charged. 5. Once fully charged, re-insert the battery and make sure it is secured in the battery compartment. For best performance: Charge battery for 24 hours before in initial use. Charge battery for 8 hours for normal recharge. If you do not have an electric power output near the toilet seat: 1. Turn off the sensor toilet seat by turning the dial all the way to the left until a click is heard and felt. 2. Push the grey release button to eject the battery from the compartment. 3. Plug in the A/C power adaptor in the hole on the battery and charge it in any electric outlet. www.fw3group.com • tel: 01404 814292 7 Automatic Toilet Seat User Manual FW3 LTD, West Hill, Nr Exeter, Devon, United Kingdom, EX11 1LQ call: 0800 328 5708 • email: [email protected]