1
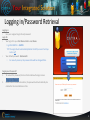
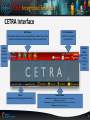
CETRA
USER MANUAL
Centre for Education & Training Records Application
CETRA V1.00BETA
UM V1.10
July 2012
Before you begin…
• Before logging in to CETRA, ensure that the computer is up-to-date with
the correct internet browser.
• CETRA will only work with Internet Explorer 7 or newer.
• To check the version, open Internet Explorer, press ALT+H, click About Internet
Explorer OR contact your IT Support Specialist.
• If you are using an older version of Internet Explorer, contact IT Support to
upgrade.
2
Before you begin… (cont’d)
• To ensure that you can navigate through the system properly, you must
enable Compatibility View Mode in Internet Explorer.
• Follow these instructions to do this yourself or contact your IT Support
Specialist for assistance.
1.
2.
3.
4.
5.
6.
Click on "Tools" (Can't find tools? Press the ALT key on your keyboard to activate the menu)
Select "Compatibility View Settings"
In the "Add this website" field, type "tcet.com"
Click "Add"
Click "Close"
Refresh your browser
3
Getting started
1.
2.
To get started, launch Internet Explorer
In the Address Bar, type: cetra.tcet.com
•
TIP: Do not include www before the address
•
For easy access, add CETRA as a desktop shortcut OR Internet
Explorer Favorite.
•
Consult with IT Support about how to do this
TIP: Does your login button look like this?
If so, you’re not using Internet Explorer.
4
Logging in/Password Retrieval
Logging in
•
Use your assigned Login ID and password.
Login ID:
•
Your login ID is your First Name Initial + Last Name.
E.g. JOHN SMITH -> JSMITH
TIP: The Login ID will automatically default to CAPS, ensure that Caps
Lock is off.
•
Your default password: Welcome00.
•
For security reasons, the password should be changed often.
Forgot your Password?
1. To recover the password, click on the link below the login screen
2.
Follow the on-screen instructions, the password will automatically be
emailed to the email address on file.
5
CETRA Interface
Main Menu
All functional menus are contained within the buttons seen in this
section. Buttons will vary depending on the user account/role.
User Information
User first + last name
Log-out button
Home
Button
will clear
all active
screens
Shortcut
Menu
Shortcuts
to most
commonly
used
menus
Footer
Application version/Copyright information
Lower Toolbar
Need Help: Email trigger to CETRA support team for assistance
How Do I: Quick usage tips
Feedback: Email trigger to CETRA support team to provide feedback
Messages: Notifications/Visits menu
6
CETRA Interface: Main Menu
Organization
Organization List: (TCET)
Company and Site setup
Workshop/Session
Outline:
Setup for
Workshops/Sessions
My Account:
Password reset, email
and service verification
Employment
Employer List: (ES)
company/contact setup
Job Posting:
(ES) setup for jobs
Job Matching:
(ES) Client – job
matching
Client
Search Client:
Search find client, edit
file, create new file.
Workshop/Session list:
Attendance, print list
Resumes:
(ES) Client resume
management
Reports
Monthly Reports:
Pre-formatted monthly
reports
Dynamic Reports
Ad hoc reporting system
Menu options may vary depending on user roles and accounts
7
CETRA Interface: Lower Toolbar
If assistance is required with a
client file or workshop/session,
use the Need Help section to
send an email to the Help
Desk.
Ensure that the REF# or
Session Code is quoted
For quick tips, reminders and troubleshooting with
simple tasks, check the How Do I section to find a
solution prior to contacting the Help Desk.
To provide feedback or suggestions
about the system, use the Feedback
section to send an email.
8
Messages: Notifications/Updates
•
•
•
The News tab of the Messages screen (Lower Toolbar) will
appear by default upon Login.
Notifications and system updates from the CETRA
development team will be posted in this section.
This window can be opened at any time by clicking the
Messages button in the lower toolbar.
•
New/unread messages will be Bold.
•
The counter will reflect the number of unread
messages.
9
My Account: User Account Information
Once logged in, click the My Account button from the shortcut menu, then
select your username.
This section will allow you to:
•
View the email address on file
•
If there is a typographical error in the email address, contact
CETRA staff.
•
View your Service(s)
•
Your department will be listed here, if an error is notice, contact
CETRA staff.
•
Change your password
1. To do this, click on the “Set Password” Button
2. Follow the instructions on screen.
10
Visits: Client Turnstile
•
When a client visits a site, they are required to scan their TCET Client Card at the front desk barcode scanner.
The information from their card is sent to CETRA. The information collected here is vital for the reporting purposes.
•
The scan record can be viewed in the Visits tab. This section
is accessed through the Messages window (Lower Toolbar)
Select the abbreviated tab for your site. (i.e. Sussex = SSX)
Amend the boxes next to the scan record accordingly
1.
2.
NOTE : By default, a scan is recorded as a “self-directed” service,
giving a count to both ES+NIC.*
NOTE : To amend the scan record, click or unclick the checkbox.
NOTE: New client scans should not be amended as Orientation
provided is a NIC & ES service.
Definitions
ES: For clients visiting the Employment Services program only
NIC: For clients visiting the Newcomer Information Centre only
Self-Directed: For clients using the computers/fax/copier/resource
area
If Self-Directed, all three boxes should be checked off.
Note: (NIC Program) If initial daily scan is self-directed, NIC Survey should not
include “In House – Computer/Internet” Service.
*Defaults vary by site.
11
Visits: Client Turnstile (cont’d)
If a physical card is not present, a manual visit can be logged
1. From the calendar, select the date of visit.
2. Click the
button.
3. A dialogue box will appear with 2 fields, enter the Card ID – OR – client REF# and press
submit.
NOTE: Client file must exist in order to log a manual visit.
NOTE: If client is not a card-holder, use REF# to log a manual visit.
•
To remove a record from the daily count, simply clear all 3 check boxes next to the record.
NOTE: If a scan has been recorded more than once a day, only the first record of the day
will be counted.
Troubleshooting: If scan records do not appear in CETRA:
a) Ensure that LogVisits* application is running
b) Restart the LogVisits* application.
*LogVisits Appliaction does not run on TouchScreen systems
12
Search Client: Create New File
If a client is not a card-holder, their file should be searched using the Search Client menu
1.
From the Client menu (or shortcut), select
2.
Enter search criteria to find file, start with a vague search.
3.
If file does not exist, enter a new 7-digit card number in the Card# field. (For phone clients, see Create
New File Using Generic Card#)
4.
Click Create New File.
13
Search Client: Create New File Using Generic Card#
For clients wishing to register over the phone, use generic a Card # to create a file
Based on the site, use one of the following:
•
NIC-Offsite/Itinerant: 0000000
•
Mississauga: 1111111
•
Malton: 2222222
•
Oakville: 3333333
•
Brampton South: 4444444
•
Brampton East: 5555555
•
Parliament: 6666666
•
Don Mills: 7777777
14
Create New File (cont’d)
1.
2.
3.
Begin entering the client’s information from the
Registration Form into the General Information
tab
NOTE: Red fields are mandatory
Save the file in order to generate a Reference #
NOTE: REF#s are unique to each client file and
should be used in combination with the
Card# to identify the client.
Tabs will vary
depending
on user
account
To print a copy of the registration form, click
Print Client Intake Form
NOTE: Form can only be printed after a REF# is
generated.
15
Client File: Occasional Child Care (NIC OCC)
1.
2.
3.
4.
5.
6.
7.
To register a child for OCC services, click on the
OCC Info tab of the Client File
Input the information (Parent Info, Emergency
Contact, Child Information)
Click check-box next to the child who will be
registered
Select the OCC site
Select the Registration Date
Press Save
Print OCC Child Registration Form for parent’s
signature
Children under 19 months cannot be registered for this service
16
Client File: NIC Needs (NIC)
1.
To record NIC services using the Survey, click NIC
Needs tab in Client File
2. Input data from NIC Survey using check-boxes
3. Enter Staff Notes
4. Select Site
5. Select Information Counselor name or SelfDirected
6. Select date of service
7. Press Save
To insert a new survey, click Insert New Survey and
repeat the process.
17
Client File: Employment Services Needs
1. Click on the ES Needs Tab in the Client File
R&I Staff
2. Complete Suitability Factors using check-boxes
3. Input Comments
Career Specialists
2. Assign a Status
(Unassisted, Assisted (Job Search, JMPI, In Placement, Employed, Retention,
In Training), Inactive)
3.
4.
5.
6.
Input CaMS Person Reference ID#
Select Site
Select Career Specialist (Assisted Clients ONLY)
Save
Note: Contents of this page will only appear on the Client Intake Form once saved
18
Client File: Search Criteria - Job Search Profile (ES)
Career Specialists
This section must be completed in order for the
client to be considered for job matching.
1. Click on the Search Criteria Tab in the Client File
2. Select criteria from the left columns, use Add>
button to bring to right
–
To find an Occupation, Click on an Occupation Type – this will update
the list of Occupations
Tips:
•
Occupation Type/Occupation – Select criteria from
at least 1 or both of these sections in order for the
client to be matched
•
Location: Select only if client is restrictive of
employment location
•
Job Type: Select only if client is restrictive of job type
•
Other Fluent Languages: Select all that apply (omit
English)
•
Wage/Salary: input minimum based on client’s
requirement
•
Keywords: input skills, certificates, etc. Separate with
comma
Note: Up to 3 criteria can be selected for each list
Note: Information is saved immediately
Tip: To quickly jump to a criteria, use your keyboard to type the first letter
19
Client File: ES History (ES)
This section is a view-only page with the client’s history.
Career Specialists
•
To add/manage resumes, click the
button at the bottom of the page.
•
For uploading and managing resumes, see
Resume Management
Definitions
Resume List: A list of all resumes currently uploaded
to the client file.
Job Posting Email Notified List: A list of all job
postings which have been sent to the client.
(See Job Posting for sending to clients)
Job Posting Submitted List: A list of all job postings
and respective employers which have been sent
resumes for this client.
(See Job Matching for sending resumes to employers)
20
Client File: Resume Management (ES)
Career Specialists
1. From the Client menu, select Resumes
2. Search-find the client file
3. Click the Resume button in the search result
This section can also be accessed via ES History
4. To upload a resume, click
5. Enter a name in the Resume Name field
(Usually resume type or occupation)
6. Click Browse and navigate to the file on your local computer
7. Press Save
•
To view/update/remove use the toolbar
•
Email function to send resume to employer is also available in
this section.
21
Client File: Service Summary
•
The Service Summary tab is a view-only list
of Workshops/Sessions that a client is
currently enrolled in. (upcoming only)
•
To refer the client to a workshop/session,
click
(See Workshop/Session: Referral for
complete referral instructions)
22
Client File: Client History
•
The Client History tab is a view-only list of all actions taken in this client file.
•
The following items can be viewed in this tab:
•
•
•
•
Client’s file creation date
Workshop Referral
Workshop Attendance
Visit History (Via Visit History Button)
23
Workshop/Session: Setup
1.
2.
3.
From the Organization
menu, click on Workshop
Outline.
Using the search criteria, find
your workshop to avoid
duplication.
If it does not exist, click
4. Input all basic information.
NOTE: Red fields are mandatory
5. Input Weekly Schedule
6. Save
Tip: Use the
action to easily duplicate a workshop/session.
Tip: If a drop-down menu variable is missing, a request must be submitted to the
CETRA team to add.
ES: If workshop is delivered by external agency where participant lists are
undisclosed. Click on the Partnership checkbox (See ES Undisclosed Participant
Registration for complete instructions)
24
Workshop/Session: Referral
1.
2.
3.
To refer a client to a workshop/session, go
to Search Client from the Client menu or
Shortcut menu
Search-find the client
From the search results, click the
(Refer to) icon
This section can also be accessed via Service
Summary
4.
6.
From the Client Referral page, use the
search criteria to find the
workshop/session
Select the workshop/session by clicking
the check-box
Click
7.
Confirm the information and click Apply
5.
25
Workshop/Session: Referral (cont’d)
Troubleshooting:
•
If you are unable to find a workshop in the
search results, the client maybe registered for a
session during that time period.
•
Click the checkbox for Include Time Conflicting
Courses under Advance Search Options
•
This will cause all conflicting sessions to appear
in red
•
Sessions where seats have filled up will appear
in black
26
Workshop/Session: Attendance
Session Attendance
1. From the Client Menu, click Workshop/Session
List
2. Use the search criteria to view the list of
registered clients
3. Click the check-box next to all clients who have
attended
4. Click the
icon then Attending
(Repeat steps for clients not attending, click
Not-Attending instead of Attending)
Note: To print a sign-in sheet, click the Print
button after step 2.
27
Workshop/Session: ES Undisclosed Participant Registration
In ES workshops where participant list is not disclosed, attendance can be indicated manually.
1. From the Client Menu, click Workshop/Session List
2. Use the search criteria to view the list of registered clients
3. Click the
button
4. A dialogue box will appear, enter the # of clients who attended.
NOTE: In order to complete this attendance, the Partnership check-box must be selected in
workshop setup. (See Workshop/Session Setup for complete instructions)
28
Workshop: Evaluation (ES)
1.
2.
3.
4.
5.
From the Client menu, select
Workshop/Session List
Use the search criteria to view the list of
registered clients
Click the
button
Input evaluation results by response. For each
response, click the
button
Close
Note: Results cannot exceed the # of clients in
“Attending” status
Note: Results are saved instantly
29
Employer Management: Setup (ES)
Job Developer
1. From the Employment menu, select Employer List
2. To add new employer, click
3. Input employer data
4. Activate by selecting the Active check-box
5. Save
6. Click
7.
Input location/site data
8. Activate by selecting the Active check-box
9. Save
10. Click
11. In Name field, input department name
12. Input contact data
13. Select Job Developer name
14. Save
Note: Employer must be set up before posting a job
30
Job Posting: Setup (ES)
Job Developer
1. From the Employment menu, select Job Posting
2. To post a new job, click
3. Select employer/location/department from drop-down menus
4. Input job posting information
5. Save
Note: To make a job posting inactive, use the Posting Status drop-down menu.
31
Job Matching: Search (ES)
Job Developer OR Career Specialist
1. From the Employment menu, select
Job Matching
2. Find the job you want to match clients
for (use search to filter)
3. Click the
(Match) button for that
job
4. Amend the search criteria based on
your preference
5. Click Search
6. From the search results, click the
(apply) icon to view/select client
resumes
(Cont’d on next)
32
Job Matching: Search (Cont’d)
(cont’d from previous)
7. To select a resume to send to the employer, click
the
(add to list) icon.
Repeat for multiple clients as needed
8. To send resumes to employer, click the
(send) icon.
9. Type email body as needed and click
To remove client resume from attachment list, use the
(remove) icon
Note: Email history can be viewed via Submitted column in Job Posting or ES
History (Client File)
33
Job Posting: Send to client (ES)
Career Specialist or Job Developer
1. From the Employment menu, select Job Posting
2. Click the
(email) icon for the selected job
3. Use the search to find the client
4. Edit the email body as needed
5. Send
6. Search next client as needed – or – close
Note: Email history can be viewed via Notified column or ES
History (Client File)
34