1
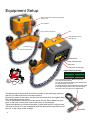
Equipment Setup
20mm [0.8”] Detector aperture and target
at the S-unit
Laser aperture
Rod
Pin for securing the chain
Laser adjustment knob
at the M-unit
Locking knob
Chain tensioning knob
On/Off button
Red and Green LED
Blue LED
Connector for charging
Light Emitting Diodes
LED COLOUR
Green
Red
Blue
FUNCTION
Power On
Charging
Connected
Turn on the SHAFTLASER™ Measuring Unit by
pressing the On/Off button.
Turn off by pressing and holding the On/Off button
for approximately 2 seconds.
To charge the SHAFTLASER™ Measuring Units, plug
in the Split charger cable to the units and attach
the other end of the cable to any USB socket.
The Measuring Unit marked S should be mounted on the stationary machine
and the unit marked M on the movable machine.
Remove the slack of the chains, let the units face each other and tighten them
firmly with the tensioning knobs.
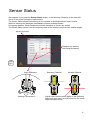
Turn on the Measuring Units and in the app at Sensor Status adjust the positions on the rods until the laser line hit the center of the M-target.
Tighten the Measuring Units and brackets in place with the four locking knobs.
The laser of the M unit, can be adjusted with the adjustment knob at the top of
the unit, to the center of the S-target.
4
microUSB