1
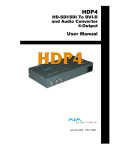
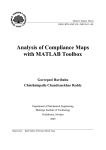
Mvix Ceeno+ Networkable Digital Signage Player w/ HDMI 2 Mvix Ceeno+ Digital Signage Player w/ HDMI Quick Installation Guide Mvix Ceeno + 2 Users Manual Mvix Ceeno+ Digital Signage Player w/ HDMI 3 Hardware Installation From Left to Right 12V DC Power Adapter (included) AV-in: Composite Video and Audio Input (3-in-1 cable included) AV-Out: Composite Video and/or audio output YPbPr: Component Video Output VGA: VGA Video port (cable not included) HDMI: HDMI AV Output (HDMI cable included) LAN: Connect to LAN or Internet network (RJ45) via CAT5 (or (CAT6) cable Note: Mvix Ceeno+ uses a solid-state external storage compact flash (CF) card or USB thumb drive for media storage and playback. Using a high-speed CF card or a USB drive is mandatory. USB drives / CF Cards are not included in the package. A High-Speed CF Card is recommended for faster download and optimal response performance by the digital signage player. (Format the CF card in ‘FAT32’ file system for better file structure performance) • • • If both CF and USB devices are inserted, CF card will be ignored. Insert only one type of media at a time. Maximum allowed capacity is up to 32GB for either of the external storage options USB detection is normally slower than CF card. Choose a high speed compact card for higher performance. Mvix Ceeno + 3 Users Manual 4 Mvix Ceeno+ Digital Signage Player w/ HDMI AV and Network Connection a) b) Insert CF card into CF card slot or the USB drive into the USB slot Plug in LAN cable that connects to network router or network switch c) Choose one of the following three options for video display (LCD / Plasma) TV connection Connect HDMI cable to LCD/LED/Plasma TV. Default video output: 1080p. This is the most recommended option. For adjusting video settings press “VIDEO MODE” button on the remote control. ii. Connect Y Pb Pr cable (Red, Green, Blue) to LCD/LED/Plasma TV or projector. Component video output resolution is upto 720/1080i iii. Connect VGA to LCD Monitor d) Connect audio cable (Red and White) to TV’s audio connectors (skip this if using HDMI cable) e) Plug in 12V AC power adapter to Mvix Ceeno+ and the wall power outlet. (IMPORTANT: do not use any other adapter) f) Turn on power and wait for the unit to boot. Screen will show ‘Initializing’ till main menu i. IMPORTANT Screen shows no video / picture ? Screen is garbled / snowy ? Press VIDEO MODE button on the remote control. Mvix Ceeno + 4 Users Manual 5 Mvix Ceeno+ Digital Signage Player w/ HDMI Mvix Ceeno+ Operation Modes (Operation modes can be set during the Mvix Ceeno+ Setup and Configuration stage ) CAT: Player will connect to Admin PC server over the Local-Area Network. This requires that the Mvix Ceeno+ player and the Admin-PC are connected to the same router or switch. CF card / USB Drive: This allows for independent playback of Mvix Ceeno+ without using any content management system. It is meant for auto-playback of media files in the CF card / USB drive upon boot. This is a stand-alone application of Ceeno+ where remote management and network control is not required. HTTP URL: In this mode, Mvix Ceeno+ will connect to specified Http URL address upon boot and and acquire the playlist (.mpl) file from a remote http server. This file is downloaded along with the media files and scheduled for playback automatically. This feature allows for remote content playback without use of CAT. iCAT: Player will connect and login to iCatSignage server with its unique ID (iCAT PLAYER ID) which is generated from web-based iCatSgnage software. Read more about this web-based content management system at: http://www.icatsignage.com/tour/. iCatSignage web-application is provided free-of-charge to all Mvix Ceeno+ users. It is feature-packed application and highly recommended for its ease of use. It can be accessed from any remote location via a standard web-browser and is compatible with Windows, Linux or Mac operating systems. Read More Mvix Ceeno + 5 Users Manual 6 Mvix Ceeno+ Digital Signage Player w/ HDMI Mvix Ceeno+ Display Screen layout Mvix Ceeno is a networkable digital signage player capable of displaying multi-zone content on a large screen TV or monitor. All the zones and settings can be remotely configured and customized over the internet via the icatsignage cloud-based content management system (Take a Tour). Content for the following zones can be customized: Top Zone: Top zone is a static image zone. It uses a JPEG image (1280 x 100 px) to display a header banner or logo. All devices within a group will have the same static top zone. Different top zone images can be assigned to devices in different groups. Image Zone: Image zone is a playlist zone comprising of a JPEG images (560x560 px) which will loop (slideshow) and can be scheduled. Each device can have its own images, slideshows, and schedules. Date / Time / Weather Zone: This is system configured zone, defined within the player’s preference settings. Weather is defined by the zip (city) code and can be displayed in degree-C or degree-F RSS / Text Ticker Zone: This marque zone can display dynamic text content acquired via an automated RSS ticker feed (Latest news, Sports, Breaking News etc.) or a custom text (for displaying specials, announcements or alerts) Video or TV Zone: This 720 x 480px zone contains the video playlist comprising of a videos. This playlist can loop and can be scheduled. This zone can also be used for streaming live TV (via the Video-in port). Each device can have its own videos / TV feed. Mvix Ceeno + 6 Users Manual 7 Mvix Ceeno+ Digital Signage Player w/ HDMI Mvix Ceeno+ Video-in Feed Mvix Ceeno+ digital signage player has a AV-In port that allows video and audio source to be fed in from a cable box, set-top box or any composite video source (e.g. Video camera or camcorder). This feature allows dynamic and live video content to be shown on the screen (on a full-screen or multi-zone format) Connections & Operation: Use the 3-in-1 (Yellow/Red/White) cable to connect to the cable or satellite box STB’s AV out (see picture) and plug the other end of this cable to Mvix Ceeno+ (AV-in) port. During media playback, you can press “Video-In” key to switch back and forth between media playback and video feed. During multi-zone playback, the video zone can be configured to display Live Video from this video-in feed. HDMI / VGA or YPbPr Composite Video Input (640x480) To enhance video resolution and picture quality/colors: Press “Keyboard” key on the remote control to enable color settings menu. Press “RESET” to restore the color settings to default values. (Note: NTSC is 50/50/50 and PAL is 62/26/40.) Press “Keyboard” key (again) on the remote control to exit the color settings menu. (Note: During color calibration process, scrolling text zone will disappear until calibration is completed) Mvix Ceeno + 7 Users Manual 8 Mvix Ceeno+ Digital Signage Player w/ HDMI Remote Control Layout Video-In key: Toggles between Video-Input source (e.g. Live TV feed) or media file source (from a playlist) on multi-zone screen or full screen mode. Screen Mode key: Toggles between a full-screen vs multi-zone playback Keyboard key: Enables color settings menu during video-feed in playback. Press to enable color settings menu to adjust brightness, hue, and contrast. Press again to exit. Video Mode key: Toggle between HDMI 1080p (default) or HDMI 720p. Also allows to switch between VGA or YPbPr video output settings. Note: If the display shows a blank screen or a lower-resolution picture quality, press this VIEO MODE key to switch to the correct video output. Mvix Ceeno + 8 Users Manual 9 Mvix Ceeno+ Digital Signage Player w/ HDMI Mvix Ceeno+ Setup and Configuration Power on Mvix Ceeno+. The unit will initialize and will display as follows: Using the remote control, click SETUP and select NETWORK. Change the Server IP (default:192.168.1.106) to match your Admin-PC’s IP (if using CAT application). This will allow the player to be recognized and controlled by the CAT application. Press Enter key on SETUP to next page Press Enter key on Operation Mode to next page. Use Right / Left key navigation key on the remote to browse for selecting the desired operation mode. Mvix Ceeno + 9 Users Manual 10 Mvix Ceeno+ Digital Signage Player w/ HDMI Mvix Ceeno+ System Time Setup Using your remote, navigate to the SETUP menu of the player. Setup => Time Setup, Mvix Ceeno will auto retrieve internet time upon boot. If there is no internet connectivity, then you can enter the year, month, day, hour, minute manually. Adjust local time based on your time zone. DST is Day-light Saving to adjust 1 hour time. Configuration Complete ! Mvix Ceeno + 10 Users Manual 11 Mvix Ceeno+ Digital Signage Player w/ HDMI iCatSignage: Web-based Management System iCatSignage is the web-based digital signage application (SaaS) for use with Mvix Ceeno Networkable Signage system. “command central” for your Digital Signage network. This online software interacts with the pre-configured, Mvix Ceeno digital signage player remotely over the network to manage playback. The iCatSignage platform is used for storing media files, scheduling campaigns and distributing uploaded media to individual signage systems across the network. Upload content to Mvix Ceeno+ using iCatsignage.com The first thing you'll want to do once you've obtained your content is to upload it to your online media library. Your media library is accessible anywhere you're logged into your account, and houses all of your content. Before a schedule of any sort can be programmed, you must first add content to your library. Log into iCatsignage.com, and click the "Media Library" tab on the top menu bar. Look for a green plus symbol on the right-hand side that says "Add Media" - click it. Underneath "Add Media Library" you'll see 5 options for uploading content. Select the 4th option, "Multi-zone". A new window will pop up under Multi-Zone that shows a template for this display, along with resolutions of the various screen zones. This is where you upload images for either your Top Zone or your Image Zone. NOTE: Both zones have fixed sizes. Uploaded images MUST match their respective resolutions. Top Zone banners must be 1280x100px and Image Zone content must be 560x560px. Mvix Ceeno + 11 Users Manual 12 Mvix Ceeno+ Digital Signage Player w/ HDMI Click the folder icon in either the Top Zone or the Image Zone, and a file-upload window will appear. o Type a name for your image, making sure NOT to include any spaces in the filename. o Then type an optional description if you like. o Click "Browse" next to the File field, navigate to the file on your computer, and click "Open". o Select "Upload", and wait until you see "Upload Success" appear underneath the "Add Media Library" title. If you wish to upload another image to the other zone, you can simply click the folder icon once more and repeate the process. Once you're done uploading content to your multizone, you can click "Media Library" to verify that the files have successfully been uploaded. Scheduling media playback on Ceeno+ (via iCatSignage.com) Once the media content is uploaded to the account on icatsignage, the next step is to create a schedule for the media for each signage device or device group (Mvix Ceeno+). Log into iCatsignage.com, and click the "Schedule" tab on the top menu bar. Look for a green plus symbol on the right-hand side that says "Add Schedule" - click it. A scheduling window will pop up, and you must now choose "Multi-zone Mode" from the two available options listed under "Playlist Media Management". A multi-zone template will appear, and you can now begin assigning content to each zone and attaching schedules. o Begin by clicking the file icon within the "Top Zone" area. A window will pop up listing all available groups, with drop-down menus next to each. o Just as full-zone schedules are attached to groups rather than players, multi-zone Top banners follow the same rules - you must first choose a group you wish to publish the Top Zone image to, and then select an available image from the drop-down list. o Select "Save" to finalize. Mvix Ceeno + 12 Users Manual 13 Mvix Ceeno+ Digital Signage Player w/ HDMI The next zone you'll want to schedule is the "Image Zone" area on the right side. o Click the folder icon inside the zone to bring up a scheduling window (this is the same type of format that full-zone scheduling has). o "Properties" section: choose a name, description, start date, and end date for your schedule. The schedule name CANNOT contain any spaces. o The start date and end date must have be at least 1 day apart. o Check the box below marked "Active" to ensure your schedule will be sent to the device. Next, in the "Weekly" section, check the boxes next to the days of the week on which you want your image zone to display. Below that, you'll see a "Group" section. Here you must choose a group, or groups, to send your schedule to keep in mind this will affect ALL players under that group. Next, you'll need to choose content from your Multi-Zone media library to add into your schedule. On the top right of the screen, you'll see a section entitled "Media Libary". This is a miniaturized index of all your Image Zone files. Using the Previous and Next buttons, page through your library and check the box next to whichever files tp want to add to your schedule. Click "Add" to add those files in the playlist field. In the playlist below the aforementioned sections, you'll see a list of the files you've added to your image zone. Here you can adjust the individual duration of each image, as well as the start and stop times if you wish to go beyond 60 seconds. You can also delete files by clicking the red "X" next to each file. When you're finished with your adjustments, click "Save Schedule" to finalize your changes. Lastly, you'll want to schedule "Video Zone". Click the folder icon inside that zone, and another scheduling window will appear. You'll add videos or images to this zone in EXACTLY the same fashion as before. You can repeat the steps above (scheduling an Image Zone) for reference. Once you're finished assigned schedules to each section, click "Save Schedule" to finalize everything. Mvix Ceeno + 13 Users Manual 14 Mvix Ceeno+ Digital Signage Player w/ HDMI CAT Installation The Client Administration Tool (CAT) is included in the Mvix Ceeno+ bundle. This is a Windows (PC-based Application). Simply click on CAT.Setup.exe and follow usual installation instructions. Mvix Ceeno + 14 Users Manual 15 Mvix Ceeno+ Digital Signage Player w/ HDMI Network Configuration Open the Client Administration Tool installed on your Admin-PC Go to Tools -> Server Setup Utility. Locate IP address by clicking “Update”. This is the IP address of the Server-PC (or Admin-PC) Enter this IP address into Player’s Network Setup manually via the included remote control. (see next page) Mvix Ceeno + 15 Users Manual 16 Mvix Ceeno+ Digital Signage Player w/ HDMI Client – Server Setup On the Ceeno+, using its remote control, Navigate to: Setup=> Network => CAT Server. Enter the Admin-PC’s IP address (198.168.x.x) where the CAT application is installed. Use remote control to enter 3 digits 1-9-2 for 192 and use right cursor key to jump to next field and enter 1-6-8, and so on. Server Port 5021 is CAT software’s default port. If it conflicts with some other application installed on the Admin-PC, then change to different value. Remember any change in Server Port on the player, warrants a similar change in Server Setup in the CAT application. Device local IP has DHCP and Static selection, leave it no change. Press Enter key to next page. Mvix Ceeno + 16 Users Manual 17 Mvix Ceeno+ Digital Signage Player w/ HDMI CAT: Software Interface Open: open any previous saved playlist file (file extension is .mpl) Save: save current playlist into local disk for future use. Global Settings: options to select and manage playback or device. Add top zone picture and image zone picture for multi-zone presentation. Specify any single media file to playback in full screen format. Move mouse to filename and highlight it and click mouse on to enable it. Left icon will become from Add TV-feed: (Ceeno+ only). Allow video-input source to be managed in the playlist. User can pre-select a playlist and enable AutoPlay. When the device is connected to the admin-PC (CAT), the software will enable the “EZPlay” feature automatically. i.e. the software will send out playlist and media file to players. This feature can be disabled from Group editor. Move mouse to group name and click right button and select “Edit Group” then uncheck “Enable AutoPlay”. Click this to send current playlist and media files to player according to the . This is manual mode vs. automatic Mode Mvix Ceeno + 17 Users Manual . 18 Mvix Ceeno+ Digital Signage Player w/ HDMI Image Zone Editor: Top Banner: Browse to locate your pre-designed image (jpg file) on your computer. Image file should be designed at 1280x100px resolution. This image will display as the top banner image on the screen. Template 1 or Template 2: Define the location of video zone and image zone layout on the screen. It can be defined for each playlist. Add: Add images (jpg files) for image zone. Resolution of image files for this zone should be 560x560px. For non-standard resolution images, the device will auto-scale to fit the layout. (Warning: this can result in cropping or image distortion) Once the top banner and image files are selected, click “OK”. The software will convert the files to YUV mode and will display the layout in the playlist window. The new multi-zone playlist is ready, click “EZ-Play” on CAT to send all content to the Mvix Ceeno+ Mvix Ceeno + 18 Users Manual 19 Mvix Ceeno+ Digital Signage Player w/ HDMI TV Feed and Full Screen: 1. TV Feed: To input external video source into “Video Zone”. Click “Add TV Feed” and “TV_FEED_ON” will appear on playlist, then select time duration or enter “Start Time hh:mm” and “Stop Time hh:mm”. a. Specific time range: ex. 12:00 to 14:00 => i.e. switch to TV (video feed) at 12pm, end at 2pm, and then start next playlist sequence. b. No time, only duration: 10m => switch to TV (or video feed) for 10 minutes, and then revert to next playlist sequence. 2. Full Screen: Allows media file to play in a full screen format instead of a multi-zone (split screen) layout. Select the desired media feed file. Then click “FullScrn” button. The left most icon will change from red dot to solid green – indicating full screen layout for this file. (Red dot in the file list indicates a multi-zone lay-out.) Mvix Ceeno + 19 Users Manual 20 Mvix Ceeno+ Digital Signage Player w/ HDMI RSS: Dynamic News/ Text Ticker CAT digital signage software allows incorporating dynamic text feed (RSS feeds) into the display layout. The scrolling text feed is displayed at the bottom of the screen. The RSS Edit icon on the top navigation bar of CAT application allows a user to add or edit RSS url and foreground color, background color, and other settings. Click “Add Feed”, a “Add New Feed” RSS window will appear. Enter RSS URL link below and click “Connect” to retrieve data. Ensure the Admin-PC is connected to the internet. Group: assign the RSS feed to any group (of devices) on the pull down window Active: If checked, the RSS data will be sent to all devices within the group. Detailed news: Typical RSS data is in two forms: title only or detailed news. If checked, the detailed news content will be displayed in the text marquee. Example RSS Feeds for Dynamic Content: Yahoo top stories Yahoo sports ESPN sports CNN news Mvix Ceeno + 20 => => => => http://rss.news.yahoo.com/rss/topstories http://sports.yahoo.com/top/rss.xml http://sports.espn.go.com/espn/rss/news http://rss.cnn.com/rss/edition.rss Users Manual Mvix Ceeno+ Digital Signage Player w/ HDMI 21 Highlight a RSS name on the list amd right click, a pop-up window appears to “Delete”, “Refresh” and to change “Property”. o Delete is to remove current RSS o Refresh is to update RSS data on the right window o Property is to pop up current RSS data for modification. To replicate the RSS feed ticker to another group, click “Property” on a current RSS. Press Ctrl-C to copy RSS link data and then click “Add Feed” and press Ctrl-V keys to paste RSS link. Once added, assign to another group name. [Note] If you click “Refresh”, but there is no RSS data (blank) on the right window. Your MSXML version is too old, please upgrade to MSXML v4.0. http://support.microsoft.com/kb/324460 RSS Settings: Enable Auto RSS: If this box is enabled, then CAT will send RSS text string to devices when the device is connected to the Admin-PC (and CAT is running). o This feature is tied with AutoPlay feature. i.e. Autoplay must be enabled as well. o Background color and others can be selected and saved. When RSS Icon send RSS text string based on all the RSS link and settings to players. is clicked, CAT will CAT updates all RSS feeds every 15 minutes automatically or user can click “Refresh” manually. Mvix Ceeno + 21 Users Manual 22 Mvix Ceeno+ Digital Signage Player w/ HDMI Sending Sample Media Files and Controlling On your Admin-PC, start the CAT Application. Move and click your cursor to “Home” group on the left window, then click the player name to. This will enable all the control buttons on the top navigation bar. Select some test files from your PC’s local directory and move (arrow key) to the right window. Press EZ-Play button. All files will be sent to player and playback will start. Bottom window will show log data for activities Refer to the User Manual for detailed operations and features. Mvix Ceeno + 22 Users Manual 23 Mvix Ceeno+ Digital Signage Player w/ HDMI Remote Control If scrolling text row is not on bottom area of the screen. There are two keys (Position + and Position -) on the remote control to adjust its position. Mvix Ceeno + 23 Users Manual