1
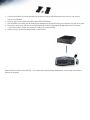
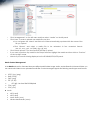
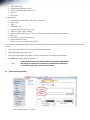
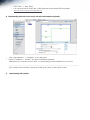
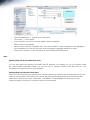
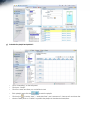
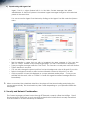
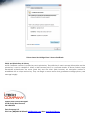
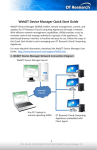
Thank you for evaluating this fully integrated hardware and software solution which enables the delivery of
compelling digital content throughout the enterprise network in a timely fashion. Version 2.0 provides the multi-zone
layout feature, providing up to eight zones to play various media files on one display. In addition to templates, users
can also customize their own templates for efficient and targeted deployment.
Before going through with the DCH2600/3700/4700 evaluation, please make sure that you follow the requirements
below:
Required equipments:
(1) Internet connection
(2) DCH2600 or DCH3700 or DCH4700 System
(3) PC or Laptop to connect to Content Manager Server on the web through Internet Explorer
You should have also received the following information from your reseller or DT Research Account Representative:
(1) UserID
(2) Password
(3) Organization
The DCH3700/4700 product evaluation box contains the following:
(1) 1 x DCH2600 or DCH3700 or DCH4700 system
(2) 1 x Power Cable (or 2 for the DCH2600)
(3) 1 x Table Top Stand
1. Connecting your DCH Series
1.
2.
3.
4.
5.
Connect the Table Top Stand (see above) to the DCH 2600/3700/4700 panel such that you can have it
stand on a flat table.
Hook up the Power Cable to the DCH 2600/3700/4700 Panel.
The DCH2600 unit comes with an extra power adapter for the SA1000 which you will need to hook up as well.
Proceed to hook up a USB mouse and USB keyboard to the SA1000 Media Player behind the LCD panel
– see picture below (There are a total of 4 USB ports on the SA1000).
Then hook up your RJ-45 Internet Cable to the SA1000.
Next proceed to boot up the SA1000. You will see the following Player Registration screen when the system is
booted up properly.
If you don’t see the Player Registration screen shown above, please press “Shift + Ctrl + Space” to access the XP
embedded panel. The SA1000 player has been configured to automatically retrieve an IP address from your local
DHCP server. If you do not have an in house DHCP server you will need to configure a static IP address on the
network adapter. Please check with your IT department on how to configure that or call DT Research.
To exit the player software if you need to tweak the configuration, press Ctrl+Shift+Space key.
Setting the Date/Time and Time Zone for the unit
1.
2.
3.
Next, set the Date/Time for the system by moving your mouse to the time section (bottom right corner), right
click on it and select “Adjust Date/Time”.
Select the “Time Zone” tab and choose a time zone that matches your location.
Select the “Date & Time” tab and proceed to set the unit to the correct date and time.
Please use the mouse to launch the program by following these steps: Start -> All Programs –> DT Research – >
WCM Player –> Register Player Again.
Please register with the following information (Again, note they are case sensitive):
Player Name: Leave it at default or change it to a meaningful name you are familiar with
Group Name: You can leave this blank for now (the group name will be created in Step 2 below)
Organization Name: Same as “Organization” from The DTRI email you received
Password: 123456
Publish Server URL: http://signage.itechlcd.com/publish (This is just an example. Don’t change the default)
If the Player registration is successful, you will get the following status screen below, please note the “Player Name”
because you will need this for the next step.
If you are having difficulty getting past the login screen, please read the “Failed to register” message presented to
you and check whether you have entered the correct password and organization name. Remember, they are all
case sensitive.
Also if the error message comes back saying “Cannot connect to the server” please make sure that the Publish
Server URL is correct. Another thing to check is to make sure that:
1. The SA1000 box is setup for auto IP configuration with a built in DHCP client. Make sure your internal network
has a DHCP server setup properly.
2. If you are still having network difficulty, check with your local System Administrator for a valid Internal
IP Address or call DT Research for help.
2. Login to the Content Manager Server in order to manage your digital content
To manage contents for playing through the players, please access http://signage.itechlcd.com/hosting (This site is
just an example. Please use the site that is specified in the email sent to you by a iTechLCD or its reseller
representative.)
Please login as:
User ID: You received this from the DTRI email Password:
You received this from the DTRI email Organization: You
received this from the DTRI email
* Please note that the above information is all case sensitive.
---------------------------------------------------------------------------------------------------------------------------------------------------------------If you need more assistance, please access the online help (via the Help link in every page) for more details on how
to operate the Content Manager. The Help content also contains a Workflow Demo in Flash.
To start off, please do the following:
a)
Pick your player as the preview player for viewing medias and playlists
•
•
•
b)
Create a player group and assign a player to the group
•
•
•
•
•
c)
Click Account management on the left panel (Under System)
Under Account, double click on “Manager” and proceed to select your login name
Pick the Player Name (Page 3) from the Preview Player drop down list
Click Player/Group on the left panel
Click “New Group” (top menu) and enter the “Group Name” then click “OK”
Now, click on the group that you just created
Click “Assign Player” (top menu)
Add a Player from the “Not Assigned” to the group
Upload your media
•
•
•
•
•
Click “Management” on the left menu and then select “Media” on the left panel
Click “New” in order to upload one media file at a time
o You can ignore the “Name” text field as it will be automatically populated with the name of the
file you upload
o Click “Browse” and select a media file to be uploaded (a few accepted formats
are .avi, .mov, .ppt, .swf (flash), jpg, .gif, etc)
Click “Batch Upload” if you have quite a few files to upload
If you want to preview any media on the Player Software, highlight the media and then click on “Preview”
on the top right corner
Watch as your media is being displayed on the DCH2600/3700/4700 panel.
Media Content Management
In the Media sub-section, there are three pre-defined media folders- Image, Audio, and Multimedia. In the each folder, you
can create sub-folders to save uploaded media files. Content Manager supports the following media types and formats.
o
o
o
o
o
o
o
JPEG (.jpg, .jpeg)
BMP (.bmp)
PNG (.png)
TIFF (.tif, tiff)
GIF (.gif) – less than 2048 X 2048 pixels
TGA (.tga)
PCX (.pcx)
■ Audio
o
o
o
o
MP3 (.mp3)
MP2 (.mp2)
Wave Audio (.wav)
Window Media Audio (.wma )
o
o
o
o
o
MIDI (.midi, .mid)
RealNetworks Real Audio (.rmi)
Audio Interchange File Format (.aif)
AU (.au)
SND (.snd)
■ Multimedia
o
o
o
o
o
o
o
o
o
o
o
Adobe Macromedia Flash (. swf) version 9 or below
MP4 (.mp4)
MMS
Flash Video (.flv)
Mcrosoft PowerPoint 97(.ppt, .pps)
MPEG1/2 (.mpe, .mpg, .mpeg)
Window Media Video (.wmv, .asf, asx) => This is temporarily not supported in version 2.3
AVI (.avi)
DVD Video (.vob) (non protected)
Apple QuickTime (.mov)
HTML (.html, .htm or data driven website)
An image or multimedia file will be scaled to full screen size when played, except the PowerPoint files. Follow the steps
below:
1.
Open the PowerPoint file with Microsoft PowerPoint application.
2.
Select File/Page Setup menu option.
3.
Adjust the width/ height of the slide to match the resolution of the display of the player.
4.
Click OK and save the file as PowerPoint 97.
Note
d)
Some media files may have small variances compared to standard files.
We strongly recommend you preview the content before publishing it
to ensure the media plays correctly on the player.
Create a ticker (optional)
•
Click “Management” -> “Ticker”
•
•
Click “New” -> “New Ticker”
You can enter some “Static Text” or RSS feed from a life Internet RSS site (sample
http://rss.cnn.com/rss/cnn topstories.rss)
e) Experimenting with multi zones layout with selected templates (optional)
•
•
Click “Management” -> “Template” on the left panel
Expand “Template” -> “Build-in” and pick a Predefined template
Alternatively you can also click on “New” to create/design a new template of your choice
-----------------------------------------------------------------------------------------------------------------------------------------------If you need more information, please click Help at any time on the top left corner.
f)
Experimenting with a playlist
•
•
•
•
•
•
Click “Management” -> “Playlist” on the left panel
Click “New” -> “New Playlist”
If you would like to have a multi zone display, select a template
Enter a name for the Playlist
Select a zone under the “Template View” then click “Media” to add a media file to the highlighted
zone (remember you can click on each zone and upload a separate media file to each)
Finally, click “Preview” to view the playlist on the DCH2600/3700/4700 panel.
Note:
Experimenting with Accuweather flash demo
-
-
You can also select and preview the playlist that DT Research has created for you. For instance under
the Accuweather Multimedia folder you will also find 3 sample weather flash files that you can
incorporate into certain zones on your template.
Experimenting with Interactive flash demo
If your DCH unit comes with the optional touch screen interface you can proceed to designate one or more
zones on the template to be interactive in nature. We have specifically prepared a few interactive flash
demos that can be found under “Multimedia -> FullHDFlash”. Simply highlight the flash (Seen on the
screenshot below) and move it to selected zones on the template.
g)
Schedule the playlist and publish it
•
•
•
Click “Scheduling” on the left panel
Click your “Group”
Click on a date and time you would like to start
•
Pick a playlist and click the
•
•
Click on the
to enter “start” – “end date time” and “recurrence”, then save it and close the
window Finally click on “Publish” to publish the playlist at the selected date/time
to add the playlist
h)
Experimenting with Urgent Cast
Urgent Cast is a unique feature built in to the Web Content Manager that allows
administrators of the iTech Systems to broadcast urgent messages throughout all or selected
panels at the same time.
You can access the Urgent Cast feature by clicking on the Urgent Cast link under the Systems
menu.
•
•
•
•
•
•
•
Click “Scheduling” on the left panel
Start by selecting a group that you wish to broadcast the same message to (You can also
click on “Group” instead of any individual grouping if you wish to broadcast to all players).
Type your urgent message under the “Text” field. You can also cut and paste onto that section.
Type in duration in seconds.
You can also change the speed, position, font and background color at this point if you wish.
Select a background audio or select some multimedia content at this point if you wish.
Click on preview to have this displayed on your pre selected media player. Once you are
satisfied with the result, click on “Publish” to make this urgent broadcast message effective
immediately.
3. When we reached the scheduled date/time, the player will start downloading and playing the
content automatically. The download may take a while depending on your uploaded media size
and playlist.
4. Security and Network Consideration
The Content Manager software hosted through DT Research currently utilizes the VeriSign Class 3
Secure server SSL Certificate, as such your login authentication information is securely transmitted
over the Internet to a server hosted by DT Research.
Picture shows the VeriSign Class 3 Secure Certificate
---------------------------------------------------------------------------------------------------------------------------------------------------------------Public and Private Keys to Privacy
An SSL Certificate consists of a public key and a private key. The public key is used to encrypt information and the
private key is used to decipher it. When a Web browser points to a secured domain, a Secure Sockets Layer
handshake authenticates the server (Web site) and the client (Web browser). An encryption method is
established with a unique session key. They can begin a secure session that guarantees message privacy and
message integrity.
Contact iTech Technical Support:
41758 Christy Street Fremont,
CA 94538 USA
iTech Company LLC
TOLL Free: (888) 483-2418 Email: [email protected] Web: www.iTechLCD.com