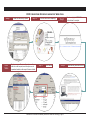
1
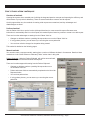
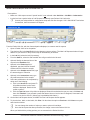
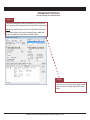
IDEXX Cornerstone* Guide: Reference Laboratory with IDEXX SmartLink* Technology 8.3 Proprietary Rights Notice Information in this document is subject to change without notice. Companies, names and data used in examples are fictitious unless otherwise noted. No part of this document may be reproduced or transmitted in any form or by any means, electronic, mechanical or otherwise, for any purpose, without the express written permission of IDEXX Laboratories. IDEXX Laboratories may have patents or pending patent applications, trademarks, copyrights or other intellectual or industrial property rights covering this document or subject matter in this document. The furnishing of this document does not give a license to these property rights except as expressly provided in any written license agreement from IDEXX Laboratories. © 2012 IDEXX Laboratories, Inc. All rights reserved. • 06-29567-00 *Cornerstone, LabREXX, Patient Clipboard, SmartLink, VetConnect, vetconnect.com and VetTest are trademarks or registered trademarks of IDEXX Laboratories, Inc. or its affiliates in the United States and/or other countries. All other product and company names and logos are trademarks of their respective holders. IDEXX Computer Systems One IDEXX Drive Westbrook, Maine 04092 USA idexx.com/cornerstone Introduction to the IDEXX SmartLink* Reference Laboratory The purpose of this guide is to assist you in learning key skills and knowledge for IDEXX Reference Laboratory. This training document will introduce you to the basic procedural steps using activities. Note: If you are located in Canada, see IDEXX Cornerstone* Guide: IDEXX Canada East/West Reference Laboratory. This guide is best suited to these learners in your practice: • Technicians • Practice managers • Owners/decision-makers Prerequisites • The current version of the IDEXX Cornerstone* Practice Management System installed at the practice. • Knowledge of basic Cornerstone navigation. • Access rights with appropriate laboratory security. • Setup and customization of Reference Laboratory. Consult your laboratory specialist for configuration setup and work-flow changes. Call 1-800-695-2877 and select Cornerstone, then Cornerstone Lab Support. Guide Content The guide covers these topics and tasks: • IDEXX Cornerstone Reference Library Workflow • Other Tasks • Support and Troubleshooting Information Throughout this training, there are references to useful information. These icons will help you identify this information: Tips enhance the basic information covered in the content. Notes provide additional information about a step or a procedure. Cornerstone 8.3 Reference Laboratory with IDEXX SmartLink Technology • Page 3 IDEXX Cornerstone* 8.3 Guide: Reference Laboratory with IDEXX SmartLink* Technology Table of Contents Introduction to the IDEXX SmartLink* Reference Laboratory...................................................... 3 Prerequisites...................................................................................................................................................3 Guide Content................................................................................................................................................3 IDEXX Cornerstone Reference Laboratory Work Flow 5 Work-Flow Overview.......................................................................................................................................5 IDEXX Cornerstone Reference Laboratory Work Flow..................................................................................6 Step 1: Create a New Lab Request .............................................................................................................7 Step 2: Print Lab Request Label and Place on Preprinted IDEXX Requisition Form....................................10 Step 3: Send the Sample to IDEXX Reference Laboratories for Analysis.....................................................10 Step 4: Automatically Download Results.......................................................................................................11 Step 5: View Results......................................................................................................................................11 To View and Update Laboratory Requests/Results from the Diagnostics Tab .............................................19 Daily Step - Check Lab Requests and Results Window ..............................................................................23 Other Reference Laboratory Tasks................................................................................................................24 Resources 34 Online IDEXX Cornerstone* Customer Support Center ...............................................................................34 Common Troubleshooting Topics, Causes, and Solutions...........................................................................35 Cornerstone 8.3 Reference Laboratory with IDEXX SmartLink Technology • Page 4 Section 1 IDEXX Cornerstone Reference Laboratory Work Flow Work-Flow Overview By using the IDEXX Reference Laboratory, you will see an increase in productivity, a decrease in missed charges, and a decrease in errors made during keyboard entry and writing of patient information. Following is an overview of the Reference Laboratory work flow. • Step 1: Create a new lab request. • Step 2: Print a tube label and collect your sample. • Step 3: Send the sample to IDEXX Reference Laboratories for analysis. • Step 4: Automatically download results. • Step 5: View results. • Other Reference Laboratory Tasks Cornerstone 8.3 Reference Laboratory with IDEXX SmartLink Technology • Page 5 IDEXX Cornerstone Reference Laboratory Work Flow Steps 2: Create new laboratory request newa laboratory request. Step 1 1 &Create and use the LabREXX form. Other Tasks: Create a new profile, manually enter Steps 4: Print and sample(s). collect your labeltube andlabel collect Step 2 3 &Print Create a new profile, manually enter results, Otherlab results, onto labrequest, request, work withorphan not addadd onto a alab resolve or not results and reprint a LabREXX Tasksrequested/orphan requested results, and/or reprint forms or labels. Form, request form label and/or tube label. sample. Step 5 View results. Steps 7ts. : View results. Steps 5: Step 3 Send sample(s) IDEXX Reference Send sample to IDEXXto Reference Laboratory for analysis. Laboratories for analysis. Step 4 Automatically download results. Steps 6: Automatically download results. Cornerstone 8.3 Reference Laboratory with IDEXX SmartLink Technology • Page 6 Step 1: Create a New Lab Request Overview of methods Creating lab requests is an essential part of utilizing the integrated practice concepts and improving the efficiency and effectiveness of your practice’s laboratory. There are several methods to create a new lab request. On this page and the next, the methods of creating a lab request are summarized, and key advantages and disadvantages are listed. Preferred method Use the Patient Visit List or use the invoice (with special actions) to create a new lab request. Because some information is automatically filled in on the request, this method requires fewer key strokes to create a new lab request. There are four other advantages to starting from the Patient Visit List: • Changes or deletions made to a pending lab request also occur on the Patient Visit List. • If using patient pictures, you can ensure you are using the correct patient file. • You can view collective charges for the patient being treated. This method is detailed on the following pages. Manual methods You can also create a request manually, starting from a number of different windows in Cornerstone. Details of these methods are in the "Other Reference Laboratory Tasks" section later in this guide. Patient Clipboard*: Using the Patient Clipboard, with a client account listed, right-click on a patient’s name and select Lab Request. There are four advantages with starting from the Patient Clipboard: • Changes or deletions made to a pending lab request also occur on the Patient Visit List. • Patient and owner fields are automatically completed on the New Lab Request window. • You can view patient alerts. • If using patient pictures, you can ensure you are using the correct patient file. Cornerstone 8.3 Reference Laboratory with IDEXX SmartLink Technology • Page 7 Lab Requests and Results Window: Use the Lab Request window. toolbar button to access the Lab Requests and Results There are three advantages with starting from the Lab Requests and Results window: • Changes or deletions made to a pending lab request also occur on the Patient Visit List. • You can view patient alerts. • Can view other lab requests and results for that patient, especially if needing to determine if lab requests on similar patient names were made before submitting a new lab request. Daily Planner: From the Daily Planner's Diagnostics tab, right-click in the work area and select New Lab Request to access the New Lab Request window. There are four advantages with accessing the New Lab Request window from the Daily Planner: • You can also easily access the other Daily Planner tabs • You can view, add, or modify lab callbacks. • You can view patient alerts. • Can view other lab requests and results for that patient, especially if needing to determine if lab requests on similar patient names were made before submitting a new lab request. Printing forms and labels Once the lab request has been completed by these methods, you may have the option to: • Print the LabREXX form, request label, and/or the tube label. • Preview the LabREXX form, request label, and/or the tube label. • Close to close the window without printing anything. Cornerstone 8.3 Reference Laboratory with IDEXX SmartLink Technology • Page 8 Create a New Lab Request from the Patient Visit List Prerequisites: • Make sure “Hide request screen if special action” is not selected under Activities > Lab Work > Laboratories. • Invoice item has a special action of Lab Request immediately upon Patient Visit List/Invoice. Consult your lab specialist for configuration setup and work-flow changes. Call 1-800-695-2877 and select Cornerstone, then Cornerstone Lab Support. From the Patient Visit List, with the client and patient displayed, to create a new lab request: 1. Open a Patient Visit List for the patient. 2. Type the item IDs in the Item ID field for the laboratory tests to perform. The New Lab Request window will open and the ID you entered on the previous step will automatically be entered. 3. In the Lab field, select the lab (if necessary). 4. From the Staff list, select the staff member who will get credit for the lab work. 5. Optional: Modify the date and time of the request in the Date/time field. 6. Optional: In the Drawn by field, if applicable, type the initials of the staff member who will collect the sample. 7. Optional: In the Sample source field, type the area and type of collection. 8. Optional: In the Instructions area, type any staff instructions for the sample. 9. Select the profile/tests to be completed, by doing one of the following: a. Click in the Item ID box and press F2. All profiles that have invoice items linked are displayed. Double-click a profile to select it. b. Click the Test List button. All profiles are displayed. Search for and select the test you want, click Next, and then click Finished. If you selected a profile that doesn't have an invoice item ID assigned, Cornerstone will create a new invoice item ID. (Unless you have disabled this feature.) 10. On the New Lab Request window, click OK. The Print Lab Request window appears. 11. To print the form, label, or tube label, click Print. You also have the option to Preview or click Close to not print and close the window. You can change the number of copies you want to print on this window. Once the lab request has been processed, the charge is sent to the Patient Visit List. When you finish with the printing options, you are returned to the Patient Visit List. Cornerstone 8.3 Reference Laboratory with IDEXX SmartLink Technology • Page 9 If additional labs are added to the Patient Visit List, they will appear on the same lab request for the patient. 12. Click OK once all items are entered on the Patient Visit List. You can view your request on the Lab Requests and Results window. Step 2: Print Lab Request Label and Place on Preprinted IDEXX Requisition Form. After you make the lab request in Cornerstone, your lab request will print automatically or you’ll receive a window for selecting print options. Collect the sample according to the diagnostic test; this process may vary based on the diagnostic test you are running. An example of sample collection training can be found at idexxlearningcenter.com. See Section 3: Sample Collection in the IDEXX VetTest* Certification manually. Step 3: Send the Sample to IDEXX Reference Laboratories for Analysis After you collect the sample, you’re now ready to send your sample to IDEXX Reference Laboratories for analysis. If you have any questions, call 1-800-667-3411 for assistance. Cornerstone 8.3 Reference Laboratory with IDEXX SmartLink Technology • Page 10 Step 4: Automatically Download Results Practices that have a constant Internet connection will be able to download their IDEXX Reference Laboratories results automatically into Cornerstone’s electronic patient records. If you do not have a continuous Internet connection, it will download when you log on to the Internet. Or you can go to vetconnect.com* to get your patients’ results—anytime, anywhere. Download Results into Cornerstone Results will automatically download into Cornerstone if you have a constant Internet connection. If you connect only to retrieve results, you will need to follow the steps below. 1. If you have a constant connection: a. An Internet connection will be initiated each time the computer is restarted. The Reference Lab Interface—IDEXX application launches automatically and queued results are downloaded. Minimize this window and keep running for continuous download at preset intervals. This application must be running in order to receive results. 2. If you connect only to retrieve results: a. Open Cornerstone on the Cornerstone Lab Workstation and make sure it is connected to the internet. b. Dial the Internet service provider to connect. c. Double-click the Reference Lab Interface—IDEXX shortcut icon on the desktop to download results. d. This will launch the Reference Lab Interface—IDEXX window that retrieves results from vetconnect.com. Step 5: View Results After your results have downloaded into Cornerstone, you are ready to view the results. Test results can be posted to patient records either automatically or manually: • Automatically post results (recommended): When a test result is returned to Cornerstone, if the result can be matched to a pending request, it is automatically posted and can be viewed in patient history. You cannot reject results that are automatically posted, but you can void results after posting. Voided results remain in the patient’s file. • Manually post results, then view: When a test result is returned to Cornerstone, it is displayed in the Lab Requests and Results window. To add the result to the patient record, you must manually change the result status to Posted. It will then be shown on the Patient Clipboard. You have the option to reject results instead of posting. The following diagrams illustrate these options. Cornerstone 8.3 Reference Laboratory with IDEXX SmartLink Technology • Page 11 Automatically Post Results View results in the Patient File of the Patient Clipboard Step 1 The results will automatically transfer into the patient’s file if you have chosen not to view the results before posting. Access the patient’s file to view the results. Warning: If you select this option, you will not have the option to reject a result. You do have the option to void a result in the patient’s history; voided results remain in the patient’s file, but are hidden in the patient’s history. Step 2 At this point, you may review the results, graph cumulative results, void results, or reassign these results to another patient. Cornerstone 8.3 Reference Laboratory with IDEXX SmartLink Technology • Page 12 Manually Post Results, then View Step 1 View results in the Lab Requests and Results window before posting to the patient’s medical record Step 2 If you have chosen to view the results before posting to the patient file, you will need to access the result from the Lab Request and Results window. Select the completed result you wish to post to a patient’s file, click Update, and change the status to Posted. Note: If this result is not a valid result, you do have an option to reject this laboratory result and NOT post it to the patient’s file. Step 3 The results will post to the patient’s file. Step 4 At this point, you may review the results, graph cumulative results, void results, or reassign these results to another patient. Cornerstone 8.3 Reference Laboratory with IDEXX SmartLink Technology • Page 13 To Manually Post Results to the Patient File: 1. Select the Lab Requests and Results button to access the Lab Requests and Results window. 2. Select the completed lab result for the patient. 3. Select Update. 4. In the Status field, select Posted. You can also reject the results at this point. 5. Click OK. 6. Close the Lab Requests and Results window. Cornerstone 8.3 Reference Laboratory with IDEXX SmartLink Technology • Page 14 View Detailed Results - Single or Cumulative Once lab results are posted to the patient file, they are stored as part of the patient’s medical history and can be viewed and printed at any time. Results can be viewed either as a single detailed result or as a cumulative result (if available). Cumulative results allow users to compare results from the same test over two or more dates and can be graphed. 1. From the Patient Clipboard, access the client. 2. In the Patient list area, click the green arrow the patients' names to expand the Patient list. button then move your cursor over 3. Select the patient. 4. In the Patient File area, select the Lab tab. 5. Right-click on the result. 6. Select View Detailed Lab Result, View Cumulative Results (Posted), or View Cumulative Results (All). The View Cumulative Results options are available only if there are multiple results of the same type. Cumulative results are shown below. This example compares the results for the Laboratory tests performed on 5/7/2010 and 6/17/2010. • Optional: You may graph the lab results. To graph the test results, select View Cumulative Results (Posted) or View Cumulative Results (All). • Select the test names for the tests you want to graph. • When the appropriate tests are selected (highlighted), click Line Graph and the test results graph will be displayed. Cornerstone 8.3 Reference Laboratory with IDEXX SmartLink Technology • Page 15 To view the data point values, move your mouse over a data point as shown below. This graph does not depict actual result displayed in the database and is only for illustration purposes. • To print the graph, click Print. • Close any open windows until you return to the Patient Clipboard. • To specify a date range to view, click Options. Cornerstone 8.3 Reference Laboratory with IDEXX SmartLink Technology • Page 16 7. To view the detailed result, right-click on the result and select Details. 8. From the Detailed Lab Results for (patient's name) window, view the detailed result. From the Detailed Lab Results for (patient's name) window, you can print, void, and reassign the test results. Procedural steps on voiding results have been provided in the “Other Reference Laboratory Tasks” section. Print Void Reassign Voided results are hidden in the patient history. Clear the Hide Voided Items check box on the Patient Clipboard to view them. Viewing Results with VetConnect* PLUS Starting with version 8.3, Cornerstone includes optional access to VetConnect* PLUS, a powerful web-based tool that lets you view and compare IDEXX in-house diagnostics and IDEXX Reference Laboratories data side by side. VetConnect PLUS works within the standard Cornerstone workflow for viewing results and has an enhanced format for viewing, comparing, and graphing result data. You can also visit vetconnectplus.com to view your results in a browser. Here’s an example of a VetConnect PLUS tab. Cornerstone 8.3 Reference Laboratory with IDEXX SmartLink Technology • Page 17 Using VetConnect PLUS, you can: • View the latest IDEXX test results in an enhanced and interactive window as soon as they are sent from the IDEXX Reference Laboratories or from your in-house analyzers. • See the complete history of a patient’s known IDEXX test results. • Compare results from IDEXX Reference Laboratories and IDEXX VetLab* Station tests side by side. (To do so, you must activate VetConnect PLUS on IDEXX VetLab Station.) • Graph and view trends for IDEXX test results with the click of a button. To use VetConnect PLUS from the IDEXX Lab Report: 1. In the Cornerstone software, open the patient record, and then use your preferred method to open an IDEXX Lab Report that contains the test results you want to see (for example, double-click an IDEXX Lab Report on the Summary tab in the Patient Clipboard). The Detailed Lab Result Set window opens. 2. Select the VetConnect PLUS tab. See the Cornerstone User's Manual or online help for more information about using VetConnect PLUS features. 3. When finished, close the results window. Cornerstone 8.3 Reference Laboratory with IDEXX SmartLink Technology • Page 18 To View and Update Laboratory Requests/Results from the Diagnostics Tab 1. From the Daily Planner, select the applicable staff. 2. Click the Diagnostics tab. 3. Select the Posted results check box and select a date range. 4. In the Other types to include area, select the check boxes for the types of requests and results you want to view. 5. Right-click on a request or result. Depending on the laboratory type/callback status, the following options may be available: • Select Update Lab Request to open and update a pending laboratory request. Click the magnifying glass icon to view the requested tests. • Select Update Lab Result to open and update a recently received laboratory result. • Select Update Call Back to open the Patient Reminders window and update an open or pending callback. • Select Patient Clipboard to open the patient’s record in the Patient Clipboard. • Select New Lab Request to open the New Lab Request window to enter a laboratory request. Viewing the Cornerstone Lab Results Log If you aren’t finding your results in the Lab Requests and Results window or the patient file, it may be helpful to view the Cornerstone Lab Results Log to verify that you are receiving results overall. Whenever a new lab result is imported into Cornerstone, an entry is written to the Lab Results Log. This log allows staff to see when a new result is back from the laboratory as well as any preliminary results. The log may be sorted by clicking on the column headings. This screen automatically refreshes every five minutes. Use the Refresh button to update information immediately. The most current result will default to the top of the window and only has viewing capabilities. You can use the Call Backs column to make or schedule call backs. See " Working with Laboratory Call Backs on the Diagnostics Tab" in the Cornerstone User's Manual. Cornerstone 8.3 Reference Laboratory with IDEXX SmartLink Technology • Page 19 To access the Lab Results Log 1. Select Activities > Lab Work > Lab Results Log. 2. Sort the list by ascending or descending order by selecting the headings at the top (e.g., Date Received, Patient Name, Lab ID, and Req ID). 3. Click Refresh to refresh the list with new labs downloaded into your Cornerstone system. 4. Click Close to close the Lab Results Log window. Viewing New Results Through the IDEXX Message Center The IDEXX Message Center lists all recently returned results from IDEXX Reference Laboratories and the IDEXX VetLab* Station. 1. Click the IDEXX Message Center button on the toolbar, then click Lab Results. The IDEXX Message Center lists all recently returned results from IDEXX Reference Laboratories and the IDEXX VetLab Station. 2. To open a result, right-click it and select Open. The IDEXX Message Center button appears in red and black when new messages and/or lab results have been added since the last time you looked at the message center. Viewing Results using vetconnect.com Results can be viewed on vetconnect.com whether they were requested in Cornerstone or on vetconnect.com. If you are a VetConnect PLUS user, you will see your results in a format similar to that described in "Viewing Results with VetConnect PLUS" above. If you do not use VetConnect PLUS, use the steps below to view your results online. 1. Open an Internet browser. 2. In the address bar, type: vetconnect.com. 3. Press Enter. 4. In the Member Login area, type your practice User Name and Password. This information is not available to IDEXX Cornerstone Software Support. You can use the email link or call VetConnect Client Services found on their website. This may take up to 24 hours. Cornerstone 8.3 Reference Laboratory with IDEXX SmartLink Technology • Page 20 5. Click Enter VetConnect. This will take you to your practice’s vetconnect.com Home page. 6. In the Search Lab Results area, enter in your search criteria. You can search by: • Laboratory account • Owner’s last name • Patient’s name • Doctor’s name • Date range from ____ to ____ • Period (x number of days) • Requisition number • Sort by • Number of results 7. Click Search. 8. In the Search Results area, select the result you want to view and/or print and click View. 9. In the Search Lab Results area, enter in your search criteria. You can search by: • Laboratory account • Owner’s last name • Patient’s name • Doctor’s name • Date range from ____ to ____ • Period (x number of days) • Requisition number • Sort by • Number of results 10. Click Search. 11. In the Search Results area, select the result you want to view and/or print and click View. Cornerstone 8.3 Reference Laboratory with IDEXX SmartLink Technology • Page 21 12. View the results. You can also print the results, create a text version of the results to print, hide comments, add additional tests and/or notes, email the results, or request a consult. 13. Log out of vetconnect.com and close your web browser. Cornerstone 8.3 Reference Laboratory with IDEXX SmartLink Technology • Page 22 Daily Step - Check Lab Requests and Results Window One important daily step to complete is checking your Lab Requests and Results window for orphan and/or not requested results that need to be resolved. Checking this window daily will help alleviate billing issues, and patient record errors, and it could improve the effectiveness and efficiency of your practice. To check your Lab Requests and Results window on a daily basis to resolve orphan and not requested results: 1. Use the Lab Request and Results toolbar button to access the Lab Requests and Results window. 2. In the Types to include area select the result type you want to view. You can also click the Type column heading to sort the lab results by lab type. Sort using Types to include area check boxes Sort by click Type column heading 3. Resolve any outstanding orphan and/or not requested results. Procedural steps on resolving not requested results and resolving orphan results have been provided in the “Other Reference Laboratory Tasks” section. 4. Close the Lab Requests and Results window. Alternative: Check on Daily Planner 1. Select Daily Planner > Diagnostics tab to access the lab results. 2. Use the Other Types to include filters and headings to customize and sort the results. 3. Resolve any outstanding Orphan and/or Not Requested results. 4. Close the Daily Planner window. Cornerstone 8.3 Reference Laboratory with IDEXX SmartLink Technology • Page 23 Other Reference Laboratory Tasks There are other tasks related to IDEXX Reference Laboratories that you may need to reference occasionally, these topics include: • Manually create request • View profiles • Create a new profile • Manually enter lab results • Add onto a lab request • Resolve not requested results • Resolve orphan results • Reprint LabREXX form, request form label, and/or tube label Manually Create Request This section covers an alternative method of creating a request, which creates a new lab manually request by accessing the New Lab Request window from the Patient Clipboard. 1. To begin from the Patient Clipboard: a. In the Client ID field, enter the client ID and press TAB. b. If Client Alerts or Patient Alerts appear, address the alerts and click OK. c. From the Patient list area, right-click on the patient’s name for whom you will create a lab request. d. Select Lab Request. e. Continue with step 5. 2. To begin from the Lab Requests and Results window, in the toolbar, click , and continue with step 5. 3. To begin from the Daily Planner, right-click in the work area and select New Lab Request. 4. In the Lab field, select the lab. 5. From the Staff list, select the staff member who will get credit for the lab work. 6. Optional: Modify the date and time of the request in the Date/time field. 7. Optional: In the Drawn by field, if applicable, type the initials of the staff member who will collect the sample. 8. Optional: In the Sample source field, type the area and type of collection. 9. Optional: In the Instructions area, type any staff instructions for the sample. 10. Select the profile/tests to be completed, by doing one of the following: a. Click in the Item ID box and press F2. All profiles that have invoice items linked are displayed. Double-click a profile to select it. b. Click the Test List button. All profiles are displayed. Search for and select the test you want, click Next, and then click Finished. If you selected a profile that doesn't have an invoice item ID assigned, Cornerstone will create a new invoice item ID. (Unless you have disabled this feature.) 11. On the New Lab Request window, click OK. The Print Lab Request window appears. Cornerstone 8.3 Reference Laboratory with IDEXX SmartLink Technology • Page 24 12. To print the form, label, or tube label, click Print. You also have the option to Preview or click Close to not print and close the window. You can change the number of copies you want to print on this window. Once the lab request has been processed, the charge is sent to the Patient Visit List. View Profiles Individual tests make up a profile, which is used to request lab work. 1. On the Activities menu, select Lab Work > Profiles. 2. To view the tests within a profile, select that profile in the list and click Update. Update the Directory of Services to Use the Latest Profiles Each profile must have a corresponding invoice item in Cornerstone. For IDEXX SmartLink* interfaces, profiles are linked to Cornerstone invoice items when the interface is installed, when you order from the IDEXX Reference Laboratories test list, or when you add a new analyzer. When the IDEXX Reference Laboratory is installed, invoice items and profiles are automatically created. However, IDEXX’s commitment to research and development continues and you may encounter a situation where you’ll want to update the IDEXX Reference Laboratories Directory of Services. We recommend you visit vetconnect.com every quarter to update your directory of tests and services. Follow the instructions below or call your lab specialist to assist you with completing this task. Call 1-800-695-2877 and select Cornerstone, then Cornerstone Lab Support. You must have an account set up on vetconnect.com to do the following. Load must be performed at Server before loading the workstations. 1. Browse to the vetconnect.com website. 2. Enter the appropriate username and password. This information is not available to IDEXX Cornerstone Software Support. 3. On the vetconnect.com Home page, click the Lab Services tab. 4. On the Links Tool Bar area, click the Downloads link. 5. In the Directory of Services Update box, click IDEXX Cornerstone Practice Management Software and click Download. 6. On the File Download window, click Open or Run and the progress of the file download is displayed. 7. On the LabREXX Directory of Services window, click Next. 8. When the update has completed, click Finish on the LabREXX Directory of Services window. 9. Repeat the above steps for each workstation on the network. With Cornerstone 7.5 or higher, you may find some or all of your invoice items with an ID of “IL-” (and the IDEXX order number). Cornerstone 8.3 Reference Laboratory with IDEXX SmartLink Technology • Page 25 Manually Enter Lab Results This feature is available to all Cornerstone users to input test results into a patient’s file for a specified laboratory (e.g., Outsourced lab work). If you’re using Cornerstone version 6.0 or later, a note appears in the patient’s lab record to indicate that the results were entered manually. 1. Activities > Lab Work > Manually Enter Lab Results. 2. Type the patient ID in the Patient ID field. You may press F2 to search. 3. Verify the correct owner displays in the Owner field. If not, select the correct owner from the list. 4. Select the lab for which you want to enter the results. 5. Select the staff member who is entering the lab results. 6. Verify the correct date and time. If you need to change the date and/or time, place your cursor in the field and type the correct date and time. 7. Select the Template for which you want to enter the results. You can create a custom template, if necessary. 8. Enter the results by filling in the following fields: • Operator • Value • Units • High/Low • Low Value • High Value If default ranges do not display after entering results, they have not been set up. If the patient falls into one of the Lab Age Groups set up on the system, the units, low values, and high values entered will be saved as defaults. 9. To add any applicable notes to the test result, click Comments. Be sure that the following setup tasks have been completed before you manually enter lab results: 1. Set up any templates you want to use for manually entering lab results. (Activities > Lab Work > Templates, then click New.) 2. Set up lab age groups for any species for which you’ll be manually entering lab results. (Lists > Species, then select a species, click Update, and click Lab Age Grps.) 3. Set up default test ranges. (Activities > Lab Work > Default Test Ranges, then fill in the Default Test Ranges dialog box, click OK and repeat for additional test ranges.) This step can only be completed after steps 1 and 2. Cornerstone 8.3 Reference Laboratory with IDEXX SmartLink Technology • Page 26 Add on to a Lab Request This feature is useful when a sample has already been sent to an IDEXX Reference Laboratories and the veterinarian wants to request an additional profile to be run on the same sample. The practice still needs to call the lab and ask for the additional profile to be run. The profile must be added to an existing requisition ID. cannot be changed. Patient information and previously requested tests 1. From the Activities menu, select Lab Work > Add on to a Lab Request. 2. Type the patient ID in the ID field and press TAB. (Or press F2 to search.) 3. Highlight the pending request, and click Select. 4. Add the additional tests requested. You may press F2 in the Item ID box to search the Profile/test Item List. 5. Once all tests are added, click OK. 6. Print the label and/or tube label if applicable. 7. Close the Add on to the Lab Request for (patient’s name) window. If the preliminary results are back, the pending request cannot be changed. If the results are final, the request no longer appears on the Lab Requests and Results window. In this case, the veterinarian needs to call the lab, ask for the additional profile, find the request, and use the Add on feature. Modify a Pending Request You can modify a test request only if no part of the request has been completed and no results have been transmitted. To modify a request: 1. Click , and then double-click the request. 2. Make the necessary changes. Patient information and some of the request details cannot be changed. Note: If the Cancel button is inactive, then a result has already been returned and the request cannot be modified. (You can still add tests to the request using Activities> Lab Work> Add on to a Lab Request.) 3. Click OK. Note: Remember to update client billing if needed. Cornerstone 8.3 Reference Laboratory with IDEXX SmartLink Technology • Page 27 Delete a Pending Request If no results have been returned (or the request was a duplicate or results don’t match a pending request): 1. Click . 2. Right-click the request and select Delete. If partial results have been returned: 1. Click , find the request, and then click the lookup button to display the Profiles on Order window. 2. Select the line(s) to delete and click Delete. IMPORTANT: If a request is deleted and charges for the request are on the Patient Visit List, the charges may be deleted, depending on how the request was made. Reject or Void Results If manual posting is enabled, you can reject results instead of posting them. If manual posting is not enabled, you can void the posted results. To reject a result: 1. Click , and then double-click the completed result to be rejected. 2. In the Status drop-down list, select Rejected, and click OK. To see rejected results, select the Rejected Results option at the top of the Lab Requests and Results window. You can change the status of a rejected result to Posted at any time. To void a posted result: 1. On the Patient Clipboard, type the client ID and press TAB. (Press F2 to search.) 2. Select the patient from the Patient list. 3. In the Summary, Text, or Lab tab, double-click the result you want to void. The Detailed Lab Results window opens. 4. In the Status field, select Voided from the drop-down list, and click OK. Voided results are labeled “voided” in the patient file. 5. To see voided results in the patient record, deselect the Hide voided items check box, located in the lower right corner of the Patient Clipboard window. Cornerstone 8.3 Reference Laboratory with IDEXX SmartLink Technology • Page 28 To undo the void action, repeat the steps above, but select Posted from the Status field. Resolve Not Requested Results A not requested result occurs when tests listed on a pending request in Cornerstone do not match the tests run by the IDEXX Reference Laboratories (tests that were not on the original pending request will transfer as not requested). 1. From the Lab Requests and Results window, select the not requested lab result you want to resolve. 2. Click Update. 3. Select to either bill or not bill the client. • Select Bill this client if you want to bill the client. If you select to bill the client, you will be prompted to enter the invoice item that corresponds to the tests completed. • Select Do not bill this client if the client is not to be billed. 4. Select the Staff member who requested the test. 5. Enter the invoice item ID and revenue center, if applicable. Cornerstone 8.3 Reference Laboratory with IDEXX SmartLink Technology • Page 29 6. Click OK You can also preview the results and/or reassign the result to another patient on this window. 7. To post the results, follow the "To Manually Post Results to the Patient File" instructions. Resolve Orphan Results Orphan results occur when the client and/or patient information on results received from the lab does not match client/patient information in Cornerstone OR if the practice uses electronic requests and no request can be found in Cornerstone for the lab results that transfer. Orphan results need to be assigned to the correct patient. Once the patient is assigned, the results are converted to a completed result or are posted directly to the patient file, depending on how the system defaults are set. It is possible to view the details of preliminary orphan lab results with use of the Preview button. 1. From the Lab Requests and Results window, select the orphan result you want to resolve. 2. Click Update. 3. Type the Patient ID in the Patient ID field. You may press F2 to search. 4. Verify the correct owner displays in the Owner field. 5. Select to either bill or not bill the client. • Select Bill this client if you want to bill the client. If you select to bill the client, you will be prompted to enter the invoice item that corresponds to the tests completed. • Select Do not bill this client if the client is not to be billed. 6. Select the staff member who requested the test. 7. Enter the invoice item ID and revenue center, if applicable. Cornerstone 8.3 Reference Laboratory with IDEXX SmartLink Technology • Page 30 8. Click OK You can also preview the results on this window. 9. To post the results, follow the "To Manually Post Results to the Patient File" instructions. To Resolve Multiple Orphan Results If you have a number of orphan results, you can resolve them by having Cornerstone automatically assign them to the patients that are the best matches. 1. On the Lab Requests and Results window, clear all the filter check boxes except Orphan, and review the orphan results that are listed. 2. Select Post Orphans. 3. On the Post Orphans dialog box, select a laboratory in the Lab ID drop-down menu, specify a date range, and click OK. Note: It may take a few moments for Cornerstone to resolve the orphan results. The software will resolve any orphan results that it can match based on patient ID or the combination of client name and patient name. Resolved results will be posted to patient history, but no new charges will be added to client accounts. 4. On the Lab Requests and Results window, check to see if any orphan results from that time range remain on the list. If so, use the "Resolve Orphan Requests" instructions above. Reprint LabREXX Form, Request Form Label, and/or Tube Label If for some reason you need to reprint your LabREXX form (lost, damaged, soiled, etc.), you can do so by following these simple steps. When reprinting the LabREXX form, if additional information is required you will need to reenter that information. Cornerstone does not remember the information previously entered. 1. Select the Lab Requests and Result toolbar button to access the Lab Requests and Results window. 2. Select the pending request for which you want to reprint the LabREXX form. Cornerstone 8.3 Reference Laboratory with IDEXX SmartLink Technology • Page 31 3. Click Update. 4. If Client Alerts or Patient Alerts display, read the messages and click OK. 5. Click OK to access the Print Lab Request [Requisition ID] window. The Validating against IDEXX Test List. Please wait... displays briefly. 6. Select the reprint item, and number of copies, and then click Print. You can also reprint labels and tube labels from this window. 7. Close the Lab Requests and Results window. Setting the IDEXX Reference Laboratories Markup Percentage You can specify a markup percentage for IDEXX Reference Laboratories tests. After you download the Directory of Services update, your Cornerstone prices for the tests will be multiplied by the markup percentage. This option is available in Cornerstone 7.6 or later. To enable automatic markup: 1. Select Activities> Lab Work> Laboratories, and then select the IDEXX Reference Laboratory ID. 2. Click Update. 3. In the IDEXX LabREXX area, select Automatically update prices. 4. Enter the markup percentage. 5. Click OK. To apply different markup percentages to different groups of tests: IMPORTANT: Always apply the markup percentages in order of highest percentage to lowest percentage. 1. Select Activities> Lab Work> Update Lab Item Prices. The Lab Item Price Update window opens. 2. Make sure “Allow prices to go down” is not selected. 3. CTRL-click to select all the tests that you do not want to change to the new (highest) markup percentage, and then press CTRL-D to temporarily delete these items from the list. 4. Enter a new value in the Markup pct. box, and click OK. You are asked whether to save the information. 5. Click Yes. A message displays the number of records saved. 6. Click OK to close the message. 7. Reopen the Lab Item Price Update window. By default only tests that have not yet been updated are displayed. 8. Repeat Steps 3–7, this time leaving the tests that will have the next highest markup percentage. Repeat until all tests have the markup percentages you want. If you have special prices for certain individual tests (i.e., the markup percentage does not apply), update all the other tests as described above, then manually change the prices on the special items. Click OK to save. Cornerstone 8.3 Reference Laboratory with IDEXX SmartLink Technology • Page 32 Recommended Interface Settings To update settings for the IDEXX Reference Laboratories interface: 1. Select Lab Work> Laboratories> IDEXX Reference Laboratory. 2. Click Update. Recommended settings: • Use patient ID for requisition ID— Required if your practice uses LabREXX forms. If your practice uses handwritten forms, select “Manually enter requisition IDs.” • Units—In U.S. always use “Common units.” • Require Requests—Laboratory results are automatically matched to pending requests. • Use special actions—Lets you create special actions that generate lab requests. • Warn in invoicing if Not Req results exist—Displays a warning message at invoicing if a patient has not-requested results. Helps prevent missed lab charges. • Create LabREXX test request forms—Lets you use bar-coded LabREXX requisition forms. Tips: • If you allow special actions for lab requests, then do not select “Hide request screen if special action.” Hiding the request screen will prevent you from reviewing the request form generated by the special action. • If you prefer to post results manually, select Review results before posting. • Select Automatically update prices if you want to update Cornerstone reference laboratory prices whenever the LabREXX test list is updated. Cornerstone 8.3 Reference Laboratory with IDEXX SmartLink Technology • Page 33 Section 2 Resources Online IDEXX Cornerstone* Customer Support Center The IDEXX Cornerstone Customer Support Center offers an extensive knowledge base of information to help you find the answers you need—24 hours a day, 365 days a year. This resource section will familiarize you with the Cornerstone Customer Support Center and demonstrate search techniques for lab-related topics. There are two ways to access the online Cornerstone Customer Support Center and you'll arrive on the home page below. 1. Access directly from within the IDEXX Cornerstone* Practice Management System. (Help > Support Center or ). 2. At an Internet browse window, enter www.cornerstonehelp.com. Online Support Center Home Page By keeping your Cornerstone support contract current, you will have access to all of these documents and much more. Cornerstone 8.3 Reference Laboratory with IDEXX SmartLink Technology • Page 34 Common Troubleshooting Topics, Causes, and Solutions The following table summarizes common issues, causes, and more explanation, where applicable. Why am I getting orphan and/or not-requested test results? Possible Causes Your practice did not create a lab request within Cornerstone. Therefore, when test results were downloaded, there was no corresponding test request to match with the test result. Solutions Follow the steps in this guide for Resolving Orphan Results or Resolving Not Requested Results. To avoid this problem in the future, create a request (and a test order) by using any of the methods described in this guide. Creating a test order in any of the following ways will cause orphan results: • By selecting Activities> Lab Work > Create IDEXX LabREXX Test Request Form • By filling out a paper form • By generating the form on vetconnect.com If you used one of the methods above because you could not find a test code in the Cornerstone test list, you may need to download the most recent list of tests. See “Updating the Directory of Services.” Your practice called Laboratory Customer Support to have results resent but the pending request no longer exists in Cornerstone. Follow the steps in this guide for Resolving Orphan Results or Resolving Not Requested Results. Multiple pending requests were created for the same patient. When the results come into Cornerstone, the software did not know which pending request to match. (This is only applicable for earlier versions of Cornerstone—version 7.5 or earlier.) Follow the steps in this guide for Resolving Orphan Results or Resolving Not Requested Results. One or more profiles is incorrect. Consult your lab specialist for assistance with troubleshooting profiles. Call 1-800-695-2877 and select Cornerstone, then Cornerstone Lab Support. Cornerstone must have a pending request to match with the results. It is important to determine why the pending request no longer exists, so you can take appropriate action. For example, if the original result was downloaded successfully, then the status of the request was changed to “completed.” Or someone may have inadvertently deleted the pending request. Cornerstone 8.3 Reference Laboratory with IDEXX SmartLink Technology • Page 35 Why am I getting orphan and/or not-requested test results? Possible Causes Your practice called Laboratory Customer Support to add on an additional test to a current finalized sample. Solutions Follow the steps in this guide for Resolving Not Requested Results. Further explanation: If your practice added on an additional test to the original request through Activities > Lab Work > Add on to a Lab Request and also called Laboratory Customer Support to request additional testing, then the additional test comes in as completed, but all of the original results for that sample are resent and appear in Cornerstone as not requested results. Your practice generated a request in Cornerstone, but also wrote on the printed form. Further explanation: If anything is handwritten on the printed form, the laboratory policy is to manually enter the requisition information, in case the bar code contains incorrect data. The laboratory always enters “1” for the patient ID, thus generating an orphan result that your practice must review. Follow the steps in this guide for Resolving Orphan Results. Why haven't test results been downloaded? Possible Causes Solutions The Internet connection is not working. To determine whether your computer system is connected to the Internet, open a browser and try to display one or more Web pages. If the pages can’t be displayed, check that all cables are secure. Try disconnecting the network or modem cable and reconnecting it. If the Internet connection still does not work, contact your Internet service provider for assistance. The IDEXX Reference Laboratories connection is not active or is not running properly. If you have constant Internet access: Double-click the icon on the desktop to start the IDEXX Reference Laboratories interface. Leave the connection running while Cornerstone is running. Shut the interface down when Cornerstone software is not running. If you connect to the Internet only to retrieve results: 1. Make sure you are at the workstation used for downloading results, and then dial the Internet service provider. 2. Double-click the IDEXX Reference Laboratories icon on the desktop to start the download. Cornerstone 8.3 Reference Laboratory with IDEXX SmartLink Technology • Page 36 Why are test prices incorrect? Possible Causes Solutions The markup percentages are wrong for your SmartLink interface to IDEXX Reference Laboratories. See “Setting the IDEXX Reference Laboratories Markup Percentage.” The prices specified on individual invoice items are wrong. 1. Select List> Invoice Item. Note: For Cornerstone version 7.5 or earlier, all prices must be specified in invoice items. 3. Click Update. 2. Search for and select the invoice item you want to update. 4. On the Information tab, change the price of the item in the Amount field, and click OK. 5. Repeat to update other prices. 6. Click Close. Cornerstone 8.3 Reference Laboratory with IDEXX SmartLink Technology • Page 37