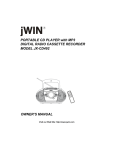
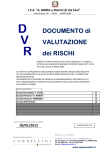
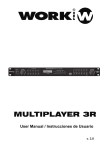
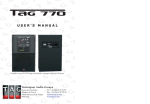
1
Professional Wireless Portable Amplifier Operation manual ISO 9001:2008 GREEN PRODUCT World Genius Convention Silver Medal Congratulations and thank you for purchasing this all-in-one portable sound system. To ensure a trouble-free operation, please read the manual thoroughly to fully understand its controls and functions. STAGE MAN can be optionally installed with wireless receiver/transmitter/MP3 recorder player/Bluetooth receiver modules, as well as CD player, DVD player and digital recorder player. The wireless receiver/transmitter module is UHF band and plus PLL synthesized type with 16 or 100 preset frequencies. Configuration STAGE MAN may come equipped with the following: 1. AC power cord 2. 1~4 wireless receiver/transmitter/MP3 recorder player/Bluetooth receiver modules 3. 1~4 transmitters, either handheld or bodypack transmitter (except version with no module installed). 4. 1 CD player, DVD player and digital recorder player. Optional accessories 1. Weather proof dust cover. 2. Tripod stand 3. Passive speaker 4. Wired microphone 5. One/two- unit trolley Remark Manufacturer reserves the rights to change the above combinations without prior notice. -1- ISO 9001 / ISO 14001 / OHSAS 18001 Parts and functions on STAGE MAN control panel 1. Mic/Line #1 volume control 2. Mic/Line level switch #1 3. Min/Line input #1 4. Mic/Line #2 volume control 5. Mic/Line level switch #2 6. Min/Line input #2 7. Line in volume control 8. Line in (3.5mm) 9. Reverb control 10. Master volume control 11. Treble control 12. Bass control 13. Aux output 14. External speaker output 15. Master Limiter indicator 16. Battery indicator 17. Charging indicator 18. Fuse 19. DC in (30-32V/4A) 20. Power on/off Parts and functions on STAGE SPEAKER control panel 1. Audio input -2- Starting to operate STAGE MAN First of all, please charge for at least 4~6 hours because the built-in rechargeable battery might have been discharged naturally due to long shipment and storage time, even though it has been fully charged in the factory prior to the shipment. To operate this portable sound unit, please switch on the main POWER switch. However, if the battery indicator stops at 40%, it means the battery is getting weak and instant recharging is necessary. The main POWER switch does NOT switch on the other devices since each of them has individual Power/Volume control. To operate those, you have to switch them on accordingly. Operating the wired microphone/LINE audio input 1. Connect the signal cable, XLR of 6.3mm, of the microphone or audio device to the INPUT 1(2) jack. 2. Set the INPUT 1(2) volume to minimum before turning on the amplifier. 2 , ○ 5 ) is for wired 3. Depending on different audio sources, the MIC mode of the switch (○ microphone and the LINE is for music level. Music audio input 1. STAGE MAN accepts one 3.5mm unbalanced audio input. 2. Set the LINE volume to minimum before turning on the amplifier. Limiter Function There’s an interior anti-overload circuit to protect the amplifier from being damaged due to over volume output, this design will automatically lower the output when it goes over the limit. Various audio outputs Aux out: This 6.3mm jack is used as audio output connection to another active amplifier. Speaker out: This 6.3mm jack is used as audio output connection to another passive amplifier. Recharging the battery STAGE MAN uses either two lead-acid batteries or one lithium battery. The battery power is leveled from 40%, 60%, 80% and FULL. If the LED stays at 40%, the battery might not be sustainable for long operation. During recharging the indicator LED will flash RED until the battery power is full, at which the LED stays GREEN. However, if there is no battery inside or the battery has problem, the charging LED will stays YELLOW. Operating the wireless modules STAGE MAN can be optionally installed with wireless receiver/transmitter/MP3 recorder player/Bluetooth receiver modules, as well as CD player, DVD player and digital recorder player. Please refer to individual instructions in the following. -3- ISO 9001 / ISO 14001 / OHSAS 18001 SDR-5116M/SDR-5100M IrDA receiver modules 1234 1. Channel indicator 2. Diversity A/B indicator 3. Audio signal indicator 4. IR sensor area (SDR-5100M IrDA) 5. Channel Selector 6. IRDA synchronization button (SDR-5100M IrDA) 7. Squelch control 8. Power switch/volume control 5678 First turn on the Power of the main unit. Then turn on the individual power of the receiver module. Select a desired channel by pressing the ▲ or ▼ button and the corresponding channel on the Transmitter. Squelch (SQ) setting When a channel is in use and undesired interference signal is received, turn the SQ in clockwise direction to make the receiver less sensitive and thus less susceptible to interference. If this still does not solve the problem, it means this frequency is not applicable at current position. Please switch over to the next channel. Channel synchronizing of the receiver and microphone (SDR-5100M IrDA) 1. Limit the distance between the receiver and transmitter within 30cm. 2. Align both infrared areas 3. To change the receiver’s channel, please press the synchronizing button of the microphone. The microphone's LED will grow to imply synchronizing signal transmitted and the receiver's channel LED will flash then change to new channel. If the channel LED shows "EC", it means the receiver and microphone don't have the same frequency band and synchronization isn't doable. 4. To change the microphones channel, please press the SYNC button of the receiver. The channel LED will flash to transmit synchronizing signal to the microphone. If its LED shows "EC", it means the receiver and microphone don't have the same frequency band and synchronization isn't doable. RP-5016M transmitter module 12 345678 1. Channel indicator -4- 2. Antenna socket(TNC type) 3. Channel selectors: Press ▲(up)▼(down) to increase/decrease channel number. Please select a non-interfering frequency channel to those used in the receiver modules. 4. Power on/off 5. Unit GAIN control: This controls the GAIN level of interior audio sources. 6. 3.5mm audio input jack 7. AUX IN GAIN control: This controls the GAIN level of external audio input. 8. Output power setting: LOW(left) for Low output power and HI(right) for high output power. Low output power will reduce the RF transmission distance and High output power will extend the possible RF transmission distance.n time than Low output power since it requires more power for longer RF transmission. DP-500M MP3 module 12348 9 10 5 11 6 7 12 1. LCD display 2. Press to return to previous track, press and hold to fast reverse. 3. Press to play/pause 4. Press to go to next track, press and hold to fast forward. 5. Press to return to previous folder. 6. Press to change play modes, press and hold to switch repeat modes. 7. Press to go to next folder. 8. IR sensor area 9. USB 2.0 input 10. USB/SD indicator: The LED flashes during play and extinguishes when stop. 11. SD card input 12. Power switch/volume control To use the USB/SD digital player, simply plug your USB/SD card into the port after the player is turned on. To prevent any possible damage to the USB/SD card, always detach it after the player has been shut off. Operating functions on the panel and the remote Operating function Play/pause Skip forward Fast forward Skip backward On the panel On the remote Press II Press Press and hold Press -5- Press I Press and hold I Press I ISO 9001 / ISO 14001 / OHSAS 18001 Press and hold Press Press Fast backward Next folder Previous folder Track select (button #0-9) - Repeat mode switch (ALL/RANDOM/SINGLE/FLDER) EQ mode switch (POP/ROCK/JAZZ/CLASSIC/COUNTRY/NORMAL) Press and hold MODE Press and hold I input track number, then press II Press MODE Press MODE Press EQ ※Remarks: 1. Changes of tracks, EQ and play modes will only be saved 5 seconds after the setting. 2. If the SD or USB are not detected, please try by inserting it again. 3. The player reboots to read whichever is last inserted. 4. This player can read MP3 files only. Other formats such as WMA and WAV aren't supported . The USB and SD card must be FAT/FAT32 formatted. DPR-500M MP3 recorder player module 12348 9 10 5 11 6 7 12 1. LCD display. 2. Press to return to previous track, press and hold to fast reverse. 3. Press to play/pause. 4. Press to go to next track, press and hold to fast forward. 5. Press to record. 6. Press to switch repeat modes. 7. Press to stop playing or recording. 8. IR sensor area 9. USB 2.0 input 10. USB/SD indicator: The LED flashes green during playing and red during recording. It lights red if there is no track to play, lighting green when playing or recording stops. 11. SD card input 12. Power switch/volume control Operating functions on the panel and the remote Operating function Play/pause Record On the panel On the remote Press II Press● to record and ■ to Press REC to record and ■ to stop. stop. -6- Skip forward Fast forward Skip backward Fast backward Next folder Previous folder Press I Press and hold I Press I Press and hold I - Track select (button #0-9) USB/SD switch Repeat mode switch (ALL/RANDOM/SINGLE/FLDER) Volume control - PressI Press and hold I Press I Press and hold I Press Press input track number, then press II Press USB/SD PressMODE Press MODE - Press or Press A-B to start, again to play section and again to stop Press DEL to delete track and again to confirm your delete press MUTE to mute/recover A-B section play - Delete tracks - Mute ※Extra attention to recording 1. Recordable only when USB/SD is detected. 2. Record files will be stored in the RECORD folder of USB/SD. 3. The files will be named as FILE_001, FILE_002, FILE_003…etc. 4. The name of a deleted track won’t be applied to its next one. 5. Recordable until FILE_999 appears with LCD displaying Num Full. 6. LCD displays USB FULL or SD FULL when insufficient memory left. 7. LCD displays SD LOK if the SD is locked. 8. Don’t remove the USB/SD during the recording process in case the interrupted track might be damaged. BT-500M Bluetooth receiver module 123 1. SCAN LED 2. LOCK LED 3. Power/volume control Matching instruction 1. Turn on BT-500M and both SCAN and LOCK LEDs will flash alternatively. 2. Activate Bluetooth on your device and search new external Bluetooth devices. 3. Find and connect to “Bluetooth Speaker” that appears on your option list. 4. Once connection is made, the LOCK LED will flash green. -7- ISO 9001 / ISO 14001 / OHSAS 18001 Operating the CD player Parts and functions 1 2 3 4 5 11 1. LCD display 2. Play/pause 3. Stop 4. Rev-Skip-Cue 5. Eject 6. CD/USB selector 11. Power/volume control 7. Repeat 8. Folder skip 9. IR led 10. USB input 6 7 8 9 10 Keys PLAY/PAUSE STOP FUNC UP/CUE DONW/REV FOLDER-UP Functions Panel Remote When this key is pushed during CD stop, play will start after track search. When this key is pushed during CD is playing, it will be changed to V V pause. When this key is pushed during CD is pausing, it will be changed to play. When CD is not stop, if this key is pushed then CD will stop. V V When press this key will change between CD and USB mode. V V In stop mode: Change the starting play track (file) during stop mode, cyclic to the first track, if it is in the last track. In program entry mode: Change to the next track(file) for program select . In play mode, pause mode, program play mode, random play mode: V V Single pressed, skip the playing track (file) to next track (file) for normal play/pause mode, to next program index track(file) for program play/pause mode, to next random track(file) for random play /pause mode. Continue pressed, fast forward during play/pause when pressed more than 0.7sec. In stop mode: Change the starting play track (file) during stop mode, cyclic to the last track, if it is in the first track. In program Entry mode: Change to the previous track (file) for program select. In play mode, pause mode, program play mode: V V Single pressed, skip the playing track (file) to precious track (file) for normal play/pause mode, to previous program index track (file) for program play/pause mode. Continue pressed, fast reverse during play/pause when pressed more than 0.7sec. In stop mode: Skip the starting play folder to next folder during stop mode, cyclic to the first folder if it is in the last folder. In program entry mode: V V Change the file for program select to next folder’s first file, cyclic to the first folder if it is in the last folder. In normal play mode: Skip the playing file to the next folder’s first file. -8- FOLDER-DOWN In stop mode: Skip the starting play folder to previous folder during stop mode, cyclic to the last folder if it is in the first folder. In program entry mode: Change the file for program select to previous folder’s first file, cyclic to the last folder if it is in the first folder. In normal play mode: Skip the playing file to the previous folder’s first file. REPEAT In mp3 mode and in USB mode . If this key is pushed, PLAY mode is changed cyclically shown below. PLAY ALL RANDOM→REPEAT TRACK→REPEAT FOLDER→REPEAT ALL→RANDOM REPEAT→PLAY ALL IN CD mode If this key is pushed, PLAY mode is changed cyclically shown below. PLAY ALL RANDOM→REPEAT TRACK→REPEAT ALL→RANDOM REPEAT→PLAY ALL. EJECT When this key is pushed, door is moved out. PROG Set to programming mode. When programming mode, “stop” key is pushed then program is all cleared. MUTE When this key is pushed during CD is playing, the set will mute the output. Pushing again can recovery the output. POWER ESP ID3 0~10 VOL.VOL.+ Power SW of the set. In CDDA mode, Press ”ESP” key, The ESP display lighted and the set is in electronic anti-shock state. The electronic anti-shock time is about 40 seconds. Press “ESP” key again, cancel the ESP function. When this key is pressed , the“ID3”in the LCD display will flash, and the ID3 TAG is displayed pressing this key again will cancel the ID3 function You can use these keys to select the track you want directly. When this key is pushed, the volume will decrease by 1dB per step, the min. volume is 0dB. When this key is pushed, the volume will increase by 1dB per step, the max. volume is 30dB. V V V V V V V V V V V V V V V V Caution: This player does not accept 8-cm diameter CD. User is advised to have the USB 2.0 formatted in “FAT” or “FAT 32”. The built-in USB 2.0 player can not be able to read the MP3 files stored in your USB if it is not formatted by either “FAT” or “FAT-32”. To avoid damage to the USB, remember to detach it only after switching off the player. -9- ISO 9001 / ISO 14001 / OHSAS 18001 Operating the DVD player Parts and functions 13 6 5 4 3 2 1 1. Power/volume control 2. Eject 3. Stop 4. Skip/forward 5. Skip/reverse 6. Play/pause 7. Video output 8. N/P 9. Repeat 10. Cue 11. Rev 12. Function switch 13. LCD display 14. IR LED 15. SD card input 16. USB 2.0 input 16 15 14 12 11 10 9 8 7 Keys Finction Panel Remote When this key is pressed during stop, play will start. When this key is pressed during CD or DVD is playing, then it is changed to pause. When this key is pressed during CD or DVD is pausing, then it is changed to play. V V When this key is pressed during playing, the set is changed to stop. The stop point is memorized. Then pressing PLAY/PAUSE key, the set will play from the stop point. When this key is pressed twice during playing. The set is changed to stop, then pressing PLAY/PAUSE key, the set will play from the beginning. V V When this key is pressed, mode is changed between USB and disk. V V In play state, press “CUE” key to carry out the fast play. Every press the key, the play speed will change for one time X2, X4, X8, X20 and normal in sequence. V In play state, press this key to carry out the fast backward play. Every press the key, the backward play speed will change for one time.X2,x4,X8,X20 and normal in sequence. V Press the key to change the TV system in the following sequence: PAL→AUTO→NTSC→PAL→... V EJECT Press this key, the disk will move out. If the disk is not taken away, press this key again, the disk will slot in. V REPEAT The default is REPEAT ALL IN MP3 WMA state ,the repeat sequence is as following: REPEAT 1→REPEAT DIR→REPAT ALL→REPEAT 1→... In CD playing state , the repeat sequence is as following: REPEAT 1→REPAT ALL→REPEAT 1→... V PLAY/PAUSE STOP FUNC CUE REV N/P V V After programming, the player will play the title, chapter or songs follow the programmed order. Press PROG button ,the menu will display on the screen as following: PROG PROGRAM 1--:-2--:-3--:-4--:-- 5--:-6--:-7--:-8--:-- 9--:-10--:-11--:-12--:-play -10- 13--:-14--:-15--:-16--:-clear V In the picture T means TITLE, C means CHAPTER. The divided unit of DVD disc is title, and can divide the title for several chapters. Usually one movie has one title. Some disc are not divided in this way, please pay attention to it when operate GOTO” and “PROG” function. Input relevant title, chapter that you want with the arrows and number keys. Use ↑↓←→ to move the cursor to “PLAY” in the picture above, then press “ENTER” button .the player will start playing follow the programmed order. Also use the same way to move the cursor to “CLEAR” and press “ENTER” button can clean the programmed order. Press “PROG” key again will exit the program mode. MUTE POWER GOTO When this key is pressed during disc is playing, the set will mute the audio output. Press again to recover the output. Power switch of the set. V V V Press GOTO to reach the title, chapter or time you want. V OSD In play state, press OSD key, the play information of the disc will show on the screen. Press it again, the OSD information will disappear. V PBC The key only act for VCD disc. V AUDIO In play state, press “AUDIO” key can choose different audio channels in the DVD disc. V ZOOM In play state, press “ZOOM” key ,the display screen will zoom by 2X, 3X, 4X, 1/2X, 1/3X, 1/4X and normal play. V SLOW Press “SLOW” key ,the set will become slow motion as following cycle: SF ½→SF 1/3→SF 1/4→SF 1/5→SF 1/6→SF 1/7→normal→SF ½→... V ↑↓←→ ENTER Cursor move keys and confirm keys. V REV-SKIPCUE Press one of these keys to skip to the next track, long press one of these keys will search forward or backward. ANGLE Press “ANGLE” key to choose different angles of the disc that recorded with multi-angle. It is not useful when the DVD disc doesn’t support multiangle. V When this key is pressed, it will become random play mode. V SUB-T In play state press “SUB-T” button to choose the different subtitles in the DVD disc. V SETUP Press “SETUP” key to enter setup manual. V TITLE Press “TITLE” key the screen will show title and manual for selection. V VOL.- When this key is pressed, the volume will decrease by 1dB per step, the minimum volume is 0dB. V VOL.+ When this key is pressed, the volume will increase by 1dB per step, the maximum volume is 40dB. V You can use these keys to select the track you want directly. V RANDOM 0~9;10+ -11- V V ISO 9001 / ISO 14001 / OHSAS 18001 Operating the Digital recorder player Parts and functions 18 19 20 654321 11 10 9 8 7 17 16 15 14 13 1. Play/Pause 2. Stop 3. SD/USB selector 4. Track number button "1" 5. Track number button "10" 6. Track number button "100" 7. A→B play section 12 8. Program/Repeat 9. Forward 10. Reverse 11. Folder selector 12. Volume control 13. USB 2.0 input 14. SD card input 15. Copy 16. Record 17. Infrared detector 18. Power on/off 19. Delete 20. LCD display Features - Recording through the Line-in recording directly to a USB or SD Card - Offer USB and SD Card function of each replication. - Recording format is most popular MP3 audio format. - Accept the capacity of 128MB to 16G USB/SD Card/SDHC - With a language learning function, can be broadcast repeatedly at designated areas - Adjustable recording quality, provide choice of 44.1 KHz, 128 Kbps and 192Kbps. - Able to store up to 99 folders, or 999 tracks in SD Card or USB Easy to use - Play through the LINE IN audio recording files into the directory folder simply select "REC" - Play copied USB or SD Card copy files into the directory folder simply select "CPY" - Direct delete function when plan single song - Can copy single, multiple songs or whole folder Operation and function of the use of panel description POWER: Switching power on/off. VOLUME: Volume control button, turning to adjust the volume USB socket: To insert a USB storage device SD CARD socket: To insert a SD CARD 100/10/1: The number buttons to select directory, or track. - Button 1, indicating the single digit 1 to 9, press once to increase every 1 single digit. - Button 10, indicating the 10-digit, press once to increase every 10-digit. If total tracks are 88, the LCD display will only show to “8”. Keep pressing will back to “0”. - Button 100, indicating the 100-digit, press once to increase every 100-digits. If the total tracks below the 100, the button has no effect. FOLDER: Folder selection key and adjust the recording quality -Select folder -12- Press FOLDER button, LCD screen display F, then REW or F. FWD button with the numbers 0 to 9 button to select the directory . Double-click the Cancel catalog select, LCD screen, "F" disappears -Recording quality adjustment: Press FOLDER button more than 3 seconds can choose the recording quality. Press REW or F. FWD key to select 44.1 KHz,128Kbps or 192Kbps Recording ■REC: Recording function key, need to use this key to record through the Line-in channel When USB and SD Card are both in the device - Press the REC button and LCD display flashing to indicate will be recorded to USB or SD. - Use USB/SD button to select the option to record to USB or SD card. - Press REC to start to record, the LCD will display “WAIT- -REC” then change to “STAND BY”. Now press “REC” again and LCD will flash to indicate the recording is functioning. Press STOP button to stop recording. When only single USB or SD Card in the device - Press REC to start to record, the LCD will display “WAIT- -REC” then change to “STAND BY”. Now press “REC” again and LCD will flash to indicate the recording is functioning. Press STOP button to stop recording. Sound recording through the REC function keys are saved in the directory folder REC -To Play REC track in folder: press FOLDER button, LCD display F. Use REV or F. WD button to select the directory REC, press PLAY/II to start playing. -The track number in the REC Folder will start from “ REC 001 “, and increase gradually. Therefore if want to check the recording file after finish record, the song will be recorded at the last track in the REC folder. COPY: Copy function key. It has to operate copy function in STOP status when use this key for USB Copy to SD or SD Copy to USB. Press STOP key, the device should be at stop mode Insert USB and SD Card, use USB/SD button to select the device you want to copy the source of any of the following options Copy single: Press REV , F. WD button or Numerals key to select tracks. Press COPY button to start copying Copy the multi-tracks or multi-directories: - Select the tracks and store the tracks in the Memory Program first(for PROG feature instruction, please refer to PROG) - Press COPY button to copy the tracks stored in the Program, if the copy to SD, LCD display will flash SD and indicates that it is recording to the SD card. Copy the whole directory: - Press FOLDER button, LCD display F, use REV button & F. WD to select the directory you want to copy - Press COPY key to start to copy the selected directory. If copy to SD, LCD display will flash SD and indicates that it is recording to the SD card. - The tracked recorded through COPY function are stored in the folder “CPY” - To play folder “CPY” of the tracks, press FOLDER button, LCD display F. Press REV keys F. WD button to select the directory CPY, press PLAY/II to start playing - The time required to copy according to the file size and track the numbers -13- ISO 9001 / ISO 14001 / OHSAS 18001 -Copy function is copying without folder. For example, if wants to copy each 5 tracks in 3 folders (total 15 tracks) and there will be storage to CPY001 ~ CPY015 at the CPY folder after copying. If copy a new song after it, it will be storage at CPY016. A↔ B: Section Repeat Play Press once to start playing the beginning of memory. Press again to stop at the end of memory area. The device repeats to play memory area. Press it again to stop playing. USB/SD Playing ■PLAY/II: Play and pause, press to play, play again to pause. ■STOP: Press to stop playing ■USB/SD: Select to use US or SD CARD ■REPEAT /PROG: Press to select Repeat or Program memory function Repeat function : Need to operate in the playing mode - Press once, LCD screen displays "REP", will repeatedly playback currently playing track. - Press twice, LCD screen displays "REP F", will repeat the entire directory is currently being played - Press 3rd times, LCD screen displays "REP ALL", will be repeated play all tracks. - Press 4th times, cancel repeat playback function. The words on LCD screen will be eliminated. Memory function: Need to operate in the stop-play mode, can be memories up to 99 songs - Single or multi-tracks memory: Press the STOP button to stop playback. Press PROG/REPEAT button, LCD screen displays PROGRAM. Select desired songs by using FOLDER button and number keys 0 to 9 and REV key or F. WD key. Press PROG/REPEAT button to store 1st song, LCD display shows “00 01” for the 1st song. Press << PROG/REPEAT >> again for storing 2nd song; LCD display shows “00 02”. Start over above process for storing more songs. Press PLAY/II memory to play the tracks stored in the Program. -Whole folder memory: Press the STOP function keys to stop playback Press PROG/REPEAT button, LCD screen display shows PROG, press the FOLDER button with the number of combination of keys or REV keys F. WD button to select the folder Press PROG to store selected folder. To store more folders, repeat above steps. Press PLAY/II button to start play memorized folders. To memorize multi-folders or multiple tracks, repeat above steps LCD will display shows FULL when stored 99 songs To cancel program feature, keep pressing PROG button until LCD display PROG disappeared ■REV I: Backwards. Press to backward to last track. Press for 3 seconds to fast reverse the track ■F. WD I: Fast forward. Press to forward to next track. Press for 3 seconds to fast forward the track -14- ■IR sensor: Infrared remote control eye. ■DEL: Delete single/folder/all of the files. Delete current playing track, can be operated under “Stop” mode or during “Playing” mode Press DEL button, LCD displays flash DEL FILE, reminding you to delete the file, and then press DEL to confirm the deletion, LCD display shows DEL END. Delete a folder: To delete the specified folder, press FOLDER button to select the folder you want to delete, click the DEL, LCD display flashes DEL FOLDER , reminding whether you want to delete the folder, and then press DEL again to confirm the deletion, LCD displays DEL END, the folder is removed Delete all the files: In the stop-play mode operation - Press the Stop button - Long DEL key to more than 5 seconds - LCD display shows "DEL ALL" to confirm whether you want to delete all the files - Then press DEL key again to delete all the files - To cancel delete function, just wait for LCD stops flashing and cancellation of delete function LCD Display: LINE: Line in audio source DEL: When using delete function : In playing mode II: Pausing REP: Repeatedly playing the single track REP ALL: Repeat all tracks REP F: Repeat specific folder RAN: Playback in random order PROG: When operate to program tracks. M: Mute function A→B: When repeat playing a specific section USB: When use USB function SD: When use SD card function COPY: When operate copy function REC: When operate recording function : The volume display, total 15 sections. 888(1st): Under the MP3 mode, it will appear the folder numbers. 888 (2nd): Display the current playing track. 88:88:88: Display the time for the current playing track or the recording. THE FUNCTIONS ON THE REMOTE CONTROLLER -15- ISO 9001 / ISO 14001 / OHSAS 18001 The remote controller shall be appointed to the receiving hole of face plate. The optimal receiving distance is 3 meters. ( the available distance is 3 meters. ) The batteries ( model CR2025 3V ) shall be put into the remote controller. ■Numeral 0 ~ 9 : Select the track from numerals. ■USB/SD: Switching for USB or SD mode. ■REC: Recording function button, use for LINE IN recording. When both USB and SD Card are both in the device - Press the REC button. LCD display flashing to indicate will be recorded to USB or SD. - Use USB/SD button to select the option to record to USB or SD card. - Press REC to start to record, the LCD will display “WAIT- -REC” then change to “STAND BY”. Now press “REC” again and LCD will flash to indicate the recording is functioning. Press STOP button to stop recording. When only single USB or SD Card in the device - Press REC to start to record, the LCD will display “WAIT- -REC” then change to “STAND BY”. Now press “REC” again and LCD will flash to indicate the recording is functioning. Press STOP button to stop recording. Sound recording through the REC function keys are saved in the directory folder REC - To Play REC track in folder: press FOLDER button, LCD display F. Use REV or F. WD button to select the directory REC, press PLAY/II to start playing. - The track number in the REC Folder will start from “ REC 001 “, and increase gradually. Therefore if want to check the recording file after finish record, the song will be recorded at the last track in the REC folder. COPY: Copy function key. It has to operate copy function in STOP status when use this key for USB Copy to SD or SD Copy to USB. Press STOP key, the device should be at stop mode Insert USB and SD Card, use USB/SD button to select the device you want to copy the source of any of the following options Copy single: Press REV , F. WD button or 0 ~9 Numerals key to select tracks. Press COPY button to start copying Copy the multi-tracks or multi-directories: - Select the tracks and store the tracks in the Memory Program first(for PROG feature instruction, please refer to PROG) - Press COPY button to copy the tracks stored in the Program, if the copy to SD, LCD display will flash SD and indicates that it is recording to the SD card. Copy the whole directory: - Press FOLDER button, LCD display F, use REV button & F. WD to select the directory you want to copy - Press COPY key to start to copy the selected directory. If copy to SD, LCD display will flash SD and indicates that it is recording to the SD card. - The tracked recorded through COPY function are stored in the folder “CPY” - To Play folder “CPY” of the tracks, press FOLDER button, LCD display F. Press REV keys and F. WD button to select the directory CPY, press PLAY/II to start playing - The time required to copy according to the file size and track the numbers - Copy function is copying without folder. For example, if wants to copy each 5 tracks in 3 folders (total 15 tracks) and there will be storage to CPY001 ~ CPY015 at the CPY folder after copying. -16- If copy a new song after it, it will be storage at CPY016. ■REP: Repeat function : Need to operate in the playing mode - Press once, LCD screen displays "REP", will repeatedly playback currently playing track. - Press twice, LCD screen displays "REP F", will repeat the entire directory is currently being played - Press 3rd times, LCD screen displays "REP ALL", will be repeated play all tracks. - Press 4th times, cancel repeat playback function. The words on LCD screen will be eliminated. ■PROG Memory function: Need to operate in the stop-play mode, can be memories up to 99 songs - Single or multi-tracks memory: Press the STOP button to stop playback. Press PROG/REPEAT button, LCD screen displays PROGRAM. Select desired songs by using FOLDER button and number keys 0 to 9 and REV key or F. WD key. Press PROG/REPEAT button to store 1st song, LCD display shows “00 01” for the 1st song. Press << PROG/REPEAT >> again for storing 2nd song; LCD display shows “00 02”. Start over above process for storing more songs. Press PLAY/II memory to play the tracks stored in the Program. - Whole folder memory: Press the STOP function keys to stop playback Press PROG/REPEAT button, LCD screen display shows PROG, press the FOLDER button with the number of combination of keys or REV keys F. WD button to select the folder Press PROG to store selected folder. To store more folders, repeat above steps. Press PLAY/II button to start play memorized folders. To memorize multi-folders or multiple tracks, repeat above steps LCD will display shows FULL when stored 99 songs To cancel program feature, keep pressing PROG button until LCD display PROG disappeared STOP: Press to stop playing I: Press to backward to previous track I: Press to forward to next track : Press to fast reverse the playback. Press again to cancel fast reversing : Press to fast forward the playback. Press again to cancel the fast forwarding DEL: Delete single/folder/all of the files. Delete current playing track, can be operated under “Stop” mode or during “Playing” mode Press DEL button, LCD displays flash DEL FILE, reminding you to delete the file, and then press DEL to confirm the deletion, LCD display shows DEL END. Delete a folder: To delete the specified folder, press FOLDER button to select the folder you want to delete, click the DEL, LCD display flashes DEL FOLDER , reminding whether you want to delete the folder, and then press DEL again to confirm the deletion, LCD displays DEL END, the folder is removed Delete all the files: In the stop-play mode operation - Press the Stop button - Long DEL key to more than 5 seconds - LCD display shows "DEL ALL" to confirm whether you want to delete all the files -17- ISO 9001 / ISO 14001 / OHSAS 18001 - Then press DEL key again to delete all the files - To cancel delete function, just wait for LCD stops flashing and cancellation of delete function ■RAN: Press to play the tracks in a random order. Press again to cancel. ■FOLDER: Folder selection key and adjust the recording quality - Select folder Press FOLDER button, LCD screen display F, then REW or F. FWD button with the numbers 0 to 9 button to select the directory . Double-click the Cancel catalog select, LCD screen, "F" disappears - Recording quality adjustment: Press FOLDER button more than 3 seconds can choose the recording quality. Press REW or F. FWD key to select 44.1 KHz, 128Kbps or 1 92Kbps ■PLAY/II: Play and pause, press to play, play again to pause ■MUTE: Press to mute, press again to back to normal playing -18- UHF handheld microphones (SQ-1016/SQ-1016V/SQ-5016/SQ-6100/SQ-7100) Parts and functions 1 2 3 4 5 6 7 SQ-1016/1016V (UHF 16-freq) 8 1 2 3 4 5 6 7 8 SQ-5016/6100/7100 (UHF LCD16/100/100-freq.) 10 11 9 Microphone parts and functions Cartridge Battery power LED Power switch Channel switch LCD Battery compartment Bottom cap Locking button Audio mute switch Setting button Up button Down button Charging port Volume control Battery used SQ-1016 1 2 3 4 SQ-1016V 1 2 3 4 5 6 5 6 7 7 8 SQ-5016 1 2 3 SQ-6100 1 2 3 SQ-7100 1 2 7 4 5 6 7 4 5 6 7 4 5 6 8 9 10 11 8 9 10 11 3 8 9 10 11 AA *2 Battery installation Insert or replace the batteries according to the correct polarity after opening the compartment. Many batteries are known to have leakage problem of conductive and corrosive liquid. So please remove the batteries if they are not to be used for a long period. Channel setting (SQ-1016/1016V) Please use the attached small screw driver to set the channel. Volume adjusting (SQ-1016V) Please slide the wheel to adjust the volume. Other settings (SQ-5016/6100/7100) -19- ISO 9001 / ISO 14001 / OHSAS 18001 1. Channel setting Use UP or DOWN button to go to the CHANNEL/ FREQUENCY page. The cursor will flash to allow changes to be made. Pressing UP or DOWN button will increase or decrease the channel number. The corresponding frequency will change accordingly. When a desired channel is selected, it will be automatically saved and stored in the memory. 2. Making changes to Battery selection Use UP or DOWN button to go to the Battery selection page. Press UP or DOWN button to move the cursor to either NiMH (rechargeable battery) or AKLN (Alkaline battery) position. When the desired battery has been selected, it will be automatically saved and stored in the memory. Remark: NiMH battery must be selected when rechargeable battery is being used. Never select AKLN (Alkaline) when microphone is intended for charging as Alkaline battery can not be charged ! Wrong selection of battery will result in battery sensing electronics to display wrong and misleading status information. 3. Making changes to Sensitivity Level Use UP or DOWN button to go to the SENS SET page. Press UP or DOWN button to increase or decrease the Sensitivity Level of the microphone. The MAX level is 4 and the MIN level is 1.When a desired sensitivity level has been selected for your application, it will be automatically saved and stored in the Memory. Remark: When selecting Sensitivity level, please bear in mind that Level 1 is for close proximity singing purposes whereas Level 4 is for use of microphone on tripod mount for speech purposes. When Level 4 setting is used for close proximity singing, high SPL input will result in undesirable distortion in the output. After performing setting changes, you could turn the protective cover 180° in either direction to block the buttons from being accidentally adjusted. -20- UHF handheld microphone (SQ-1100 IrDA) Parts and functions 12345 1. Cartridge 2. Battery power LED 3. Power switch 4. Synchronizing button 5. Battery compartment 6. Synchronizing LEDs 67 7. Charging port Cartridge replacement First rotate off the ball screen from the housing and take out the cartridge to be replaced. Then insert a new one, which comes in dynamic or condenser types. Battery installation The battery power LED lights green to imply enough power. If it turns red then the batteries are being dead and need replacement. Insert or replace the batteries (AA x2) according to the correct polarity after opening the compartment. Many batteries are known to have leakage problem of conductive and corrosive liquid. So please remove the batteries if they are not to be used for a long period. Channel synchronizing of the receiver and microphone Please refer to the "Channel synchronizing of the receiver and microphone" instruction of "SDR5100M IrDA receiver module" on page 4. -21- ISO 9001 / ISO 14001 / OHSAS 18001 UHF beltpack transmitters (SM-1016/SM-5016/SM-7100) Parts and functions 11 1 2 3 4 5 1 2 3 4 5 6 7 12 13 14 15 6 SM-1016 (UHF 16-Freq.) Transmitter parts and functions Antenna Battery weak/audio mute indicator Power switch Mini XLR connector Audio mute switch LCD Charging port Cover release button Charging contacts Lavalier microphone Setting button Up button Down button Channel switch Gain control (GT, high impedance) Gain control (MT, low impedance) Battery used 8 10 SM-5016/7100 9 (UHF LCD 16/100-Freq.) SM-1016 1 2 3 4 5 9 6 SM-5016/SM-7100 2 3 1 5 4 8 6 7 9 10 11 14 15 11 12 13 12 13 AA *2 Battery installation Insert or replace the batteries according to the correct polarity after opening the compartment. Many batteries are known to have leakage problem of conductive and corrosive liquid. So please remove the batteries if they are not to be used for a long period. -22- Channel and GAIN setting (SM-1016) Please use the attached small screw driver to set the channel. Gain control is an adjustable design that enables user to set different output levels. GT is for the use of instrument with high impedance, such as guitar while MT is for the use of low impedance such as lavalier or headset microphone. Other settings (SM-5016/7100) 1. Channel setting Use UP or DOWN button to go to the CHANNEL/ FREQUENCY page. The cursor will flash to allow changes to be made. Pressing UP or DOWN button will increase or decrease the channel number. The corresponding frequency will change accordingly. When a desired channel is selected, it will be automatically saved and stored in the memory. 2. Making changes to Battery selection Use UP or DOWN button to go to the Battery selection page. Press UP or DOWN button to move the cursor to either NiMH (rechargeable battery) or AKLN (Alkaline battery) position. When the desired battery has been selected, it will be automatically saved and stored in the memory. Remark: NiMH battery must be selected when rechargeable battery is being used. Never select AKLN (Alkaline) when microphone is intended for charging as Alkaline battery cannot be charged! Wrong selection of battery will result in battery sensing electronics to display wrong and misleading status information. -23- ISO 9001 / ISO 14001 / OHSAS 18001 UHF beltpack transmitter (SM-1100 IrDA) Parts and functions 1 7 4 6 8 9 5 32 1. 2. 3. 4. Antenna Battery weak indicator Power switch Mini XLR connector 5. IrDA sensor area 6. Cover release button 7. Charging contacts 8. Lavalier microphone 10 11 9. Synchronizing button 10.GT 11.MT Battery installation Insert or replace the batteries (AA x2) according to the correct polarity after opening the compartment. Many batteries are known to have leakage problem of conductive and corrosive liquid. So please remove the batteries if they are not to be used for a long period. Channel synchronizing of the receiver and transmitter Please refer to the "Channel synchronizing of the receiver and microphone" instruction of "SDR5100M IrDA receiver module" on page 4. GAIN setting (GT/MT) Gain control is an adjustable design that enables user to set different output levels. GT is for the use of instrument with high impedance, such as guitar while MT is for the use of low impedance such as lavalier or headset microphone. -24- Maintenance-free Lead Acid battery Guidelines for maintenance-free Batteries: 1. Battery should operate at temperatures between 15°C ~ 50°C. To ensure a longer life span, it should be kept between 5°C ~ 35°C. For optimum result, 20°C ~ 25°C will be ideal. When temperature falls 15 degrees below zero, battery will undergo some changes in its chemical contents and therefore cannot be recharged. Operating the battery at higher temperature will result in higher capacity but shorter lifespan, whereas lower temperatures operation has a longer lifespan but less capacity. 2. If the battery is not recharged 72 hrs after it is completely used, it will be permanently damaged. 3. When the battery is being charged, the internal gases will be electrolyzed into water at the negative charge, maintaining the battery’s storage abilities with no water added. However, erosion at the charged ends of the battery will cause poor performance. 4. The battery’s cycle lifespan (no. of charge and discharge cycle) is determined by the degree at which power is dissipated., especially the degree of discharged each time it is used and the recovery charging method. For normal use, the battery can be used for longer hours when less power is dissipated each time and vice versa. At 25°C, maintenance-free batteries could be charged 150 ~ 200 times at 100% discharge each time. 5. Decrease in capacity, internal short circuit, deformation in appearance, erosion of charged ends and decrease in open circuit voltage are symbols indicating battery is approaching the end of its life cycle. 6. When two batteries are used in parallel connection, the resistance of the cables should be kept equal. Properties of the Lead Acid Battery: 1. Has no memory effect. Can be charged at anytime, even when the recharge indication light is not on. 2. Performance and efficiency are affected by changes in the environment, especially temperature and humidity. (Best operated between 20°C ~ 25°C) 3. Battery discharge naturally according to a certain pattern even not in use. For best performance and a prolonged lifespan, it should be recharged every month even when not in use. 4. Under normal circumstances, battery could last for about a year. 5. When the battery’s life expires, possible indicators include internal short-circuit, decrease in capacity, deformation in appearance, erosion of charged ends and decrease in operating voltage. User’s Precautions: 1. For first-time use, charge the battery for 10 hrs until it is fully charged. 2. To maintain performance and lifespan, if product has not been used for 3 months after the initial shipment, please fully charge the battery. 3. Before each use, it’s advisable to charge the battery to its full capacity. 4. The average lifespan of the battery is one year. The user is advised to change the battery after one year of use. 5. The current consumption is in direct ratio with load current. The more current consumption, the less the operation time. -25- ISO 9001 / ISO 14001 / OHSAS 18001 -26- CHIAYO ELECTRONICS CO.,LTD. Http://www.chiayo.com.tw Email: [email protected] Office: 30, Lane 27, Section 4, Jen-Ai Road, Taipei 10685, Taiwan / Tel: 886-2-27415741 / Fax: 886-2-27525242 Factory: 88, Chung-Hsiao Street 2, Chiayi 60080, Taiwan / Tel: 886-5-2711000 / Fax: 886-5-5767611 12I1288