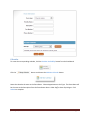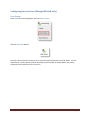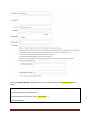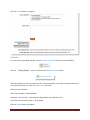
1
Consult Accelerator 4.5: Intended for the End User January 29, 2013 Page 1 Contents Introduction .................................................................................................................................................. 4 Consult Accelerator – Application Workflow................................................................................................ 4 Referrer – Account Creation ..................................................................................................................... 4 Referrer – Add a Case ............................................................................................................................... 4 Specialist – Provider Notes ....................................................................................................................... 4 Specialist/Referrer – Followup Notes ....................................................................................................... 5 Log In ............................................................................................................................................................. 6 Search for an Account ................................................................................................................................... 7 Advanced Search ....................................................................................................................................... 8 Search Results ........................................................................................................................................... 9 Referrer – Account Creation ....................................................................................................................... 10 Referrer – Add a New Case ......................................................................................................................... 12 Assign a Case ........................................................................................................................................... 15 Submitting a Case by Fax ............................................................................................................................ 16 Submitting a Quick Consult Case ................................................................................................................ 17 Specialist – Provider Notes ......................................................................................................................... 19 Specialist/Referrer – Followup Notes ......................................................................................................... 23 Unsaved Form Entries ................................................................................................................................. 25 Reviewing the Audit History ....................................................................................................................... 25 Starting a Collaboration .............................................................................................................................. 26 Selecting Attendees from List ............................................................................................................. 26 Searching for Attendees by Name ...................................................................................................... 26 Entering Email Addresses and/or SMS Numbers ................................................................................ 26 Provider Call Calendar......................................................................................................................... 27 Starting a Video Session .......................................................................................................................... 27 Starting a Phone Call ............................................................................................................................... 30 Sending a Message.................................................................................................................................. 34 View Anonymized Cases ............................................................................................................................. 35 Provider Availability Scheduler ................................................................................................................... 36 Create a new On Call Availability ............................................................................................................ 38 Call Priority .......................................................................................................................................... 43 January 29, 2013 Page 2 Call and Auto-close Cases ................................................................................................................... 44 Contact Preferences............................................................................................................................ 45 Site Administrator – Manage Calendars ................................................................................................. 47 Site Administrator – One Pass Communities .............................................................................................. 49 Site Administrator – Editing your Contact Information .............................................................................. 49 Site Administrator – User Provisioning ....................................................................................................... 49 User Groups ............................................................................................................................................ 52 Referrers ............................................................................................................................................. 53 Specialists ............................................................................................................................................ 53 Front Desk ........................................................................................................................................... 53 Site Administrators ............................................................................................................................. 53 Site Administrator – Reports....................................................................................................................... 54 Configuring Endpoints (Emerge.MD staff only) .......................................................................................... 56 Exam Rooms............................................................................................................................................ 56 Calendar .................................................................................................................................................. 57 Configuring Service Lines (Emerge.MD staff only) ...................................................................................... 58 User Group .............................................................................................................................................. 58 Calendar .................................................................................................................................................. 60 Messaging ................................................................................................................................................... 63 Logging Out ................................................................................................................................................. 64 January 29, 2013 Page 3 Introduction This user manual will provide you with basic information on how to use the Consult Accelerator application. It discusses the intended workflow, how to log in to the application, enter data, make changes to data, and search for completed cases. Questions about specific issues not covered in this manual can be directed to Emerge MD at [email protected]. Consult Accelerator – Application Workflow The following is an outline of the workflow for the Consult Accelerator application: Referrer – Account Creation 1. Open your internet browser and go to the Consult Accelerator website provided by your administrator. 2. Log into the application. 3. Click on the Create Patient button at the top of the dashboard. 4. Fill in the patient’s Quick Registration demographic information and click Save & Exit. Required questions are marked by an asterisk and highlighted in yellow. 5. If desired, you may click on the Continue to Patient Contact Information button to fill in contact information for the patient. When this page is completed click on the Save Demographics button to save the information. 6. When demographics are complete you will be taken to the Patient View. From here you can create a new case or edit the demographic information. Referrer – Add a Case 7. To add a new case click on the Add Case button. 8. Select the Service Line you want to refer to and then click on the Save and Continue button. 9. Answer the questions specific to the service line you chose, including uploading any attachments, and then click the Save and Continue button, this will submit your case. 10. From the case summary page you can click on the Edit Case button if you need to go back and make any changes. 11. From the summary page you can also assign the case to yourself or someone else using the Assign and Assign to Me buttons. 12. If you start the referral case but don’t finish it, the patient will show up in the Cases Started queue so you can return easily to the case. 13. Once you submit the case the patient will show up in the Cases Waiting queue and a notification will be sent to the appropriate specialist that a case has been submitted. However, if you assigned the case to someone it will appear in the Assigned Cases queue instead. Specialist – Provider Notes 14. When a case has been submitted to you the case will appear in the Cases Waiting queue. Click on the case you wish to review and then click the Add Provider Notes button to review and comment on the case. January 29, 2013 Page 4 15. A summary of the case appears at the top of the page for you to review. If you need to consult with the referring doctor you can do so from this page using the Collaboration button provided. The collaboration can be audio only or audio/video. When you are done on this page click on the Continue to the Review and Signature Page button to continue. 16. If you change your mind about filling out the provider notes at this time, you can click on the Return to summary button. This will discard any information you have filled out on this page. 17. The Review and Signature page contains all of the case information including the notes you made on the case. If you need to alter your notes or recommendation you can click on the Update Provider Documentation link to go back and make edits. 18. Once you have checked the box to sign click on the Sign and Complete button to submit. 19. After submitting, a final summary of the case will appear that you can download as a CCD or PDF using the Download CCD or PDF buttons. 20. If you begin the provider notes but do not finish, the case will appear in the Assigned Cases queue. 21. When you sign off on the provider notes the case will then appear in the Cases Completed queue. Specialist/Referrer – Followup Notes 22. Once a provider has signed a case and it is closed you can still add notes to the case using the followup notes form. Click on the Add Followup Notes button to append notes to a case. 23. Add your notes, check the box to sign, and then click on the Complete button at the bottom of the page to save the information. January 29, 2013 Page 5 Log In Open the application and log in by entering your Username and Password and clicking on the Login button. If you have forgotten your login info click on the Retrieve It link. This will take you to the Look Up Your Login Information page where you can enter your email address to be sent information on accessing your account. Clicking on the link in the email sent to you will take you to the Change Password page. From here enter and confirm your new password and click Submit. You will be taken into your account and will use this new password to log into your account going forward. January 29, 2013 Page 6 Search for an Account You can search for an account by entering the patient’s Medical Record Number, ID, First Name, Last Name, Date of Birth, or Sex into the textboxes in the Patient Search section of the Dashboard page. You may also just select the Search button without entering any information to return all patients. January 29, 2013 Page 7 Advanced Search Clicking on the Advanced button in the Patient Search section of the Dashboard page will display drop down menus containing filter settings for each search field. You can change these settings to broaden or refine a search field. You can refine your search by using the drop down menus to change the search filters. If you select the filter “Contains” for the Last Name field and then enter “ier” into the corresponding field box, all last names containing “ier” will be displayed on the search results page. To return to the simple search click the Simple button. To clear all information entered into the textboxes click on the Reset button. January 29, 2013 Page 8 Search Results If you have entered enough information for the database to identify the patient account then you will be taken directly to the Patient View for that patient. If the database holds patients who have similar values for the same fields then the application will navigate to a Search Results page to display the patient accounts that match the search. Below is an example of the Search Results page. In the Details column, on the far left next to each account, you will see an edit button. By clicking the edit button, the application will take you to the Patient View for that patient. You can do an advanced search by clicking on the Refine Search button and to return to the Dashboard page click on the Back to Home button. Below is one example of a Patient View. January 29, 2013 Page 9 Referrer – Account Creation From the Dashboard, click on the Create Patient button at the top of the page. You will be taken to the Quick Registration section of the Demographics form. Here you will fill in a series of fields that identify the patient. When you are finished entering data you can either click the Continue to Patient Contact Information button at the bottom of the first page to continue to the Contact Information section or you can click Save & Exit to exit the Demographics form. When you are done filling in the second page, click the Save Demographics button at the bottom of the page to save the data. All questions marked with an asterisk are required and must be answered in order to complete the form. January 29, 2013 Page 10 When demographics are complete you will be taken to the Patient View. From here you can create a new case or edit the demographic information. January 29, 2013 Page 11 Referrer – Add a New Case To add a new case click on the Add Case button. Select the Service Line you want to refer to and, if it applies, the Requesting Location. If the call back number for the requesting location has been set up by an administrator it will fill in automatically when the location is selected. You can always manually add or edit the Call Back Number. Finally, if this is a high priority case, check the High Priority box. Checking high priority for a case will mark it with a star and cause it to stay at the top of the queues. When you are done filling out the information click on the Save and Continue button. The following page will contain questions specific to the service line you have chosen. Below is an example of a Quick Consult form. January 29, 2013 Page 12 You can also upload relevant documents to this page using the file upload function. Click on the Select button under attachments to browse to and attach files. Select the file you wish to attach and click Open to attach it. The attached file shows up under Attachments. If you are using Firefox, Chrome, or IE 10 or better you can also drag and drop files to attach them. Simply drag the file you want to attach to the area under the Attachments header. You will see a box appear that says Drop files here. Drop your file and it will show up under Attachments. January 29, 2013 Page 13 You can click the Remove button if you decide you do not wish to attach this file. You can click the Edit button to give the file a better name and you can also add a description of the file in the Description box. To edit the file click on the Edit button, change the name, and then click Save. After completing the form if you wish to download, view, or delete any attachments you would click on the Edit button next to the Case link. You can view the attachment from the case summary page by clicking on the link. January 29, 2013 Page 14 If you want to edit or delete the attachment click on the Edit Case button. You may have to click the Save and Continue button until you get to the page containing the attachment. From there click on the edit button next to the attachment to edit the file name or description or the trash can to delete the attachment. Note that once a case is signed by a provider it is locked and will not allow you to delete or edit attachments. When you are done working with attachments and filling in the form click the Save and Continue button to save any changes. You will be taken to the case summary page. From here you can click the Edit Case button if you need to go back and make any changes. You can also add notes to the case using the Add Followup Notes button. Assign a Case From the case summary page you can assign a case to yourself or someone else using the Assign to Me or the Assign buttons. Clicking the Assign button will bring up the Assign window. Choose someone from the User list or by Call Calendar and then click on Assign. To assign a case to yourself click on the Assign to Me button. Once you have assigned the case to someone the information will show up on the case summary page. January 29, 2013 Page 15 The name of the assignee will also show up in the queues. If you start the case but don’t finish it, the patient will show up in the Cases Started queue so you can return easily to the case. Once you submit the case the patient will show up in the Cases Waiting queue and a notification will be sent to the appropriate specialist that a case has been submitted. If you assigned the case to someone the case will show up in the Assigned Cases queue. Submitting a Case by Fax Each specialty service line can now optionally provide their referrers with a dedicated fax number used to submit cases. Faxes sent to this number will become cases in Consult. The application will attach the faxed documents as a PDF to the case. The provider on call for the service line will receive a notification that a new case has been submitted. The case can be reviewed, added to, and assigned like any other case. January 29, 2013 Page 16 Submitting a Quick Consult Case If you don’t have the time to create a patient account before starting a case you can start a Quick Consult Case. Click on the Quick Consult button at the top of the dashboard page to start the case. You will be taken to the select a service line page just like when you add a case to a patient’s account. The case will be submitted with no patient details. It will have only a unique ID number. It will appear in the queues as Quick Case followed by the ID number of the case. You can add patient information to the Quick Case later by clicking on the details link at the top of the case summary. Clicking details will take you to the demographics summary page. Click on the Edit Demographics button to add patient information. January 29, 2013 Page 17 Once you have edited the patient information the case will show under the patient’s name as normal. January 29, 2013 Page 18 Specialist – Provider Notes When a case has been submitted to you the case will appear in the Cases Waiting queue. Click on the case you wish to review and then click the Add Provider Notes button to review and comment on the case. You can also assign the case to someone else or yourself if it hasn’t already been assigned to you using the Assign and Assign to Me buttons. On the provider notes page a summary of the case appears at the top for you to review. If you need to consult with the referring doctor or with anyone else about this case you can do so from this page by clicking on the appropriate button. If you want to return to the previous page you can click on the Return to summary button. When you have reviewed the case, fill in the necessary information and click the Continue to the Review and Signature Page button to continue. January 29, 2013 Page 19 The Review and Signature page contains all of the case information including the notes you made on the case. If you need to alter your notes or recommendation you can click on the Update Provider Documentation link to go back and make edits. Once you have checked the box to sign, click on the Sign and Complete button to submit. After submitting, a final summary of the case will appear that you can download as a CCD or PDF using the Download CCD or Download PDF buttons. January 29, 2013 Page 20 For a quicker turn around, if you have nothing to provide on the provider notes form you can sign and complete the case using the Verify and Complete button located on the case summary page. You will be asked to verify your intent to sign off on the case and mark it as completed. Click OK to continue. Once you’ve signed off on the case you will not be able to edit the provider notes form. You can, however, still add notes to the case using the Add Followup Notes button. January 29, 2013 Page 21 If you begin the provider documentation but do not finish the case will appear in the Assigned Cases queue. When you sign off on the case the case will then appear in the Cases Completed queue. January 29, 2013 Page 22 Specialist/Referrer – Followup Notes Once a doctor has signed a case and it is closed you can still add notes to the case using the followup notes form. Click on the Add Followup Notes button from the case summary page to append notes to a case. Add your notes and check the box to sign off on them and then click on the Complete button at the bottom of the page to save the information. Once saved you can view the followup notes on the case summary page. You can also add more notes from here using the Add Followup Notes button. January 29, 2013 Page 23 January 29, 2013 Page 24 Unsaved Form Entries When entering documentation into any form within the application the information is saved automatically as you type. If you lose connectivity or your browser crashes before you Save and Continue, when you return to the page you will be prompted to reload your unsaved entries. However, this does not apply to any identifying patient health information. To ensure HIPAA compliance patient identifying data is not stored locally in browser memory. Reviewing the Audit History You can see a full history of edits made to a patient’s account from the case summary page. In the top right corner of each summary box is the information for the last edit made. Click on the text to see a full history. January 29, 2013 Page 25 Starting a Collaboration The first step to starting a collaboration is to invite attendees. There are four ways to invite attendees. Selecting Attendees from List Click on the small blue triangle to view the drop down list showing all available attendees. These are attendees that are registered in your Consult Accelerator site. Scroll through the list to select the desired attendee(s). The names appear alphabetically by first name. Searching for Attendees by Name Begin by typing an attendee’s name. In this example, the first three letters of Gail were typed – “Gai”. Matches to the typed letters will appear in a drop down list below the line. You may continue typing to reduce your matches or scroll through the list to find the attendee. Stopping at three letters returned two potential matches. Entering Email Addresses and/or SMS Numbers You can enter an email address or SMS number directly onto the line. This is used for inviting attendees who are not registered in your Consult Accelerator site. January 29, 2013 Page 26 Provider Call Calendar You can select from the available providers who are currently on call by selecting a Call Calendar from the drop down list. The Behavioral Health calendar is selected for this example. A list of available providers who are on call for the selected calendar will appear below the Call Calendar drop down. Select the provider by checking the check box next to their name. When you click the check box, the provider’s name will appear in the Invite Attendees box. If you wish to remove an attendee from the list click the yellow x next to an attendee’s name, email address or phone number. You can enter information for the attendees in the Message box. Once you have created your list of attendees you can send a message, start a phone call, or start a collaboration session. Starting a Video Session There are three places in the application where you can start an audio/video session. The meeting module on the main dashboard page, from inside the physician documentation form, and from the Case Summary page. To begin an audio/video session from the meeting module you would invite attendees using one of the methods explained above and click on the Video + Share button. The meeting will begin and notifications will be sent to the attendees. The meeting module will also switch to displaying the status of the consultation. You can see the status of the invited attendees. The status is Pending if the attendee has not responded at all, it will switch to Snoozed if the attendee chose to put the session on hold and join later, Joined if they chose to join the session and Declined if they were not available to join the session. January 29, 2013 Page 27 You can also invite more attendees by selecting people in the same manner as the initial invite and then clicking on the Add Attendees button. Finally, you can reconnect to your session if necessary using the Reconnect Now button and end your session using the End Consultation button. You can also reconnect and end your session from the green bar at the bottom of the application or click the End Meeting button in the bottom right-hand side of the meeting window. To begin an audio/video session from the case summary page or from inside the physician documentation form click the Collaborate or Start Collaboration button. January 29, 2013 Page 28 The Invite Attendees window will pop up and you invite attendees in the same manner as you would from the meeting module on the dashboard page. When you’ve selected attendees click the Video + Share button to start the session. If the logged in user does not have a license to begin video consults the Video + Share button will be grayed out and unusable. They will still be able to send messages and start voice calls. To view a log of all your consultations click on the My Collaborations tab of the meeting module. Then click on the View Previous Consults button to view your consultations. You can see consults you initiated as well as consults others invited you to. The initiator is listed under Host and the other attendees under Invitees. Click the down arrows next to Invitees to see the list of attendees for each session. January 29, 2013 Page 29 Starting a Phone Call There are three places in the application where you can start a phone call. The meeting module on the main dashboard page, from inside the physician documentation form, and from the Case Summary page. To begin a phone call from the meeting module you would invite attendees using one of the methods explained above and click on the Call button. A pop up window will appear asking for a phone number to call you at. You can select from the list of numbers you have associated with your account or you can enter a new number. Once you have entered your number click on the Start Call button to start the call. The system will call you and when you have answered, it will call the invited attendees. The attendees will also receive a text message containing a link they can use to reconnect to the call if necessary. Once the call has started the meeting module will switch to displaying the status of the call. You can see the status of each of the invited attendees. The status will say Pending until the attendee joins the call. Once they have joined the status will switch to Joined. January 29, 2013 Page 30 You can add others to the call by selecting them in the same manner as the initial invite. Once you have selected the additional attendees click on the Add Attendees button to invite them. You can turn your phone call into a video session by clicking on the Add Video + Share button. This will start a meeting session on your computer and send out an invite to the attendees on the call. When an attendee clicks to join the session they will be given the option of being called or skipping to the session. Clicking Skip and join collaboration session now will join them to the meeting. January 29, 2013 Page 31 Finally, you can reconnect to your session if necessary using the Reconnect Now button and end your session using the End Consultation button. When you end the meeting it will end the phone call as well. You can also reconnect and end your session from the green bar at the bottom of the application. To begin a phone call from inside the physician documentation form or from the case summary page click the Start Collaboration button. The Invite Attendees window will pop up and you invite attendees in the same manner as you would from the meeting module on the dashboard page. When you’ve selected attendees click the Call button to start the call. To view a log of all your calls click on the My Collaborations tab of the meeting module. Then click on the View Previous Consults button to view your calls. You can see calls you initiated as well as calls others invited you to. The initiator is listed under Host and the other attendees under Invitees. Click the down arrows next to Invitees to see the list of attendees for each call. January 29, 2013 Page 32 January 29, 2013 Page 33 Sending a Message Another means of communication within the application is the send message functionality. To send a message from the meeting module you would select recipients using one of the methods explained above for inviting attendees to a call or collaboration and then click on the Send button. If you wish to remove a recipient from the list click the yellow x next to the recipient’s name, email address or phone number. Once you have selected your recipient(s) type your message in the Message box and click on the Send button. You will receive verification that the message was sent successfully. Please note the recipient will not be able to reply directly to this message. January 29, 2013 Page 34 View Anonymized Cases To view cases anonymously click on the Anonymized Cases button at the top of the page. This will display the queues on the dashboard page by the patient’s User ID rather than by the patient’s name. When you click on a patient in the queue you will be taken to a summary of the patient’s case that is also anonymized. To return to the anonymized dashboard click on the January 29, 2013 button. Page 35 Provider Availability Scheduler The Provider Availability Scheduler is a management tool for Providers of Service Lines to maintain their On Call times. A Provider who is scheduled On Call will receive email/SMS/pager alerts for various events, such as the submission of a referral case. Begin by clicking the Provider Availability button from the top of the page. You will be brought to the Provider Availability page. The small calendar in the upper-left corner will allow you to quickly and easily navigate through the days, weeks and months to get to your desired date. The Calendars list will show you all of the calendars that are available for you to view. You can control which ones you would like to view by checking the corresponding check boxes. These add layers to your calendar. Having all boxes checked will show all Providers and all Service Lines on your main calendar. January 29, 2013 Page 36 The Time Zone drop-down will give you a list of all available time zones for North America. The name of the time zone and the UTC offset is listed in the drop-down. The current date and time of that zone is displayed on the right. The Day/Week/Month views are toggled by clicking on them. The Week view is displayed by default. Week View: Day View: Month View: January 29, 2013 Page 37 Create a new On Call Availability Locate the date and time that you wish to add availability. In the example below, the date Fri, 24 at 16:00 was selected. After right-clicking, choose Add Availability from the menu. From the Availability Editor, you should first select the name of the individual you want to schedule an availability for. You can select from the drop list or start typing a name to use the auto-complete function. When typing in a name start with the user’s last name. If you don’t see the name of the person you wish to schedule you may need to change the calendar first to the appropriate service line. January 29, 2013 Page 38 The name drop down filters based on membership in the service line group associated with each calendar. Next you can select a calendar and then edit the Start and End Times. The Calendar was changed to Intensive/Critical Care and the End time was changed to 6:00 PM. Click the Save button when you are finished. January 29, 2013 Page 39 After the availability is saved, you are taken back to the Availability Calendar. You can now see the availability on this calendar. You can easily move the availability by clicking and dragging the availability to another time slot. Below, the availability was dragged from the 16:00 time slot to the 14:00 time slot. Availabilities can quickly be edited by clicking the bar on the bottom and dragging down to extend or up to reduce the length of the availability. January 29, 2013 Page 40 The availability was extended by an hour. Reduce availabilities in the same manner. This availability was reduced to an hour. To edit a scheduled availability, right-click the availability and select Edit. January 29, 2013 Page 41 This will open the availability selector. You can also add availability by clicking on the Add Availability button in the top left corner or by double clicking a section of the main calendar. Finally, you can add an availability by clicking and dragging to select a block of time and then right clicking the selected block and selecting Add Availability. January 29, 2013 Page 42 Call Priority When you put someone on the call calendar you can set their Call Priority from the dropdown menu. When notifications are sent to the provider on call they will use this call priority. The notification will be sent first to Call 1 and if not answered in a set amount of time will then send to Call 2 and so on. When there are no more providers on call the notification would then be sent to the group owner or owners for the given service line. The amount of time before the notification escalates to the next person on call can be set in the Service Line Group. Thus the time to escalation is specific to a service line. January 29, 2013 Page 43 To set the escalation time click on Provisioning and then User Groups and then click the Edit button next to the Service Line Group you wish to set. Set the time in minutes in the box Minutes Before Escalation. Call and Auto-close Cases Schedulers can mark providers on a call calendar with the option to ‘auto-call and close case’. This will prompt the referrer of a case to start a phone call with this user rather than wait for the provider to log in and reach out to them. This is particularly useful for use cases where a 3rd party call center can handle any escalations when a provider is unable to respond within a certain time. January 29, 2013 Page 44 The case overview page also shows who has been notified of the waiting case, and will count down the number of minutes until the case is escalated to the next provider on call. Contact Preferences You have the ability to choose how you want to be contacted when on call. Contact preferences are set in your OnePass profile. However, you can alter your contact preferences when adding availability to the calendar. If you wish to change your default preferences, uncheck the Use default on call preferences box. This will provide you with a dropdown list for phone and notification contact preferences. Choose your preference for this on call period and click Save. January 29, 2013 Page 45 January 29, 2013 Page 46 Site Administrator – Manage Calendars Service Lines or Specialties, such as Nephrology or Behavioral Health have corresponding On Call Calendars. When new service lines are created new calendars must be created to go with them. Please note that creation of a service line must be completed by Emerge.MD before you can take any of the following steps. To create a new service line calendar, click the Provider Availability button from the Dashboard. Click the Manage Calendars button and choose the Add New Calendar button. Name the calendar with the same name as the service line. Select a Color for the new service line. Give the calendar a description if you wish. Choose Availability as the Type and choose the Service Line from the list. Check the Show Priority check box. If you are setting up an Appointment calendar the Service Line dropdown will change to an Exam Room dropdown. January 29, 2013 Page 47 Next you need to define user permissions for the calendar. Under Access Controls select the groups that will be associated with the calendar from the drop down list and click the Add Group button for each one. After each group is added check the appropriate permissions for each group. The following permissions should be selected for each group: Specialists – [Service Line] – View Schedules, Read Details and Schedule for Self Site Administrators – All privileges Staff – View Schedules and Read Details Click the Submit button to complete. January 29, 2013 Page 48 Site Administrator – One Pass Communities Site administrators can access their OnePass communities from within the application. Click on the My OnePass Community button to be taken to your communities page in OnePass. Site Administrator – Editing your Contact Information Site administrators can edit their contact information from within the application. Click on the My Contact Information button to be taken to OnePass to edit your information. Site Administrator – User Provisioning As the Site Administrator in Consult Accelerator, you can create new users and edit existing users. Click on the Manage Community button to be taken to the Manage Community page in OnePass. First select the community you want to work with from the Select Community to Manage dropdown. To create a new user and add them to a community enter their information and click on Create New User and Add to Community button. This will take you to the demographics page where you can finish filling in the user information. You can also create a password for the user or reset an existing user’s password from here by clicking on the Reset Password button. January 29, 2013 Page 49 Enter in a password for the user and click Change Password. You will receive confirmation of the password reset. When you are done filling in the user’s information click the Complete button at the bottom of the page to save the user and return to the Manage Community page. January 29, 2013 Page 50 You can search for a user to edit by entering their First Name, Last Name, Email, and/or Username into the search boxes and clicking Search. You can quickly clear the search boxes by clicking the Clear Search button. You can add or remove users from the selected community by clicking on the Add or Remove button under Actions. Clicking the Edit button next to a user’s name will take you to the demographics form where you can update their information or password. To edit a user’s groups click on the list of groups or the Add To Groups link in the Group column. This will bring up a list of groups. Check the box next to group to add the user to the group and uncheck the box to remove them. When you are finished click the Save button. January 29, 2013 Page 51 User Groups Outlined below is a summary of some of the possible User Groups. Staff – By default, all users who are not patients are part of the Staff User Group. This user group allows view access of the calendars and will place these users in the list of those available for Telehealth visits and for the Send Message functionality. Referrers – This group gives access to create patient accounts, fill out medical history, submit referral cases, view provider documentation and add addendums. They can view all of the available queues. Specialists – This group gives access to view patient accounts, fill out medical history, view referral cases, create provider documentation, and add addendums. They can view all of the available queues. Front Desk – This group gives access to create patient accounts, fill out medical history, create referral cases, view provider documentation, and view addendums. They can view all of the queues. This group is primarily used for Patient Registration, Patient Scheduling and beginning a new Telehealth Visit to room a Patient. Site Administrators – This group has the most privileges of all the groups. Among some of their unique abilities they can; edit/create calendars, manage the editable content blocks, view reports, edit/create copay information, manage group access and manage ePrescribe. They can also create patient accounts, fill out medical history, create referral cases, create provider documentation, and create addendums. January 29, 2013 Page 52 Service Line Groups – These are Specialty or Service Line groups to which the Specialists can belong. These groups allow the Providers to manage their On Call time in the corresponding Availability Calendars. (i.e. Nephrology, Behavioral Health, Stroke Care) Referrers User Groups: Staff and Referrers. Specialists User Groups: Staff, Specialists, and Service Line Groups Front Desk User Groups: Staff and Front Desk Site Administrators User Groups: Staff and Site Administrators January 29, 2013 Page 53 Site Administrator – Reports To view reports click on the Reports button at the top of the Dashboard page. Choose the report you want to see from the Select Report drop down. Below is an example of the Site Statistics report. January 29, 2013 Page 54 Some reports have parameters that can be edited to alter the view of the report. For example, Site Statistics has a Staff User parameter that can be set so the report shows everyone’s statistics or a particular user’s statistics. When you select new parameters you must click the View Report button to refresh the report with the new settings. Sometimes a report will require you to enter parameters before you can run it, but most reports run automatically using a default set of parameters. You can export a report in different formats by selecting the format from the Select a format drop down and clicking the Export button. January 29, 2013 Page 55 Configuring Endpoints (Emerge.MD staff only) Exam Rooms Hover over the Provisioning button and select Exam Rooms. Click the Add New Room button. Choose the appropriate Room Type followed by a concise Friendly Name and Description. These will be used to link the Exam Room to the proper Calendar in the next step. Click Submit when complete. Allow Staff access to the room. January 29, 2013 Page 56 Calendar To create the corresponding calendar, click the Provider Availability button from the Dashboard. Click the button and choose the Add New Calendar button. Name the calendar the same as the Exam Room. Choose Appointment as the Type. The Exam Room will be the same as the Description from the Exam Room above. Allow Staff to have all privileges. Click Submit to complete. January 29, 2013 Page 57 Configuring Service Lines (Emerge.MD staff only) User Group Hover over the Provisioning button and select User Groups. Click the Add Group Button. Enter the correct name for the Service Line. Check the Public and Service Line check boxes. You can optionally set a copay amount, provider template, and the number of minutes before call priority escalation that are specific to this service line. January 29, 2013 Page 58 Enter the Custom Attributes HTML like below. Enter your Group Name where Group Name appears below: <CustomAttributes> <CustomAttribute id="ParentGroupID" /> <CustomAttribute id="Specialty" value="Group Name" /> </CustomAttributes> January 29, 2013 Page 59 Click the Submit button to complete. Calendar To create the corresponding calendar, click the Provider Availability button from the Dashboard. Click the button and choose the Add New Calendar button. Name the calendar the same as the Service Line. Choose Availability as the Type and choose the Service Line as defined previously. Check the Show Priority check box. Define the ACL as follows: Staff – View Schedules and Read Details Specialists – [Service Line] – View Schedules, Read Details and Schedule for Self Front Desk and Site Administrators – All privileges Click the Submit button to complete. January 29, 2013 Page 60 January 29, 2013 Page 61 Now the Exam Room will show in the drop down list on page 1 of the Intake and it will be able to be scheduled for patient appointments. January 29, 2013 Page 62 Messaging The messaging for the Consult Accelerator application consists of notifications that are sent via SMS, pager, or emails to specific employees. There are four notifications currently set up on this application, aside from the ones involved with telehealth sessions. 1. Referral Case Submitted – when a referring doctor submits a new case the on call specialists associated with the selected service line are notified of the submission. a. This message will be sent immediately upon completion of a case. This message is sent only once. 2. Physician Notes Completed – when a specialist completes their notes on a referral case the referring physician is notified. a. This message will be sent immediately upon completion of the physician notes form. This message is sent only once. 3. Moderator Alert Message – if you have users that belong to the moderators user group they will receive a message when a case is submitted. a. This message will be sent immediately upon completion of a case. This message is sent only once. 4. Case Assigned Message – when a case is assigned to someone that person will receive a message telling them a case has been assigned to them. This message will be sent immediately upon assignment of a case. This message is sent only once. January 29, 2013 Page 63 Logging Out To log out of the application, click on the Sign Out button located in the top right corner of every page underneath your username. January 29, 2013 Page 64