1
ezScriptWriter User Manual
© 2011 Iccomplish, Inc
ezScriptWriter
Prescription Writing Software
by Iccomplish, Inc
ezScriptWriter User Manual
© 2011 Iccomplish, Inc
All rights reserved. No parts of this work may be reproduced in any form or by any means - graphic, electronic, or
mechanical, including photocopying, recording, taping, or information storage and retrieval systems - without the
written permission of the publisher.
Products that are referred to in this document may be either trademarks and/or registered trademarks of the
respective owners. The publisher and the author make no claim to these trademarks.
While every precaution has been taken in the preparation of this document, the publisher and the author assume no
responsibility for errors or omissions, or for damages resulting from the use of information contained in this
document or from the use of programs and source code that may accompany it. In no event shall the publisher and
the author be liable for any loss of profit or any other commercial damage caused or alleged to have been caused
directly or indirectly by this document.
Printed: March 2011
4
ezScriptWriter User Manual
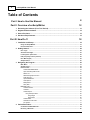
Table of Contents
Part I How to Use this Manual
Part II Overview of ezScriptWriter
8
12
1 Evaluating
...................................................................................................................................
the Software (Free Trial Period)
13
2 Register/Activate
...................................................................................................................................
software
14
3 How to
...................................................................................................................................
Purchase
15
4 Hardware
...................................................................................................................................
Requirements
15
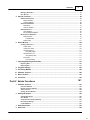
Part III How Do I?
18
1 Installation
...................................................................................................................................
and Setup
18
Using the Setup
..........................................................................................................................................................
Wizard
19
Passw ord Selection
.......................................................................................................................................................... 24
2 Getting
...................................................................................................................................
Started
24
User Login .......................................................................................................................................................... 25
Adm inistrator..........................................................................................................................................................
Login
25
Lost/forgotten
..........................................................................................................................................................
passw ords
26
FAQ (frequently
..........................................................................................................................................................
asked questions)
29
User Manual (pdf)
.......................................................................................................................................................... 29
Sam ple Patient
.......................................................................................................................................................... 30
3 Navigating
...................................................................................................................................
the Program
30
Main Menu .......................................................................................................................................................... 31
QuickFind Tool
.......................................................................................................................................................... 32
Patient Charts.......................................................................................................................................................... 34
Create a New
.........................................................................................................................................................
Patient Chart
34
Open an Existing
.........................................................................................................................................................
Patient Chart
35
Patient List......................................................................................................................................................... 36
Patient Demographics
.........................................................................................................................................................
Screen
39
Subscriber.........................................................................................................................................................
Info
45
Open/Pulled
.........................................................................................................................................................
Charts
46
Chart Options
......................................................................................................................................................... 47
Modify Name
......................................................................................................................................................... 48
Sticky Note......................................................................................................................................................... 50
Encounter List
.......................................................................................................................................................... 51
Create Encounter
......................................................................................................................................................... 53
Create Rx ......................................................................................................................................................... 53
Create a Report
......................................................................................................................................................... 59
Using the Report .........................................................................................................................................
Writer
60
Using Images ................................................................................................................................... 63
Using Tables ................................................................................................................................... 66
Create a Note
......................................................................................................................................................... 74
Attach/Scan
.........................................................................................................................................................
a Document
75
Rx Logbook
......................................................................................................................................................... 77
4 Patient
...................................................................................................................................
Reminders
78
Create/Send a..........................................................................................................................................................
New Rem inder
79
Receiving a Rem
..........................................................................................................................................................
inder
80
© 2011 Iccomplish, Inc
Contents
5
Managing Rem
..........................................................................................................................................................
inders
81
User Groups .......................................................................................................................................................... 81
5 Special
...................................................................................................................................
Functions
82
Database Maintenance
.......................................................................................................................................................... 83
Backup Database
......................................................................................................................................................... 83
Compact Database
......................................................................................................................................................... 86
Softw are Mantenance
.......................................................................................................................................................... 86
Report Bugs
......................................................................................................................................................... 87
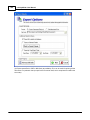
Check for Updates
......................................................................................................................................................... 87
Data Managem..........................................................................................................................................................
ent
88
Query/Statistics
......................................................................................................................................................... 88
Encrypt/Compress
.........................................................................................................................................................
Reports
90
Miscellaneous..........................................................................................................................................................
Functions
90
Report Designer
......................................................................................................................................................... 90
Available Fields ......................................................................................................................................... 97
Rolodex Utility
......................................................................................................................................................... 101
6 Recall
...................................................................................................................................
Wizard
102
Creating a Recall
..........................................................................................................................................................
List
102
Create Labels
......................................................................................................................................................... 105
Create Form
.........................................................................................................................................................
Letters
109
Generate.........................................................................................................................................................
Email List
110
Using "Mail Chimp"
......................................................................................................................................... 110
Generate.........................................................................................................................................................
Phone List
113
Using "Dial My Calls"
......................................................................................................................................... 114
Export Data
......................................................................................................................................................... 117
Using "Click2Mail"
......................................................................................................................................... 118
7 Importing/Exporting
...................................................................................................................................
Patient Data
119
Im porting Data
.......................................................................................................................................................... 120
Exporting Data
.......................................................................................................................................................... 121
8 Program
...................................................................................................................................
Settings
123
9 PreTesting
...................................................................................................................................
Module
129
10 Software
...................................................................................................................................
Versions
129
11 Misc...................................................................................................................................
Functions
130
12 ePrescribe
................................................................................................................................... 135
Part IV Admin Functions
141
1 Software
...................................................................................................................................
Account
141
Purchase Softw
..........................................................................................................................................................
are
142
Register/License
..........................................................................................................................................................
Softw are
143
View Licenses
.......................................................................................................................................................... 145
Change Account
..........................................................................................................................................................
Num ber
145
2 Settings
...................................................................................................................................
& Options
146
Clinic Details..........................................................................................................................................................
Screen
146
User Details .......................................................................................................................................................... 147
Com prehensive
..........................................................................................................................................................
Security Settings
150
International..........................................................................................................................................................
Settings
151
Locate Database
.......................................................................................................................................................... 152
3 Reset
...................................................................................................................................
Passwords
153
4 Audit...................................................................................................................................
Trail
154
© 2011 Iccomplish, Inc
5
6
ezScriptWriter User Manual
5 System
...................................................................................................................................
Info
155
Part V Troubleshooting Problems
158
Part VI Software License Agreement
166
© 2011 Iccomplish, Inc
Part
I
8
1
ezScriptWriter User Manual
How to Use this Manual
Navigating this Manual
This User’s Guide is provided in both printed and electronic form, searchable with most commonly
available document viewing programs. If you cannot locate an index topic you need, please do a
text string-search for the relevant word or phrase, or related words.
The screenshots shown throughout this guide have been taken with a relatively small window size.
The default display is a window that fills the screen. Click once on the Minimize button (upper righthand corner of window display) to get a smaller working area; click on the Maximize button to return
to full-screen display.
The screenshots have been taken with the next-to-last version of the software. We have made every
effort to match what you will see in ezScriptWriter with what the guide shows, but there may be
slight discrepancies.
This guide assumes you have basic familiarity with using a mouse and file manipulation in Microsoft
Windows. This manual was written using a tree structure (for example, topics are listed in a
hierarchical branching format). If the tree is fully closed, click the "+" sign in the box icon
to the
left of the node icon to open up the first branch, then repeat this process to open up further
branches. Alternatively, click the blue underlined hyperlinks on this page to jump to the main
sections.
If you want to move down the tree using the keyboard, press the Tab key. This will take you to all
subtrees that are currently open.
Conventions Used in this Manual
Click refers to clicking a menu item, a button or a clickable icon (tool button).
Press refers to pressing a keyboard key or key sequence.
Mouse and Keyboard Notation
Mouse Notation
Unless otherwise specified, click refers to clicking the left mouse button once. Where there might
be ambiguity, the terms left-click, right-click, and double-click (using the left mouse button) will
be used.
Drag-and-drop refers to dragging an object with the mouse cursor while keeping the left mouse
button depressed, then releasing the left mouse button to "drop" the object.
Keyboard Notation
Keyboard key combinations are shown in boldface, for example, Backspace means “Press the
© 2011 Iccomplish, Inc
How to Use this Manual
9
Backspace key.”
The Control key is shortened to Ctrl. For example, Ctrl+A means "Press the Control key, and
while holding it down, press the A key."
The Alt key is an abbreviation for Alternative.
The Shift key is not abbreviated.
Shift+Ctrl+A means "Depress the Shift and Control keys, and while holding them down together,
press the A key."
Note: You can choose the Shift, Ctrl and Alt keys from either side of the keyboard, according to
convenience.
The Escape key is abbreviated as Esc.
To select a node means to click its icon or title in the Tree view on the left side, or move the Tree
view cursor up or down using the cursor (arrow) keys, until the desired node is highlighted.
Mouse Conventions
You may perform several actions during your work with this software; the following specific words
are used to describe them:
Point to – move the mouse pointer to an item.
Click or Left-click – point to an item and press the left mouse button.
Right-Click – point to an item and press the right mouse button.
Double-Click – point to an item and quickly press the left mouse button twice.
Drag – point to an item and press and hold down the left mouse button while you move
the item.
Select – highlight or make an interface element active by either clicking it or dragging
over it (other actions are possible, if specified in the documentation). If used in select the
check box, it means that the check box should be marked with a tick (as opposed to
clear the check box when the check box should be cleared, without a mark).
Keyboard Conventions
Keystroke commands are noted in bold letters. Command key combinations are separated by the
dash symbol (“-“). This indicates that the noted keys are to be pressed simultaneously. For
example, Alt-S signifies that you should hold down the Alt key while pressing the S key. Bold
lower-case letters indicate operating system commands and command lines. For example, you
would enter copy *.* on the command line exactly as written.
Menu Notation
© 2011 Iccomplish, Inc
10
ezScriptWriter User Manual
Menu selections are shown in boldface italics to distinguish them from commands and the rest of
the text. An instruction such as "Click File / Save" means "Click the word File on the Main menu
(located at the top of the window) and when a drop-down menu appears, select Save from the list of
options.
If the words in the menu appear faint or "greyed-out," this means that the menu option exists, but is
unavailable (disabled) right now.
When there is a specific order of buttons to click, they will be separated by the arrow symbol "-->";
to complete the action follow the sequence exactly as presented.
For an explanation of keyboard shortcuts and menu access keys see Making it all happen.
Other Conventions Used in this Manual
Besides icons noting specific operating systems throughout this manual, the following are used to
indicate specific types of information. The applicable information follows each icon in indented
paragraph format as shown below:
© 2011 Iccomplish, Inc
Part
II
12
2
ezScriptWriter User Manual
Overview of ezScriptWriter
What is ezScriptWriter?
ezScriptWriter is a powerful, yet easy-to-use software system for creating and printing medication
and/or ophthalmic prescriptions. It includes a built-in word processor, report editor, Rx logbook
feature, reminders and note documentation tool in one application, which you can use to organize
your patient demographics, Rxs and other data.
Program Structure
ezScriptWriter uses familiar images as the cornerstone of the user interface. For example, a patient
chart looks similar to what you would see in the paper format. Rx's and notes are presented in lists
that can be double clicked to call up the appropriate report. The report editor is similar to standard
word processors available in Windows XP.
Certification
Our ezScriptWriter software is very low cost (only $189 per year per location with unlimited
computers/users) and does not include any EHR features (other than ability to create Rx's and scan
in paper charts), so we are not pursuing certification. However, because some of our doctors see a
significant amount of Medicare patients, we have partially integrated with PracticeFusionEHR.com.
That site is a free EHR and has ONC certification. Sponsored in part by Dell Computers, they are
the leading free EHR solution. This fits nicely with our own low cost software model. The website is
fairly limited in optometric functions (which is where our software comes into play). You simply
paste your SOAP note to the site and keep a parallel system online. So it also functions as a
“backup” of your SOAP notes that can be accessed anywhere there is internet.
To qualify, you have to be an eligible provider who bills CMS. Next, you need to use a certified EHR
system and meet 20 criteria for Meaningful Use. For 2011, you will to attest to CMS that you met
the Meaningful Use criteria for 90 consecutive days and your incentives will be paid with your
reimbursements.
Practice Fusion's EHR is ONC-ATCB 2011/2012 compliant and is certified as an EHR Module in
accordance with the applicable certification criteria adopted by the Secretary of Health and Human
Services (HHS).
1. Record patient demographics (including gender, race and ethnicity, date of birth,
preferred language) at least 50% of the time
2. Record vital signs (height, weight, blood pressure, body mass index, and growth
charts for children) at least 50% of the time
3. Maintain up-to-date problem lists at least 80% of the time
4. Maintain active medication lists at least 80% of the time
5. Maintain active medication allergy lists at least 80% of the time
6. Record smoking status for patients older than 13 years of age at least 50% of the
time
7. Provide patients with a clinical summary for each office visit within 3 business days,
at least 50% of the time
8. On request, provide patients with an electronic copy of their health information
(including test results, problem lists, meds lists, allergies) within 3 business days,
© 2011 Iccomplish, Inc
Overview of ezScriptWriter
13
at least 50% of the time
9. Generate electronic prescriptions at least 40% of the time
10. Use Computerized Physician Order Entry (CPOE) for medication orders at least
30% of the time. (note: CPOE for lab ordering, imaging ordering, and referrals are
not addressed here – only medications)
11. Implement drug-drug and drug-allergy interaction checks at least 40% of the time
12. Be able to exchange key clinical information among providers by performing at
least one test of the EMR’s ability to do this.
13. Implement one clinical decision support rule, and ability to track compliance with
the rule (this is reduced from the previous 5 rules to the final 1 rule)
14. Implement systems that protect privacy and security of patient data in the EMR, by
conducting or reviewing a security risk analysis, and taking corrective step if
needed
15. Report clinical quality measures to CMS or states – for 2011 provide aggregate
numerator and denominator through attestation; for 2012, electronically submit
measures (this refers to PQRI measures)
Rx Wizards
In order to quickly build a Rx, a wizard is available to walk you through the process. Whether you
are creating a medication Rx, a spectacle Rx or a contact lens Rx, the wizard gives you the tools to
easily enter your prescription data. One of ezScriptWriter's great strengths is that it allows you to
create Rx's based on prior data, simply by double clicking on a past Rx in the Logbook
It should be mentioned that ezScriptWriter does not oblige you to use the Rx Wizard at all. For
example, for custom Rx's you can simple open a blank report and manually type your data.
Reports
Although functioning mostly to generate Rx's, ezScriptWriter can also help you save time by
generating letters, reports, and patient handouts. Many pre-existing sample reports are included or
you can build your own!
Compatibility
Since ezScriptWriter can export data in both text and PDF formats, you can send your Rx's and
letters in e-mail or simply create backup copies that can be opened on any computer.
2.1
Evaluating the Software (Free Trial Period)
ezScriptWriter is free to try for up to the first 30 days, during which time the program is fully
functional. Beyond this limit, you need to register the software. You should keep the following in
mind when evaluating ezScriptWriter:
Notes:
The installation of a fresh version of ezScriptWriter over a previously installed evaluation
version does not prolong the original 30 day evaluation period.
Each location (clinic) that uses ezScriptWriter will have its own uniquely assigned serial ID
number and account number. Your account number is your practice telephone number.
When you register the software you will be asked to provide your practice telephone
© 2011 Iccomplish, Inc
14
ezScriptWriter User Manual
number; please provide a valid and accurate number. If your telephone number should
change in the future, you will need to re-register your software. If you have two (or more)
locations, each will require a separate registration number.
2.2
Register/Activate software
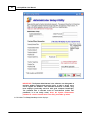
To register ezScriptWriter, you simply need to download the activation codes automatically once
the software is properly licensed.
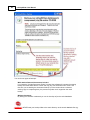
ezScriptWriter will run unregistered for up to 30 days. When unregistered, the software runs without
limitations of any kind; what you see is what you will get.
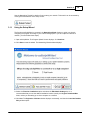
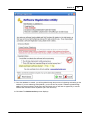
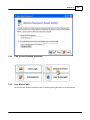
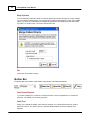
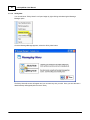
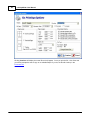
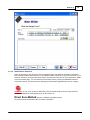
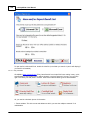
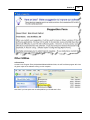
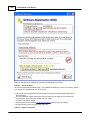
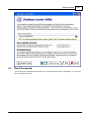
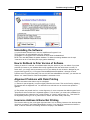
When you run an unregistered version of ezScriptWriter in excess of the allowed 30 days, a window
will appear displaying the expiration status of your trial and giving you the opportunity to do one of
the following:
Purchase your version of ezScriptWriter (with the Purchase Software button or directly via
the ezScriptWriter website);
Register your version of ezScriptWriter by using the online activation (or CD-ROM) you
once you have purchased your license(s); or
Exit the unregistered program.
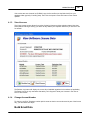
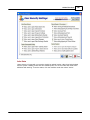
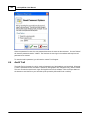
You can also find the Purchase/Register options by logging in as the Adminsitrator and clicking
Admin Settings --> Software Account.
Once you register ezScriptWriter, you will notice that the View Licenses menu of the Administrator
screen displays your serial number and registration status.
The registration Web page, where you can purchase and register your ezScriptWriter software is
located at www.ezScriptWriter.com/order.htm
If you have more than one clinic location, each will need to be individually registered since each will
have a separate database and account number (which is the practice telephone number).
You DO NOT have to purchase a license for each computer and/or user; we license only the single
clinic location.
© 2011 Iccomplish, Inc
Overview of ezScriptWriter
2.3
15
How to Purchase
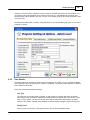
We recommend you use the internal Order Form built into the ezScriptWriter software. You can
also find the Purchase/Register options by logging in as the Adminsitrator and clicking Admin
Settings --> Software Account.
For detailed information regarding how to buy a software license, visit the website order form at
www.ezscriptwriter.com
2.4
Hardware Requirements
We highly recommend that you use a computer system with more than the minimum requirements
to improve performance and speed. Also, the choice of network greatly impacts the speed at which
you can access the database. Wireless networks should only be used for light-duty workstations.
You can find up-to-date information about system requirements by visiting our website located at
www.ezScriptWriter.com
Before you start using ezScriptWriter, you should have a working knowledge of your PC and your
operating system. The software is designed to operate under Windows XP/2000/2003. You should
know how to use a mouse, keyboard, the standard Windows menus and commands, and how to
open, save, and close files. For more information, consult your Microsoft documentation.
To use ezScriptWriter successfully, you need to a printer (preferably a Laser printer, although an
inkjet will work). And, of course, you need a computer that is capable of running ezScriptWriter. A
network setup is very desirable, as this will allow frontdesk staff to enter the basic patient
demographics and to print letters for patients at the front counter.
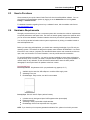
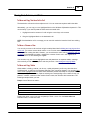
Recommended Paper
No Security Features: Weyehaeuser 20 lb. pre-perforated copy paper (at 5 ½")
Available by the case from Office Depot or a similar office supply store
Advantage: Low cost
Disadvantages: Easy to alter; not valid in some states
Security Paper: Secure Laser Rx Paper (various formats)
Includes security background (word VOID appears when photocopied)
Erasure protection
Advantage: Nearly impossible to duplicate/alter
Disadvantage: Much more expensive than copy paper
NOTE: If you intend to print computer-generated medication Rx's, please check with your state
© 2011 Iccomplish, Inc
16
ezScriptWriter User Manual
Pharmacy Board to verify that they will be acceptable in your state or locality. Some states, for
example New Jersey, require pre-numbered prescription blanks.
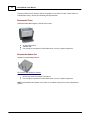
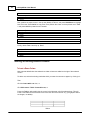
Recommended Printer
KONICA Minolta-QMS PagePro 1350-W Laser Printer
21 pages-per-minute
1200 dpi, 8M
Can usually be purchased for under $200 online or at any computer superstore
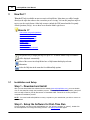
Recommended Network Gear
Wireless Pre-N Broadband Router
Click here to visit the Belkin website.
Allows both wired and wireless connections
Can usually be purchased for under $100 online or at any computer superstore
NOTE: ezScriptWriter will operate much slower on a wireless network than over a wired ethernet
system.
© 2011 Iccomplish, Inc
Part
III
18
3
ezScriptWriter User Manual
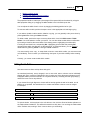
How Do I?
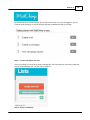
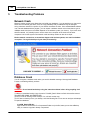
"How do I?" help is available on most screens in ezScriptWriter. Many times you will be brought
directly to the topic that relates to the screen that you are viewing. You can also jump from topic-totopic or use the search feature. Other help resources include the PDF manual and the Frequently
Asked Questions (FAQs). Access these areas from the Main Login Screen.
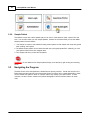
How do I ?
Get started using ezScriptWriter?
Use the Admin functions?
Create a new patient?
Open an existing patient?
Use the QuickFind tool?
Create a Rx?
Create a Report?
Create a Note?
Scan or Attach Documents?
The quickest way to display the help is to press F1. If context-sensitive help is available it
will be displayed automatically.
Most of the screens in ezScriptWriter have a Help button that displays relevant
information.
Select the Help item in the menu bar for additional help options.
3.1
Installation and Setup
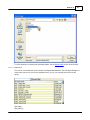
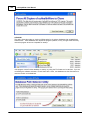
Step 1 - Download and Install
After you have downloaded the software from the website (www.ezScriptWriter.com), you must doubleclick on the setup file to begin the installation process. The setup file is called "ezscriptwriter_setup.exe"
and is usually located in your My Documents or Downloads folder. Follow the on-screen prompts to
complete the installation process.
NOTE: You must install ezScriptWriter on every computer on your network that you wish to connect to
the database.
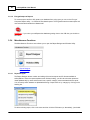
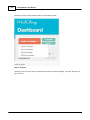
Step 2 - Setup the Software for First-Time Run
On the computer you wish to keep the database (e.g. the "primary computer" or "server"), double-click
the ezScriptWriter icon to begin the Setup process. The Setup Wizard will appear.
© 2011 Iccomplish, Inc
How Do I?
19
See the Networking Tutorial for details of how to setup your network. This tutorial can be accessed by
clicking the tutorial button on the setup screen:
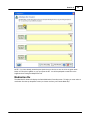
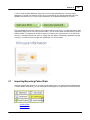
3.1.1
Using the Setup Wizard
The first time ezScriptWriter is accessed, the Networking Wizard displays to guide you through
configuring the program according to your custom settings (even if you do not plan to install on a
network, you must follow these steps).
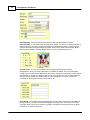
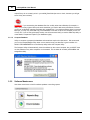
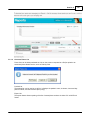
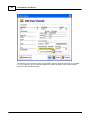
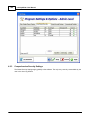
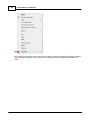
1. Open ezScriptWriter. The Program Splash Screen displays; click Continue
2. Click Start to start the wizard. The Networking Wizard window displays:
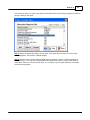
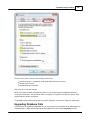
3. Select the First time installation option and select the Edit Admin Settings box. It is
recommended that you use the default installation location (usually the Program Files\ezHealthWare
folder, unless you are setting up a client computer on a network.
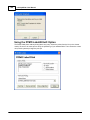
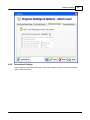
4. Click Next. The Registration of Software window displays momentarily, and then the Create New Database
Utility window opens:
© 2011 Iccomplish, Inc
20
ezScriptWriter User Manual
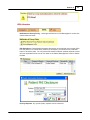
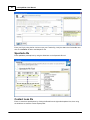
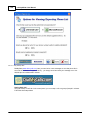
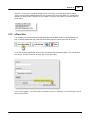
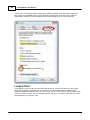
5. Click Build New Database. The system builds your database and displays a completion message once
the database is created.
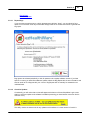
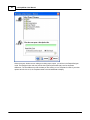
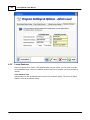
6. Click Next. The Registration of Software window displays:
© 2011 Iccomplish, Inc
How Do I?
21
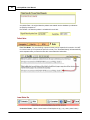
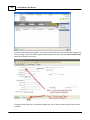
7. Once the database is created, you will be guided through the process of registering and setting up the
software. If you are evaluating ezScriptWriter, you do not have to provide a software registration key
code in the space provided. Simply leave this field blank and you will have an opportunity to use the
software with a limited number of patients (30 is the maximum).
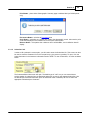
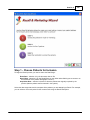
8. Click Next. The Administrator Setup screen displays:
© 2011 Iccomplish, Inc
22
ezScriptWriter User Manual
IMPORTANT: The System Administrator is the software user delegated to
maintain software settings and security levels, to add or delete users,
and to register the software. This individual should be a trusted, longterm employee (preferably someone with good computer knowledge).
The password that is selected must be remembered (unlike user
passwords, it is not easily reset). Keep the System Administrator
password in a secure location that is not easily accessible by others.
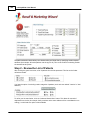
9. Click Next. The Primary User Setup window displays:
© 2011 Iccomplish, Inc
How Do I?
23
Enter your primary user information in the spaces provided. The system will automatically
generate a username for you when once you enter your name. You can accept the username or
create your own (your username must consist of at least five characters). If you have two users
with the same last name and first initials, you will have to create a custom UserName for at
least one of them (since the default username is first initial plus lastname)
International Settings - if you are using the software outside the United States you will likely
need to adjust the date format and metric measurements.
10. Click Next. The Password Information window displays:
© 2011 Iccomplish, Inc
24
ezScriptWriter User Manual
When you first log into the USER account, you will need to enter the default password. The
default password for users is the same as the UserName (so for "jsmith", enter the password as
"jsmith"). You will then be prompted to enter a new password.
11. Restart the software. You will see a notice that the Trial Period has begun.
12. Open ezScriptWriter and sign in to the Administrator account to review/set the security options.
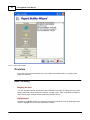
3.1.2
Password Selection
It is a good practice to choose a secure password. To often an easy-to-guess password is chosen,
which defeats the whole purpose of passwords! A strong password would look like "r%i1L" or
"sus99an1". A secure password should contain:
No less than 6 characters
Not be the same as your user name, personal name or birthday
Does not sound like a dictionary word (e.g. "glove")
Contains a combination of capital & lower case letters, numerical and/or special characters.
Having a simple password can leave you vulnerable to guessing or dictionary attacks, which can lead to
unauthorized access to patient information. HIPAA regulations require that you make every attempt to
secure your data. We recommend you use a password that has at a minimum eight characters and
contains a combination of both letters and numbers. Passwords should be changed regularly.
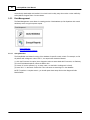
3.2
Getting Started
How do I login as a User?
How do I login as a Administrator?
© 2011 Iccomplish, Inc
How Do I?
25
How do I recover a lost password?
How do I access FAQ (frequent questions)?
How do I access the User Manual (pdf)?
How do I use the demo patient "Joe Sample"?
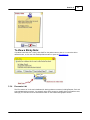
3.2.1
User Login
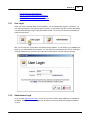
When you come to the Main Menu of ezScriptWriter, you are automatically logged in. However, if you
click the Logout button or are timed out due to inactivity, you will need to log back in before proceeding.
You have three attempts to login before the software closes. The screen you will see will have buttons
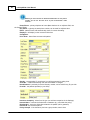
similar to those below:
After you click the User Login button, the following screen appears. You must enter your UserName (as
setup by your Administrator) and password. You can change your password at any time by clicking the
"Change Password" link. Click the Login button at the lower right to complete the login process.
3.2.2
Administrator Login
Once you have logged out as a user, you can re-log in as the Admin. Special features are available for
the Admin, including the ability to create user accounts, set security levels and manage the software
account.
© 2011 Iccomplish, Inc
26
ezScriptWriter User Manual
WARNING: Be sure to Log Off of the Admin account when you have completed your work.
3.2.3
Lost/forgotten passwords
NOTE: The first time a user attempts to login, the default password is the same as the assigned
UserName. After the first sign-in, the User must change the password.
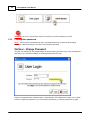
Via User - Change Password
The User can change their own password after clicking the User Login button (only if they remember the
password; if not, see below for details on resetting the password of a user).
Enter the old password then create and enter a new password. The software will not allow you to create
a blank or single letter password. If you mis-enter the password(s), you will be prompted to try again.
© 2011 Iccomplish, Inc
How Do I?
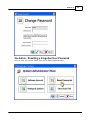
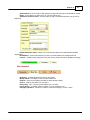
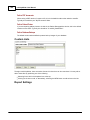
Via Admin - Resetting a Forgotten User Password
First, you must sign in as the Admin. Then click the Reset Passwords button.
© 2011 Iccomplish, Inc
27
28
ezScriptWriter User Manual
NOTE: When the password is reset, it becomes the same as the UserName. So user "jsmith" will have
a password of "jsmith" which must be changed on the first login attempt.
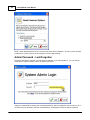
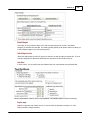
Admin Password - Lost/Forgotten
The Admin password is set when you first setup the software. If you have forgotten it, you can reset by
clicking the "Forgot Password" next to the Admin login button.
Change your password by entering the current password (you will be prompted to enter a new one). Or, if
you have lost your password, enter the code provided by TechSupport to reset the Admin Password.
© 2011 Iccomplish, Inc
How Do I?
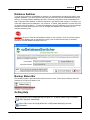
3.2.4
FAQ (frequently asked questions)
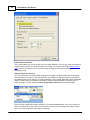
3.2.5
User Manual (pdf)
Click on the User Guide on the Main Screen to view the printed (pdf) version of the help manual.
© 2011 Iccomplish, Inc
29
30
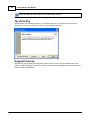
3.2.6
ezScriptWriter User Manual
Sample Patient
The software comes with a demo patient that you can use to create practice charts, reports, Rx's and
such. You can also create your own sample patients, however we recommend that you use the default
sample patient for these reasons:
1. "Joe Sample" is known to the software for being a demo patient, and all reports and charts are ignored
when creating "real" reports.
2. The default sample patient can be closed even with open (unsigned) reports/Rx's. Normally you can't
close patient charts if there are unsigned items.
3. Tech Support will have you test with this patient.
WARNING: Do not delete the Joe Sample patient! Simply close the file by right-clicking and selecting
Close.
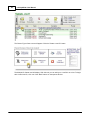
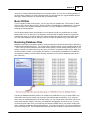
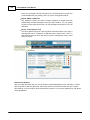
3.3
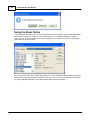
Navigating the Program
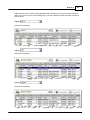
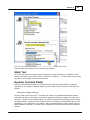
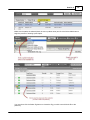
The Main Screen of the ezScriptWriter is divided into two primary sections: the left side section is the
Button Menu and the right-side is the Open/Active Charts List. Much like in a paper-based office, charts
can be created and "opened". When in "opened" status, they display in the Open Charts. To avoid
confusion, the term "Charts" relates to the patient demographics and Encounters relate to an exam
chart.
© 2011 Iccomplish, Inc
How Do I?
Open Charts Section
When you are doing work on a patient's Chart, it usually needs to be in "open" status. By double
clicking on the patient name, you open the Encounter List for that patient.
Patient Status Icons:
Female Patient (red)
Male Patient (blue)
Gender not specified
Sticky Note present - click the patient name once to read or edit.
Right-Click Menu Options:
View Encounters - Opens the Encounter List
Edit Demographics - Opens the Patient Demographics
Modify Name - Allows a patient name to be changed.
Attach Document - Allows you to attach a document (or scan one directly to the chart)
Message Manager - Add a Sticky Note or Billing Note
Close & Refile Chart - Closes the chart; will disappear from Open Ledgers list
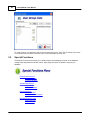
3.3.1
Main Menu
© 2011 Iccomplish, Inc
31
32
ezScriptWriter User Manual
How do I ?
Create a new patient chart?
Open an existing chart?
Search for a patient?
View patient reminders?
Use the Recall Wizard?
Use the Special Functions?
Customize program settings?
Find out about ePrescribing?
Import or export data?
3.3.2
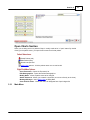
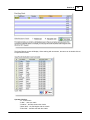
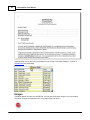
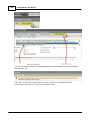
QuickFind Tool
Using the Q-Link Tool, you may enter some, or all, of a patient's name to quickly pull up their chart. You
may use just a single letter of either the first or last name, or as many as you wish. The more letters
you enter, the more unique your search results. You may also us the wildcard character "*" to indicate
that you do not know the letter. Just press the Enter Key to quickly start the search.
If you wish to search by Chart Number, simply enter the number you are searching for and the matching
patient will be displayed.
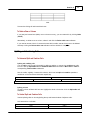
Examples
© 2011 Iccomplish, Inc
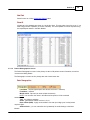
How Do I?
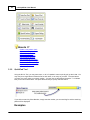
33
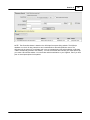
Imagine we are trying to quickly pull up Margaret Smith, while trying to type the minimum number of
letters. We could try it each of the following ways. The best method is to enter two letters of both first
and last name.
Typing:
Would find the following:
Typing:
Would find the following:
Typing:
Would find the following:
© 2011 Iccomplish, Inc
34
3.3.3
ezScriptWriter User Manual
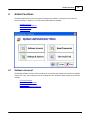
Patient Charts
How do I create a new patient chart?
How do I find and open an existing patient chart?
3.3.3.1
Create a New Patient Chart
1. Click the New Patient button
2. Enter the patient demographics. Note that only the first name, last name and date of birth are required
to create the chart.
© 2011 Iccomplish, Inc
How Do I?
35
3. Click the Save button to create the new chart.
Duplicate Patients
If a patient already exists in the system, you will see the Duplicate Patient screen after you enter the
name and date of birth. If a patient matches, click the checkbox next to the name and click the Select
button to open that patient's chart. Otherwise, click Close and continue entering patient demographics.
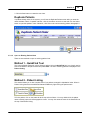
3.3.3.2
Open an Existing Patient Chart
There are two methods to open an existing patient chart:
Method 1 - QuickFind Tool
This is the preferred method for quickly finding a patient. Using the QuickFind field, you simply need to
enter a few letters of the patient name and press Enter. The list of matching patients is displayed in the
Patient Listing.
Method 2 - Patient Listing
This method allows you to view complete lists of you patients, arranged in alphabetical order. When in
Patient Listing view there are additional features available by right-clicking the patient name.
To find a patient, click on the Letter tab at the top and scroll down. You may double-click the patient
name to directly open to the Demographics screen. You may also enter the name in the Search Box at
the top of the Patient Listing.
© 2011 Iccomplish, Inc
36
3.3.3.3
ezScriptWriter User Manual
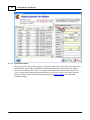
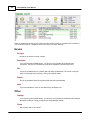
Patient List
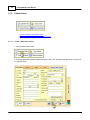
The Patient Listing is the main dashboard for working with patient's demographic charts. You enter the
Patient Listing by either using the QuickFind tool or the Find Existing button.
© 2011 Iccomplish, Inc
How Do I?
37
Double clicking on a patient name opens the demographic screen. Right-clicking a patient name opens
up the additional features menu. Note that you MUST have the patient name highlighted for the menu to
open.
Pull Ledger
This option pulls the chart and adds to the Open Ledgers screen. It does not display the
Demographics screen. This is useful if you need to pull multiple patients.
View Demographics
Opens directly to the patients demographic screen (equivalent to double-clicking the patient name in
the Patient Listing).
Bad Address
Allows you to mark the patient as having a "bad address", without having to open the demographics
screen.
Mark as Inactive
Allows you to mark the patient as "inactive", without having to open the demographics screen.
Delete Patient
Allows you to delete the patient chart. Note this requires you to have sufficient Security Level to
perform this action. The Admin function in the Main Module allows for security settings to be
adjusted.
© 2011 Iccomplish, Inc
38
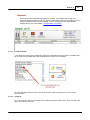
ezScriptWriter User Manual
Merge Duplicates
If you accidentally create two charts on the same patient (for instance because of a name change),
you can merge the data together. The merge function keeps the demographics of the "First" patient
(which you select by chart number) and merges all documents and reports under that first patient
ID. There is no undo function, so use this function with care.
Exit
Leaves the menu without change.
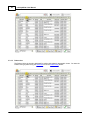
Button Bar
The Button Bar at the bottom of the Patient Listing allows a few additional features.
Select Current Physician
If you wish to display only charts for a selected physician, use the dropdown box to choose the
physician. The default is to show all physicians.
Delete Chart
Allows you to delete the patient chart. Note this requires you to have sufficient Security Level to
perform this action. The Admin function in the Main Module allows for security settings to be
adjusted.
© 2011 Iccomplish, Inc
How Do I?
39
New Chart
Same function as clicking Create New Patient button.
Show All
All patients in the database are shown in a single list. Note: This may take a long time to run, if you
have a large number of patients (in excess of 20-30K). The actual patient list can be exported using
the Import/Export feature in the Main Module.
3.3.3.4
Patient Demographics Screen
The Patient Demographics screen is the primary location of all patient contact information, as well as
insurance and billing details.
The Demographic screen has four primary tabs and a lower button bar:
Basic Demographics
Last Name - required (apostrophe's are allowed; minimum 1 character)
First Name - required
Middle Initial - optional (can enter multiple characters)
NOTE: You can enter the name in all lowercase for speed; it will be converted
automatically.
Title - the patient's salutation
Suffix - generational suffixes such as Jr, Sr, III
Date of Birth (DOB) - highly recommended. Can enter just 2-digit year, but day/month
require 2-digits.
Address block - you can customize the city/state/zip list under Settings in the Main
Module.
© 2011 Iccomplish, Inc
40
ezScriptWriter User Manual
NOTE: If you have entered the Guarantor/Subscriber for this patient
already, you can use the blue arrow to pull the Guarantor's data
forw ard
Home Phone - primary telephone at home (Note that there is no cellphone field; use
the Custom Fields)
Day Phone - typically the work phone number; can be used for cellphone also
Email - patient's email; will automatically check for correct formatting.
Employer - will display on the Insurance Claim form
Occupation Prior Exam - date of last encounter with patient
Gender - recommended. if not selected, you will be prompted on saving chart
Chart No. - created automatically and cannot be edited or changed.
Identification # - previously for Social Security number; can be used for any ID you wish.
Provider - the patients provider (in your office)
Insurance Company - select from list (you can add new companies in the Settings)
Insured Name - same as the Subscriber or Guarantor (e.g. who holds the policy)
Relationship - how is the Subscriber related to the patient (self or guarantor)
Insured ID - the insurance plan ID
Policy Group # - if the insurance plan has a group number, enter it here
© 2011 Iccomplish, Inc
How Do I?
41
Authorization # - if the insurance plan requires pre-approval and gives an authorization number
Notes - do not display on Claim Form; for your own internal use
Additional Insurance Plans - click the button to add or view additional plans (only for 2nd or
additional)
HIPAA Notification status - allows you to indicate that patient has read/understood HIPAA
requirements
Bad Address - if mail is returned and you wish to remove patient from mailing/recall lists
Inactive - if patient leaves the practice for some reason (charts will still be available for viewing)
More Information
Nickname - an alternate preferred name by the patient
Marital Status - will display on the Insurance Claim form
Hobbies - useful to track patient activities to assist provider rapport
Source - what got the patient into your office
Referred by - who, if anyone, got the patient into your office
Family Group - if a patient is part of a family, you can indicate it here
Emergency Contact - a person to contact if a medical emergency occurs in office.
© 2011 Iccomplish, Inc
42
ezScriptWriter User Manual
Race/Ethnicity - hold the mouse over the letters to see what abbreviations indicate.
Patient Picture - if you wish to have an image of the patient you need to: (1) take picture with a
digital camera or camcorder, (2) save the image to a shared network folder or similar, and (3)
click the Set button to find and display the image. Click Clear to reset to blank image. NOTE:
Patient photos display in the Main Module when you click the patient name once.
Custom Fields - up to six custom fields can be created for inclusion in the patient
demographics. Once you create a field name, it CANNOT be altered. This is to prevent data
mixing (e.g. you create a field called 'email' then want to change it to 'cell phone', but the original
data remains). If you wish to change a field you can only create a new one (and stop using the
old one). Custom Fields can contain nearly any data. Examples can include: Cell Phone,
Facebook ID, Nursing Home Facility, Prior Chart #, etc.
Chart Alerts - for important chart information that you wish to flag. The Alert icon will display at
the top tab when you open the Patient Demographics, alerting you to the existence of a note.
The Chart Alerts can be of any nature, but typically are special circumstances such as allergy
notifications or collection accounts.
© 2011 Iccomplish, Inc
How Do I?
43
HIPAA Information
Notification of Privacy Policy - checking the HIPAA box on first Demographics screen auto
checks these two boxes.
PHI Disclosures - Patient Health Information disclosures can be tracked on this screen. Each
time the patient or an outside entity sends a record request, you should use the "Add New"
button to record the event. You can print the Disclosure list when/if a patient requests to know
who has requested PHI. Be sure to click Save on the Patient Demographics screen to finalize
the data.
Privacy Requests - any specific privacy requests can be noted here
© 2011 Iccomplish, Inc
44
ezScriptWriter User Manual
Acquisition Date - the original date the patient was entered into the database (or otherwise
acquired by the practice.
Recall Date - the date the patient is scheduled for recall visit.
Patient Notes
Free Text Notes - any sort of billing or personal notes can be entered in this section. It is NOT
for clinical notes (it is not printed as part of the chart). The "Time/Date Stamp" will automatically
add a separator after you enter the note with current date/time information.
Lower Button Bar
Customize Button - allows customization of lists/dropboxes (e.g. city, state, postal codes)
© 2011 Iccomplish, Inc
How Do I?
45
Print Button - prints either a Demographic Summary page or address label (on DYMO printer
only)
Encounters Button - switches to Encounters view
Save Button - used after any changes are made to the demographic record. Also used to pull a
chart when displayed in the Patient List into the Open Charts screen.
Balance Notice - if the patient has a balance due in ezClaimBiller, a red notification bar will
display
3.3.3.5
Subscriber Info
In order to bill a patient's insurance plan, you will need to enter the Subscriber info. This screen can also
be used to enter the Guarantor info for a minor patient (e.g. the parent or guardian). To open, click the
Subscriber button in the Insurance Information section. NOTE: To clear a subscriber, click the red delete
button.
The Guarantor/Subscriber screen will open. The default type is "self", but you can enter either an
existing patient (by selecting from the displayed patient list) or enter a new guarantor/subscriber. Use
the blue arrows to transfer information (such as same last name or address). Be sure to select the
appropriate "Relationship to Guarantor".
© 2011 Iccomplish, Inc
46
3.3.3.6
ezScriptWriter User Manual
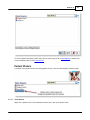
Open/Pulled Charts
The very first screen you see upon signing in is the Open Charts screen. Much like a chart pulled from a
real file cabinet, Open Charts are available for viewing and creating items (encounters, Rx's, reports,
etc). When you are done with a chart, it is "closed" and removed from the Open Charts screen. You
close a chart by right-clicking the name and selecting "Close Chart". You can only close a chart that
has all encounters, reports and notes finalized (except for the Sample Patient, which does allow
immediate closing).
© 2011 Iccomplish, Inc
How Do I?
47
To use the Open/Pulled Chart, simply right-click the name to get a list of Chart Options or double-click
to be immediately taken to the Encounter List.
Patient Photo's
If a patient has a photo entered in the demographics screen, click the name ONCE to view the image.
3.3.3.7
Chart Options
Right-click a patient name in the Pulled/Active Charts list to pull up the options menu.
© 2011 Iccomplish, Inc
48
ezScriptWriter User Manual
How do I view Encounters?
How do I edit Patient demographics?
How do I modify a patient name?
How do I attach a document to the chart?
How do I create a message or note?
How do I close/refile the chart?
3.3.3.8
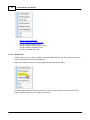
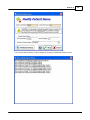
Modify Name
Patient names (once the chart is created) can only be modified with this tool. This is done to both track
name changes/reasons and to prevent data loss.
Right-click the patient name in the Open Ledgers view and select Modify Name.
The Modify Patient Name screen will show and you can enter the corrected name in the boxes at the
bottom. Indicate a reason for the change and click okay.
© 2011 Iccomplish, Inc
How Do I?
You can also view the history of name changes by clicking the Modification History button.
© 2011 Iccomplish, Inc
49
50
3.3.3.9
ezScriptWriter User Manual
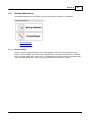
Sticky Note
You can add short "Sticky Notes" to a Open Ledger by right-clicking and selecting the Message
Manager option.
Once the Message Manager appears, select the Sticky Note button.
The Sticky Note edit screen will appear and you can enter any text you wish. Once you save the note a
date/timestamp will append (with the user's name).
© 2011 Iccomplish, Inc
How Do I?
51
To View a Sticky Note:
If a patient has a Note icon, simply click ONCE on the patient name to view it. You can also edit or
delete the note, or click the View FeeSlips/Claims button to open the Encounter List.
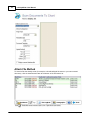
3.3.4
Encounter List
The "Encounter List" is the main dashboard for viewing patient encounters (including Reports, Rx's and
scanned/attached documents). You generally arrive at this screen by double-clicking the patient name,
although you could also click the Encounters button on the Patient Demographics screen.
© 2011 Iccomplish, Inc
52
ezScriptWriter User Manual
There are several tabs across the top of the Encounter Screen to help you navigate to the correct item.
You can double-click the <Add New> at the top of any list to add a new item.
Exams
All Pages
Shows all the items from every category
Encounters
If you are using the full EMR version, you will see a list of pending and finalized exam
encounters. The first CPT assessment code will be displayed in the description field.
Rx's
The list of generated Rx's for a patient (that have been printed/saved). The full list of every Rx
(even if not printed) will be shown by clicking the Logbook button.
Reports
The list of generated reports for a patient (that have been printed/saved).
Notes
If you have entered any notes on the patient they will display here.
Other
Drawings
If you are using the full EMR version, you will see a list of pending and finalized exam drawings.
By double-clicking an image you will see the Image Manager display.
Photos
Not currently used in this version.
© 2011 Iccomplish, Inc
How Do I?
53
Attachments
The list of scanned or attached documents for a patient. If you double-click an item, the
document will open in native format (e.g. pdf documents open in Adobe, doc in MS Word) if you
have the software installed on your computer. You can download the free Adobe Reader
software directly from their website: http://get.adobe.com/reader/
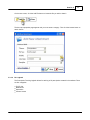
3.3.4.1
Create Encounter
A new Exam Encounter can be created by clicking the Create New Encounter button. The default date
will be Today and the default Encounter Template will be used if none is selected.
Click the Help button within the Exam Encounter screens to get more help once you have a new
encounter open.
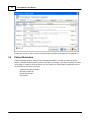
3.3.4.2
Create Rx
To create a new Rx, open the Encounter List by double-clicking the patient name. Then click the <Add
New> line at the top of the list:
© 2011 Iccomplish, Inc
54
ezScriptWriter User Manual
The Choose Type of Item screen will appear. Click the "Create a new Rx" button.
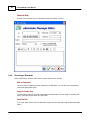
The Multiple Rx Creator tool will display. With this tool you can add up to 4 new Rx's at a time. To begin
with a brand new Rx, click one of the "New" buttons on the topmost Rx box:
© 2011 Iccomplish, Inc
How Do I?
55
NOTE: If you have already entered a prescription that you wish to re-use, the click the green arrow
button to call up the LogBook so you can import the Rx. You will be prompted to save Rx's to the
LogBook when closing the Multiple Rx Tool.
Medication Rx
The New Med Rx button will display the Quick Medication Prescribe screen. To begin you must select a
medication from the top dropdown screen (or choose one from your Favorite Meds list):
© 2011 Iccomplish, Inc
56
ezScriptWriter User Manual
Enter your Sig by using the list choices or use your Favorite Sig. Verify the data in the Preview Box and
then click Continue to add to the Multiple Rx list.
Spectacle Rx
Enter ophthalmic prescriptions by using the slider bars on the Spectacle Rx tool.
Contact Lens Rx
Enter a contact lens prescriptions by clicking the Brand from the right-side dropdown lists, then using
the slider bars to enter the correct diopter power.
© 2011 Iccomplish, Inc
How Do I?
57
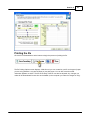
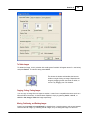
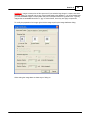
Printing the Rx
Click the Print Preview button at the bottom to begin the process of printing the Rx.
The Rx Printing Options screen displays. With this tool you can customize your Rx to the type of paper
you are using (whether 2 or 4-part Rx paper) or just plain paper. You can also customize what
information appears on the Rx. The font of the body of the Rx can also be adjusted. Any changes you
make will be remembered for next time as the default (on the computer you make the changes on only).
© 2011 Iccomplish, Inc
58
ezScriptWriter User Manual
Clicking Continue will display the actual Rx as it will appear. Once you print the Rx, click Close and
you will be prompted to save a copy as an editable Report. If you do, the Rx will show up in the
Encounter List.
© 2011 Iccomplish, Inc
How Do I?
3.3.4.3
59
Create a Report
Use the Report Builder wizard to create new reports and letters. Rx's can also be built this way (which
allows for more customization, however you are limited to one Rx per page this way).
© 2011 Iccomplish, Inc
60
ezScriptWriter User Manual
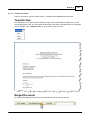
3.3.4.3.1 Using the Report Writer
Overview
This section of the manual explains how to use various commands to make your reports more
legible and attractive.
Basic Text Editing
Navigating the report
You may already be familiar with functions of the standard cursor keys for finding your way around
reports, particularly if they extend over more than a single screen. These commands are similar to
those used by many word processors, particularly Microsoft Word.
Highlighting text
Wherever in the Reports window you happen to be working is where the focus is. Selecting an item
means to highlight it to let you know it has been selected.
© 2011 Iccomplish, Inc
How Do I?
61
Insert and overtype modes
Just as in other word processors, whether you insert text or overwrite existing text depends on
whether you are in Insert or Overtype mode, as displayed on the Status bar at the bottom of Report
Writer main window.
Replacing text
When you need to replace text, simply highlight the part to be replaced, then immediately type the
replacement text without needing to press Delete.
Deleting text
Press the Delete key to delete a selected block of text, or use the Delete or Backspace keys to
delete one character at a time.
Undo and Redo
Pressing Ctrl+Z immediately you change your mind or realize you made an error will undo most
report edits including formatting changes, so should always be tried before other methods. Press
Ctrl+Y to redo the changes. The Report Writer remembers all your edits from the moment you
selected the current node (enabling you to press Ctrl+Z successively to backtrack through your
edits), but forgets them all as soon as you close the report.
Copying and Moving Text
Having selected (highlighted) the block of text, you have the choice of using the keyboard or mouse
to accomplish these aims.
Drag-and-Drop Using the Mouse
Dragging the selected text block and dropping it at its new location is a quick and easy way to
move text from one location to another within the same report. You can also use this to break up an
report into smaller chunks by dragging and dropping each section where you wish it to be located.
You can also copy text from documents in compatible applications such as Microsoft Word to the
currently open report.
Cut/Copy/Paste using the keyboard
Having highlighted the block, press Ctrl+X to cut it or Ctrl+C to copy it, then Ctrl+V to paste it
within the same or a different report, all using the Windows Clipboard. The target may be in the
same report file, another report file that you open, or an open document in a compatible application
such as a word processor. Although dragging and dropping is very easy to do, this method offers
several advantages:
Using the keyboard to select text may feel more precise. Once text is copied to the Windows
Clipboard itcan be pasted into multiple locations, whereas the entire drag-and-drop must be
repeated each time.
© 2011 Iccomplish, Inc
62
ezScriptWriter User Manual
Formatting Text
Although you can use the same font face, size and color throughout the report, text is much more
attractive when headings are more prominent, subparagraphs are indented, etc.
Plain Text and Rich Text
You can add text colors, font faces, sizes and styles such as boldface, and the report is regarded
as being in Rich Text Format (RTF). RTF reports can be converted to plain text easily, if desired:
Examples :
This paragraph uses Plain Text alone. All text is the same font face, style, size and color.
Boldfacing, italics, underlining, etc. are not used; changing from lower case to UPPER CASE is the
only way to make text more prominent.
This paragraph uses Rich Text, which allows many more formatting attributes such as color to be
incorporated. Adding color and images automatically changes the format from plain text to rich text,
since both hide extra codes in the report (which the user cannot view).
Report Writer regards its reports as being in rich text format, but you can mix these within a file.
Who would want to use plain text when rich text has so much more to offer? Here are two good
reasons:
Plain text reports make the ezScriptWriter database much smaller, since there are no hidden
formatting characters. This can make quite a difference when you have thousands of reports. You
are not faced with the extra chore of reformatting to match the format of the rest of the report text if
you copy and paste in plain text.
Note also that plain text reports cannot contain images, underlined hyperlinks, tables, boldfaced or
other types of formatting. Converting a rich text report to plain text removes images and table cell
borders but leaves the text itself.
Basic formatting commands
Let's concentrate now on rich text. You will find the most frequently used commands (bold, italic,
underline, case conversion, font face/size/color/highlight color, etc.) displayed along the Report
formatting toolbar. Let your mouse cursor hover over each toolbutton in turn to display a tooltip
(text popup message) informing you of its function and keyboard shortcut, if there is one. Try them
out.
Aligning and Indenting Text
Report Writer offers several methods for indenting and aligning text. Toolbuttons for many of them
are on the Paragraph toolbar.
© 2011 Iccomplish, Inc
How Do I?
63
Alignment and justification
Click the Left, Right, Justify or Center toolbuttons (or press their corresponding shortcut keys) for
text aligned with the left or right margins, both margins or center of the report.
Tab key and Auto Indent
Press the Tab key one or more times to indent the text an appropriate distance from the left
margin. This is best used for short single lines, since tabbing and auto-indenting only affect the first
line of a paragraph.
Bulleted and numbered paragraphs
Text which is bulleted and numbered is automatically indented. Round bullet symbols, numbers and
letters are available. Toolbuttons for this are on the Paragraph toolbar.
Enclosing text in table cells
Just as in HTML pages, you can compartmentalize text in individual cells of tables for greater
control when combining text and images. These advanced methods are discussed in Tables.
Inserting Items into Your Text
The Insert menu
Frequently-reused text (also known as "boilerplate" text) can be copied to the Windows Clipboard
(see Copying and moving text), then pasted in where needed.
Tables
To insert a table where required, click Main menu / Table / Insert command. See the Tables
section.
3.3.4.3.1.1 Using Images
Images
Since images may occasionally be required, ezScriptWriter allows you to display images alongside
text. Images can flow with the text or be anchored to the page.
To Insert Images
Inserting images is very easy. You can do this by cutting and pasting them from the Windows
clipboard, although we recommend that you use the Insert command to select the appropriate
image(s) from image files already stored on your computer.
© 2011 Iccomplish, Inc
64
ezScriptWriter User Manual
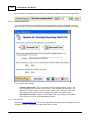
Find an image you would like to insert into your report and note its location in Windows Explorer.
Right-click in the report where you would like to insert the image and click Insert / At Caret Postion
to open the Insert image into report window.
Navigate to the folder containing the image, click it to select it and then click Open to insert it at
the current cursor position.
To Modify Image Properties
To modify the properties of an image, right-click the image to pull up the Image Attributes dialog.
The position of the image as well as text wrapping style can be modified. Saving options allow
embedding of the image (recommended for small-to-mid sized images) or saving externally (to the
same folder as the database). See the Report Designer section for details on saving externally.
© 2011 Iccomplish, Inc
How Do I?
65
To Delete Images
To delete the image, click it (a border with small square "handles" will appear around it - see below)
and press Delete. To undo this step, press Ctrl+Z.
This shows the border and handles that become
visible on single-clicking an image. Reposition the
image by dragging it when the border is visible, or
re-size it by dragging one of its handles.
Copying, Cutting, Pasting Images
You can copy an image from one report to another, or even from a compatible document such as a
Microsoft Word document, via the Windows Clipboard, simply by pressing Ctrl+C , Ctrl+X , or
Ctrl+V to Cut, Copy or Paste the image respectively.
Moving, Positioning, and Resizing Images
Images can be moved and repositioned by dragging them, inserting spaces, tabs or text between
them and the left margin, by indenting the left margin, or by enclosing the image in a table cell.
© 2011 Iccomplish, Inc
66
ezScriptWriter User Manual
Resizing can be done by dragging the handles, but it is better to do this only to get a rough idea of
their ideal size, then use an image editing program to resize them accurately while maintaining their
proportion and re-import them.
3.3.4.3.1.2 Using Tables
Overview
Using the Tables toolbar you can create and edit tables. You can also combine and split cells, color
cells, color the table, set the table border-width and color, delete and insert table rows and columns.
This feature helps you create anything from simple reports to complex forms.
Working with Tables
To Create a Table in Report Writer
Click Main menu / Table / Insert table. A dialog box will appear allowing you to choose:
the number of columns
the number of rows
This table has 3 rows, 2 columns, center alignment and a border:
Row 1 Col 1
Row 2 Col 1
Row 2 Col 1
Row1 Col 2
Row2 Col 2
Row3 Col 2
The best way to learn about tables is to create tables in various configurations within a test report.
To Alter a Table
Click inside a table in the report, then activate Main menu / Table . There are several menu
choices, enabling you to alter the following table parameters.
Other methods of altering tables
Editing text in tables
Adjusting column width and position
© 2011 Iccomplish, Inc
How Do I?
67
Moving a column or row
Inserting and deleting rows and columns
Splitting and combining cells
The proportional width of a table (as a percentage of the report width) can be altered by using the
table properties dialog or by dragging the table-handles in the horizontal report ruler.
You can adjust the width of each column by dragging the dividing partition left or right.
To enter text within a table, position the report cursor in the appropriate cell and begin typing.
If you make a mistake in table creation, deletion or typing, you can generally undo your actions by
pressing Ctrl+Z or clicking the Undo toolbutton.
To delete a table, position the report cursor anywhere within it and click Main menu / Table /
Delete. You will be asked to confirm your action. You can also delete a table without confirmation
by inserting a blank line above and below if not already present, highlighting the whole table,
including the two blank lines, and pressing Del. Highlighting just the table and pressing Del
removes all text within the table but not the table itself. As mentioned above, you can restore a
deleted table by pressing Ctrl+Z or clicking the Undo toolbutton.
You cannot easily move, copy , or swap whole columns or rows within a table; you must move each
cell individually. For this reason you should design the layout of your table carefully before creating
it.
Currently, you cannot create a table within a table.
Editing Text in Tables
Here are some more hints and tips about doing this.
As mentioned previously, text (or images) in one or more cells, rows or columns can be individually
aligned (left | right | center) by highlighting it then choosing one of the alignment toolbuttons on the
Paragraph toolbar (or via the Edit menu or a keyboard shortcut). Centering text and right-justifying
dollars and cents can be very effective.
If you choose left or right alignment, the text will be hard up against the wall of the table, as cell
padding is not provided. One workaround is to create extra hidden columns to act as margins.
For example:
Text hard up against left margin
Add a dummy column
Then hide its border
To hide the border, click anywhere in the cell with text, then click the Show left border toolbutton on
the Table toolbar to disable it. This will be discussed more fully later. You can drag the Table toolbar
off the Toolbars area, making it "float" closer to where you are working.
© 2011 Iccomplish, Inc
68
ezScriptWriter User Manual
You can treat text in tables as you would anywhere else in an report. You can cut, copy and paste
it.
You can select (highlight) a whole row or column by performing one of the following actions:
?
Click-dragging the mouse cursor over it; or
?
Combining the Shift key with the cursor (arrow) keys to select multiple cells just like
increasing the size of a highlighted section of text; or
?
Clicking in one cell and selecting the Select table row or Select table column command
from Main menu / Table, or choosing the appropriate Table toolbar toolbutton.
Having highlighted these cells you can apply boldface, italics or color changes to the text or
background.
Adjusting Column Width and Position
You can adjust the width and position of any column by dragging the internal vertical partitions left
or right. When your mouse cursor passes over a partition, the cursor will change to a pair of vertical
bars with arrows:
You cannot drag the horizontal partitions up or down, but you can add extra spaces to the entries in
a row, or add a blank row or column.
You may need to adjust the partitions after deleting a column.
Navigating Within a Table
Think of a table as being a block of text that happens to contain vertical and horizontal lines. Use
the Tab and arrow cursor keys if you don't want to keep reaching for the mouse all the time. To
jump from cell to cell, left to right along a row and top to bottom, press the Tab key. To go in the
reverse direction, press Shift+Tab.
The Right arrow key follows the same direction as the Tab key but stops at each character.
Similarly, the Left arrow key follows the Shift+Tab key. The Up and Down arrow keys move up and
down columns. Note that if you start from outside a table, the Down arrow key will move down the
leftmost column and the Up arrow key will move up the rightmost column.
© 2011 Iccomplish, Inc
How Do I?
69
Moving Text, Columns, and Tables
To Move and Copy Text from Cell to Cell
The destination cell need not be an adjacent cell. You can move text anywhere within the table.
Alternatively, you can copy or cut a highlighted block to the Windows Clipboard and paste it in. This
can be handy if you need to paste the same text into several cells.
1.
Highlight the entire contents of a cell using the cursor keys or the mouse
2.
Drag the highlighted block to the destination cell.
NOTE: If the destination cell is not empty you can use this method to insert the block into existing
text.
To Move a Column or Row
You can only move one cell at a time using the method described in Moving and copying text from
cell to cell; you cannot move a whole column or row. For this reason, you should plan your layout
carefully before creating the table. However, you can achieve the same end by inserting a new row
or column in the destination position, dragging the contents of each cell in the original row or
column across to it, then deleting the original.
You can also copy one or more highlighted rows and paste them as separate tables, rearrange
them vertically to form a new sequence and then join them. See Moving and copying tables.
To Move and Copy Tables
Whole tables, including contents, can be cut, copied and pasted, just like any other blocks of
highlighted text, to and from the Windows Clipboard. They cannot be dragged. You can also copy
one or more highlighted rows and paste them elsewhere (outside the table) as a separate table.
However, pasting them back only replaces existing text corresponding to the number of rows you
pasted in. Instead, create the same number of extra rows, then fill them with inserted text. The
following example shows you how:
Example: Insert Table 2 into table 1.
aaaaa Table 1
ddddd
bbbbb Table 2
ccccc
Position the report cursor in the top row (aaaaa) of Table 1, then click the Insert table row
toolbutton twice, to insert two rows.
aaaaa Table 1
© 2011 Iccomplish, Inc
70
ezScriptWriter User Manual
ddddd
bbbbb Table 2
ccccc
Now, position the report cursor in the top row (bbbbb) of Table 2, and press Shift+Down to highlight
both of its rows. Press Ctrl+C to copy them, then position the cursor on the top blank row in Table
1 and press Ctrl+V to paste the text contents.
aaaaa Table 1
bbbbb Table 2
ccccc
ddddd
bbbbb Table 2
ccccc
Finally, delete Table 2 and tidy up. Done!
aaaaa Table 1
bbbbb
ccccc
ddddd
Inserting and Deleting Rows and Columns
To Insert a Row or Column
New rows are added below the selected row. New columns are added to the right of the selected
column.
To add a row, select the existing row below which you want the new row to appear. by clicking in it.
Then:
Click the Insert table row icon; or
Click Main menu / Table / Insert table row; or
Press the Tab key after positioning the cursor in the rightmost cell of the selected row. This will
insert a new table row and move the focus to the first cell of the new row. E.g. (the graphics below
are images, not tables):
Before
© 2011 Iccomplish, Inc
How Do I?
71
After
Successive clicking will add more blank rows.
To Delete a Row or Column
If you have just inserted one (blank) row or column too many, you can reverse this by clicking Undo
(Ctrl+Z).
Alternatively, to delete a row or column, select it and click the Delete table row toolbutton.
If you need to remove a block of consecutive rows within a table, start at the top row to be deleted
and keep clicking the Delete table row toolbutton until the deletion is completed.
Splitting and Combining Cells
To Horizontal Split and Combine Cells
Splitting and combining cells
You can split a cell into two horizontally by adding a partition, or remove it to combine two cells
into one. Use the Split table cell and Combine table cells commands in Main menu / Table or
corresponding Table toolbar toolbuttons.
Here is a table, originally 3 rows and 2 columns, which has had split and combine operations
carried out on the second and third rows respectively.
Cell 1
Cell 2
Cells 1 and 2 combined
Cell 3
Splitting columns
To split a column of blank cells into two: highlight the whole column then click the Split table cell
toolbutton.
To Vertical Split and Combine Cells
Vertical splitting relies on showing/hiding the top and bottom borders of adjacent cells.
Let's start with a 4-cell table:
Cell 1
Cell 3
© 2011 Iccomplish, Inc
Cell 2
Cell 4
72
ezScriptWriter User Manual
Figure 1
Think of each cell as having four borders, like this:
Cell 1
Cell 2
Cell 3
Cell 4
Figure 2
To avoid grid thickening, either the upper cell's floor or the lower cell's ceiling may be visible, but not
both. (Occasionally you may notice a double thickness grid wall but this will disappear when you
return to the report after moving to another node or closing the file, so is an artefact.)
Cell 1 floor visible
Cell 3 ceiling hidden
Cell 2
Cell 4
Figure 3
Cell 1 floor hidden
Cell 3 ceiling visible
Cell 2
Cell 4
Figure 4
Cell 1 floor hidden
Cell 3 ceiling hidden
Cell 2
Cell 4
Figure 5
Note the misalignment in the floors of Cells 1 and 2 in Figure 3 compared with Figure 4, due to
different show/hide selections. If you notice this when creating your own tables, ensure that these
parameters match across the whole row.
We have thus "combined" cells 1 and 3, so let's add some blank lines and rename the combination
Cell 5:
Cell 2
Cell 5
Cell 4
Vertical splitting is essentially the reverse of this.
Selecting Rows and Columns
By clicking any cell and then choosing from Select table row or Select table column in the Table
menu or the Table toolbar, you can select the whole row or column that includes that cell.
This command is useful if you wish to change the font attributes, colors, etc. of all cells in the row
or column, or to clear the contents of the row or column. You cannot use it to copy, move, swap or
delete a row or column.
© 2011 Iccomplish, Inc
How Do I?
73
You can also select a whole column, row or block of cells by click-dragging the mouse pointer or by
using Shift+cursor keys. See Editing text in tables.
To Select an Entire Table
Clicking anywhere in a table and selecting Main menu / Table / Select entire table will immediately
select the whole table, which can be very convenient if you wish to change the same property for all
cells or to hide/unhide cell borders for the whole table.
Table and Cell Borders
The right-most eight toolbuttons of the Table toolbar determine whether the borders of the cells
selected are visible or hidden. Click any cell and see which of these border toolbuttons are
depressed. Clicking any of them again reverses their effect.
Fig. 1: Original
Cell 1
Cell 3
This is the original table.
Cell 2
Cell 4
Fig.2: Hide borders
Cell 1
Cell 3
Cell 2
Cell 4
This can be reversed by clicking Show borders1.
Fig.3: Show outer border(s)
Cell 1
Cell 3
This can can be reversed by clicking Show inner border(s)
Cell 2
Cell 4
Fig.4: Hide borders then Show inner border(s)
Cell 1
Cell 3
This can be reversed by clicking Show borders.
Cell 2
Cell 4
Fig.5: Show left border and Show right border disabled in all cells
Cell 1
Cell 3
Cell 2
Cell 4
Fig.6: Show top border enabled in lower cells and Show bottom border enabled in upper cells.
Cell 1
Cell 2
Cell 3
Cell 4
Combining these borders results in a thicker line which makes a convenient divider.
Fig.7: Show top border disabled in lower cells and Show bottom border disabled in upper cells.
Cell 1
Cell 2
Cell 3
Cell 4
© 2011 Iccomplish, Inc
74
ezScriptWriter User Manual
Fig.8: Show right border enabled in Cell 1 and Show left border enabled in Cell 2. Show right
border disabled in Cell 1 and Show left border enabled in Cell 4.
Cell 1
Cell 2
Cell 3
Cell 4
Cells 3 and 4 display the standard configuration as seen in Fig. 1. You would expect that adding
Cell 1's right border would cause a thicker partition, but its only effect is to stagger the existing one
towards Cell 1. The only remedy is to disable Cell 1's right border.
Notes:
If you highlight a block of text and accidentally click any of the Show ... border toolbuttons your
paragraph will display a horizontal or vertical line along one of its borders like part of a table. Doing
this deliberately is not recommended as such stray table cell wall lines may cause interference with
text and prove difficult to remove.
Table and Cell Color
Report Writer gives you full control over table and cell colors. With the table properties screens
you can set the global table color or individual cell colors, as well as the table border-color and
border-width.
Table Hints and Tips
To Insert Images into Tables
Tables are a good way to store images, which can be inserted using the Main menu / Insert /
Image at Caret Position command. Just like web-pages which owe their neatness to tables with
hidden borders, you can hide the table borders once you have finished inserting images. If you wish
to display the table frame (also referred to as a grid), you can space the image away from the cell
wall by adding a blank line above (press Enter), or by adding spaces.
3.3.4.4
Create a Note
You can use the Note Writer to create simple chart notes on a patient. This can be useful for recording
telephone messages or brief in-office encounters that don't warrant a full Exam Encounter.
© 2011 Iccomplish, Inc
How Do I?
3.3.4.5
75
Attach/Scan a Document
There are two ways to get documents into the software: Direct Scan Method and Attach File Method.
Both methods create a new folder item in your database folder containing a copy of the document. If you
Attach a document, the original document stays in the present location and an exact duplicate is added
to the Documents folder. You can browse the Documents folder by opening the database folder and
clicking Documents. The documents are arranged by Patient Name (alphabetized), then by category.
WARNING: Do not move, rename or delete files in the Document folder as this will cause the file to
become unavailable for browsing/opening in the Encounter List.
Direct Scan Method (requires a TWAIN compatible scanner):
Click the Scan Document button after you select <Add New>.
© 2011 Iccomplish, Inc
76
ezScriptWriter User Manual
Attach File Method
To Attach a file that already exists (for example, a faxed/emaild pdf document or your own scanned
document), click the Attachments button at the bottom of the Encounter List.
© 2011 Iccomplish, Inc
How Do I?
77
On the next screen, click the Add File button to locate the file you wish to Attach.
The document properties page appears and you must enter a category. Then click the browse button to
attach the file.
3.3.4.6
Rx Logbook
The Prescription Tracking Logbook allows for tracking of all prescriptions created in the software. There
are four categories:
Full Rx List
Medications
Spectacles
Contact Lenses
© 2011 Iccomplish, Inc
78
ezScriptWriter User Manual
Double-click an item to select. Use the Expand/Collapse checkbox to show/hide the full prescription.
3.4
Patient Reminders
Patient Reminders allows a method to send messages/reminders to yourself (or others) for specific
patients, generally to be acted upon at some future date. For example, if you wish to remind your staff to
call a patient in a week to check the status of an eye problem you would create an eReminder and set
the send date for one week in the future.
Create/Send a New Reminder
Receiving a Reminder
Managing Reminders
User Groups
© 2011 Iccomplish, Inc
How Do I?
3.4.1
79
Create/Send a New Reminder
To create and send an eReminder, you fill out a form that resembles a standard email. The following
fields must be entered:
To Field (REQUIRED)
Enter the user that the email should be sent to (or choose a user group).
Action Date (REQUIRED)
This is the date the eReminder will trigger and appear in the recipients inbox.
Patient (REQUIRED)
The patient that is the subject of the eReminder.
Subject (REQUIRED)
The reason for the eReminder.
Urgency
A flag for the level of urgency.
Mark as Confidential
If you wish to keep the eReminder from being read by anyone but the actual user, you can set a
password.
© 2011 Iccomplish, Inc
80
ezScriptWriter User Manual
eReminder Body
The text of the reminder (can be formatted by using the richtext controls).
3.4.2
Receiving a Reminder
When a Reminder is received, there are four options that the user can take:
Mark as Completed
Once you have completed the action required by the Reminder, you can mark it as completed by
clicking the appropriate button.
Assign to Another User
To have another user take over the responsibility of the Reminder, use the Assign to Another User
button. The Reminder will show up in their inbox.
Reset Due Date
If you need further time to finish the Reminder, simply reset the due date using the Reset Due Date
button.
© 2011 Iccomplish, Inc
How Do I?
81
Discard
If you wish to delete this Reminder (for example, it is no longer relevant).
3.4.3
Managing Reminders
The Reminders can be located in four areas:
Inbox
Holds pending Reminders that have not been acted upon.
Completed/Archived
Contains a list of your completed Reminders (those marked as completed by the user).
Outbox/Pending
Those reminders that have not triggered yet (pending) will be listed here (only those of the user who
created them).
Deleted Items
Any items that were deleted previously.
3.4.4
User Groups
You can group together users (e.g. "Staff", "part-time doctors", "receptionists") so that Reminders can
be sent only to the members of that particular group.
© 2011 Iccomplish, Inc
82
ezScriptWriter User Manual
To create a group, click New then enter a unique name for the group. Then click the names of the users
to include and use the arrows to transfer to the "Current Members of Group" list.
3.5
Special Functions
The Special Functions menu allows you to perform various housekeeping functions on the database,
manage report templates and rolodex names, report bugs and check for updates, and query the
database.
Database Maintenance
Backup Database
Compact Database
Software Maintenance
Report Bugs
Check for Updates
Data Management
Query/Statistics
Encrypt/Compress Reports
Miscellaneous Functions
Report Designer
Rolodex Utility
© 2011 Iccomplish, Inc
How Do I?
3.5.1
83
Database Maintenance
The Database Maintenance menu allows options for maintaining the health of your database.
Backup Database
Compact Database
3.5.1.1
Backup Database
Utility to create a compressed backup copy of ezScriptWriter’s date files. We recommend that you
perform a backup EVERY DAY and save the compressed file on removable media (CD Rom, USB Flash
Drive, or another network drive). Store a copy of your database off-site (either using the removable media
or an online data storage site). This off-site copy should be replaced weekly (if not daily).
© 2011 Iccomplish, Inc
84
ezScriptWriter User Manual
You can do two types of backup's:
With attached/scanned documents included
If you leave the "Include Documents Folder" checked, the software will compare the existing
backup document folder with the current and copy any new documents over. If this is the
first time you are backing the documents folder up (or if the location does not have an
existing copy to compare against), the process may take much longer than the usual
backup.
Without documents
By leaving the checkbox unselected you can do a backup of just the main databases.
WARNING: NEVER save your backup folder to the same directory as the actual database files (e.g.
© 2011 Iccomplish, Inc
How Do I?
85
never use "C:\ezHW_Data\ezHW_Backup" as a backup location). You can use "C:\ezHW_Backup" on
the same drive, however if you have a hard-drive crash you will lose both your original database and the
backup(s). Instead, backup to an external drive or removable media.
Burn CD Disc
If your computer includes a CD recorder, you can copy files to a writeable disc. This process is called
burning a disc. Use the "Burn CD Disc" button to create a CD-ROM with your database files. This utility
copies the files to the Windows temporary CD folder. You must complete the process by using the
Windows CD Writing Wizard.
The CD Writing Wizard opens and prompts you for a label for the CD (it is pre-filled with the current
Backup Date). You can enter up to 16 characters. Click Next and the wizard displays a progress bar
indicating the status. If you did not select the Close the wizard after the files have been written check
box, then a final dialog box opens, asking if you'd like to make an additional copy of the same files.
Restoring Database Files
Navigate to the folder you originally created to save your backups and open the backup file (it will have a
name like “Backup090110xxxx.zip”. The numbers are a date/time stamp, so this example would be Sep
1, 2010. Once you have located the most recent backup (usually in the C:\ezHW_Backup folder on your
primary computer, but that location may vary), then you need to uncompress (unzip) the file. Right click
the file and select “Extract” (or just double click the file; in most versions of Windows this will start the
uncompression feature). Once the folder has been extracted, you will see five databases (each end in ".
dez" extension).
Typically the database file MOST LIKELY TO CRASH is the ezDB.dez file. So you should FIRST copy
just that file over from your backup copy and see if the software starts successfully. If you know the
exact order you entered patients since the last backup, you can re-enter them in the same order so the
exact same Chart# is assigned. This way your ezReports.dez database can still be in sync. If you do
not know the exact order, then you should copy the following THREE files to your primary ezHW_Data
folder: ezDB.dez, ezReports.dez and ezImages.dez. The computer will ask if you wish to overwrite and
you should respond yes. The ezToolData and events.dez files are not likely to crash and should only be
© 2011 Iccomplish, Inc
86
ezScriptWriter User Manual
copied if they do not currently exist in your ezHW_Data folder (be sure to check, because you will get
errors if they are not there!).
WARNING: If you are restoring the database files from a utility other than ezBackup (for example, a
utility you run every night to backup the entire hard-drive) you need to take extra precautions to ensure
you do not accidentally overwrite good data with outdated files. If your backup software does incremental
backups, you may only have ONE copy of the database to roll back to (and if it's corrupted you are out
of luck). So, if you are using third-party backup, we still recommend that you use the ezBackup utility to
create dated, compressed copies of your database nightly.
3.5.1.2
Compact Database
Utility to compress (compact) the database and sometimes repair minor data errors. We recommend
you run the Compact/Repair utility about once a week to keep your data files in good condition. It’s
HIGHLY RECOMMENDED to run the Backup utility before the Compact Utility.
The Compact Utility will automatically close the software on the current computer, but you MUST close
out the software on any other computers on the network. This includes all modules (ezClaimBiller and
ezApptScheduler).
3.5.2
Software Mantenance
Use these menu items to look for software updates or send bug reports.
© 2011 Iccomplish, Inc
How Do I?
87
Report Bugs
Check for Updates
3.5.2.1
Report Bugs
If you encounter a persistent error or glitch (programmers call them “bugs”), you can upload or fax a
report to us so that the issue may be resolved. Simply follow the on-screen instructions to generate the
bug report.
Bug reports are reviewed periodically to look for patterns and complete software crashes. If you have
specific concerns you would like addressed, please submit the Bug Report with the error information and
send an email to Tech Support with your concern. Bug Reports will not normally be answered on an
individual basis.
3.5.2.2
Check for Updates
Occasionally you will notice that an Alert will appear at the bottom of the ezScriptWriter Login screen
alerting you that an update to the software is available (assuming you have Internet connection for this
check to occur):
This utility checks the Internet site for any updates to the software. If a newer version is found it is
© 2011 Iccomplish, Inc
88
ezScriptWriter User Manual
automatically downloaded and installed. You should run this utility every few months or when notified by
ezScriptWriter Support Team of a new release.
3.5.3
Data Management
The Data Management menu allows for creating queries of the database (to find all patients with certain
attributes) and to encrypt/compress reports.
Query/Statistics
Encrypt/Compress Reports
3.5.3.1
Query/Statistics
The QueryBuilder tool allows for mining of the database for specific search criteria. For example, to find
all patients with a diagnosis code of "367.1", the steps below should be followed:
(1) click the Encounter List option (since diagnosis codes are associated with Encounters, not Patients)
(2) in the Field Name dropdown, select the DIAG1 field
(3) choose "is" as the operator (e.g. an exact match, so that ONLY the diagnosis is found).
(4) enter "367.1" in the search criteria field. This is what we are searching for in the database.
NOTE: To perform a complete search, you should repeat these steps for the other diagnosis fields
DIAG2-DIAG4.
© 2011 Iccomplish, Inc
How Do I?
89
The Query Results screen will display. When working with encounters, the name can be double-clicked
to open the Encounter.
Operator Choices:
"Is" - exact match
"Is Not" - does not match
"Contains" - the field contains the criteria
"Starts With" - the field begins with the criteria
"Ends With" - the field ends with the criteria
© 2011 Iccomplish, Inc
90
3.5.3.2
ezScriptWriter User Manual
Encrypt/Compress Reports
To conserve space and/or to fully protect your database from prying eyes you can run the Encrypt/
Compress Reports utility. It converts the text-based report to a encrypted format that saves space and
cannot be decoded outside the software itself.
WARNING: If you notice your ezReports.dez database growing close to the 1GB size you should run
this utility.
3.5.4
Miscellaneous Functions
The Miscellaneous Functions menu allows you to open the Report Designer and Rolodex Utility.
Report Designer
Rolodex Utility
3.5.4.1
Report Designer
The Report Designer allows creation and editing of the various reports and Rx formats available in
ezScriptWriter. When the report template screen finishes loading, you will notice that the reports are
listed alphabetically by name and that each has a specific category name associated with the report.
You can easily switch between an alphabetized listing of report name or by category by clicking on the
heading bar.
To edit an existing report, click on the name and then click the Edit button (or, alternatively, just double© 2011 Iccomplish, Inc
How Do I?
91
click the report name). To create a new report click the New button and a dialog will appear to guide you
through creating a new report:
Step A: Select an appropriate category for the report. If the report does not easily fit one of the predefined categories, use the Misc. Reports category.
Step B: Give the report a unique and descriptive name (for example, “Letter to Patient-Importance of
Diabetic Control”). You may also indicate whether this report will be based on a prior report format or
blank report. Even if you choose a blank report, you can easily copy and paste data from your favorite
word processing program.
© 2011 Iccomplish, Inc
92
ezScriptWriter User Manual
When the report, whether new or editing an existing report, opens, you will be in the Report Designer
mode. The Designer looks and acts just like the regular report viewer with just a few important
differences. The first difference is that the data you are working on is a Template from which your other
reports are built. As such, the Template needs to be told what data to display.
© 2011 Iccomplish, Inc
How Do I?
93
There are three types of data you can insert into your template:
Static Text
This is text that does not change and will be included in every report of that type. Examples include
headings and labels such as “Date of Exam:” and “Report of Findings:”. You create static text by simply
typing text in the Designer just like a work processor.
Dynamic Text (aka Fields)
These are special codes embedded in your report document that tells ezScriptWriter to insert text
appropriate to, for example, a particular patient or provider, each Field has a specific format and looks
like this:
Dear [[Name Title]][[Last Name]]:
The word “Dear” and the semi-colon “:” are static text. However, the double-bracketed fields indicate
placeholders for data to be inserted, in this case the patients salutation (for example, Mr. or Mrs.) and
last name. Using the list of pre-defined Fields, it is possible to generate grammatically correct and fully
personalized letters, handouts and miscellaneous reports. Using even more specialized Fields such as
[[MedRx]] you can create Rx’s for your patients. Many sample templates for various reports, Rx’s and
letters have been created for you. Simply copy the old report to the new and edit the text and Fields as
needed.
© 2011 Iccomplish, Inc
94
ezScriptWriter User Manual
Inserting Fields can be done using the dropdown list at the top of the Report Designer. A full list of
available fields are listed below.
Images
In addition addition to static text and FIELDS, you may also insert static images in your documents.
These may be logos or signature blocks or any other image you desire.
© 2011 Iccomplish, Inc
How Do I?
95
WARNING: Images consume lots of disc space and if you embed a large image in a report, then each
and every report you save will have a copy of that image saved to the database. It is recommended that
you limit embedded images to small (under 10K) size. Examples would be a signature block. Typically,
images that are embedded should be in “.jpg” or similar format, since they are highly compressed.
To modify the properties of an image, right-click the image to pull up the Image Attributes dialog:
When saving the image there are three ways of doing so:
© 2011 Iccomplish, Inc
96
ezScriptWriter User Manual
Embed data in document
This is the simplest way, but can quickly fill up your report database. Only use very small, low resolution
images with this method. To convert and resize your image, use a product like SnagIt (www.techsmith.
com) to reduce the resolution. If you embed too large an image you will receive a warning when
attempting to save.
Embed original file reference
This is the best way to incorporate larger image files; the image is save seperately from the document
and is displayed only when you open the document. The drawback is that the image must be stored in
the database folder on the network. So create a subfolder in the C:\ezHW_Data folder called "Embedded
Images" and then add your images to that folder (for instance signature stamps or practice logo). To
insert the image, click the menu item Insert->Image->Move with Text in the Report Designer:
When the Insert Image dialog shows, navigate to your network database folder. Click on the image you
wish to embed and click open. When you save the document, a link to this path to the image is saved.
When you create a report this same path is maintained.
© 2011 Iccomplish, Inc
How Do I?
97
For more information on editing text and adding tables, see the Report Writer section of this manual.
3.5.4.1.1 Available Fields
This is a list of all Codes that can be inserted into Reports/Handouts/Rx's. Use the Report Designer to
insert codes (some may not be in the dropdown menu, but you can manually enter them into the
report).
[[Rx Date]]
[[Rx Date+1]]
© 2011 Iccomplish, Inc
98
ezScriptWriter User Manual
[[Rx Date+2]]
[[Today Date]]
[[Today Date+1
[[Today Date+2]]
[[Last Exam]]
[[Last Exam+1
[[Last Exam+2]]
[[Enc Date]]
[[Enc Date+1]]
[[Enc Date+2]]
[[Request Date]] Prompts user to enter a Date
[[Consult Reason]] Prompts to enter a Consult Reason
[[RolodexName]] Prompts to select from the Rolodex
[[RolodexNameDegree]]
[[RolodexFirstName]]
[[RolodexLastName]]
[[RolodexInitial]]
[[RolodexSpecialty]]
[[RolodexDegree]]
[[RolodexClinic]]
[[RolodexAddress]]
[[RolodexCityStateZip]]
[[RolodexTel]]
[[RolodexFax]]
[[RolodexNotes]]
[[RolodexEmail]]
[[RolodexUPIN]]
[[RolodexNPI]]
[[RolodexFullAddress]]
PATIENT INFORMATION
[[FirstLastName]]
[[LastFirstMI]]
[[FirstName]]
[[Initial]]
[[LastName]]
[[NameTitle]]
[[Suffix]]
[[Age]]
[[DOB]]
[[Home Tel]]
[[Day Tel]]
[[Email]]
[[Primary Ins]]
[[UCPrimary Ins]]
[[Primary InsID]]
[[Guarantor]]
[[Primary InsGrp]]
[[Primary Auth#]]
[[GuarantorDOB]]
[[GuarantorGender]]
© 2011 Iccomplish, Inc
How Do I?
[[Secondary Ins]]
[[UCSecondary Ins]]
[[Secondary InsID]]
[[Secondary InsGrp]]
[[Secondary Auth#]]
[[SecondarySubscriber]]
[[SecondaryDOB]]
[[SecondaryGender]]
[[Nickname]]
[[Employer]]
[[Occupation]]
[[Chart#]]
[[UCFirstLastName]] UC means Uppercase
[[UCLastFirstMI
[[UCFirstName]]
[[UCLastName]]
[[UCNameTitle]]
[[UCSuffix]]
[[UCPrimary Ins]]
[[R]]
Patient.Race
[[G]]
[[UCgender]]
[[Gender]]
[[He/She]]
[[he/she
[[His/Her]]
[[his/her]]
[[Him/Her]]
[[him/her]]
[[PatFullAddress]] Multi-line address
[[PatAddress1]]
[[PatAddress2]]
[[PatCity]]
[[PatState]]
[[PatPostalCode]]
[[CustomName#1]]
[[CustomValue#1]]
[[CustomName#2]]
[[CustomValue#2]]
[[CustomName#3]]
[[CustomValue#3]]
[[CustomName#4]]
[[CustomValue#4]]
[[CustomName#5]]
[[CustomValue#5]]
[[CustomName#6]]
[[CustomValue#6]]
© 2011 Iccomplish, Inc
99
100
ezScriptWriter User Manual
PROVIDER/PRACTICE INFO
[[DrNameFull]]
[[PracticeName]]
[[ProviderFirst]]
[[ProviderLast]]
[[ProviderMI]]
[[UCDrNameFull]]
[[UCPracticeName]]
[[UCProviderFirst]]
[[UCProviderLast]]
[[UCProviderMI]]
[[PracticeTel]]
[[PracticeFax]]
[[PracticeEmail]]
[[PracticeWeb]]
[[PracticeAddress1]]
[[PracticeAddress2]]
[[PracticeCity]]
[[PracticeState]]
[[PracticeZIP]]
[[PracCityStateZip]][[PracticeFullAddress]]
[[GroupTIN]]
[[GroupMedicare]]
[[ProviderLic]]
[[ProviderDEA]]
[[ProviderDegree]]
[[ProvNPI]]
[[GroupTIN]]
[[GroupNPI]]
[[GroupMedicare]]
[[ProviderLic]]
[[ProviderDEA]]
[[ProvNPI]]
[[ProviderDegree]]
[[Final SRx]]
[[sphOD]]
[[cylOD]]
[[axOD]]
[[addOD]]
[[addOD]]
[[prismOD]]
[[prismOD]]
[[sphOS]]
[[cylOS]]
[[axOS]]
[[addOS]]
[[addOS]]
[[prismOS]]
[[prismOS]]
[[SRxNote]]
[[SRxRecommend]]
© 2011 Iccomplish, Inc
How Do I?
101
[[Final SRx]]
[[SpecRx]]
[[CLBrandOD]]
[[CLBCOD]]
[[CLsphOD]]
[[CLcylOD]]
[[CLaxOD]]
[[CLDIAOD]]
[[CLparametersOD]]
[[CLBrandOS]]
[[CLBCOS]]
[[CLsphOS]]
[[CLcylOS]]
[[CLaxOS]]
[[CLDIAOS]]
[[CLparametersOS]]
[[CLinstructions]]
[[CLRx]]
[[Final CLRx]]
[[Med Rx]]
FOR USE BY THE SOFTWARE (DO NOT ADD/REMOVE)
[[SRxTool]]
[[CLRxTool]]
[[MedRxTool]]
3.5.4.2
Rolodex Utility
Allows managing of all your healthcare provider contacts (for example, consultants, PCP’s, specialists
and others). The Rolodex is automatically launched when reports include the Rolodex Field (for example,
when writing a letter to a patient’s PCP). You can add or modify existing entries simply by clicking the
action buttons at the bottom of the screen.
Consultants - Doctors/providers to whom you refer patients
PCP - Primary care providers
Specialists - specialty medical providers (e.g. neurologists)
Facility - nursing homes or skilled health care facilities
Other - others that do not readily fit in the above categories
© 2011 Iccomplish, Inc
102
3.6
ezScriptWriter User Manual
Recall Wizard
The Recall Wizard allows you to create and send recall notices to your patients. The tool is powerful
enough to create specific patient lists for exporting also.
3.6.1
Creating a Recall List
Creating a Recall List is a three step process as shown on the Wizard:
© 2011 Iccomplish, Inc
How Do I?
103
Step 1 - Choose Patients for Inclusion
To begin the Recall process you need to select the Date Range:
Exam Date - selection is by the last exam date on file
Recall Date - selection is by the Recall Date you set (either when finalizing an encounter or on
the HIPAA tab of the patient demographics screen)
Acquisition Date - selection is based on when the patient was originally acquired by the
practice (date the patient was first entered in the system)
Select the date range that would encompass all the patients you are attempting to Recall. For example,
you can select a one month period for the current month using the Recall Date option.
© 2011 Iccomplish, Inc
104
ezScriptWriter User Manual
The patient selection criteria allow you to further refine your Recall List by specifying certain required
attributes (for example, all female patients over the age of 40). This can be useful for marketing outside
the standard recall system.
Step 2 - Review the List of Patients
After clicking the green next arrow, a list of patients found will be presented. This list can be further
refined and sorted.
You have the option of excluding certain categories of patients (such as those marked "inactive" or "bad
address").
To refine your list even further, click the "Advanced Search/Sort" button. This allows for removal of
duplicates from the list (for example, family members at the same address will be consolidated to one
mailing). A multi-level sort option is also available.
© 2011 Iccomplish, Inc
How Do I?
105
Step 3 - Select the Contact Method
The last step to creating a Recall is to select how you want the data presented (based on how it will be
used). This can be one of five methods:
Create Labels
Create Form Letters
Generate Email List
Generate Phone List
Export the Data
3.6.1.1
Create Labels
To create labels for a Recall mailing, click the Labels button. The Select Format dialog will display;
choose either sheet (laser or inkjet) or DYMO printer roll. You must have a DYMO printer installed for
this option to be available. Single or dual roll LabelWriter® printers are supported.
© 2011 Iccomplish, Inc
106
ezScriptWriter User Manual
Using the Sheet Option
If you select the Sheet option you will first need to specify the correct labels. Using the standard Avery®
label system numbers, you select the correct label number (e.g. for standard address use 5160 or
5161). You can click on a number to see the size and type. If you cannot find your label, use the New
Label button to create a new one.
After you click OK, the Label Template dialog will show. A list of available templates (some pre-existing,
some that you may have created) is displayed. Click on the one you wish to use (typically this would be
the Avery 5160 label template to match the standard label) and click Load button.
© 2011 Iccomplish, Inc
How Do I?
107
The Label Layout Wizard will display with your select label layout displaying. You can alter the layout or
just click Preview/Print to create your labels.
Add Fields
To add fields you double-click on the Field Selection list on the right side, then position them in the
proper location on the label template. Use the Edit->Font menu at the top to set the label font.
Create Template
To create your own custom template, create the label layout you desire. Then select Templates->Save
from the menu at the top. Choose a unique name that describes the label layout you created (typically
you would want to use the Avery label number to keep things simple).
© 2011 Iccomplish, Inc
108
ezScriptWriter User Manual
Using the DYMO LabelWriter® Option
The DYMO label printer makes printing labels very easy. Select the printer from the list (or the closest
match). Be sure to do a test print to verify the positioning of your address fields. Then choose the correct
roll (on dual systems) to begin the print job.
© 2011 Iccomplish, Inc
How Do I?
3.6.1.2
109
Create Form Letters
There are two views in the Form Letters section: Template view and Merged Document view.
Template View
This view allows you to edit the letter template (including a mix of data fields and regular text). To add
text formatting (bold, fonts, etc) then create the document in MS Word or Wordpad first, then copy/paste
into the template. Click Template->Save in the top menu to save your work.
Merged Document
Click the Show Merged Document button to preview what an actual letter will look like.
© 2011 Iccomplish, Inc
110
ezScriptWriter User Manual
Use the arrows to navigate through the letters. Click the Print All button to printout the merged letters.
3.6.1.3
Generate Email List
If you wish to generate a list of email addresses (for those patients that have one entered), use this
utility. Currently, you must export the list of email addresses to be used by a third-party email service.
You can export to two formats:
Universal CSV Format - this is the standard comma-separated values. Lines in the
text file represent rows of a table, and commas in a line separate what are fields in the
tables row. The first record in a csv file usually contains column names in each of the
fields (make sure the "Should column headings be included" is checked as yes).
Microsoft Excel Format - output is in Excel 2000 format ("xls" extension). This allows
easy opening by Excel or similar spreadsheet programs.
3.6.1.3.1 Using "Mail Chimp"
Mail Chimp (www.mailchimp.com) is a low-cost, high-feature email service that can manage your email
campaigns. Currently, they allow up to 2000 names with no charge.
© 2011 Iccomplish, Inc
How Do I?
111
To use Mail Chimp, you must first sign up for a free account. Then, once you are logged in, you can
create an email campaign. It's a three step process that the website will work you through.
Step 1 - Create and Import your List
The very first thing you should do is setup a managed list. This is because you can't really create and
send an email campaign until you have a list to send it to.
Step 2 - Setup a Campaign
© 2011 Iccomplish, Inc
112
ezScriptWriter User Manual
Now that you have a list to send an email to, let's create an email!
Step 3 - Reports
We'll show you how many times you opened and clicked in the test campaign, how many bounces you
got, and more.
© 2011 Iccomplish, Inc
How Do I?
3.6.1.4
113
Generate Phone List
Phone lists can be either previewed as a list on the screen or exported as a file (for upload to an
automated phone blaster service, such as Dial My Calls.
Preview List
The preview list can be used as a call list. It displays the patient's name, nickname, home and day
phone numbers, and the insurance plan (if any).
Export List
The export feature allows exporting of the list of names/phone numbers in either CSV or MS Excel
format.
© 2011 Iccomplish, Inc
114
ezScriptWriter User Manual
3.6.1.4.1 Using "Dial My Calls"
DialMyCalls (www.dialmycalls.com) lets you send voice or text messages to an entire phone list in
seconds. No hardware or equipment to buy - you simply record and send your message out to 2 or
200,000 phone numbers within minutes.
Setting Up A Call
Using the "Setup A Call" tab in the control panel, you can setup a call to a group of people in minutes.
Follow the three steps below.
© 2011 Iccomplish, Inc
How Do I?
115
Manage Your Contacts
From your My Contacts tab, you can easily add, remove, and modify your call lists. Our call group
features make it easy to manage multiple calling lists from one account. lists from one account.
Manage Your Recordings
Recordings are messages or greetings that you create that are played for your call recipients. You can
add, modify or delete all your recordings at any time. There are 3 different options for creating
recordings:
Record Over Your Phone
Put in a phone number and our automated system will call you and let you
© 2011 Iccomplish, Inc
116
ezScriptWriter User Manual
record your message right over the phone! You can preview and re-record until
you're satisfied with your greeting. This is by far our most popular method.
Upload A MP3 or WAV File
This method is usually the choice of larger companies or people that have
professionally recorded messages. Using the web interface, you can upload
any MP3 or WAV audio file and use it for the message to be played to your call
recipients.
Use the Text-to-Speech Tool
The Text-to-Speech engine is a voice synthesis tool that will allow you to type a
message and have it converted to a digitized male or female voice. This is a
great solution when you don't have time to record a message but need to send
a call out quickly.
Detailed Call Reports
After your calls have been sent out, you can receive complete breakdowns of your call status. You'll be
able to see which calls were picked up, which ones went to voicemail and if there were any numbers
with problems, such as invalid or disconnected phone numbers. You can even download your call reports
into a spreadsheet.
© 2011 Iccomplish, Inc
How Do I?
3.6.1.5
117
Export Data
The Export Data function is a generic method to get your recall data out of the software into a standard
file format (either universal CSV or MS Excel). Typically this method is used to create mailing lists that
you send to third-parties such as Click2Mail (an approved USPS partner).
© 2011 Iccomplish, Inc
118
ezScriptWriter User Manual
To open the file in Microsoft Excel, double-click the file (in the folder you saved it in) and it will display (if
you have Excel installed).
3.6.1.5.1 Using "Click2Mail"
Click2Mail's (www.click2mail.com) "Easy Letter Sender" has simple fill-in forms making it easy, quick,
and affordable to send a letter (with or without images) or a picture postcard. So easy, you can jump
right in and start your mail piece in minutes. Other more advanced letter types are also available.
All you need is a few basic pieces of information
1. Return address: This is the name and address to which you want the mailpiece returned if it is
undeliverable.
© 2011 Iccomplish, Inc
How Do I?
119
2. One or more recipient addresses: Enter one or more names and addresses or choose "Import
addresses" to upload a list saved as a CSV file. A list template for use with Microsoft Office Excel is
available here and when you choose "Import addresses" on the Recipient address fill-in screen.
Using the default font and size, page one of your letter holds 23 lines of text, or roughly 350 words, while
subsequent pages hold 37 lines. Using the text editor, you can choose other fonts and sizes to produce
different results. You regulate the number of pages you create by the amount of text you include in the
text box. If you add more text than will fit on a page, the next page is automatically generated (10 page
maximum). You will see how the pages are divided when you click "Preview".
3.7
Importing/Exporting Patient Data
Using the Import/Export wizard you can easily import patients from your existing Practice Management
or EHR software. Alternatively, you can export patient demographics or reports/Rx's to text/PDF format.
Importing Data
Exporting Data
© 2011 Iccomplish, Inc
120
3.7.1
ezScriptWriter User Manual
Importing Data
************************************************************
*****
WARNING: When you import data into ezScriptWriter, please review the
column matches closely. If the data does not appear to match, then DO
NOT IMPORT until you have found the matching fields (or marked them
"unmatched"). Once you import patient data, there is no undo function!
************************************************************
*****
There are two options for Importing Data:
(1) Importing from a text (csv, comma separated values) file. This option works with files that you create
by exporting to text format from your current software.
(2) Importing directly from an OfficeMate database. This pulls the patient demographics only.
Using the Import Wizard
The Import Wizard helps you quickly and easily populate your new database with existing patients. It is,
however, a basic tool. It will import patient demographic information (such as name, address, telephone,
DOB, insurance info and other identifiers). The wizard requires the data to be in a standard text format
such as CSV (comma-separated values) or tab-deliminated.
The current version of the Import Wizard will not allow you to import EMR or billing information. This
type of data is too complex for the Wizard (smart as it may be). If you wish to populate your new
database with more detailed information from your current practice management and/or EMR system,
please contact Tech Support at [email protected] for details and pricing on database
conversion services.
© 2011 Iccomplish, Inc
How Do I?
121
If you get errors, or have other problems importing your patient data, it may be necessary for us to
manually convert your data for you. There will be no charge if we can use your current text-based import
file and we are importing only the data that the Wizard would normally handle. Additional fees will apply
if your current software cannot generate an Export file or if you need addition and/or custom data
imported.
OfficeMate Database Import
Use this utility to import the patients from the OfficeMate database directly into ezScriptWriter. Only the
patient demographics will be imported.
3.7.2
Exporting Data
There are two options for exporting data:
(1) Export to a text or Excel File. This option allows you to export all patients or just a selected patient.
You can also export by Last Exam date. The data exported is basic demographics (name, address,
birthdate, etc), although if you use the Advanced button you can select more fields to export (not
encounters or reports however).
© 2011 Iccomplish, Inc
122
ezScriptWriter User Manual
(2) Export reports/Rx's to PDF or MS Word (text editable). This can be useful for printing all the
documents in a patient's chart (except for the Encounter itself, which are printed from within the
encounter).
© 2011 Iccomplish, Inc
How Do I?
3.8
Program Settings
The Program Settings button allows for customization of ezScriptWriter.
General Settings
© 2011 Iccomplish, Inc
123
124
ezScriptWriter User Manual
Date Format for Encounters
Allows customization of the way a date is displayed throughout the software (for example, mm/dd/
yyyy format). You may use one of the three predefined formats or create your own.
Date Format for Rx/Reports
Allows customization of the way a date is printed on reports (for example, mm/dd/yyyy format). You
may use one of the three predefined formats or create your own.
Auto-select provider for reports/Rx's as currently logged user
Determines whether the current user is selected as the provider for certain reports/Rx's.
Auto-select HIPAA notification for each new patient
Automatically create a HIPAA notification entry for any new patients. This indicates the patient was
provided a copy of the clinic’s privacy protection practices.
Default Report for a Record Release
Select the default report for use when the user clicks the Print Record Release Form on the Patient
Demographics window (under the HIPAA tab). Default setting is the report “Record Release
Request”.
Manage CPT Codes
All the codes you need to bill for services and products can be entered in the Products & Service
Codes screen. Some standard codes are pre-populated, but you will need to edit the Fee and Tax
fields to reflect your practice fee schedule.
Manage ICD-9/10 Diagnosis Codes
You can add, delete, or edit the Diagnosis Codes (ICD-9 or ICD-10) using this utility. These codes
are used on the FeeSlip in the diagnosis column and in the Assessment/Plan section of an
Encounter.
User Details
© 2011 Iccomplish, Inc
How Do I?
125
This screen allows the user to modify their own information, including license and insurance ID numbers.
Certain items (such as security level and user type) can only be modified in the Admin settings.
User Name/Password
You can change the username here as well as the password (if the current password is known;
otherwise the Admin account must be used to reset it)
Security Setting
The user security level is visible (but only modifiable by the System Administrator). The user can,
however, change their username or password on this screen.
Set me as the Default user
On each computer (network or solo), the default username displayed at startup ( on the LOGIN
screen) is determined by this setting. The user who primarily uses this computer should check this
box.
Folder Paths
Set default locations for the following folders:
© 2011 Iccomplish, Inc
126
ezScriptWriter User Manual
Path to PDF documents
When saving a PDF version of a report or Rx, this is the default location when asked to save file.
Typically this would be your "My Documents" folder.
Path to Patient Photos
If you are capturing patient photos to include in the Patient Demographics window, this is the default
location to store them. Typically this should be "C:\ezHW_Data\Photos".
Path to Database Backups
The default location where ezBackup stores backup images of your database.
Custom Lists
Throughout ezScriptWriter, there are various lists and choices that can be customized. You may edit or
add to these lists by performing one of the following:
Selecting list to edit in the dropdown box at the top.
Clicking on the item to edit, or alternatively, selecting the NEW button to add an item to the list.
Report Settings
© 2011 Iccomplish, Inc
How Do I?
127
Default Margins
The margin to use for reports, letters, Rx's and encounter printouts (if not set in the Report
Designer) or otherwise not specified. This setting applies globally to all reports that do not allow you
to set individual margins (e.g. when printing notes).
Default Report to Use
Allows the default report for each Rx type to be selected, as well as setting a default title. The four
main Rx categories are: Blank Rx, Medication Rx, Spectacle Rx and Contact Lens Rx.
Auto Save
In some cases, you can specify that the software save your report without being prompted first.
Tool Settings
Allows customization of the Rx Tools in ezScriptWriter. The available options include the following:
Diopter steps
Applies to spectacle and contact lens Rx’s. Can be either the standard 1/4 steps or in 1/8th
steps (rounded to 2 digits however).
© 2011 Iccomplish, Inc
128
ezScriptWriter User Manual
Mouse button
For fine adjustments on spectacle or contact Rx tools. Basically, this allows for the reversal
of the effect of clicking on the right or left button. The default for fine movements is the left
button (i.e. clicking with the left button increments or decrements the power by the default
diopter step amount; the right button “jumps” to the clicked location.
Automatically copy first CL brand to other eye
Auto copies the selected contact lens brand from right eye to left (default is true) in the
Contact Lens Tool.
Save all new Rx’s to LogBook
Default is true; can be overridden when creating Rx with the Rx wizard.
Set default fonts
Set default fonts for the Rx data being inserted into reports. This can be modified if your
reports are exceeding a full page when Rx data is inserted.
Default Rx Wizard
No longer used; the Multi-Medication wizard allows you to select the tool you wish to use.
Insurance List
The Insurance List allows for custom entry of any insurance plan you accept. The information you enter
will appear on the claim exactly as you enter it.
© 2011 Iccomplish, Inc
How Do I?
3.9
129
PreTesting Module
[IN DEVELOPMENT]
The PreTesting module is in development. It will allow for entering of basic pretest information (e.g. visual
acuities, lensometry readings) before an actual encounter is opened/created.
3.10
Software Versions
During the Trial period you may download and try any of the various version of ezHealthWare software.
Once you have licensed the software, the database will only be associated with the software you have
purchased.
© 2011 Iccomplish, Inc
130
3.11
ezScriptWriter User Manual
Misc Functions
Below are some of the miscellaneous functions you may need from time-to-time in the software.
© 2011 Iccomplish, Inc
How Do I?
131
Database Switcher
If you are using more than one database (for example, you travel between two offices and prefer to have
separate databases or you work part-time doing nursing home visits) then the ezDataBaseSwitcher will
allow you to change between databases with ease. The primary requirement is that the databases are
kept in separate folders (whether on different computers or just different folder names). For example, you
could have a laptop with two databases: one located at "C:\ezHW_Data_MainOffice" and the second at
"C:\ezHW_Data_SecondOffice." To utilize both databases setup two databases by clicking the Manage
Database List->New button sequence. Then by changing the database in the dropdown you can
alternate between the two.
WARNING: Be sure to close all ezScriptWriter modules on this computer, since any running modules
will crash if the database path is changed while running. Use the ezForceClose utility if necessary.
Otherwise, possible database damage could occur.
Backup Status Bar
The last backup date is presented at the bottom left of the screen. If it has been a few days since the
last backup you will see it appear in red.
Getting Help
The quickest way to display the help is to press F1. If context-sensitive help is available it
will be displayed automatically.
Most of the screens in ezScriptWriter have a Help button that displays relevant
information.
© 2011 Iccomplish, Inc
132
ezScriptWriter User Manual
Select the Help item in the menu bar for additional help options.
Tip of the Day
Displayed when the software first starts, you can disable the Tips by unchecking the "Show tips at
startup" box. You can re-enable at any time by using the Help->Tips menu.
Suggest Features
Use this utility (found under Help->Suggest a Feature in the top menu). Use the Upload button at the
bottom to send the suggestion directly to our server. We review these suggestions and incorporate them
into the software when feasible.
© 2011 Iccomplish, Inc
How Do I?
133
Other Utilities
ezForceClose
Located in the Program Files (x86)\ezHealthWare\ezUtilities folder, the ezForceClose program will close
all ghost copies of the software running on this computer. .
Note that if you have open work in ezScriptWriter you should save it first.
© 2011 Iccomplish, Inc
134
ezScriptWriter User Manual
ezPathUtil
This utility allows the setting or clearing of folder paths for the various databases that ezHealthWare
software uses. These databases are required for program operation, so any changes made here may
cause the program to become inoperable on startup.
If the program cannot find the database on startup, try using the Find buttons to locate them. If you are
re-installing the software and want a "Fresh Start" with a clean, new database use the Clear button to
reset the location to the database.
© 2011 Iccomplish, Inc
How Do I?
135
If there is concern that a networked computer is not connecting, you should verify that the path is
correct. Use the Check Database Path to pull up a report of the connection status. It's a good idea to
printout this report for each computer on your network in case you ever need to re-enter the paths for
some reason.
3.12
ePrescribe
You can open the recommended ePrescribing website from the Main Screen or from the Multiple Rx
Tool. A browser window will open (note that ePrescribing requires internet connection to function).
If you have an existing AllScripts account enter your UserID and Password to login. If you don't have an
account yet, click the "Create an account" link to sign-up (it's free).
Once you are logged in, you must create a new patient account in AllScripts so your prescription can be
sent to the Pharmacy:
© 2011 Iccomplish, Inc
136
ezScriptWriter User Manual
Once the Patient Data screen appears, you will need to upload the patient to the AllScripts webpage. Do
this by clicking in the Phone field (to align the data sequence) and then clicking the Insert Patient Data
button at the bottom of the screen.
The patient should show up in the AllScripts Patient List, but if it does not enter the last and first name
to Search.
© 2011 Iccomplish, Inc
How Do I?
137
Make sure the patient is selected (black dot next to patient name) and click the Select Med button to
begin the process of entering a prescription.
You must then click the Select Sig button to choose the Sig you wish to send with the Rx to the
pharmacy:
© 2011 Iccomplish, Inc
138
ezScriptWriter User Manual
You may see warning screens if any of the medications you selected trigger a flag (contra-indication,
duplicate dose, etc):
If all is well, you will see the Select Pharmacy screen, where you can send the prescription
electronically to the Pharmacy of your (or your patient's) choice:
© 2011 Iccomplish, Inc
How Do I?
139
NOTE: The ePrescribe feature is based on the AllScripts free e-prescribing website. The AllScript
database can check for drug interactions and contraindications that ezScriptWriter cannot. The
AllScripts site is external to our software and is not an integrated part of the ezScriptWriter (so Rx data
is NOT automatically passed to the website). You have to send the data manually; the steps above help
you create a Rx with the website. You should also add the medication to your LogBook, even if you don't
print an actual prescription for the patient.
© 2011 Iccomplish, Inc
Part
IV
Admin Functions
4
141
Admin Functions
The Administrator Menu is the main portal to managing the software, including User accounts and
Security Settings. In addition, you can purchase and register the software.
Software Account
Admin Settings & Options
Reset Passwords
View Audit Trail
4.1
Software Account
The Manage Software Account screen will allow you to purchase the software (via secure link), register/
license your copy, view existing licenses and change the clinic telephone (which serves as the account
number).
Purchase Software
Register/License Software
View Licenses
Change Clinic Telephone Number
© 2011 Iccomplish, Inc
142
4.1.1
ezScriptWriter User Manual
Purchase Software
Whether you are purchasing the software for the first time or renewing your license, the Purchase
Software screen will the make the process super easy. The uploading of your order is our recommended
method since there is no chance of mis-entering important account information that we need to generate
your license file.
You can purchase in one of three methods:
Via secure internet connection directly to our server (with full encryption of your credit card data)
Generate a paper order form; submit via fax or mail
Launch the website so you can order off the ezScriptWriter website.
© 2011 Iccomplish, Inc
Admin Functions
4.1.2
143
Register/License Software
This is the tool you use to update your license after purchasing. Make sure the Primary Practice
Telephone is filled in with the phone number for your clinic/office. This is the number we will use for
licensing. It is NOT MODIFIABLE once licensed and will display in your as you have entered it. If you
wish to change it in the future you will have to use the Change Account Number instructions. You only
need to license ONE time, no matter how many computers you have networked.
© 2011 Iccomplish, Inc
144
ezScriptWriter User Manual
There are two options for updating the License File (registering your license):
Option 1 - Via the Internet
Click the Activate Now via Internet button. The software will attempt to contact our servers to retrieve
your license file. Problems that can occur include:
not enough time has passed since your purchase; all orders should be updated within 24-48
business hours.
incorrect telephone number entered (you must include the exact digits as you indicated on
your purchase order, especially country and area codes).
no internet connection present
attempting to license the wrong version of the software (from what you purchased)
an internet error has left our server down (very rare)
Option 2 - Import License File
© 2011 Iccomplish, Inc
Admin Functions
145
If the codes were sent via email or CD-ROM, copy the license files (not the folder itself) into your
database folder (typically C:\ezHW_Data). Then click the Import License File button so the license
updates.
4.1.3
View Licenses
The View Licenses screen allows for a review of existing licenses and the expiration dates. Note that
ezScriptWriter will begin warning you about 30 days before your expiration date that you license is due
for renewal.
The Revision Log button will display the current list of available upgrades for the software (if applicable).
The Reset License is only used when directed by Tech Support to reset your licenses in the case of
error or other issues.
4.1.4
Change Account Number
To change your Clinic Telephone number (which serves as the Account number and is part of the license
file), you must follow two steps:
Build Email Data
© 2011 Iccomplish, Inc
146
ezScriptWriter User Manual
Your primary practice telephone number serves as an unique identifier and is part of your license/
registration key. In order to change it (for example, if your area code changes or you move locations)
you must send a request to us to have a new registration key code generated. The process may take
up to 24-48 hours. We will generally verify the clinic telephone number to ensure that it is registered
correctly.
Set New Number
Once you receive the confirmation email click the "Set New Number" button to make the change final.
The software will automatically update your license for you (Internet connection is required).
4.2
Settings & Options
The Admin Settings & Options screens allow you to set the overall properties for the software. This
includes the Clinic Details, User Security, Overall Security and International Defaults.
Clinic Details
User Details/Security
Global Security Settings
International Defaults
4.2.1
Clinic Details Screen
The Clinic Details screen allows for entry of the Practice Information, including the all-important Practice
Telephone number (which serves as your Account Number). Once the software is purchased and
© 2011 Iccomplish, Inc
Admin Functions
147
licensed, the Practice/Clinic Telephone number cannot be changed unless done by Tech Support. You
can however change the formatting of the number at any time (e.g. add parenthesis or dashes). The
remaining fields can be altered in any way you wish. If you have a group tax ID number and/or NPI, enter
it on this screen.
The field "Doctor Name/Title" is used in many reports/Rx's, so it should reflect your name as you wish it
to appear in reports.
4.2.2
User Details
The Administrator can manage the various users (including him or herself). You can Add, Edit or Delete
users (although making an existing user "inactive" is preferred). The security levels and basic information
can be edited on this screen.
Every user will have three required settings:
User Type
The user type can be either Staff or Provider. A staff member is someone who does not provide
direct patient care; a provider is classified as someone who does provide direct care (doctor, nurse,
tech). In some cases, you may wish to limit lower level providers to the Staff category to restrict
access to Rx creation, although many features can be blocked by setting the proper security level.
Security Level
Security Level can be set by clicking the Security Level on the User Details screen:
© 2011 Iccomplish, Inc
148
ezScriptWriter User Manual
The Security Level can be set quickly using the Quick Security Settings slider (from 0, the lowest,
to 10, the highest). Level 10 should be reserved for yourself, the Admin. Click the Use Custom
button to modify individual settings.
© 2011 Iccomplish, Inc
Admin Functions
149
Active Status
Users who are no longer with your practice should be marked Inactive, rather than being deleted
from the system. Deleting a user who has created reports, Rx's or encounters will cause some
difficulties with tracking. To set the status, click the checkbox under the column "Active"
© 2011 Iccomplish, Inc
150
4.2.3
ezScriptWriter User Manual
Comprehensive Security Settings
The Global Security Settings apply globally to the software. The only entry currently customizable by the
user is the Auto Log Off time.
© 2011 Iccomplish, Inc
Admin Functions
151
.
4.2.4
International Settings
Users outside the United States will need to set the date, telephone, postal code and measurement
fields to reflect their locale.
© 2011 Iccomplish, Inc
152
4.2.5
ezScriptWriter User Manual
Locate Database
When the network link is broken or the database folder has been moved, you may need to use the
Locate Database Utility. Use the Find Button (small binocular icon) to search your local hard-drive or
network.
Clear Database Path
Use this button to clear the database path stored in the computer's registry. This forces the Setup
Wizard to show at the software startup.
© 2011 Iccomplish, Inc
Admin Functions
4.3
153
Reset Passwords
If a user has lost or forgotten their password you can reset it with this utility. Alternatively, you can reset
all user passwords at once.
© 2011 Iccomplish, Inc
154
ezScriptWriter User Manual
When the password is reset, the new password becomes the same as the username. So user "idoktor"
will have the password reset to "idoktor". The first time the user logs in the software will require a real
password to be entered.
To reset the Admin password, you will need to contact Tech Support.
4.4
Audit Trail
The Audit Trail is the means by which nearly all transactions of the database can be tracked. Whenever
a chart is opened/accessed, a module is opened or demographics are changed an entry will be created.
This tool can also be used to track logon and logoff times from the software. Click the Export button at
the bottom to send the file to your hard-drive (to be opened by Microsoft Excel or similar).
© 2011 Iccomplish, Inc
Admin Functions
4.5
155
System Info
Use the SysInfo button in Admin or at the bottom of the menu Help->About ezScriptWriter to get a
detailed look at the computer and software. This may be requested by Tech Support if you are having
troubles.
The report can be printed, faxed or uploaded directly to our server. Please email when you upload a
report so that we can review it promptly.
© 2011 Iccomplish, Inc
156
ezScriptWriter User Manual
© 2011 Iccomplish, Inc
Part
V
158
5
ezScriptWriter User Manual
Troubleshooting Problems
Network Crash
Network crashes are the worst diaster that can befall your database! If you are working on a chart at the
same time the network goes down, there is a high probability that you database may be damaged.
Using a wireless network for a portion of your network increases the risks. Since ezHealthWare software
is an intensive database-driven program, you can expect a wireless network to be slower than a typical
100Mbps wired LAN (how much slower depends on the wireless system you choose). If you must use a
wireless network, it is probably best to use the exam room computer as the server and let other
computers link into that system. Bad network cards and faulty cables can also be a culprit.
Broken network connections, as sometimes happen with wireless systems, can result in database
corruption! Do regular backups of your data (at least daily).
Database Crash
You will recognize a database crash when you see this dreaded message: Unrecognized Database
Format or something similarly ominous.
WARNING: Do an immediate backup using the instructions below before doing anything else!
(1) Make an immediate backup (copy the entire "C:\ezHW_Data\" folder to a flash drive and/or external
drive (BEFORE DOING ANYTHING ELSE).
(2) Do you have an existing recent backup? If so, roll back to that copy.
(3) If it’s been a few days since your backup, send the following file to us so we can analyze and attempt
to repair the database:
C:\ezHW_Data\ezDB.dez
Right-click and choose Send To->Compressed Folder to zip the file; better yet use the ezBackup
utility to create a copy that's already compressed.
© 2011 Iccomplish, Inc
Troubleshooting Problems
159
You can use the link we send you to securely upload the database to us (do this at the end of your
workday; we will TRY and return it the next day if it is repairable). Note that some database crashes
cannot be repaired and you MUST return to your most recent backup.
Software Crashes - low memory
The MOST common cause of crashes of the software is due to low memory. If you are running the
software and getting persistent errors (that don't seem to have a pattern), ask yourself if you have (1) 2 or
more charts open at once and (2) less than 2 GB of RAM. If so, upgrade your RAM. You can also
increase the size of your Virtual RAM. This allows you to simulate RAM by using your hard drive to store
the data that would be on the physical RAM.
Steps to Increase Virtual Memory
1. Under the start menu go into the Control Panel.
2. Double click Performance and Maintenance and then on System.
3. Under the Advanced tab click on Performance and then on Settings.
4. Where you see Virtual Memory shown click Change.
5. Click on the hard drive where your OS is installed (this is where your paging file
should be).
6. Once you have completed all of this check the Custom Size checkbox. Now you are
able to input how much memory you want to save for virtual memory. There will be
two fields there, the first one is called initial and the other is called maximum. If you
want the best performance out of your machine you should set these the same as
each other.
Vista Compatibility
We recommend Windows 7 Professional or WinXP for all our software products. Win7 can be either 32
or 64 bit systems. In many instances our software runs perfectly in Windows Vista. But in some
situations, there may be minor, or even major, malfunctions. This is especially true for the Database
Upgrade utility, Online Licensing module and scanning modules. To get around this problem, you simply
need to start the software in XP Compatible Mode.
To use Windows XP compatibility mode, right-click the ezScriptWriter icon and choose Properties from
the context menu that appears:
© 2011 Iccomplish, Inc
160
ezScriptWriter User Manual
After choosing Properties from the context menu, a window will appear displaying the different properties
of the application organized in tabs. Select the Compatibility tab to run the application Windows XP
mode:
© 2011 Iccomplish, Inc
Troubleshooting Problems
161
On this screen, place a check in each of these checkboxes:
Run this program in compatibility mode for Windows XP (service pack 2)
Disable Visual Themes
Disable Desktop Composition
Then click OK to save the changes.
NOTE: If this does not work and problems remain, try running the Program Compatibility Wizard by
clicking the Start button, clicking Control Panel > Programs > Programs and Features > Use an older
program with this version of Windows
If compatibility mode and the wizard does not solve the problem, contact Tech Support for further help.
Upgrading Database Fails
If your attempts to upgrade your database fail, you may need to run the software as an Administrator (in
Vista/Windows7). Right-click the application ezScriptWriter.exe and choose Properties from the
© 2011 Iccomplish, Inc
162
ezScriptWriter User Manual
context menu, a window will appear displaying the different properties of the application organized in
tabs. Select the Compatibility tab to run the application Windows XP mode and check the Run as
Administrator checkbox. Once the database has finished upgrading you can uncheck the box.
Locked Chart
If you attempt to open a chart that has already been opened by yourself or another user, the Locked
Chart warning appears. A problem may occur when a chart was opened and the software crashes
leaving the chart still marked as open. If this is the case, then it is safe to use the "Unlock Chart" button.
If you are unsure or another user may possibly have the chart open, it is best to check with other users
before attempting to unlock the chart.
© 2011 Iccomplish, Inc
Troubleshooting Problems
163
Uninstalling the Software:
(1) In the Windows Control Panel, click the "Add/Remove Programs" icon.
(2) Find the entry for ezScriptWriter and click "Remove"
(3) Navigate to "C:\Program Files" and delete the entire folder "ezHealthWare"
NOTE: This does NOT delete the patient database. To delete the existing database use the topic
"Instructions to do a Fresh Start (with empty patient database)".
How to Rollback to Prior Version of Software
Starting in version 4.0 and later, the software retains the prior version so your can rollback if your have
problems (for instance, your database did not fully upgrade and the new version does not start). To
switch back, you simply need to recreate an icon on your desktop for the old version. Navigate to your
program folder (typically it is “C:\Program Files\ezHealthWare\ezScriptWriter”, although on 64-bit
systems select “Program Files (x86)”). Be sure it is NOT the ezHealthWare 4.0 folder, you need the one
without “4.0”. Now find the file called “ezScriptWriter” and double-click it.
Alignment Problems with Claim Printing
There are two reasons that claims may be misaligned:
(1) The text is spaced properly, but prints slightly offset from the boxes. This can be fixed by adjusting
the margins with the Alignment tool. You will have to use trial and error to move the text up/down or
right/left.
(2) The problem may be with the font, not the alignment. On some computers the default system font is
"proportional" and so all the text is squeezed together. To fix the issue, you must select a different font.
On the alignment tool, select the font "Lucida Console" or "Courier" and font size "12". That should fix
the alignment problem (you can try other fonts if it doesn't, but these usually work best).
Insurance Address & Name Not Printing
The insurance will only print on the upper right hand side if it is an existing insurance from the drop-down
list (which you select in the Patient Demographics screen). If you mistype or hand-enter the insurance
name, it can't be matched to an existing insurance company in the database.
© 2011 Iccomplish, Inc
164
ezScriptWriter User Manual
If you wish to add or edit an insurance company, use Main Menu->Program Settings->Insurances in
ezScriptWriter or within the ezClaimBiller module you can use the top menu Options->List of Insurance
Plans
Dealing with a Total Network Outage
(1) Keep a 4-GB USB stick drive handy (empty)
(2) Keep a laptop computer in the office with the newest version of ezScriptWriter installed. But don't run
the software yet, since it doesn't have a database to attach to (yet)
(3) When you have a network emergency, use the USB stick drive to copy the database folder from your
server to the stick drive. You need to copy the five files that end in ".dez" to a folder on the stick drive
you create called “ezHW_Data”.
(4) Once the files are copied, insert the stick drive in your laptop.
(5) Start ezScriptWriter on the laptop. If it's the first time run, it will show a setup screen and as whether
you've installed before... say YES and select Find Database. Link to the files on your USB drive. If you
have run ezScriptWriter before on this computer, it will open to the blank database. Simply click Switch
Database on the main screen and select the location on the stick drive.
(6) Now you can enter data normally on your laptop... for instance working in your exam room right on
the laptop.
(7) When your network is operating again, you need to copy the database files back on to the server. Be
careful that you are copying FROM the usb drive TO the server.
(8) Restart computers on your network and they should be back to normal operations.
© 2011 Iccomplish, Inc
Part
VI
166
6
ezScriptWriter User Manual
Software License Agreement
This ezScriptWriter Software End-User License Agreement ("EULA") is a legal agreement for the
ezScriptWriter Software Product in which this EULA is contained, which includes computer
software and may include associated media, printed materials, and "online" or electronic
documentation (collectively the "Software Product"), between you and ezScriptWriter Software.
("ezScriptWriter Software"). By installing, copying, or otherwise using the Software Product, you
agree to be bound by the terms of this EULA. You must indicate your agreement to be bound by
the terms of this EULA by pressing the "I ACCEPT" button on the Software Product's installation
program, or else you will not be able to install the Software Product. If you do not agree to the
terms of this EULA, you may not install or use the Software Product; you may, however, within 30
days of your initial purchase of a copy of the Software Product, return the entire copy of the
Software Product (including all computer media, packaging and documentation) either to
ezScriptWriter Software's Customer Service department or to the retailer from which you purchased
the Software Product, for a refund of the amount indicated by your sales receipt for the Software
Product, in which event your rights under this EULA are immediately terminated. If you are
installing the Software Product on a computer that is not owned by you, you are bound to the terms
of this EULA both in your individual capacity and as an agent of the owner of the computer, and
your actions will bind the owner of the computer. You represent and warrant to ezScriptWriter
Software that you have the capacity and authority to enter into this Agreement on your own behalf
as well as on behalf of the owner of the computer the Software Product is being installed upon. For
purposes of this EULA, the "owner" of a computer is the individual or entity that has legal title to the
computer or that has the possessory interest in the computer if it is leased or loaned by the actual
title owner.
Copyright. The Software Product is protected by copyright laws and international copyright
treaties, as well as other intellectual property laws and treaties. All title and copyrights in and to the
Software Product (including but not limited to any images, photographs, animations, video, audio,
music, text, and "applets" incorporated into the Software Product) are owned by ezScriptWriter
Software or its suppliers.
Grant Of License. The Software Product is licensed, not sold. Subject to the condition that you
are in compliance with the terms of this EULA: (a) you may install and use one copy of the
Software Product, or any prior version for the same operating system, on a single computer for use
by a single simultaneous operator; and (b) you may install a single copy of the Software Product,
strictly for your own personal use, on one portable computer owned by you. No other use, copying
or distribution of the Software Product is permitted. You may not rent the Software Product, nor
may you offer use of it to others through a service bureau or application service provider. If you are
installing this copy of the Software Product as an upgrade, update, patch or enhancement of a prior
release of the same Software Product which was installed on the same computer, your rights under
the prior license agreement for the Software Product are terminated, and all of your use of the
Software Product (including its prior versions) are solely under the terms of this license agreement.
Limitations. Except to the extent such a restriction is unenforceable under local law, you may not
reverse engineer, decompile, or disassemble the Software Product. The Software Product is
licensed as a single product, and its component parts may not be separated for use on more than
© 2011 Iccomplish, Inc
Software License Agreement
167
one computer. You may not modify, amend, or create derivative works of the Software Product.
Term. If the Software Product that was distributed to you was labeled as an EVALUATION
VERSION or TRIAL VERSION (or its functional equivalent) (an "Evaluation Version"), the license
granted under this EULA commences upon the installation of the Software Product and is effective
for the longer of 60 days following the date you install the Software Product or the first 60 uses (the
"Evaluation Term"). Evaluation Version Software Products may include software code intended to
disable their functionality after the expiration of the Evaluation Term. You may take no actions to
circumvent the operation of such disabling code, and you accept all risks that might arise from such
disabling code. If the Software Product was not distributed as an Evaluation Version, or if you
converted an Evaluation Version installation of the Software Product to a non-Evaluation Version of
the Software Product by authorized use of the conversion mechanism provided with the Software
Product (in each case either being or resulting in a "Full-License Version"), the licenses granted
under this EULA commence upon the installation of the Software Product and are effective in
perpetuity unless terminated per the terms of this Agreement.
Termination. Upon the expiration of the Evaluation Term (if any), your rights under this EULA
terminate automatically without notice from ezScriptWriter Software. Without prejudice to any other
rights, ezScriptWriter Software may terminate this EULA or your rights under this EULA at any time
if you fail to comply with the terms and conditions of this EULA. Upon termination of your rights
under this EULA for any reason, or upon termination of the EULA itself, you must destroy all copies
of the Software Product and all of its component parts in your possession (including all component
parts, the media and printed materials, any prior versions, and this EULA). The terms of this
paragraph shall survive any termination of this EULA.
Transfer. You may permanently transfer all of your rights under this EULA (except if your rights
are in an Evaluation Version), provided you retain no copies, you transfer all copies of the Software
Product (including all component parts, the media and printed materials, any prior versions, and this
EULA), and the recipient agrees to be subject to the terms of this EULA. Upon the occurrence of
such a transfer, your rights under this EULA terminate immediately.
Limited Warranty. The warranties and disclaimers described in this paragraph are collectively the
"Limited Warranty". ezScriptWriter Software warrants to you (and only you) that the Software
Product will perform substantially in accordance with the accompanying documentation (if any) for a
period of ninety (90) days from the date of original purchase of a license to the Software Product
from an authorized retailer or directly from ezScriptWriter Software (or the date you have obtained
authorization from ezScriptWriter Software or an authorized retailer to convert an Evaluation Version
to a Full-License Version) (in each case the "Purchase Date"). Implied warranties on the Software
Product, to the extent required by applicable law, are limited to ninety (90) days from the Purchase
Date. Some states do not allow limitations on how long an implied warranty lasts, so the above
limitation may not apply to you. To the maximum extent permitted by applicable law, ezScriptWriter
Software and its suppliers disclaim all other warranties and conditions with regard to or arising out
of the Software Product, either express or implied, including, but not limited to, implied warranties of
merchantability, fitness for a particular purpose, non-infringement and/or accuracy of information.
The Limited Warranty is void if failure of the Software Product has resulted from accident, abuse,
© 2011 Iccomplish, Inc
168
ezScriptWriter User Manual
misapplication, use of the Software Product other than as described in the documentation issued by
ezScriptWriter Software, use of the Software Product in combination with other Software Products
that are not described as compatible in the documentation issued by ezScriptWriter Software, or
your breach of the terms of this EULA. This warranty gives you specific legal rights, and you may
also have other rights which vary from State to State. No individual (except a duly authorized officer
of ezScriptWriter Software) and no reseller or retailer has any authority to amend or add to any of
the above representations and disclaimers.
Your Remedy. Your exclusive remedy for any breach of the Limited Warranty is for you to give us
notice of the breach by returning to ezScriptWriter Software (at the address shown below) a copy of
your purchase receipt for your copy of the Software Product and a description of the alleged breach,
and then, at ezScriptWriter Software's option, ezScriptWriter Software shall either: (a) return the
price you paid (if any) for the Software Product (at which time your rights under this EULA are
deemed to have terminated); or (b) repair or replace the Software Product. The Limited Warranty
period for any replacement Software Product will be extended for the remainder of the original
warranty period or thirty (30) days after the replacement Software Product is delivered to you,
whichever is longer. If your license is for an Evaluation Version, your exclusive remedy for any
breach of this EULA, including a breach of the Limited Warranty, shall be to terminate your rights
under this EULA. Your remedies described in this paragraph are your exclusive remedies, and shall
not be deemed to fail of their essential purpose so long as ezScriptWriter Software is willing to
repair or replace the Software Product or return the price you paid for the Software Product.
Limitation of Liability. To the maximum extent permitted by applicable law, in no event shall
ezScriptWriter Software or its suppliers be liable for any special, incidental, indirect, or
consequential damages whatsoever (including, without limitation, damages for loss of business
profits, business interruption, loss of business information, or any other pecuniary loss) arising out
of the use of or inability to use the Software Product, even if ezScriptWriter Software has been
advised of the possibility of such damages. In any case, ezScriptWriter Software's entire liability
under any provision of this EULA shall be limited to the greater of the amount actually paid by you
for the Software Product or US$5.00. Some states do not allow the exclusion or limitation of
incidental or consequential damages, so the above limitation or exclusion may not apply to you.
Statement Concerning U.S. Government Users. The Software Product is commercial computer
software developed exclusively at private expense, and in all respects is proprietary data belonging
to ezScriptWriter Software or its suppliers. The Software Product is comprised of “commercial
computer software” and “commercial computer software documentation” as such terms are used in
48 C.F.R § 12.212. Consistent with 48 C.F.R. § 12.212 and 48 C.F.R. § 227.7202-1 through §
227.7202-4, all U.S. Government licensees acquire the Software Product with only those rights set
forth in this EULA.
Site Licenses. The owner of the computer that you are installing the Software Product upon may
have entered into a broad license agreement with ezScriptWriter Software governing the use of
certain ezScriptWriter Software products including this Software Product. To the extent that the
owner of the computer has entered into such an agreement that specifically states that it governs
the use of the Software Product on computers owned by the owner, then any conflict between that
© 2011 Iccomplish, Inc
Software License Agreement
169
agreement and this EULA shall be resolved in favor of the terms of that agreement, but otherwise
this EULA shall simultaneously govern your license to the Software Product.
Third Party Works. To the extent that any third party's intellectual property is incorporated within
the Software Product, you agree that such third party is a third-party beneficiary of the terms of this
EULA to the extent of the third party's license to ezScriptWriter Software.
Samples. The Software Product may be provided with certain "Sample Patients" intended to
demonstrate use of the Software Product or provide a base starting point for use of the Software
Product. Sample Forms includes forms, templates, database records, charts, or similar items. If
Sample Patients are provided, they are considered part of the Software Product for purposes of this
EULA.
General. This EULA constitutes the entire agreement between you and ezScriptWriter Software
concerning the Software Product. No terms of any purchase order, acceptance, purported
amendment, or any document or communication other than an agreement expressly agreed upon in
writing by a duly authorized officer of ezScriptWriter Software shall replace, modify, amend or
override this EULA. If any provision of this EULA is held to be unenforceable for any reason, such
provision shall be reformed only to the extent necessary to make it enforceable, and such decision
shall not affect the enforceability of such provision under other circumstances, or of the remaining
provisions hereof under all circumstances. No waiver by ezScriptWriter Software of any breach of
any term or provision of this EULA shall be construed to be a waiver of any preceding or succeeding
breach of the same or any other term or provision hereof. Our various rights and remedies
hereunder shall be construed to be cumulative and no one of them is exclusive of any other or of
any right or remedy allowed by law or in equity. This EULA shall be governed by and construed in
accordance with the laws of the State of Washington, USA (without regard to its choice of law
principles), except to the extent the local law of your local jurisdiction requires use of your local
jurisdiction's law, and shall benefit ezScriptWriter Software, its successors and assigns.
© 2011 Iccomplish, Inc