1
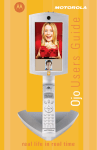
Ojo U s e r s G u i d e
520659-001
04/05
MGBI
real life in real time
Copyright © 2005 Motorola, Inc.
Copyright © 2005 WorldGate Service, Inc.
All rights reserved. WorldGate and the Ojo logo are trademarks and/or service marks of WorldGate
Service, Inc. Motorola, HomePlug and the stylized M logo are registered in the U.S. Patent and
Trandemark Office. All other trademarked products mentioned in this document are the sole property of
their respective owners. Patents are pending with respect to this product. Use of the product is subject
to a license agreement.
No part of this publication may be reproduced in any form or by any means or used to make any
derivative work (such as translation, transformation or adaptation) without written permission from
Motorola, Inc.
Motorola and WorldGate Services reserve the right to revise this publication from time to time without
obligation on the part of Motorola and WorldGate Services to provide notification of such revision.
Motorola and WorldGate Services provide this guide without warranty of any kind, either implied or
expressed, including but not limited to, the implied warranties of merchantability and fitness for a
particular purpose. Motorola and WorldGate Services may make improvements or changes in the
product(s) described in this manual at any time.
Introducing Ojo
Welcome! Thank you for choosing the Ojo™ Personal Video Phone from
Motorola, a global leader in communications technology.
Ojo is the first video phone to provide true-to-life video telephone calls over
the Internet. Its unique design lets you make hands-free calls with full-motion
video, and the camera and display screen are ideally positioned for natural,
face-to-face conversations. With Ojo, you'll think that you're talking to the
person next to you, rather than talking on the phone.
Ojo handles video and conventional telephone calls.
Ojo is easy to use, with simple on-screen instructions and prompts.
Because privacy is a concern for many people, Ojo lets you decide whether to
transmit video with each call. At any time–at the beginning of a call or during
it–you can easily start or stop video transmission. And the cordless handset
ensures that no one else overhears your conversation.
Ojo can make true-to-life, quality calls across the country and around the
world! You'll experience Ojo's synchronized video and voice, without delays and
jerkiness.
Thank you for choosing Ojo. We know you will enjoy your video phone.
i
ii
Table of Contents
Introducing Ojo ...............................................................................i
Important Safety Instructions .........................................................vii
Installation Guidelines .............................................................viii
Battery Safety Instructions.......................................................viii
FCC and Interference Information ...................................................ix
Notification of the Local Telephone Company..............................ix
Rights of the Telephone Company ..............................................x
Interference Information............................................................x
Hearing Aid Compatibility ..........................................................xi
Getting Started ...............................................................................1
What You Need .........................................................................1
Unpacking and Checking the Contents ........................................1
Choosing a Location ..................................................................2
Ojo Lighting Tips .......................................................................2
Installing the Battery Pack .........................................................3
Connecting Ojo .........................................................................4
Charging the Handset ................................................................5
Activating Ojo ...........................................................................6
Setting the Correct Time Zone....................................................7
Ojo Controls and Screens ................................................................8
Ojo (without Cordless Handset) ..................................................8
Cordless Handset ......................................................................8
Screens ....................................................................................9
Navigation Keys ........................................................................9
Setting Up Ojo ..............................................................................11
Customizing Ojo ......................................................................11
Setting the Ring Tone ..............................................................11
Setting the Ring Volume ..........................................................12
Setting the LCD Brightness.......................................................12
Setting the Time Zone .............................................................12
iii
Using the Basic Functions ..............................................................13
Making a Video Call .................................................................13
Making a Conventional Call.......................................................14
Receiving a Call .......................................................................14
Using Redial ............................................................................15
Adjusting the Volume During a Call ...........................................16
Using the Cordless Handset for Audio Privacy ............................16
Muting the Audio During a Call .................................................16
Turning the Camera Off for Video Privacy During a Call ..............17
Speed Dialing ..........................................................................18
Appendix 4 – Troubleshooting........................................................35
Appendix 5 – Technical Specifications .............................................40
Personal Video Phone Technical Specifications ................................40
Cordless Handset Technical Specifications .................................41
Warranty ......................................................................................43
Index ...........................................................................................45
Phonebook ...................................................................................19
Adding a Listing to the Phonebook............................................19
Calling from the Phonebook .....................................................22
Editing a Phonebook Listing......................................................22
Deleting a Phonebook Listing .........................................................24
Finding a Name in the Phonebook.............................................25
Call Logs ......................................................................................28
Reviewing the Calls Received or Calls Dialed Logs ......................28
Placing a Call from the Calls Received or Calls Dialed Log ...........28
Deleting a Call from a Call Log .......................................................28
Adding an Entry to Your Phonebook from a Call Log...................29
Taking a Caller ID Picture ..............................................................27
Locating a Photo .....................................................................27
Moving a Photo from a Call Log to the Phonebook .....................27
Selecting a Caller ID Photo .......................................................28
Appendix 1 – Caring for Ojo...........................................................31
Appendix 2 – Software Upgrades....................................................31
Appendix 3 – Startup Connections ..................................................32
Changing Bandwidth Profile and Internet Settings ...........................32
Changing Bandwidth Profile......................................................32
Changing Internet Settings.......................................................32
Resetting Network Connection..................................................32
iv
v
vi
Important Safety Information
When using Ojo, follow these safety precautions to reduce the risk of fire,
electric shock, and injury to persons or property:
1. Keep all slits and openings of the phone unblocked. Do not set the phone
on a heating register or over a radiator. Ensure that proper ventilation is
provided at the installation site.
2. Do not use while wet or while standing in water.
3. Do not use this product near water (for example, near a bath tub, kitchen
sink, or swimming pool).
4. Do not allow anything to rest on the power cord. Place the power cord so
that it will not be walked on.
5. Never insert objects of any kind into the product slits as that may result in
fire or shock.
6. Unplug this product from the wall outlet before cleaning. Do not use liquid
cleaners or aerosol cleaners. Use a damp cloth for cleaning.
7. Do not disassemble this product. If service or repair work is required,
contact the Motorola address found in the back of this user’s guide.
8. Do not overload wall outlets and extension cords.
9. Avoid using during an electrical storm. Use a surge protector to protect the
equipment.
10. Do not use Ojo to report a gas leak, especially if you are in the vicinity of
the gas line.
Unplug Ojo immediately from an outlet if:
•
The power cord or plug is damaged or frayed.
•
Liquid has been spilled on to the product.
•
The product has been exposed to rain or water. Do not retrieve the handset
or base until after you have unplugged the power and phone from the wall.
Then retrieve the unit by the unplugged cords.
•
The product has been dropped or the cabinet has been damaged.
•
The product exhibits a distinct change in performance.
vii
Important Safety Information
Installation Guidelines
1. Read and understand all instructions and save them for future reference.
2. Follow all warnings and instructions marked on the product.
3. Do not install this product near a bathtub, sink, or shower.
4. Operate this phone using only the power source indicated on the marking
label. If you are unsure of the power supply to your home, consult your
dealer or local power company.
5. Do not place this product on an unstable cart, stand, or table. This product
may fall, causing serious damage to the product.
6. Adjust only those controls that are covered by the operating instructions.
Improper adjustment of other controls may result in damage and will often
require extensive work to restore the product to normal operation.
7. Clean this product with a soft, damp cloth. Do not use chemicals or
cleaning agents to clean this phone.
8. Use only the power supply that came with this unit. Using other power
supplies may damage the unit.
9. Because Ojo operates on electricity, you should have at least one phone in
your home that is not cordless in case the power goes out.
10. To avoid interference to nearby appliances, do not place the base of Ojo on
or near a TV, microwave oven, or VCR.
Battery Safety Instructions
•
Do not burn, disassemble, mutilate, or puncture the battery or battery
pack. The batteries contain toxic materials that could be released, resulting
in injury.
•
Caution: There is a risk of explosion if you replace the batteries with an
incorrect battery type. Use only the battery pack that came with your
phone or an authorized replacement recommended by the manufacturer.
•
Keep batteries and battery pack out of the reach of children.
•
Remove the battery pack if storing the product over 30 days.
•
Do not dispose of batteries or battery pack in fire, which could result in
explosion.
The rechargeable batteries that power this product must be disposed of
properly and may need to be recycled. Refer to your battery pack’s label for
battery type. Contact your local recycling center for proper disposal
methods.
•
viii
FCC and Interference Information
This equipment complies with Parts 15 and 68 of the FCC rules and the
requirements adopted by the Administrative Council for Terminal Attachments
(ACTA).
A plug and jack used to connect this equipment to the premises wiring, and
telephone network must comply with applicable FCC Part 68 rules and
requirements adopted by the ACTA. A compliant telephone cord and modular
plug are provided with this product. The product is designed to be connected
to a compatible modular jack that is also compliant. See installation
instructions for details.
Notification of the Local Telephone Company
On the bottom of this equipment is a label that contains, among other
information, a product identifier in the form US:AAAEQ##TXXXX. You must,
upon request, provide this information to your telephone company.
The digits represented by ## in the product identifier indicate the Ringer
Equivalency Number (REN) for this equipment. The REN is useful in
determining the number of devices you may connect to your telephone line
and still have all of these devices ring when your telephone number is called.
In most (but not all) areas, the sum of the RENs of all devices connected to
one line should not exceed five (5). To be certain of the number of devices you
may connect to your line as determined by the REN, contact your local
telephone company.
Notes:
•
This equipment may not be used on coin service provided by the telephone
company.
•
Connection to party line service is subject to state tariffs. Contact the state
public utility commission, public service commission or corporation
commission for information.
•
If your home has specially wired alarm equipment connected to the
telephone line, ensure that the installation of Ojo does not disable your
alarm equipment. If you have questions about what will disable alarm
equipment, consult your telephone company or a qualified installer.
ix
FCC and Interference Information
•
Notice must be given to the telephone company upon permanent
disconnection of your telephone from your line.
•
The FCC requires that you connect your cordless telephone to the
nationwide telephone network through a modular telephone jack (USOC
RJ11C/RJ11W or RJ14C/RJ14W).
Rights of the Telephone Company
Should your equipment cause trouble on your line, that may harm the
telephone network, the telephone company shall, where practical, notify you
that temporary discontinuance of service may be required. Where prior notice
is not practical and the circumstances warrant such action, the telephone
company may temporarily disconnect service immediately. In case of such
temporary discontinuance, the telephone company must:
1. Promptly notify you of such temporary discontinuance.
2. Afford you the opportunity to correct the situation.
3. Inform you of your right to bring a complaint to the Commission pursuant
to procedures set forth in Subpart E of Part 68, FCC Rules and Regulations.
The telephone company may make changes in its facilities, equipment,
operations, or procedures that could affect the operation of the equipment. If
this happens, the telephone company will provide advance notice in order for
you to make necessary modifications to maintain uninterrupted service.
Interference Information
This device complies with Part 15 of the FCC Rules. Operation is subject to the
following two conditions:
FCC and Interference Information
This equipment generates, uses, and can radiate radio frequency energy and, if
not installed and used in accordance with the instructions, may cause harmful
interference to radio communications. However, there is no guarantee that
interference will not occur in a particular installation.
If this equipment does cause harmful interference to radio or television
reception, which can be determined by turning the equipment on and off, you
can try to correct the interference with one or more of the following measures:
1. Connect the telecommunications equipment into an outlet on a circuit
different from that to which the receiving antenna is connected.
2. Reorient or relocate and increase the separation between the
telecommunications equipment and the receiving antenna.
3. Reorient or relocate the receiving antenna (that is, the antenna for the
radio or television that is “receiving” the interference).
If these measures do not eliminate the interference, please consult your dealer
or an experienced radio/television technician for additional suggestions. Also,
the FCC has prepared a helpful booklet, “How to Identify and Resolve Radio/TV
Interference Problems.” This booklet is available from the U.S. Government
Printing Office, Washington D.C. 20402. Please identify stock number 004-00000345-4 when ordering copies.
The FCC requires this product to be serviced only by Motorola or its authorized
service agents. Changes or modifications not expressly approved by Motorola
could void not only the user’s authority to operate the equipment, but also the
limited warranty.
Hearing Aid Compatibility
This telephone system meets the FCC standards for hearing aid compatibility.
1. This device may not cause harmful interference.
2. This device must accept any interference received, including interference
that may cause undesired operation.
This equipment has been tested and found to comply with the limits for a Class
B digital device, pursuant to Part 15 of the FCC Rules. These limits are
designed to provide reasonable protection against harmful interference in a
residential installation.
x
xi
FCC and Interference Information
xii
License Agreement
IMPORTANT: PLEASE READ THIS SOFTWARE LICENSE (“LICENSE”)
CAREFULLY BEFORE YOU USE THE OJO™ VIDEO PHONE. BY USING THE OJO
VIDEO PHONE, YOU INDICATE YOUR ACCEPTANCE OF EACH OF THE TERMS
OF THIS LICENSE WITH RESPECT TO USE OF ALL PROGRAMS, PROCEDURES,
RULES, DATA AND/OR ROUTINES IN OBJECT MACHINE READABLE LANGUAGE,
WHICH INSTRUCT THE OPERATION OF THE OJO OR WHICH MAY BE LOADED
INTO A COMPUTER FOR USE (collectively, SOFTWARE”). UPON ACCEPTANCE,
THIS LICENSE WILL BE A LEGALLY BINDING AGREEMENT BETWEEN YOU AND
MOTOROLA. THE TERMS OF THIS LICENSE APPLY TO YOU AND TO ANY
SUBSEQUENT USER OF THIS SOFTWARE.
IF YOU DO NOT AGREE TO ALL OF THE TERMS OF THIS LICENSE (I) DO NOT
INSTALL OR USE THE SOFTWARE AND (II) RETURN THE OJO VIDEO PHONE
AND THE SOFTWARE (COLLECTIVELY, “PRODUCT”), INCLUDING ALL
COMPONENTS, DOCUMENTATION AND ANY OTHER MATERIALS PROVIDED
WITH THE PRODUCT, TO YOUR SERVICE PROVIDER OR POINT OF PURCHASE
FOR A FULL REFUND (IF YOU PURCHASED THE PRODUCT).
The Software includes associated media, any printed materials, and any “on
line” or electronic documentation. Software provided by third parties may be
subject to separate end-user license agreements from the manufacturers of
such Software. This License shall also apply to any updates, bug fixes, or
newer versions of the software provided by WorldGate for use with this
Product.
The Software is never sold. Motorola licenses the Software to the original
customer and to any subsequent licensee for personal use only on the terms of
this License. Worldgate Services, Inc. and its 3rd party licensors retain the
ownership of the Software and are considered third party beneficiaries under
this License, with full right to enforce the obligations contained herein.
xiii
License Agreement
The Software is protected by patents, copyright and other intellectual property
laws and international treaty provisions. You are hereby granted a personal,
nontransferable, nonexclusive, revocable license to use the Software (without
making any modification thereto or copies thereof,) solely as reasonably
required for your legal and proper use of the video phone, and on the terms
and conditions hereinafter set forth. Except for this specific license, no interest,
right or license, express or implied, is granted in or to the Software, and all
such other interests, rights and licenses are hereby reserved by WorldGate
Services, Inc. and its licensors.
The Ojo video phone has been designed for use with a video phone service
such as the Ojo video phone service, provided by Ojo Services, Inc. (“Ojo
Services”). If you decide to use the Ojo video phone with any service or
application not provided by Ojo Services, you warrant and represent that you
possess all required rights, including required licenses, to use the Ojo video
phone with the non-Ojo service or application, and that the service or
application is compatible with the Ojo video phone. You may not: (1) change
the electronic serial number or any equipment identifier associated with the
Ojo video phone; (2) loan, distribute, rent, lease, give, sublicense or otherwise
transfer the Software, in whole or in part, to any other person, separate from
the Product, and then only to a person who agrees to be bound by the terms
and conditions of this License Agreement; (3) copy or translate the User Guide
included with the Product, other than for personal use; (4) copy, alter,
translate, disassemble, reverse-engineer, alter, modify or tamper with the
Software, including but not limited to, modifying the Software to make it
operate on non-compatible hardware, and (5) disassemble, reverse-engineer,
alter, modify or tamper with the Ojo video phone or any security controls
contained therein, without express written permission from Ojo Services in
each instance; (6) remove, alter or cause not to be displayed, any copyright
notices or startup message contained in the Software programs or
documentation; and(7) export the Software or the Product components in
violation of any United States export laws.
License Agreement
You acknowledge and understand that the Ojo video phone may not function in
the event of power failure or a failure of your communication network. A power
or network failure may also require a reset or reconfiguration of the Ojo video
phone.
YOU ACKNOWLEDGE AND UNDERSTAND THAT THE OJO VIDEO PHONE MAY
PERMIT PARTIES TO A CALL, TO CAPTURE AND STORE INFORMATION
RELATED TO A CALL SUCH AS THE APPLICABLE CALLED OR CALLING PARTY
IDENTIFICATION INFORMATION AND OTHER CALL RELATED DATA FOR THE
CALL. SOME OF THIS DATA MAY BE STORED AND USED, FOR EXAMPLE, AS
PART OF AN ADDRESS BOOK, VOICE AND VIDEO MESSAGING APPLICATIONS
AND OTHER USES DISCUSSED IN THE USER GUIDE FOR THE OJO VIDEO
PHONE. IF YOU DO NOT WISH YOUR IMAGE AND/OR VOICE TO BE
CAPTURED YOU CAN USE THE VIDEO AND AUDIO MUTE FEATURES
CONTAINED WITHIN THE OJO VIDEO PHONE. PLEASE REFER TO THE OJO
PRIVACY POLICY CONTAINED ON THE WWW.OJOPVP.COM WEBSITE FOR
FURTHER INFORMATION.
Your Ojo video phone is connected to and uses public communication networks
in order to transmit communications. You acknowledge and agree that these
networks may be subject to security breaches which are outside of any
reasonable control by Ojo or anyone else. For example, you may receive calls
from third parties who have received your number from unauthorized sources
or who call you by accident or through methods such as random telephone
numbers generation. Some of these incoming calls may be undesired and/or
may contain content which may be objectionable or improper. Although we
endeavor to prohibit the improper use of the Ojo video phone through our
licenses and other agreements with our users, current communication network
technology cannot necessarily predict or prevent such calls or otherwise
prevent security breaches.
The Product is not designed or intended for use in on-line control of aircraft, air
traffic, aircraft navigation or aircraft communications; or in design,
construction, operation or maintenance of any nuclear facility. WORLDGATE
AND ITS 3RD PARTY LICENSORS DISCLAIM ANY EXPRESS OR IMPLIED
WARRANTY OF FITNESS FOR SUCH USES. YOU REPRESENT AND WARRANT
THAT YOU SHALL NOT USE THE PRODUCT FOR SUCH PURPOSES.
In order for you to be provided with the most current features and software
available for your Ojo video phone, your Ojo video phone has been configured
to permit automatic downloads of the latest software. Any obligation to provide
such downloads, is however, expressly disclaimed and to the extent any
downloads are performed they will be performed solely at the discretion of Ojo
Services. If Ojo elects to provide such downloads, we will endeavor to conduct
the downloads during non-peak hours and otherwise in a manner to minimize
any disruption of your use of the Ojo video phone, however, no assurance can
be made that such downloads will not result in an interruption of your
communication network and you ability to make and/or receive calls as
discussed above.
xiv
xv
License Agreement
You acknowledge and understand that Ojo Services and Motorola disclaim any
and all liability associated with the above matters, and you agree to defend,
indemnify, and hold harmless Ojo Services, Motorola, our affiliates and
distribution/infrastructure partners and our and their officers, directors,
employees, affiliates and agents, from any and all claims, losses, damages,
fines, penalties, costs and expenses (including, without limitation, reasonable
attorneys’ fees) arising from your breach of any of the foregoing.
This License and your rights regarding any matter it addresses are governed by
the laws of the Commonwealth of Pennsylvania, without reference to conflict of
laws principles. THIS LICENSE SHALL TERMINATE AUTOMATICALLY if you fail
to comply with the terms of this License.
xvi
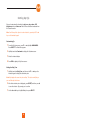
Getting Started
What You Need
To set up your Motorola Ojo Personal Video Phone, you need:
•
A computer with high-speed Internet connection and a router.
•
An active home telephone account (for conventional telephone calls).
•
A major credit card to establish your Ojo account.
•
Ojo Unit ID Number located on the box and on the bottom of your Ojo.
Write your Ojo Unit ID Number in the box below for future reference:
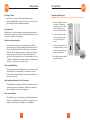
Unpacking and Checking the Contents
Check to make sure the your package contains each of the items pictured
below:
PowerC ord with
PowerBlock
O jo Personal
Video Phone
C ordless
Handset
EthernetC able
Battery Pack
Users G uide and
Q uick StartG uide
1
Telephone C able
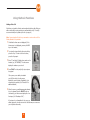
Getting Started
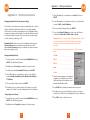
Getting Started
Choosing a Location
Installing the Battery Pack
•
Place Ojo near your cable or DSL modem and telephone jack.
Important: Before handling batteries, read the Battery Safety Instructions.
•
Lighting should illuminate your face as you sit in front of your Ojo screen.
See the lighting tips below for additional information.
1
Remove the battery cover from
the back of the handset by
pressing down on the recess
and then sliding the cover
down and off of the handset.
2
Insert the battery connector
into the socket with the red
wire to the left side of the
socket.
3
Insert the battery pack into the
compartment. Gently press the
wires into the remaining space
above the battery pack.
4
Slide the battery cover upward
and snap into place.
Ojo Lighting Tips
Although we do not have the advantage of strategically placing professional
quality lights in our living rooms, there are a few simple things that you can do
to improve the quality of your video image.
Direction, intensity and quality
Find an area of the room where you can place at least two lights on
opposite sides of Ojo. One light should be about two-times as bright as
the other (key light) and both lights should have some sort of shade to
soften the light. Two table lamps placed on each side of the Ojo would
do nicely, or place a desk lamp next to Ojo and a floor lamp on the
opposite side. One lamp should have a 100 watt bulb and the other a 4060 watt bulb. Each light source should be placed an equal distance from
the subject. If you stop here, you should be fine.
Avoid strong backlighting
This is where your subject is standing with the sky or a window or white
wall behind them. The camera attempts to compensate for the light
coming in from the back and darkens the image (and the subject) so you
can hardly see their face.
Avoid Lights placed directly in front of the subject
These lights flatten the subject rather than flatter and often cause a big
objectionable shadow in the background. Additionally, frontal lighting
causes a glare when the subject is wearing glasses.
Avoid overhead lighting
These lights, like those in the boardroom, cause shadows that mask the
subject’s eyes. Additionally, they often reflect into the camera from the
subject’s forehead causing a result similar to strong backlighting.
2
3
Getting Started
Connecting Ojo
Getting Started
Ojo powers on, performs a series of self-tests, and displays a series of startup
screens. After a few minutes, the message “Please Call Customer Service” is
displayed.
Connect Ojo as described below:
Note: If you have already registered Ojo and
established an Ojo account, the Ojo Home screen
may be displayed instead of the “Please Call
Customer Service” message.
Power
Charging the Handset
Connects to
Phone Jack
Connects to
Router
1
Turn off the modem and router power.
2
Confirm that your modem is correctly connected to your router.
3
Plug one end of the provided Ethernet cable into the “ROUTER” port on
the back of Ojo and the other end into an open port on the router.
4
Plug one end of the telephone cable into a phone jack and the other end
into the “WALL” port on the back of Ojo.
5
Turn on the power to the modem, wait one minute, and then turn on the
power to the router.
6
Plug one end of the Ojo power cord into the Ojo power block and the
other end into an electrical outlet.
7
Plug the Ojo power block into the “12V” port on the back of Ojo.
4
After you’ve installed the handset battery pack,
place the cordless handset in the handset cradle. An indicator on the handset
screen shows that the handset is charging.
C harging
Indicator
Note: You can register or make a call before the handset is fully charged by
eaving the handset in the cradle. Keep the handset in the cradle to allow the
battery pack to charge fully. It takes approximately 12 hours to charge the
battery pack for the first time.
When the battery pack is fully charged, the handset screen displays a fullpower indicator.
5
Getting Started
Activating Ojo
Getting Started
Setting the Correct Time Zone
Before you can use Ojo, you must register and establish an Ojo account. This
account enables you to make and receive video calls with other Ojo users.
Have available:
•
Your 12-digit Ojo Unit ID Number (found on the “Please Call Customer
Service” message, the bottom of your Ojo, and on the box)
•
A major credit card
1
From the Ojo Home screen, press or on the handset to highlight
MAIN MENU, then press SELECT. The Main Menu appears.
2
Highlight and select Customize to display the
Customize screen.
3
Highlight and select Time Zone and then use the
or keys on the handset keypad to display the
desired time zone.
4
After the desired time zone is displayed, press
SELECT, and then press to save the
selection. Ojo prompts you to confirm.
5
Use the and keys to highlight Yes, then press
SELECT.
6
Press END to display the Ojo Home screen.
To activate your account:
•
Call an Ojo customer service representative at 1-877 FOR MY OJO
(1-877-367-6965) from a phone that will use the same phone number as
Ojo. Press “1” at the voice prompt to reach a representative.
After you establish your Ojo account, the Ojo Home
screen is displayed with the correct time (for the
Eastern Time Zone) and date.
C orrectDate
and Tim e
Note: Refer to the following page for the procedure
to change the time zone.
If the Ojo Home screen is not displayed
(or if the displayed time and/or date are incorrect)
after you have registered and established an Ojo
account, refer to Appendix 4 – Troubleshooting.
Hom e Screen
6
7
Getting Started
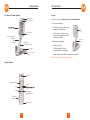
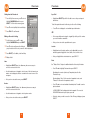
Ojo (without Cordless Handset)
Getting Started
Screens
Lens C over
C am era Lens
Ojo has two screens: the video screen and the handset screen.
The video screen displays:
•
Video Screen
Inset
O peration Buttons
TALK/SPKR
END
LO C ATE
C radle for
C ordless Handset
•
The Ojo Home screen, used for easy
navigation of Ojo’s features.
When not in use, the video screen
will go blank. Pressing any key will
reactivate the display.
Handset
Screen
The handset screen displays:
•
Battery power level
Speaker
•
“Battery Charging” (when the
handset battery is being charged)
Volum e C ontrol
Buttons
•
Numbers being entered (when an outgoing call is placed)
Note: The handset screen does not display video.
Cordless Handset
Earpiece
HandsetScreen
M ute
Talk
Select
Num eric
Keyboard
Navigation
Keys ()
{
M icrophone
8
Video
Screen
9
Getting Started
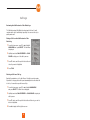
Navigation Keys
Most Ojo screens provide instructions to follow, buttons, and an
information bar.
You can highlight any of the buttons using the navigation keys on the handset.
Usually, the top-most option on a screen (PHONEBOOK in the example) is
selected by default.
Press or on the handset to
highlight a button (PHONEBOOK or
MAIN MENU in the example). Then
press SELECT to choose the
highlighted button.
Instructions
Buttons
If the Ojo Home screen is not displayed
(or if the displayed time and/or date are
incorrect) after you have registered and
established an Ojo account, refer to
Appendix 5, Troubleshooting.
10
Hom e Screen
Inform ation
Bar
Setting Up Ojo
Ojo can be customized by selecting the ring tone, ring volume, LCD
brightness, and your time zone. Each of these selections is accessed from
the Customize screen.
Note: Scroll through the options for each selection by pressing the or keys on the handset keypad.
Customizing Ojo
1
From the Ojo Home screen, press or to highlight MAIN MENU.
Press SELECT. The Main Menu appears.
2
Highlight and select Customize to display the Customize screen.
3
Select the desired settings.
4
Press END to display the Ojo Home screen.
Setting the Ring Tone
1
Highlight and select Ring Tone, and then use the or keys on the
handset keypad to display the desired ring tone.
Note: Ojo displays the current ring tone setting. The ring tones will play as
you scroll through the choices.
2
After the desired ring tone is displayed, press SELECT, and then press to save the selection. Ojo prompts you to confirm.
3
Use the and keys to highlight Yes, then press SELECT.
11
Setting Up Ojo
Setting the Ring Volume
1
Highlight and select Ring Volume, and then use the or keys on the
handset keypad to display the desired ring volume.
Note: Ojo displays the current ring volume setting. The ring volumes will play
as you scroll through the choices.
2
After the desired ring volume is displayed, press SELECT, and then press
to save the selection. Ojo prompts you to confirm.
3
Use the and keys to highlight Yes, then press SELECT.
Setting the Video Screen Brightness
Your Ojo Video Screen is a Liquid Crystal Display (LCD). You can control the
brightness of the screen.
1
Highlight and select LCD Brightness, and then use the or keys on
the handset keypad to display the desired LCD brightness.
Note: The LCD brightness levels are Very Bright, Bright, Normal, Dim,
and Dark.
2
After the desired LCD brightness is displayed, press SELECT, and then
press to save the selection. Ojo prompts you to confirm.
3
Use the and keys to highlight Yes, and then press SELECT.
Setting the Time Zone
1
Highlight and select Time Zone, and then use the or keys on the
handset keypad to display the desired time zone.
Note: The list of time zones includes Eastern, Central, Mountain, Pacific,
Arizona, Aleutian, Alaska, Hawaii, Samoa, Michigan, Indiana-Starke,
and East Indiana.
2
After the desired time zone is displayed, press SELECT, and then press to save the selection. Ojo prompts you to confirm.
3
Use the and keys to highlight Yes, and then press SELECT
12
Using the Basic Functions
Making a Video Call
Ojo allows you to make both video and conventional telephone calls. When you
make a video call, the party receiving your call must have an Ojo. To use Ojo
as a conventional phone, attach a phone line (see page 4).
Note: You must register Ojo before you can make or receive a video call. See
Getting Started for the procedure.
1
Check that the Home screen is displayed. (If the
Home screen is not displayed, press any the END
key on the handset.)
2
To preview the image that the other party will see,
press the # key. To return to the home screen,
press the # key again.
3
Enter “1” and the full 10-digit phone number on the
handset (e.g., 18773676965). The video screen
displays the number as you enter it.
4
Press TALK. The other party’s Ojo rings or gives a
busy signal.
If the person you are calling is entered in
your Ojo Phonebook, the video screen
displays the person’s picture (if available), their
name and phone number. (See “Phonebook” for
additional details.)
5
When the person you called answers and activates
his or her camera (Press the SELECT button on
the handset), your video screen displays his or her
live image. (See “Receiving a Call.” )
A live image of you (transmitted to the person you
called) appears in your video screen inset. Use this image to ensure that
you are positioned correctly.
13
Using the Basic Functions
6
If you do not want the other party to see you, slide the lens cover to the
left (see page 17). The orange block covers the camera lens, and your
image does not appear. In its place, a message is displayed to the other
party indicating that your camera is off.
Using the Basic Functions
3
The video screen displays live video of the person
who called.
Note: Whenever your camera lens is covered, a notice displayed in the video
screen inset reminds you that your video privacy in on.
Your camera is not activated automatically.
Consequently, neither the caller nor you can see
your video image. (Notice the ”Camera is off”
message at the bottom of the screen.)
Slide the lens cover to the right to allow the camera to display your video
image.
7
Press END, or hang up.
Press TALK. You are now connected, and you can
hear the caller speaking.
4
To turn your camera on, press SELECT. Your video
image replaces the “Camera is off” message.
5
Press END, or hang up.
Note: The functions like the END key when you are on a call.
Making a Conventional Call
Note: To make a conventional phone call, your Ojo must be connected to a
phone line.
1
Enter the phone number.
2
Press TALK.
Using Redial
You can redial the last number called by pressing TALK
twice.
Receiving a Call
1
When a call comes in, Ojo rings and displays
a Caller ID picture of the person calling (if available),
his or her name and phone number.
Adjusting the Volume During a Call
There are two ways to adjust the volume while on a call:
• Press the volume buttons on the right side of Ojo’s base.
OR
• Press or on the handset.
2
If the person calling has an Ojo but a picture is not
available, a silhouette appears instead of the caller’s
picture.
Note: When you change the volume, the video screen temporarily displays the
volume indicator.
Note: If you answer an audio only call using your
regular phone, your Ojo phone may continue to ring for
a few seconds.
14
15
Using the Basic Functions
Using the Basic Functions
Using the Cordless Handset for Audio Privacy
Turning the Camera Off for Video Privacy During a Call
The speakerphone is active whenever the handset is in the cradle. For audio
privacy:
You can shut off your camera during a call for video privacy.
1
Note: The handset will lose audio if it is moved out of the base unit range
during a call. Press the TALK button twice after moving back into range to
restore the handset audio.
2
1
Pick up the handset and use it as a cordless phone. To adjust the volume
of the handset audio while on a call, press the volume buttons on the right
side of the Ojo’s base or or on the handset.
Return the handset to the cradle to activate the speakerphone.
Note: When the handset is out of the cradle, you can use the three buttons on
the cradle to: 1) Answer a call by pressing TALK, 2) Press LOCATE to activate
your camera, 3) End a call by pressing END, or 4) locate a misplaced handset
by pressing and holding LOCATE. The handset will emit a distinct sound.
Slide the lens cover to the left to close the cover
and prevent the caller from seeing
you.
“Camera is off” replaces your video image.
2
To enable the caller to see your video image
again, slide the lens cover to the right.
Your video image replaces the “Camera is
off” message. The other party can see you again
on their incoming video screen.
Muting the Audio During a Call
You can prevent the caller from hearing you or any other noise or conversation
on your end of the call.
1
Press the MUTE button. Ojo displays a mute indicator. You can still hear
the caller speaking, but the caller cannot hear you.
2
Press MUTE again so that the caller can hear you.
Note: This does not affect the video.
16
17
Using the Basic Functions
Speed Dialing
You can use a one- or two-digit code to call a frequently called number.
1
Check that the Home screen is displayed.
2
Enter the one- or two-digit speed dial code on the
handset numeric key pad.
Note: The speed dial code must be set up in your Ojo
Phonebook before you can use it. Refer to page 20 for
instructions on specifying a speed dial code.
3
Press TALK. The call is made
18
Phonebook
The Ojo Phonebook makes it easy to call those you talk to frequently. It stores
up to 100 entries.
A phonebook entry can be added manually or from a call log.
Adding a Listing to the Phonebook
You can add a Phonebook entry any time you are not using
Ojo to make a call.
1
From the Ojo Home screen, press or to highlight
PHONEBOOK, and then press SELECT. The
Phonebook screen appears.
2
Highlight and select ADD NEW ENTRY to display the
Phonebook Edit screen.
3
Highlight and select Name and use the handset
numeric keypad to enter the name. After the character
you want to enter is displayed, the cursor
automatically advances to the next space. To advance
the cursor manually, use the and keys on the
handset.
Notes:
When entering names in the Phonebook use the * and # to navigate
without deleting information.
The name entered and the name that Ojo displays for the caller may be
different. Ojo displays the name used during registration (e.g., “Aunt
Sammy 123-456-7890” appears as “Samantha Nelson 123-456-7890”).
19
Phonebook
• Press a key once to enter the lower case first letter on that number key. For
example, press 4 once to enter g:
Phonebook
5
4 once g
To enter the speed dial number for this entry,
do either of the following:
• Press a key two or three times to enter the second or third lower case
letter. For example, press 4 twice to enter h:
4 twice h
• Press a key additional times to enter a capitalized letter or the number itself.
For example, press 4 five times to enter H:
4 five times H
•
• To enter a space, press . To correct an error, press (backspace) to erase
the last entry.
After you have entered the speed dial number,
press SELECT.
6
After you have entered the name, press SELECT.
4
Press or to display the next available
speed dial number.
• Enter the speed dial number using the keypad.
Ojo notifies you if the number you enter is
invalid or unavailable.
• Or press 4 seven times to enter the number 4:
4 seven times 4
Highlight and select Speed Dial. Speed Dial
allows you to make a call to anyone in your
Phonebook using a one- or two-digit number.
Highlight and select Location, and then use
the and keys on the handset keypad to
highlight the Home, Mobile, Work, or Home2
icon.
After you highlight the desired location icon,
press SELECT.
Highlight and select Number and then use the
handset keypad to enter the phone number.
• Use only numeric characters (No spaces,
commas, parentheses, or dashes).
Note: "Photo" cannot be used when adding a
listing to the Phonebook. Refer to sections, Taking
a Caller ID Photo and Editing a Phonebook Listing.
• To correct an error, press (backspace)to erase
the last character entered.
7
After you have entered the phone number, press
SELECT.
Press to save the new Phonebook listing. At
least one character must be entered in both
the Name and Number fields before the listing
can be saved.
Ojo prompts you to press SELECT to save the
Phonebook listing. Use the and keys on
the handset keypad to highlight Yes to
confirm saving the listing, or highlight No, and
then press SELECT.
20
21
Phonebook
Calling from the Phonebook
1
Phonebook
Speed Dial
From the Ojo Home screen, press or to
highlight PHONEBOOK and then press
SELECT. The Phonebook screen appears.
• Highlight and SELECT Speed Dial. Use to remove the present speed
dial number.
To edit the speed dial number for this entry, do either of the following:
2
Press or to highlight the desired listing.
•
3
Press TALK. The call is made.
OR
Editing a Phonebook Listing
1
•
On the Home screen, press or to
highlight PHONEBOOK and press SELECT.
Press or to display the next available speed dial number.
Enter a speed dial number using the keypad. Ojo notifies you if the number
you enter is invalid or unavailable.
• After you have entered the speed dial number, press
2
Press or to scroll among the listings in
your phonebook until the one you want to edit is highlighted.
3
Press SELECT, or the key to edit an listing.
• Highlight and select Location and then use the and keys on the
handset keypad to highlight the Home, Mobile, Work, or Home2 icon.
4
Editing a field:
• After you highlight the desired location icon, press SELECT.
Location
Photo
Name
• Highlight and SELECT Name. Use as many times as necessary to
remove the contents of the field.
See “Taking a Photo” chapter for additional details on this using this feature.
• Press or to highlight Photo and then press SELECT.
• Use the handset numeric keypad to enter the name. After the character you
want to enter is displayed, wait three seconds for the cursor to move to the
next space.
Ojo displays the number of photos (or Snapshots) stored for this
Phonebook entry.
•
Ojo also displays "Keep," for the number of snapshots to store, and
"Discard," for the number of snapshots to delete.
After you have entered the name, press SELECT.
Number
• Highlight and SELECT Number. Use as many times as necessary to
remove the contents of the field.
• Use the handset numeric keypad to enter the phone number.
• After you have entered the number, press SELECT.
22
• Press or to view each available thumbnail photo. Press to mark a
photo to discard.
A “DISCARDED” label is displayed below the snapshot. To remove the
DISCARDED label and keep the photo, press .
• When the photo you wish to use as the Caller ID image is displayed, press
SELECT.
23
Phonebook
5
6
Press to save the edited Phonebook listing.
Ojo prompts you to press SELECT to save the
Phonebook listing. Use the and keys on
the handset keypad to highlight Yes to
confirm deleting the listing, or highlight No,
then press SELECT.
Phonebook
Finding a Name in the Phonebook
1
From the Ojo Home screen, press or to highlight PHONEBOOK and
then press SELECT. The Phonebook screen appears.
2
Use the handset keys to enter the first letter of the name. The first listing
beginning with that letter is displayed.
For example, press the 5 key to display the first listing that begins with the
letter J.
Deleting a Phonebook Listing
1
From the Home screen, press or to
highlight PHONEBOOK and press SELECT.
2
Press and to scroll among the listings in
your Phonebook until the listing you want to
delete is highlighted.
3
Press SELECT to display the Phonebook Edit screen.
4
Press to highlight the Delete button and then press SELECT to delete
the listing. Ojo prompts whether to delete the Phonebook listing.
5
Use the and keys on the handset keypad to highlight Yes to confirm
deleting the listing, or highlight No, then press SELECT.
24
3
Press the same key again to display listings that begin with the next letter
on that key.
For example, press the 5 key again to display the first listing that begins
with the letter K.
A prompt appears if there are no entries that can be accessed by the key
you pressed. For example, if there are no entries that begin with J, K, or
L, a prompt notifies you that there are no entries beginning with J, K, or
L, depending on how many times you press that key.
If you select a letter for which there are no entries, but there are entries
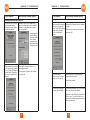
that begin with other characters on that key, those entries will be
displayed. For example, pressing the 5 key displays the first listing that
begins with K if there are no entries that begin with the letter J.
25
Phonebook
26
Call Logs
Reviewing the Calls Received or Calls Dialed Logs
The Calls Received and Calls Dialed logs keeps track of the last 20 calls
received and the last 20 calls dialed, respectively. You can use either log to
quickly make a call.
Placing a Call from the Calls Received or Calls
Dialed Log
1
From the Home screen, press or to highlight
MAIN MENU and press SELECT. The Main Menu
is displayed.
2
Highlight and select CALLS RECEIVED or CALLS
DIALED to display one of the call log screens.
3
Press or to scroll through the list of calls until
the call you want is highlighted.
4
Press TALK.
Deleting a Call from a Call Log
Each call log maintains up to 20 calls. When a 21st call is received or made,
Ojo adds it to the appropriate call log and automatically deletes the oldest call
in the log. You can delete any call from a call log.
1
From the Home screen, press or to highlight MAIN MENU
and press SELECT. The Main Menu is displayed.
2
Highlight and select CALLS RECEIVED or CALLS DIALED to display the
call log screen.
3
Press or to scroll through the list of calls until the entry you wish to
delete is highlighted.
4
Press to display the Entry Options screen.
27
Call Logs
5
Select an option.
To Delete a Single Entry:
•
Highlight an entry you wish to delete. Select DELETE ENTRY. The entry
you highlighted is removed from the call log.
To Delete All Entries:
•
Highlight an entry you wish to delete. Select DELETE ALL. The entry you
highlighted is removed from the call log.
Adding an Entry to Your Phonebook from a Call Log
You can quickly add the name, number, and/or picture of a caller listed on
either call log to your phonebook.
1
From the Home screen, press or to highlight MAIN MENU and
press SELECT. The Main Menu is displayed.
2
Highlight and select CALLS RECEIVED or CALLS DIALED to display the
call log screen.
3
Press or to scroll through the list of calls until the call you want is
highlighted.
4
Press SELECT to display the Entry Options screen.
5
Highlight and select STORE ENTRY. Ojo prompts whether to store the
Phonebook entry.
6
Press SELECT to store the entry. If you decide not to save the entry,
press to select No, and then press SELECT.
7
Press END to return to the Home screen.
You can confirm that the entry was saved by checking your phonebook. See
“Phonebook” chapter for more details.
28
Taking a Caller ID Picture
A key feature of Ojo is seeing the person you are speaking with during a call.
Ojo also lets you see who is calling before you answer the phone. You can take
a still picture of a caller during a video call and store it as part of the Caller ID
entry. Ojo displays the picture along with the other Caller ID information when
you next dial the number or receive a call from the number.
Taking a Caller ID Photo
You can capture Caller ID pictures any time during a video call. As a courtesy
to your callers, tell them you wish to take their Caller ID picture so they can
position themselves in front of their camera. Then press SELECT. The video
inset screen will display the Caller ID picture for 10 seconds. You can take
multiple pictures during a call.
Locating a Photo
Photos are temporarily located under their call listing in the appropriate Calls
Received or Calls Dialed log. To use a photo for Caller ID, it is important that
you move it from a Call log to your Phonebook.
Note: If you have multiple photos of a person already listed in your
Phonebook, the photo does not need to be moved. The photo automatically
becomes part of their Phonebook entry.
Moving a Photo from a Call Log to the Phonebook
After ending the call, you can review and move the photos to your phonebook
to use as a Caller ID Photo.
1
After the call ends, go to the appropriate Calls Received or Calls Dialed log
(see page 24) and highlight the last call.
2
Press or SELECT on the handset keypad to display the Entry Options
screen.
3
Select Store Entry and press END. The Ojo Home screen is displayed.
29
Taking Caller ID Pictures
Selecting a Caller ID Photo
1
From the Ojo Home screen, press or to highlight PHONEBOOK and
then press SELECT. The Phonebook screen appears.
2
Press or to highlight the phone number and then press SELECT.
3
Press or to highlight Photo and then press SELECT.
Ojo displays the number of Caller ID pictures (or Snapshots) stored for
this Phonebook entry. Ojo also displays two additional columns of
information: Keep, for the number of snapshots to store, and Discard,
for the number of snapshots to delete when finished editing Photo.
4
Press or to view each available thumbnail photo. Press to mark a
photo to discard. A “DISCARDED” label is displayed below the snapshot.
Press to remove the DISCARDED label and keep the snapshot.
5
Press and to view each available thumbnail photo. When the desired
photo is displayed, press SELECT to save the photo.
6
Press to save the Phonebook listing. Ojo prompts you to press SELECT
to confirm saving the Phonebook listing. Use the and keys on the
handset keypad to highlight Yes to confirm saving the listing, or highlight
No, then press SELECT. Snapshots marked for DISCARD are deleted
when the entry is saved.
Press END to display the Ojo Home screen.
30
Appendix 1 – Caring for Ojo
Unplug your Ojo. Clean external components with a soft cloth dampened with
water. If needed, use mild soap to remove stains.
Important: Never use strong detergents, other harsh cleaning agents, or
treated cloths, as they may damage the surface of Ojo. Never use a spray
or excess water, as this may affect electrical continuity.
Replacement cordless handsets and power supplies are available should they
become lost or damaged. Contact your retailer or call an Ojo customer service
representative at 1-877 FOR MY OJO (1-877-367-6965) to order units.
Appendix 2 – Software Upgrades
Occasionally, Ojo may inform you that software upgrades are available for
installation. This software could consist of new features or improvements to
Ojo’s operating system. There are two types of upgrades, standard and critical.
Upgrades will normally install in less than 15 minutes.
You may choose to install a standard upgrade, or choose to ignore it. Your Ojo
will continue to function normally.
A critical upgrade needs to be installed immediately. Ojo may not function
normally without the installation of a critical upgrade.
However, whether an upgrade is standard or critical, your settings, call logs,
and phonebook entries will be preserved and remain stored in Ojo.
31
Appendix 3 - Startup Connections
Appendix 3 – Startup Connections
Changing Bandwidth Profile and Internet Settings
The Connection screen allows you to change your bandwidth profile or Internet
settings. Normally the default settings work best. The selected bandwidth
profile needs to be less than your upstream speed. If the bandwidth selected
exceeds your upstream speed, the quality of your Ojo calls will deteriorate and
your Ojo may not function properly. If you do not know your upstream speed
or wish to confirm it, please call your ISP.
3
Use the and keys on the handset to select Get IP, then press
SELECT.
4
Use the and keys on the handset to select one of the following IP
methods: DHCP or Static IP Address.
5
After you select the desired method, press SELECT.
6
If you selected Static IP Address, you need to enter the following
information: IP Addr, DNS 1, DNS 2, Mask, or Route.
Important: Before entering any Static IP Address information, contact
your Internet Service Provider (ISP) to obtain the correct address
information. Entering incorrect information will render your Ojo
inoperable.
Bandwidth Profile allows you to change the bandwidth used during a call.
Internet Settings allows you to change the method Ojo uses for an IP
address. Reset Connection allows you to reacquire your Internet connection
without power cycling your Ojo.
Write the address information obtained from your ISP in the spaces
below:
Changing Bandwidth Profile
1
On the Home screen, press or to highlight MAIN MENU and press
SELECT. The Main Menu is displayed.
2
Highlight and select Connection to display the Connection screen.
3
Press or to highlight Bandwidth Profile and press SELECT.
4
Use the and keys on the handset to select one of the following
profiles: Cable Modem 150 kbps, DSL 100 kbps, DSL 150 kbps, or
T1 250 kbps.
5
After you select the desired profile, press SELECT.
6
Press to save your Connection settings. Ojo prompts you to save the
settings. Choose “Yes” to save the settings and return to the Main Menu.
Changing Internet Settings
1
On the Home screen, press or to highlight MAIN MENU and press
SELECT. The Main Menu is displayed.
2
Highlight and select Connection to display the Connection screen.
32
IP Addr:
___.___.___.___
DNS 1:
___.___.___.___
DNS 2:
___.___.___.___
Mask:
___.___.___.___
Route:
___.___.___.___
7
Using the numeric keypad, enter the address
information you obtained from your ISP. Use
the and keys on the handset to move to
different Static IP address fields.
8
Press SELECT when the address information has been entered.
9
Press save your Connection settings. Ojo prompts you to save the
settings. Choose “Yes” to save the settings and return to the Main Menu.
10 Press END to return to the Home screen.
33
Appendix 3 - Startup Connections
Resetting Network Connection
Appendix 4 – Troubleshooting
Reset Connection allows you to reacquire your Internet connection without
power cycling your Ojo.
1
If this happens...
On the Home screen, press or to highlight MAIN MENU and press
SELECT. The Main Menu is displayed.
2
Highlight and select Connection to display the Connection screen.
3
Press or to highlight Reset Connection and press SELECT. Ojo
prompts you to reset the network connection. Choose “Yes” to reacquire
your network connection, or “No” to return to the Connection screen.
Before calling Technical Support...
During Installation and Power-Up…
Ojo prompts you to “Please
Plug In The Network Cable.”
Check that the Ethernet cable is connected
to the “ROUTER/MODEM” port on the back
of Ojo, and the other end is plugged into an
open port on your router.
The “ROUTER/MODEM” port uses green and
amber LEDS to indicate connection status
and speed. The green LED blinks when data
is flowing through the connection, otherwise
it stays lit. The amber LED is off for low
speed connections and lit for high speed
connections. If connected properly the
green status LED on the Ojo should be lit or
blinking. If not try using a different Ethernet
cable.
If a different cable fails, try power cycling
Ojo once more.
If it still fails, place a call to Technical
Support.
34
35
Appendix 4 - Troubleshooting
If this happens...
Before calling Technical Support...
Press to move to the CONNECTION
screen. You may need to enter a Static IP
address for your network set up. Please
refer to Appendix 3.
If, after updating
your IP address,
Ojo again checks
for a network
connection and
fails, place a call to
Customer Service.
After successfully connecting
to the network, Ojo prompts
you to “Please Call Customer
Service“ while “Connecting
to Server” is highlighted in
orange.”
If this happens...
Before calling Technical Support...
During Installation and Power-Up…
During Installation and Power-Up…
Ojo informs you of network
problems and displays
“Network Problems. Please
Consult User Manual.”
Appendix 4 - Troubleshooting
After successfully connecting
to the server, Ojo prompts
you to “Please Call Customer
Service“ while “Activating
Phone” is highlighted in
orange.
Place a call to Customer Service to activate
your Ojo.
You’ve made all the
connections but the Home
screen does not come up.
Check that power is connected and the
power source is turned on.
This is a routine occurrence the first time
you set up Ojo.
Place a call to Customer Service to
authenticate the unit.
This is a routine occurrence the first time
you set up Ojo.
Check router settings.
The Home screen displays
the wrong time and date.
If your time and date are off by more than a
day or two, check router settings.
Otherwise, review Setting the Correct Time
Zone on page 7 of your User Guide. Your
Ojo may be functioning correctly but set for
the wrong time zone.
36
37
Appendix 4 - Troubleshooting
If this happens...
Before calling Technical Support...
During Installation and Power-Up…
Ojo displays a “Failed to
Connect” message when you
turn on the power.
It takes a really long time for
Ojo to get to the Home
screen.
Ojo always displays a “Failed to Connect”
message the very first time you power on
before activating the phone. Call a customer
service representative to activate or reactivate the phone.
It can take up to five minutes. If it takes
longer than five minutes, re-power the cable
modem and try again.
If the Home screen is still not displayed,
contact Technical Support.
Appendix 4 - Troubleshooting
If this happens...
Before calling Technical Support...
During Installation and Power-Up…
The self-image video is not
clear.
Maintain a distance of at least 17 inches
from the camera.
Increase the lighting in the room.
The self-image video is too
dark.
Increase the lighting in the room.
There is no incoming video
(of the other party) on the
video screen.
Ask the other party to check that their
camera lens is not covered.
The incoming video image is
too dark.
Tell the other party to increase the lighting
in the room they are in.
Cancel the call and try again.
During Call Set-Up (Trying to Make a Call)…
The handset is not working.
Press and hold the handset TALK button for
eight seconds.
Try adjusting the brightness of your LCD
screen. Review LCD Brightness on page 10
of the User Guide.
Check that the handset battery is installed
and charged.
Move closer to Ojo.
Sometimes you don’t see a
picture ID of the incoming
caller.
Review “Taking a Caller ID Picture” in your
User Guide. You may not have a Caller ID
Picture for this caller in your Phonebook. Ask
the caller if they have taken their picture ID
photo.
During the Call…
There is no self-image video
on the video screen.
The incoming video image
freezes.
Allow a few seconds for the problem to
correct itself.
Cancel the call and try again.
There is no incoming audio
(you can’t hear the other
party).
Have the other party confirm that their mute
setting is off.
There is an echo.
Lower the volume.
Check the speaker volume setting.
Check that the camera lens is not covered.
Check that you are within view of the
camera.
During an incoming call, be sure to press
SELECT to transmit your video self-image.
Increase the lighting in the room.
38
The surface may be too hard. Put a
placemat or mouse pad under Ojo.
The acoustics of the room may not be ideal.
Move Ojo to another location with better
acoustics.
39
Appendix 5 - Technical Specifications
Appendix 5 – Technical Specifications
Personal Video Phone Technical Specifications
General
DC Input
DC Current
Power Consumption
Gigahertz
Operating Temperature
Storage Temperature
Dimensions
Weight
Network
12 V
3 A (typical)
30 W (typical)
2.4 GHz
10° to 40°C
10° to 70°C
15.5” x 9.1” x 8.8”
2.5 lbs
Connector (2)
Protocol
RFC3261
Ethernet Network Interface
Communications Standards
PSTN
RJ-45
TCP/IP, UDP/IP, RTP, SIP
Connector
Dialing Mode
Audio
RJ-11
Tone (DTMF)
Compression (Video Calls)
Compression (Audio Calls)
Speakerphone
iLBC
G.711
Audio Processing
Echo Cancellation
Display
Full Duplex
Adaptive Sub-band
LCD Monitor
Type
Resolution
Aspect Ratio
Camera
100 Base-T
SIP, TCP/IP, RTP, UDP
Personal Video Phone Technical Specifications (Continued)
Video (in call)
Resolution
Frame Rate
Compression
Standards and Certifications
Standards
IEEE 802.3, 10 Base-T,
100 Base-TX
FCC, CE
Certifications
Cordless Handset Technical Specifications
General
Dimensions
Weight
Display
Range (Nominal Effective)
Battery
6.25” x 1.5” x 0.5”
5 oz
Illuminated Graphic LCM
100 ft
Battery Type
Charge Time
Talk Time
Standby Time
Nickel Metal Hydride
1 hour
6 hours
96 hours
7” diagonal
LCD
480 x 854
9:16
Image Sensor
Backlight Compensation
Automatic Gain Control
White Balance
Minimim Illumination
¼” color
Yes
Yes
Auto
2 lux
40
176 x 144 (QCIF)
30 fps
H.264
41
42
Limited Warranty
WARRANTY INFORMATION
Retail Purchasers. If you purchased this Product directly from Motorola or from an
authorized Motorola retail reseller, Motorola warrants to you, the original end user
customer, that the Product will be free from defects in materials and workmanship
under normal use. This Limited Warranty to you, the original end user customer,
continues for a period of two (2) years from the date of purchase from Motorola or
from an authorized Motorola reseller. To take advantage of this Limited Warranty
or to obtain technical support, you must call the Motorola toll-free phone number
(below). Motorola’s sole and exclusive obligation under this Limited Warranty for
retail sales shall be to repair or replace any Product that does not meet this
Limited Warranty. All warranty claims must be made within the applicable
Warranty Period.
Cable Operator or Service Provider Arrangements. If you did not purchase this
Product directly from Motorola or from a Motorola authorized retail reseller,
Motorola does not warrant this Product to you, the end-user. A limited warranty
for this Product (including Software) may have been provided to your service
provider (“Service Provider”) from whom you obtained the Product. Please contact
your Service Provider if you experience problems with this Product.
General Information. The warranties described in this Section shall not apply: (i)
to any Product subjected to accident, misuse, neglect, alteration, Acts of God,
improper handling, improper transport, improper storage, improper use or
application, improper installation, improper testing or unauthorized repair; or (ii) to
cosmetic problems or defects which result from normal wear and tear under
ordinary use, and do not affect the performance or use of the Product. Motorola’s
warranties apply only to a Product that is manufactured by Motorola and identified
by Motorola owned trademark, trade name or product identification logos affixed
to the Product. Motorola does not warrant to you, the end user, or to anyone else
that the Product will perform error free or without bugs. MOTOROLA IS NOT
RESPONSIBLE FOR, AND PROVIDES “AS IS” ANY SOFTWARE SUPPLIED BY 3RD
PARTIES. ALL IMPLIED WARRANTIES OF ANY KIND ARE HEREBY DISCLAIMED,
INCLUDING IMPLIED WARRANTIES OF MERCHANTABILITY AND FITNESS FOR A
PARTICULAR PURPOSE, EXCEPT TO THE EXTENT THAT SUCH IMPLIED
WARRANTIES MAY NOT BE DISCLAIMED UNDER APPLICABLE LAW. IN SUCH A
CASE, ANY IMPLIED WARRANTIES THAT MAY NOT BE DISCLAIMED SHALL BE
LIMITED TO THE DURATION OF THIS EXPRESS LIMITED WARRANTY.
43
NOTWITHSTANDING THE FOREGOING, THE REPAIR OR REPLACEMENT AS
PROVIDED UNDER THIS EXPRESS LIMITED WARRANTY IS THE EXCLUSIVE
REMEDY OF THE CONSUMER FOR BREACH OF ANY IMPLIED WARRANTIES. IN
NO EVENT SHALL MOTOROLA BE LIABLE, WHETHER IN CONTRACT OR TORT
(INCLUDING NEGLIGENCE) FOR DAMAGES IN EXCESS OF THE PURCHASE PRICE
OF THE PRODUCT, ACCESSORY OR SOFTWARE, OR FOR ANY INDIRECT,
INCIDENTAL, SPECIAL OR CONSEQUENTIAL DAMAGES OF ANY KIND, OR LOSS
OF REVENUE OR PROFITS, LOSS OF BUSINESS, LOSS OF INFORMATION OR DATA,
SOFTWARE OR APPLICATIONS OR OTHER FINANCIAL LOSS ARISING OUT OF OR
IN CONNECTION WITH THE ABILITY OR INABILITY TO USE THE PRODUCT,
ACCESSORIES OR SOFTWARE TO THE FULL EXTENT THESE DAMAGES MAY BE
DISCLAIMED BY LAW.
What additional provisions should I be aware of? Because it is impossible for
Motorola to know the purposes for which you acquired this Product or the uses to
which you will put this Product, you assume full responsibility for the selection of
the Product for its installation and use. While every reasonable effort has been
made to insure that you will receive a Product that you can use and enjoy, to the
fullest extent permitted under law Motorola does not warrant that the functions of
the Product will meet your requirements or that the operation of the Product will
be uninterrupted or error-free. MOTOROLA IS NOT RESPONSIBLE FOR PROBLEMS
OR DAMAGE CAUSED BY THE INTERACTION OF THE PRODUCT WITH ANY OTHER
SOFTWARE OR HARDWARE. ALL WARRANTIES ARE VOID IF THE PRODUCT IS
OPENED, ALTERED, AND/OR DAMAGED.
THESE ARE YOUR SOLE AND EXCLUSIVE REMEDIES for any and all claims that
you may have arising out of or in connection with this Product, whether made or
suffered by you or another person and whether based in contract or tort.
These matters are governed by the laws of the Commonwealth of Pennsylvania,
without regard to conflict of laws principles and excluding the provisions of the
United Nations Convention on Contracts for the International Sale of Goods.
Retail Purchasers Only. If you purchased this Product directly from Motorola or
from a Motorola authorized retail reseller, please call the Motorola toll-free
number, 1-877-FOR MY OJO (367-6965) for technical support or warranty service.
Cable Operator or Service Provider Arrangements. If you did not purchase this
Product directly from Motorola or from a Motorola authorized retail reseller,
please contact your Service Provider for technical support.
44
Index
A
audio
muting ................................16
privacy ...............................16
volume control ...............8, 16
B
bandwidth profile
changing ............................32
battery pack
charging ...............................5
installation ............................3
power level...........................5
safety instructions...............vii
brightness .......................12, 41
C
Call Logs .........................27–28
adding to phonebook .........25
deleting ..............................24
placing call from .................24
reviewing............................24
Caller ID ......................8, 14, 15
saving picture ...............29-30
taking picture ................29-30
calls .................................13-18
conventional.......................14
receiving ............................14
video calls ..........................13
camera ........................7, 13, 17
turning on ...........................13
charging
handset ................................5
connecting Ojo
in a network .......................32
to a DSL modem ................32
controls
handset ................................8
Ojo .......................................8
conventional calls .............1, 14
critical upgrade .....................31
customizing .......................9–10
IP address..........................33
LCD brightness ..................10
ring tone ...............................9
ring volume ........................10
time zone .......................6, 10
D
DSL service.......................1, 27
F
FCC compliance ................ix-xii
G
guidelines .............................viii
H
handset ...............................1, 8
charging ...............................5
controls ................................8
hearing aid compatibility.........xi
I
image preview.......................13
installation.............................viii
installing
battery pack .........................2
interference.........................v, vi
introduction .............................iii
IP address
changing .......................32-33
K
keypad ....................................8
L
LCD brightness ...............12, 39
lens cover .............................17
lighting ....................................2
location ...................................2
M
microphone .............................8
muting audio ......................8,16
N
navigation keys ....................8-9
network connection
resetting .............................34
45
O
Ojo
caring for ............................31
connecting ...........................4
contents ...............................1
setting up .......................1, 27
Unit ID Number ....................1
P
phonebook .......................19-26
add listing...........................19
calling from ........................26
deleting listing ....................21
editing listing ......................22
finding a name ...................25
precautions ............................vii
preview .................................13
privacy
audio ..................................16
video ........................iii, 12, 17
provisioning
see registering .....................6
R
receiving a call ......................14
redial .....................................15
registering Ojo ........................6
replacement parts .................26
requirements ...........................1
resetting
network connection ............32
ring tone ................................12
ring volume ...........................12
specifications ...................40-41
speed dial .............................18
standard upgrade..................31
T
technical specifications ....37,38
telephone company ...........ix-xii
time zone ..........................7, 12
troubleshooting ................32-39
call set-up ..........................39
Caller ID .............................39
dark image .........................39
dark video ..........................39
date and time .....................37
during call .....................38-39
echo ...................................40
failed connection ................38
handset ..............................38
Home screen ...............34, 35
installation or power up 32–35
network cable.....................32
network problems ..............32
no audio .............................35
no video ............................ 39
unclear video .....................39
video freeze .......................39
U
Unit ID Number .....................11
unpacking................................1
upgrades
critical upgrade ..................31
standard upgrade...............31
S
V
safety instructions ............vii,viii
screens ...................................8
setting
LCD brightness ..................12
ring tone .............................11
ring volume ........................12
time zone .......................7, 12
software upgrades ................31
speaker ...................................8
video calls .......................25, 27
volume
during call ..........................26
46