1
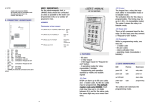
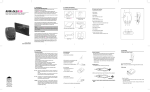
Catalog
Appearance ........................................................................................................................................................ 5
Installation Steps ................................................................................................................................................ 8
Learning the remote control ............................................................................................................................ 17
Reset the default settings...................................................................................................................... 17
Multimedia Message Setting ........................................................................................................................... 18
Authorized Number ......................................................................................................................................... 20
SOS – Send MMS Message............................................................................................................................... 21
GPS real-time position tracking via mobile ...................................................................................................... 22
GPS real-time position tracking via server ....................................................................................................... 23
Security Alarm .................................................................................................................................................. 26
Security Alarm sensitivity................................................................................................................................. 26
Time Zone......................................................................................................................................................... 27
Geo-Fence ........................................................................................................................................................ 27
Cellular Positioning .......................................................................................................................................... 29
Low-voltage alert ............................................................................................................................................. 30
Photo shot ........................................................................................................................................................ 30
SMS Configuration ........................................................................................................................................... 31
Surrounding Setting and the information of device ........................................................................................ 32
IMEI .................................................................................................................................................................. 32
Language .......................................................................................................................................................... 32
Input / Output the setting file.......................................................................................................................... 32
Radar Speed Camera Detector......................................................................................................................... 34
1- Switch On ............................................................................................................................................. 34
2- Radar Speed Camera Detector - System Function Setting................................................................... 35
3- Driving mode setting............................................................................................................................ 36
4- Radar Signal Detector Setting .............................................................................................................. 37
5- The introduction of self-created coordinate........................................................................................ 37
Constant Speed Setting and Collect the relative consider value ............................................................. 39
GPS and Specification of Radar ........................................................................................................................ 39
Instruction of E-dog driver downloading and installation ............................................................................... 40
Warranty Service and Responsibility
The information contained in this document is proprietary and confidential information of Sheng Jay
Automation Technologies Co., Ltd. Any unauthorized reproduction, use or distribution is strictly
prohibited.
This document and information is intended solely for authorized hang Jay Automation Technologies
Co., Ltd. customers as permitted by Sheng Jay Automation Technologies Co., Ltd. and for the limited
purposes set forth herein.
The incorrect installation or utilization could cause damage to device or user. We shall not be liable
for result, incidental damages or other losses that incurred by user in relation with user's mistake
to obey the information and instructions contained herein. The product is designed to record, store,
play and analyzes videos caused by impacts but we do not guarantee the product records every event
without missing. Furthermore, if the impact is too weak, the vibration sensor may not be able to
detect the impact, which induces that the system will be unable to automatically start recording
the video file. The information within this manual may change without notice due to technical changes
or upgrades.
Over view
This product provides the precise and stabile GPS function. Include the speed cameras detector
function voice warning and anti-theft system. You can use this by easy installation.
Speed Camera Detector
It alerts you kinds of speed cameras. Radar Detector and database are built-in L869. GPS system starts
to work after being turned on. The front panel displays your direction and GPS time.
Vehicle monitoring system
Highly sensitive GPS chip and localization sensors can trace your position and send the location
where you are to the cellphone or IP address.
Anti-theft system
Ultrasonic wave and G-sensor detect unusual invasion, break of car window and tow. Front lens take
pictures and store in Micro SD Card which is built-in, after warning mode being started. L869 is
different from the other speed camera detector, it can provide you a more detailed situation in your
car.
Standard Package
Device
RF remote-control
USB extension cable
Software CD
Car Charger
Appearance
Power Button
Ultrasonic
wave
Camera
Volume down
electronic
compass
Volume up
o'clock
Set-up
Time
Ultrasonic
wave
Appearance2
E dog set-up
G-sensor
Ultrasonic
wave sensor
air pressure
Micro SD slot
sensor
Learning
Sensor
System
System
SIM card
remote
setting
setting
reset
slot
control
Power input
退卡鈕
port
RF remote-control
Anti-theft system
on
Undefine
d
Anti-theft system off
SOS urgent
button
Hardware
1. Use tool to take out SIM card socket
2. Insert the SIM card, with the chip side on the top. Please remember to remove the PIN code in
your SIM card before setting.
3. Set Micro SD card in your SJ-L869. The Micro SD card supports up to 2G.
Installation Steps
1.
Execute the Setup file in CD
, open the setup interface, and click Next.
2.
Execute the Setup file in CD, open the setup interface, and click next.
3.
Enter the password 「sja」 with lowercase and click Next.
4.
You can also select the destination location and click Next.
5.
Install it in the following Start Menu folder, You can designate any name you like, set it as
SJ-L869, and click Next to continue.
6.
Create desktop icon, and click Next.
7.
Click install to continue with the installation.
8.
Click Finish to exit Setup.
9.
Link the set-up port of SJ-L869 by USB extension cable, the computer would search Driver
automatically. Click automatic set-up software to continue.
10. Waiting for searching.
11. Select SJA-SJ-L869 in the list and click Next.
12. Click keep setting.
13
12. Waiting for the setting finished.
13. Click Finished, you can find the execution files on desktop, click it to enter the setting
14
list.
15
Installation position
※A and B are propositional Installation position
16
Learning the remote control
security mode on
security
mode off
SOS urgent
button
Undefined
1.
Hold the LK key on the interface of SJ-L869 for 5 seconds until L/K being light on.
2.
Press any key of the remote controller.
3.
The device buzz four times, when it has learnt the controller. Up to 4 remote controllers
supported.
Remote Controller buzz table
Type
The device can receive no more remote
Beep frequency
1 time
control(Received over four pieces)
The remote control received successfully
4 times
The remote control have already been set
1 time
Reset the default settings
When the device was shut down, press the reset key on the device until hearing beep for 3times.
It will be reset the default settings.
Software Setting
Please install the file of dotNetFx40 in the CD if you can use software settings.
Run the “SJ-L869.exe”
Connect the USB extension cable to SJ-L869 and your computer.
設定介面
Multimedia Message Setting
SOS、siren will send a multimedia message to the phone number you register.
You have to finish the multimedia register. The message setting is different according to
different telecommunications
Please acquire the correct setting with the SIM card telecommunications.
How to Set
1.
Click “Connect”
2.
Key in the SIM card setting mobile number in authorized number No.2 /No.3/No.4
3.
Click “Set” to save your personal setting
4.
Click “Disconnect”
※You can click the list to find the SIM card telecommunication and use the setting built
in multimedia message setting.
19
Authorized Number
Security alarm、SOS alarm、Low battery alert SMS and SD Card warning SMS will be sent to the
authorized number
Only authorized number can change the L869 setting via SMS. The unauthorized number will not
get any reply from L869
How to set
1. Click “Connect”
2. Enter your mobile phone number
3. Click “Set” to save your personal setting
4. Click “Disconnect”
SOS number table
Function
順序
Ultrasonic / Air pressure /
Send to the 1 .2 .3 .4 authorized
Vibration
st
nd
rd
th
number
SOS-message
Send to the2nd.3rd.4th authorized number
Without Micro Card
Only send to the 1st authorized number
Low battery warning
Only send to the 1st authorized number
APN setting error
Only send to the 1 authorized number
st
20
SOS – Send MMS Message
Press SOS button on the remote controller to make vide call to authorized number.
The L869 will call to second authorize number first.
If second authorized number does not pick the phone, L869 call next (third) authorized number.
Priority call: Authorized number NO.2-> NO.3-> NO.4 X 3 rounds
After pressing SOS button, the L869 will
SOS !
!
How to Set
1.
Click “Connect”
2.
Key in mobile number in authorized number No.2 /No.3/No.4
3.
Click “Save”
4.
Click “Disconnect”
21
5.
Press the SOS button on the remote controller
※Make sure your remote controller has been learnt by the device . Please refer the “RF Remote
Controller selection”and “The Setting of Multimedia Message.”
GPS real-time position tracking via mobile
Send SMS to the L869get the location map.
Send LOCATION to the L869
L869 reply a SMS “TRACKING PLEASE WAIT” message first then send second SMS message which
is including map link to the user
※ It can only request the location of L869 by SMS of SOS reply number.
22
Location
LOCATION
Location
Tracking…
Reply
&
……please
http://maps.google.c
om/maps?q=
※If you would like to know about more functions, you can read “SMS remote control”
GPS real-time position tracking via server
L869 sends data to the remote server by GPRS continuously.
User can see the real-time status of SJ-869 on the server
※Before it work, please confirm that the CPRS of your SIM card has been activated with the
telecommunication.
23
How to set
1. Device ID
2. Name an ID for the device. The device ID will be show on Server. 2-12 bits upper and lower
case English letters allowed.
3. APN Name
Input APN of the SIM card to activate the GPRS.
Please contact your SIM card provider to get the APN.
4. APN Acc/Pwd
Put in APN Username and Password of the SIM card to activate the GPRS.
Please contact your SIM card provider to get the APN Username and Password
5. DNS (Domain Name System)
Put in your DNS name of the server. Device will send the GPS data to the server.
If DNS link is failed or column is empty, device auto-connect to Server IP_1
Device server connection priority DNS > IP 1 >IP 2
6. Server IP_1
24
Set an IP address and port for your server.
If Server IP_1 link is failed or input column is empty, device auto-connect to Server IP_2
Device server connection priority DNS > IP 1 >IP 2
7. Server IP_2
Set the backup IP address and port for your server. The server IP_2 will assign an IP address
to the device, when it received a connect request.
Device server connection priority DNS > IP 1 >IP 2
8. Time Interval
Define the time interval of the GPRS transmission.
Setting range is from 001 to 120 Minutes EX: 001 . Send data to server per one minute
If you don’t know the setting of APN, account and password in your SIM card, you can try
to click the setting built-in the list of telecommunication.
25
Security Alarm
Press the “Security on key”on the remote controller to activate the security system
If one of security sensor has been triggered, the L869 will send a picture to authorized number
to notice the car owner while detecting any unusual invasion. Authorized number pick the phone
call and press key “5” to confirm the call to see the video
How to set
1. Connect
2. Start the sensor you want to use, ultrasonic, air pressure or vibration.
3. Save setting
※You have to complete MMS Message Setting before Alarm Settings.
Security Alarm sensitivity
You can change the sensitivity of the sensor by adjusting the VR
Right turn is sensitivity high, Left turn is sensitivity low
26
Time Zone
Set your time zone in your area
Geo-Fence
GEO-Fence is a virtual perimeter for a real-world geographic area.
You can set 5 GEO-Fences for the L869. Geo-fence can be a predefined set of boundaries by
user; the boundaries could be set from 100 meter to 25.5 KM.
If you come into or out of the Geo-fence (boundaries), L869 will send a message “GEO-Fence
ALARM”by SMS to user. Also, it sends alert to remote server if GPRS is available.
How to set
1. Click to connect
2. Enable Geo-Fence
ON: Activated the GEO-Fence function
OFF: Disable the GEO-Fence function
3. Select the Group 1- 5
4. Choose your location on the Map
Map Zoom in
Double click mouse left key or Mouse scroll wheel forward
Zoom out
27
Double click mouse right key or Mouse scroll wheel backward
5. Mark your location
Click a location that you wanted on the map, and you can see a red balloon on it.
Click “Mark” key to request the latitude and longitude of the marked position on the map
and display at Center Position column.
6. Define the Radius of your location
Define the radius of marked position
Define range from 0 to 255 (per 100 M).
Put 3 digital numbers to define the radius of the GEO-Fence.
EX: 100 = 10 Km
7. Alarm Type
Disable: Disable this group
Enter: when enter this area alarm
Leave: when leave this area alarm
8. Set
Set the GEO-Fence range
9. Click view
Display all group setting to ensure you get the all Geo-fence you needed
28
10. Click the set
Save
Cellular Positioning
When L869 is indoor or the GPS signal is too weak, L869 will use base station to position
and send based station information to the ALARM number. Use the based station position, it
will be a range area not a position location.
29
Low-voltage alert
The Low battery SMS will be sent to first Authorized number.
L869 detect the voltage of the battery to make sure device work well.
When the voltage of the battery is low, L869 sends the SMS immediately to alert the authorized
user.
Photo shot
Photo shot
When SOS or Alarm activated, the external cameras will totally take two photos.
You can find your photo in Picture folder in the micro SD card
※When the micro SD card memory is 80 % full, the L869 will send a SMS message to the first
authorized number.
30
SMS Configuration
Authorize number
Security alarm、SOS alarm、Low battery alert SMS and SD Card warning SMS will be sent to
authorized number
SMS:
AUTHOR:number
Use “/” to input more number. 4 sets maximum
EX: AUTHOR:0912345678/0923456789/0913673079/0913654679
L869 reply AUTHOR:0912345678/0923456789/0913673079/0913654679 ok
Location
Check the current location the L869. L869 will send a Google Map link to the SMS sender
SMS: LOCATION
L869 reply “TRACKING PLEASE WAIT” and Google Map link
Security alarm on
Activate Security mode.
SMS: ALARM ON
L869 reply: ALARM ON ok
Security alarm off
Deactivate Security mode.
SMS: ALARM OFF
L869 Reply: ALARM OFF ok
ReSeT
Erase the setting of the L869
SMS: ReSeT
AK Reply: ReSeT ok
Surrounding Setting and the information of device
IMEI
Check device’s IMEI code by click “Read”
Language
Change the software display language. It supports Traditional Chinese / Simplified Chinese
/ English.
Input / Output the setting file
Save this setting to another file, it can be completely imitate afterward.
Output
Click the Output to export the setting file
Name your setting file. *.sja
Input
Click the Input the load the setting file.
Select the setting file *.sja
Click open
33
Radar Speed Camera Detector
Detect kinds of speed camera detector on the way, and built-in e-dog radar detector and complete
data bank. Start to mark your GPS position after being turned on, and the panel supports
electronic compass to display your direction and GPS time.
■
Base function
The instruction of main button
Power Button
Volume down
Volume up
Set-up
1- Switch On
1.
It displays the LED test while beeing switched on at the first, LED panel light on and
display electronics compass, radar frequency, distance and speed.
2.
Shows the status of device, [The GPS radar is switching on, please fasten the seat belt]
3.
The electronics compass of LED panel will keep twinkling on east, west, sounth and north
in turn.When satellite connected, the electronics compass will display the direction,
and play the sound track of [Hope you are safe to drive a vehicle]
34
2- Radar Speed Camera Detector - System Function Setting
1. System Function Setting
▲Hold the 【SET】 key on the interface of SJ-L869 for 3 seconds until system function
setting is available. After enterting system function setting, everytime you press【SET】
key for 1 second, you can select setting in turn,and hold the 【SET】 key for 3 seconds
to save setting, or wait for backing to original screen automatically.
1.1 The radar mute setting could be set from 0 KM to 150 KM, you can adjust per 10 KM. The
default is 50 KM. When the speed is low than 30 KM, the device would be mute automatically
and only twinkles even if detected electric wave radar system.The system could block automatic
door and the other noise interference in the city.
1.2 The exceed the speed limit setting could be set from 0 KM to 150 KM, you can adjust per
10 KM. The default is 150 KM.If you set 100 KM for speed limit, but you exceed over 100 KM,
the system would make noise for the warning of exceed the speed until slow down to the setting.
The function could be base station to position to warn the speed limit, and upload the data
by base station to share woth other users.
1.3 The fine tuning could be set from 0 KM to 20KM, The default is 50 KM. When the GPS speed
is not identical with the car speed, you can adjust the GPS speed to be identical with the
car speed, after observing average deviation.
1.4 You can adjust alarm voice setting to sounds and noise mode→sounds mode→continuous noise
mode, three kinds of alarm voice modes are as below:
▲ Sounds and noise mode: in this mode, when the car approaching the warning point of the
speed camera system, except announcing of the kind of speed camera, speed limit and countdown
of distance, when the car speed exceed the limit of camera, the system would make 【Ding Dong
】 warning noise automatically. When the car speed is lower than the speed limit, the system
would stop making 【Ding Dong】 warning noise automatically, and keep countdown.
35
▲ Sounds mode: in this mode, when the car approaching the warning point of the speed camera
system, the system would announce the kind of speed camera, speed limit and countdown of
distance, whether the car speed exceeds the speed limit or not, the system would not make
【Ding Dong】 warning noise.
▲ Continuous noise mode: in this mode, when the car approaching the warning point of the
speed camera system, the system would announce the kind of speed camera, speed limit and
countdown of distance, whether the car speed exceeds the speed limit or not, the system would
make 【Ding Dong】 warning noise until passing the warning point of the speed camera system.
1.5 Delect the self-created coordinate, the storages limit to 256 records. This function could
fix position in favourable coordinate, and collect the coordinate of opposite direction
1.6 Set the tiome of light on mode, the default is 7 a.m.
1.7 Set the dimness mode, the default is 6 p.m. Set your time zone in your area.
3- Driving mode setting
▲ Hold the 【VOL-】 key on the interface of SJ-L869 for 3 seconds until driving mode setting
is available.
2-1 Save driving mode could not only remind the user fixed speed camera location and distance
countdown, but remind such as the locations which accidents often occur, the markets, the
schools, the gas stations, the tollbooths and so on. To make the users know the situations
on the way well.
2-2 Speed camera mode would only remind the user fixed speed camera location and distance
countdown, but not remind such as the locations which accidents often occur, the markets,
the schools, the gas stations, the tollbooths and so on.
2-3 The function of save driving mode is the same with the description of 1-1, but it would
not announce the speed limit in the warning section.
2-4 The function of speed camera mode is the same with the description of 1-2, but it would
not announce the speed limit in the warning section.
36
4- Radar Signal Detector Setting
▲ Hold the 【+】 key on the interface of SJ-L869 for 3 seconds until radar signal detector
setting is available.
▲ ultrahigh level: radar signal detector setting is ultrahigh, it is
recommanded to use while driving in highway.
▲high level:radar signal detector setting is high, it is recommanded to
use while driving in highway.
▲medium level: radar signal detector setting is medium, it is recommanded to use while driving
in city.
▲Low level: radar signal detector setting is low, it is recommanded to use while driving
in city.
5- The introduction of self-created coordinate
The product is built-in 256 record of huge capacity. It provides the user set coordinate warning
location and fix the warning by limit setting. After finishing setting, while the user passes
by the self-created coordinate, the system would announce【the self-created coordinate is
ahead, please drive with caution】 and display distance countdown.(if the user is under the
limit speed, it announces 【the self-created coordinate is ahead, limit speed XX KM, please
drive with caution】 while passing. After passing the coordinate, the system would make a
finished noise of self-created coordinate, the screen would display 【 PASS 】 at the same
time.
How to collect self-created coordinate
Favourable self-created coordinate
The diving direction is the same with photo shot direction. For example, the car drives to
east, the user press 【SET】 key while being away from target 5 meters, after finished, the
system announces 【self-created coordinate finished】. Please refer to the illustration of
details:
37
▲ The user press 【SET】 key while being away from target 5 meters, after finished, the
system announces 【self-created coordinate finished】 automatically. And returns to
display the car speed after 2 seconds.
Contrary self-created coordinate
The diving direction is contrary with photo shot direction. For example, the car drives to
west, the user press 【SET】 key twice times while being away from target 3 meters, after
finished, the system announces 【contrary self-created coordinate finished】. Please refer
to the illustration of details:
▲The user press 【SET】 key twice times while being away from target 3 meters, after
finished, the system announces 【contrary self-created coordinate finished】 automatically.
And returns to display the car speed after 2 seconds.
Delete self-created coordinate:
▲ Delete single self-created coordinate: Please enter the delete setting of self-created
coordinate, and press 【upward key】 or【downward key】 to delete the self-created coordinate.
▲ Delete whole self-created coordinate: Please enter the delete setting of self-created
coordinate, and hold 【SET】 key, then you can delete whole self-created coordinate.
38
Constant Speed Setting and Collect the relative consider value
constant speed cruise
(limit speed)
Collect distance(with the target)
1
10-30 KM
About 150 meters
2
40-60 KM
About 300 meters
3
0 or 70-80 KM
About 500 meters
4
90 KM
About 700 meters
5
100-150 KM
About 1000 meters
The rule of collecting self-created coordinate depends on constant speed. For example, when
the user set the constant speed to 0 KM. the distance of user’s elf-created coordinate is
500 meters, please refer to the diagram of constant speed.
GPS and Specification of Radar
Specification
Satellite receiving
Receiving Range
1.57542GHZ ± 1.023MHz
-110 ± 2dB
X-BAND
10.525GHz ± 100 MHz
- 110 ± 2dB
K-BAND
24.125GHz ± 175 MHz
-124 ± 2dB
Ka-BAND
35.100GHz ± 100 MHz
-115 ± 2dB
Ka-BAND
34.700GHz ± 1300 MHz
-115 ± 2dB
Tripod Ka-BAND
34.300GHz ± 1300 MHz
-115 ± 2dB
Laser Beam
904nm ± 33nm
Anti-detect VG2
11.150GHZ ± 175MHz
Power providing demand
DC12V
frequency
Outputting electric current
Operation temperature
<=300mA
-25 ℃ -75 ℃
39
Instruction of E-dog driver downloading and
installation
▲
Enter SJA’s official website:http://www.ecarfj.com, and click the section of data
downloading
1. Open the web page of downloading center, Log in with order number on the back of the product
2. click“
”to download the driver.(You have to upgrade the driver if it’s the
first time)
3. Install the driver
40
Download the data of Driver.exe 文件( If it’s blocked by firewall, please allow all
operation.)
If the driver starts to install, the screen would display:
41
Instruction update the downloading and installation
Click the picture as
to download the data update
Execute the data update
Please confirm the device has been connect to the computer, and click Summit.exe
42
如果設備已經連接, “下一步“ 會亮起,點選下一步
Instruction of area:
Sounth area: HK, Macao, Taiwan, Guangdong, Fujian, Guangxi, Hainan, Hunan, Jiangxi, Shanghai,
Zhejiang, Guizhou, Anhui, Jiangsu, Yunnan, Hubei, Chongqing
North area: Beijing, Henan, Hebei, Gansu, Heilongjiang, Jilin , Liaoning, Inner Mongol,
Ningxia, Qinghai, Shanxi, Tianjin, Sinkiang, Tibet, Shanxi, Sichuan, Shandong
Sounth and North cross area: Anhui, Henan, Jiangsu , Shandong, Shanxi, Sichuan, Tibet, Yunnan,
Chongqing, Guizhou, Shanghai, Gansu, Beijing, Hubei, Tianjin, Qinghai
43