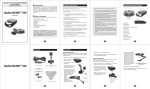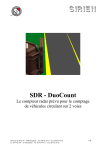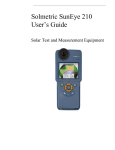
1
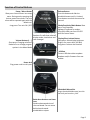
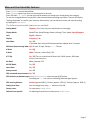
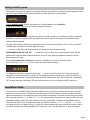
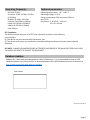
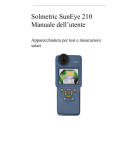
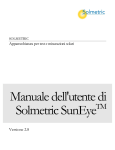
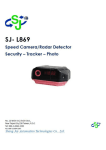
Pro series
User manual
© 2015 Radenso®
Radar Detector RADENSO Pro
Foreword
Congratulation to your new investment. You chose one of the best GPS enabled mobile radar- and laser detetcor
available on the market today.
The Radenso Pro is high tech MADE IN EUROPE packaged into the smallest detetcor in the world. The focus of the
development of Radanso Pro was simple: Design the most ergonomic and user-friendly radar detector for easy
and unobtrusive installation with long range warning on all radar bands coupled with intelligent filters to
eliminate annoying false alarms from non-radar threats. And our Engineers delivered!
Radenso Pro features:
Smallest high performance radar detetcor in the world
Selectable X, K and Ka radar band
Selectable Ka narrow radar band tuned to the exact radar frequencies used in North America
Selectable K narrow radar band tuned to the exact radar frequencies used in North America for increased
range and reduced false alarms
Selectable Ka POP radar band (ON/OFF)
Selectable Traffic Sensor Rejection Filter (TSRF)
Highway, City and AutoCity Mode
Revolutionary AutoCity Mode with selectable Band filtering based on speed settings
Bright, Dim, Dark Display modes
Smart Dark Display Mode (turns on display only for alerts)
Bright Alphanumeric LED display
AutoMute reduces volume of alerts after 2 seconds
Preloaded GPS Speed- and Redlight camera data base
Unlimited free lifetime updates for database and firmware – no obsolescence ever
7 selectable display modes (Speed/Time, Speed/Voltage, Battery Voltage, Time, Speed, Speed/Compass)
Display of radar frequency during visual alert
Voice Alerts
SpeedMeter Option (turns off radar circuitry completely and converts Radenso Pro into a digital
Speedometer for states where radar detector are prohibited)
Mark your own POI locations for future alerts
User friendly, easy voice guided feature selection
Extreme suction cups for firm, secure installation at windshield
Power Cord with Power ON/OFF button
Optional Direct Wire power cord available
Optional Vertical windshield mount available
2 year manufacturer warranty
Page 1
Quick Start up Guide
To start using your Radenso Pro radar detetcor follow these easy steps:
1. Slide the windshield mounting bracket into the QuickMount slot at the front of the radar detector
2. Plug the small end of the power cable into the Power Jack of Radenso Pro on the left side of the detector
and connect the large plug with the 12V power socket of your car
3. Press the red button at the large end of the power cable (at the 12 V socket) to turn the power cable on.
The button will light up and indicate if Power is on.
4. Press the Power button (left button on top of unit) for 2 seconds to turn on Radenso Pro
Unit will power up with start up sequence. After a few seconds Radenso Pro will notify you with a Voice
message that Satellite is connected
Adjust the volume level by pressing the Volume buttons „“+“ or “-“ located on the right side of the unit.
Change Default settings:
Radenso Pro is now ready to go. If you want to change any of the default settings of your unit please refer to
the next pages
Main functions of Radenso Pro
Radenso PRO is one the most powerful detectors in the Industry and is designed to protect the driver from
speeding fines. Radenso Pro communicates with the driver in English language and its main functions are
the detection of microwave radars (X / K / Ka narrow bands), laser guns, red light cameras and fixed speed
cameras (GPS database).
Notifications:
Notifications:
When a radar signal is detected the driver is being alerted by a visual text warning and a voice and tone
alert. The display and voice alert will indicate the received radar band or frequency and the signal strength.
A beeping warning tone will increase its intensity with increasing signal strength. The signal strength has
ten levels. GPS alerts are reported by voice, for example “Speed Camera”.
Page 2
Function of Control Buttons
Release Button
Press this button and slide the
windshield mount until it is locked.
Press button to unlock the mount for
removal
Power / Menu Button
Short press: You will enter into setup
menu. During an alert pressing the
button mutes the volume. The next
alarm will be reported again with the
default vol.
Long press: Turn unit ON / OFF
Volume Buttons [+ - ]
Short press: Changing volume of
Radenso Pro or change program
options in the Menu Mode
Alphanumeric Display
Radenso Pro will show selected
display mode, visual alerts and
text messages
Mode/Sensitivity/Mark Button Short
press: Scroll between
Highway/City/AutoCity modes. .
Long Press: Add your own POI GPS
point for future alarms
Display/Alert Lockout Button
Short press: Select display brighness
(Bright, dim, smart dark, full dark)
Long press: Lockout alert location
USB Port
Connect USB data cable to update
database and/or firmware from our
website
Power Jack
Plug power cord into this port
Windshield Mount Slot
Insert the windshield mount into this
slot until you hear the „click“
Radar Horn Antenna and Laser
Lens
Needs unbostructed view of
the road ahead. Do not mount
behind metal coated
windshields or wipers
Page 3
Installation
The Radenso Pro windshield mount allows a firm and secure installation of the radar detector at the windshield
of your vehicle. Locate an area at the windshield that enables an unobtrusive installation with clear view to the
road ahead.
1. Place the nipple of the suction cups in the
large hole of the bracket und pull the suction
cup into the small hole to secure them. Push
the rubber damper into the hole in the
middle of the bracket
Rubber damper
2. Attach the windshield mount to the desired area of the windshield. Make sure it is in a level
position parallel to the road ahead. To adjust the angle if necessary, gently push or pull on the
bracket to bend it. DO NOT use the detector to bend the bracket.
3. Insert the windshield mount into the slot at
the front of the detector until it is locked in
position
For firm and secure adherence to the windshield keep windshield and suction cups clean
4. Plug the small end of the power cable into the detetcor (located on the left side) and the large end into
your vehicle’s 12V ACC socket.
5. To remove Radenso Pro from the windhield press the release button on top of the unit and slide the unit
off the mount.
Page 4
Control buttons on top and side of unit:
Left
Le ft button MENU / ONON - OFF
Short press: You will enter into setup menu. During an alert pressing the button will mute the volume.
The next alarm will be reported again in the standard volume.
Long press:
Turn ON / OFF Radenso Pro.
Middle button BRIGHTNESS / ALERT SUPPRESSION
Short press:
Bright:
Dim:
Smart Dark:
Full Dark:
You can change the brightness of the display - Bright -> Dim -> Smart Dark -> Full Dark.
Brightest display setting
Slightly dimmed display
Display is deactivated but will come on with Text warning during an alert
Display is completely deactivated. Only voice and tone alerts are active
Long Press:
Holding the button during an obvious false alert will lockout the location in the future. The
signal will no longer be reported and the alarm suppressed when passing the marked
location again. You can re-activate the location again by holding the button when
approaching the marked location.
Right button SENSITIVITY / ADD YOUR OWN GPS POINT
Short press:
You can scroll between Highway / City / Auto City modes. In City or Auto City modes the
sensitivity of X / K / Ka bands can be reduced according to user preference.
Long Press:
Add your own POI GPS point for future alarms.
+ / - Buttons on the right side
Short press:
Changing alert volume of Radenso Pro or change program options while in Menu Mode
Page 5
Menu and User Selectable Features
Press left button to enter Menu Mode.
Press left button again to go from one menu option to the next.
Press VOLUME + or – button (on the right side of detector) to change your setting within the category.
To save the changed selection simply wait a few seconds without pressing any button. The unit will display
“Setting Completed” to confirm your selection. Alternatively, you can leave the menu and save the setting
by tapping the right button.
The following selectable features are vailable:
Setting Mode:
Highway / City / Auto City (see explanation on next page)
Display Mode:
Speed/Time, Speed/Voltage, Battery Voltage, Time, Speed, Speed/Compass
Unit:
English / Metrics
Display:
Frequency / Bar
Auto Mute:
On / Off:
If activated alert volume will be automatically reduced after 2 seconds.
Minimum Speed sensing radar: Off, 10 mph, 20 mph, 30 mph ......... ..70 mph
X-Band:
On / Off
K-Band:
Wide / Narrow / Instant Only / Off
K TS Rej:
On / Off (Turn on to eliminate K falses from Traffic sensors, Blind spot
mirrors, lane assist etc.)
Ka-Band:
Wide / Narrow / Off
Ka POP Band:
On / Off
Laser Band:
On / Off
Startup sound:
On / Off
GPS connected announcement: On / Off
GPS detection by database type: Via Middle button you can select the type of GPS points.
For editing use + / -. You can turn on and off particular type of point.
GPS warning distance:
Normal (approx. 800 ft) / Farther (approx. 1250 ft) / Farthest (approx. 1650 ft)
Setting local time:
You can change time using + / - button on the side
Factory reset:
For reset press middle button.
Delete all user points?:
For deleting all saved user locations press middle button.
Page 6
Setting AutoCity speed
The AutoCity driving mode allows the setting of minimum alert detection speed for signal suppression AND
signal filtering resulting in 90% reduced false alerts. Select AutoCity in Setting Mode
Setting AutoCity speed: (feature selectable only if Setting Mode is set to AutoCity):
Tapping the Middle button lets you select the speed for editing
Left speed setting indicates the speed below which the radar reception of the detector will be completely
disabled (in example above 20 mph). No signals from police radar or false signals from automatic door
openers will be reported.
The right speed setting indicates the speed below which the detector will detect alerts in City mode with
reduced radar sensitivity (in example above 40 mph).
+ / - buttons on the right side of the detector will change the specific speed setting.
RECOMMENDATION “20” and “35”
The detector will not alert to any signal below 20 mph and will
operate with reduced radar reception between 20 and 35 mph. Maximum detector sensitivity will be
achieved above 35 mph.
Setting City and AutoCity sensitivity (this option is available only in City or AutoCity Mode):
By means of the Middle button you can select the radar band for editing.
To change the sensitivity of signal reception use + / -button on the side of the unit. The level of signal
suppression can be selected in the range 0-9. The displayed numbers indicate the sensitivity reduction in
the different radar bands. The example displayed above indicates that the X Band sensitivity is reduced by
50%, K Band sensitivity reduced by 20% and Ka Band sensitivity is not reduced at all (0% reduction).
SpeedMeter Mode:
This function is intended for legal operation of Radenso Pro in countries or states where the use of radar
detectors is not permitted. The detector stops alerting to POI GPS locations as well as all radar and laser
signals and the device is only displaying the travel speed and heading. To activate this function you need to
simultaneously hold the middle and right button for approximately 5 seconds. After that you will enter into
SpeedMeter Mode and all POI, radar and laser warnings are disabled. To deactivate SpeedMeter and to
reactivate the full function of Radenso Pro again you need to hold the right button and the + button and
then plug the unit into a power source. You need to hold the buttons for approximately 8 seconds. After 8
seconds the display will show SpeedMeter OFF and radar-, laser- and POI detection is reactivated again.
Page 7
Operating frequency:
GPS: SiRF STAR IV
Ka narrow: 33.80, 34.7GHz, 35,5GHz
(± 120MHz)
Ka Wide: 33.4 GHz - 36.0 GHz
K narrow: 24.125GHz (± 70MHz)
K wide: 24.125GHz (± 150MHz)
X band: 10.525GHz (± 50MHz)
Laser: 904nm
Technical parameters:
Operating temperature: --30° - +180 ° F
Operating voltage: 11-16 V
Energy consumption: 250 mA normal, 330 mA
max. (12V)
Dimensions: 2.44 x 3.62 * 1.33 inch
62 x 92 x 34 mm
FCC Compliance
This device complies with part 15 of FCC rules: Operation is subject to the following
two conditions:
(1) This device may not cause harmful interference, and
(2) This device must accept any interference received including interference that may cause undesired
operation.
FCC NOTE: CHANGES OR MODIFICATIONS NOT EXPRESSLY APPROVED BY THE MANUFACTURER COULD VOID
THE USER’S AUTHORITY TO OPERATE THE EQUIPMENT
Database Updates:
Radenso Pro is web ready and equipped with a Mini USB data port. It is recommended to check for GPS
Database updates every three months. To download updates of the GPS database follow the instructions at
http://radenso.com/free-radar-detector-updates
Your Dealer:
Manual REV: 2015-05-30
Page 8