1
Introduction to
Quantum GIS
(Titan)
Version 0.8.0
Author:
Gary Watry
Introduction to Quantum GIS Tutorial Version 0.8.0
2/16/2007
------------------------------------------------------------------------------------------------------------
Introduction to Quantum GIS Tutorial Version 0.8.0
2/16/2007
------------------------------------------------------------------------------------------------------------
Table of Contents
COPYRIGHT SUMMARY ............................................................................................................................X
GIS CERTIFICATION INSTITUTE ......................................................................................................... XI
CONTRIBUTORS:...................................................................................................................................... XI
NOTES AND REMARKS ..........................................................................................................................XII
CHAPTER 1
INTRODUCTION............................................................................................................. 1
1.1
GENERAL INFORMATION .............................................................................................................. 1
1.1.1
Introduction .......................................................................................................................... 1
CHAPTER 2
GETTING THE SOFTWARE.......................................................................................... 3
2.1
FILE UNZIP SOFTWARE ................................................................................................................ 3
2.1.1
General Information for File Unzip software: ..................................................................... 3
2.1.2
Getting and Installing 7-Zip ................................................................................................. 3
2.2
QUANTUM GIS ............................................................................................................................ 4
2.2.1
General Information for Quantum GIS: ............................................................................... 4
2.2.2
Get and Set Up Quantum GIS............................................................................................... 5
CHAPTER 3
GETTING THE DATA..................................................................................................... 7
3.1
TO OBTAIN DATA FROM NATIONAL ATLAS................................................................................. 7
3.1.1
General Information for Obtaining Data from National Atlas: ............................................ 7
3.1.2
To Obtain Data from National Atlas .................................................................................... 7
CHAPTER 4
UPDATING QUANTUM GIS .......................................................................................... 9
4.1
UPDATING QUANTUM GIS .......................................................................................................... 9
4.1.1
General Information for Updating Quantum GIS ................................................................ 9
4.1.2
Setup for Updating Quantum GIS ........................................................................................ 9
4.1.3
Updating Quantum GIS........................................................................................................ 9
CHAPTER 5
PROJECTS ..................................................................................................................... 10
5.1
CREATING A NEW PROJECT ....................................................................................................... 10
5.1.1
General Information for Creating a New Project .............................................................. 10
5.1.2
Setup for Creating a New Project....................................................................................... 10
5.1.3
Creating a new project ........................................................................................................ 10
5.2
LOADING AN EXISTING PROJECT ............................................................................................... 11
5.2.1
General Information for Loading an Existing Project ....................................................... 11
5.2.2
Setup for Loading an Existing Project................................................................................ 11
5.2.3
Steps for Loading an Existing Project................................................................................. 11
5.3
SAVING A PROJECT .................................................................................................................... 11
5.3.1
General Information for Saving a Project.......................................................................... 11
5.3.2
Setup for Saving a Project................................................................................................... 11
5.3.3
Steps for Saving a Project .................................................................................................. 11
CHAPTER 6
THE FIRST PROJECT .................................................................................................. 13
6.1
SPECIFYING MAP PROPERTIES ................................................................................................... 13
6.1.1
General Information for Specifying Map Properties.......................................................... 13
6.1.2
Setup for Specifying Map Properties:.................................................................................. 13
6.1.3
Specifying Map Properties: ................................................................................................. 13
6.2
OPTIONS .................................................................................................................................... 14
6.2.1
General Information for Options........................................................................................ 14
6.2.2
Setup for Options................................................................................................................. 14
CHAPTER 7
RENDERING.................................................................................................................. 16
iii
Introduction to Quantum GIS Tutorial Version 0.8.0
2/16/2007
-----------------------------------------------------------------------------------------------------------7.1
RENDERING .............................................................................................................................. 16
7.1.1
General Information about Rendering ................................................................................ 16
7.1.2
Setup for Rendering:........................................................................................................... 16
CHAPTER 8
PROJECTIONS .............................................................................................................. 18
8.1
PROJECTIONS ............................................................................................................................ 18
8.1.1
General Information about Projections.............................................................................. 18
8.1.2
Setup for Projections .......................................................................................................... 18
8.1.3
Usage of Projections .......................................................................................................... 18
8.2
THE PROJECTION DIALOG .......................................................................................................... 19
8.2.1
General Information for the Projection dialog................................................................... 19
8.3
SPECIFYING A PROJECTION .................................................................................................... 19
8.3.1
General Information for Specifying a Projection ............................................................... 19
8.3.2
Setup for Specifying a Projection ....................................................................................... 19
8.3.3
Use for Specifying a Projection.......................................................................................... 20
8.4
CUSTOM PROJECTIONS .............................................................................................................. 20
8.4.1
General Information about Custom Projections ................................................................ 20
8.4.2
Setup for Custom Projections .............................................................................................. 20
8.4.3
Usage of Custom Projections ............................................................................................. 20
CHAPTER 9
THE QUANTUM GIS INTERFACE............................................................................. 22
9.1
THE STANDARD TOOLBARS ....................................................................................................... 22
9.1.1
General Information about the Standard Toolbar.............................................................. 22
9.2
ADDITION MENUS: .................................................................................................................... 25
9.2.1
General Information about Addition Menus: ..................................................................... 25
CHAPTER 10
TOOLS ............................................................................................................................ 29
10.1
MAP ZOOM TOOLS .................................................................................................................... 29
10.1.1 General Information for Map Zoom Tools .......................................................................... 29
10.2
ZOOMING IN
................................................................................................................... 29
10.2.1 General Information for Zooming In................................................................................... 29
10.2.2 Setup for Using the Zoom-in Function: ............................................................................... 29
10.2.3 Steps for Using the Zoom-in Function................................................................................. 29
10.3
ZOOMING OUT:
............................................................................................................... 29
10.3.1 General Information for Zooming Out ................................................................................ 29
10.3.2 Setup for Using the Zoom-out Function .............................................................................. 29
10.3.3
Steps for Using the Zoom-out Function ...................................................................... 29
10.4
ZOOMING TO FULL EXTENT
........................................................................................... 30
10.4.1 General Information for Zooming to Full Extent ................................................................ 30
10.4.2 Setup for Zooming to Full Extent: ....................................................................................... 30
10.4.3 Steps for Zooming to Full Extent......................................................................................... 30
10.5
ZOOMING TO LAST EXTENT:
........................................................................................... 30
10.5.1 General Information for Zooming to Last Extent ................................................................ 30
10.5.2 Setup for Zooming to Last Extent ........................................................................................ 30
10.5.3 Steps for Zooming to Previous Extent ................................................................................. 30
10.6
ZOOM TO LAYER
............................................................................................................ 30
10.6.1 General Information for Zoom to Layer.............................................................................. 31
10.6.2 Setup for Zooming to Layer ................................................................................................. 31
10.6.3 Steps for Zooming to Layer Extent ...................................................................................... 31
iv
Introduction to Quantum GIS Tutorial Version 0.8.0
2/16/2007
-----------------------------------------------------------------------------------------------------------10.7
PANNING
........................................................................................................................... 31
10.7.1 General Information for Panning........................................................................................ 31
10.7.2 Setup for Panning................................................................................................................ 31
10.7.3 Steps for Panning ................................................................................................................ 31
10.8
MEASURING DISTANCE
.................................................................................................... 32
10.8.1 General Information for Measuring Distance ..................................................................... 32
10.8.2 Setup for Measuring Distance ............................................................................................. 32
10.8.3 Measuring Distance............................................................................................................. 32
10.9
MEASURING AREA
........................................................................................................... 32
10.9.1 General Information for Measuring Area ........................................................................... 32
10.9.2 Setup for Measuring Area ................................................................................................... 32
10.9.3 Measuring Area................................................................................................................... 33
CHAPTER 11
VECTOR DATA.............................................................................................................. 34
11.1
ADDING VECTOR MAP DATA .................................................................................................... 34
11.1.1 General Information for Adding Vector Map Data: Not Applicable................................... 34
11.1.2 Setup for Adding Vector Map Data ..................................................................................... 34
11.1.3 Adding Vector Map Data..................................................................................................... 34
11.2
USING THE LEGEND TO CONTROL THE LAYERS ......................................................................... 35
11.2.1 General Information about Using the Legend to Control the Layers.................................. 35
11.3
CHANGING THE LAYER NAME ................................................................................................... 36
11.3.1 General Information for Changing the Layer Name ........................................................... 36
11.3.2 Setup for Changing the Layer Name ................................................................................... 36
11.3.3 Steps for Changing the Layer Name.................................................................................... 36
11.4
CHANGING THE DRAWING ORDER:............................................................................................ 37
11.4.1 General Information for Changing the Drawing Order:..................................................... 37
11.4.2 Setup for Using the Changing the Drawing Order.............................................................. 37
11.4.3 Steps for Using the Changing the Drawing Order:............................................................. 37
11.5
REMOVING A LAYER FROM THE MAP ........................................................................................ 38
11.5.1 General Information for Removing a Layer from the Map.................................................. 38
11.5.2 Setup for Using the Removing a Layer from the Map ......................................................... 38
11.5.3 Steps for Using the Removing a Layer from the Map.......................................................... 38
11.6
MAKING THE LAYER SCALABLE ................................................................................................ 38
11.6.1 General Information for Making the Layer Scalable .......................................................... 38
11.6.2 Setup for Using the Making the Layer Scalable .................................................................. 38
11.6.3 Steps for Using the Making the Layer Scalable................................................................... 38
11.7
MAP LAYER SYMBOLIZATION ................................................................................................... 40
11.7.1 General Information for Map Layer Symbolization:........................................................... 40
11.8
CHANGING THE DEFAULT SYMBOLOGY .................................................................................... 41
11.8.1 General Information for Changing the Default Symbology: ............................................... 41
11.8.2 Setup for Changing the Default Symbology: ....................................................................... 41
11.8.3 Steps for Changing the Default Symbology ......................................................................... 41
11.9
CHANGING SELECTED SYMBOLOGY .......................................................................................... 43
11.9.1 General Information for Changing Selected Symbology ..................................................... 43
11.9.2 Setup for Changing the Selected Symbology ....................................................................... 43
11.9.3 Steps for Changing the Default Symbology ......................................................................... 43
11.10
ADDING A LABEL TO A LAYER .................................................................................................. 43
11.10.1 General Information for Adding a Label to a Layer ........................................................... 43
11.10.2 Setup for Adding a Label to a Layer.................................................................................... 43
11.10.3 Steps for Adding a Label to a Layer .................................................................................... 44
LIST OF QUESTIONS FOR LESSON #01............................................................................................... 48
v
Introduction to Quantum GIS Tutorial Version 0.8.0
2/16/2007
-----------------------------------------------------------------------------------------------------------CHAPTER 12
MANIPULATING THE MAP........................................................................................ 51
12.1
QUERYING MAP FEATURES ....................................................................................................... 51
12.1.1 General Information for Querying Map Features............................................................... 51
12.1.2 Setup for Querying Map Features:...................................................................................... 51
12.1.3 Steps for Querying Map Features ....................................................................................... 51
12.2
SELECTING FEATURES BY RECTANGLE...................................................................................... 51
12.2.1 General Information for Selecting Features by Rectangle .................................................. 52
12.2.2 Setup for Selecting Features by Rectangle .......................................................................... 52
12.2.3 Steps for Selecting Features by Rectangle........................................................................... 52
12.3
SELECTING FEATURES BY ATTRIBUTE ....................................................................................... 53
12.3.1 General Information for Selecting Features by Attribute.................................................... 53
12.3.2 Setup for Selecting Features by Attribute............................................................................ 53
12.3.3 Steps for Selecting Features by Attribute ............................................................................ 53
CHAPTER 13
DATA CREATING AND EDITING .............................................................................. 55
13.1
CREATING A NEW LAYER .......................................................................................................... 55
13.1.1 General Information about Creating a New Layer ............................................................. 55
13.1.2 Setup for Creating a New Layer .......................................................................................... 55
13.1.3 Usage of Creating a New Layer .......................................................................................... 55
13.2
EDITING A LAYER ...................................................................................................................... 57
13.2.1 General Information for Editing a Layer ............................................................................ 57
13.2.2 Setup for the Editing a Layer............................................................................................... 57
13.2.3 Steps for Editing a Layer..................................................................................................... 57
LIST OF QUESTIONS FOR LESSON #02............................................................................................... 58
CHAPTER 14
RASTER DATA .............................................................................................................. 59
14.1
WORKING WITH RASTER DATA ................................................................................................. 59
14.1.1 General Information for Working with Raster Data ........................................................... 59
14.2
LOADING RASTER DATA ........................................................................................................... 59
14.2.1 General Information about Loading Raster Data: .............................................................. 59
14.2.2 Creation or Setup for Loading Raster Data:....................................................................... 59
14.2.3 Usage of Loading Raster Data ............................................................................................ 60
14.3
RASTER PROPERTIES ................................................................................................................. 60
14.3.1 General Information about Raster Properties..................................................................... 60
LIST OF QUESTIONS FOR LESSON #03............................................................................................... 64
CHAPTER 15
PLUG-INS AND EXTENSIONS ................................................................................... 65
15.1
PLUG-INS ................................................................................................................................... 65
15.1.1 General Information about Plug-ins ................................................................................... 65
15.1.2 Setup for Plug-ins ................................................................................................................ 65
15.1.3 Usage of Plug-ins ................................................................................................................ 65
15.2
ADDING DATA USING THE DELIMITED TEXT PLUG-IN
.................................................. 66
15.2.1 General Information for Adding Data Using the Delimited Text Plug-in ........................... 66
15.2.2 Setup for Adding Data Using the Delimited Text Plug-in: .................................................. 66
15.2.3 Adding Data Using the Delimited Text Plug-in: ................................................................. 67
15.3
WORKING WITH THE ATTRIBUTE TABLE ................................................................................... 69
15.3.1 General Information for Working with the Attribute Table................................................. 69
15.4
COPYRIGHT PLUG-IN
....................................................................................................... 69
15.4.1 General Information about Copyright Plug-in:................................................................... 69
15.4.2 Setup for Copyright Plug-in ................................................................................................ 69
15.4.3 Use of Copyright Plug-in..................................................................................................... 70
vi
Introduction to Quantum GIS Tutorial Version 0.8.0
2/16/2007
-----------------------------------------------------------------------------------------------------------15.5
GEOREFERENCER PLUG-IN
.............................................................................................. 70
15.5.1 General Information about Georeferencer Plug-in............................................................. 70
15.5.2 Setup for Georeferencer Plug-in ......................................................................................... 70
15.5.3 Use of Georeferencer Plug-in.............................................................................................. 70
15.6
GPS TOOLS PLUG-IN
......................................................................................................... 72
15.6.1 General Information about GPS Tools Plug-in................................................................... 72
15.6.2 Setup for GPS Tools Plug-in ............................................................................................... 72
15.6.3 Use of GPS Tools Plug-in.................................................................................................... 72
15.7
GRASS PLUG-IN ....................................................................................................................... 73
15.7.1 General Information about GRASS ..................................................................................... 73
15.7.2 Setup for GRASS: ................................................................................................................ 73
15.7.2 Usage of GRASS.................................................................................................................. 74
15.8
GRASS MAPSETS..................................................................................................................... 76
15.8.1 General Information about GRASS Mapsets ....................................................................... 76
15.8.2 Setup for GRASS Mapset:.................................................................................................... 76
15.8.3 Creation of GRASS Mapsets................................................................................................ 77
15.9
CREATING NEW GRASS VECTOR FILES .................................................................................... 77
15.9.1 General Information about Creating new GRASS Vector files ........................................... 78
15.9.2 Setup for Creating New GRASS Vector files: ...................................................................... 78
15.9.3 Creating New Vector files ................................................................................................... 78
15.10
EDITING GRASS VECTOR FILES ................................................................................................ 80
15.10.1 General Information about Editing GRASS Vector files: .................................................... 80
15.10.2 Setup for Editing GRASS Vector files:................................................................................. 80
15.10.3 Editing GRASS Vector files ................................................................................................. 80
15.11
GRASS IMPORTING .................................................................................................................. 81
15.11.1 General Information about GRASS Importing .................................................................... 81
15.11.2 Setup for GRASS Importing:................................................................................................ 81
15.11.3 Usage of GRASS Importing ................................................................................................. 82
15.12
GRASS IMPORT GDAL RASTER LAYER .................................................................................... 82
15.12.1 General Information about GRASS Import GDAL raster layer .......................................... 82
15.13
GRASS VECTOR OVERLAYS ..................................................................................................... 83
15.13.1 General Information about GRASS Vector Overlays. ......................................................... 83
15.13.2 Setup for GRASS Vector Overlays....................................................................................... 83
15.13.3 Usage of GRASS Vector Overlays ....................................................................................... 83
15.14
GRASS VECTOR INTERSECTION................................................................................................ 83
15.14.1 General Information about GRASS Vector Intersection...................................................... 83
15.14.2 Setup for GRASS Vector Intersection .................................................................................. 83
15.14.3 Usage of GRASS Vector Intersection .................................................................................. 84
15.15
GRASS VECTOR INTERSECTION................................................................................................ 84
15.15.1 General Information about GRASS Vector Subtraction. ..................................................... 84
15.15.2 Setup for GRASS Vector Subtraction................................................................................... 84
15.15.3 Usage of GRASS Vector Subtraction................................................................................... 84
15.16
GRASS VECTOR INTERSECTION................................................................................................ 85
15.16.1 General Information about GRASS Vector Non-Intersection.............................................. 85
15.16.2 Setup for GRASS Vector Non-Intersection. ......................................................................... 85
15.16.3 Usage of GRASS Vector Non-Intersection .......................................................................... 85
15.17
GRASS VECTOR BUFFERS ........................................................................................................ 85
15.17.1 General Information about GRASS Vector Buffers ............................................................. 86
15.17.2 Setup for GRASS Vector Buffers.......................................................................................... 86
15.17.3 Usage of GRASS Vector Buffers.......................................................................................... 86
15.18
GRASS RASTER BUFFERS......................................................................................................... 86
15.18.1 General Information about GRASS Raster Buffers ............................................................. 86
15.19
SELECT GRASS FEATURES OVERLAPPED BY FEATURES IN ANOTHER MAP ................................ 87
vii
Introduction to Quantum GIS Tutorial Version 0.8.0
2/16/2007
-----------------------------------------------------------------------------------------------------------15.19.1 General Information about Select GRASS Features overlapped by features in another map
87
15.19.2 Setup for Select GRASS Features overlapped by features in another map.......................... 87
15.19.3 Usage of Select GRASS Features overlapped by features in another map.......................... 87
15.20
SELECT GRASS FEATURES BY ATTRIBUTES .............................................................................. 87
15.20.1 General Information about Select GRASS Features by Attributes ...................................... 87
15.20.2 Setup for Select GRASS Features by Attributes................................................................... 88
15.20.3 Usage of Select GRASS Features by Attributes ................................................................... 88
15.21
EXTRACT SELECTED GRASS FEATURES ................................................................................... 88
15.21.1 General Information about Extract Selected GRASS Features ........................................... 88
15.21.2 Setup for Extract Selected GRASS Features........................................................................ 88
15.21.3 Usage of Extract Selected GRASS Features........................................................................ 88
15.22
GRASS DELAUNAY TRIANGULATION (LINES)........................................................................... 89
15.22.1 General Information about GRASS Delaunay triangulation (lines).................................... 89
15.23
GRASS DELAUNAY TRIANGULATION (AREAS) ......................................................................... 89
15.23.1 General Information about GRASS Delaunay triangulation (areas) .................................. 89
15.24
GRASS VORONOI DIAGRAM (AREAS)....................................................................................... 89
15.24.1 General Information about GRASS Voronoi diagram (areas) ............................................ 89
15.25 GRASS CONVEX HULLS ............................................................................................................. 90
15.25.1 General Information about GRASS Convex Hulls............................................................... 90
15.26
GRASS NETWORK ANALYSIS - CREATE NODES ON NETWORK .................................................. 90
15.26.1 General Information about GRASS Create nodes on network ............................................ 90
15.27 GRASS NETWORK ANALYSIS - ALLOCATE NETWORK ............................................................... 90
15.27.1 General Information about GRASS Allocate network ......................................................... 90
15.28
GRASS NETWORK ANALYSIS - CUT NETWORK BY COST ISOLINES ........................................... 90
15.28.1 General Information about GRASS Cut network by cost isolines ....................................... 90
15.29 GRASS NETWORK ANALYSIS - CONNECTING NODES BY SHORTEST ROUTE (TRAVELING
SALESMAN)............................................................................................................................................... 90
15.29.1 General Information about GRASS Connecting nodes by shortest route (traveling
salesman) ............................................................................................................................................ 90
15.30
GRASS NETWORK ANALYSIS - CONNECT SELECTED NODES BY SHORTEST TREE (STEINER TREE)
91
15.30.1 General Information about GRASS Connect selected nodes by shortest tree (Steiner tree) 91
15.31
ADD ELEMENTS TO GRASS LAYER (ALL ELEMENTS OF THE SELECTED LAYER TYPE) ............... 91
15.31.1 General Information about Add elements to GRASS layer (All elements of the selected layer
type)
91
15.32
GRASS RANDOM POINTS ......................................................................................................... 91
15.32.1 General Information about GRASS Random Points............................................................ 91
15.32.2 Setup for GRASS Random Points ........................................................................................ 91
15.32.3 Usage of GRASS Random Points......................................................................................... 91
15.33
CREATE GRID IN CURRENT GRASS REGION ............................................................................. 92
15.33.1 General Information about Create Grid in Current GRASS Region ................................... 92
15.34
CREATE NEW GRASS VECTOR AREA MAP WITH CURRENT REGION EXTENT .............................. 92
15.34.1 General Information about Create new Grass vector area map with current region extent92
15.34.2 Setup for Create new Grass vector area map with current region extent: .......................... 92
15.34.3 Usage of Create new Grass vector area map with current region extent............................ 92
15.35
CONVERT A GRASS VECTOR TO RASTER USING CONSTANT ...................................................... 93
15.35.1 General Information about Convert a GRASS vector to raster using constant................... 93
15.35.2 Setup for Convert a GRASS vector to raster using constant ............................................... 93
15.35.3 Usage of Convert a vector to raster using constant ............................................................ 93
15.36
COUNT OF NEIGHBORING GRASS POINTS ................................................................................. 94
15.36.1 General Information about Count of neighboring GRASS points ....................................... 94
15.37
GRASS GAUSSIAN KERNEL DENSITY ........................................................................................ 94
15.37.1 General Information about GRASS Gaussian kernel density .............................................. 94
15.38
GRASS INTERPOLATE ATTRIBUTE VALUES (RST) .................................................................... 94
viii
Introduction to Quantum GIS Tutorial Version 0.8.0
2/16/2007
-----------------------------------------------------------------------------------------------------------15.38.1 General Information about GRASS Interpolate attribute values (RST) .............................. 94
15.39
GRASS INTERPOLATE ATTRIBUTE VALUES (IDW) ................................................................... 94
15.39.1 General Information about GRASS Interpolate attribute values (IDW).............................. 94
15.40
GRASS RASTER MAP CALCULATOR ......................................................................................... 95
15.40.1 General Information about GRASS Raster Map Calculator ............................................... 95
15.41
GENERATE GRASS SLOPE MAP FROM DEM (DIGITAL ELEVATION MODEL) .............................. 95
15.41.1 General Information about Generate GRASS slope map from DEM (digital elevation
model) 95
15.42
GENERATE GRASS ASPECT MAP FROM DEM (DIGITAL ELEVATION MODEL.............................. 95
15.42.1 General Information about Generate GRASS aspect map from DEM (digital elevation
model 95
15.43
GENERATE GRASS SET RASTER COLOR TABLE ......................................................................... 95
15.43.1 General Information about Set raster color table ............................................................... 95
15.44
CONVERT A RASTER TO GRASS VECTOR POINTS ...................................................................... 95
15.44.1 General Information about Convert a raster to GRASS vector points ................................ 95
15.45
CONVERT A RASTER TO GRASS VECTOR LINES ........................................................................ 96
15.45.1 General Information about Convert a raster to GRASS vector lines .................................. 96
15.46
CONVERT A RASTER TO GRASS VECTOR AREAS ...................................................................... 96
15.46.1 General Information about Convert a raster to GRASS vector Areas................................. 96
15.47
SHAPEFILE EXPORT OF GRASS VECTOR LAYERS....................................................................... 96
15.47.1 General Information about Shapefile export of GRASS vector layers................................. 96
15.47.2 Setup for Shapefile export of GRASS vector layers ............................................................. 96
15.47.3 Usage of Shapefile export of GRASS vector layers ............................................................. 96
15.48
GML EXPORT OF GRASS VECTOR LAYER ................................................................................. 97
15.48.1 General Information about GML export of GRASS vector layer......................................... 97
15.49
GRASS GEO TIFF RASTER EXPORT .......................................................................................... 97
15.49.1 General Information about GRASS Geo TIFF raster export............................................... 97
15.50
GRASS SHELL .......................................................................................................................... 97
15.50.1 General Information about GRASS Shell ............................................................................ 97
15.51
GRASS ENVIRONMENTAL VARIABLES ........................................................................................ 97
15.51.1 General Information about Grass environmental variables................................................ 97
LIST OF QUESTIONS FOR LESSON #04............................................................................................... 98
CHAPTER 16
THIRD PARTY PLUG-INS.......................................................................................... 103
CHAPTER 18
EXTRA FEATURES........................................... ERROR! BOOKMARK NOT DEFINED.
18.1
MAP OVERVIEW ...................................................................................................................... 108
CHAPTER 20
HARD COPY/EXPORTING......................................................................................... 109
CHAPTER 21
SUPPORT AND HELP ................................................................................................ 113
21.1
SUPPORT.................................................................................................................................. 113
21.1.1 General Information about Support .................................................................................. 113
APPENDIX A ............................................................................................................................................ 115
ix
Introduction to Quantum GIS Tutorial Version 0.8.0
2/16/2007
------------------------------------------------------------------------------------------------------------
Copyright Summary
Copyright @ 2007 Gary Watry, COAPS - FSU
GNU Free Documentation License
Version 1.2, November 2002
Copyright (C) 2006, Gary Watry, COAPS-FSU
Permission is granted to copy, distribute and/or modify this
document under the terms of the GNU Free Documentation License, Version
1.2 or any later version published by the Free Software Foundation;
with no Invariant Sections, no Front-Cover Texts, and no Back-Cover
Texts.
A copy of the license is included in the section entitled "Appendix A.
The users are free:
•
to copy and redistribute it, with or without modifying it, either
commercially or non-commercially.
Under the following conditions:
The User must preserve for the author and publisher a
way to get credit for their work, while not being
considered responsible for modifications made by
others.
You may copy and distribute the Document in any medium,
either commercially or non-commercially, provided that
this License, the copyright notices, and the license
notice saying this License applies to the Document are
reproduced in all copies, and that you add no other
conditions whatsoever to those of this License.
You may copy and distribute a Modified Version of the
Document , provided that you release the Modified
Version under precisely this License,
•
•
For any reuse or distribution, the user must make clear to others
the license terms of this work.
Any of these conditions can be waived if the user get permission
from the copyright holder.
x
Introduction to Quantum GIS Tutorial Version 0.8.0
2/16/2007
------------------------------------------------------------------------------------------------------------
GIS Certification Institute
This course is recognized by the GIS Certification Institute and is accepted as
academic credit towards course points: points earned through successful completion of
individual courses, workshops, and other formal, documented educational activities
whose subject matter relates directly to geographic information technologies. Each course
is about 10 contact hours and worth 0.25 GISCI course points.
Contributors:
The following have contributed to this work:
Gary Watry, Center for Ocean Atmospheric Prediction Studies – Florida State
University
Author
Charlie Schweik, Center for Public Policy and Administration – University of
Massachusetts at Amherst
Maria T. Fernandez, University of Massachusetts at Amherst
xi
Introduction to Quantum GIS Tutorial Version 0.8.0
2/16/2007
------------------------------------------------------------------------------------------------------------
Notes and Remarks
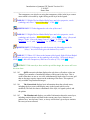
Notes: In this and following tutorials, the following will be used:
[New]
a button activated by clicking on it
“(A new blank map project)”
a checkbox activated by put a check in the box by
clicking on the box
a text-box name where you enter data by typing it in
“(Username)”
ISSUE
a potential limitation to the use of the software
NOTE
an addition comment to point out addition
functionality or information
TASK
Asking you to practice a skill we just discussed
QUESTION:
Asking you to collect information provided by a
TASK
1.0
1.1
1.1.1
1.1.1.01
Chapter
Section
Subsection
Sub-subsection
xii
Introduction to Quantum GIS Tutorial Version 0.8.0
2/16/2007
Introduction
------------------------------------------------------------------------------------------------------------
Chapter 1
Introduction
1.1
General Information
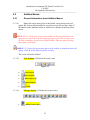
1.1.1
Introduction
1.1.1.01
Quantum GIS (QGIS) is a user friendly Open Source Geographic
Information System (GIS) that runs on Linux, Unix, Mac OSX, and Windows.
QGIS supports vector, raster, and database formats. QGIS is licensed under the
GNU General Public License. QGIS lets the user browse and create map data on
their computer. It supports many common spatial data formats (e.g. ESRI
ShapeFile, geotiff). QGIS supports Plug-ins to do things like display tracks from
the GPS units. QGIS is Open Source software and it is free of cost.
1.1.1.02
Known Issues: There are a number of issues related to this release. As the
name 'preview' indicates, this is still an unstable release, intended to provide a
peek at the new features coming in QGIS 0.8 and to provide a platform for users
to file bug reports. The user can view the currently open issues at the Quantum
GIS Trac website.
1.1.1.03
New features in Version 0.8.0-Preview-2
•
On the fly projection support to automatically project layers from different
coordinate systems
•
Map Composer for creating map layouts
•
Toolbox for running GRASS tools from QGIS. The toolbox can be easily
customized to add additional tools
•
Handling of spatially enabled tables and views in PostgreSQL has been
greatly improved. QGIS can now load any table in the database that contains a
geometry column
•
PostgreSQL views containing a geometry column can be viewed in QGIS
•
Raster graphing tool to produce a histogram for a raster layer
•
Raster query using the identify tool allows the user to get the pixel values
from a raster by making it the active layer and clicking on the point of interest
1
Introduction to Quantum GIS Tutorial Version 0.8.0
2/16/2007
Introduction
-----------------------------------------------------------------------------------------------------------• User preferences provides customizable settings for the digitizing line width,
color, and selection color
•
New symbols for use with point layers are available from the layer properties
dialog
•
Spatial bookmarks allow the user to create and manage bookmarks for an area
on the map. Bookmarks are persistent and global; meaning they are available
for all projects
•
Measure tool allows the user to measure distances on the map with both
segment length and total length displayed as the user clicks
•
GPX loading times and memory consumption for large GPX (GPS) files has
been drastically reduced
•
Many enhancements to the digitizing tools have been made, including the
ability to capture data straight into PostgreSQL/PostGIS, and improvements
to the definition of attribute tables for newly created layers
•
The Raster Georeferencer Plug-in can be used to generate a world file for a
raster. The Plug-in allows you to define known control points in the raster
coordinate system. Once enough control points are defined, the world file can
be generated and the raster properly displayed in QGIS or other GIS
applications
•
Improvements to the Mapserver export tool
2
Introduction to Quantum GIS Tutorial Version 0.8.0
2/16/2007
Getting the Software
------------------------------------------------------------------------------------------------------------
Chapter 2
Getting the software
2.1
File Unzip software
2.1.1
General Information for File Unzip software:
2.1.1.01
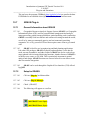
The following information on 7-Zip is taken from http://www.7-zip.org/
2.1.1.02
7-Zip is a file archive program with high compression ratio. 7-Zip is free
software distributed under the GNU LGPL (except for the RAR Plug-in).
2.1.2
Getting and Installing 7-Zip
2.1.2.01
Open the web browser and go to http://www.7-zip.org/
2.1.2.02
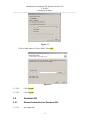
Click on the [download] button next to type “.exe”
Figure 2.1
2.1.2.03
Select a mirror site and click on [download]
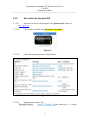
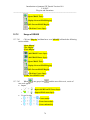
2.1.2.04
When the screen changes to
3
Introduction to Quantum GIS Tutorial Version 0.8.0
2/16/2007
Getting the Software
------------------------------------------------------------------------------------------------------------
.
Figure 2.2
Click on radio-button “(Save to Disk)” then [OK]
Figure 2.3
2.1.2.05
Click [Install]
2.1.2.06
Click [Finish].
2.2
Quantum GIS
2.2.1
General Information for Quantum GIS:
2.2.1.01
Not Applicable
4
Introduction to Quantum GIS Tutorial Version 0.8.0
2/16/2007
Getting the Software
------------------------------------------------------------------------------------------------------------
2.2.2
Get and Set Up Quantum GIS
2.2.2.01
Open the web browser and navigate to the Quantum GIS website at
http://qgis.org/
2.2.2.02
Click on the Newsflash item [0.8 Preview 2 Available]
Figure 2.4
2.2.2.03
Choose the operating system for the platform
Figure 2.5
2.2.2.04
Download the windows file
into a directory.( i.e. C:\temp)
5
Introduction to Quantum GIS Tutorial Version 0.8.0
2/16/2007
Getting the Software
-----------------------------------------------------------------------------------------------------------2.2.2.05
Unzip the file by copying it into the correct directory (i.e. "C:\Program
Files\qgis\”) and then unzip it.
2.2.2.06
Make a shortcut on the desktop using attached icon
6
Introduction to Quantum GIS Tutorial Version 0.8.0
2/16/2007
Getting the Data
-----------------------------------------------------------------------------------------------------------
Chapter 3
Getting the data
3.1
To Obtain Data from National Atlas
3.1.1
General Information for Obtaining Data from National
Atlas:
3.1.1.01
Not Applicable
3.1.2
To Obtain Data from National Atlas
3.1.2.01
Create a directory called workspace on the machine e.g. D:/workspace.
3.1.2.02
Open the web browser and go to
http://www.nationalatlas.gov/atlasftp.html
3.1.2.03
Click on “Boundaries”
Figure 3.1
7
Introduction to Quantum GIS Tutorial Version 0.8.0
2/16/2007
Getting the Data
----------------------------------------------------------------------------------------------------------3.1.2.04
Download the following Shapefile layers and unzip them into the
Workspace folder:
• County Boundaries, 2001
• Federal Lands
• State Boundaries
3.1.2.05
Download the following Shapefile layer from “Map Reference” and unzip
them into the Workspace folder:
• Urban Areas
3.1.2.06
Download the following Shapefile layers from “Transportation” and unzip
them into the Workspace folder:
• Airports
• Railroads
• Roads
3.1.2.07
•
Download the following Shapefile layer from “Water” and unzip them
into the Workspace folder:
Streams and Waterbodies
3.1.2.08
Download the following Shapefile layers from “Biology” and unzip them
into the Workspace folder:
• Invasive Species - Africanized Honey Bees
• Invasive Species – Zebra Mussel Distribution
• Ecoregions – Bailey
• Ecoregions – Omernik
3.1.2.09
Download the following Shapefile layer from “People” and unzip them
into the Workspace folder:
• Mortality, Various Causes
3.1.2.10
Download the following Shapefile layer from “Geology” and unzip them
into the Workspace folder:
• Shaded Relief Land - Color - 1 Kilometer Resolution
• Shaded Relief Land - Color - Conterminous United States 200 Meter
Resolution
• Coal Fields
8
Introduction to Quantum GIS Tutorial Version 0.8.0
2/16/2007
Updating Quantum GIS
-----------------------------------------------------------------------------------------------------------
Chapter 4
Updating Quantum GIS
4.1
Updating Quantum GIS
4.1.1
General Information for Updating Quantum GIS
4.1.1.01
Not Applicable
4.1.2
Setup for Updating Quantum GIS
4.1.2.01
Not Applicable
4.1.3
Updating Quantum GIS
4.1.3.01
Click on the [Help]
4.1.3.02
Click on [About]
4.1.3.03
Go back to the website and check the current development release. Do this
occasionally to take advantage of the latest tools.
9
Introduction to Quantum GIS Tutorial Version 0.8.0
2/16/2007
Projects
-----------------------------------------------------------------------------------------------------------
Chapter 5
Projects
5.1
Creating a New Project
5.1.1
General Information for Creating a New Project
5.1.1.01
Not Applicable
5.1.2
Setup for Creating a New Project
5.1.2.01
Not Applicable
5.1.3
Creating a new project
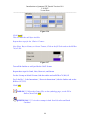
5.1.3.01
Double Click on the Desktop Icon
Figure 5.1
5.1.3.02
The following screen will appear
Figure 5.2
10
Introduction to Quantum GIS Tutorial Version 0.8.0
2/16/2007
Projects
-----------------------------------------------------------------------------------------------------------
5.2
Loading an Existing Project
5.2.1
General Information for Loading an Existing Project
5.2.1.01
Not Applicable
5.2.2
Setup for Loading an Existing Project
5.2.2.01
Not Applicable
5.2.3
Steps for Loading an Existing Project
5.2.3.01
Click on [File] menu item
5.2.3.02
Click on [Open Project]
5.2.3.03
Navigate to the directory where the stored projects are and select the
project to be opened by highlighting it
5.2.3.04
Click the [Open] button to launch QGIS with the selected project
5.3
Saving a Project
5.3.1
General Information for Saving a Project
5.3.1.01
While working on any project it is advisable to save regularly to guard
against data lost and for later retrieval. When saving a project for the first time it
is necessary to provide a name for the project file. It is important to note that a
saved project file does not contain any map data. The project file contains
references to map data, as well as other information, such as layer symbology.
Projects are stored on the hard drive with an .epf extension
5.3.2
Setup for Saving a Project
5.3.2.01
Not Applicable
5.3.3
Steps for Saving a Project
5.3.2.01
Click the [File] on the Main Toolbar
11
Introduction to Quantum GIS Tutorial Version 0.8.0
2/16/2007
Projects
----------------------------------------------------------------------------------------------------------5.3.3.02
Click the [Save] item, if this is the first time the project has been saved,
the user will be prompted to provide a path and filename
5.3.3.03
Click the [Save as] item, if the project has been saved once, but want to
save a different version, a prompt will appear for the user to provide a new path
and filename
12
Introduction to Quantum GIS Tutorial Version 0.8.0
2/16/2007
The First Project
-----------------------------------------------------------------------------------------------------------
Chapter 6
The First Project
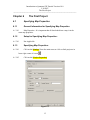
6.1
Specifying Map Properties
6.1.1
General Information for Specifying Map Properties
6.1.1.01
Map Properties - It is important that all data loaded into a map is in the
same map properties.
6.1.2
Setup for Specifying Map Properties:
6.1.2.01
Not Applicable
6.1.3
Specifying Map Properties:
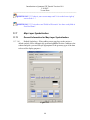
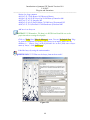
6.1.3.01
Click on the [Settings] from the main menu or click on little projector in
lower right corner of screen
6.1.3.02
Click on the [Project Properties]
Figure 6.1
13
Introduction to Quantum GIS Tutorial Version 0.8.0
2/16/2007
The First Project
----------------------------------------------------------------------------------------------------------6.1.3.03
Select the [General Tab]
6.1.3.04
Type in a Project Title
6.1.3.05
Select the Map Units to be used
NOTE #1***** the Map units should be in the units that your data is in i.e. Meters,
Feet or Decimal Degrees. Do not set it to meters if the data is Decimal Degrees
as this will generate strange results
6.1.3.06
Select the Cursor Display Precision.
6.1.3.07
Click on the [Projection Tab]
6.1.3.08
Click on ‘(Enable on the Flyer Projection)’
6.1.3.09
Click on [OK]
TASK # 1*****Under [General],Type Project name as ‘Penn’, set decimal degrees
as the map unit for this project, set cursor display precision to manual and 6
decimal places. Click [Apply]. Click on [Projection] tab, click on ‘(Enable
Projection on the Fly’. Set Projection as WGS 84 under Geographic Coordinate
System, Click [OK]
ISSUE # 1***** The functionality to measure in feet if the map data is in Decimal
Degrees is not included in the software due to the complex algorithms required to
accurately compute distance when using decimal degrees.
6.2
Options
6.2.1
General Information for Options
6.2.1.01
This allows the user to preset certain conditions within your project
6.2.2
Setup for Options
6.2.2.01
Click on the [Settings] from the main menu.
6.2.2.02
Click on [Options]
14
Introduction to Quantum GIS Tutorial Version 0.8.0
2/16/2007
The First Project
----------------------------------------------------------------------------------------------------------6.2.2.03
On the [Appearance] Tab, the user can hide the opening splash screen and
change the icons on the toolbars. It starts out as default but can be changed to
‘nkids’.
6.2.2.04
There is nothing to change on the [Rendering] tab
6.2.2.05
The user can change the Search radius for identifying features on the
[Selection & Measuring] Tab
6.2.2.06
On the [Projection] tab the user can set what to do when loading a layer
that has no projection information with it. It is recommended to use ‘(Prompt for
projection)’ unless the user is sure all the data is already in the same projection
(i.e. it all came from the same source).
6.2.2.07
The [Help Browser] tab allows the user to set the browser to be used when
opening the Help documents
NOTE #2***** in this exercise we will use d:\workspace or the directory you
created when you installed the software
15
Introduction to Quantum GIS Tutorial Version 0.8.0
2/16/2007
Rendering
-----------------------------------------------------------------------------------------------------------
Chapter 7
Rendering
7.1
Rendering
7.1.1
General Information about Rendering
7.1.1.01
By default, QGIS renders all visible layers whenever the map canvas must
be refreshed. The events that trigger a refresh of the map canvas include:
• Adding a layer
• Panning or zooming
• Resizing the QGIS window
• Changing the visibility of a layer or layers
7.1.1.02
QGIS allows the user to control the rendering process in a number of
ways.
7.1.2
Setup for Rendering:
7.1.2.01
Controlling Map Rendering: Map rendering can be controlled in the
following ways:
• Stopping rendering during drawing of the map canvas
• Temporarily suspending rendering
• Setting an option to control the visibility of layers when they are added
7.1.2.02
Stopping Rendering: To stop the map drawing, press the [ESC] key. This
will halt the refresh of the map canvas and leave the map partially drawn. It may
take a bit of time between pressing [ESC] and the time the map drawing is halted.
7.1.2.03
Suspending Rendering: To suspend rendering, click the ‘(Render)’
checkbox in the lower right corner of the status bar. When the
Render box is not checked, QGIS does not redraw the canvas in response to any
of the events described in Section 103.1.1.01
7.1.2.04
•
•
•
•
Examples of when the user might want to suspend rendering include:
Add many layers and symbolize them prior to drawing
Add one or more large layers and set scale dependency before drawing
Add one or more large layers and zoom to a specific view before drawing
Any combination of the above
7.1.2.05
Checking the ‘(Render)’ box enables rendering and causes and immediate
refresh of the map canvas.
16
Introduction to Quantum GIS Tutorial Version 0.8.0
2/16/2007
Rendering
----------------------------------------------------------------------------------------------------------7.1.2.06
Setting Layer Add Option: The user can set an option to always load
new layers without drawing them. This means the layer will be added to the map,
but its visibility checkbox in the legend will be unchecked by default.
7.1.2.07
To set this option, choose [Options] from the [Settings] menu and click on
the [Rendering] tab. Uncheck the ‘(New layers added to the map should be
displayed)’ checkbox. Any layer added to the map will be off (invisible) by
default.
7.1.2.08
Updating the Map Display during Rendering, The user can set an
option to update the map display as features are drawn. By default, QGIS does not
display any features for a layer until the entire layer has been rendered. To update
the display as features are read from the data store, choose [Options] from the
[Settings] menu and click on the [Rendering] tab. Set the feature count to an
appropriate value to update the display during rendering. Setting a value of 0
disables update during drawing (this is the default). Setting a value too low will
result in poor performance as the map canvas is continually updated during the
reading of the features. A suggested value to start with is 500.
TASK #2***** Go Ahead and adjust the rendering by Checking Initial Visibility
and setting the Update during Drawing to 500
17
Introduction to Quantum GIS Tutorial Version 0.8.0
2/16/2007
The Quantum GIS Interface
-----------------------------------------------------------------------------------------------------------
Chapter 8
Projections
8.1
Projections
8.1.1
General Information about Projections
8.1.1.01
QGIS supports on-the-fly projection of vector layers. This feature allows
the user to display layers with different coordinate systems and have them overlay
properly.
8.1.1.02
QGIS has support for approximately 2,700 known projections. Projections
are stored in a Sqlite database that is installed with QGIS. Normally the user does
not need to manipulate the database directly. In fact, doing so may cause
projection support to fail. Custom projections are stored in a user database
8.1.1.03
The projections available in QGIS are based on those defined by EPSG
and are largely abstracted from the spatial references table in PostGIS version 1.x.
Note that the identifiers used in QGIS do not correspond to the EPSG or PostGIS
spatial reference identifiers. The EPSG and PostGIS identifiers are present in the
database and can be used to specify a projection in QGIS.
8.1.1.04
In order to use OTF projection, the data must contain information about its
coordinate system. For PostGIS layers QGIS uses the spatial reference identifier
that was specified when the layer was created. For data supported by OGR, QGIS
relies on the presence of a format specific means of specifying the coordinate
system. In the case of shapefiles, this means a file containing the Well Known
Text (WKT) specification of the coordinate system. The projection file has the
same base name as the shapefile and a prj extension. For example, a shapefile
named lakes.shp would have a corresponding projection file named lakes.prj.
8.1.2
Setup for Projections
8.1.2.01
Not Applicable
8.1.3
Usage of Projections
8.1.3.01
At startup, QGIS does not have On-the-Fly (OTF) projection enabled. To
use OTF projection, the user must open the Project Properties dialog, select a
projection for the map, and enable projections. There are two ways to open the
Project Properties dialog:
8.1.3.02
Select [Project Properties] from the [Settings] Menu or
8.1.3.03
Click on the projector icon in the lower right-hand corner of the status bar
18
Introduction to Quantum GIS Tutorial Version 0.8.0
2/16/2007
The Quantum GIS Interface
----------------------------------------------------------------------------------------------------------8.1.3.04
When opening the [Project Properties] dialog from the [Settings] menu,
click on the [Projection] tab to view the projection settings. Opening the dialog
from the [Projector] icon will automatically bring the [Projection] tab to the
front.
8.2
The Projection dialog
8.2.1
General Information for the Projection dialog
8.2.1.01
The Projection dialog contains four important components.
•
(Enable on the fly projection) - This checkbox is used to enable or disable
OTF projection. When off, no projection takes place and each layer is drawn
using the coordinates as read from the data source. When on, the coordinates
in each layer are projected to the coordinate system of the map canvas.
•
Projections - this is a list of all projection supported by QGIS, including
Geographic, Projected, and Custom coordinate systems. To use a coordinate
system, select it from the list by expanding the appropriate node and selecting
the projection.
•
Proj4 text - this is the projection string used by the Proj4 projection engine.
This text is read-only and provided for informational purposes.
•
Search - if the user knows the PostGIS or EPSG identifier for a projection,
use the search feature to find it. Enter the identifier and click on [Find].
8.3
Specifying a Projection
8.3.1
General Information for Specifying a Projection
8.3.1.01
QGIS automatically sets the map projection to the coordinate system of
the first layer loaded. One way to specify the map projection is to first load a layer
with the projection that is wanted for the entire map. Then open the [Project
Properties] dialog and click on the “(Enable on the fly projection)” checkbox.
And finally, close the Project Properties dialog and add additional layers to the
map.
8.3.2
Setup for Specifying a Projection
8.3.2.01
Not Applicable
19
Introduction to Quantum GIS Tutorial Version 0.8.0
2/16/2007
The Quantum GIS Interface
-----------------------------------------------------------------------------------------------------------
8.3.3
Use for Specifying a Projection
8.3.3.01
If the user has already added layers and wants to enable OTF projection,
open the [Project Properties] dialog. Then find the projection or geographic
coordinate system that is to be used in the list of projections. Alternatively, use
the search feature as described in the previous section.
8.4
Custom Projections
8.4.1
General Information about Custom Projections
8.4.1.01
If QGIS doesn’t have the projection need, define a custom projection
8.4.1.02
Defining a custom projection requires a good understanding of the Proj.4
projection library. To begin, refer to Cartographic Projection Procedures for the
UNIX EnvironmentNA UserOs Manual by Gerald I. Evenden, U.S. Geological
Survey Open-File Report 90-284, 1990 (available at
ftp://ftp.remotesensing.org/proj/new_docs/OF90-284.pdf ). This manual describes
the use of the proj and related command line utilities. The cartographic
parameters used with proj and described in the user manual are the same as those
used by QGIS.
8.4.1.03
•
•
The Custom Projections dialog requires only two parameters to define a
user projection:
a descriptive name
the cartographic parameters
8.4.2
Setup for Custom Projections
8.4.2.01
Not Applicable
8.4.3
Usage of Custom Projections
8.4.3.01
To define a projection, select [Custom Projections] from the [Settings]
menu. Custom projections are stored in the QGIS user database. In addition to
custom projections, this database contains spatial bookmarks and other custom
data.
8.4.3.02
To create a new projection, click the [New] button and enter a descriptive
name and the projection parameters.
20
Introduction to Quantum GIS Tutorial Version 0.8.0
2/16/2007
The Quantum GIS Interface
----------------------------------------------------------------------------------------------------------8.4.3.03
The user can test the custom projection parameters to see if they give sane
results by clicking on the [Test] tab and pasting the projection parameters into the
“(Parameters)” field.
8.4.3.04
Then enter known WGS 84 latitude and longitude values in ‘North’ and
‘East’ fields respectively.
8.4.3.05
Click on [Calculate] and compare the results with the known values in the
projected coordinate system.
21
Introduction to Quantum GIS Tutorial Version 0.8.0
2/16/2007
The Quantum GIS Interface
-----------------------------------------------------------------------------------------------------------
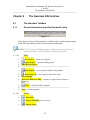
Chapter 9
The Quantum GIS Interface
9.1
The Standard Toolbars
9.1.1
General Information about the Standard Toolbar
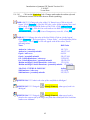
Figure 9.1
In the upper left corner of the program is a toolbar with several drop-down menus.
Each of the Drop-down lists has several functions within them.
NOTE #3***** several of the Buttons appear in both the drop-down lists and
individual toolbars, I will only define the button the first time.
9.1.1.01
•
•
•
•
•
[File]
[New Project] - create a new project
[Open Project] – open an existing project
[Open Recent Project]
---------------------------------------------------------------------------------[Save Project] – save a project with the existing name
•
•
•
[Save Project As] – save a project with a new name
[Save as Image]
[Export To Mapserver Map] - export as a .map for the web-server
MapServer
•
•
•
[Print] – call up the Map Composer
---------------------------------------------------------------------------------[Exit] – exit the program
9.1.1.02
[View]
•
[Zoom Full]
•
[Zoom to Selection] in Active layer
•
[Zoom to Layer]
22
Introduction to Quantum GIS Tutorial Version 0.8.0
2/16/2007
The Quantum GIS Interface
----------------------------------------------------------------------------------------------------------•
[Zoom Last]
•
[Refresh] – redraws the map
•
[Show Bookmarks] – list all existing bookmarks
•
[New Bookmarks] – create a new bookmark
9.1.1.03
[Layer]
•
[Add a Vector Layer] – add a data layer
•
[Add a Raster Layer] – add a image layer
•
[Add a PostGIS Layer]
•
[Add WMS layer]
•
[Remove Layer]
•
[New Vector Layer] – create anew data layer
•
[In Overview] – send to overview map
•
[Add All to Overview] – add all layers to overview
•
[Remove All from Overview] – removes all layers from overview
•
[Hide All Layers] – make all layers invisible
•
[Show All Layers] – make all layers visible
9.1.1.04
•
•
•
[Settings]
[Project Properties] – set project information for layer or project
[Custom Projections] – build your own custom projects
[Options] – set options for the project
9.1.1.05
[Plug-ins]
• [Plug-in Manager] – turn on and off Plug-ins
The following will appear if turned on by the Plug-in Manager.
• [Decorations >]
•
o
[Copyright Label]
o
[Scale Bar]
o
[North Arrow]
[Delimited Text >]
23
Introduction to Quantum GIS Tutorial Version 0.8.0
2/16/2007
The Quantum GIS Interface
----------------------------------------------------------------------------------------------------------•
o
[Add Delimited Text]
[Geoprocessing >]
•
o
[Buffer Feature]
[Georeferencing >]
•
o
[Georeferencer]
[GPS >]
[GPS Tools]
o
•
o
[Create New GPX Layer]
[GRASS >]
o [Open Mapset]
o [New Mapset]
o [Close Mapset]
o
[Add GRASS Vector Layer]
o
[Add GRASS Raster Layer]
o
[Open GRASS Tools]
o
[Display Current GRASS Region]
o
[Edit Current GRASS Region]
•
o
[Edit Grass Vector Layer]
o [Create New GRASS Vector]
[Graticules >]
•
o
[Spit]
o
9.1.1.06
•
•
•
•
•
[Graticule Creator]
[Import shape to PostGreSQL]
[Help]
[Help Contents]
[QGIS Home Page]
[QGIS Sourceforge]
[Check QGIS Version]
[About]
24
Introduction to Quantum GIS Tutorial Version 0.8.0
2/16/2007
The Quantum GIS Interface
-----------------------------------------------------------------------------------------------------------
9.2
Addition Menus:
9.2.1
General Information about Addition Menus:
9.2.1.01
Right-click on an empty place on the toolbar, a drop-down menu will
appear. By click on different name the can add extra specific tool bars. Most of
the buttons on the additional menus or toolbars are contained in the drop down
menus.
ISSUE # 2***** If the user closes all the toolbars on the drop-down menu, the
right click to reopen the drop down menu no longer works. The user has to use
the Plug-in manager to turn on the GRASS Toolbar. Then the right-click dropdown menu works again.
TASK #3***** right-click on an empty place on the toolbar, a drop-down menu will
appear. Click on all the different specific tool bars.
The screen will look as follows:
9.2.1.02
[File Toolbar] (Click this tool to turn it one)
Figure 9.2
•
•
[New Project]
[Save Project]
•
[Save Project As]
•
[Open Project]
•
9.2.1.03
[Print]
[Manage Layers] (Click this tool to turn it one)
Figure 9.3
•
[Add a Vector Layer]
25
Introduction to Quantum GIS Tutorial Version 0.8.0
2/16/2007
The Quantum GIS Interface
----------------------------------------------------------------------------------------------------------•
[Add a Raster Layer]
•
[Add a PostGIS Layer]
•
[Add WMS Layer]
•
[New Vector Layer]
•
[Remove Layer]
•
[In Overview]
•
[Add All to Overview]
•
[Remove All from Overview]
•
[Show All Layers]
•
[Hide All Layers]
9.2.1.04
[Help] (Click this tool to turn it on)
Figure 9.4
•
9.2.1.05
[Help Contents]
[Digitizing] (Click this tool to turn it one)
Figure 9.5
•
[Start Editing the Current Layer]
•
[Stop Editing the Current Layer]
•
[Capture Point]
•
[Capture Line]
•
[Capture Polygon]
•
[Delete Selected]
•
[Add Vertex]
•
[Delete Vertex]
26
Introduction to Quantum GIS Tutorial Version 0.8.0
2/16/2007
The Quantum GIS Interface
----------------------------------------------------------------------------------------------------------•
[Move Vertex]
•
[Cut Feature]
•
[Copy Feature]
•
9.2.1.06
[Paste Feature]
[Map Navigation] (Click this tool to turn it one)
Figure 9.6
•
[Pan Map]
•
[Zoom In]
•
[Zoom Out]
•
[Zoom Full]
•
[Zoom to Selection]
•
[Zoom to Layer]
•
[Zoom Last]
•
[Refresh]
9.2.1.07
[Attributes] (Click this tool to turn it one)
Figure 9.7
•
[Identify Features]
•
[Select Features]
•
[Open Table]
•
[Measure Line]
•
[Measure Area]
27
Introduction to Quantum GIS Tutorial Version 0.8.0
2/16/2007
The Quantum GIS Interface
----------------------------------------------------------------------------------------------------------•
[Show Bookmark]
•
[New Bookmark]
9.2.1.08
[Plug-in] (Click this tool to turn it one)
Figure 9.8
•
[Add Delimited Text]
•
[Copyright Label]
•
[Georeferencer]
•
[GPS Tools]
•
[Graticular Creator]
•
[North Arrow]
•
[Buffer Feature]
•
[Scale Bar]
•
[Import shape to PostGreSQL]
9.2.1.09
[GRASS] (Click this tool to turn it one)
Figure 9.9
•
[Add GRASS Vector Layer]
•
[Add GRASS Raster Layer]
•
[Open GRASS Tools]
•
[Display Current GRASS Region]
•
[Edit Current GRASS Region]
•
[Edit Grass Vector Layer]
28
Introduction to Quantum GIS Tutorial Version 0.8.0
2/16/2007
Tools
-----------------------------------------------------------------------------------------------------------
Chapter 10
Tools
10.1
Map Zoom Tools
10.1.1
General Information for Map Zoom Tools
10.1.1.01
When working with a map it may be necessary to zoom in to view an
area in more detail, or zoom out to see a larger area.
10.2
Zooming In
10.2.1
General Information for Zooming In
10.2.1.01
Not Applicable
10.2.2
Setup for Using the Zoom-in Function:
10.2.1.01
Not Applicable
10.2.3
Steps for Using the Zoom-in Function
10.2.3.01
Zoom in to a specific area. Click and hold the left mouse. Move the mouse
to drag a rectangle to create the area to zoom to. Release the mouse button to
complete the zoom.
10.3
Zooming Out:
10.3.1
General Information for Zooming Out
10.3.1.01
Not Applicable
10.3.2
Setup for Using the Zoom-out Function
10.3.2.01
Not Applicable
10.3.3
Steps for Using the Zoom-out Function
10.3.3.01
Zoom out to a specific Area. Click and hold the left mouse button, Move
the mouse to drag a rectangle to create the area. The current map extent will be
29
Introduction to Quantum GIS Tutorial Version 0.8.0
2/16/2007
Tools
----------------------------------------------------------------------------------------------------------resized to fit in the rectangle drawn. As a result the smaller the rectangle the
further the map will zoom out. Release the mouse button to complete the zoom.
10.4
Zooming to Full Extent
10.4.1
General Information for Zooming to Full Extent
10.4.1.01
Zooming to full extent resets the map view so that every feature of very
layer is contained within the visible extent
10.4.2
Setup for Zooming to Full Extent:
10.4.2.01
Not Applicable
10.4.3
Steps for Zooming to Full Extent
10.4.3.01
Click the [Zoom Full] button on the Tools toolbar
10.4.3.02
Or click on [View] then [Zoom Full]
10.5
Zooming to Last Extent:
10.5.1
General Information for Zooming to Last Extent
10.5.1.01
Zooming to last extent allows stepping back to last map view. For
example, start with a map view at full extent then zoom in to an area on the map.
Now click the last button; the map will return to the previous map view, which
was the full extent.
10.5.2
Setup for Zooming to Last Extent
10.5.2.01
Not Applicable
10.5.3
Steps for Zooming to Previous Extent
10.5.3.01
For Zooming to Last Extent – Click the [Zoom Last] button on the Tools
Toolbar
10.6
Zoom to Layer
30
Introduction to Quantum GIS Tutorial Version 0.8.0
2/16/2007
Tools
-----------------------------------------------------------------------------------------------------------
10.6.1
General Information for Zoom to Layer
10.6.1.01
Zoom to a layers extent will set the map display to an area just big enough
to show every feature in a particular layer.
10.6.2
Setup for Zooming to Layer
10.6.2.01
Not Applicable
10.6.3
Steps for Zooming to Layer Extent
10.6.2.01
Click on the [Zoom to Layer] button on the Map Navigation Toolbar or
10.6.3.02
Right-click on the layer in the legend, a new menu will popup.
10.6.3.03
Click on [Zoom to Layer Extent]
10.7
Panning
10.7.1
General Information for Panning
10.7.1.01
Panning allows the user to move the map display around to show areas
outside of the current viewing area without changing the scale of the map.
10.7.2
Setup for Panning
10.7.2.01
Not Applicable
10.7.3
Steps for Panning
10.7.3.01
Click the [Pan] button on the Map Navigation Toolbar.
10.7.3.02
Move the mouse over the map.
10.7.3.03
Click and hold down the left mouse button.
10.7.3.04
Move the mouse, still holding down the mouse button. The map will move
with the mouse.
10.7.3.05
Release the mouse button to complete the pan operation
31
Introduction to Quantum GIS Tutorial Version 0.8.0
2/16/2007
Tools
-----------------------------------------------------------------------------------------------------------
10.8
Measuring Distance
10.8.1
General Information for Measuring Distance
10.8.1.01
The measurement tool is used to calculate distances between 2 or more
user-defined points on the map.
10.8.2
Setup for Measuring Distance
10.8.2.01
Not Applicable
10.8.3
Measuring Distance
10.8.3.01
Click the [Measure Line] tool on the Map Navigation Toolbar.
10.8.3.02
Move the mouse over the map to the starting position.
10.8.3.03
Using the left mouse button, Click once, and now move to the next
position. A line will draw as the mouse moves.
10.8.3.04
Using the left mouse button, click once to define the end position
10.8.3.05
Repeat steps 3 and 4 to create a multi point line as necessary.
10.8.3.06
The distance will be calculate and displayed in a popup window. The
upper window column is the length of each segment while the bottom column is
the cumulative length
10.8.3.07
Right Clicking will reset the measuring tool.
10.9
Measuring Area
10.9.1
General Information for Measuring Area
10.9.1.01
The measurement tool is used to calculate area within 3 or more userdefined points on the map.
10.9.2
Setup for Measuring Area
10.9.2.01
Not Applicable
32
Introduction to Quantum GIS Tutorial Version 0.8.0
2/16/2007
Tools
-----------------------------------------------------------------------------------------------------------
10.9.3
Measuring Area
10.9.3.01
Click the [Measure Area] tool on the Map Navigation Toolbar.
10.9.3.02
Move the mouse over the map to the starting position.
10.9.3.03
Using the left mouse button, Click once, and now move to the next
position. A line will draw as the mouse moves.
10.9.3.04
Using the left mouse button, click to create a second point
10.9.3.05
Using the left mouse button, click to create a third point
10.9.3.06
Repeat steps 5 to create as many points for the area as necessary.
10.9.3.07
The total area will be calculate and displayed in a popup window.
10.9.3.08
Right Clicking will reset the measuring tool.
33
Introduction to Quantum GIS Tutorial Version 0.8.0
2/16/2007
Vector Data
-----------------------------------------------------------------------------------------------------------
Chapter 11
11.1
Vector Data
Adding Vector Map Data
11.1.1
General Information for Adding Vector Map Data: Not
Applicable
11.1.1.01
QGIS supports numerous GIS data formats that can be added to a project
with a few simple clicks. It should first be determined if the GIS data is in a
vector format that is compatible with Quantum GIS by using the list below:
• ESRI® Shapefiles (*.shp)
• ESRI® Arc/Info Binary Coverages (*.E00)
• MapInfo® TAB files (*.tab)
• STDT
11.1.1.02
QGIS supports vector data in a number of formats, including shapefiles,
MapInfo mif, and PostGIS layers in a PostgreSQL database. Support for
additional data types is provided by Plug-ins, for example delimited text. Many of
the features available in QGIS work the same regardless of the vector data source.
This is by design and includes the identify, select, labeling, and attributes
functions
11.1.1.03
PostGIS layers are stored in a PostgreSQL database. The advantage of
PostGIS is the spatial indexing, filtering, and query capability. Using PostGIS,
vector functions such as select and identify work more accurately than with OGR
layers in QGIS.
11.1.1.04
Each GIS data set will be added to the map project as a single layer
11.1.2
Setup for Adding Vector Map Data
11.1.2.01
Not Applicable
11.1.3
Adding Vector Map Data
11.1.3.01
Adding data using [Layer] then [Add a Vector Layer]
11.1.3.02
or Click on the [Add a Vector Layer] icon on the [Data] Toolbar
11.1.3.03
Browse to the location of the GIS data.
34
Introduction to Quantum GIS Tutorial Version 0.8.0
2/16/2007
Vector Data
----------------------------------------------------------------------------------------------------------11.1.3.04
Click on the GIS data you want to add as a new layer in your project.
NOTE #4 ***** If you want to add multiple layers, hold down the control key and
select each addition layer by clicking on it.
11.1.3.05
Click the [Open] button. The new layer will be added to your project
TASK #3***** Uncheck the render box in the lower right corner, add
afrbeppp020, airportx020, coalfdp050, countyp020, ecoomrpr075, ecoregp075,
fedlandp020, hydrogpl020, hydrogpp020, mortalp020, railrdl020, roadtrl020,
statep020, urbanp020, and zmussel020 layers to the project.
TASK #4 ***** Turn the Statep020 Layer on by putting the check in the box next to
the layer name. Put a check in the render box.
11.2
Using the Legend to Control the Layers
11.2.1
General Information about Using the Legend to Control
the Layers
11.2.1.01
The legend is a graphical representation of all the map layers in the current
project. The default position of the legend is docked on the left hand side of the
screen. The legend offers layer manipulation functionality including but not
limited to changing a layers symbology or its order in the drawing process.
11.2.1.02
•
•
•
•
•
•
•
•
•
•
•
•
Right Click Functionality
[Properties]
[Zoom to Layer Extent]
[Add to Overview]
[Remove from Overview]
[Remove]
[Allow Editing]
[Save as Shapefile]
[Rename]
[Add Group]
[Expand All]
[Collapse All]
[Show File Groups]
35
Introduction to Quantum GIS Tutorial Version 0.8.0
2/16/2007
Vector Data
-----------------------------------------------------------------------------------------------------------
11.3
Changing the Layer Name
11.3.1
General Information for Changing the Layer Name
11.2.1.01
Changing the name of a layer does not affect the underlying data. The
layer name is project dependent and will not modify any information stored
against the map source.
11.3.2
Setup for Changing the Layer Name
11.3.2.01
Not Applicable
11.3.3
Steps for Changing the Layer Name
11.3.3.01
Right-click on the layer in the legend and a new menu will popup.
11.3.3.02
Click on the [Properties] and the Layer Properties dialog will be
displayed.
11.3.3.03
Click on [General] Tab
11.3.3.04
Change the text in the “Display Name” box. This will be the new layer
name.
11.3.3.05
Click the [OK] button to close the Layer Properties dialog. The legend will
update to show the new layer name.
11.3.3.06
Or right-click on the layer in the legend and a new menu will popup
11.3.3.07
Click on [Rename]
11.3.3.08
Highlight the name in the legend and type in new name
TASK #5***** Change
• afrbeep020 to Africanize Honey Bees
• airportx020 to Airports
• coalfdp050 to Coal Fields
• countyp020 to U.S. Counties
• ecoomrpr075 to Ecoregions – Omernik
• ecoregp075 to Ecoregions – Bailey
• fedlandp020 to Federal Lands
36
Introduction to Quantum GIS Tutorial Version 0.8.0
2/16/2007
Vector Data
----------------------------------------------------------------------------------------------------------• hydrogpl020 to Rivers and Streams
• hydrogpp020 to Lakes and Ponds
• mortalp020 to Mortality 1988-1992
• railrdl020 to Railroads
• roadtrl020 to Roads
• statesp020 to U.S. States
• urbanp020 to Urban Areas
• zmusslx020 to Zebra Mussels
11.4
Changing the Drawing Order:
11.4.1
General Information for Changing the Drawing Order:
11.4.1.01
The legend indicates the order that layers are drawn in. The first layer in
the legend is the top layer of the map. The last layer in the legend is the bottom
layer on the map. The layers are drawn from bottom up, hence the bottom layer is
drawn first then the last but one layer and so on. As a result is it important to
carefully order the map layers so data is not obscured by layers placed on top.
11.4.2
Setup for Using the Changing the Drawing Order
11.4.2.01
Not Applicable
11.4.3
Steps for Using the Changing the Drawing Order:
11.4.2.01
Click and drag a layer to the desired location.
TASK #6***** Put the layers in the following order from top to bottom,
• Zebra Mussels
• Africanized Honey Bees
• Airports
• Roads
• Railroads
• Mortality 1988-1992
• Rivers and Streams
• Lakes and Ponds
• Federal Lands
• Urban Areas
• Coal Fields
• U.S. Counties
• Ecoregions – Omernik
37
Introduction to Quantum GIS Tutorial Version 0.8.0
2/16/2007
Vector Data
----------------------------------------------------------------------------------------------------------• Ecoregions – Bailey
• U.S. States
Save your project
11.5
Removing a Layer from the Map
11.5.1
General Information for Removing a Layer from the Map
11.5.1.01
Removing a layer does not remove or delete the underlying data, it just
removes the reference to the layer from the project
11.5.2
Setup for Using the Removing a Layer from the Map
11.5.2.01
Not Applicable
11.5.3
Steps for Using the Removing a Layer from the Map
11.5.3.01
Right-click on the layer in the legend, a new menu will popup
11.5.3.02
Click on [Remove]
11.6
Making the Layer Scalable
11.6.1
General Information for Making the Layer Scalable
11.6.1.01
When adding a new data layer to the project the default scale dependency
will be set to all. Essentially meaning that the layer will be visible at all scales. If
map units have been set for this project it is possible to make any of the layers
scale dependent, that is, visible between certain scale bounds.
11.6.1.02
For example, for a layer to be visible below 1:50000 set Min Scale to 1
and Max Scale to 50000. For a layer to be visible between 1:20000 and 1:50000
set Min Scale to 20000 and Max Scale to 50000
11.6.2
Setup for Using the Making the Layer Scalable
11.6.2.01
Not Applicable
11.6.3
Steps for Using the Making the Layer Scalable
11.6.2.01
Right-click on the layer in the legend, a new menu will appear.
38
Introduction to Quantum GIS Tutorial Version 0.8.0
2/16/2007
Vector Data
----------------------------------------------------------------------------------------------------------11.6.3.02
Click on [Properties], the Layer Properties dialog will be displayed.
11.6.3.03
Click on [General] tab, by default the Minimum scale is set to 1 and
Maximum scale is to the largest dataset scale, which means the layer is not scale
dependent.
11.6.3.04
Change the “(Minimum)” text box to a valid scale value. This is the
minimum scale at which a layer will be visible.
11.6.3.05
Change the “(Maximum)” text box to a valid scale value. This is the
maximum scale at which a layer will be visible.
11.6.3.06
Check the ‘(use scale dependent rendering)’
11.6.3.07
Click [OK]
TASK #7***** set the maximum scale for U.S. Counties to be 2500000 and the
minimum scale to 2400, check the ‘(use scale dependent rendering)’ turn on U.S.
Counties.
TASK #8***** Zoom into the area around the Great Lakes until the counties
appear.
TASK #9***** Zoom out to the Full extent of the map using the [Zoom to Full
Extent] Button
TASK #10***** using the [Zoom Last] and [Zoom to Full Extent], you can
switch between the Great Lakes and the Whole coverage
TASK #12***** Turn on the Coal Fields layer and zoom to its extent
QUESTION #1 ***** what is your current map scale? It is on the lower right of
screen Scale 1: ?
TASK #13***** Zoom to extent of Zebra Mussels
39
Introduction to Quantum GIS Tutorial Version 0.8.0
2/16/2007
Vector Data
----------------------------------------------------------------------------------------------------------QUESTION #2 ***** what is your current map scale? It is on the lower right of
screen Scale 1: ?
QUESTION #3 ***** Are there coal Fields in Wisconsin? Are there coal fields in
New York State?
11.7
Map Layer Symbolization
11.7.1
General Information for Map Layer Symbolization:
11.7.1.01
Default Symbology - When adding a new map layer to the project a
default symbol will be automatically generated. QGIS will select a random color
scheme and pick a pen and fill style appropriate to the geometry type of the data
to be used for display purposes.
Figure 11.1
40
Introduction to Quantum GIS Tutorial Version 0.8.0
2/16/2007
Vector Data
----------------------------------------------------------------------------------------------------------11.7.1.02
GIS supports a number of symbology renderers to control how vector
features are displayed. Currently the following renderers are available:
•
Single symbol - a single style is applied to every object in the layer.
•
Graduated symbol - objects within the layer are displayed with different
symbols classified by the values of a particular field.
•
Continuous color - objects within the layer are displayed with a spread of
colors classified by the numerical values within a specified field.
•
Unique value - objects are classified by the unique values within a specified
field with each value having a different symbol.
11.7.1.03
For layers containing point features, additional renderers are available that
use SVG icons:
•
Single marker - a single specified icon is used for every point within the layer.
•
Graduated marker - points within the layer are displayed with different icons
classified by values within a particular field.
•
Unique value marker - points are classified by unique values within a
specified field with each value having a different icon.
11.8
Changing the Default Symbology
11.8.1
General Information for Changing the Default Symbology:
11.8.1.01
Not Applicable
11.8.2
Setup for Changing the Default Symbology:
11.8.2.01
Not Applicable
11.8.3
Steps for Changing the Default Symbology
11.8.3.01
Right-click on the layer in the legend, a new menu will appear
11.8.3.02
Click on [Properties], the Layer Properties dialog will be displayed
41
Introduction to Quantum GIS Tutorial Version 0.8.0
2/16/2007
Vector Data
----------------------------------------------------------------------------------------------------------11.8.3.03
Click on the [Symbology] tab. Changes made under the outline style and
Fill Patterns sections will become the new default symbology
TASK # 14****** Change the color of the U.S. States Layer. Click on it in the
legend, Click [Properties]. Click the Fill color, select ‘define custom Color’ and
set it to Red, Green Blue(RGB) Values of 240,219,0; Click [Add to Custom
Colors]; Click [Ok]; Click the Line color and set it to RGB 0,97,73; Click [Add
to Custom Colors]; Click [Ok]; Leave Transparency set at 0%, Click [OK].
TASK #15***** Change the color of the Coal Fields, Click on it in the legend,
Click [Properties]. Set Legend type to “Unique Value”, set Classification field to
“Descriptio”. Click [Apply], A list will appear with all the values, Set the
following values.
Name
RGB Value
Anthracite / other uses
191,71,31
Anthracite / potentially minable
160,137,115
Lignite / other uses
98,1,59
Lignite / potentially minable
226,137,169
Low Volatile Bituminous / other uses
32,238,125
Low Volatile Bituminous / potentially minable
136,238,179
Medium and High Volatile Bituminous / other uses
179,11,136
Medium and High Volatile Bituminous / potentially minable 179,136,179
NO COAL / INTERNAL POLYGON
Subbituminous / other uses
Subbituminous / potentially minable
hollow
255,170,0
255,170,75
QUESTION #4***** what is the color of the coal fields in Michigan?
QUESTION #5***** Using the
Michigan?
[Identify Features], what type of coal is in
QUESTION #6***** Using the
[Identify Features], what type of coal is
found on the eastern side of the large coal fields that extend from New York State
southwest to Alabama?
42
Introduction to Quantum GIS Tutorial Version 0.8.0
2/16/2007
Vector Data
----------------------------------------------------------------------------------------------------------QUESTION #7***** Make sure your map units are decimal degrees and your
project is WGS 84. What is the approximate length of the Coal field described in
Question #6?
QUESTION #8***** What is the approximate area of the Coal field in Question
#6?
11.9
Changing Selected Symbology
11.9.1
General Information for Changing Selected Symbology
11.9.1.01
Selected symbology is used to render a feature that has been selected. By
making this symbol different from the main default symbol it is easy to see which
features on the map are selected
11.9.2
Setup for Changing the Selected Symbology
11.9.2.01
Not Applicable
11.9.3
Steps for Changing the Default Symbology
11.9.2.01
Click on [Settings]
11.9.3.02
Click on [Project Properties]
11.9.3.03
Click on the Colored bar under Map Appearance and set the color to
desired choice.
11.10
Adding a Label to a Layer
11.10.1
General Information for Adding a Label to a Layer
11.10.1.01
Label themes are an easy method to add dynamic text labels to geometry
feature on the map. QGIS will extract a user-defined field from the map data to be
used as the label text.
11.10.2
Setup for Adding a Label to a Layer
11.10.2.01
Not Applicable
43
Introduction to Quantum GIS Tutorial Version 0.8.0
2/16/2007
Vector Data
-----------------------------------------------------------------------------------------------------------
11.10.3
Steps for Adding a Label to a Layer
11.10.2.01
Right-click on the layer in the legend, a new menu will appear
11.10.3.02
Click on [Properties], the Layer Properties dialog will be displayed.
11.10.3.03
Click the [Labels] tab
11.10.3.04
Select the ‘(Field containing label)’
11.10.3.05
Select the ‘(display labels)’ so a check appears.
11.10.3.06
Click [OK]
ISSUE #2***** the program does not remove duplicate labels so every polygon of
a theme is labeled. This is a problem with multiple parts having the same
name such as Florida which would label each Island.
11.10.3.07
To remove the label theme, Select the ‘(display labels)’ so the check
disappears.
TASK #16 ******Label U.S. Counties with the County names. Zoom in until the
counties and their name appear and then zoom out again to the Zebra
Mussel Coverage
NOTE #4***** I don’t know if it is a software, hardware, or user issue on my part,
but every once and a while, the program will kick me out back to the
operating system. So save your project after you complete a major piece of
work.
If you come to a place where it exits the program more than twice, read
over the part that does not work and proceed past it. We have run into a
problem where it works on one machine but does not work on an second
identical machine. We have a problem symbolizing the lakes and streams (
it could be size of the data) but we can perform the same task using urban
areas, so go ahead and experiment a little to learn the strengths and
limitations of Quantum GIS
TASK #17 ***** Turn on Lakes and Ponds, Open the layer property, Change
‘Legend Type’ to “Unique Value”,
44
Introduction to Quantum GIS Tutorial Version 0.8.0
2/16/2007
Vector Data
-----------------------------------------------------------------------------------------------------------
Figure 11.2
Set the ‘Classification Field’ to “feature”.
Figure 11.3
Click [Apply],
Click on the [blank] Button under ‘Outline Style’.
Figure 11.4
Click on the Null Feature
Figure 11.5
Click on the [hollow] button under ‘Fill Patterns’. This turns off the Outline
45
Introduction to Quantum GIS Tutorial Version 0.8.0
2/16/2007
Vector Data
-----------------------------------------------------------------------------------------------------------
Figure 11.6
Click [Apply]
This will make the null layer invisible
Repeat these steps for the ‘Glacier’ Feature
Now Select ‘Bay or Estuary or Ocean’ Feature, Click on the fill Color and set the RGB to
76,143,209
Figure 11.7
Turn off the Outline as well just like the ‘Null’ Feature
Repeat these steps for Canal, Lake, Reservoir, and Stream
For the ‘Swamp or Marsh’ Feature, hide the outline and set RGB to 76,209,185
For ‘Lake Dry’, ‘Lake Intermittent’, ‘Reservoir Intermittent’, hide the Outline and set the
RGB to 197,132,2
Click [OK]
TASK #18*****Open the County File, on the symbology page, set the Fill to
Hollow, then Click [OK]
QUESTION #9 ***** Are there swamps in both North Carolina and South
Carolina?
46
Introduction to Quantum GIS Tutorial Version 0.8.0
2/16/2007
Vector Data
----------------------------------------------------------------------------------------------------------TASK #19***** Turn on Rivers and Streams, Right click on it in the legend, Click
on [General] tab, check the ‘(use scale dependent rendering)’ set the maximum
scale for Rivers to be 5000 and the minimum scale to 2400 Click the [Properties].
Click the [Symbology] tab. Click the outline color and set it to (RGB) Values of
29,190,224; Click [Add to Custom Colors]; Click [Ok]; Click [Ok]
ISSUE #3 ***** If the data set is too large, when you try to symbolize it, it may
kick you out of the program
TASK #20***** Turn on Urban Areas, Right click on it in the legend, Click the
[Properties]. Click the [Symbology] tab. Set outline Style to Blank; Click
the fill color and set it to (RGB) Values of 244,150,104; Click [Add to
Custom Colors]; Click [Ok]; Click the Outline color and set it to blank;
Click [Ok]Click “Close”.
Save Project
ISSUE #4***** If you try to zoom out to full extent after you do a reprojection and
the data set is too large, it may exit the program without warning. So zoom
out in smaller increments if it does happen. Also I recommend you save
your project just before you do any reprojecting
TASK #21***** Click on [Settings] then [Project Properties], Click on the
[Projection] Tab. Select “(Projected Coordinate Systems)” then click on
the plus box next to “(Lambert Azimuthal Equal Area)” until “(U.S.
National Atlas Equal Area)” appears. Highlight “(U.S. National Atlas
Equal Area)” and click [OK].
QUESTION #10 ***** What is the unit of measure on the scale bar?
QUESTION #11*****What is the approximate length of the Coal field described in
Question #6?
QUESTION #12***** Was there a significant difference in the measurements in
Question #7 and #11?
47
Introduction to Quantum GIS Tutorial Version 0.8.0
2/16/2007
Vector Data
-----------------------------------------------------------------------------------------------------------
List of Questions for Lesson #01
QUESTION #1 ***** what is your current map scale? It is on the lower right of screen
Scale 1: ?
QUESTION #2 ***** what is your current map scale? It is on the lower right of
screen Scale 1: ?
QUESTION #3 ***** Are there coal Fields in Wisconsin? Are there coal fields in
New York State?
QUESTION #4***** what is the color of the coal fields in Michigan?
QUESTION #5***** Using the
Michigan?
[Identify Features], what type of coal is in
QUESTION #6***** Using the
[Identify Features], what type of coal is
found on the eastern side of the large coal fields that extend from New York State
southwest to Alabama?
QUESTION #7***** Make sure your map units are decimal degrees and your
project is WGS 84. What is the approximate length of the Coal field described in
Question #6?
QUESTION #8***** What is the approximate area of the Coal field in Question
#6?
QUESTION #9 ***** Are there swamps in both North Carolina and South
Carolina?
QUESTION #10 ***** What is the unit of measure on the scale bar?.
QUESTION #11*****What is the approximate length of the Coal field described in
Question #6?
48
Introduction to Quantum GIS Tutorial Version 0.8.0
2/16/2007
Vector Data
----------------------------------------------------------------------------------------------------------QUESTION #12***** Was there a significant difference in the measurements in
Question #7 and #11?
End of Lesson #01
49
Introduction to Quantum GIS Tutorial Version 0.8.0
2/16/2007
Vector Data
----------------------------------------------------------------------------------------------------------########################################################################
Beginning of Lesson #02
NOTE #5*****This week, most of the exercises will take place in New England,
which is in the northeastern part of the United States.
TASK #22***** Zoom into New England (This should include the states of New
York on the West and Maine on the East.
50
Introduction to Quantum GIS Tutorial Version 0.8.0
2/16/2007
Manipulating the Map
-----------------------------------------------------------------------------------------------------------
Chapter 12
Manipulating the Map
12.1
Querying Map Features
12.1.1
General Information for Querying Map Features
12.1.1.01
Identifying features - The identify tool
attribute data about a feature on the map
is the simplest way to retrieve
12.1.1.02
The identify result tool has a limited radius of effect.
12.1.2
Setup for Querying Map Features:
12.1.2.01
Click the [Settings] menu from the main menu.
12.1.2.02
Click on the [Options] tab
12.1.2.03
Click on [Selection and Measuring]
12.1.2.04
Enter a valid search radius.
12.1.2.05
Press the [OK] button.
12.1.3
Steps for Querying Map Features
12.1.2.01
Click the [Identify] button on the toolbar.
12.1.3.02
Move the mouse over the map and click on the feature to be identified.
The Identify Results dialog will be displayed.
TASK #23***** Zoom into the state of Maine.
QUESTION #13 ***** what is the northern most county in Maine?
QUESTION #14 ***** what are size in square miles of this county?
12.2
Selecting Features by Rectangle
51
Introduction to Quantum GIS Tutorial Version 0.8.0
2/16/2007
Manipulating the Map
-----------------------------------------------------------------------------------------------------------
12.2.1
General Information for Selecting Features by Rectangle
12.2.1.01
Select by Rectangle allows the user to select features on the map by
drawing a rectangle. Any features of the active layer that fall within the selection
tolerance of the rectangle will be selected
12.2.2
Setup for Selecting Features by Rectangle
12.2.2.01
Not Applicable
12.2.3
Steps for Selecting Features by Rectangle
12.2.3.01
Click on the layer that has features to be looked at from on the legend.
This will make the layer active.
12.2.3.02
Click the [Select Features] button
on the toolbar.
12.2.3.03
Move the mouse over the map and click and hold the mouse button. This
click will represent the first corner of the rectangle.
12.2.3.04
Move the mouse to another location, keeping the mouse button held down.
12.2.3.05
Release the mouse button to specify the opposite corner of the rectangle.
Features of the active layer that fall within the selection tolerance will be selected
and drawn.
NOTE #8***** by holding down the control key, you can draw additional
rectangles and add the selection to the original selected data.
12.2.3.06
To view attribute data of selected features, click on [Open Table] in the
‘Attributes Toolbar’, the Attribute Table dialog for the layer will open.
12.2.3.07
Click on the
[Move Selected to Top] button to see the attributes of the
selected features moved to the top of the table
TASK #24***** turn on Urban Areas, click on it in the legend, click on properties,
Set the outline style to ‘blank’ , click the fill color and set it to RGB of
244,150,104; click [Add to Custom Colors]; click [Ok]; click [Ok].
52
Introduction to Quantum GIS Tutorial Version 0.8.0
2/16/2007
Manipulating the Map
----------------------------------------------------------------------------------------------------------QUESTION #15 ***** In the eastern most county of Maine (Washington County),
what are the names of the six towns?
12.3
Selecting Features by Attribute
12.3.1
General Information for Selecting Features by Attribute
12.3.1.01
Select by Attribute allows the user to select features from within the
attribute table of the layer.
12.3.2
Setup for Selecting Features by Attribute
12.3.2.01
Not Applicable
12.3.3
Steps for Selecting Features by Attribute
12.3.3.01
Click on the layer that has features to be looked at from on the legend.
12.3.3.02
Click on [Open Table] in the ‘Attributes Toolbar’, the Attribute Table
dialog for the layer will open.
12.3.3.03
Type in the search attributes, select the column that is to be searched, and
the type of selection to be done.
Figure 12.1
12.3.3.04
Click [Search]
12.3.3.05
There are several options that can be done
Figure 12.2
•
[Remove Selection] – Unselects the values just selected
•
[Move Selection to Top]
•
[Invert Selection]
53
Introduction to Quantum GIS Tutorial Version 0.8.0
2/16/2007
Manipulating the Map
----------------------------------------------------------------------------------------------------------• [Copy Selected Rows to Clipboard]
•
[New Attribute] – Edit Mode only and will be available in later versions
•
[Delete Attribute] – Edit Mode only and will be available in later versions
12.3.3.06
Click on the "Zoom to selection" button in the toolbar and the map will
zoom to the selected features
TASK #25*****open attribute table for Urban Areas, Search for ‘ME’ in the
‘STATE’ Attribute column, and have it select them.
QUESTION #16 *****How many features were selected?
QUESTION #17*****Search for the town of ‘Machias’ in ‘Name’. Was it found?
QUESTION #18*****Search for the town of ‘MACHIAS’ in ‘Name’. Was it found?
54
Introduction to Quantum GIS Tutorial Version 0.8.0
2/16/2007
Data Creating and Editing
-----------------------------------------------------------------------------------------------------------
Chapter 13
Data Creating and Editing
NOTE #9*****this tutorial will cover GRASS more fully as a Plug-in later in the
course
ISSUE #5*****A problem exists in that user created point files do not display
properly, This issue is being address and will be addressed in the next preview release or
the final release of 0.8.0. the course will address making point layers when it covers the
GRASS tolls later in the turoial.
13.1
Creating a New Layer
13.1.1
General Information about Creating a New Layer
13.1.1.01
Not Applicable
13.1.2
Setup for Creating a New Layer
13.1.1.01
Not Applicable
13.1.3
Usage of Creating a New Layer
13.1.3.01
To create a new layer for editing, choose [New Vector Layer] from the
[Layer] menu.
13.1.3.02
The ‘New Vector Layer’ dialog will be displayed. Choose the type of
layer (point, line, or polygon).
13.1.3.03
To complete the creation of the new layer, add the desired attributes by
clicking on the [Add] button and specifying a name and type for the attribute.
Only real, integer, and string attributes are supported
NOTE #10*****Real are floating point numbers
ISSUE #6*****There is not a way to add attribute column or delete attribute
columns after the shapefile is created. These two features will be available in a
future Preview release and the final official release.
55
Introduction to Quantum GIS Tutorial Version 0.8.0
2/16/2007
Data Creating and Editing
----------------------------------------------------------------------------------------------------------13.1.3.04
Click [Ok] and provide a name for the shapefile. QGIS will automatically
add a .shp extension to the name specified.
ISSUE #7***** This error box will appear, Click [ok]
Figure 13.1
13.1.3.05
When the program asks for the layer Projection, make sure the Radio
button ‘EPSG ID’ is selected
TASK #26*****Turn on airports, click on [Layer] then [New Vector Layer], select
‘line’, then click on [Add], make the name “number”, type is’ integrer’, click
[OK], click [OK] to close the new layer. save it as ‘lines’, click [Save], Set
projection as Projected Coordinate system, U.S. National Atlas, Equal Area,
Select “EPSG ID”, click [OK], click on ‘Capture Line’, draw a line between the
two airports in Aroostook County. Save changes
QUESTION #19*****what is the distance between the two airports as measured
down the line?
TASK #27***** Penobscot county is just south of Aroostook County near the center
of the state, click on [Layer] then [New Vector Layer], select ‘polygon’, then
click on [Add], make the name “number”, type is’ integrer’, click [OK], click
[OK] to close the new layer. save it as ‘polygon’, click [Save], Set projection as
Projected Coordinate system, U.S. National Atlas, Equal Area, Select “EPSG
ID”, click [OK], click on ‘Capture Polygon’, draw a polygon covering the three
airports in Penobscot County. Save changes
QUESTION #20*****What is the area between the three airports measured in
square kilometers?
56
Introduction to Quantum GIS Tutorial Version 0.8.0
2/16/2007
Data Creating and Editing
-----------------------------------------------------------------------------------------------------------
13.2
Editing a Layer
13.2.1
General Information for Editing a Layer
13.1.3.01
QGIS supports basic capabilities for editing spatial data. Before
performing any edits, always make a backup of the dataset you are about to edit.
13.2.2
Setup for the Editing a Layer
13.2.2.01
Not Applicable
13.2.3
Steps for Editing a Layer
13.2.3.01
To edit an existing layer, click on the legend entry for that layer then
choose [Start Editing the Current Layer] from the ‘Digitizing Toolbar’.
Remember to backup the data to be edited before starting!
ISSUE #8***** Add, Delete, or Move Vertex do not work in this version
13.2.3.02
Now that the layer is editable, use the [Capture Points]
icon (or
similar icon for line and polygon layers) on the ‘Digitize toolbar’ to put the QGIS
cursor into digitizing mode. If capturing a point feature, simply use the pan and
zoom tools to navigate to the area of interest, then click the [Capture Points] tool
and click on the map area to create the new point feature.
13.2.3.03
A window will appear allowing the user to set the attributes, type in the
data, press [Ok].
13.2.3.04
Feature deletion for shapefiles was only recently added to GDAL (the
underlying library we use for reading and writing shapefiles). Support for deleting
shapes is now in QGIS development branch and will be available as part of 0.8
final release (and the next preview release most likely). The user will need to have
an up to date copy of GDAL installed for it to work.
13.2.3.05
When finished editing features, choose [Stop Editing] from the layer’s
context menu. Choosing [Yes] will save the changes to disk, while choosing [No]
at this point will cause them to be discarded.
13.2.3.06
QGIS currently has no possibility of joining external tables to attribute
tables.
57
Introduction to Quantum GIS Tutorial Version 0.8.0
2/16/2007
Data Creating and Editing
----------------------------------------------------------------------------------------------------------#####################################################################
List of Questions for Lesson #02
QUESTION #13 ***** what is the northern most county in Maine?
QUESTION #14 ***** what are size in square miles of this county?
QUESTION #15 ***** according to the Urban Area Layer, in the eastern most
county of Maine (Washington County), what are the names of the six towns in
Washington County?
QUESTION #16 *****How many features were selected?
QUESTION #17*****Search for the town of ‘Machias’ in ‘Name’. Was it found?
QUESTION #18*****Search for the town of ‘MACHIAS’ in ‘Name’. Was it found?
QUESTION #19*****what is the distance between the two airports as measured
down the line?
QUESTION #20*****What is the area between the three airports measured in
square kilometers?
End of Lesson #02
58
Introduction to Quantum GIS Tutorial Version 0.8.0
2/16/2007
Raster Data
----------------------------------------------------------------------------------------------------------#######################################################################
Beginning of Lesson #03
Chapter 14
Raster Data
14.1
Working with Raster Data
14.1.1
General Information for Working with Raster Data
14.1.1.01
Definition: Raster data in GIS are matrices of discrete cells that represent
features on, above or below the earth’s surface. Each cell in the raster grid is the
same size, and cells are usually rectangular (in QGIS they will always be
rectangular). Typical raster datasets include remote sensing data such as aerial
photography or satellite imagery and modeled data such as an elevation matrix.
14.1.1.02
QGIS supports a number of different raster data formats. Currently tested
formats include:
• Arc/Info Binary Grid
• Arc/Info ASCII Grid
• Grass Raster
• GeoTIFF
• Spatial Data Transfer Standard Grids (with some limitations)
• USGS ASCII DEM
• Erdas Imagine
14.1.1.03
Because the raster implementation in QGIS is based on the GDAL library,
other raster formats implemented in GDAL are also likely to work, but have not
yet been tested.
14.1.1.04
Unlike vector data, raster data typically do not have an associated database
record for each cell.
14.2
Loading Raster Data
14.2.1
General Information about Loading Raster Data:
14.2.1.01
Not Applicable
14.2.2
Creation or Setup for Loading Raster Data:
14.2.1.01
Not Applicable
59
Introduction to Quantum GIS Tutorial Version 0.8.0
2/16/2007
Raster Data
-----------------------------------------------------------------------------------------------------------
14.2.3
Usage of Loading Raster Data
14.2.3.01
Raster layers are loaded either by clicking on the [Load Raster] icon on
the ‘Manage Layers Toolbar’
14.2.3.02
Or by selecting the [Layer] and then [Add Raster Layer] menu option.
14.2.3.03
More than one layer can be loaded at the same time by holding down the
Control key and clicking on multiple items in the file dialog.
TASK #28*****Turn off all layers in the Project. Load the image ‘shdrlfi020l.tif’
into the Penn project, move it to the bottom of the legend and make it visible.
Right Click on shdrlfi020l.tif and rename it” Shaded Relief’
14.3
Raster Properties
14.3.1
General Information about Raster Properties
14.3.1.01
QGIS supports three forms of raster layers:
• Single Band Grayscale Rasters
• Palette Based RGB Rasters
• Multi-band RGB Rasters
14.3.1.02
From these three basic layer types, eight forms of symbolized raster
display can be used:
• Single Band Grayscale
• Single Band Pseudocolor
• Paletted Grayscale (where only the red, green or blue component of the image
is displayed)
• Paletted Pseudocolor (where only the red, green or blue component of the
image is displayed, but using a pseudocolor algorithm)
• Paletted RGB
• Multi-band Grayscale (using only one of the bands to display the image)
• Multi-band Pseudocolor (using only one of the bands shown in pseudocolor)
• Multi-band RGB (using any combination of three bands)
14.3.1.03
QGIS can invert the colors in a given layer so that light colors become
dark (and dark colors become light). Use the Invert Color Map checkbox to
enable / disable this behavior. QGIS has the ability to display each raster layer at
varying transparency levels. Use the transparency slider to indicate to what extent
the underlying layers (if any) should be visible though the current raster layer.
60
Introduction to Quantum GIS Tutorial Version 0.8.0
2/16/2007
Raster Data
----------------------------------------------------------------------------------------------------------The transparency can also be set using the transparency slider in the layer context
menu which is accessible by right-clicking on the layer in the legend.
TASK #29*****Right Click on Shaded Relief layer and select properties, on the
symbology tab, select “(Invert Color Map)”, Click [OK]
QUESTION #21*****what happened to the color of the water?
TASK #30*****Right Click on Shaded Relief layer and select properties, on the
symbology tab, deselect “(Invert Color Map)”, Click [Apply], select “(Grayscale
Image)”,In the ‘ Grayscale Image’ box set “(Gray)” to ‘Green’, “(Std
Deviation)” to ‘0’, and “(Color Map)” to ‘Greyscale’, click [OK]
QUESTION #22*****Changing the color between red, blue and green in the
“(Gray)” box, which color gives the darkest Grey scales?
TASK #31*****Move U.S. States to the bottom of the legend, Right Click on Shaded
Relief layer and select properties, on the symbology tab, deselect “(Grayscale Image)”,
Click [Apply], Move the transparency Slide bar to a value of 25%, click [OK].
NOTE #11****the state layer does not line up with the image, the course will cover
this issue later.
14.3.1.03
QGIS can restrict the data displayed to only show cells whose values are
within a given number of standard deviations of the mean for the layer. This is
useful when there are one or two cells with abnormally high values in a raster grid
that are having a negative impact on the rendering of the raster. This option is
only available for pseudocolor images.
14.3.1.04
The General tab displays basic information about the selected raster,
including the layer source and display name in the legend (which can be
modified). This tab also shows a thumbnail of the layer, its legend symbol, and
the palette.
14.3.1.05
The Metadata tab displays a wealth of information about the raster layer,
including statistics about each band in the current raster layer. Statistics are
gathered on a ’need to know’ basis, so it may well be that a given layers statistics
have not yet been collected.
61
Introduction to Quantum GIS Tutorial Version 0.8.0
2/16/2007
Raster Data
----------------------------------------------------------------------------------------------------------14.3.1.06
To gather statistics for a layer, select pseudocolor rendering and click the
[Apply] button, Gathering statistics for a layer can be time consuming. Please be
patient while QGIS examines the data!
14.3.1.07
Large resolution raster layers can slow navigation in QGIS, By creating
lower resolution copies of the data (pyramids), performance can be considerably
improved as QGIS selects the most suitable resolution to use depending on the
level of zoom.
14.3.1.08
The user must have write access in the directory where the original data is
stored to build pyramids.
NOTE #12*****Please note that building pyramids may alter the original data file
and once created, they cannot be removed. In order to preserve a ’nonpyramided’ version of the raster, make a backup copy prior to building pyramids.
ISSUE #9***** If the user forgets to check ‘projection on the fly’ and add an
image to a set of shapefiles layers and they are in different projections, it may exit
the program.
ISSUE #10*****If the user tries to reproject the image by setting ‘projection on the
fly’ and then adding shapefile layers in one projection (thus setting the projection
for the project) and then add a image layer in a different projection, it may exit
the program.
NOTE #13***** Add the image to the project first, check ‘projection on the fly’,
add shapefile layers, do not reproject while images are loaded.
TASK #31*****Move U.S. States to above the Shaded Relief layer of the legend,
Right Click on Shaded Relief layer and select properties, on the symbology tab, ,
Move the transparency Slide bar to a value of 0%, click [OK].
NOTE #14*****Tthere is an offset in the way the state layer overlays the image.
This is because the projections are not identical.
The Image is
+proj=laea +lat_0=45 +lon_0=-100 +x_0=0 +y_0=0 +ellps=WGS84 +datum=WGS84
+units=m +no_defs
while “U.S. National Atlas Equal Area”, is
62
Introduction to Quantum GIS Tutorial Version 0.8.0
2/16/2007
Raster Data
----------------------------------------------------------------------------------------------------------+proj=laea +lat_0=45 +lon_0=-100 +x_0=0 +y_0=0 +a=6370997 +b=6370997 +units=m
+no_defs
TASK #32***** Build a custom projection using the image parameters
QUESTION #23***** Does this fix the shift error?
63
Introduction to Quantum GIS Tutorial Version 0.8.0
2/16/2007
Raster Data
----------------------------------------------------------------------------------------------------------#####################################################################
List of Questions for Lesson #03
QUESTION #21*****what happened to the color of the water?
QUESTION #22*****Changing the color between red, blue and green in the
“(Gray)” box, which color gives the darkest Grey scales?
QUESTION #23***** Does this fix the shift error?
End of Lesson #03
64
Introduction to Quantum GIS Tutorial Version 0.8.0
2/16/2007
Plug-ins and Extensions
----------------------------------------------------------------------------------------------------------#######################################################################
Beginning of Lesson #04
Chapter 15
Plug-ins and Extensions
15.1
Plug-ins
15.1.1
General Information about Plug-ins
15.1.1.01
QGIS has been designed with a Plug-in architecture. This allows new
features/functions to be added to the application. Many of the features in QGIS
are actually implemented as Plug-ins.
15.1.1.02
There are two types of Plug-ins in QGIS: core and user-contributed. A
core Plug-in is maintained by the QGIS development team and is part of every
QGIS distribution. A user-contributed Plug-in is an external Plug-in that is
maintained by the individual author. The QGIS Community site (http://qgis.org)
serves as the repository for user contributed Plug-ins.
15.1.2
Setup for Plug-ins
15.1.2.01
When QGIS is installed, all of the core Plug-ins are included. Additional
user contributed Plug-ins may be available on the QGIS site. To see what usercontributed Plug-ins are available, see the Plug-ins page on the QGIS site
(http://qgis.org/index.php?option=com_content&task=category§ionid=5&id=
75&Itemid=48).
15.1.2.02
Typically, user-contributed Plug-ins are distributed in source form and
require compiling. For instructions on building and installing a user-contributed
Plug-in, see the documentation included with the Plug-in.
15.1.3
Usage of Plug-ins
15.1.3.01
Managing Plug-ins consists of loading or unloading them from QGIS.
15.1.3.02
Loaded Plug-ins are “remembered” when the user exits the application and
restored the next time QGIS is run.
15.1.3.03
To manage Plug-ins, open the [Plug-in Manager] from the [Tools] menu.
The Plug-in Manager displays all the available Plug-ins and their status (loaded or
unloaded).
65
Introduction to Quantum GIS Tutorial Version 0.8.0
2/16/2007
Plug-ins and Extensions
----------------------------------------------------------------------------------------------------------15.1.3.04
Typically all QGIS Plug-ins are installed in the same location. This
location is shown in the Plug-in Directory text field. The user can tell QGIS to
load Plug-ins from another location by specifying a different directory.
15.1.3.05
If the user finds that QGIS crashes on startup, a Plug-in may be at fault.
Stop all Plug-ins from loading by editing the .qt/qgisrc file in the home directory
on Linux/Unix (Windows users will have to edit the registry). On Linux/Unix,
open the qgisrc file in a text editor and find the [Plug-ins] section. Set all the
Plug-in values to false to prevent them from loading. For example, to prevent the
Delimited text Plug-in from loading, the entry in qgisrc should look like this:
‘Add Delimited Text Layer=false’. Do this for each Plug-in in the [Plug-ins]
section. Then start QGIS and add the Plug-ins one at a time from the Plug-in
Manger to determine which is causing the problem.
15.2
Adding Data Using the Delimited Text Plug-in
15.2.1
General Information for Adding Data Using the Delimited
Text Plug-in
15.2.1.01
The Delimited Text Plug-in allows the user to load a delimited text file as
a layer in QGIS.
15.2.2
Setup for Adding Data Using the Delimited Text Plug-in:
15.2.2.01
To view a delimited text file as layer, the text file must contain:
• A delimited header row of field names. This must be the first line in the text
file
• The header row must contain an X and Y field. These fields can have any
name.
• The x and y coordinates must be specified as a number. The coordinate system
is not important
15.2.2.02
An example of a valid text file might look like this:
name,latdec,longdec,cell,
196 mile creek,61.89806,-150.0775,tyonek d-1 ne,
197 1/2 mile creek,61.89472,-150.09972,tyonek d-1 ne
a b mountain,59.52889,-135.28333,skagway c-1 sw,
apw dam number 2,60.53,-145.75167,cordova c-5 sw,
apw reservoir,60.53167,-145.75333,cordova c-5 sw,
apw reservoir,60.53,-145.75167,cordova c-5 sw,
aaron creek,56.37861,-131.96556,bradfield canal b-6,
aaron island,58.43778,-134.81944,juneau b-3 ne,
66
Introduction to Quantum GIS Tutorial Version 0.8.0
2/16/2007
Plug-ins and Extensions
----------------------------------------------------------------------------------------------------------aats bay,55.905,-134.24639,craig d-7,
Some items of note about the text file are:
• The example text file uses , as delimiter. Any character can be used to delimit
the fields.
• The first row is the header row. It contains the fields name, latdec, longdec,
and cell
• No quotes (") are used to delimit text fields
• The x coordinates are contained in the longdec field
• The y coordinates are contained in the latdec field
15.2.3
Adding Data Using the Delimited Text Plug-in:
15.2.3.01
Open the Plug-in Manager by choosing the [Tools] then the [Plug-in
Manager] menu. The Plug-in Manager displays a list of available Plug-ins. Plugins that are already loaded have a check mark to the left of their name.
15.2.3.02
Click on the checkbox to the left of the [Add Delimited Text Layer] Plugin and click [Ok] to load it.
15.2.3.03
Click on [Add Delimited Text Layer] on Plug-in toolbar. This will open
the Delimited Text dialog.
15.2.3.04
First select the file to import by clicking on the ellipsis button:
15.2.3.05
Select the desired text file from the file dialog. Once the file is selected,
the Plug-in attempts to parse the file using the last used delimiter, in this case ‘,’
15.2.3.06
If the delimiter ‘,’ is not correct for the file, the X and Y field drop-down
boxes will not contain valid field names. To properly parse the file, change the
delimiter
15.2.3.07
After changing the delimiter, click [Parse]. The drop-down boxes now
contain the fields properly parsed.
15.2.3.08
Choose the X and Y fields from the drop down boxes and enter a Layer
name.
15.2.3.09
To add the layer to the map, click [Add Layer]. The delimited text file
now behaves as any other map layer in QGIS.
TASK #33*****Pplace several Buoys off the northeast coast. Using a text editor
like wordpad or notepad, create a file with the following data in it
67
Introduction to Quantum GIS Tutorial Version 0.8.0
2/16/2007
Plug-ins and Extensions
----------------------------------------------------------------------------------------------------------Station, lat, long,comment
44013,42.35,-70.69,Boston 16 NM east of Boston
44018,41.26,-69.29,SE Cape Cod 30 NM East of Nantucket MA
44027,44.27,-67.31,Joneport ME
44005,43.19,-69.19,Gulf of Maine 78 NM East of Portsmouth NH
44007,43.53,70.14,Portland 12 NM Southeast of Portland ME
Add save it as buoys.txt
NOTE #15*****Remember, The data is in WGS84 and should be set as the
projection when creating the shapefile.
Click on [Tools] then [Plug-in Manager] menu, Turn on [Delimited Text] Plugin, open the Delimited Text dialog, select buoys.txt to import, make sure the
delimiter is ‘,’ Choose ‘long’ as the X field and ‘lat’ as the Y field, enter a Layer
name of ‘buoys’, click [Add Layer].
Label the buoys by using the station number
QUESTION #24***** What are the buoys from north to south?
Figure 15.1
68
Introduction to Quantum GIS Tutorial Version 0.8.0
2/16/2007
Plug-ins and Extensions
----------------------------------------------------------------------------------------------------------ISSUE #11***** will only accept .txt files
ISSUE #12***** In order to do any further editing of this file you have to rightclick on the file just created and select [Save as Shape File]. If the user opens
the buoy layer attribute table without resaving it as a shapefile, the attribute table
may be missing data.
TASK #34*****resave the buoys as a shapefile named NEBuoys
15.3
Working with the Attribute Table
15.3.1
General Information for Working with the Attribute Table
15.3.1.01
Using the Attribute Table - The attribute table displays all data that is
associated with the currently selected layer. This data is displayed as a table on
which functions can be performed
ISSUE #13***** the user can not add or delete attribute columns
ISSUE #14***** The user can not add new features to the shape if the layer type is
point.
15.4
Copyright Plug-in
15.4.1
General Information about Copyright Plug-in:
15.4.1.01
This Plug-in overlays copyright information on the rendered map
15.4.2
Setup for Copyright Plug-in
15.4.2.01
Click on [Plug-ins] on Main toolbar
15.4.2.02
Check “CopyrightLabel”
15.4.2.03
Click [OK]
69
Introduction to Quantum GIS Tutorial Version 0.8.0
2/16/2007
Plug-ins and Extensions
-----------------------------------------------------------------------------------------------------------
15.4.3
Use of Copyright Plug-in
15.4.3.01
Click [Copyright Label] on main toolbar
15.4.3.02
Type in copyright information in box
15.4.3.03
Select placement
15.4.3.04
Check “(Enable Copyright Label)”
15.4.3.05
Click [OK]
QUESTION #25***** How many locations are there for the user to choose from in
placing the copyright mark?
TASK #35***** Put a copyright for your organization in the lower right corner
15.5
Georeferencer Plug-in
15.5.1
General Information about Georeferencer Plug-in
15.5.1.01
The QGIS Geo-referencing Plug-in is a tool that can generate world files
for raster files. World files are small text files that contain the world coordinates
for the upper left corner of the raster, and the size in world coordinate units of
every raster pixel.
15.5.1.02
This Plug-in can be used to add world files to scanned paper maps, so the
user can use them in a project with other datasets covering the same area.
15.5.2
Setup for Georeferencer Plug-in
15.5.2.01
Not Applicable
15.5.3
Use of Georeferencer Plug-in
15.5.3.01
To figure out the coordinates for the raster's upper left corner and the size
of the pixels, the Plug-in needs to know the world coordinates for some points in
the raster. The user can supply these coordinates by clicking on points in the
raster and entering their coordinates in a popup window. The more coordinates
given, the better the generated world file should fit the "real" coordinates.
70
Introduction to Quantum GIS Tutorial Version 0.8.0
2/16/2007
Plug-ins and Extensions
----------------------------------------------------------------------------------------------------------15.5.3.02
When the user thinks that enough coordinates have been entered, tell the
Plug-in to generate the world file.
15.5.3.03
The Plug-in will then try to fit a certain transform to the given coordinates.
The user can choose between two types of transform, "Linear" and "Helmert".
Figure 15.2
15.5.3.04
If the user chooses the "Linear" transform type (which isn't really linear in
the mathematical sense but it is a combination of two separate line functions in
the X and Y coordinates) the Plug-in will assume that the raster only needs to be
scaled and translated to fit the map, and it will simply generate a world file for the
original raster file.
15.5.3.05
If the user on the other hand chooses the "Helmert" transform the Plug-in
will assume that the raster also needs to be rotated to fit the map (this is useful if
the user has scanned a paper map and couldn't get it to line up perfectly in the
scanner). A new raster file will be generated, which is a rotated copy of the old
raster, and a world file will be generated for this new raster file instead.
15.5.3.06
If the user chooses the "Helmert" transform he/she will also get to choose
the resampling method for the rotation - "Cubic" or "Bilinear" is best for RGB
raster, but "Nearest neighbor" should be used for raster that use an indexed
colormap.
71
Introduction to Quantum GIS Tutorial Version 0.8.0
2/16/2007
Plug-ins and Extensions
-----------------------------------------------------------------------------------------------------------
15.6
GPS Tools Plug-in
15.6.1
General Information about GPS Tools Plug-in
15.6.1.01
Tool for loading and importing GPS data.
15.6.1.02
The user has the options to
•
Load GPX Files. GPX is the GPS Exchange file format, which is used to store
information about waypoints, routes, and tracks.
•
Import other file: QGIS can only load GPX files by itself, but many other
formats can be converted to GPX using GPSBabel (http://gpsbabel.sf.net). This
requires that the user have GPSBabel installed where QGIS can find it.
•
Download from GPS: This tool will help you download data from a GPS device.
•
Upload to GPS: This tool will help to upload data from a GPX layer to a GPS device.
15.6.2
Setup for GPS Tools Plug-in
15.6.1.01
Not Applicable
15.6.3
Use of GPS Tools Plug-in
15.6.1.01
This is a little more involved for a basic introduction to Software
15.6.1.02
Import other file: Select a GPS file format and the file to import, the
feature type to use, a GPX filename to save the converted file as, and a name for
the new layer. All file formats can not store waypoints, routes, and tracks, so
some feature types may be disabled for some file formats.
15.6.1.03
Download from GPS: Choose GPS device, the port it is connected to, the
feature type to download, a name for new layer, and the GPX file to store the
data. If the device isn't listed, or to change some settings, edit the devices.
This tool uses the program GPSBabel (http://gpsbabel.sf.net) to transfer the data.
If GPSBabel is not installed where QGIS can find it, this tool will not work.
15.6.1.04
Upload to GPS: Choose the layer to upload, the device to upload it to,
and the port the device is connected to. If the device isn't listed, or to change some
settings, edit the devices.
72
Introduction to Quantum GIS Tutorial Version 0.8.0
2/16/2007
Plug-ins and Extensions
----------------------------------------------------------------------------------------------------------This tool uses the program GPSBabel (http://gpsbabel.sf.net) to transfer the data.
If GPSBabel is not installed where QGIS can find it, this tool will not work.
15.7
GRASS Plug-in
15.7.1
General Information about GRASS
15.7.1.01
Geographic Resources Analysis Support System (GRASS) is a Geographic
Information System (GIS) used for geospatial data management and analysis,
image processing, graphics/maps production, spatial modeling, and visualization.
GRASS is currently used in academic and commercial settings around the world,
as well as by many governmental agencies and environmental consulting
companies. It is a very powerful GIS tool that requires some effort to get started
with
15.7.1.02
GRASS is ideal for use in engineering and land planning applications.
Like other GIS packages, GRASS can display and manipulate vector data for
roads, streams, boundaries, and other features. GRASS can also be used to keep
maps updated with its integral digitizing functions. Another feature of GRASS is
its ability to use raster, or cell, data. This is particularly important in spatial
analysis and design. GRASS functions can convert between vector data to raster
data for seamless integration.
15.7.1.03
GRASS can be used through the Graphical User Interface (GUI) offered
by QGIS.
15.7.2
Setup for GRASS:
15.7.1.01
Click on [Plug-ins] on Main toolbar
15.7.1.02
Click on [Plug-in Manager]
15.7.1.03
Check “(GRASS)”
15.7.1.04
The following will appear as a tool bar
Figure 15.3
[Add GRASS Vector Layer]
[Add GRASS Raster Layer]
73
Introduction to Quantum GIS Tutorial Version 0.8.0
2/16/2007
Plug-ins and Extensions
----------------------------------------------------------------------------------------------------------[Open GRASS Tools]
[Display Current GRASS Region]
[Edit Current GRASS Region]
[Edit Grass Vector Layer]
15.7.2
Usage of GRASS
15.7.2.01
Click on [Plug-ins] and then hover over [GRASS] will make the following
tools available
[Open Mapset]
[New Mapset]
[Close Mapset]
[Add GRASS Vector Layer]
[Add GRASS Raster Layer]
[Open GRASS Tools]
[Display Current GRASS Region]
[Edit Current GRASS Region]
[Edit Grass Vector Layer]
[Create New GRASS Vector]
15.7.2.02
When
is not grayed out
new tools appear.
• Import
•
, and the user clicks on it, a suite of
o
[Import OGR/PostGIS Vector Layer]
o
Vector Overlay
[Import GDAL raster layer]
o
[Vector union]
o
[Vector intersection]
o
[Vector subtraction]
74
Introduction to Quantum GIS Tutorial Version 0.8.0
2/16/2007
Plug-ins and Extensions
----------------------------------------------------------------------------------------------------------•
[Vector Buffer]
o
•
[Vector non-intersection]
o
Buffer
o
[Raster Buffer]
Extract features from Vectors
[Select features overlapped by features in another
o
map]
[Select Features by attribute]
o
•
•
•
o
[Extract Selected Features]
Delaunay triangulation, Voronoi diagrams and convex hulls
o
[Delaunay Triangulation (lines)]
o
[Delaunay Triangulation (areas)]
o
[Voronoi diagram (lines)]
o
[Voronoi diagram (areas)]
o
[Convex hull]
Network Analysis
o
[Create nodes on network]
o
[Allocate network]
o
[Cut network by cost isolines]
o
[Connecting nodes by shortest route (traveling salesman)]
o
Layers
[Connect selected nodes by shortest tree (Steiner tree)]
[Add elements to layer (All elements of the selected layer
o
type)]
•
Random Points
•
[Create Grid in Current Region]
•
•
[Create new vector area map with current region extent]
Convert a vector to raster
•
o
[Convert a vector to raster using constant]
Density of Points
o
[Count of neighboring points]
75
Introduction to Quantum GIS Tutorial Version 0.8.0
2/16/2007
Plug-ins and Extensions
----------------------------------------------------------------------------------------------------------•
•
•
o
Interpolation
[Gaussian kernel density]
o
[Interpolate attribute values (RST)]
o
[Interpolate attribute values (IDW)]
Raster Map Calculator
Geomorphology
[Generate slope map from DEM (digital elevation model)]
o
•
[Generate aspect map from DEM (digital elevation
model)]
Set raster color table
•
o
[Set raster color table]
Convert a raster to vector
o
[Convert a raster to vector points]
o
•
•
o
[Convert a raster to vector lines]
o
Export
[Convert a raster to vector Areas]
o
[Shapefile export of vector layers]
o
[GML export of vector layer]
o
General
[Geo TIFF raster export]
o
[GRASS Shell]
o
[Grass environmental variables]
15.8
GRASS Mapsets
15.8.1
General Information about GRASS Mapsets
15.8.1.01
A GRASS mapset holds a set of data layers that cover a geographic area
and all in the same projection.
15.8.2
Setup for GRASS Mapset:
15.8.2.01
Not Applicable as already installed with Quantum GIS as a Plug-in
76
Introduction to Quantum GIS Tutorial Version 0.8.0
2/16/2007
Plug-ins and Extensions
-----------------------------------------------------------------------------------------------------------
15.8.3
Creation of GRASS Mapsets
15.8.3.01
Create a subdirectory in workshop called ‘GRASS’
15.8.3.02
Click on [Plug-in]
15.8.3.03
Click on [GRASS]
15.8.3.04
Click on [New Mapset]
15.8.3.05
GRASS data are stored in tree directory structure. The GRASS database is
the top-level directory in this tree structure. Click [Next]
15.8.3.06
Select “(Create new location)” and type in location name, Click [Next]
15.8.3.07
Set projection and click [Next]
15.8.3.08
The user can set the region by entering in the coordinates, selecting a
predefined region such as ‘United States’ or click [set current QGIS extent]
which would set the region to your screen extent. Set the region and click [Next].
The GRASS region defines a workspace for raster modules. The default region is
valid for one location. It is possible to set a different region in each mapset. It is
possible to change the default location region later.
15.8.3.09
Enter “(New mapset)” name and click [Next]
15.8.3.10
Click [Finish]
15.8.3.11
Click on [Edit Current GRASS Region] on the GRASS toolbar and this
allows the users to change parameters of the region
15.8.3.12
By clicking on [Plug-in], then [GRASS], and finally [Open Mapset],
allows the user to change back and forth between mapsets.
TASK #35***** Create a mapset called NewEngland and set it to your current
screen. Zoom out slightly and the region should appear on the map vie.
QUESTION #26***** What are the coordinates of your GRASS region?
15.9
Creating new GRASS Vector files
77
Introduction to Quantum GIS Tutorial Version 0.8.0
2/16/2007
Plug-ins and Extensions
-----------------------------------------------------------------------------------------------------------
15.9.1
General Information about Creating new GRASS Vector
files
15.9.1.01
This tool allows for the creation of new Vector files
15.9.2
Setup for Creating New GRASS Vector files:
15.9.2.01
Not Applicable as already installed with Quantum GIS as a Plug-in
NOTE #12***** Apparently, this application does not work when ‘on the fly
projection’ is turned on. I recommend that this be used in Geographic
Coordinate Systems (i.e WGS 84 or NAD 83) projections with ‘Enable on the fly
projection’ turn off.
15.9.3
Creating New Vector files
15.9.3.01
Click on [Settings]
15.9.3.02
Click on [Projection Properties]
15.9.3.03
Click on [Projections]
15.9.3.04
Uncheck “(Enable on the fly projection)”
15.9.3.05
Click [Ok]
15.9.3.06
Click on [Plug-in]
15.9.3.07
Click on [GRASS]
15.9.3.08
Click on [Create new GRASS Vector]
15.9.3.09
Type “(New Vector Name)” and click [Ok]
15.9.3.10
The following Screen appears, select the type of shape file to build
78
Introduction to Quantum GIS Tutorial Version 0.8.0
2/16/2007
Plug-ins and Extensions
-----------------------------------------------------------------------------------------------------------
Figure 15.4
15.9.3.11
Add the features to the layer using the
15.9.3.12
Under the ‘Table’ tab, Add the appropriate columns to the Attribute Table
15.9.3.13
Click on [Create /Alter Table]
Figure 15.5
15.9.3.14
Click [Ok]
15.9.3.15
Click the
15.9.3.16
Click on [Settings]
15.9.3.17
Click on [Projection Properties]
15.9.3.18
Click on [Projections]
15.9.3.19
Uncheck “(Enable on the fly projection)”
to close the tool.
79
tool
Introduction to Quantum GIS Tutorial Version 0.8.0
2/16/2007
Plug-ins and Extensions
----------------------------------------------------------------------------------------------------------TASK #36***** Create a point map with at least 5 points.
15.10
Editing GRASS Vector files
15.10.1
General Information about Editing GRASS Vector files:
15.10.1.01
Not Applicable
15.10.2
Setup for Editing GRASS Vector files:
15.10.1.01
Not Applicable as already installed with Quantum GIS as a Plug-in
15.10.3
Editing GRASS Vector files
15.10.3.01
Click on the GRASS layer to be edited
15.10.3.02
Click on [Plug-in]
15.10.3.03
Click on [GRASS]
15.10.3.04
Click on [Edit GRASS Vector Layer]
15.10.3.05
The following Screen appears, select the type of shape file to build
Figure 15.6
15.10.3.06
Add the features to the layer using the
80
tool
Introduction to Quantum GIS Tutorial Version 0.8.0
2/16/2007
Plug-ins and Extensions
-----------------------------------------------------------------------------------------------------------
Figure 15.7
Click on [Update] when finished adding features
15.10.3.07
Under the ‘Table’ tab, Add the appropriate additional columns to the
Attribute Table
15.10.3.08
Click on [Create /Alter Table]
15.10.3.09
Click the
to close the tool.
TASK #36*****Add at least 3 more points to the point map just created
15.11
GRASS Importing
15.11.1
General Information about GRASS Importing
15.10.1.01
Not Applicable
15.11.2
Setup for GRASS Importing:
15.10.1.01
Not Applicable as already installed with Quantum GIS as a Plug-in
81
Introduction to Quantum GIS Tutorial Version 0.8.0
2/16/2007
Plug-ins and Extensions
-----------------------------------------------------------------------------------------------------------
15.11.3
15.11.3.01
Usage of GRASS Importing
[Import OGR/PostGIS Vector Layer]
15.11.3.02
Click on [Open GRASS tools] on GRASS toolbar
15.11.3.03
Click on [Import OGR/PostGIS Vector Layer]
15.11.3.04
On the options tab, select “(OGR raster layer)” (Shapefile) to import
15.11.3.05
Enter “(Name for output vector map)” and click [Run]
15.11.3.06
Click on [Add GRASS vector layer]
15.11.3.07
Select layer to be added and click [Ok]
15.12
GRASS Import GDAL raster layer
15.12.1
General Information about GRASS Import GDAL raster
layer
15.12.1.01
[Import GDAL raster layer] is not covered in this tutorial.
TASK #37***** Import the buoys file created earlier in the tutorial. Name vector
map as Buoys1
QUESTION #27***** Is the Buoys1 layer visible?
TASK #38***** Import the poly1 and poly2 layers created earlier in the tutorial.
Name vector maps as poly1 and poly2
TASK #39***** Import the line1 layer created earlier in the tutorial. Name vector
maps as line1
QUESTION #28***** Is the poly1, poly2, and line1 maps visible?
82
Introduction to Quantum GIS Tutorial Version 0.8.0
2/16/2007
Plug-ins and Extensions
-----------------------------------------------------------------------------------------------------------
15.13
GRASS Vector Overlays
15.13.1
General Information about GRASS Vector Overlays.
15.13.1.01
This tool allows for the clipping of a polygon by another polygon.
15.13.2
Setup for GRASS Vector Overlays
15.13.1.02
Not Applicable as already installed with Quantum GIS as a Plug-in
15.13.3
Usage of GRASS Vector Overlays
15.13.3.01
[Vector union}
15.13.3.02
Click on [Open GRASS tools] on GRASS toolbar
15.13.3.03
Click on [Union Vector]
15.13.3.04
Select 2 input polygon vector maps
15.13.3.05
Name the “(Name of output vector map)”
15.13.3.06
Click [Run]
15.13.3.07
Click on [Add GRASS vector layer]
15.13.3.08
Select layer to be added and click [Ok]
TASK #45***** Make a union of poly1 and poly2 and add to map view
15.14
GRASS Vector intersection
15.14.1
General Information about GRASS Vector Intersection.
15.14.1.01
Not Applicable
15.14.2
Setup for GRASS Vector Intersection
15.14.2.01
Not Applicable as already installed with Quantum GIS as a Plug-in
83
Introduction to Quantum GIS Tutorial Version 0.8.0
2/16/2007
Plug-ins and Extensions
-----------------------------------------------------------------------------------------------------------
15.14.3
Usage of GRASS Vector Intersection
15.14.3.01
[Vector intersection]
15.14.3.02
Click on [Open GRASS tools] on GRASS toolbar
15.14.3.03
Click on [Union Intersection]
15.14.3.04
Select 2 input polygon vector maps
15.14.3.05
Name the “(Name of output vector map)”
15.14.3.06
Click [Run]
15.14.3.07
Click on [Add GRASS vector layer]
15.14.3.08
Select layer to be added and click [Ok]
TASK #40***** Make a intersection of poly1 and poly2 and add to map view
15.15
GRASS Vector intersection
15.15.1
General Information about GRASS Vector Subtraction.
15.15.1.01
Not Applicable
15.15.2
Setup for GRASS Vector Subtraction
15.15.2.01
Not Applicable as already installed with Quantum GIS as a Plug-in
15.15.3
Usage of GRASS Vector Subtraction
15.15.3.03
[Vector subtraction]
15.15.3.04
Click on [Open GRASS tools] on GRASS toolbar
15.15.3.05
Click on [Vector Subtraction]
15.15.3.06
Select 2 input polygon vector maps
15.15.3.07
Name the “(Name of output vector map)”
84
Introduction to Quantum GIS Tutorial Version 0.8.0
2/16/2007
Plug-ins and Extensions
----------------------------------------------------------------------------------------------------------15.15.3.08
Click [Run]
15.15.3.09
Click on [Add GRASS vector layer]
15.15.3.10
Select layer to be added and click [Ok]
TASK #41***** Make a subtraction of poly1 minus poly2 and add to map view
15.16
GRASS Vector intersection
15.16.1
General Information about GRASS Vector NonIntersection.
15.16.1.01
Not Applicable
15.16.2
Setup for GRASS Vector Non-Intersection.
15.16.2.01
Not Applicable as already installed with Quantum GIS as a Plug-in
15.16.3
Usage of GRASS Vector Non-Intersection
15.16.3.01
[Vector non-intersection]
15.16.3.02
Click on [Open GRASS tools] on GRASS toolbar
15.16.3.03
Click on [Vector Non-Intersection]
15.16.3.04
Select 2 input polygon vector maps
15.16.3.05
Name the “(Name of output vector map)”
15.16.3.06
Click [Run]
15.16.3.07
Click on [Add GRASS vector layer]
15.16.3.08
Select layer to be added and click [Ok]
TASK #42***** Make a non-intersection of poly1 and poly2 and add to map view
15.17
GRASS Vector Buffers
85
Introduction to Quantum GIS Tutorial Version 0.8.0
2/16/2007
Plug-ins and Extensions
-----------------------------------------------------------------------------------------------------------
15.17.1
General Information about GRASS Vector Buffers
15.16.2.01
Not Applicable
15.17.2
Setup for GRASS Vector Buffers
15.17.2.01
Not Applicable as already installed with Quantum GIS as a Plug-in
15.17.3
Usage of GRASS Vector Buffers
15.17.3.01
[Vector Buffer]
15.17.3.02
Click on [Open GRASS tools] on GRASS toolbar
15.17.3.03
Click on [Vector Buffer]
15.17.3.04
Select a input vector map (point, line, polygon)
15.17.3.05
Set the “(Buffer distance in map units)”
15.17.3.06
Name the “(Name of output vector map)”
15.17.3.07
Click [Run]
15.17.3.08
Click on [Add GRASS vector layer]
15.17.3.09
Select layer to be added and click [Ok]
TASK #42***** Make a buffer of line1 at 10000 meters and add to map view
15.18
GRASS Raster Buffers
15.18.1
General Information about GRASS Raster Buffers
15.18.1.01
[Raster Buffer] is not covered in this tutorial.
86
Introduction to Quantum GIS Tutorial Version 0.8.0
2/16/2007
Plug-ins and Extensions
-----------------------------------------------------------------------------------------------------------
15.19
Select GRASS Features overlapped by features in
another map
15.19.1
General Information about Select GRASS Features
overlapped by features in another map
15.19.1.01
This tool allows for the selection of features by use of another feature or
by attribute and then to be able to extract them.
15.19.2
Setup for Select GRASS Features overlapped by features
in another map
15.19.2.01
Not Applicable as already installed with Quantum GIS as a Plug-in
15.19.3
Usage of Select GRASS Features overlapped by features
in another map
15.19.3.01
map]
[Select features overlapped by features in another
15.19.3.02
Click on [Open GRASS tools] on GRASS toolbar
15.19.3.03
Click on [Select features overlapped by features in another map]
15.19.3.04
Enter “(Name of input Vector map)” that is to be selected from. This can
be a line, point or area file.
15.19.3.05
Enter “(Name of input Vector map)” that is to be used as the selection
layer.
15.19.3.06
Name the “(Name of output vector map)”
15.19.3.07
Click [Run]
15.19.3.08
Click on [Add GRASS vector layer]
15.19.3.09
Select layer to be added and click [Ok]
15.20
Select GRASS Features by attributes
15.20.1
General Information about Select GRASS Features by
Attributes
87
Introduction to Quantum GIS Tutorial Version 0.8.0
2/16/2007
Plug-ins and Extensions
----------------------------------------------------------------------------------------------------------15.20.1.01
Not Applicable
15.20.2
Setup for Select GRASS Features by Attributes
15.20.2.01
Not Applicable as already installed with Quantum GIS as a Plug-in
15.20.3
Usage of Select GRASS Features by Attributes
15.20.3.01
[Select Features by attribute]
15.20.3.02
Click on [Open GRASS tools] on GRASS toolbar
15.20.3.03
Click on [Select Features by attribute]
15.20.3.04
Enter “(Name of input Vector map)” that is to be selected from. This can
be a line, point or area file.
15.20.3.05
Enter “(Where conditions of SQL statement without)”.
15.20.3.06
Name the “(Name of output vector map)”
15.20.3.07
Click [Run]
15.20.3.08
Click on [Add GRASS vector layer]
15.20.3.09
Select layer to be added and click [Ok]
15.21
Extract Selected GRASS Features
15.21.1
General Information about Extract Selected GRASS
Features
15.21.1.01
Not Applicable
15.21.2
Setup for Extract Selected GRASS Features
15.21.2.01
Not Applicable as already installed with Quantum GIS as a Plug-in
15.21.3
Usage of Extract Selected GRASS Features
15.21.3.01
[Extract Selected Features]
88
Introduction to Quantum GIS Tutorial Version 0.8.0
2/16/2007
Plug-ins and Extensions
----------------------------------------------------------------------------------------------------------15.21.3.02
Click on [Open GRASS tools] on GRASS toolbar
15.21.3.03
Click on [Extract Selected Features]
15.21.3.04
Enter “(Name of input Vector map)” that is to be selected from. This can
be a line, point or area file.
15.21.3.05
Enter “(CATS)” that is to be used as the selection categories.
15.21.3.06
Name the “(Name of output vector map)”
15.21.3.07
Click [Run]
15.21.3.08
Click on [Add GRASS vector layer]
15.21.3.09
Select layer to be added and click [Ok]
15.22
GRASS Delaunay triangulation (lines)
15.22.1
General Information about GRASS Delaunay triangulation
(lines)
15.22.1.01
tutorial.
15.23
[Delaunay Triangulation (lines)] is not covered in this
GRASS Delaunay triangulation (areas)
15.23.1
General Information about GRASS Delaunay triangulation
(areas)
15.23.1.01
tutorial.
15.24
[Delaunay Triangulation (areas)] is not covered in this
GRASS Voronoi diagram (areas)
15.24.1
General Information about GRASS Voronoi diagram
(areas)
15.24.1.01
[Voronoi diagram (areas)] is not covered in this tutorial.
89
Introduction to Quantum GIS Tutorial Version 0.8.0
2/16/2007
Plug-ins and Extensions
-----------------------------------------------------------------------------------------------------------
15.25
GRASS convex hulls
15.25.1
General Information about GRASS Convex Hulls
15.25.1.01
15.26
[Convex hull] is not covered in this tutorial.
GRASS Network Analysis - Create nodes on network
15.26.1
General Information about GRASS Create nodes on
network
15.26.1.01
[Create nodes on network] is not covered in this tutorial.
15.27
GRASS Network Analysis - Allocate network
15.27.1
General Information about GRASS Allocate network
15.27.1.01
15.28
[Allocate network] is not covered in this tutorial.
GRASS Network Analysis - Cut network by cost
isolines
15.28.1
General Information about GRASS Cut network by cost
isolines
15.28.1.01
15.29
[Cut network by cost isolines] is not covered in this tutorial.
GRASS Network Analysis - Connecting nodes by
shortest route (traveling salesman)
15.29.1
General Information about GRASS Connecting nodes by
shortest route (traveling salesman)
15.29.1.01
[Connecting nodes by shortest route (traveling salesman)] is
not covered in this tutorial.
90
Introduction to Quantum GIS Tutorial Version 0.8.0
2/16/2007
Plug-ins and Extensions
-----------------------------------------------------------------------------------------------------------
15.30
GRASS Network Analysis - Connect selected nodes
by shortest tree (Steiner tree)
15.30.1
General Information about GRASS Connect selected
nodes by shortest tree (Steiner tree)
15.30.1.01
[Connect selected nodes by shortest tree (Steiner tree)] is not
covered in this tutorial.
15.31
Add elements to GRASS layer (All elements of the
selected layer type)
15.31.1
General Information about Add elements to GRASS layer
(All elements of the selected layer type)
15.31.3.01
[Add elements to layer (All elements of the selected layer
type)] is not covered in this tutorial.
15.32
GRASS Random Points
15.32.1
General Information about GRASS Random Points
15.32.1.01
Not Applicable
15.32.2
Setup for GRASS Random Points
15.32.2.01
Not Applicable as already installed with Quantum GIS as a Plug-in
15.32.3
Usage of GRASS Random Points
15.32.3.01
[Random Points]
15.32.3.02
Click on [Open GRASS tools] on GRASS toolbar
15.32.3.03
Click on [Random Points]
15.32.3.04
Enter “(Number of points to be created)”
15.32.3.05
Name the “(Vector File to be created)”
15.32.3.06
Click [Run]
91
Introduction to Quantum GIS Tutorial Version 0.8.0
2/16/2007
Plug-ins and Extensions
----------------------------------------------------------------------------------------------------------15.32.3.07
Click on [Add GRASS vector layer]
15.32.3.08
Select layer to be added and click [Ok]
TASK #43*****Zoom out so the mapset is visible and there is an area visible
around the mapset. Make a Random point File of 1000 points?
QUESTION #29*****Do all the points fall inside the mapset?
15.33
Create Grid in Current GRASS Region
15.33.1
General Information about Create Grid in Current GRASS
Region
15.25.1.01
15.34
[Create Grid in Current Region] is not covered in this tutorial.
Create new Grass vector area map with current
region extent
15.34.1
General Information about Create new Grass vector area
map with current region extent
15.34.1.01
Not Applicable
15.34.2
Setup for Create new Grass vector area map with current
region extent:
15.34.2.01
Not Applicable as already installed with Quantum GIS as a Plug-in
15.34.3
Usage of Create new Grass vector area map with current
region extent
15.34.3.01
[Create new vector area map with current region extent]
15.34.3.02
Click on [Open GRASS tools] on GRASS toolbar
15.34.3.03
Click on [Create new vector area map with current region extent]
92
Introduction to Quantum GIS Tutorial Version 0.8.0
2/16/2007
Plug-ins and Extensions
----------------------------------------------------------------------------------------------------------15.34.3.04
Enter “(Output map where points will be written)”
15.34.3.05
Click [Run]
15.34.3.06
Click on [Add GRASS vector layer]
15.34.3.07
Select layer to be added and click [Ok]
TASK #44*****Zoom out so the mapset is visible and there is an area visible
around the mapset. Make a new vector area map?
QUESTION #30*****Does the new area map fall inside the mapset?
15.35
Convert a GRASS vector to raster using constant
15.35.1
General Information about Convert a GRASS vector to
raster using constant
15.35.1.01
Not Applicable
15.35.2
Setup for Convert a GRASS vector to raster using
constant
15.35.2.01
Not Applicable as already installed with Quantum GIS as a Plug-in
15.35.3
Usage of Convert a vector to raster using constant
15.35.3.01
[Convert a vector to raster using constant]
15.35.3.02
Click on [Open GRASS tools] on GRASS toolbar
15.35.3.03
Click on [Convert a vector to raster using constant]
15.35.3.04
Enter “(Name of input vector map)”
15.35.3.05
Name the “(Raster Value)”
15.35.3.06
Name the “(Name for output raster map)”
15.35.3.07
Click [Run]
93
Introduction to Quantum GIS Tutorial Version 0.8.0
2/16/2007
Plug-ins and Extensions
----------------------------------------------------------------------------------------------------------15.35.3.08
Click on [Add GRASS raster layer]
15.35.3.09
Select layer to be added and click [Ok]
TASK #45*****Zoom out so the mapset is visible and there is an area visible
around the mapset. Make a raster map of poly1?
15.36
Count of neighboring GRASS points
15.36.1
General Information about Count of neighboring GRASS
points
15.36.1.01
15.37
[Count of neighboring points] is not covered in this tutorial.
GRASS Gaussian kernel density
15.37.1
General Information about GRASS Gaussian kernel
density
15.37.1.01
15.38
[Gaussian kernel density] is not covered in this tutorial.
GRASS Interpolate attribute values (RST)
15.38.1
General Information about GRASS Interpolate attribute
values (RST)
15.38.1.01
tutorial.
15.39
[Interpolate attribute values (RST)] is not covered in this
GRASS Interpolate attribute values (IDW)
15.39.1
General Information about GRASS Interpolate attribute
values (IDW)
15.39.1.01
[Interpolate attribute values (IDW)] is not covered in this
tutorial.
94
Introduction to Quantum GIS Tutorial Version 0.8.0
2/16/2007
Plug-ins and Extensions
-----------------------------------------------------------------------------------------------------------
15.40
GRASS Raster Map Calculator
15.40.1
General Information about GRASS Raster Map Calculator
15.40.1.01
15.41
[Raster Map Calculator] is not covered in this tutorial.
Generate GRASS slope map from DEM (digital
elevation model)
15.41.1
General Information about Generate GRASS slope map
from DEM (digital elevation model)
15.41.1.01
15.42
[Generate slope map from DEM (digital elevation model)]
is not covered in this tutorial
Generate GRASS aspect map from DEM (digital
elevation model
15.42.1
General Information about Generate GRASS aspect map
from DEM (digital elevation model
15.42.1.01
[Generate aspect map from DEM (digital elevation model)]
is not covered in this tutorial
15.43
Generate GRASS Set raster color table
15.43.1
General Information about Set raster color table
15.43.1.01
15.44
[Set raster color table] is not covered in this tutorial
Convert a raster to GRASS vector points
15.44.1
General Information about Convert a raster to GRASS
vector points
15.44.1.01
[Convert a raster to vector points] is not covered in this
tutorial
95
Introduction to Quantum GIS Tutorial Version 0.8.0
2/16/2007
Plug-ins and Extensions
-----------------------------------------------------------------------------------------------------------
15.45
Convert a raster to GRASS vector lines
15.45.1
General Information about Convert a raster to GRASS
vector lines
15.45.1.01
[Convert a raster to vector lines] is not covered in this
tutorial
15.46
Convert a raster to GRASS vector Areas
15.46.1
General Information about Convert a raster to GRASS
vector Areas
15.46.1.01
[Convert a raster to vector Areas] is not covered in this
tutorial
15.47
Shapefile export of GRASS vector layers
15.47.1
General Information about Shapefile export of GRASS
vector layers
15.47.1.01
Not Applicable
15.47.2
Setup for Shapefile export of GRASS vector layers
15.47.2.01
Not Applicable as already installed with Quantum GIS as a Plug-in
15.47.3
Usage of Shapefile export of GRASS vector layers
15.47.3.01
[Shapefile export of vector layers]
15.47.3.02
Click on [Open GRASS tools] on GRASS toolbar
15.47.3.03
Click on [Shapefile export of vector layers]
15.47.3.04
Enter “(Name of input vector map)”
15.47.3.05
Enter “(Output Shapefile)”
15.47.3.06
Click [Run]
96
Introduction to Quantum GIS Tutorial Version 0.8.0
2/16/2007
Plug-ins and Extensions
----------------------------------------------------------------------------------------------------------15.47.3.07
Click on [Add a vector layer]
15.47.3.08
Select layer to be added and click [Ok]
15.48
GML export of GRASS vector layer
15.48.1
General Information about GML export of GRASS vector
layer
15.48.1.01
[GML export of vector layer] is not covered in this tutorial
15.49
GRASS Geo TIFF raster export
15.49.1
General Information about GRASS Geo TIFF raster export
15.49.1.01
[Geo TIFF raster export] is not covered in this tutorial
15.50
GRASS Shell
15.50.1
General Information about GRASS Shell
15.50.1.01
[GRASS Shell] is not covered in this tutorial
15.51
Grass environmental variables
15.51.1
General Information about Grass environmental variables
15.51.1.01
Grass environmental variables is not covered in this tutorial
97
Introduction to Quantum GIS Tutorial Version 0.8.0
2/16/2007
Plug-ins and Extensions
----------------------------------------------------------------------------------------------------------#####################################################################
List of Questions for Lesson #04
QUESTION #24***** What are the buoys from north to south?
QUESTION #25***** How many locations are there for the user to choose from in
placing the copyright mark?
QUESTION #26***** What are the coordinates of your GRASS region?
QUESTION #27***** Is the Buoys1 layer visible?
QUESTION #28***** Is the poly1 and poly2 maps visible?
QUESTION #29*****Do all the points fall inside the mapset?
QUESTION #30*****Does the new area map fall inside the mapset?
End of Lesson #04
98
Introduction to Quantum GIS Tutorial Version 0.8.0
2/16/2007
Plug-ins and Extensions
----------------------------------------------------------------------------------------------------------#######################################################################
Beginning of Lesson #05
15.52
Graticule Creator Plug-in
15.52.1
General Information about Graticule Creator Plug-in:
15.52.1.01
This tool allows for the building of a graticule grid over the map
15.52.2
Setup for Graticule Creator Plug-in
15.52.3.01
Click on [Plug-ins] on Main toolbar
15.52.3.02
Click on [Plug-in Manager]
15.52.3.03
Check “(Graticule Creator)”
15.52.3.04
Click [OK]
15.52.3
Use of Graticule Creator Plug-in
15.52.3.01
Click [Graticle Builder] on main toolbar
15.52.3.02
Fill in the appropriate values
15.52.3.03
Click [OK]
QUESTION #31***** What type of Graticles can you make?
TASK #45***** Build a Grid from Latitude 10.0 Longitude -170.0 to Latitude 80.0
Longitude -10.0, Graticle Size 5 and 5, save as shape “latlon” in your
workspace directory
ISSUE #15***** no easy way to label graticle
15.53
North Arrow Plug-in
99
Introduction to Quantum GIS Tutorial Version 0.8.0
2/16/2007
Plug-ins and Extensions
-----------------------------------------------------------------------------------------------------------
15.53.1
General Information about North Arrow Plug-in
15.53.1.01
Not Applicable
15.53.2
Setup for North Arrow Plug-in
15.53.2.01
Click on [Plug-ins] on Main toolbar
15.53.2.02
Click on [Plug-in Manager]
15.53.2.03
Check “NorthArrow”
15.53.2.04
Click [OK]
15.53.3
Use of North Arrow Plug-in
15.53.3.01
Click [North Arrow] on main toolbar
15.53.3.02
Select desired placement
15.53.3.03
Click on “(Enable North Arrow)”
15.53.3.04
Click on “(Set direction automatically)”
15.53.3.05
Click [OK]
TASK #45***** Put a North Arrow in the upper right corner
QUESTION #32***** What many types of North Arrow can be chosen?
QUESTION #33***** What is the angle of the north arrow using the current
projection?
QUESTION #34***** Can the north arrow be pointed in a direction other than
true north?
15.53
PostgresSQL Geoprocessing Plug-in
100
Introduction to Quantum GIS Tutorial Version 0.8.0
2/16/2007
Plug-ins and Extensions
-----------------------------------------------------------------------------------------------------------
15.53.1
General Information about QGS Launcher Plug-in
15.53.1.01
Geoprocessing functions for working with PostgreSQL/PostGIS Layers is
not covered in this tutorial
15.55
Scale Bar Plug-in
15.55.1
General Information about Scale Bar Plug-in
15.55.1.01
Plug-in to draw scale bar on Map
15.55.2
Setup for Scale Bar Plug-in
15.55.2.01
Click on [Plug-ins] on Main toolbar
15.55.2.02
Click on [Plug-in Manager]
15.55.2.03
Check “ScaleBar”
15.55.2.04
Click [OK]
15.55.3
Use of Scale Bar Plug-in
15.55.3.01
Click [Scale Bar] on main toolbar
15.55.3.02
Select desired placement
15.55.3.03
Select Bar Style
15.55.3.04
Click on “(Enable Scale Bar)”
15.55.3.05
Click on “(Automatically snap to round numbers in resize)”
15.55.3.06
Click [OK]
QUESTION #35***** How many locations are there to put the Scale bar
QUESTION #36***** How many types of scale bar are there?
TASK #46***** Put a Scale Bar in the low left corner
101
Introduction to Quantum GIS Tutorial Version 0.8.0
2/16/2007
Plug-ins and Extensions
-----------------------------------------------------------------------------------------------------------
15.56
Spit Plug-in
15.56.1
General Information about Spit Plug-in
15.55.1.01
This is a Shapefile to PostgreSQL/PostGIS Import Tool and is not covered
in this tutorial
102
Introduction to Quantum GIS Tutorial Version 0.8.0
2/16/2007
Third Party Plug-ins
-----------------------------------------------------------------------------------------------------------
Chapter 16
Third Party Plug-ins
16.1
Open Modeler Plug-in
16.1.1
General Information about Open Modeler Plug-in
16.1.1.01
The openModeller project aims to provide a flexible, user friendly, crossplatform environment where the entire process of conducting a fundamental niche
modeling experiment can be carried out. The software includes facilities for
reading species occurrence and environmental data, selection of environmental
layers on which the model should be based, creating a fundamental niche model
and projecting the model into an environmental scenario. A number of
fundamental niche modeling algorithms are provided as plug-ins, including
GARP, Climate Space Model, Bioclimatic Envelopes, and others. Additional
algorithms are planned for the future.
16.1.1.02
OpenModeller is a spatial distribution modeling library, providing a
uniform method for modeling distribution patterns using a variety of modeling
algorithms. openModeller can be used via programmatic interfaces, including
SOAP and SWIG-python, as well as via a user friendly desktop graphical user
interface and a GIS Plug-in.
16.1.2
Setup for Open Modeler Plug-in
16.1.2.01
Not Applicable
16.1.3
Use of Open Modeler Plug-in
16.1.3.01
The openModeller desktop GUI program runs on both Linux and
Windows (9x,ME,2k,NT,XP). The program can be run as a standalone GUI
application or as a Plug-in for Quantum GIS. The program takes the form of a
'Wizard', collecting information from the user via a number of screens. The
selections made are saved between sessions thus streamlining the modeling
process on subsequent occasions.
16.1.3.02
The first screen prompts the user to select the modeling algorithm to use.
Tabbed pages provide the user with information about each algorithm such as the
author details, general description and references.
16.1.3.03
The second step asks the user to select a coordinate system. openModeller
uses the projection library proj to support using point locality data in any WKT
defined coordinate system
103
Introduction to Quantum GIS Tutorial Version 0.8.0
2/16/2007
Third Party Plug-ins
----------------------------------------------------------------------------------------------------------16.1.3.04
Next, the user is asked to load a text file containing the point locality data
for the study species. As the text file can contain data for more than one species,
the user must then specify which species to use.
16.1.3.05
Then the user defines the environmental raster layers with which to build
the model. Layers can be specified one by one, or the folder containing all the
required files can be selected and openModeller will load them recursively. The
openModeller uses the GDAL library to read raster surfaces and therefore it
supports most of the popularly used GIS data formats. The openModeller can use
raster layers of different extents and coordinate systems within the same analysis
and therefore all raster layers must have coordinate systems defined.
16.1.3.06
The following page provides a similar interface so the user can specify the
layers into which they would like to project their model. This could be the same
data as was specified in the previous page (to model the present day potential
distribution), or data for a different region or time period.
16.1.3.07
Next, the user is prompted to select the mask layers which will be used to
mask the input occurrences and to determine the output format. As openModeller
supports raster layers of different extents and coordinate systems, the output mask
layer specified determines the extent and coordinate system of the resulting
prediction.
16.1.3.08
The next step allows the user to define parameters required for the selected
modeling algorithm. The number of available parameters depends on the
algorithm selected. By holding your mouse over each box, a tooltip provides a
more detailed description of each parameter's function
16.1.3.09
Here the user defines the base file name for the model output files and the
folder where these files should be written. The wizard will produce a GEOTIFF
image suitable for use in most GIS packages, a configuration file which can be
used to run the model again using the openModeller console client and a color
ramped PNG image for initial viewing by the user.
16.1.3.10
The final wizard screen displays progress bars informing the user of the
progress of the model creation and model projection.
16.1.3.11
Once the wizard has completed the task, a new window is opened showing
the color ramped PNG image of the model output. The window can be used to
save the image in a variety of file formats as well as to open the Wizard to run
another model
104
Introduction to Quantum GIS Tutorial Version 0.8.0
2/16/2007
Third Party Plug-ins
----------------------------------------------------------------------------------------------------------NOTE #11***** There is a link from the http://qgis.org/ site to the openModeller
Plug-in. Download and work through it if you want, but it is a little more involved
for a basic introduction to Software
105
Introduction to Quantum GIS Tutorial Version 0.8.0
2/16/2007
Third Party Plug-ins
----------------------------------------------------------------------------------------------------------########################################################################
List of Questions for Lesson #05
QUESTION #31***** What type of Graticles can you make?
QUESTION #32***** What many types of North Arrow can be chosen?
QUESTION #33***** What is the angle of the north arrow using the current
projection?
QUESTION #34***** Can the north arrow be pointed in a direction other than
true north?
QUESTION #35***** How many locations are there to put the Scale bar
QUESTION #36***** How many types of scale bar are there?
End of Lesson #05
106
Introduction to Quantum GIS Tutorial Version 0.8.0
2/16/2007
Stand Alone Utilities
----------------------------------------------------------------------------------------------------------########################################################################
Beginning of Lesson #06
TASK #46***** Create two polygon layers named poly1 and poly2 and make sure
that partially overlap each other. Create a line layer named Line1 and make sure
it crosses over poly1.
Chapter 17 Stand Alone Utilities
Not Applicable
107
Introduction to Quantum GIS Tutorial Version 0.8.0
2/16/2007
Extra Features
-----------------------------------------------------------------------------------------------------------
Chapter 18
Extra Features
18.1
Map Overview
18.1.1
General Information for Map Overview
18.1.1.01
The map overview area provides a full extent view of layers added to it.
Within the view is a rectangle showing the current map extent. This allows the
user to quickly determine which area of the map currently being viewed. Note that
labels are not rendered to the map overview even if the layers in the map
overview have been set up for labeling.
18.1.2
Setup for Using the Map Overview
18.1.2.01
Not Applicable
18.1.3
Steps for Using the Map Overview
18.1.3.01
The user can add a single layer to the overview by right-clicking on it in
the legend and choosing [Add to Overview].
18.1.3.02
The user can also add or remove all layers to the overview using the [Add
All to Overview] or [Remove All from Overview] tool on the Layer drop down
menu or on the [Manage Layers] toolbar.
108
Introduction to Quantum GIS Tutorial Version 0.8.0
2/16/2007
Customizing and Programming
-----------------------------------------------------------------------------------------------------------
Chapter 19
Customizing and Programming
Not covered in this tutorial but will be added
109
Introduction to Quantum GIS Tutorial Version 0.8.0
2/16/2007
Hard Copy and Exporting
-----------------------------------------------------------------------------------------------------------
Chapter 20
Hard Copy/Exporting
20.1
Map Composer
20.1.1
General Information about Map Composer
20.1.1.01
The map composer is a feature that provides improved layout and printing
capabilities. The composer allows the user to add elements such as the QGIS map
canvas, legend, scalebar, and text. The user can size and position each item and
adjust the properties to create the layout. The result can be printed, exported as an
image, or exported to SVG.
20.1.2
Setup for Map Composer
20.1.2.01
Not Applicable
20.1.3
Using Map Composer
20.1.3.01
To access the map composer, click on the [Print] button in the toolbar or
choose [Print] from the [File] menu
20.1.3.02
To use the map composer, first add the layers wanted to be printed to
QGIS. The layers should be rendered and symbolized prior to composing the
map. Opening the map composer provides a blank canvas to which can be added
the current map view, legend, scalebar, and text.
20.1.3.03
The map composer has two tabs: [General] and [Item]. The General tab
allows the user to set the paper size, orientation, and resolution for the map. The
Item tab displays the properties for the currently selected map element. By
selecting an element on the map (eg. legend, scalebar, text, etc.) and clicking on
the Item tab, the user can customize the settings.
20.1.3.04
The user can add multiple elements to the composer. This allows the user
to have more than one map view and legend in the composer. Each element has its
own properties and in the case of the map, its own extent.
20.1.3.05
Adding a Map to the Composer
•
To add the QGIS map canvas to the map composer, click on the [Add a new
map] button in toolbar.
•
Drag a rectangle on the composer canvas to add the map. The user can resize
the map later by clicking on the Select/move item button, clicking on the map,
110
Introduction to Quantum GIS Tutorial Version 0.8.0
2/16/2007
Hard Copy and Exporting
----------------------------------------------------------------------------------------------------------and dragging one of the handles in the corner of the map. With the map
selected, the user can also resize the map by specifying the width and height
on the [Item] properties tab.
•
The map is linked to the QGIS map canvas. If the user changes the view on
the map canvas by zooming or panning, the user can update the map composer
view by selecting the map in composer and clicking on the [Set Extent]
button. The suer can also change the composer view by specifying a map
scale. To set the view to a specific scale:
o Choose [Scale] (calculate extent) from the Set drop-down box
o Enter the scale denominator in the scale box
o Press [Enter]
20.1.3.06
Adding other Elements to the Composer
20.1.3.07
A legend can be added to the composer canvas and customized to show
only the desired layers. To add a legend, click on the [Add New Vector Legend]
button. The legend will be placed on the composer canvas and the user can move
it to where it is desired.
20.1.3.08
Click on the [Items] tab to customize the appearance of the legend,
including
•
Setting the Title for the legend
•
Setting a border or frame for the map
•
Setting the font, font style and font size
•
Which layers are shown or hidden.
20.1.3.09
To add a scalebar to the composer, click on the [Add Scalebar] button.
20.1.3.10
Use the [Item] tab to customize
•
the segment size
•
number of segments
•
Map Units per scalebar unit
•
Unit Label
111
Introduction to Quantum GIS Tutorial Version 0.8.0
2/16/2007
Hard Copy and Exporting
----------------------------------------------------------------------------------------------------------•
Map it applies to
•
font, font style and font size
•
Line Width.
20.1.3.11
The user can add text labels to the composer by clicking on the [Add New
Label] button.
20.1.3.12
Use the Item tab while the text is selected to
•
customize the default text
•
change the font, font style and font size
20.1.3.13
The map composer has navigation tools to zoom in and out.
20.1.3.14
To zoom in, click the zoom in tool. The map composer canvas will be
scaled by a factor to 2. Use the scrollbars to adjust the view to the area of interest.
20.1.3.15
Zooming out works in a similar fashion.
20.1.3.16
If the user finds the view in an inconsistent state, use the refresh button to
redraw the map composer
20.1.3.17
The map composer allows the user to print the map to a printer, export to a
PNG, or export to SVG. Each of these functions is available from the composer
toolbar.
20.1.3.18
The map composer also allows for the building of templates and loading
of templates
TASK #47*****Make a png file of a map
112
Introduction to Quantum GIS Tutorial Version 0.8.0
2/16/2007
Support and Help
-----------------------------------------------------------------------------------------------------------
Chapter 21
Support and Help
21.1
Support
21.1.1
General Information about Support
21.1.1.01
QGIS is still under active development and as such it won’t always work
like the user expects it to. The preferred way to get help is by joining the qgisusers mailing list. The questions will reach a broader audience and answers will
benefit others. The user can subscribe to the qgis-users mailing list by visiting
here: http://lists.sourceforge.net/lists/listinfo/qgis-user
21.1.1.02
If the user is a developer facing problems of a more technical nature, the
user may want to join the qgis-developer mailing list here:
http://lists.sourceforge.net/lists/listinfo/qgis-developer
21.1.1.03
There is also a presence on IRC - visit QGIS by joining the #qgis channel
on irc.freenode.net. Please wait around for a response to the question as many
folks on the channel are doing other things and it may take a while for them to
notice the question.
21.1.1.04
Commercial support for QGIS is available from Micro Resources
21.1.1.05
While the qgis-users mailing list is useful for general ’how do I do xyz in
QGIS’ type questions, the user may wish to notify the developers about bugs in
QGIS. The user can submit bug reports using the QGIS bug tracker. When
reporting a bug, either login to SourceForge or, if you don’t have a SourceForge
id, provide an email address where we can request additional information.
21.1.1.06
Please bear in mind that the bug may not always enjoy the priority the user
might hope for (depending on its severity). Some bugs may require may require
significant developer effort to remedy and the manpower is not always available
for this.
21.1.1.07
If the user have found a bug and fixed it, submit it to the QGIS
Sourceforge patch queue where someone will review it and apply it to QGIS.
Please don’t be alarmed if the patch is not applied straight away - developers may
be tied up with other commitments.
21.1.1.08
Feature requests can be submitted using the feature tracker.
113
Introduction to Quantum GIS Tutorial Version 0.8.0
2/16/2007
Support and Help
----------------------------------------------------------------------------------------------------------21.1.1.09
There is also a community site for QGIS where the developers encourage
QGIS users to share their experiences and provide case studies about how they
are using QGIS. The community site is available at: http://qgis.org
21.1.1.10
Lastly, the developers maintain a WIKI web site at http://wiki.qgis.org
where you can find a variety of useful information relating to QGIS development,
release plans, links to download sites and so on.
TASK #48*****Send me an e-mail with attached png map and a statement that you
have finished to course
114
Introduction to Quantum GIS Tutorial Version 0.8.0
2/16/2007
Appendix A
-----------------------------------------------------------------------------------------------------------
Appendix A
Full Copyright License
GNU Free Documentation License
Version 1.2, November 2002
Copyright (C) 2000,2001,2002 Free Software Foundation, Inc.
51 Franklin St, Fifth Floor, Boston, MA 02110-1301 USA
Everyone is permitted to copy and distribute verbatim copies of this
license document, but changing it is not allowed.
0. PREAMBLE
The purpose of this License is to make a manual, textbook, or
other functional and useful document "free" in the sense of freedom: to
assure everyone the effective freedom to copy and redistribute it, with
or without modifying it, either commercially or noncommercially.
Secondarily, this License preserves for the author and publisher a way
to get credit for their work, while not being considered responsible
for modifications made by others.
This License is a kind of "copyleft", which means that derivative works
of the document must themselves be free in the same sense.
It
complements the GNU General Public License, which is a copyleft license
designed for free software.
We have designed this License in order to use it for manuals for free
software, because free software needs free documentation: a free
program should come with manuals providing the same freedoms that the
software does. But this License is not limited to software manuals; it
can be used for any textual work, regardless of subject matter or
whether it is published as a printed book. We recommend this License
principally for works whose purpose is instruction or reference.
1. APPLICABILITY AND DEFINITIONS
This License applies to any manual or other work, in any medium, that
contains a notice placed by the copyright holder saying it can be
distributed under the terms of this License.
Such a notice grants a
world-wide, royalty-free license, unlimited in duration, to use that
work under the conditions stated herein. The "Document", below, refers
to any such manual or work.
Any member of the public is a licensee,
and is addressed as "you". You accept the license if you copy, modify
or distribute the work in a way requiring permission under copyright
law.
A "Modified Version" of the Document means any work containing the
Document or a portion of it, either copied verbatim, or with
modifications and/or translated into another language.
115
Introduction to Quantum GIS Tutorial Version 0.8.0
2/16/2007
Appendix A
----------------------------------------------------------------------------------------------------------A "Secondary Section" is a named appendix or a front-matter section of
the Document that deals exclusively with the relationship of the
publishers or authors of the Document to the Document's overall subject
(or to related matters) and contains nothing that could fall directly
within that overall subject.
(Thus, if the Document is in part a
textbook of mathematics, a Secondary Section may not explain any
mathematics.)
The relationship could be a matter of historical
connection with the subject or with related matters, or of legal,
commercial, philosophical, ethical or political position regarding
them.
The "Invariant Sections" are certain Secondary Sections whose titles
are designated, as being those of Invariant Sections, in the notice
that says that the Document is released under this License.
If a
section does not fit the above definition of Secondary then it is not
allowed to be designated as Invariant.
The Document may contain zero
Invariant Sections. If the Document does not identify any Invariant
Sections then there are none.
The "Cover Texts" are certain short passages of text that are listed,
as Front-Cover Texts or Back-Cover Texts, in the notice that says that
the Document is released under this License. A Front-Cover Text may be
at most 5 words, and a Back-Cover Text may be at most 25 words.
A "Transparent" copy of the Document means a machine-readable copy,
represented in a format whose specification is available to the general
public, that is suitable for revising the document straightforwardly
with generic text editors or (for images composed of pixels) generic
paint programs or (for drawings) some widely available drawing editor,
and that is suitable for input to text formatters or for automatic
translation to a variety of formats suitable for input to text
formatters. A copy made in an otherwise Transparent file format whose
markup, or absence of markup, has been arranged to thwart or discourage
subsequent modification by readers is not Transparent. An image format
is not Transparent if used for any substantial amount of text. A copy
that is not "Transparent" is called "Opaque".
Examples of suitable formats for Transparent copies include plain ASCII
without markup, Texinfo input format, LaTeX input format, SGML or XML
using a publicly available DTD, and standard-conforming simple HTML,
PostScript or PDF designed for human modification.
Examples of
transparent image formats include PNG, XCF and JPG.
Opaque formats
include proprietary formats that can be read and edited only by
proprietary word processors, SGML or XML for which the DTD and/or
processing tools are not generally available, and the machine-generated
HTML, PostScript or PDF produced by some word processors for output
purposes only.
The "Title Page" means, for a printed book, the title page itself, plus
such following pages as are needed to hold, legibly, the material this
License requires to appear in the title page.
For works in formats
which do not have any title page as such, "Title Page" means the text
near the most prominent appearance of the work's title, preceding the
beginning of the body of the text.
116
Introduction to Quantum GIS Tutorial Version 0.8.0
2/16/2007
Appendix A
----------------------------------------------------------------------------------------------------------A section "Entitled XYZ" means a named subunit of the Document whose
title either is precisely XYZ or contains XYZ in parentheses following
text that translates XYZ in another language. (Here XYZ stands for a
specific section name mentioned below, such as "Acknowledgements",
"Dedications", "Endorsements", or "History".) To "Preserve the Title"
of such a section when you modify the Document means that it remains a
section "Entitled XYZ" according to this definition.
The Document may include Warranty Disclaimers next to the notice which
states that this License applies to the Document.
These Warranty
Disclaimers are considered to be included by reference in this
License, but only as regards disclaiming warranties: any other
implication that these Warranty Disclaimers may have is void and has no
effect on the meaning of this License.
2. VERBATIM COPYING
You may copy and distribute the Document in any medium, either
commercially or noncommercially, provided that this License, the
copyright notices, and the license notice saying this License applies
to the Document are reproduced in all copies, and that you add no other
conditions whatsoever to those of this License.
You may not use
technical measures to obstruct or control the reading or further
copying of the copies you make or distribute. However, you may accept
compensation in exchange for copies. If you distribute a large enough
number of copies you must also follow the conditions in section 3.
You may also lend copies, under the same conditions stated above, and
you may publicly display copies.
3. COPYING IN QUANTITY
If you publish printed copies (or copies in media that commonly have
printed covers) of the Document, numbering more than 100, and the
Document's license notice requires Cover Texts, you must enclose the
copies in covers that carry, clearly and legibly, all these Cover
Texts: Front-Cover Texts on the front cover, and Back-Cover Texts on
the back cover. Both covers must also clearly and legibly identify you
as the publisher of these copies.
The front cover must present the
full title with all words of the title equally prominent and visible.
You may add other material on the covers in addition. Copying with
changes limited to the covers, as long as they preserve the title of
the Document and satisfy these conditions, can be treated as verbatim
copying in other respects.
If the required texts for either cover are too voluminous to fit
legibly, you should put the first ones listed (as many as fit
reasonably) on the actual cover, and continue the rest onto adjacent
pages.
If you publish or distribute Opaque copies of the Document numbering
more than 100, you must either include a machine-readable Transparent
copy along with each Opaque copy, or state in or with each Opaque copy
a computer-network location from which the general network-using public
117
Introduction to Quantum GIS Tutorial Version 0.8.0
2/16/2007
Appendix A
----------------------------------------------------------------------------------------------------------has access to download using public-standard network protocols a
complete Transparent copy of the Document, free of added material.
If you use the latter option, you must take reasonably prudent steps,
when you begin distribution of Opaque copies in quantity, to ensure
that this Transparent copy will remain thus accessible at the stated
location until at least one year after the last time you distribute an
Opaque copy (directly or through your agents or retailers) of that
edition to the public.
It is requested, but not required, that you contact the authors of the
Document well before redistributing any large number of copies, to give
them a chance to provide you with an updated version of the Document.
4. MODIFICATIONS
You may copy and distribute a Modified Version of the Document under
the conditions of sections 2 and 3 above, provided that you release the
Modified Version under precisely this License, with the Modified
Version filling the role of the Document, thus licensing distribution
and modification of the Modified Version to whoever possesses a copy of
it. In addition, you must do these things in the Modified Version:
A. Use in the Title Page (and on the covers, if any) a title distinct
from that of the Document, and from those of previous versions
(which should, if there were any, be listed in the History section
of the Document). You may use the same title as a previous version
if the original publisher of that version gives permission.
B. List on the Title Page, as authors, one or more persons or entities
responsible for authorship of the modifications in the Modified
Version, together with at least five of the principal authors of the
Document (all of its principal authors, if it has fewer than five),
unless they release you from this requirement.
C. State on the Title page the name of the publisher of the
Modified Version, as the publisher.
D. Preserve all the copyright notices of the Document.
E. Add an appropriate copyright notice for your modifications
adjacent to the other copyright notices.
F. Include, immediately after the copyright notices, a license notice
giving the public permission to use the Modified Version under the
terms of this License, in the form shown in the Addendum below.
G. Preserve in that license notice the full lists of Invariant Sections
and required Cover Texts given in the Document's license notice.
H. Include an unaltered copy of this License.
I. Preserve the section Entitled "History", Preserve its Title, and add
to it an item stating at least the title, year, new authors, and
publisher of the Modified Version as given on the Title Page. If
there is no section Entitled "History" in the Document, create one
stating the title, year, authors, and publisher of the Document as
given on its Title Page, then add an item describing the Modified
Version as stated in the previous sentence.
J. Preserve the network location, if any, given in the Document for
public access to a Transparent copy of the Document, and likewise
the network locations given in the Document for previous versions
it was based on. These may be placed in the "History" section.
You may omit a network location for a work that was published at
118
Introduction to Quantum GIS Tutorial Version 0.8.0
2/16/2007
Appendix A
----------------------------------------------------------------------------------------------------------K.
L.
M.
N.
O.
least four years before the Document itself, or if the original
publisher of the version it refers to gives permission.
For any section Entitled "Acknowledgements" or "Dedications",
Preserve the Title of the section, and preserve in the section all
the substance and tone of each of the contributor acknowledgements
and/or dedications given therein.
Preserve all the Invariant Sections of the Document,
unaltered in their text and in their titles. Section numbers
or the equivalent are not considered part of the section titles.
Delete any section Entitled "Endorsements". Such a section
may not be included in the Modified Version.
Do not retitle any existing section to be Entitled "Endorsements"
or to conflict in title with any Invariant Section.
Preserve any Warranty Disclaimers.
If the Modified Version includes new front-matter sections or
appendices that qualify as Secondary Sections and contain no material
copied from the Document, you may at your option designate some or all
of these sections as invariant.
To do this, add their titles to the
list of Invariant Sections in the Modified Version's license notice.
These titles must be distinct from any other section titles.
You may add a section Entitled "Endorsements", provided it contains
nothing but endorsements of your Modified Version by various parties-for example, statements of peer review or that the text has been
approved by an organization as the authoritative definition of a
standard.
You may add a passage of up to five words as a Front-Cover Text, and a
passage of up to 25 words as a Back-Cover Text, to the end of the list
of Cover Texts in the Modified Version.
Only one passage of FrontCover Text and one of Back-Cover Text may be added by (or through
arrangements made by) any one entity. If the Document already includes
a cover text for the same cover, previously added by you or by
arrangement made by the same entity you are acting on behalf of, you
may not add another; but you may replace the old one, on explicit
permission from the previous publisher that added the old one.
The author(s) and publisher(s) of the Document do not by this License
give permission to use their names for publicity for or to assert or
imply endorsement of any Modified Version.
5. COMBINING DOCUMENTS
You may combine the Document with other documents released under this
License, under the terms defined in section 4 above for modified
versions, provided that you include in the combination all of the
Invariant Sections of all of the original documents, unmodified, and
list them all as Invariant Sections of your combined work in its
license notice, and that you preserve all their Warranty Disclaimers.
The combined work need only contain one copy of this License, and
multiple identical Invariant Sections may be replaced with a single
copy. If there are multiple Invariant Sections with the same name but
different contents, make the title of each such section unique by
119
Introduction to Quantum GIS Tutorial Version 0.8.0
2/16/2007
Appendix A
----------------------------------------------------------------------------------------------------------adding at the end of it, in parentheses, the name of the original
author or publisher of that section if known, or else a unique number.
Make the same adjustment to the section titles in the list of
Invariant Sections in the license notice of the combined work.
In the combination, you must combine any sections Entitled "History" in
the various original documents, forming one section Entitled "History";
likewise combine any sections Entitled "Acknowledgements", and any
sections Entitled "Dedications". You must delete all sections Entitled
"Endorsements".
6. COLLECTIONS OF DOCUMENTS
You may make a collection consisting of the Document and other
documents released under this License, and replace the individual
copies of this License in the various documents with a single copy that
is included in the collection, provided that you follow the rules of
this License for verbatim copying of each of the documents in all other
respects.
You may extract a single document from such a collection, and
distribute it individually under this License, provided you insert a
copy of this License into the extracted document, and follow this
License in all other respects regarding verbatim copying of that
document.
7. AGGREGATION WITH INDEPENDENT WORKS
A compilation of the Document or its derivatives with other separate
and independent documents or works, in or on a volume of a storage or
distribution medium, is called an "aggregate" if the copyright
resulting from the compilation is not used to limit the legal rights of
the compilation's users beyond what the individual works permit.
When the Document is included in an aggregate, this License does not
apply to the other works in the aggregate which are not themselves
derivative works of the Document.
If the Cover Text requirement of section 3 is applicable to these
copies of the Document, then if the Document is less than one half of
the entire aggregate, the Document's Cover Texts may be placed on
covers that bracket the Document within the aggregate, or the
electronic equivalent of covers if the Document is in electronic form.
Otherwise they must appear on printed covers that bracket the whole
aggregate.
8. TRANSLATION
Translation is considered a kind of modification, so you may distribute
translations of the Document under the terms of section 4. Replacing
Invariant Sections with translations requires special permission from
their copyright holders, but you may include translations of some or
all Invariant Sections in addition to the original versions of these
Invariant Sections. You may include a translation of this License, and
all the license notices in the Document, and any Warranty Disclaimers,
provided that you also include the original English version of this
120
Introduction to Quantum GIS Tutorial Version 0.8.0
2/16/2007
Appendix A
----------------------------------------------------------------------------------------------------------License and the original versions of those notices and disclaimers. In
case of a disagreement between the translation and the original version
of this License or a notice or disclaimer, the original version will
prevail.
If a section in the Document is Entitled "Acknowledgements",
"Dedications", or "History", the requirement (section 4) to Preserve
its Title (section 1) will typically require changing the actual title.
9. TERMINATION
You may not copy, modify, sublicense, or distribute the Document except
as expressly provided for under this License. Any other attempt to
copy, modify, sublicense or distribute the Document is void, and will
automatically terminate your rights under this License. However,
parties who have received copies, or rights, from you under this
License will not have their licenses terminated so long as such parties
remain in full compliance.
10. FUTURE REVISIONS OF THIS LICENSE
The Free Software Foundation may publish new, revised versions of the
GNU Free Documentation License from time to time. Such new versions
will be similar in spirit to the present version, but may differ in
detail to address new problems or concerns. See
http://www.gnu.org/copyleft/.
Each version of the License is given a distinguishing version number.
If the Document specifies that a particular numbered version of this
License "or any later version" applies to it, you have the option of
following the terms and conditions either of that specified version or
of any later version that has been published (not as a draft) by the
Free Software Foundation. If the Document does not specify a version
number of this License, you may choose any version ever published (not
as a draft) by the Free Software Foundation.
ADDENDUM: How to use this License for your documents
To use this License in a document you have written, include a copy of
the License in the document and put the following copyright and license
notices just after the title page:
Copyright (c) YEAR YOUR NAME.
Permission is granted to copy, distribute and/or modify this
document under the terms of the GNU Free Documentation License, Version
1.2 or any later version published by the Free Software Foundation;
with no Invariant Sections, no Front-Cover Texts, and no Back-Cover
Texts.
A copy of the license is included in the section entitled "GNU
Free Documentation License".
If you have Invariant Sections, Front-Cover Texts and Back-Cover Texts,
replace the "with...Texts." line with this:
with the Invariant Sections being LIST THEIR TITLES, with the
121
Introduction to Quantum GIS Tutorial Version 0.8.0
2/16/2007
Appendix A
----------------------------------------------------------------------------------------------------------Front-Cover Texts being LIST, and with the Back-Cover Texts being LIST.
If you have Invariant Sections without Cover Texts, or some other
combination of the three, merge those two alternatives to suit the
situation.
If your document contains nontrivial examples of program code, we
recommend releasing these examples in parallel under your choice of
free software license, such as the GNU General Public License, to
permit their use in free software.
122