1
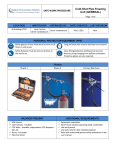
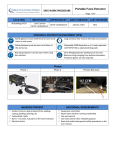
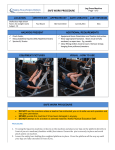
SAFE WORK PROCEDURE Drain Cleaning Machine (RIGID) Page 1 of 4 LOCATION WRITTEN BY: APPROVED BY: DATE CREATED All Buildings PTSD Lorie Carriere Brent Vandenbosch Brent Vandenbosch April 22, 2014 LAST REVISION New PERSONAL PROTECTION EQUIPMENT (PPE) Safety glasses or face shield must be worn at all times in work areas. Long and loose hair must be tied back and covered Safety footwear must be worn at all times in the work area. Protective outer gloves and inner latex gloves are required. Close fitting/protective clothing must be worn. Remove strings hanging from pullovers /sweaters. Photos Photo 1 Photo 2 HAZARDS PRESENT MSI injuries Moving parts Electrical shock Biological hazards - splashes Chemical exposure – splashes, burns Pinch / twist / whip injuries from the cable Primary Risk Area ADDITIONAL REQUIREMENTS Equipment orientation Never leave machine running unattended Use tools only for their intended purpose Read and understand general safety procedures in the user manual. SAFE WORK PROCEDURE Drain Cleaning Machine (RIGID) Page 2 of 4 SAFE WORK PROCEDURE PRE-OPERATIONAL SAFETY CHECKS: 1. Inspect required personal protective equipment and replace if required. 2. Workers are required to wear an inner nitrile glove with an outer work glove. The work glove protects the hand from the cable, while the inner glove protects from biological and chemical hazards. 3. Keep gloved hands on the cable whenever the machine is running. This prevents twisting, kinking and breaking of the cable. 4. Never operate the machine with a glove or belt guard removed. 5. Do not allow the cutter to stop turning while the machine is running. 6. Keep hands away from rotating drum and guide tube. Do not reach into drum unless machine is unplugged. 7. Ensure no slip/trip hazards are present in workspaces and walkways. 8. Do not use this machine if the power cord has been damaged or ground removed. 9. Inspect the machine before use and verify that it is working properly. Check the power cord for damage; clean any oil, grease or dirt from equipment handles and controls; inspect cables for wear and damage or corrosion; ensure the foot switch is attached to the machine. Do not operate without the foot switch. 10. Do not use the equipment in rain or wet conditions. Water may increase the risk of electrical shock. Disconnect the plug from the power source before making any adjustments, changing accessories, or storing the tool. 11. Check for misalignment or binding of moving parts, breakage of parts and any other condition that may affect the tool’s operation. 12. Do not twist or kink the main cable, doing so may cause severe injury. 13. Do not leave this equipment running while unattended. 14. Do not use machine if it is damaged. Immediately report any damages to your supervisor. OPERATION: 1. Inspect and don all personal protective equipment: safety glasses, gloves and safety footwear. Remove all jewelry; loose clothing and tie back hair. 2. Transport the extractor to the location where the work will be conducted in a clear, level, stable dry place. Do not use the machine while it is standing in water. Use proper lifting techniques to minimize back strain. 3. Position the machine so that the drum opening is within two feet of the drain inlet or properly support exposed cable when the distance exceeds two feet. 4. Check the work area for combustible materials / liquids. 5. Inspect the drain to be cleaned. If possible, determine the access point(s) to the drain, the size(s) and length(s) of the drain, distance to tanks or mainlines, the nature of the blockage, presence of drain cleaning chemicals or other chemicals, etc. If chemicals are present in the SAFE WORK PROCEDURE Drain Cleaning Machine (RIGID) Page 3 of 4 6. 7. 8. 9. drain, see the caretaker to determine what was used and obtain the MSDS sheet to determine what PPE is required. If needed, remove fixture (water closet, sink, etc.) to allow access to the drain. Do not feed the cable through a fixture. If needed, place protective covers in the work area to protect the surrounding area and minimize clean up. Pull the handle locking lever on the machine and lower the handle until it locks into the lowest position. Check to make sure that the rubber bumpers on the lower end of the handle are firmly in contact with the floor. Determine the correct drain cleaning equipment for the application. Select and install the proper tool to the end of the cable. a) If the obstruction is unknown, use a straight or bulb auger to explore the obstruction b) Once the obstruction is known, an appropriate tool can be selected for the application a) Install the tool to the end of the cable. The T-slot coupler allows the cutting tool to be snapped into the cable coupler. Pin Auger Cutter Spade Cutter 10. Ensure that the FOR/OFF/REV switch is set to the OFF position prior to starting the machine. 11. Position the foot switch. You must be able to hold and control the cable, control the foot switch, and reach the FOR/OFF/REV switch, all at the same time. 12. Plug the machine into a properly grounded outlet. 13. Pull cable out of drum and feed into drain. Push cable at least one foot into the drain so that the end of the cable will not come out of the drain and whip around when you start the machine. 14. Move the FOR/OFF/REV switch to the FOR (FORWARD) position. 15. Press on the foot switch to start the machine. 16. Advance the cable into the drain by moving the feed lever into the advance position until it engages and advances the cable. 17. Always keep one hand on the cable. As you feed the cable into the drain you will be able to feel the cable load or wind up. Do not let the cable build up outside the drain. 18. When the cable winds up or if the tool stops turning, move the feed lever to the retrieve position to free the tool from the blockage. 19. Once free slowly feed the rotating tool back into the blockage and let it dwell in the blockage to break it up. 20. Once the drain is open, start a flow of water down the drain to flush the debris out of the line. 21. While the water is running, retrieve the cable from the line by moving the feed lever in the opposite direction that the cable and drum rotate. SAFE WORK PROCEDURE Drain Cleaning Machine (RIGID) Page 4 of 4 Note: The FOR/OFF/REV switch should be in the FOR position. 22. Once the tool is just inside the drain opening. Move the feed lever to the neutral position and release the foot switch. Allow the drum to come to a complete stop. Do not pull the end of the cable from the drain while the cable is rotating. The tool can whip around and could cause serious injury. 23. Place the FOR/OFF/REV in the OFF position and unplug the machine. Pull the remaining cable from the drain by hand and feed into the drain cleaner. If needed, change the tool and continue cleaning following the above process. Several passes through a line are Required for complete cleaning of the line. If an emergency situation occurs while conducting this task or there is an equipment malfunction, shut the equipment off immediately and unplug the power tool. REPORT ANY HAZARDOUS SITUATION TO YOUR SUPERVISOR IMMEDIATELY. REGULATORY REQUIREMENTS Mb. Regulations 217/2006, Part 16, Machines, Tools & Robots, Sections 16.1 – 16.18 WS&H Act W210, Section 4, 5, 7, 7.1 Operators Manual for the RIDGID Drain Cleaning Machine, K-400