1
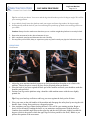
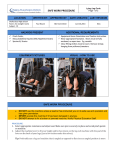
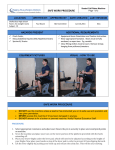
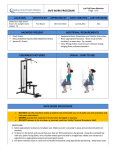
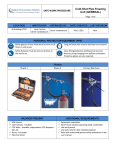
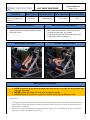
SAFE WORK PROCEDURE LOCATION Shaftesbury High School Room: ALC (weight room) Subject: PE WRITTEN BY: APPROVED BY: Paul Bryant HAZARDS PRESENT Leg Press Machine Page 1 of 3 DATE CREATED S&H Committee LAST REVISION June 20,2014 New ADDITIONAL REQUIREMENTS Pinch Points, Musculoskeletal Injuries (MSI, Repetitive Strain) Sprains &, Strains EQUIPMENT PICTURES Equipment Room Orientation and Teacher Instruction. Wear appropriate footwear. Shoes must be fully enclosed, no open toes. E.g. sandals Close fitting clothes must be worn. Remove strings hanging from pullovers/sweaters. VISUAL : HOW TO USE SAFE WORK PROCEDURE DO NOT use this machine unless a teacher has instructed you on its safe use and operation and has given permission. NEVER operate this machine if it has been damaged in anyway. DO NOT attempt to fix a broken or jammed machine. Notify Physical Education Staff. PROCEDURE: 1. To using the leg press machine, sit down on the machine and place your legs on the platform directly in front of you at a medium (shoulder width) foot stance. Ensure the pin is securely in place and avoid pinch points on machine. 2. Lower the safety bars holding the weighted platform in place. Press the platform all the way up until your legs are fully extended in front of you. SAFE WORK PROCEDURE Leg Press Machine Page 2 of 3 Tip: Do not lock your knees. Your torso and the legs should make a perfect 90-degree angle. This will be your starting position. 3. As you inhale, slowly lower the platform until your upper and lower legs make a 90-degree angle. 4. Pushing mainly with the heels of your feet and using the quadriceps go back to the starting position as you exhale. Caution: Always check to make sure that when you re-rack the weight the platform is securely locked. 5. Repeat the movement for the desired amount of reps. 6. Once completed, stand up and dismount the unit carefully. 7. If at any time you feel faint, dizzy or experience pain, stop and consult your physical education teacher. VARIATIONS: Hack Squats. 1. Adjust leg press machine into hack squat set up. Pull pin and adjust foot plate so it is flush with machine. Ensure the pin is securely in place and avoid pinch points on machine. 2. Place the back of your torso against the back pad of the machine and hook your shoulders under the shoulder pads provided. 3. Position your legs on the platform using a shoulder width medium stance with the toes slightly pointed out. Tip: Keep your head up at all times and keep your torso against the back pad at all times. 4. Place your arms on the side handles of the machine and disengage the safety bars by moving the side handles from a facing front position to a diagonal position. 5. Now straighten your legs without locking the knees. This will be your starting position. Begin to slowly lower the unit by bending the knees as you maintain a straight posture with the head up. Continue down until the angle between the upper leg and the calves becomes slightly less than 90degrees (which is the point in which the upper legs are below parallel to the floor). Inhale as you perform this portion of the movement. SAFE WORK PROCEDURE Leg Press Machine Page 3 of 3 Tip: If you performed the exercise correctly, the front of the knees should make an imaginary straight line with the toes that are perpendicular to the front. If your knees are past that imaginary line (if they are past your toes) then you are placing undue stress on the knee and the exercise has been performed incorrectly. 6. Begin to raise the unit as you exhale by pushing on the floor with mainly with the heel of your foot as you straighten the legs again and go back to the starting position. 7. Repeat the movement for the desired amount of reps. 8. Once completed, stand up and dismount the unit carefully. 9. If at any time you feel faint, dizzy or experience pain, stop and consult your physical education teacher. REGULATORY REQUIREMENTS • WS&H Act W210, Section 9.3(1) Regulations, - Part 16, Section: 16.1-16.8 - Part 2, Section 2.1- 2.2, 2.7-2.9, 2.14 Manufacturers User manual