1
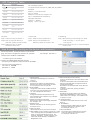
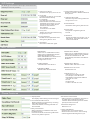
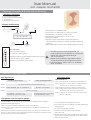
User Manual
VoIP Adapter GLVP-8000
Package Contents & Setup and for Booting
1.Package Contents
A. One Telephone Adapter
B. One 12V/500mA Power Adapter
C. One LAN Cord
D .One Telephone Line Cord
2.Setup and Booting
Internet
Router
2
4
5
Power Jack
Phone Adapter
RESET WAN/LAN PC
PHONE
PSTN
DC12V/1A
3
1
PSTN
1.Plug telephone on PHONE socket.
! line on WAN socket to connect to Internet.
2.Plug RJ45
3.Plug POTS line (if available ) on PSTN socket.
4.Plug RJ45 line on LAN socket to connect to PC.
5.Plug power adaptor.
6.Wait for booting completed. A ring from the telephone
indicates device booting successfully and begin registering
to server.
7.When registering function OK. The LAN LED indicates in yellow.
LED's Indication:
1.To make the phone call through firewall, you
Power on indication (green)
need to open SIP port and RTP port on your firewall.
PSTN connection status (green)
Booting finish indication (green)Register OKindication(yellow)
(Please also check the firewall setting of
!
anti-virus software. )
PC port 10/100M link (green/yellow)
2.Please check the Network Type ( DHCP or PPPoE
WAN/LAN port 10/100M link (green/yellow)
or Static IP) and finish the configuration process.
3.Press Reset Button arround 4 secs. to the default
value if needed.
VoIP & PSTN Operation
PSTN Operation
VoIP Operation
Dial Peer IP Phone directly
Step 1:
OR
Make a PSTN call
Dial E.164 through SIP Server
Step 1: Pick up phone and you will hear the dial tone.
Step 2: Press the "
Pick up phone and you will hear the dial tone.
* " key to switch to PSTN mode and
you will hear the dial tone from PSTN
Step 2: Dial IP address use
'*' instead of '.'
Dial E.164 number
Step 3: Dial the number you want to make the call.
Step 4: Hang up the phone when the call completes
Step 3:
press '#' to send
If IP address = 192.168.1.163
real dial key: 192*168*1*163#
and repeat step 1 to make another call.
If the peer phone's E.164 number
is 100 real dial key: 100#
Step 5: Hang up the phone for two seconds to switch
Back to VoIP mode
VoIP phone calls the regular phone:
The GLVP-8000 can call any land or mobile phone anywhere in the world pls.
Dial with following description:
Step 1: Going into the Web configuration with correct password.
Step 2: Set the countr y code as you belong then you can dial the number as your
countr y rule.
1.Go to the Web of the www.glinksnet.com
2.Click VoIP to go into the dialing out page(CCNET VoIP
billing system).
3.Choice the language you want.
Step 3: Buy the credit from the VoIP of www.glinksnet.com before you make the call.
4.Enter your user name(the phone number )
Notice: Pls. don't make the call to regular phone from the VoIP phone unless you had
buy the credit from the G-Links' dialing out:
5.Begin to enjoy the G-Links' CCNET VoIP platform that
and pass code.
you can buy the credit of dialing out, on the line and
many other functions.
IVR Command Table
Char
0.@:
+ -
Char Mapping
00 01 02 03 04 05 06
1 Space "
10 11 12
2 abc ABC
20 21 22 23 24 25 26
3 def DEF
30 31 32 33 34 35 36
4 ghi GHI
40 41 42 43 44 45 46
5 jkl JK L
50 51 52 53 54 55 56
6 mno MNO
60 61 62 63 64 65 66
7 pqrs PQRS
70 71 72 73 74 75 76
77 78
8 tuvTU V
80 81 82 83 84 85 86
9 wxyz WXYZ
90 91 92 93 94 95 96
97 98
IVR Char Mapping Table
Configure IVR item with type IVR_CMD_TYPE_SET_STRING
Examples:
Example 1, user name is abc.
Input : 212223#
Example 2, user name is [email protected]
Input : 1020300243747101236361#
Playing IVR examples:
Example 1, " aBcDef "
Playing : " a up b c up d e f "
Call Hold:
Call Transfer:
Call Waiting:
Step1: Flash hook (key) and press "1"
Step1: Flash hook (key) and press "2"
Step1: When hearing a call waiting tone. Press
Step2: Then you will hear dial tone.
Step2: Then you will hear dial tone.
Press the number you want to dial.
Press the number you want to dial.
" Flash hook (key)+1" to pick up the
Coming call.
Step2: Press" Flash hook (key) " to switch between
Step3: Flash hook (key) to switch
the two calls.
Between the two calls.
Web Setting (To configure the device with browser)
The access buttons, located across the top of the web
page, are used to configure the IP Phone for operation.
For example: 192.168.1.3
1.Please enter IVR Menu "16881688#"
-->"100#" to get your IP address
2.Please open MSIE(Win98,Win2000 and XP)
And input your IP address--http://xxx.xxx.xxx.xxx:8080
3. Input user name and password
user name is : normal
password is : 1234
SIP Settings
1. Network Type
Specify the Network type to connect to
Internet
2. IP Address
Assign the IP address of WAN interface
Effective only when network type is static
IP; for example: 220.130.187.221
3. Subnet Mask
Assign the subnet mask of WAN interface
Effective only when network type is static
IP; For example:255.255.255.0
4. Gateway
Assign the default route.Effective only
when network type is static IP; For example
220.130.187.254
5. PPPoE User Name/ Password
Effective only when network type is PPPoE
For example: 123
6. NTP Server IP
Network Time Server IP. Used to get time
Form this server
7. NTP Time Zone
Global Time Zone of your current location
8. NAT Traversal(none stun static)
If "None" is selected,no stun operation in SIP
activities
If "Stun"is selected,the device will detect the
NAT type automatically and get the result to
modify SIP activities
Be aware to set the"Stun URL"when "Stun"is
selected.
If "Static" is selected, specify the "NAT"
external IP
9. STUN URL
STUN server domain name or IP address.
When NAT TRAVERSAL is "Stun", you must
set this item. For example, "stun.fwdnet.net"
or "80.67.17.102".
10. NAT External IP
IP address of the NAT device in front of the
Device
11. First DNS IP
Primary Domain in Name Server used to
lookup IP address form domain name
For example:"168.95.1.1"
12. Second DNS IP
13. Band Width Control: used to control the traffic Second Domain in Name Server used to
lookup IP address form domain name
rate flooding between LAN/WAN interface, in
For example:"168.95.1.2"
order to reserve bandwidth for VoIP. For
example,1000kbps, It means that the max
traffic rate will be limited to 1000kbps in
Bridge/NAT mode
SIP Settings
SIP Settings are needed under the phone bundled with a
number(from service provider)
1. Using Proxy Server
Choose to use proxy server or not
6. Using Outbound Proxy Server
Specify to enable or disable outbound
Proxy server
2. Proxy URL
If "Using Proxy Server" is selected
this item must be identify
For example:
"210.202.244.130:7890"
When the SIP server does not use
the default port number, you can
specify the port number by the
format "IP:Port Number"
For example,
" 210.202.244.130:7890 "
7. Outbound Proxy URL
Effective only when "Using outbound
Proxy server" is on
8. Domain Name
Used when "Using Proxy Server"is on
3. Proxy user
The SIP account name when"Using
Proxy Server" is on.
9. Expire Time
The period of registering time in
second
10. RTP Port
Specify the RTP port number. If "0" or
bland is set, the system will choose
one Port at random
4. Proxy password
The SIP account password when
"Using Proxy Server" is on
5. User Name
User name of SIP user agent
NAT Relative
1.NAT Enable
Select "On" to enable NAT function;
Select "Off" to disable NAT function
and Enable bridge function;
When "NAT Enable" the DHCP server
function is disabled even that
Configured it at "On" .
4.DHCP Server Enable
Select "On" to enable DHCP server on
LAN Interface. Select " Off" to disable
this function.DHCP server will
automatically shut down when NAT is
disabled .
2.LAN IP Address
Default Value:192.168.111.1
5.DHCP Server Start IP
Default value:192.168.111.100
3.LAN Subnet Mask
Default Value:255.255.255.0
6.DHCP Server IP Count
Default value: 30
7.Virtual Server 1~ 5
Virtual servers setting for NAT.
For example, one FTP server
behind NAT router with IP address:
"192.168.111.100"
Port:21
Protocol:TCP
Local IP:192.168.111.100
Phone Features
1.Display Name
The display name setting on SIP user agent
2.Unconditional Call Forward
Setting this item to forward every incoming
call to the specified URL.
If the item is blank, incoming calls will not
be forwarded
3.Busy Call Forward
Setting the item to forward the calls ,then
the phone is busy
If the item is bland, the incoming calls when
You are busy will be rejected
4.No Answer Call Forward
Setting the item to forward the call when no
one pick up the calls in some times.
The item "No Answer Ring Time"is used to
specify the time in second
5.No Answer Ring Time
Reference 4.4
6.Using Call Waiting
Select to turn on or off this feature
When the item is turned on, the incoming
call will signal the alerting tone to you.
FPA (Frequent problems and Answer)
Problem
Possible Cause
Your Network connection
Bandwidths is less than 10Kbps
Low Voice Quality
Unstable Network connection :
Network delay > 500ms or
Trembling > 100ms or
Network packet loss > 10%
Log in obstructed by Firewall. You
Can not log in to SIP Server
are using a proxy network which is
(message : Registering Fail, no
blocking the log in. Your are not in
@ symbol in the position 'b' of
DHCP network. You did not enter
LCD)
the correct configuration.
Can not dial with regular phone
Solution
Pls. check your LAN cord plug to make sure your
plug in good condition and also check the Router
or Switch Hub which you connect to, and make
sure that you use the phone in the best
condition network possible.
Pls. contact the G-Links customer center
( [email protected] /
[email protected]).
Pls. check the configuration which you
set again.
Pls. make sure that you are in same type of
network with your phone setting (DHCP is
defaulted type for the device).
Pls. make sure your line and phone are in good
PSTN or Phone plug not well
condition.
connection or plug wrong location.
Pls. check the plug in correct location.