1
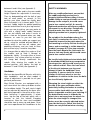
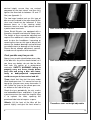
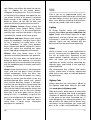
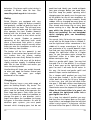
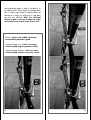
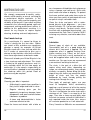
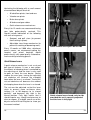
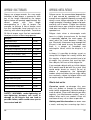
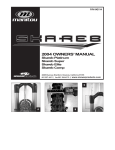
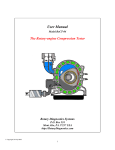
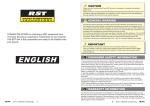
Table of Contents
Before You Ride..........................................4
Weight Rating...........................................4
Standover Height......................................4
Saddle Height...........................................4
Handlebars................................................6
Check your bike every time you ride........8
Riding.........................................................11
Lighting...................................................11
Helmet.....................................................11
Highway Code.........................................11
Braking....................................................12
Changing gear........................................12
Maintenance and Care..............................16
Free 2-week check-up............................16
Cleaning..................................................16
Lubrication..............................................17
Quick Release Levers.............................18
Brakes.....................................................20
Wheels....................................................24
Tyres and tubes......................................26
Gears......................................................26
Headset...................................................31
Bolt Checks.............................................32
Recommended Tools..............................32
Bicycle Storage.......................................33
Warranty.....................................................34
Limitations...............................................34
Appendix 1: Bolt Torques........................36
Appendix 2: Metal Fatigue.......................37
What to look out for.................................37
Why does fatigue damage happen?.......38
Bristol Bicycles User Manual
This manual contains important safety and maintenance
information. It is essential that you read it thoroughly before you ride
your new bicycle, and keep it for future reference.
Please pay special attention to all the points of safety information in
this manual, as they are in place to help you avoid serious injury.
If you encounter any issues with your bicycle not detailed in this
manual, or if you do not understand anything, please cease use of
the bicycle immediately and consult Bristol Bicycles.
This manual is not intended as a comprehensive service or repair
manual. Even if you carry out the maintenance detailed in this
manual, your bicycle will still require professional servicing,
normally every 6 to 12 months, or sooner in the case of accident,
damage, malfunction or heavy use.
This manual provides general guidance only; for detailed
information please refer to the instructions from individual
component manufacturers provided at the time of bicycle purchase.
Intended Use
Bristol Bicycles are for use on-road and on well-finished, smooth
paths and trails. They are not suitable for mountain biking, stunting,
jumping, carrying more than one person, or any other purposes.
Using a Bristol Bicycle for anything other than the type of riding for
which it was designed may result in damage, injury or death.
Any non-standard use could also substantially shorten the useful
product life of the bicycle. All Bristol Bicycles should be checked
annually by a professional bicycle mechanic for indications of
potential failures including cracks, corrosion, dents, deformation,
paint peeling and any other indications of problems, inappropriate
use or abuse. These are crucial safety checks and very important to
help prevent accidents, bodily injury or death.
SAFETY WARNING: all bicycles are subjected to wear and high
stresses. Different materials and components may react to
wear or stress fatigue in different ways. If the design life of a
component has been exceeded, it may suddenly fail, possibly
causing injury to the rider. Any form of crack, scratch or
change of colouring in highly stressed areas may indicate that
the life of the component bas been reached and it should be
replaced immediately. See Appendix 2 for more information.
A crash or other impact can place high stresses on bicycle
components, causing them to fatigue prematurely. Damaged
components can fail suddenly and catastrophically, causing
loss of control, serious injury or death. Always get your bike
checked by a professional after a crash or collision.
Like any form of transport, cycling involves potential risk of injury
and damage. While the risk is low compared to many other
activities, by choosing to ride a bike you assume the responsibility
for that risk, so you need to know and to practice the rules of safe
and responsible riding and of proper use and maintenance. Proper
care of your bicycle reduces the risk of injury.
This manual contains safety warnings concerning the
consequences of failure to maintain or inspect your bicycle and of
failure to follow safe cycling practices. Many of the warnings say
“you may lose control and fall”. Any fall can result in serious injury
or even death, so we do not always repeat the warning explicitly.
It is impossible to anticipate every riding situation or eventuality, so
this manual makes no representation about the safe use of the
bicycle under all conditions. Some risks are inherent in the use of
any bicycle which cannot be predicted or avoided, and these are
the sole responsibility of the rider.
2
3
BEFORE YOU RIDE
Weight Rating
Bristol Bicycles of all sizes are certified up to
a gross weight of 100kg (this is the combined
weight of bicycle and rider and any luggage).
Standover Height
Seatpost too high: unsafe
The standover height is the distance from the
ground to the top of the bicycle’s frame at the
point where your crotch is when straddling
the bike. To check for correct standover
height, straddle the bike while wearing the
kind of shoes in which you will be riding. If
your crotch is in contact with the frame, the
bike is too large. This cannot be adjusted,
and means you require a different size of
bicycle frame. You should have a minimum
standover height clearance of about two
inches (5cm).
Saddle Height
Seatpost lowered sufficiently: safe
A saddle that is too high or too low will make
riding uncomfortable and could result in
injury. Check the saddle height before riding
to ensure it is safe. (On a Bristol Bicycle,
your saddle height will normally have been
adjusted at the time of purchase. If in doubt,
please consult Bristol Bicycles for advice).
SAFETY WARNINGS:
To confirm the optimum saddle height for
you, sit on your bike and lean against a wall.
Place your heels on the pedals and pedal
backwards a few times. When the pedal is at
the bottom of its travel your leg should be
straight. If your knee is bent when the pedal
is at its lowest position, you need to raise the
saddle. If you have to stretch your leg to
reach the pedal or if you find yourself rocking
from side to side on the saddle in an attempt
to reach the pedals at their lowest point, your
saddle is too high. Get off the bike and adjust
the saddle height, using a 5mm allen key in
the seat clamp bolt. Tighten this bolt to
4
Do not adjust the saddle above the
safe limit, as marked on the seatpost.
The seatpost should be lowered to the
point where the limit mark is entirely
slid into the bicycle frame, and no
mark is visible above the seat clamp. If
the seatpost extends from the frame
beyond the limit marking the seatpost
or frame may break, which could
cause you to lose control and fall.
Do not slide the saddle forward or
backward beyond the limit marks on
the saddle rails. If the bike is ridden
with the saddle extended too far
forward or backward the saddle rails
may bend or break, which could cause
you to lose control and fall.
5
between 6 and 8 Nm (see Appendix 1).
Get back on the bike and try the new saddle
height. Repeat the adjustment if necessary.
Then try backpedalling with the ball of your
foot on each pedal, as normal. In this
position your knee should be slightly bent
when the pedal is at its lowest point. This is
the best saddle height for optimal pedalling
comfort and efficient use of your leg muscles.
If you are new to cycling, you may prefer to
start with a slightly lower saddle, because
this can aid stability and make it easier to
place a foot on the ground when you stop.
However, as soon as you feel safe and
confident to raise the saddle, we suggest you
do so, using the method outlined above. A
saddle which is too low will reduce your
pedalling efficiency and can lead to knee
pain or knee injury if used for long rides.
It is also possible to adjust the angle or tilt of
the saddle, and to slide it forward or
backwards slightly. To make either of these
adjustments, use a 6mm allen key to loosen
the clamp bolt directly underneath the
saddle. After altering the saddle to the
desired position, fully tighten the bolt to
between 21 and 23 Nm (see Appendix 1).
Handlebars
We have designed Bristol Bicycles with fairly
high handlebars, and on most models a
range of adjustment is possible to suit your
personal preferences.
Most Bristol Bicycles are equipped with a
quill stem which can slide up or down to alter
the handlebar height. The quill stem's height
can be adjusted by loosening the 6mm allen
bolt facing upwards in the centre of the stem.
After loosening it approximately 2 whole
turns, tap the top of the bolt gently with a
hammer to free the internal clamping
mechanism. Now the stem and handlebar
should be free to move up and down. Once
you have repositioned the handlebars to the
6
SAFETY WARNINGS:
After any saddle adjustment, ensure that
the saddle adjusting mechanism is
properly tightened before riding. A loose
saddle clamp or seat post binder can cause
damage to the seatpost, or could cause
you to lose control and fall. A correctly
tightened mechanism will allow no saddle
movement in any direction. Periodically
check to make sure that the saddle
adjusting mechanism is properly tightened.
Do not adjust the handlebars above the
safe limit, as marked on the stem. The stem
should be lowered to the point where the
limit marking is entirely slid into the bicycle
frame, and no marking is visible above the
headset (see page 9). If the stem extends
from the frame beyond the limit mark, the
stem or fork may break, which could cause
you to lose control and fall.
An insufficiently-tightened stem binder bolt
or handlebar binder bolt may compromise
steering action, which could cause you to
lose control and fall. Place the front wheel
of the bicycle between your legs and
attempt to twist the handlebar/ stem
assembly. If you can twist the stem in
relation to the front wheel or turn the
handlebars in relation to the stem, the bolts
are insufficiently tightened.
Changing the stem height can affect the
tension of the gear and brake cables,
potentially locking the brakes or creating
excess cable slack which can make the
brakes inoperable or affect gear indexing. If
the brake blocks move in towards the
wheel rim or out away from the wheel rim
when the stem height is changed, the
brakes must be correctly adjusted before
you ride the bicycle. Check also that the
cables are not pulled taut when steering.
7
desired height, ensure they are centred
compared to the front wheel, and then fully
tighten the 6mm bolt to between 15 and 17
Nm (see Appendix 1).
The two large headset nuts on this type of
bike are not involved in the adjustment of the
stem and should not be loosened. If they
become loose, or if the steering action
becomes loose or over-tight, please consult
a professional mechanic.
Quill stem too high: unsafe
Some Bristol Bicycles are equipped with a
threadless headset and external clamp stem.
The height of these cannot be adjusted and
requires the addition of a stem adapter if you
want to raise the handlebars. Loosening or
removing the stem on this type of bicycle will
release the headset bearings and could lead
to maladjustment or damage of the headset.
Please do not attempt adjustment yourself,
instead consult a professional mechanic.
Check your bike every time you ride
Always have a quick check before every ride.
If the bike fails any of the checks below, or if
you have any doubts, do not ride the bike
and seek the advice of a professional
mechanic. SAFETY WARNING: failing to
properly carry out these checks before
each ride and using a bike with loose,
faulty or badly-adjusted components
could cause you to lose control and fall.
Quill stem lowered sufficiently: safe
Tyres: check that they feel firm even under
hard thumb pressure. It is normal to have to
top up the tyre pressures every few weeks. If
soft, inflate the tyres to the correct pressure,
as written on the side of the tyre.
Check the tyres periodically for cuts, cracks
and embedded thorns and debris. If you get
a puncture out on the road, the simplest thing
is to replace the tube, repairing the
punctured tube later to keep as a spare.
Wheels: Lift the front of the bike off the
ground slightly and give the front wheel a
8
Threadless stem: not height adjustable
9
spin. Make sure neither the wheel rim nor the
tyre is rubbing on the brake blocks,
mudguard or anything else. Then lift the back
of the bike off the ground and repeat for the
rear wheel. If either of the wheels is buckled
badly enough to be rubbing on the brake
blocks or frame, do not ride the bike and
seek the advice of a professional mechanic.
RIDING
Quick Release Levers: Always check the
quick-release levers before riding. Check
both that the lever is in the closed position
and fully tight, and that the wheel is fully and
symmetrically seated in the frame or fork.
Lighting
Handlebars and stem: Always have a quick
tug on the handlebars, and give them a twist
to see if anything has come loose. If the
stem, handlebars or grips have become
loose, tighten them before setting off. If whilst
riding you notice that anything has come
loose, stop riding immediately and check it.
Brakes: Give your brake levers a firm
squeeze and check the brakes are operative.
Check that the lever does not travel too far
before the brake starts working: it is essential
that the brake lever cannot come into contact
with the handlebar grip, no matter how hard it
is squeezed.
Gears: check that the chain is not jammed or
stuck, and that the gears have not been
shifted accidentally while the bike was
stationary. Check that the pedals turn freely
without any noises from the chain. As on any
derailleur-geared bike check with special
care that the derailleur hanger is not bent,
and that the rear derailleur cannot come into
contact with the spokes of the rear wheel.
(Get into the habit of spinning the cranks and
pedals backwards one or two turns before
each ride. If the chain goes slack or falls off
during this test, it is probably a sign that the
gears are misaligned or the hanger is bent. It
is better to discover this now than whilst
riding when it could cause substantial
damage or an accident.)
10
Even if you are an experienced cyclist, we
recommend you take time to get used to your
new bike before using it on a busy road. All
bikes have different handling characteristics
and you may need a little time to adjust.
All Bristol Bicycles come with reflectors
already fitted; these are not a substitute for
lights. Bright and efficient lights are a legal
requirement, and are vital for your safety, if
the bicycle is used after dark on any public
highway. Lights are not included with the
bicycle and must be purchased separately.
Helmet
Whilst a helmet is not a legal requirement in
the UK, wearing one can potentially reduce
the risk of head injury, especially at low
impact speeds. However, wearing a helmet
does not make you invincible: it is no
substitute for careful cycling, observing the
highway code, and having a safe and wellmaintained bike.
We recommend that children and novice
cyclists should wear a helmet; experienced
adult cyclists can make an informed decision
for themselves.
Highway Code
Always obey the law, and always adhere to
the highway code when riding on the road.
See www.gov.uk/highway-code
Ride defensively, being aware of what other
road users are doing, and trying to anticipate
situations of potential danger or risk. Riding
in the gutter or too close to parked cars is
more dangerous than taking your place in the
flow of traffic. Be aware that car drivers may
not always see or anticipate you, so do your
best to be visible and predictable in your
11
behaviour. One-to-one adult cycle training is
available in Bristol, often for free. See
www.lifecycleuk.org.uk for information.
Braking
Bristol Bicycles are equipped with very
powerful brakes. Apply the brakes smoothly
and gradually, and do not grab the levers or
squeeze them too hard. The left-hand lever
operates the rear brake and the right-hand
lever operates the front. Sudden, powerful
braking with the left-hand lever can easily
cause the rear wheel to skid, which can be
difficult to control. Sudden or powerful
squeezing of the right-hand lever could
cause a front-wheel skid, which is almost
impossible to control and will normally either
throw you over the handlebars or cause you
to fall sideways from the bike.
The brakes will be less powerful in wet
weather. A wet road or loose gravel will have
less traction than dry tarmac, making
skidding much more likely. Before the wheels
have a chance to skid, ease off the brakes
slightly and then reapply. A skidding wheel
does little to slow the bike and means you
have no steering control.
Hard braking will throw your weight forward,
so when you apply the brakes extend your
arms slightly and move your weight
backwards on the saddle.
Changing gear
Bristol Bicycles have a very wide range of
gears for tackling Bristol's hilly terrain. The
right-hand shifter operates the smaller rear
gears, and the left-hand shifter operates the
three large front gears. Each shifter has two
levers: a thumb lever under the handlebar to
change the gears in one direction, and a
finger lever above the handlebar to change
the gears in the other direction. As with all
derailleur gear systems, you must pedal
forwards whilst changing gear, but do not
12
pedal too hard. Ideally you should anticipate
your gear changes before you need them,
and then keep the pedals spinning whilst
changing gear but gently ease the pressure
off the pedals for one or two revolutions to
allow the gears to change smoothly. Avoid
sudden shifts or changing too many gears at
once because the chain may hesitate or jam.
Plan ahead and change into an easy gear
before coming to a stop. Do not change
gear whilst the bicycle is stationary or
whilst not pedalling. Do not backpedal
whilst changing gear, nor immediately
afterwards.
For normal, fairly flat terrain we suggest you
set off with the left-hand shifter in number 2,
and the right-hand shifter somewhere in the
middle of its range, around gear 3 or 4. As
you accelerate or try a gentle downhill slope
and find your legs spinning faster, you can
change the right-hand shifter to a higher
gear. As you slow down again, change the
right-hand shifter to a lower gear again
before coming to a stop.
Now try a gentle uphill slope. You may find
that gear 3 or 4 is too difficult. If so, change
into a lower gear on the right-hand shifter:
gear 2 or even 1 will make the hill easier. In
this way, flat terrain and gentle uphill and
downhill slopes can be tackled easily.
For a steeper uphill gradient you may find
that even gear number 1 on the right-hand
shifter does not make the hill easy enough.
In that case, also shift the left-hand shifter
into gear 1. With both shifters now displaying
gear 1, the bike is in its lowest gear and
should make even the steepest hills possible.
When the left-hand shifter is in gear 1, do
not change the right-hand shifter into a
gear higher than 4 or 5.
On a long, fast downhill gradient you may
find that even the highest gear on the righthand shifter is not enough when the left-hand
shifter is only in gear 2. In that case, shift the
left-hand shifter into gear 3. With the shifters
13
now displaying gears 3 and 8, the bike is in
its highest gear. Don't forget to change back
into a lower gear before slowing down or
coming to a stop, as setting off in top gear
can be very difficult! With the left-hand
shifter in gear 3, do not change the righthand shifter into a gear lower than 3 or 4.
Below chain is on middle chainring
and middling sprocket: good
Opposite page, top chain is on large
chainring and largest sprocket: avoid
Opposite page, bottom chain on small
chainring and smallest sprocket: avoid
14
15
MAINTENANCE AND CARE
We strongly recommend 6-monthly safetychecks and 6-monthly or annual servicing by
a professional bicycle mechanic, in the
interests of your safety and the longevity and
reliability of the bicycle. If you notice anything
untoward in the intervening period, again we
recommend seeking professional advice. In
addition to this professional servicing, it is
normal for any bicycle to require regular
cleaning, checking and small adjustments.
Free 2-week check-up
On a new bicycle it is normal for things to
'settle in' during the first few rides. Cables
can stretch a little, or brakes can sometimes
develop a squeal, for example. All Bristol
Bicycles come with a free tune-up within the
first 2 weeks of ownership to give you a
chance to ride the bike a few times and then
have these adjustments and checks made.
Please call to book your Bristol Bicycle in for
a free check-up and adjustment. This check
is limited to the original purchaser and it is
only available within the first two weeks of
ownership. It is the owner's responsibility to
ensure the bike is booked in and returned for
the check-up within this period. Proof of
purchase may be required.
Cleaning
Cleaning your bike is important:
car shampoo or diluted bike chain degreaser
using a sponge and soft brush. Rinse with
clean water and allow to drip-dry. To protect
the frame and fork and make them easier to
clean next time, polish all paintwork with wax
car polish using a soft cotton cloth.
Clean the chain and gears with a waterbased bicycle chain degreaser – we have
found Fenwicks FS-1 to be most effective –
using a small brush. For best results, clean
the chain with a dedicated cleaning tool – we
recommend the Park Tools Cyclone CM-5.2
as being very effective, and more robust than
most.
Lubrication
Several types of chain oil are available.
Conventional 'wet' oil is a good choice but
attracts dirt if too much is applied. 'Dry' oil
evaporates after it is applied, leaving a lowfriction coating (e.g. Teflon) on the chain.
This stays clean but is easily washed off so
must be reapplied often and is best for dry
weather use. For most users we recommend
a conventional 'wet' bicycle chain oil.
The chain is the part of a bike that will
require oiling most often: depending on
usage, we recommend weekly, every couple
of weeks, or monthly. Before oiling the chain,
wipe off any dirt: hold a rag around the lower
length of chain and turn the pedals
backwards by hand, thereby pulling the
moving chain through the rag.
A clean and lubricated bike is faster
and more efficient to ride.
Then apply oil sparingly: again, use your
hand to backpedal whilst continuously
applying a small amount of oil to the moving
chain, avoiding the wheel rims and brakes.
The aim is to lubricate the entire chain with a
minimum of oil. There is no need to oil the
cogs. Then take a clean rag and lightly wipe
the chain to remove surface oil: lubrication is
only required inside the chain links, excess
oil is counter-productive as it will attract dirt.
Clean the frame and wheels with a bike or
Every 3 months or 500 miles we recommend
A bike kept in good, clean condition is
likely to last longer and hold its value.
Regular cleaning gives you the
opportunity to spot any damage, loose
components and wear-and-tear before
it becomes a problem.
16
17
lubricating the following with a small amount
of conventional bicycle chain oil:
All derailleur pivots, front and rear
V-brake arm pivots
Brake lever pivots
All brake and gear cables
Quick-release cam mechanisms
Every 6 to 12 months we recommend having
your bike professionally serviced. This
should include lubrication of the following
with anti-seize grease:
Seatpost and quill stem (to prevent
them seizing in place).
Adjustable stem hinge mechanism (to
prevent it creaking or becoming worn).
Every 12 months or 2,000 miles, whichever
occurs sooner, we recommend getting the
headset and wheel bearings rebuilt
professionally with good quality automotive,
marine or bicycle bearing grease.
Quick release lever open: do not ride
Quick Release Levers
A quick release mechanism is not a nut and
bolt type of fastener. It uses a cam action:
the amount of clamping force is controlled by
the adjusting nut, and the lever is only used
to open or close the cam device. Having
undone the cam lever, turning the adjusting
nut clockwise will increase the clamping
force when the lever is re-closed. Turning the
nut anti-clockwise will decrease the amount
of clamping force when the lever is re-closed.
The nut must be adjusted so that the lever
starts to present some resistance when
halfway (i.e. at 90 degrees to its closed
position), and becomes fully tight in the
closed position. Fully tight means that it
should require very strong hand pressure to
close or reopen. If in doubt, cease use of the
bicycle and ask Bristol Bicycles to show you
the correct method.
18
Quick release lever closed: safe to ride
provided the nut is correctly adjusted
and the lever is fully tight
19
Whenever you open or adjust the quick
release levers, always ensure that the
wheels are re-installed fully into the bicycle
frame or fork and are sitting centrally before
re-closing the quick release levers.
Every 3 to 6 months, open each quick
release lever, drip a couple of drops of chain
oil into the cam mechanism at the base of
the lever, and then check and re-close the
lever. This will prevent it from rusting and will
ensure smooth action and easier use.
Closed noodle: safe to ride
Brakes
Bristol Bicycles are equipped with ‘direct pull’
brakes, commonly known as V-brakes.
To disconnect the brakes for wheel removal,
release the curved metal tube (the lead pipe
or noodle) from the slotted holder on the
brake arm. To do this, grab both brake arms
with one hand and squeeze them together,
onto the rim. There should now be enough
slack in the cable to unhook the noodle pipe
from its holder, allowing the brake arms to
open for wheel removal – if not, use the
barrel adjuster on the brake lever to add a
little slack, but remember to re-adjust this
before riding.
Opening the noodle
To reconnect the brake, squeeze the brake
arms together and hook the noodle pipe back
into the holder. Make sure that the noodle
pipe is correctly located and that the outer
cable is properly seated at both ends (it can
‘pop out’ of the brake lever when slack, and
not pop back in when re-assembled).
Brake blocks are consumable items and
wear out with use. As they wear, the brake
levers will travel further before the brake
operates, and must be adjusted before the
levers are able to come into contact with the
handlebar grip. You can take up this cable
slack with the barrel adjuster on the brake
lever: turn the adjuster a few turns anticlockwise and then check the brake lever
travel again. Also check the blocks and make
20
Open noodle: do not ride
21
sure they are not worn out, or worn unevenly.
Uneven pad wear may create ridges that can
cause the pad to get stuck against the rim, or
could cause the block to rub on the tyre
causing instant damage.
Each brake block is marked with a safe limit
line or wear line. Once the brake blocks have
worn down to this mark, they must be
replaced immediately. Use only good quality
brake blocks of the correct type. Observe the
correct position and order of the washers and
shims. Hold the new block flat against the rim
and tighten up the allen bolt. Check that the
block hits the rim squarely and isn't too high
or low, then tighten the allen key fixing bolt to
between 6 and 8 Nm (see Appendix 1). See
the accompanying Brake System Service
Instructions for further information, and if you
are not completely familiar with brake system
maintenance, it is essential to seek the
assistance of a professional mechanic.
Brake cables can also eventually become
worn, or bent or corroded. If there is any
visual damage or corrosion to the brake
cable inners or outers, or if the brake cable
becomes sticky or has too much friction, it
will probably require replacement. Seek the
assistance of a professional mechanic.
Brake block correctly adjusted
Brake block set too high: do not ride
Brake block set too low: do not ride
Opposite a worn brake block (above)
and one in good condition (below)
SAFETY WARNING: A fully-functioning
brake system is vital to safety. Always
check your brakes before riding, and if
in doubt cease use of the bike and
consult Bristol Bicycles.
22
23
Wheels
Over time bicycle wheels can go slightly out
of true as some of the spokes slacken off,
meaning that the wheel will spin with a
wobble. Normally this can be rectified simply
by wheel truing – please consult a
professional bike mechanic to have this work
done. If a wheel is badly buckled, it may be a
sign of broken spoke(s), or a damaged rim in
which case the wheel will require repair or
replacement.
The sides of the bicycle wheel rim are
subject to wear from the brake blocks, and
will gradually wear out. This process
normally takes thousands of miles.
Eventually the rim will become too thin to
safely hold the pressure of the tyre. If the
braking surface is at all concave, damaged
or worn-looking, cease using the bicycle and
get it checked by a professional mechanic.
Some Bristol Bicycles have rims equipped
with an external wear indicator. This is a
1mm deep and 1mm wide groove in the
middle of the rim's braking surface which will
gradually disappear as the surrounding metal
wears down. Once this groove has largely
disappeared, the rim is worn out and must be
replaced immediately.
Other Bristol Bicycles have rims equipped
with an internal wear indicator. These rims
are smooth when new, and have an internal
cavity which will appear as the rim wears. As
soon as this cavity appears as a crack or slit
anywhere in the braking surface, the rim is
worn out and must be replaced immediately.
To differentiate between internal and external
wear indicators, use the following rule: if the
groove is 1mm deep or less, it is the external
type and is intended to be there. This rim is
safe to ride until the groove has almost
disappeared. If the groove is much deeper
than 1mm or has no visible bottom, it is an
internal type which has become visible due
to wear, and the rim is worn out and unsafe.
24
SAFETY WARNINGS:
These maintenance and care instructions
are issued as guidance only and are not
intended to replace professional bicycle
maintenance by a qualified mechanic.
The first check-up service is not an
alternative to regular mechanical attention.
Please refer to the advice above. Do not
attempt maintenance you are unfamiliar
with, as a poorly maintained or adjusted
cycle could cause damage or injury. If in
doubt please consult Bristol Bicycles.
Do not use a high-pressure hose or jet
wash as it can force water into the bearings
and cause premature wear and corrosion.
Do not polish wheel rims as this will make
the brakes less effective. Take care to keep
oil well away from brake blocks and wheel
rims. Riding a bicycle with oil or grease
residue on any of the braking surfaces
could cause you to lose control and fall.
Always ensure all cables are reinstalled
before riding the bike. Riding with
disconnected or maladjusted cables could
cause you to lose control and fall.
Do not ride the bike with incorrectly
secured quick release levers or incorrectly
installed wheels. A loose wheel is very
dangerous and could cause you to lose
control and fall.
Do not ride a bicycle with worn or damaged
wheel rims. A worn out wheel rim can crack
or break, allowing the tyre to burst causing
you to lose control and fall.
25
Tyres and tubes
Regularly check the tyres for splits, cracks,
cuts and wear. Check that the tyre tread
pattern is clearly showing all around the tyre.
Hard braking and skidding greatly reduces
tyre life. Tyres should be replaced
immediately if damaged.
Do not ride with under-inflated tyres: it can
cause the tyre sidewalls to crack, and it
makes cycling much harder work. To inflate,
a foot pump or track pump should be used
along with an accurate tyre pressure gauge.
Never inflate a tyre beyond the pressure
recommended on its sidewall. Take into
account the maximum inflation pressure
specified by the rim manufacturer as well.
Ensure your tyres do not come into contact
with oil or any other rubber solvents.
When repairing a tube, always follow the
instructions on the repair kit. When refitting
or replacing a tyre, take care not to pinch the
tube. Do not fit a tyre which is too wide or too
narrow for the rim. See the accompanying
tyres documentation for more information.
Gears
Bristol Bicycles are equipped with widerange Shimano derailleur gears.
The rear derailleur moves a pre-determined
amount to one side or the other with every
gear change, and the two jockey wheels in
their sprung cage automatically take up slack
in the chain.
If the rear gears stop working accurately on
your bike, first check that the derailleur
hanger is not bent. This is the part of the
frame onto which the rear derailleur is bolted,
and it can easily become bent if the bike falls
over onto the right-hand side or if another
bike is pushed against it. If the derailleur
hanger is bent, do not attempt to straighten it
without specialist tools; instead ask a
professional mechanic to realign or repair it.
26
SAFETY WARNINGS:
Never inflate a tyre beyond the maximum
pressure marked on the tyre’s sidewall.
Exceeding the recommended maximum
pressure may blow the tyre off the rim,
which could cause damage to the bike and
injury to the rider and bystanders.
Improperly installed tyres or tubes can
blow off the rims, causing a serious crash
that may result in injury or death.
Do not ride a bike with a bent or damaged
derailleur hanger. Changing gear with a
damaged hanger could mean the derailleur
gets caught in the spokes as the wheel
turns, damaging the wheel, chain,
derailleur and bike frame and possibly
causing you to lose control and fall.
Do not ride a bike with a very worn chain
because it can allow the pedals to slip
under hard foot pressure, causing to you
lose control and fall.
Do not ride a bike with loose, over-tight or
worn headset bearings. A worn, damaged
or incorrectly adjusted headset will impede
your ability to steer the bike and could
cause you to lose control and fall.
Do not make any unsafe modifications or
alterations to the bicycle. If you are in
doubt about changing any components or
adding accessories, please consult Bristol
Bicycles for advice.
Always tighten all nuts and bolts correctly
after adjustment or disassembly. See
Appendix 1 for correct bolt torques.
27
The other common cause of inaccurate rear
gear shifting is a damaged, corroded or
sticky gear cable. To access the cable for
inspection
and
lubrication
without
disconnecting it, shift the right-hand gear
shifter into 1 (largest sprocket) whilst
pedalling, and then stop pedalling and shift
into gear 8. This will introduce enough slack
in the cable to allow its release via the slots
in the cable guides on the bicycle frame.
Now the outer cable casings will slide over
the inner cable to allow inspection of the
entire length of inner cable. If any portions
are frayed, kinked, corroded or otherwise
damaged, the cable will require replacement.
Please consult a professional mechanic.
If the cable is simply dirty or sticky, it can be
cleaned with wire wool or similar, lubricated
with bicycle chain oil, and reconnected.
With both the hanger and the cable checked,
you have eliminated the most common
causes of inaccurate gear shifting. If the
gears still do not shift smoothly, the cable
may require adjustment. The gear system is
indexed, meaning that one click of the shifter
moves the derailleur sideways a precise
amount, from one sprocket to the next.
If the rear gears shift smoothly from higher
numbers into lower ones (e.g. from 3 to 2, or
2 to 1 etc.) but not from lower numbers into
higher ones, then the cable needs loosening.
Turn the rear derailleur's barrel adjuster half
a turn clockwise and try shifting the gears
again. Repeat until they change smoothly.
If the rear gears shift smoothly from lower
numbers into higher ones (e.g. from 1 to 2, or
2 to 3 etc.) but not from higher numbers into
lower ones, then the cable needs tightening.
Turn the barrel adjuster half a turn anticlockwise and try shifting the gears again.
Repeat until they change smoothly.
It is normal to adjust the barrel adjuster in
this way every few hundred miles to
compensate for slight stretch in the cable. If
28
the barrel adjuster requires more than
approximately two turns, it is likely that
something else is amiss: please consult a
professional mechanic for advice.
The rear derailleur also has two limit screws
marked H and L which limit its maximum
sideways travel in either direction. The H
(high gear) screw prevents the derailleur
from travelling too far outwards, and should
be adjusted clockwise if the chain is able to
fall off the smallest sprocket onto the bike
frame. The L (low gear) screw prevents the
derailleur from travelling too far inwards
towards the wheel, and should be adjusted
clockwise if the chain is able to fall off the
largest sprocket into the spokes. These two
screws are set when the derailleur is first
fitted to the bike and normally do not need
subsequent adjustment unless the derailleur
or rear wheel is replaced. If you discover that
one or both limit screws suddenly seem to
need a lot of adjustment, it could be a sign of
a bent hanger or some other problem: please
consult a professional mechanic.
The front derailleur is simpler than the rear,
but is adjusted in a similar manner. Before
making any adjustments, check that the front
derailleur is mounted correctly on the bike
frame. The outer plate of the derailleur
should be completely parallel with the outer
chainring, and its lower edge should pass
approximately 2mm above the tips of the
highest teeth on the outer chainring. Check
also that the front gear cable is not damaged
or corroded. Clean, lubricate or get it
replaced as necessary.
Once this is done, check that the L limit
screw is set such that the chain is able to
shift into the smallest chainring, but does not
shift too far and fall onto the bike frame.
Then, with the left-hand shifter in gear 1,
check that the front gear cable is tight. Then
whilst pedalling, shift the left-hand shifter into
gear 2, and check that the chain shifts
accordingly onto the middle chainring. If it
29
does not, turn the barrel adjuster on the lefthand shifter one complete turn anti-clockwise
and try again. Repeat as required.
Now, with the chain still on the middle
chainring, shift the rear gears whilst
pedalling, and check that the chain does not
come into contact with the front derailleur
cage in any of the rear gears. If the chain
rubs the outer plate, turn the barrel adjuster
on the left-hand shifter anti-clockwise half a
turn to tighten the cable and move the front
derailleur outwards. Try pedalling again and
repeat the adjustment as necessary. If the
chain rubs the inner plate of the front
derailleur, turn the barrel adjuster on the lefthand shifter clockwise half a turn to loosen
the cable and allow the front derailleur to
move inwards. Repeat as necessary. See
the accompanying Drive System Service
Instructions for more detailed information.
The chain itself does not need adjustment,
but does require regular cleaning and
lubrication (see Lubrication section above)
and is vulnerable to mud, water, corrosion,
and becoming dry. All chains wear out with
use. In turn, a worn chain quickly wears the
teeth on the cassette and chainrings. Once
the teeth are worn they will not work with a
new chain, and the whole drivetrain (the
chain and all the cogs) must be replaced.
There are essentially two choices: replace
the chain regularly, e.g. every 1,000 miles, in
order to preserve the cassette and chainset;
or wear out the whole lot and then replace it
all, e.g. after 5,000 miles. We recommend
having your chain changed fairly regularly to
avoid damaging the rest of the system, and
to avoid chain slippage when pedalling.
To estimate whether the chain is worn,
change gear into the largest chainring and
with your fingers pull the front-most chain link
forwards, away from the chainring. If it lifts
away from the chainring enough to reveal the
tooth underneath, then the chain is worn.
Check with a professional mechanic whether
30
it needs replacement before the rest of your
drivetrain also becomes excessively worn.
Refitting or replacing a chain requires the
use of a chain tool, so we suggest consulting
a professional bike mechanic.
A chain can take anything from 500 to 5,000
miles to wear, depending on how clean it is
kept, whether it is properly lubricated, and
whether the bike is used in dry weather or all
conditions. How you pedal is also important:
changing into a larger rear sprocket and
spinning faster is better for the chain – and
also kinder to your knees! Standing up and
stomping hard in a small rear sprocket will
wear everything out more quickly.
Headset
The headset comprises the two bearings
which allow the front fork and handlebars to
turn relative to the bicycle frame. To steer
and control the bike, the headset must run
smoothly without being loose or too tight.
To check the headset, lift the front wheel off
the ground slightly, and turn the handlebars
gently from side to side. If this movement
feels stiff or notchy, the headset is either
worn or too tight. Next, with the wheel on the
ground, apply the front (right-hand) brake
and steer the handlebars 90° to the left, and
rock the handlebars back and forth several
times. Can you feel a rattle or looseness? If
so, the headset is probably too loose.
Different models of Bristol Bicycle come with
different types of headset. We recommend
you do not adjust or service the headset
yourself. It is adjusted at the time of
assembly, and should then be rebuilt and
adjusted during annual servicing. If it needs
any attention in the meantime, please consult
a professional mechanic.
Note that the headset should not be
loosened or adjusted when altering the
handlebar stem height (see the Before You
Ride section).
31
Bolt Checks
Regularly check the torque of all nuts and
bolts on your bicycle to ensure nothing has
loosened or failed. For a lightly used bike this
check may only be required every few
months. For a regularly used bike we
recommend checking all bolts weekly. For
very heavy use or after a long ride over
rough roads with heavy luggage, it is
advisable to check the bolt torques daily. See
Appendix 1 for a list of bolt torques. If in
doubt, consult a professional bicycle
mechanic for assistance.
Recommended Tools
The toolkit required to perform all the day-today maintenance of a Bristol Bicycle is
surprisingly minimal. It is small enough and
light enough to carry with you whenever you
use the bike. We recommend the following:
In addition, a puncture repair kit will allow
you to patch any punctured inner tubes ready
for future use.
We also recommend
cleaning purposes:
the
following
for
A non-abrasive sponge
A soft brush
Car shampoo or bike cleaner
A soft cotton cloth
Car polish
If your chain becomes excessively dirty, we
recommend the use of a chain degreaser
and a chain cleaning tool (see Cleaning
section).
Bicycle Storage
A good track pump or mini track pump
Always keep the bike indoors in a dry
environment when not being ridden. The
chain, cables, bearings and other steel parts
will quickly rust if the bike is stored outdoors
or in excessively damp conditions.
Spare inner tube
If storing the bicycle for a long period of time:
Chain oil and rag
Hang it with the tyres off the ground to
prevent them from becoming distorted
or cracked.
Simple multi-tool with 4, 5, 6 mm allen
keys and flat & Phillips screwdrivers
Two or three tyre levers
Ensure the chain and all cables and
bearing systems are well lubricated to
prevent corrosion.
Take special care that the storage
environment is dry, and not at all
damp.
Store the bike in the dark, or at least
away from direct sunlight, to prevent
UV damage to the tyres and plastic
components, and discolouration of the
paintwork.
32
33
WARRANTY
All Bristol Bicycles come with a 12-month
limited
warranty
on
materials
and
workmanship. This warranty extends for one
year from date of purchase while owned by
the original retail purchaser.
If a component should fail due to faulty
materials or workmanship within the warranty
period, a replacement component will be
provided free of charge. At the discretion of
Bristol Bicycles we may also fit the part
without charge, but we retain the right to
refuse to do so: under the terms of the
warranty the original owner is responsible for
all labour charges connected with the repair
or replacement of all parts. The owner is also
responsible for the return of the bicycle to the
place of purchase for any work to be carried
out.
Limitations
This warranty does not cover consumable
items such as (but not limited to) tyres and
inner tubes or brake blocks or pads, nor does
it cover wear and tear: components such as
chains, chainrings, cables, and eventually
wheel rims will wear out under prolonged and
heavy use.
If you elect to repair a defective product
yourself or use the services of someone
other than Bristol Bicycles, we will not be
liable for any damage, failure or loss caused.
The foregoing warranties are in lieu of and
exclude all other warranties not expressly set
forth herein, whether express or implied by
operation of law or otherwise, including but
not
limited
to
any
warranties
of
merchantability or fitness for a particular
purpose.
Bristol Bicycles shall in no event be liable for
incidental or consequential losses, damages
or expenses in connection with its bicycle
products. Bristol Bicycles' liability hereunder
is expressly limited to the replacement of
goods not complying with this warranty or, at
our election, to the repayment of an amount
equal to the purchase price of the product in
question. Liability is not limited or excluded
for any bodily injury or death caused by the
negligence of Bristol Bicycles or any of its
employees.
Warranty does not affect your statutory
rights. Errors and omissions excepted.
No liability is accepted for damage caused
through neglect, improper use, lack of
regular servicing, road accident/collision, or
anything other than faulty materials or
workmanship.
The warranty applies to original purchaser
only and is not transferable. Proof of
purchase may be required.
In the event that Bristol Bicycles elect to
replace a defective frame, a new frame of
equal or greater value will be provided. The
new frame may not be the exact model
purchased. We may not be held responsible
for
labour
charges
for
component
changeovers when a frame is replaced.
34
35
APPENDIX 1: BOLT TORQUES
APPENDIX 2: METAL FATIGUE
Always use a torque wrench. As a very rough
indication of bolt torque, a spanner or allen
key of the length indicated by the torque
figures below will provide approximately the
correct
torque,
with
1cm
length
corresponding to 1 Nm of torque. For
example, to achieve 6 Nm of torque, exert
firm but comfortable hand pressure on an
allen key with a 6cm long handle. To achieve
20 Nm of torque, exert firm but comfortable
hand pressure on a 20cm long spanner.
Fatigue means the accumulated degradation
of a part caused by repeated use. Large
enough forces applied frequently enough will
always cause fatigue damage in the end. A
simple example is bending a paper clip back
and forth until it breaks. Fatigue has nothing
to do with time or age: a bicycle stored in the
shed does not fatigue; it occurs only through
repeated use.
Seatpost
Seat tube clamp
6-8 Nm
Saddle clamp
21-23 Nm
Stem and handlebar
Handlebar clamp bolts (on quill stem) 14-16 Nm
Stem quill bolt (on quill stem)
15-17 Nm
All bolts (on threadless stem)
6-8 Nm
Shifter/brake lever clamp bolts
6-8 Nm
Handlebar grip grubscrews
6 Nm
Chainset
Crank bolts
35-50 Nm
Pedals
35-40 Nm
Fatigue starts when a microscopic crack
forms in a highly stressed area. As the load
is repeatedly applied, the crack grows. At
some point the crack becomes visible by
eye. Eventually it becomes large enough that
the part is too weak to carry the load: now
there is a danger of immediate and
catastrophic failure, whilst the bicycle is in
use.
In theory it is possible to design a part so
strong that its fatigue life is nearly infinite, but
this requires a lot of extra material and a lot
of weight. Any structure that must be light,
like a bicycle, will have a finite fatigue life.
Brake boss bolts
5-7 Nm
Brake cable pinch bolts
6-8 Nm
Brake block fixing nuts
6-8 Nm
If you wanted a bicycle with an infinite fatigue
life it would need to be built like a tank (and
would weigh almost as much!) So we all
choose a compromise: the lightweight
modern aluminium bikes that we enjoy riding
are eventually subject to fatigue failure and
so require regular inspection for cracks.
Rear derailleur attachment bolt
8-10 Nm
What to look out for
Front derailleur clamp bolt
5-7 Nm
Front & rear gear cable pinch bolts
5-7 Nm
Brakes
Gears
SAFETY WARNING: under-tightening or
over-tightening fasteners can result in
damage to the bicycle that can lead to
possible failure, which could cause you to
lose control and fall.
36
Corrosion speeds up damage. Any area
with rust (brown or orange) or aluminium
oxide (white and powdery) could be hiding a
crack or defect. Clean and lubricate your bike
regularly (see Maintenance section), store it
indoors when not in use, protect it from salt
and clean off any salt as soon as possible.
Staining and discolouration can occur near
a crack, and may be a warning sign that a
37
crack exists, or that the paint or protective
coating has been damaged which could lead
to corrosion. Investigate stains immediately
to see if they are evidence of a crack.
Significant scratches, gouges, dents or
scrapes create starting points for cracks.
Think of the damage as a focal point for
stress (engineers call such areas “stress
risers”: areas where the stress is increased).
Try to avoid scratching or denting any
component. If you do, pay frequent attention
to this area and replace the part soon.
Creaking noises as you ride. Any such
noise could be a serious warning sign. A well
maintained bicycle should be quiet and free
of creaks and squeaks. Investigate the
source of any noise and rectify immediately.
Once a crack starts it will always grow
and can grow fast. Any crack is potentially
dangerous and will only become worse with
use. If you find even only a small crack,
replace the part immediately.
High rider weight or heavy luggage
Corrosive environment (rain, salt air,
winter road salt, storage outdoors)
Abrasive mud, dirt, sand, grit etc.
Lack of regular cleaning
Factors that lengthen product life:
Smooth, gentle riding style
No crashes, collisions or off-road use
Low mileage
Lower rider weight and lighter luggage
Non-corrosive environment (dry, saltfree air, stored indoors)
Dry, clean roads
Regular bike cleaning
SAFETY WARNING: Do not ride a bicycle
or component with any crack, bulge or
dent, even a small one. Riding a cracked
frame, fork or component could lead to
complete failure, with risk of serious
injury or death.
Why does fatigue damage happen?
Normally a fatigue crack is not a defect. It is
a sign that the part is worn out and has
reached the end of its useful life. When the
soles of your shoes wear out, it does not
mean they were defective. They are simply
well used and the wear to the sole says “time
for replacement”. When a metal bike part
shows a fatigue crack, it is simply worn out.
The crack says “time for replacement”.
Fatigue is not a perfectly predictable science,
but below are some guidelines to help
determine how often your bicycle should be
inspected.
Factors that shorten product life:
Strong, fit, aggressive rider
Crashes, collisions, rough terrain
High mileage
38
All Bristol Bicycles are tested and certified to comply with BS EN
14764 and/or ISO 4210.
Bristol Bicycles is a trading name of Jake's Bikes Ltd, a company
registered in England & Wales with company number 07449533.
Registered address: 6A Haymarket Walk, Bristol BS1 3LN
Last revised 27/10/2015
All content Copyright © Jake's Bikes Ltd. 2015. All rights reserved.
39