1
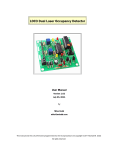
PTC Model III
Programmable Turntable Controller
Controller and Motor Assembly
P/N 03-160
K
Installation Instructions
And
Users Manual
For Keypad Track Selector Models
New York Railway Supply
13225 Thornton Dr Westlake, TX 76262
(817) 233-5068
http://www.nyrs.com
© NYRS 1994-2010, Rev 7/10, US Patents Pending
PTC Model III, Keypad Selector Installation Instructions and User Manual, Rev 05/14 - Page 1
W ARN I N G:
T h e s o l d e r us e d i n t h i s p ro d uc t c o nt ai n s l e ad , a
c h e m i c al kno wn t o t h e S t at e o f C al i f o rn i a t o c au s e
b i rt h d e f e c ts an d o t h e r re p ro d uc t i ve h arm . P l e a s e
was h h an d s af t e r h an d l i n g i n t e rn al c o m p on e n t s an d
c i rc ui t b o ard s an d av o i d i n h al at i o n of f um e s i f he at i n g
t h e s o l d e r.
PTC Model III, Keypad Selector Installation Instructions and User Manual, Rev 05/14 - Page 2
I n s t al l at i o n I n s t ruc t i on s
PTC Model III
If you are designing your own motor mount, refer to Figure 1,
"Motor Dimensions and Mounting Hole Pattern" to understand
the mechanical requirements for attaching the motor to your
mounting system. Primary considerations you should keep in
mind when designing your system include:
Programmable Turntable Controller
•
an d U s e rs Man ual
•
•
•
INTRODUCTION
Before you begin installation and programming of your new
turntable controller, be sure to read through these instructions
completely. Also, review the PTC Model III Product
Overview as well as the Basic Motor Mount Installation
Instructions, if you are using the optional Motor Mount Kit.
The PTC is not difficult to install, but as with any precision
mechanism, some time and care will be needed to achieve a
neat, reliable installation.
The main steps involved in installing your PTC Model III are:
•
•
•
•
•
Motor Installation,
Controller Installation,
Track Selector Installation,
System Check-Out, and
Programming.
If these guidelines are followed, your installation will provide
years of reliable service.
CONTROLLER INSTALLATION
Controller installation is simple, and only requires a suitable
location under the benchwork to rest the controller. Typically,
a small shelf is attached to the benchwork if no other location
is available. When selecting a mounting location, be sure that:
•
•
MOTOR INSTALLATION
There are two main options for motor installation:
•
•
Design your own motor mount system; or
Use the optional Motor Mount Kit.
Do not have the motor actually hanging or otherwise
supported by your turntable shaft. The motor can be
supported by the turntable pit, if sufficiently strong. The
motor is heavy and should not be allowed to stress the
turntable bridge or shaft mechanism.
Be sure the mount is rigid. Since
S
the controller can
achieve very small step increments, the motor should not
be allowed to move rotationally or laterally.
Be sure the mount keeps the motor perpendicular to the
turntable shaft. Your mount should make sure that the
motor and turntable shafts stay in alignment, and do not
connect to each other "off angle".
Design the mount so that it shares a common mounting
surface with the turntable, such as the layout surface or
supporting benchwork immediately connected to the
turntable. Do not use benchwork that otherwise supports
the layout. The objective is to minimize misalignment
effects related to possible expansion and contraction of
the layout or supporting benchwork.
•
The mounting location is within 2' of the turntable, which
is the length of the motor cable. The short cable length is
recommended to minimize the potential for the motor
mot to
pick up unwanted electrical noise. However, optional 3',
6', and 10' extension cables are available, if needed.
Be sure the mounting location is within 3' of where you
plan to mount the Track Selector panel controls, which is
the length of that cable.. Again, shorter cables are better,
but 6 and 10' foot cables are available if needed.
Lastly, be sure the front panel of the controller is visible
for programming later. You will need to see the front
panel on occasion (not during normal operation, usually),
usu
so be sure you can see it without too much trouble.
In general, use of the motor mount kit is recommended unless
you have a special situation where the kit is not suitable, or if
you are designing a new or scratchbuilt turntable where you
can integrate the motor support system into the turntable
design. If using the Motor Mount Kit, refer to the detailed
instructions included with the kit and install it before
proceeding here.
PTC Model III, Keypad Selector Installation Instructions and User Manual, Rev 05/14 - Page 3
PTC Model III, Keypad Selector Installation Instructions and User Manual, Rev 05/14 - Page 4
Once you have selected your mounting location:
1.
4.
Mount the controller.
Drill out the four mounting holes using a 1/8” drill. Use a
center punch to mark the hole locations and to prevent the
drill from “creeping” as you start the drill.
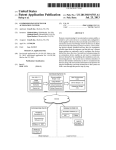
Outside edge of selector Cover Plate
Trace four mounting holes in corners
Mark cutout (dotted line), with cutout edge
extending to outside edge of mouting hole
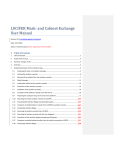
Figure 2: Controller and Bridge Connections
2.
3.
If you are going to use the Track Power Reversing
capability, connect the bridge track power leads to
terminals "A" and "B" on the rear of the Controller.
Polarity is not important. Connect the bridge track power
feeders to terminals "C" and "D" on the controller. See
figure 2. The plug is removable if you need to disconnect
the controller for some reason.
Connect the Motor to the Controller. Note that the motor
cable connector has two small tabs on one side; these tabs
should be facing up when you insert it into the Controller.
Figure 3: Panel Cutout
5.
Cut out the area defined by the lines you drew in, using an
appropriate saw. As you reach each corner, radius the cut
from the line you are cutting to the adjoining line.
Important! Be sure to NOT cut all the way to the
mounting holes.
6.
Debur the hole and test fit the hole by placing the Cover
Plate face down over the hole again. Caution: Be sure
you have deburred the hole completely, and use care
when placing the Cover Plate over the hole. Burrs on
the hole can scrape and mar the black anodized finish on
the Cover Plate. This is especially true if your facia is
aluminum or other metal.
After you have double-checked the connections so far,
continue to installation of the Track Selector Modules.
KEYPAD TRACK SELECTOR INSTALLATION
Once you have completed the mounting cutout, complete the
final assembly of the Keypad Selector Module:
Examine the Track Selector Cover Plate and Keypad Selector
Module to familiarize yourself with the control panel cutout
and the mounting hole pattern required.
7.
Locate the Track Selector to Controller Cable. This is a
flat ribbon cable, standard 3’ in length. You may have a
longer cable, if you ordered that option.
Once you have located a suitable spot for locating the Keypad
Selector, the installation steps are as follows:
8.
Connect the flat ribbon Track Selector to Controller Cable
to connector J1 on the Keypad Selector Module.
Connector J1 is noted on the Selector Module PCB. The
marked edge of the cable must be oriented to line up with
the Pin 1 on J1, which is located on the left side.
Reference Figure 4:
1.
Locate the Keypad Mounting Plate in the box containing
the Keypad Selector. Remove the bubble wrap.
2.
Position the Cover Plate on your layout facia, face down.
Using it as a template, lightly trace the location of the four
mounting holes. Put the Cover Plate aside.
3.
Using a straightedge, draw 4 lines connecting the outside
edges of mounting holes you have traced.
PTC Model III, Keypad Selector Installation Instructions and User Manual, Rev 05/14 - Page 5
that the Keypad Selector Cover Plate can’t cover the hole
properly!
12. Locate the four 4-40 x ¾” Philips pan head screws,
washers, and nuts in the Hardware Kit. Refering to
Figure 4, install the screws, washers, and nuts, securing
the Keypad Selector Module to the facia. Note: The ¾”
screws are provided to facilitate installation of the Keypad
Selector Module in panels up to 5/8” thick.
13. Connect the Track Selector Cable to the Controller.
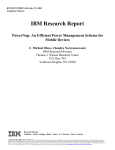
Figure 4: Controller Cable Connection
Figure 5: Controller Cable Connection
If correctly installed, the cable should hang straight down
when the Keypad Selector is oriented upright as shown.
Important! Be sure the marked edge of the cable is on
the RIGHT as you view the rear of the controller.
Installing the Selector Cable in backwards may
damage the Track Selector Module. Be sure it is
correctly installed before turning the system power on.
Refer to Figure 5.
◆Tip: Each end of the cable has its connector oriented in
opposing fashion. If the cable does not look oriented
properly, try using the other end of the cable.
9.
Locate the Keypad Selector Hardware Kit. Remove the
black plastic LED Bezel. Install the bezel into the
Keypad Selector Module LED mounting hole.
10. Remove the two 4-40 x 1/8” Philips pan heads screws
from the hardware kit. Position the Keypad Selector
Cover plate over the Keypad Selector Module, resting it
on the two hex standoffs mouted to the module PCB.
Carefully install the two screws, tightening them securely.
Caution! Do not let the screwdriver “jump” from the
screwhead, as this can scrape and mar the black anodized
finish on the Cover Plate.
◆Tip: It may occur that some of the capacitors on the
PCB will sit slightly high, interfering with comfortable
placement of the cover plate on the hex standoffs. Gently
push them over to provide clearance for the Cover Plate.
After assembling the Keypad Selector Module, install it into
the cutout:
11. Feed the loose end of the Keypad Selector Cable through
the facia hole, positioning the Keypad Selector Module in
the facia cutout. Caution! The clearance between the
facia cutout and the Keypad Selector Cable/PCB
Assembly may be very close, depending on how big you
actually made the cutout. If needed, add additional
clearance by filing the hole where the cable needs to clear
the cutout. Be careful not to make the hole too big, such
After you have installed the Keypad Track Selector Module,
double-check your connections. Be sure the main power
switch is on the down (OFF) position. Plug the Power Supply
cable into the Controller, and then plug the Power Supply into
the wall outlet. You are now ready to test and program the
Controller.
SYSTEM CHECK-OUT
Testing the installation involves turning on the Controller in
"Index Mode". While in Index Mode, the Controller will
continually turn the motor (and the bridge) clockwise until you
tell it to stop.
1.
Locate the switch block on the bottom of the controller.
Confirm that Switch #8, the Run/Learn switch, is set to
Run ("ON").
2.
With the Controller Power Switch in the down (OFF)
position, press and hold the "*" key on the Keypad
Selector. You may need a helper for this, if it is not
possible for you to reach the Controller and the Keypad
Selector at the same time.
PTC Model III, Keypad Selector Installation Instructions and User Manual, Rev 05/14 - Page 6
3.
While holding down the "*" key, turn the Power switch
to ON (the UP position).
4.
Let go of the "*" key. The power-on LED on the
Controller should be lit, the Dual Digit Display should
display “Ad” (for “Advancing”):
Ad
The bridge should begin turning clockwise, and the Status
Indicator (LED) should be alternately flashing red and yellow.
Figure 6: Keypad Selector Module
PROGRAMMING
Note: The programming steps for the Rotary and
Pushbutton Track Selector Modules are similar, but do
include significant differences. If you have purchased a
Rotary Track or Pushbutton Track Selector Module,
refer to the detailed instructions provided with that
module.
Programming the PTC involves the following simple steps to
teach the PTC where your lead and service track locations are.
Programming should take about 5-10 minutes; take your time.
Feel comfortable while programming; you can't hurt anything.
If you are in doubt about making a mistake at any point, don't
worry about it... you can simply restart the programming
process.
Your first consideration will be to select a track that you will
identify to the controller as your primary reference track.
Usually, this will be your primary lead track to the bridge. If
you have two or more lead tracks to your turntable, identify
one as your primary lead track. This track will be identified to
the controller as “Track #1”.
If this does not happen, turn off the power and re-check your
connections.
While the bridge is turning, carefully observe the bridge's
movement throughout its full circular rotation. No binding or
"stuttering" should be evident. If there is, turn off the power
and examine the motor installation for any misalignment.
Correct any problems and re-start the Controller in Index
Mode to verify the fix.
◆Tip: While the bridge is turning in Index Mode, you can
make the bridge stop turning and go into "Single Step Mode"
by pushing the "*" key again. Each new push of the "*" key
will result in the bridge advancing one step. The Status
Indicator will also alternate between solid red and solid green
to confirm each individual step. Use this feature to single-step
the turntable through any problem areas of rotation you want
to examine closely. To resume continuous rotation, repeat
Steps 1 through 3. Note: Since the bridge is taking very small
individual steps, it may not be immediately evident that the
bridge is turning while in single step mode, especially for N
scale and smaller HO scale bridges (<9 inches). Observe the
alternately flashing Status Indicator to confirm bridge
movement.
After you have completed the system check out, proceed to
programming!
Next, consider which end of the bridge you would like to
identify as the “head end” of the bridge for programming.
Since turntable bridges are typically not perfectly symmetrical
at both ends (even though they might look it), you will
proceed by programming all of the “head end” locations first,
then the “tail ends”. Frequently, the head end of the bridge is
the end with the operator’s shack. If your bridge does not
have such a distinction, be sure that you can otherwise
determine which end of the bridge is which.
◆Tip: If your bridge is basically identical at each end,
consider marking your bridge's head end with a water barrel or
other object to make the head end easy to identify from a
distance.
◆Tip: Most users find it helpful to diagram their turntable,
numbering their service and lead tracks before they sit down
to program their controller. They then “check off” the tracks
the’ve programmed as they proceed with the programming
session. Note that your primary lead track (the system
reference track) must be numbered “1”.
◆Tip: When numbering your lead and service tracks, it is not
necessary to number them in any specific order after
programming Track #1. Any numbers in the range from 2 to
99 may be used, in any order. For example, you may number
your primary lead tracks 1, 2, and 3; tracks into the
roundhouse 11, 12, 13, 14, 15; outdoor storage tracks 20, 21,
and 22, etc.
PTC Model III, Keypad Selector Installation Instructions and User Manual, Rev 05/14 - Page 7
To begin programming:
1.
Initialize the controller. With the power off:
1.1. Locate the switch block on the bottom of the
Controller. Locate the Configuration Switch Block
on the bottom of the controller. Set switch #8, the
Run/Learn switch, to the "OFF" ("LEARN")
position.
1.2. Turn on the Controller power (front panel switch to
"ON").
1.3. The Status Indicator on the control panel will be red
briefly (about 1 or 2 seconds), then will change to a
solid yellow. The Dual Digit Display will display
“Ln” (for “Learn”).
Ln
This indicates that the controller has powered-up in
the "LEARN" mode. Note: If you had previously
programmed the PTC during another session, all
previously programmed settings will be erased at
this point.
2. Program the location of the lead track. Determine
which end of the turntable bridge you would like to be the
"head end" of the bridge for programming. Following the
procedure below, rotate the head end of the bridge to the
location of the lead track:
2.1. Press and release the "*" key. The bridge will now
begin turning in a clockwise direction. The status
LED will flash yellow, and the Dual Digit Display
will show “Ad” (for “advancing”):
Ad
At this point, it does not matter where the bridge is
pointing or what track it is lined up with. The
bridge will keep turning until you press the "*" key
again.
2.2. When the bridge gets within a few degrees of the
lead track, press the "*" key again. The bridge will
stop rotating. The status indicator will be red or
green, depending on where you happened to stop.
The Dual Digit Display will not change.
2.3. Tap the "*" key again; the bridge will take a single
step and stop. Keep tapping the "*" key until the
bridge lines up with the lead track. The status
indicator will alternate between red and green to
confirm each step.
2.4. If you pressed the "*" key too many times (you
overshoot the location you want), press and hold the
"*" key for at least 3 seconds, then release. The
bridge will reverse and back up about 2°. Tap the
"*" key to single step the bridge, lining it up with
the lead track.
◆Tip: When single stepping the bridge in the forward
direction a single step is only .025 degree. Barely visible to the
eye. If you think it hasn’t moved, make a reference point at
the current location and step it 10 times. You will see that it is
moving.
3. When you have lined up the bridge to the lead track, enter
the track number of the lead track, which must be “1”:
3.1. Press the "#" key. The Dual Digit Display will show
“ - - “ to indicate that the controller is ready for you
to enter a track number. The status indicator will
show a steady green.
3.2. Press the “1” key.
3.3. Complete the track number entry by pressing the
"*" key. The sequence of keys, in summary, would
be the following:
# 1 *
3.4. After you have typed in the "*" key, the Status
Indicator will flash red for a short time to
acknowledge the key entry and to indicate that the
location is being programmed into the system’s
memory.
4. Program the location of the next track. After the Status
Indicator stops flashing red, it will go back to a solid yellow.
This is to tell you that it is ready to learn the location of the
next track, rotating clockwise. To do this, repeat the same
basic steps:
4.1. Press and release the "*" key to start the bridge
turning slowly again.
4.2. When the bridge gets within a few degrees of the
next track, press the "*" key to stop the bridge.
4.3. Tap the "*" key until the bridge lines up with the
next track.
4.4. Press and hold the "*" key for 3 seconds to back up
the bridge, if you overshoot the spot you want.
4.5. When you have lined up the bridge to the track,
press the "#" key, then enter the track number
you’ve decided you’d like to use for that track, then
the "*" key to terminate the entry sequence. For
example, if you wanted to program the head end of
the bridge as location “2”, type the following:
# 2 *
Note: Track number “0 0” may not be used, as this
is reserved for other functions (discussed later).
4.6. After you have typed in the "*" key, the Status
Indicator will again flash red. This is your indication
that the controller has learned the next track's
location.
◆Tip: Remember that it is not necessary to number your lead
and service tracks in any specific order after programming
track #1. Any numbers in the range from 2 to 99 may be used,
in any order. For example, you may number your primary
lead tracks 1, 2, and 3; tracks into the roundhouse 11, 12, 13,
14, 15; outdoor storage tracks 20, 21, and 22, etc.
PTC Model III, Keypad Selector Installation Instructions and User Manual, Rev 05/14 - Page 8
◆Tip: If you enter the wrong track number, for example, you
entered “25” when you wanted “23”, re-enter “2”, and then
”3”. Each new number you enter simply results in the previous
numbers being “shifted over”. You may continue entering
numbers as long as you wish. When you have track number
you want, indicate you are done by pressing the "*" key.
will display the track you programmed, along with a decimal
point in the lower right hand corner, to indicate that the tail
end of the bridge is aligned at the track location shown. For
example, after programming the location above, the Dual
Digit Display will show:
◆Tip: If you enter the "#" key twice in a row, the Dual Digit
Display will briefly display an error code, “E1”. This is to
remind you that the next key expected is a number, not the
"#" key again. At any time you enter a key that the controller
does not expect, don’t worry. The controller will briefly
display an error code in the range “E1” through “E8” to
prompt you with the information the controller expects. Refer
to Tables 2 and 3, (“Mode Definition Summary” and “Error
Definition Summary”) in the Troubleshooting section for a
summary of these codes. The Troubleshooting section can be
found at the end of this manual.
Or, as another example, if one of the tail end track location
you program is “39”, the display would show:
5. Program the rest of the track head locations. Repeat
Step 4 to program the rest of your head track locations.
6. Program the bridge tail end positions. Although many
bridges are identical at both ends, most are not-- the tracks do
not line up exactly through the center of the turntable, and are
sometimes offset.
In addition, most turntables have
concentricity errors that must be compensated for. This is
achieved by repeating programming Step 4 while teaching the
PTC where the correct locations are for positioning the tail
end of the bridge. In this way, the PTC treats the head and tail
end of the bridge locations "separately" and their respective
concentricity and offset errors are accounted for automatically.
01.
39.
◆Tip: If you enter the wrong track number, for example, you
entered “32” when you wanted “39”, follow the same
corrective steps as when doing the head track locations: reenter “3”, and then ”9”. You may continue entering numbers
as long as you wish, and they will shift over. When you have
the tail track number you want, indicate you are done by
pressing the "#" key (recall that head track locations are
terminated with the "*" key).
7. Repeat these steps to program the rest of the tail end
bridge locations.
8. Prepare the controller for normal operation. After the
remaining bridge tail locations have been programmed,
configure the controller for normal use:
8.1. Turn off the power.
8.2. Set Configuration Switch #8, the Run/Learn switch,
to "RUN".
Important! Be sure the Run/Learn switch is set to
"Run" prior to turning on the power! When the
controller is powered-up in the "Learn" mode, the
controller erases any previously programmed locations in
preparation for new locations.
Begin by teaching the controller the correct position for
aligning the tail end of the bridge with the lead track
programmed earlier in Step 1:
8.3. Re-index the bridge to bring the head end of the
bridge back to the lead track location:
8.3.1.As in Step 1, hold down the "*" key while
turning on the power. While you are holding
down the "*" key, the Dual Digit Display will
display "- -".
8.3.2. Release the "*" key, and the bridge will
begin turning. When you release the "*" key,
the Dual Digit Display will show "Ad".
8.3.3. When the head end of the bridge
approaches the lead track, press the "*" key
again and single step it into proper position.
The Dual Digit Display will show "01",
reminding you that you should be lining up to
Track #1.
6.1. Press and release the "*" key to start the bridge
turning slowly again.
6.2. When the tail end of the bridge gets within a few
degrees of the reference (lead) track, press the "*"
key to stop the bridge.
6.3. Tap the "*" key until the tail end of the bridge lines
up with the lead track.
6.4. Press and hold the "*" key for 3 seconds to back up
the bridge, if you overshoot the lead track.
6.5. When you have lined up the tail end of the bridge to
the lead track, press the "#" key, followed “1”, then
the "#" key again:
# 1 #
6.6. The Status Indicator will again flash red. This is
your indication that the controller has learned the
lead track's “tail” location.
Important! Note that the key sequence for programming tail
locations is the "#" key, followed by the track number, then
terminated with the "#" key again. The Dual Digit Display
9.
When the bridge is re-indexed, turn off the power.
Your controller is now fully programmed and ready to go!
Refer to "Operating the PTC" for instructions on using your
newly programmed turntable controller.
PTC Model III, Keypad Selector Installation Instructions and User Manual, Rev 05/14 - Page 9
For example, if you want to align the head end of the bridge at
location “7”, type the following:
Programming hints. Follow these simple guidelines to
assure proper programming of the PTC controller:
•
•
•
•
Program all locations you are using in one programming
session.
If you think you have made a mistake during
programming or want to start over, just turn the power off
and then on again to reset the controller. This will erase
any settings you have made while in "LEARN" mode.
Important: When turning off the power, wait at least 5 full
seconds before turning it back on.
Since most bridges are identical at both ends, be sure you
can identify which end of the bridge is the head end so
you can re-index the table later on, when necessary. Use
the Index Mode described in the "System Check Out
Section" to re-orient the head end of the bridge to the lead
track. If you add more tracks to your turntable later on,
reprogram the PTC from Step 1.
Avoid removing the motor and/or bracket after you
program the unit, unless you really need to. Although not
a problem, it is an inconvenience because you will not
likely be able re-align the motor exactly where you had it
before.
You will have to reindex the unit after
reinstallation of the motor.
# 7 *
Or, to align the tail end of the bridge to track “43”, enter the
following:
# 4 3 #
After entering the track number, the Dual Digit Display will
show the track number, plus a decimal point in the lower right
corner of the display if the requested location indexed is a
bridge “tail end” location:
43.
3. After entering the track location, the Status Indicator will
flash green. If momentum is turned on (see later section), the
bridge will start to ramp up speed. Depending on the track
selected and the present position of the bridge, the controller
will automatically rotate the bridge clockwise or counterclockwise the shortest distance needed to line up the desired
end of the bridge up with the selected track location. As the
bridge approaches the desired track, it will start to slow down
(if momentum is enabled), then stop.
❑
OPERATING THE PTC
After programming, the PTC is ready for use. Operation is
simple:
1. Power-up the controller in "RUN" mode. To do this, be
sure the power switch is OFF. Confirm that Configuration
Switch #8 (the Run/Learn switch) is set to "RUN". Turn on
the power. The controller will go through its power-on self
test sequence:
• The Dual Digit Display will briefly illuminate all
display segments to confirm they are all operational:
8.8.
•
•
The Status Indicator on the control panel will glow
red briefly, then convert to a steady green to indicate
that the controller has powered-up in the normal
"RUN" mode.
The controller will do a "power-on motion self test"
function to confirm proper operation. This wags the
bridge clockwise about 10°, then counterclockwise,
then back again.
2. To select a track, press the "#" key, followed by the track
number, then either:
• The "*" key for aligning the head end of the bridge,
or
• The "#" key for aligning the tail end of the bridge.
To stop the bridge in an emergency. If it is necessary to
"panic stop" the bridge during rotation, simply hit any key
on the keypad. The bridge will stop immediately, with no
momentum. The controller will place itself in a "PAUSE"
mode and the Status Indicator will glow red. The Dual
Digit Display will display Error Code “E0”:
E0
The PTC will stay in pause until the any key is pressed, at
which time the PTC will continue its progress. (in
software versions pryor to 11.5 the ‘*’ key must be
pressed to resume rotation.
❑ Ver 11.7 - Now you can stop the bridge and tell it to
go to another location. You simply hit any keypad
button as if doing an emergency stop. Hit '*' to
continue to the original location, or '#' to enter a new
track number.
Operating Hints:
•
The PTC will not operate prior to programming. If turned
on, it will not perform any functions and the control panel
Status Indicator will flash yellow to indicate
programming is required. The Dual Digit Display will
also display “nP”, to indicate that the system is “Not
Programmed”:
PTC Model III, Keypad Selector Installation Instructions and User Manual, Rev 05/14 - Page 10
•
•
nP
when using a Keypad Selector. Changing their settings will
not affect Controller operation.
When the new track destination you have selected is
counter-clockwise from the bridge's current location, the
controller will overshoot the target track approximately
3°, then slowly backtrack clockwise to the desired track.
This is normal: although the PTC gearhead utilizes very
high quality gears, this move is necessary to compensate
for the very small amount of backlash that exists in the
gear train.
If you request a track location that has not been
programmed, the Dual Digit Display will briefly display
the error code “E3”:
The user accesses the speed, momentum, and power reversing
options by putting the controller in the Function Programming
Mode to retrieve and modify the variables of interest.
E3
•
•
•
•
The Dual Digit Display will then revert to displaying the
bridge’s current location, and the controller will return to
“standby” (ready) mode.
Important: After turning off the power, let the Controller
sit for a full 5 seconds before turning it back ON. This
will assure that the Controller starts up in the proper reset
mode.
Do not turn off the controller power when it is in "Pause"
mode between track locations. Although it is not a
problem, it is an inconvenience since you will have to reindex (reference) the controller. If re-indexing is
necessary, the Dual Digit Display will show “E2” and
Status Indicator will flash a "double red" after power-up
in "RUN" mode (instead of green) to indicate that the
controller does not "remember" where the bridge is and
needs to be re-indexed.
The stepper motor may get warm to the touch. This is
normal since the motor draws nearly 1 amp of current,
even while stationary.
If you want to cancel a track move after you have started
by pressing the "#" key, cancel the entry by entering “00”
followed by the "*" key:
To access the Function Programming Mode: With the
controller in standby (ready) mode, enter the track code for “00-tail”, which is:
# 0 0 #
Entering this track select code tells the controller you are
requesting the Function Programming Mode. Once requested,
the Dual Digit Display will indicate a Function Prompt:
FEnter the function number you are interested in:
Function
Name
Speed
Momentum
ATR Mode
ATR Enable
Track Edit
The Keypad Selector enables a broader selection of speed,
momentum, and power reversing relay options than the
standard Rotary and Pushbutton Track Selectors. They are
accessed by entering special command sequences on the
keypad.
When using the Keypad Selector, the DIP switches on the
bottom of the PTC controller are not used, except for the
Run/Learn Switch as described in the previous sections. The
DIP switches on the bottom of the controller are disabled
1
2
3
4
5
0–9
0–9
0–1
0–1
00-99
After you enter the Function Number, the controller will
retrieve the current Programmed Value from memory and
display it on the Dual Digit Display, using a “P” followed by
the value. For example, if you entered “1” at the Function
Prompt, the controller will respond with the default speed
range value, which is set at the factory as “6”:
P6
After reviewing the value, you may elect to keep the value or
change it:
•
•
Changing the Momentum and Maximum Speed Settings:
Function
Range
Table 5: Function Names and Numbers
# 0 0 *
The Dual Digit Display will revert to indicating the
current bridge position, and the controller will return to
“standby” (ready) mode.
Function
Number
To accept the value without changing it, press the
"*" key to cancel, or
Press the "#" key to proceed.
If you accept the value and press the "*" key, the Function
Programming Mode will be canceled and the Dual Digit
Display will revert to displaying the current track location.
If you pressed the "#" key to proceed, the Dual Digit Display
will display a Programming Prompt:
PEnter the value you want:
• Speed: Range is “0” through “9”, where “0” is the
slowest speed (approximately 0.19 RPM) and “9” is
PTC Model III, Keypad Selector Installation Instructions and User Manual, Rev 05/14 - Page 11
•
•
•
•
the fastest speed (approximately 0.50 RPM). The
factory default speed setting is “6” (medium speed).
Momentum: Range is “0” through “9”, where “0” is
no momentum, “1” is the shortest momentum period,
and “9” is the longest momentum period. The
momentum periods are scaled to depend on the
maximum speed variable you have selected. The
momentum range you may prefer will largely depend
on the size and scale of your turntable bridge. The
best way to find the range you like is to first
determine the maximum speed you prefer, then
experiment with different momentum range
variables. The factory default momentum setting is:
“0” (no momentum).
Automatic Track Power Reversing (“ATR”)
Mode: The ATR Mode instructs the controller on
how you want it to execute the optional track power
reversing function, if your controller is so equipped.
The two modes are Standard Mode (split ring rail
emulation) and Optional Mode (toggle switch
emulation). See the section on “Using the Automatic
Track Power Reversing Feature”, below, for full
details on the two ATR modes. At the Programming
Prompt, enter “0” for Standard Mode, or “1” for
Optional Mode. The factory default ATR Mode
setting is: “0” (Standard Mode).
Automatic Track Power Reversing (“ATR”)
Enable: The ATR Enable function simply turns the
power reversing feature on or off. Enter “0” to
enable the ATR, or “1” to disable it. The factory
default ATR Enable setting is: “0” (enabled).
Track Edit: (ver 11.7 and higher, or 8.94 for older
units): To edit a track setting, rotate the bridge to the
track in question. Hit #00#. When the display
indicates F-, enter a 5. At this point, hit the '#' sign to
advance a click or the '*' to retreat a few clicks, then
use the '*' key to advance to where you want the track
to be. Hit any key to exit the edit mode and then new
position is saved. Track #1 can’t be edited and you
will receive an E8 error.
E7
•
meaning: “Not a valid function code value”. The Dual
Digit Display will then revert to the Function Prompt,
where you can enter a correct function value.
If you enter a range value that is not appropriate for the
function you have requested (for example: entering “3”
for the ATR Mode, or “#” when a number was expected),
the Dual Digit Display will briefly display error code
“E8”,
E8
•
•
meaning: “Programming value not in correct range”. The
Dual Digit Display will then revert to the Programming
Prompt, where you can enter a correct range value.
The changes you make in these settings will take effect
the next time the controller starts a bridge move. It is not
necessary to turn the system power off for your new
settings to take effect.
If momentum is enabled, the maximum momentum
achievable is limited by the maximum speed selected. In
other words, at maximum speed, maximum momentum is
possible.
The controller automatically reduces the
momentum to suit the maximum speed, if the momentum
selected is higher than allowable.
Using the Automatic Track Power Reversing Feature.
The Automatic Track Power Reversing ("ATR") feature is an
optional capability whose purpose is to eliminate the need to
use a split ring rail, split commutator, or DPDT switch to
reverse the track power during bridge rotation and operation.
The ATR has two modes of operation, Standard and Optional:
Standard Mode: In this mode, sometimes called “split ring”
mode, the ATR works by remembering where your reference
track is (Track #1), and then automatically reversing the
bridge track power whenever the head end of the bridge
moves more than 90 degrees either direction from that point.
This simulates what would happen if you used a split ring rail
to carry power to the bridge, with the split made 90 degrees
each direction from the lead track. Refer to Figure 4, below:
Function Programming Hints:
•
•
•
If your system is equipped with the Optional Automatic
Track Power Reversing ("ATR") feature, be sure to turn it
on when you are ready to use it; the system default is off.
Once you turn it on, it stays enabled unless you explicitly
turn it off again.
If you do not have the ATR feature installed, you can still
change the values of the ATR Mode and ATR Enable, but
they will have no effect.
If you enter a function value that is not appropriate (for
example: entering “5” at the Function Prompt), the Dual
Digit Display will briefly display error code “E7”,
Lead Track
When the head
end is located
on this side of
the pit, power
will be
reversed.
Optional Mode: In this mode, sometimes called “toggle”
mode, the ATR operates by remembering where you start each
move, and toggles the power if you move more than 90
degrees in either direction from the starting point of that
particular move. For example, if you were to turn a
locomotive 180 degrees from any track location, the controller
PTC Model III, Keypad Selector Installation Instructions and User Manual, Rev 05/14 - Page 12
will toggle the power as if you had done manually it with an
auxiliary toggle switch:
Any Track
If the bridge is
moved more
than 90
degrees from
any track,
power will be
toggled.
Put another way, if the bridge is moved less than 90 degrees
(for example, between two tracks located close to each other),
the power will not be reversed.
--
Number entry prompt. Enter desired track
number, followed by the "*" key for head
end alignment, or the "#" key for tail end
alignment. The controller will also display
this pattern when first entering Index Mode
upon start up.
F-
Function Prompt. Enter desired function
value.
P-
Programming Prompt. Enter programming
value for the function selected. For Speed and
Momentum, the value will be in the range of
“0” to “9”. For ATR Mode and ATR Enable,
the programming value will be “0” or “1”.
For track edit the value will be the currently
selected track number;
Note: When you first program the controller, the power
reversing relay is initialized to feed power “straight through”,
meaning, not reversed. From that point, the controller
remembers each move and toggles the power as needed.
◆Tip: If you have the automatic Track Power Reversing
Feature and want to turn it off for any reason, follow the
Function Programming instructions (above) to disable it. If
ATR is turned off, the Controller will still provide power to
the bridge rails, but it will not reverse or toggle it. The change
will take effect the next time the controller does a bridge
move.
TABLE 3, Error Definition Summary (Dual Digit Display)
E0
Error Code 0: The controller is in Emergency
Stop (Pause) mode. Emergency Stop mode is
entered by hitting any key on the keypad
while the bridge is moving. To resume the
bridge move, press the "*" key.
Troubleshooting.
E1
Error Code 1: Not a valid key pressed, a
number (0 through 9) expected.
The PTC Model III Controller has been enhanced to provide
the user with more feedback, so corrective action can be taken
if the controller detects that something is wrong.
E2
Error Code 2: Indexing required. This is
usually the result of turning off the controller
in the middle of a bridge movement, or
turning off the bridge while it was in a pause
or emergency stop mode. This will also occur
if the unit has been programmed but not
indexed to track #1. See section 8.3.
To index: While holding down the "*" key,
turn on the system power. Release the "*"
key to start bridge movement, then single step
the bridge to align it with your primary lead
track (track #1).
E3
Error Code 3: Not a valid track (the track
selected is not a programmed location). Enter
a programmed location.
E4
Error Code 4: Not a valid key pressed, the
"#" key is expected. Press the "#" key to
start track entry sequence.
E5
E6
(Not used)
◆Tip: If you change the ATR Mode, it will not take affect
(the relay will not change state, if needed) until the next bridge
move.
Feedback is primarily provided by the Dual Digit Display.
The Status Indicator provides secondary feedback by use of
different combinations of colors and flash patterns. Note that
in the case of the Status Indicator, the meaning of the different
indications depends on if you currently have the controller in
RUN or LEARN modes. Refer to the tables below for a brief
description of the different indications and their meanings:
TABLE 2, Mode Definition Summary (Dual Digit Display)
nP
Normal power-on, but controller is “Not
Programmed”. Program your track locations.
Ln
Normal power-on, controller is ready and is
in "Learn" mode
Ad
Normal bridge learn move in progress, the
bridge is “Advancing”:
Error Code 6: Track ID selected (“00”) is
reserved. Enter a track and head/tail value
that is not “00”.
PTC Model III, Keypad Selector Installation Instructions and User Manual, Rev 05/14 - Page 13
E7
Error Code 7: Not a valid Function entry;
enter a Function value in the range “1”
through “4”, corresponding to Speed,
Momentum, ATR Mode, and ATR Enable
respectively.
E8
Error Code 8: Not a valid Programming
value; enter a Programming value in the range
“0” through “9” is setting Speed or
Momentum values; “0” or “1” if setting ATR
Mode or ATR Enable.
E9
(Not used)
Table Legend:
•
•
•
R is red, G is green, Y is yellow, "-" means LED is off
( ) means a solid, steady on
,... means the pattern repeats
Examples:
(R)
means the indicator is a solid, steady red
R,G,... means the indicator flashes red, green, red,
green,
etc. (no off)
R-R- ,... means the indicator flashes red twice, goes off,
and
then repeats.
Note: Flash pattern definitions depend on whether you have
the controller in RUN or LEARN modes.
TABLE 4, LEARN Mode LED Flash Pattern Summary
(Y)
Normal power-on, the controller is ready for
programming.
Y-Y- ,...
Normal bridge "learn" move in progress.
( R ) or ( G )
When "single stepping" at the end of a bridge
learn move, the indicator will alternate
between ( R ) and ( G ) as you take each step.
R-R- ,...
The controller has confirmed the new track
selected and is programming it into memory.
TABLE 5, RUN Mode LED Flash Pattern Summary
(G)
Normal power on, controller ready.
G-G- ,...
Normal bridge move in progress.
R-Y- ,...
Index mode: normal bridge index movement
in progress. Note: When "single stepping" at
the end of the indexing movement, the
indicator will alternate between ( R ) and
( G ) as you take each step.
Y-Y- ...
Power-on self test: The controller is set to
"RUN", but it is not programmed. Turn off
controller, set Run/Learn switch to learn.
Turn on power and program track locations.
(R)
Controller in PAUSE mode during bridge
move. Push the "*" key to resume bridge
movement.
FOR MORE INFORMATION
We are interested in your comments and suggestions. For
answers to your questions or for more information on the PTC
Model III, call or write New Your Railway Supply, Inc.,
attention
Technical
Support,
or
email
us
at
[email protected].
NEW YORK RAILWAY
SUPPLY
13225 Thornton Dr
Westlake, TX 76262
http://www.nyrs.com
Tel: (817) 233-5068
R-R- ,...
Power-on self test: Controller needs to be
reindexed. To enter the Index Mode, hold
down the "*" key while turning on the
system power switch.
NYRS 1994-2014, Rev 05/14, US Patents Pending
PTC Model III, Keypad Selector Installation Instructions and User Manual, Rev 05/14 - Page 14