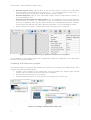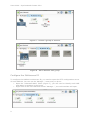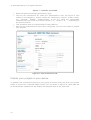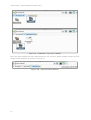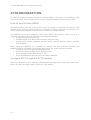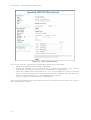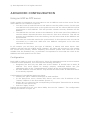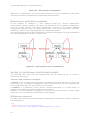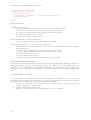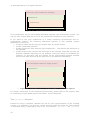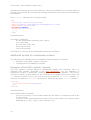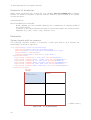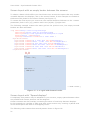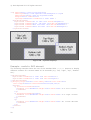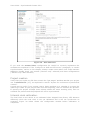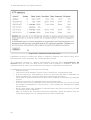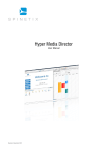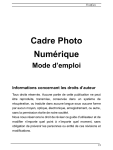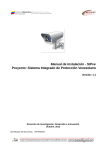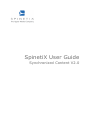
1
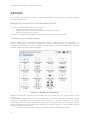
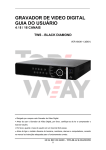
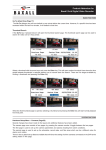
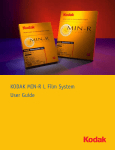
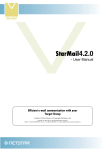
SpinetiX User Guide
Synchronized Content V2.0
© 2009 SpinetiX S.A. All rights reserved.
DISCLAIMER
THE SPECIFICATIONS AND INFORMATION REGARDING THE PRODUCTS IN THIS MANUAL
ARE SUBJECT TO CHANGE WITHOUT NOTICE. ALL STATEMENTS, INFORMATION, AND
RECOMMENDATIONS IN THIS MANUAL ARE BELIEVED TO BE ACCURATE BUT ARE
PRESENTED WITHOUT WARRANTY OF ANY KIND, EXPRESS OR IMPLIED. USERS MUST
TAKE FULL RESPONSIBILITY FOR THEIR APPLICATION OF ANY PRODUCTS. THE
SOFTWARE LICENSE AND LIMITED WARRANTY FOR THE ACCOMPANYING PRODUCT ARE
SET FORTH IN THE INFORMATION PACKET THAT IS SHIPPED WITH THE PRODUCT AND
ARE INCORPORATED HEREIN BY THIS REFERENCE. IF YOU ARE UNABLE TO LOCATE THE
SOFTWARE
LICENSE
OR
LIMITED
WARRANTY,
CONTACT
YOUR
SPINETIX
REPRESENTATIVE FOR A COPY.
NOTWITHSTANDING ANY OTHER WARRANTY HEREIN, ALL DOCUMENT FILES AND
SOFTWARE OF THESE SUPPLIERS ARE PROVIDED “AS IS” WITH ALL FAULTS. SPINETIX
DISCLAIMS ALL WARRANTIES, EXPRESSED OR IMPLIED, INCLUDING, WITHOUT
LIMITATION, THOSE OF MERCHANTABILITY, FITNESS FOR A PARTICULAR PURPOSE AND
NONINFRINGEMENT OR ARISING FROM A COURSE OF DEALING, USAGE, OR TRADE
PRACTICE.
IN NO EVENT SHALL SPINETIX OR ITS SUPPLIERS BE LIABLE FOR ANY INDIRECT,
SPECIAL, CONSEQUENTIAL, OR INCIDENTAL DAMAGES, INCLUDING, WITHOUT
LIMITATION, LOST PROFITS OR LOSS OR DAMAGE TO DATA ARISING OUT OF THE USE
OR INABILITY TO USE THIS MANUAL, EVEN IF SPINETIX OR ITS SUPPLIERS HAVE BEEN
ADVISED OF THE POSSIBILITY OF SUCH DAMAGES.
Hyper Media Director User Manual V1.0
©2007-2008 SpinetiX S.A. All rights reserved.
"SpinetiX" and “HMP Hyper Media Player” are registered trademarks, and all logo and
graphic designs are trademarks of SpinetiX S.A. Other product and company names
appearing in SpinetiX S.A. products and materials are used for identification purposes
only and may be trademarks or registered trademarks of their respective companies.
Registered and unregistered trademarks used in any SpinetiX S.A. products and
materials are the exclusive property of their respective owners
SpinetiX S.A.
Rue des Terreaux 17
1003 Lausanne
Switzerland
www.spinetix.com
[email protected]
2
User Guide : Synchronized Content V2.0
INTRODUCTION
A video wall is a set of screens accurately placed to create a single display. Screens may
be one next to the other to compose a bigger, regular area or they may have irregular
positions to create a non-conventional pattern.
In all of these cases a perfect synchronization of the content displayed is required to
provide a sense of uniformity, no matter how the screens are placed.
The HMP100 let you control accurately when each item are displayed, enabling a very
flexible solution for managing any type of video wall applications.
Application examples:
In public transportation, multiple displays are deployed along escalators. The content on
the displays follows the user moving from one display to the next. This special effect
increases the impact of the message to the user.
In retails shops, hotels and bars, multiple displays are deployed in the same hall to
create an ambiance or a "leitmotif": animations can be created to move from one display
to the next one creating global effects.
Two or three small size display can be grouped together to create a larger size display
with higher impact to the audience.
3
© 2009 SpinetiX S.A. All rights reserved.
TABLE OF CONTENT
Disclaimer ............................................................................................................ 2
Introduction .......................................................................................................... 3
Application examples: ......................................................................................... 3
Table of Content .................................................................................................... 4
Multiscreen Displays .............................................................................................. 5
Design ................................................................................................................. 6
Designing content for a multiscreen layout ............................................................ 6
Choosing your screens layout ........................................................................... 6
Creating a Multiscreen project .......................................................................... 7
Editing multiscreen content .............................................................................. 8
Configuring HMD and the HMP100 ........................................................................ 8
Create a virtual device..................................................................................... 8
Configure the Multiscreen ID ............................................................................ 9
Publish your project on your device .....................................................................10
Synchronization ...................................................................................................12
How to synchronize HMPs? .................................................................................12
Configure NTP through the HTTP interface ........................................................12
Advanced Configuration.........................................................................................14
Using an HMP as NTP server ...............................................................................14
Configuration ................................................................................................14
Master/server architecture examples ................................................................16
Syntax for multiscreen synchronized content ........................................................16
Canvas and viewbox concepts .........................................................................16
Multiscreen elements ......................................................................................16
Synchronization element.................................................................................17
Additional syntax for multiscreen content .............................................................19
Extension of the SVG <switch> element ...........................................................19
Extension of JavaScript...................................................................................20
Examples .........................................................................................................20
Screen layout with six screens .........................................................................20
Screen layout with an empty border between the screens ...................................21
Screen layout with "Spread displays"................................................................21
Example: <switch> SVG element ....................................................................22
Example: JavaScript .......................................................................................23
Troubleshooting ...................................................................................................24
NTP Synchronization ..........................................................................................24
Project creation.................................................................................................25
Internal clock calibration. ...................................................................................25
4
User Guide : Synchronized Content V2.0
MULTISCREEN DISPLAYS
HMP100s clocks are precisely time synchronized, letting the user control exactly when an
item should be displayed. This feature can be used to schedule content to be displayed at
a certain time of the day, or to synchronize the display of two or more HMP100. This
enable the usage of the HMP100 in multiscreen displays.
The Hyper Media Director software (HMD) offers an intuitive way of managing
multiscreen projects, trough the use of predefined templates and the possibility to create
virtual devices for the publications process. In this case the same project will be used on
all the HMP100 composing the multiscreen display, but each individual HMP100 will
display only on part of the project. This let the user manage multiscreen display the
same way as single screen displays.
To display content on multiple screen using HMD you need to perform the following
operations.
• Create a project based on one of the multiscreen templates available in your
install of HMD. This will be described in the design section of this document.
For advanced user you can also create your own custom layout using the SpinetiX
multiscreen syntax described in the advance part of this user guide.
• Create a virtual device to be able to publish your project on all the HMP100
composing your multiscreen display.
• Configure each HMP100 so that it knows its position in the multiscreen layout. It
might also be necessary to configure the synchronization server for all the
HMP100.
• Publish your project on the virtual device.
5
© 2009 SpinetiX S.A. All rights reserved.
DESIGN
This chapter will show you how to create multiscreen content using the HMD software
provided by SpinetiX.
Designing content for a multiscreen layout
To create a multiscreen layout you need to:
• Choose the layout of your screens
• Replace the index of your project by a multiscreen index
• Start working on your project
These three steps are described in more details in the following sections
Choosing your screens layout
HMD provides a set of predefined multiscreen layout. To select the correct layout for your
screen configuration open the "Multiscreen" folder located under 'My templates'. A
snapshot of the folder is shown in Figure 1. All predefined layout corresponds to adjacent
screens creating a large scale videowall.
Figure 1 - Multiscreen templates
Different multiscreen layouts are provided. The icon shows you the configuration of the
screens.
The template configurable.svg let you configure any kind of multiscreen matrix (NxM),
including a possible border between the screens. To use this template, All screen
composing the multiscreen layout must have the same dimension and the same aspect
ratio. A snapshot of the configurable template is shown in Figure 2. The template let you
configure the following items:
• Conventional multi-layer settings: duration, and new layer dimensions
6
User Guide : Synchronized Content V2.0
•
•
•
•
Screen aspect ratio: aspect ratio of the screens used to create your videowall.
You can select horizontal layouts (16:9, 4:3, ...) or vertical layout (9:16, 3:4, ...)
from the drop box or type any custom aspect ratio if needed.
Screen diagonal: size of your individual screen. Can be expressed in inches ('')
or in centimeters (cm)
Vertical and Horizontal frame border: Let you configure the size of the border
of the screen in inches (''), centimeter (cm) or millimeters (mm). Note that you
can use a negative value for the frame border for overlapping projected screens.
In this case the HMP100 will add a blending gradient on the overlapping region.
Array columns and rows: number of screen composing your videowall.
Figure 2: configurable.svg, a generic multiscreen template
It is possible to use custom layout for multiscreen design as explained in the advanced
section of this documentation.
Creating a Multiscreen project
The second step for working with multiscreen content is to create your HMD project. This
is done using the following steps:
• Create a new project in the usual way. You can select any aspect ratio as this
setting will be override by the multiscreen templates
• Delete the index.svg from your project.
• Copy the desired layout to your project and rename it to index.svg.
Figure 3: Using a multiscreen index file
7
© 2009 SpinetiX S.A. All rights reserved.
Editing multiscreen content
Once the index file has been created you can start working on your project like for single
display project. For instance you can:
• Add a background covering all the displayed content.
• Add playlist over the complete displayed area.
• Add a video covering one or multiple screen.
• ...
You can choose to see a global view of your project (Document) or a single screen
portion at any time by pushing the "Multiscreen layout view" button, as shown in Figure
4.
Note that the content must obey the limitations of a single HMP100 unit. For instance the
maximum resolution for a displayed video is SD. If you want to display video with higher
resolution, the video must be cut into 4 or video of smaller sizes.
Figure 4 - Multiscreen layout view button
Configuring HMD and the HMP100
Before you can publish your project you need to configure your HMP100 to be ready to
receive a multiscreen project. Two operations are needed: The creation of a virtual
device in HMD and the configuration of the multiscreen ID of each HMP100.
Create a virtual device
It is possible to create group of devices under the My Device folder. Project can be
published on single devices or on group of devices. This mechanism will be used to create
a virtual device for multiscreen projects.
Creating a virtual device:
• Go to "My devices" in your "Workspace"
• Create a "New collection", rename it for example to "Videowall HMPs", as in Figure
5.
• Find the HMPs where you want to publish your project to, and move them into the
newly created folder, see Figure 6.
8
User Guide : Synchronized Content V2.0
Figure 5 - Create a group of devices
Figure 6 - Move devices into group
Configure the Multiscreen ID
To configure the HMP100 multiscreen ID, you need to open the HTTP configuration server
of each HMP100. You can use the 'Manage...' menu entry to do so:
• Open the "Videowall HMPs" folder (Figure 7), you will need to identify each HMP
and assign its position in the layout
• Right click on the first HMP and choose "Manage...", the web interface will open.
9
© 2009 SpinetiX S.A. All rights reserved.
Figure 7 - Identify each HMP
•
•
•
•
Open the Network Settings configuration page
Look for the "Multiscreen ID" under the "Identification" title, see Figure 8. This
needs to be changed to exactly reflect the "Multiscreen Layout" screen names.
e.g. "Top-Left", "Middle", "Bottom-Right". If you are using the configurable
template then the screen are named "screen-1.1", "screen-1.2", ... depending on
the screen position.
This operation need to be performed for each HMP100.
Once all the Multiscreen ID have been configured, you are now ready to publish
your projects
Figure 8 - Set multiscreen ID
Publish your project on your device
To publish your multiscreen project to your group of devices, drag and drop your project
folder on top of the "Videowall HMPs" folder icon (as shown in Figure 9); each HMP will
be automatically updated and will display the assigned area of the video wall.
10
User Guide : Synchronized Content V2.0
Figure 9 - Publish to a group of HMPs
Once the first publish has been performed you can use the "Quick publish" button like for
single screen projects as shown in Figure 10.
Figure 10 - Quick Publish button
11
© 2009 SpinetiX S.A. All rights reserved.
SYNCHRONIZATION
In order to be able to display content on multiple display, the clocks of the HMP100 must
be synchronized. The synchronization is done using the Network Time Protocol (NTP).
How to synchronize HMPs?
The NTP protocol uses one or more NTP server to be able to control the precision of the
internal clock. Using the NTP protocol it is possible to reach a precision as good as 1ms.
This is more than sufficient to synchronize a video on multiple screens.
The HMP100 comes pre-configured with some public NTP servers, which are fine to
regulate local date and time, but with the following limitations:
• Time precision around 200 ms
• Firewall needs to let NTP traffic through (UDP port 123),
• Synchronized content playback across several screens requires higher precision
and reliability.
When using the HMP100 in a multiscreen display, the time precision between the
HMP100 must be increased. This can be done using one of the following method:
• Configure a local or ISP provided NTP server
• Use a third party hardware plug & play servers
• Use a software based NTP server on a PC
• Use one HMP100 as NTP server for the other HMP100.
Configure NTP through the HTTP interface
Open your browser at your HMP100 configuration web page and choose the "Date/Time"
tab on the left, the page shown in Figure 11 will appear:
12
User Guide : Synchronized Content V2.0
Figure 11 - NTP Configuration
Once you are on the "Date/Time" configuration page, do the following:
• Make sure the NTP Server button is selected.
• Insert the address of your NTP server(s). Leave the "Monitor only" options
unchecked. This option is needed only for advanced configurations.
• Leave the "Pause device and startup" to "0 s". If your HMP100 is using a local NTP
server, you can increase this value to insure that your HMP100 will boot after your
server in case of power cut in your installation for instance.
• Click on "Apply" to enable the new configuration
After you have configured all your HMPs with your local NTP server(s) they are ready to
play synchronized content.
13
© 2009 SpinetiX S.A. All rights reserved.
ADVANCED CONFIGURATION
Using an HMP as NTP server
Under certain circumstances you may want to use an HMP100 unit as time server for the
other HMP100. For instance in case of:
• You don't have a local NTP server and want to use the public servers. In this case
one HMP100 will synchronize to the public servers and the others HMP100 will be
synchronize to this HMP100. This will provide a better accuracy between all the
HMP100.
• The HMP100 do not have access to the Network. In this case one of the HMP100 is
used as master whereas the other ones uses it's time as a reference. This will not
prevent your installation from time drifting, but will insure that all the HMP100 are
synchronized.
• You have two units that need to be synchronized. In this case the two unit can be
connected by a cross-over cable and one HMP100 configured to be the time
reference for the other.
In all scenario you will have two type of HMP100, a master and some slaves. One
HMP100 will play the role of NTP server (master), the other will connect to it for getting
the correct time (slaves). Before adopting this solution please note that this is less
reliable than the standard one; in particular it's important to know that the clock of the
HMP100s will drift apart from UTC time.
Configuration
Each HMP is ready to work as a NTP server, but a few parameters must be set to assure
a smooth overall operation, thus execute the following procedure:
• Designate one and only one HMP unit as the master. It should have a static IP
address. The clock should be already properly calibrated before use (for
calibration refer to the "Troubleshooting" section at the end of this document)
• All other HMP100 units are slaves. They should also have static IP addresses but it
is not strictly required
Configuration of the HMP100 acting as slaves:
• Identify the "slave" HMP100 and open its web interface
• In the Date/Time menu choose NTP Server and write the IP address of the
"master" HMP100 in the first textbox (Server 1)
• Select "90 s" in the menu list corresponding to the option "Pause device at startup
to wait for NTP servers by"
• Push the "Apply" button
Repeat this procedure for all your slave HMPs, but not the "master". The configuration
settings are shown in Figure 12.
14
User Guide : Synchronized Content V2.0
Figure 12 - NTP slave configuration
Configuration of the HMP100 acting as master:
Identify the "master" HMP100 that will work as NTP server and configure it as follows
through the web interface (also refer to Figure 13):
• In the Date/Time menu choose NTP Server and write the IP address of as many
slave HMP100s with static IP addresses as possible in the server textboxes
(Server 1, Server 2, etc.)
• Check the corresponding box(es) in the right column, under the title "Monitor
only". The check box must be checked otherwise you will create a reference loop,
and you system will not work correctly.
• Select "0 s" in the menu list corresponding to the option "Pause device at startup
to wait for NTP servers by"
• Push the "Apply" button.
15
© 2009 SpinetiX S.A. All rights reserved.
Figure 13 - NTP master configuration
With such a configuration, you will be able to switch on all your HMP100s at the same
time and have them automatically synchronized between them.
Master/server architecture examples
As the number of HMP100s in your network grows up, several master/slave
configurations become possible. The Figure 14 presents a set of possible configuration.
The red arrows indicate the server address(es) entered in the master HMP100
configuration (Monitor only). The black arrows refer to the values entered for the slave
HMP100(s). Refer to previous paragraph for configuration details.
Note that multiple levels of NTP hierarchies is strongly discouraged. For large installations
it is more appropriate to invest in a NTP server.
Figure 14 - NTP master/server architecture
Syntax for multiscreen synchronized content
The following XML code must be implemented into the index.svg file to create a
multiscreen document:
Canvas and viewbox concepts
A canvas is the complete area physically described by the SVG index file, it may have
(quite) any size, it generally corresponds to the rectangle formed by your videowall and
it is usually larger than the size of one of your screens.
A viewbox is a subsection of the canvas, normally associated to a single screen. A
viewbox can be placed anywhere inside the canvas area.
Example: in a 2x2 videowall, composed of 4 screens, the canvas will be 4 times larger
than each of the 4 viewboxes associated to the 4 displays.
Multiscreen elements
The following elements provide information regarding the canvas size and the viewboxes
size and position:
<svg
xmlns="http://www.w3.org/2000/svg"
xmlns:spx="http://www.spinetix.com/namespace/1.0/spx"
16
User Guide : Synchronized Content V2.0
width="100%" height="100%"
viewBox="xc yc wc hc" >
<spx:multiScreen>
<spx:screen viewBox="x y w h" xml:id="screenID"/>
</spx:multiScreen>
[...]
</svg>
Value definitions:
viewBox="xc yc wc hc"
it's the space position and full size of the canvas, in pixels, where:
xc is the x-axis coordinate of the top-left point of the canvas,
yc is the y-axis coordinate of the top-left point of the canvas,
wc is the total width of the canvas,
hc is the total height of the canvas.
<spx:multiScreen> </spx:multiScreen>
it's the element enabling the multiscreen functionality
<spx:screen viewBox="x y w h" xml:id="screenID"/>
it's the element representing each of the units that compose the complete canvas,
its attributes are:
x is the x-axis coordinate of the top-left point of this screen,
y is the y-axis coordinate of the top-left point of this screen,
w is the width of this screen,
h is the height of this screen,
screenID is the screen identification name of your choice
Synchronization element
There are two possible techinique to ensure a corect synchronisation between content on
different screens: The use of a schedule file or the usage of an inline begin time of a
documemt. The predefined mulitscreen templates are using the inline begin time
strategy. This means that synchronisation will be automatic when those templates are
used.
The iCalendar (.ics) file
The first option for synchronizing content displayed on multiple screens is using an
iCalendar file to contain the multiscreen file. Figure 15 shows the structure of the files to
be created. The structure of your project should be as follow:
• Create an index.svg with you multiscreen setup. The file should contain the
<spx:multiScreen> instructions.
• Create a iCalendar schedule file.
• Add your content designed for multiscreen into your schedule.
17
© 2009 SpinetiX S.A. All rights reserved.
index.svg (with multiscreen settings)
schedule.ics
content.svg
Figure 15 - iCalendar file for synchronization
This configuration let you use multiple schedules together with multiscreen content. You
can use your custom SVG file or one of the multiscreen template as your index file.
If you want to use your multiscreen in a setup combining synchronised and unsynchronised content. The following alternative aproach is also possible (shown
graphically in Figure 16:
• Create an index.svg file using the aspect ratio of a single screen
• Create a iCalendar schedule
• Create multiscreen files with the<spx:multiScreen> instructions and add them to
the calendar
• Create single screen content and add them to the calendar. Note that you can use
different calendar depending on the HMP100 (using the switch of JavaScript for
instance). In this later case the content too be synchronized between multiple
screen must start and end at the same time in the different calendards.
index.svg
(with the aspect ratio of a single screen)
schedule.ics
multiscreen.svg
singlescreen.svg
•
Figure 16 - iCalendar file for synchronization, alternative option.
For further information on the scheduling functionality, please refer to the chapter "How
to scheduling a Hyper Media project with HMD?" of this Userguide.
The spx:begin element
Instead of using a complete calendar file just for the synchronisation of the mulitple
screens, it is possible to use an inline reduce schedule inside the index file. The schedule
is described using a proprietarty tag in the svg element: spx:begin. The spx:begin
18
User Guide : Synchronized Content V2.0
describes the starting point of the document. Using this attribute has the same effect as
putting the document in a schedule file starting at the same tiem as the one described by
the attribute.
The spx:begin element can be used as follow:
<svg
xmlns="http://www.w3.org/2000/svg"
xmlns:spx="http://www.spinetix.com/namespace/1.0/spx"
height="100%" width="100%"
spx:begin="Thhmmss"
viewBox="xc yc wc hc" >
[...]
</svg>
Value definitions:
spx:begin="Thhmmss"
it's the presentation beginning time, where:
T is a fixed flag,
hh is the hour of the day,
mm are the minutes,
ss are the seconds.
This feature is used by all the predefined multiscreen templates.
Additional syntax for multiscreen content
The following two methods are also available to build multiscreen contents:
• Extension of the SVG <switch> element
• JavaSript MULTI_SCREEN_ID variable
Extension of the SVG <switch> element
The SVG <switch> element allows to conditionally display SVG elements. This is a
standard SVG element described in the SVG specification. For the handeling of
multiscreen content a proprietary condition has been added by SpinetiX. This let you
visualize a specific content based on the screenID of the player running the show. The
<g> content is shown only if spx:multiScreenId is equal to "screenID". Multiple <g>
contents, for different "screenID" values can be listed into the same <switch> element.
<switch>
<g spx:multiScreenId="screenID">
</g>
<switch>
Value definitions:
spx:multiScreenId="screenID"
spx:multiScreenId is the variable tested by the switch, it contains the ID of the
current screen
screenID is the value associated to each of the screens where the content will be
displayed (e.g. "left", "right", "top", "bottom", etc).
19
© 2009 SpinetiX S.A. All rights reserved.
Extension of JavaScript
When using JavaScript into a SVG file, the variable MULTI_SCREEN_ID is allways
defined. It allows to visualize a specific content, based on the screenID of the player
running the show.
Value definitions:
MULTI_SCREEN_ID="screenID"
MULTI_SCREEN_ID is the variable tested by the if statement, it contains theID of
the current screen
screenID is the value associated to each of the screens where the content will be
displayed (e.g. "left", "right", "top", "bottom", etc).
Examples
Screen layout with six screens
The following example creates a 2-columns, 3-rows grid with 6 16:9 screens set
horizontally, as shown in Figure 16:
<svg xmlns="http://www.w3.org/2000/svg"
xmlns:xlink="http://www.w3.org/1999/xlink"
xmlns:spx="http://www.spinetix.com/namespace/1.0/spx"
height="100%" width="100%"
spx:begin="T000000" viewBox="0 0 2560 2160" >
<spx:multiScreen>
<spx:screen viewBox="0 0 1280 720" xml:id="TopLeft"/>
<spx:screen viewBox="1280 0 1280 720" xml:id="TopRight"/>
<spx:screen viewBox="0 720 1280 720" xml:id="MidLeft"/>
<spx:screen viewBox="1280 720 1280 720" xml:id="MidRight"/>
<spx:screen viewBox="0 1440 1280 720" xml:id="BotLeft"/>
<spx:screen viewBox="1280 1440 1280 720" xml:id="BotRight"/>
</spx:multiScreen>
0,0
0,0
↔ 1280 x 720 ↕
1280,0
0,720
1280,720
0,1440
1280,1440
↔ 2560 x 2160 ↕
Figure 16 - 2 x 3 grid layout
20
User Guide : Synchronized Content V2.0
Screen layout with an empty border between the screens
To obtain a better whole effect you should take into account the space that may remain
unusable between the displays, due to the screen frames. In this example we consider a
thickness of 80 pixels for the screen frames (see Figure 17)
To create the final layout you must sum the internal borders thickness to the viewBox
parameters, both in the (x,y) position and in the (w)idth, (h)eight sizes.
The following example creates the same grid as the previous one, but empty internal
borders are also calculated:
<svg xmlns="http://www.w3.org/2000/svg"
xmlns:xlink="http://www.w3.org/1999/xlink"
xmlns:spx="http://www.spinetix.com/namespace/1.0/spx"
height="100%" width="100%"
spx:begin="T000000" viewBox="0 0 2640 2320" >
<spx:multiScreen>
<spx:screen viewBox="0 0 1280 720" xml:id="TopLeft"/>
<spx:screen viewBox="1360 0 1280 720" xml:id="TopRight"/>
<spx:screen viewBox="0 800 1280 720" xml:id="MidLeft"/>
<spx:screen viewBox="1360 800 1280 720" xml:id="MidRight"/>
<spx:screen viewBox="0 1600 1280 720" xml:id="BotLeft"/>
<spx:screen viewBox="1360 1600 1280 720" xml:id="BotRight"/>
</spx:multiScreen>
0,0
0,0
↔ 1280 x 720 ↕
1360,0
0,800
LCD frame: →
↓ +80 pixels
1360,800
0,1600
1360,1600
↔ 2640 x 2320 ↕
Figure 17 - 3 x 2 grid with frames border
Screen layout with "Spread displays"
A completely free pattern may be adopted for your screens; empty spaces between them
are possible and custom positions can be assigned.
Screen contents can also overlap, increasing the sense of continuity between displays.
In this example we consider a wide area with some screens only covering a partial area
of the whole space and with an overlapping corner.
The following code creates the area and pattern shown in Figure 18:
21
© 2009 SpinetiX S.A. All rights reserved.
<svg xmlns="http://www.w3.org/2000/svg"
xmlns:spx="http://www.spinetix.com/namespace/1.0/spx"
xmlns:xlink="http://www.w3.org/1999/xlink"
height="100%" width="100%"
spx:begin="T000000" viewBox="0 0 4260 1920" >
<spx:multiScreen>
<spx:screen viewBox="50 50 1280 720" xml:id="TopLeft"/>
<spx:screen viewBox="1706 240 1280 720" xml:id="TopRight"/>
<spx:screen viewBox="852 1150 1280 720" xml:id="BotLeft"/>
<spx:screen viewBox="2800 800 1280 720" xml:id="BotRight"/>
</spx:multiScreen>
Figure 18 - Spread displays
Example: <switch> SVG element
The following example shows the use of the standard SVG <switch> element to display
different contents on a screen based on its screenID (e.g. "left, "right", "top", "bottom"
etc.).
<spx:multiScreen>
<spx:screen viewBox="0 0 1280 720" xml:id="left"/>
<spx:screen viewBox="0 0 1280 720" xml:id="right"/>
</spx:multiScreen>
<g display-align="center" font-family="Arial" font-size="100"
text-align="center" transform="translate(320,180)">
<switch>
<g spx:multiScreenId="left">
<textArea fill="#fed600" height="360" width="640" >I'm left screen!
</textArea>
</g>
<g spx:multiScreenId="right">
<textArea fill="#00d6fe" height="360" width="640" >I'm right screen!
</textArea>
</g>
<g>
<textArea fill="#d600fe" height="360" width="640" >No screen defined
</textArea>
</g>
</switch>
</g>
22
User Guide : Synchronized Content V2.0
Example: JavaScript
The following example shows the usage of the JavaScript MULTI_SCREEN_ID variable to
control teh text content of a textArea item.
<spx:multiScreen>
<spx:screen viewBox="0 0 1280 720" xml:id="left"/>
<spx:screen viewBox="0 0 1280 720" xml:id="right"/>
</spx:multiScreen>
<script>
<![CDATA[
if (MULTI_SCREEN_ID == "left")
document.getElementById("textId").textContent="I'm left!";
else if (MULTI_SCREEN_ID == "right")
document.getElementById("textId").textContent="I'm right!";
else
document.getElementById("textId").textContent="No screen defined!";
]]>
</script>
<g>
<text x="50" y="50" xml:id="textID">_Text_will_be_here_</text>
</g>
23
© 2009 SpinetiX S.A. All rights reserved.
TROUBLESHOOTING
Synchronized content over multiple screen need a correct configuration of teh HMP100
and a well designed hyper media project to work as expected. In case the project is not
displayed correctly, here a first list of parameter to check before contacting
[email protected].
NTP Synchronization
The content are not synchronized, i.e. one or more screens play their part of media
earlier or later than the other displays.
Please check the following:
• Make sure that NTP is enabled through your web interface and that you have
chosen a good NTP server (one or more):
o It should be on your local network to be able to reach the few milliseconds
of precision required.
o Public NTP servers are usually too "far" to provide such a precision. Review
section "Synchronization" for details on inserting NTP server addresses.
• Verify your HMP100s NTP statistics:
o Values in the column "Time offset" should be as close to 0 as possible, as
the example shown in Figure 19.
• Make sure that at least one NTP server is always reachable (at least one column
"Reach" should be equal to 100%).
In case some of your NTP server can't be reached ("Status" column remains always
"Initializing"), it may be behind a firewall or just wrongly configured. Check the NTP
server configuration with your system administrator. For further details on the NTP
protocol, please refer to http://www.ntp.org.
24
User Guide : Synchronized Content V2.0
Figure 19 - NTP Statistics
If you used the master/slave configuration be careful to correctly implement the
architectures explained in the "Configure an HMP as NTP server" paragraph, in section
Synchronization, earlier in this chapter. Always create trees rather than loops between
HMP100s. Double check your master ("Monitor only" selected) and slave configurations
("Monitor only" NOT selected).
Project creation
Verify that your index.svg file does contain the "spx:begin" attribute or that your project
use a schedule file (.ics), as explained in section "Syntax for multiscreen synchronized
content".
A good test to verify if you content uses a begin attribute or a calendar is to open the
index.svg in HMD. If your project start from the beginning, then no schedule are present.
If opening the project multiple times always shows the same starting point, then no
schedule are present and the playback will not be synchronized.
Internal clock calibration.
The local clock on the device is not calibrated when shipped from factory. NTP behaves
differently while the local clock is not yet calibrated and it will not synchronize as
expected. Figure 20 below shows the configuration window before calibration is
completed.
25
© 2009 SpinetiX S.A. All rights reserved.
Figure 20 - Internal clock calibration
Calibration consists in finding the offset in frequency between the internal clock and a
NTP reference and is necessary for normal operation of NTP.
The calibration process is started automatically and will take approximately 60
minutes when at least one NTP server (other than loopback) is available. Once the
calibration data is saved it is reused when the device is rebooted or powered off.
To calibrate the clock of a device do the following:
o Start the device
o Look at the "NTP statistics" section of the "Date/Time" configuration page
o If at the end of the "NTP statistics" section it says that the clock is calibrated, no
more operations are required, otherwise continue this procedure
o Check that at least one NTP server other than loopback is reachable and selected
as peer
o Allow for some time for reachable servers to become peers
o If no NTP servers are reachable check that the NTP servers are correct and that
the network configuration is working fine; if not, modify the settings and restart
the procedure.
o Once a peer other than loopback is selected leave the device running for at least
70 minutes without rebooting
o After 70 minutes the local clock should be calibrated, reboot the device from the
maintenance page (do not unplug the device before rebooting)
26