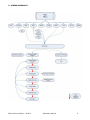
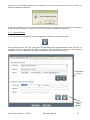
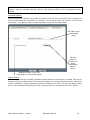
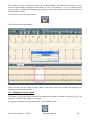
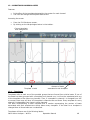
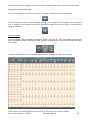
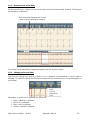
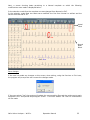
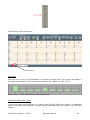
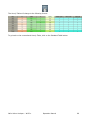
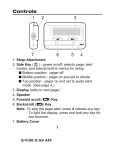
1
Galix WinTer Holter Analyzer User’s Manual 2555 Collins Avenue, Suite C-5, Miami Beach, FL 33140, U.S.A. Tel.: (305) 534-5905 Fax: (305) 534-8222 INDEX 1 – INTRODUCTION .............................................................................................................................................................4 1.1 – CORRECT ELECTRODE PLACEMENT ...............................................................................................................................4 1.2 – HARDWARE REQUIREMENTS ..........................................................................................................................................5 2– SCREEN HIERARCHY ....................................................................................................................................................6 3 – OPENING THE HOLTER ANALYZER SOFTWARE ................................................................................................7 3.1 - SCREEN CONFIGURATION ...............................................................................................................................................7 4 – MAIN MENU.....................................................................................................................................................................9 4.1 – TOOLBAR OPTIONS ........................................................................................................................................................9 5- CONFIGURATION MENU .............................................................................................................................................12 5.1 - PHYSICIANS/INSTITUTION INF. FILE FOLDER ................................................................................................................13 5.1.1. - New Institution ....................................................................................................................................................13 5.1.2 – Delete Institution..................................................................................................................................................14 5.1.3 – New Physician .....................................................................................................................................................15 5.1.4 – Delete Physician ..................................................................................................................................................16 5.2 – PHYSICIAN CONFIGURATION FILE FOLDER ..................................................................................................................17 5.3 - DATA SOURCE FILE FOLDER .........................................................................................................................................18 6 – PATIENT HOOK UP......................................................................................................................................................21 6.1 – PATIENT INFORMATION................................................................................................................................................22 6.2 – OPTIONAL DATA ..........................................................................................................................................................23 6.3 – CANCELING MEMORY CARD IDENTIFICATION ...............................................................................................................23 6.4 – COMPLETING MEMORY CARD IDENTIFICATION .............................................................................................................23 6.5 - FILE CONTAINING THE CURRENT PATIENT INFORMATION ..............................................................................................24 7 – NEW PATIENT ...............................................................................................................................................................25 7.1 – PATIENT DEMO ............................................................................................................................................................25 7.2. - AUTOMATIC DATA UPDATE ..........................................................................................................................................26 7.3 – PATIENT INFORMATION................................................................................................................................................27 7.4 – ECG SIGNAL DECOMPRESSION .....................................................................................................................................27 7.5 - EXISTING PATIENT ........................................................................................................................................................27 7.6 - EXISTING PATIENT STUDY .............................................................................................................................................28 7.7 - MORE THAN SIX STUDIES PER PATIENT .........................................................................................................................28 7.8 – CLOSING THE CURRENT PATIENT FILE ..........................................................................................................................29 8 – ECG STRIPS PRE-ANALYSIS .....................................................................................................................................30 9 – ECG STRIPS POST-ANALYSIS...................................................................................................................................33 9.1 – EIGHT-SECONDS AND ONE-MINUTE GRAPHS .................................................................................................................33 9.2 - STORING STRIPS ............................................................................................................................................................35 9.3 – CHANGING THE STRIP LENGTH .....................................................................................................................................36 9.4 – PRINTING STRIPS ..........................................................................................................................................................37 9.5 - INTERVAL MEASUREMENT ...........................................................................................................................................37 9.6 – CHANGE BEATS CLASSIFICATION .................................................................................................................................38 9.7 – PACEMAKER ANALYSIS ...............................................................................................................................................39 10 – TWENTY FOUR HOURS STATISTICAL GRAPHS...............................................................................................41 10.1 – MINUTES NOT ANALYZED ..........................................................................................................................................41 10.2 – HEART RATE AND TACHOGRAM ................................................................................................................................41 10.3 - DETAILED VIEW .........................................................................................................................................................42 10.4 - ST-SEGMENT DEVIATION ...........................................................................................................................................42 10.5 – QT INTERVAL VALUES ..............................................................................................................................................43 10.6 – VENTRICULAR ECTOPICS (VE) PER HOUR ..................................................................................................................43 10.7 – SUPRAVENTRICULAR ECTOPICS (SVE) PER HOUR ......................................................................................................44 11 – FULL DISCLOSURE....................................................................................................................................................45 11.1 – FULL DISCLOSURE SCROLL COMMANDS ....................................................................................................................46 Galix Holter Analyzer – WinTer Operation Manual 2 11.2 – FULL DISCLOSURE EDITION COMMANDS ...................................................................................................................46 12 – ARRHYTHMIA MORPHOLOGIES ..........................................................................................................................48 12.1 – TEMPLATES ................................................................................................................................................................48 12.2 – EDIT MORPHOLOGIES .................................................................................................................................................49 12.3 - SAVE CHANGES ..........................................................................................................................................................50 13 - MORPHOLOGY CATEGORIES ................................................................................................................................51 13.1 – BEATS ........................................................................................................................................................................51 13.2 - CHANGING THE CURRENT BEAT ..................................................................................................................................52 13.3 – DETAILED VIEW OF THE BEAT ....................................................................................................................................54 13.4 – CHANGING THE BEAT LABEL ......................................................................................................................................54 14 – SIGNIFICANT EVENTS..............................................................................................................................................56 15 – SIGNIFICANT EVENTS EDITOR .............................................................................................................................58 16 – HEART RATE VARIABILITY ...................................................................................................................................60 16.1 – TIME DOMAIN ANALYSIS ............................................................................................................................................60 16.2 – FREQUENCY DOMAIN ANALYSIS .................................................................................................................................61 17 – HOURLY TABLE .........................................................................................................................................................67 18 – RETAINED STRIPS .....................................................................................................................................................70 19 – PRINTING REPORTS .................................................................................................................................................71 20 – RETRIEVE STORED PATIENT INFORMATION..................................................................................................76 20.1 – STORE PATIENT FILES .................................................................................................................................................76 20.2 – STUDY SELECTION .....................................................................................................................................................78 21 – ERASE PATIENTS .......................................................................................................................................................79 22 – STORE PATIENT INFORMATION ..........................................................................................................................80 23 – MORE THAN 24-HOURS RECORDING ..................................................................................................................82 24 - WARRANTY..................................................................................................................................................................83 Galix Holter Analyzer – WinTer Operation Manual 3 1 – INTRODUCTION The continuous monitoring of ECG signal over a 24-hour period is a powerful tool for a thorough evaluation of a cardiac patient, both in hospital and ambulatory environments. The Holter study should only be performed on a patient when prescribed by a physician. In this section we describe the main characteristics of the Galix WinTer Holter analyzer program. The program has been designed to offer the user all the tools necessary to perform advanced Holter analysis while maintaining communication with the user in simple and easy terms. The Holter analyzer program allows: Storage of as many complete Holter studies as the particular hard disk allows. As a reference, each 24-hour Holter study takes 34 Mb of disk space. The storage of Holter reports in the hard disk. A maximum of 6 Holter reports or complete Holter studies per patient can be stored in the hard disk. Analysis of 3-channel Holter studies by measuring the ST-segment deviations, the QT interval, ventricular ectopics, supraventricular ectopics, etc. The deactivation of one of the three channels for analysis. This feature is valuable in order to obtain a good Holter analysis even when one of the channels is noisy. The evaluation of arrhythmias and the possibility to edit morphology classifications. The Galix Holter Analyzer program provides a series of tools that enable a better reading of electrocardiographic studies. These are: Automatic Detection and Classification, Supervised Detection and Classification Page Scans. 1.1 – Correct Electrode Placement This is the most important phase in acquiring the 3-channel ECG signal during a 24-hour period. The most important issue to obtain a good quality ECG tracing is a proper electrode placement technique. This is essential in order to reduce the recording of artifacts and poor quality baselines. ELECTRODE PLACEMENT 5 LEAD 3 CHANNEL 5 LEAD 2 CHANNEL F10 - 5 LEAD 7 CHANNEL Blue Brown White White Red Brown Black Green Orange Black White Red Galix Holter Analyzer – WinTer Green Brown Black Operation Manual Green Red 4 To obtain clean ECG tracings, it is recommended that the patient is shaved in the area where the electrodes will be placed. Electrode sites should be clean, dry and free of any residue. If oils, liniments or lotions have been used in the patient’s care, alcohol will be required to remove the residue. When alcohol is used, allow the sites to dry completely 1.2 – Hardware Requirements The only hardware requirement is a recent PC with a Windows operating system. Nevertheless, the more up-to-date the PC is, the better the Holter or ECG analysis will be. “Up-to-date” refers to the capacity of the hard disk, RAM size, video card resolution, and microprocessor speed. All these upgrades will enable the user to obtain greater speed in the calculations and an optimization in the presentation of graphic displays. Similar arguments apply to the printer, which we recommend be a laser one. Before loading any supporting or informative programs, the user should contact Galix Biomedical Instrumentation or an authorized representative. Galix Holter Analyzer – WinTer Operation Manual 5 2– SCREEN HIERARCHY Galix Holter Analyzer – WinTer Operation Manual 6 3 – OPENING THE HOLTER ANALYZER SOFTWARE To open the Holter Analyzer Software, click on the Start button of the Windows Bar and then select: Programs > GBI Holter > GBI Holter. Alternatively, you can double click on the Holter icon located on the Windows Desktop 3.1 - Screen Configuration Initially, the program will automatically control the screen configuration. In case the user does not find the following recommended configuration: 1024 x 768 large pixels Appearance: Standard Windows Galix Holter Analyzer – WinTer Operation Manual 7 The following message will appear: When the option “OK” is selected, the user should manually modify the screen configuration before the program continues. If the user chooses to cancel the action, the system will continue with the program. Next, the main menu will appear. From now on, we will refer to this screen as the “Main Menu”. Galix Holter Analyzer – WinTer Operation Manual 8 4 – MAIN MENU From the main menu the following options are available: 4.1 – Toolbar Options Connect: Allows the identification of each memory card containing the patient data before recording the 24-hour ECG signal. If desired, this option enables the “Patient Diary” printing. New: Decompresses and analyzes the ECG recordings stored in a “memory card.” Open: Allows visualization of the analyzed studies in either summary form (about 400 Kb) or complete form (34 Mb) or studies that have only being retained. Retain: Decompresses the ECG signal recorded, but does not analyze it. Exit: This option is used to quit the program. Galix Holter Analyzer – WinTer Operation Manual 9 Demo: Run this option to process a demo signal in order to start getting familiarized with the program. To process the demo signal, click the demo icon located in the Main Menu toolbar. The program will enter the “New Patient” screen (explained in section 7) with the demo patient information. Galix Holter Analyzer – WinTer Operation Manual 10 To start analyzing the demo signal press the following icon: VLP: Enables the Ventricular Late Potential analysis module. For more information please refer to VLP operation manual. Electrodes: This option offers a visual help for the correct placement of the electrodes. To access, click the following icon located in the Main Menu toolbar. The program will open the following file: Galix Holter Analyzer – WinTer Operation Manual 11 5- CONFIGURATION MENU Features All the necessary parameters for the system to analyze the ECG signal according to the user’s needs are set up here. Entering the Configuration Screen With the left button of the mouse click on the icon shown below located on the Toolbar of the Main Menu. The program will display the following screen: Menus Icons to add and delete institutions Stored institutions Icons to add and delete physicians Galix Holter Analyzer – WinTer Operation Manual 12 This window contains three file folders: Physicians/Institutions Information Physician configuration Data Source 5.1 - Physicians/Institution Inf. File folder This file folder contains: A - “Institution Information”: Information corresponding to those institutions which have already been stored in the database. Institution: Name of the clinic, hospital, etc. This name will appear as a header in the Holter Summary Report and the Patient Diary. Clicking on the arrow found on the right of the control will display the institution names in alphabetical order. Address: Address of the selected institution. Telephone: Phone number of the selected institution. Fax: Fax number of the selected institution. B - “Physician Information by Institution”: Information of the physicians belonging to each institution. Last Name: Last name of the physician who will analyze the study for the selected institution in the upper quadrant. If the user clicks on the arrow to the right of this control he/she will note that all the last names of the selected institution’s registered physicians are found in alphabetical order. Name: Physician’s name Address: Physician’s address Telephone: Physician’s phone number. Fax: Physician’s fax number. 5.1.1. - New Institution In the Institution Information panel located in the “Inf. Physician/Institution” folder you can find the following icon: When clicking on this icon the lower part of this window is deactivated to allow the user to complete only the data of the new institution. In addition, the inscriptions on the icons are changed allowing the user to update the changes introduced by clicking on the save icon. Galix Holter Analyzer – WinTer Operation Manual 13 Icons to save or cancel changes Deactivated section Every time an institution is added, the system will automatically add a physician by default called “Test Physician”. This field cannot be eliminated since each institution should have at least one physician, but can be renamed. Once the information has been entered, click on the “Save” button to store the data into the database or cancel this operation by clicking on “Cancel”. The system will not save any changes unless the institution’s name is entered. When trying to save a file without the institution’s name the following message will appear: 5.1.2 – Delete Institution In the Institution Information panel the icon Delete can be found: Galix Holter Analyzer – WinTer Operation Manual 14 Once one of the existing institutions is selected, the user should click on this icon in order to delete the selected institution. If the user selects the “Yes” option, the Institution will be removed as well as all the physicians related to that Institution. If the “No” option is selected no change will take place. 5.1.3 – New Physician In the Physician Information by Institution panel the following icon can be found: When clicking on this icon the upper part of the window will be deactivated to allow the user to complete only the new physician data. In addition, the inscriptions on the icons are changed allowing the user to update the changes introduced by clicking on the save icon. Deactivated section Icons to save or cancel changes Galix Holter Analyzer – WinTer Operation Manual 15 Once the information has been entered, click on the “Save” icon to store the data in the database or cancel this operation by clicking on “Cancel”. The system will not save any changes unless the physician’s name is entered. When trying to save a file that misses the physician’s name the following message will appear: 5.1.4 – Delete Physician In the lower panel of the “Physicians/Institution Inf.” folder the following icon can be found: Once one of the existing physicians is selected, the user will be able to click on this icon and the system will request confirmation for deleting the selected physician as shown in the following screen. Note: The “Clinic Physician” cannot be eliminated. If the user tries to delete it, there will be a message saying that this action cannot be performed. Galix Holter Analyzer – WinTer Operation Manual 16 5.2 – Physician Configuration File Folder This file folder contains: Parameter information that the system will consider for detection and classification of the ECG signal. Selection of the reports to be printed. Hours to process: Allows user to choose the processing time. This option is useful when the Holter study has lasted less than 24 hours, thus saving processing time. Pause Time: Allows choosing the time, in seconds, that is considered as a pause (absence of a beat) for a specific patient. If the period between two beats exceeds in seconds the one indicated in this field, the system will consider it a pause. SVE Prematurity: Allows setting the percentage at which a beat is considered premature, in order for the program to classify it as an SVE (Supra Ventricular Ectopic). This option is useful when the user knows that the patient is experiencing atrial fibrillation. Increasing this percentage to about 40% will eliminate most of the premature beats (atrial fibrillation) of the SVE count. Print Disabled Channel: This option enables the printing of the disabled channel even though the signal is too noisy. Heart Rate Limits: The user must select the desired heart rate which the system will use as heart rate upper and lower limits. Galix Holter Analyzer – WinTer Operation Manual 17 Printing: The user can select the type of printing from color to black & white. Doc & Print: Enables/ Disables the automatic printing of a configurable report. Report: Pressing on this icon located in the lower left section of the Configuration Menu, will allow the selection of the pages to be printed in the report. Select the appropriate boxes in order to include the different pages in the report and press “Apply” when the selection is completed or “Cancel” if these changes are not desired. 5.3 - Data Source File folder In this folder, the path which the program uses to find the ECG signal files for analysis can be found. There are two ways of searching for the data path. The first is automatic and the second is manual, selected by the user. Our Digital Holter Analyzer uses memory cards as a recording medium and a memory card reader as the interface, which can be internal or external to the PC. Since this method of analysis is conventional among the digital Holters, the system is prepared so that the analysis takes place in direct form, i.e., with the “Automatic Search” enabled. Nevertheless, because of the extraordinary advances in data transmission methods, Galix considered it necessary to program access via alternative methods such as, CDs, fiber optic transmission, fast internet access, and others. In this case, the user will select the “Manual” option where the alternative data path can be specified. Galix Holter Analyzer – WinTer Operation Manual 18 IMPORTANT: If studies are only processed from the “memory card”, the option “Automatic Search” must be enabled, and the memory card must be placed in the corresponding card reader. Automatic Search: When this option is selected, the system will search in all the units connected to the computer for the card containing the information for analysis. If the system does not find the unit with the information, it will ask the user to insert the memory card into the card reader. File Path for the compressed signal Manual search of the disk unit where compressed signal is stored Automatic search of the unit containing the compressed signal Manual Search With this option the user manually indicates the path where the information is located. This can be done by typing the path directly into the space provided or by using the Browse button. When this button is pressed, a typical exploration window will appear from which the user can select a data source. Once the folder containing the files is selected, the user should select the “Ok” button. Galix Holter Analyzer – WinTer Operation Manual 19 Note: Pressing the symbol “+” found in front of each disk unit, allows the user to view all the folders contained in each disk unit. To select one of these folders, the user should left click on the one desired and then press the “OK” button. Confirm or cancel changes Finally, the user will confirm the changes to update the database by selecting “Apply”. Clicking on the “Exit” icon will display the following message: If the user selects “Yes”, the program will save the changes and exit the system. If the user selects “No”, the program will exit the system without saving the changes. Selecting “Cancel” will go back to the previous screen. Galix Holter Analyzer – WinTer Operation Manual 20 6 – PATIENT HOOK UP Features Is used to control the proper patient electrode placement before recording the ECG signal. Enables the identification of each memory card that will be placed in the Galix Holter Recorder GBI-3SM with a text file containing patient data, prior to carrying out the 24-hour recording. To provide the patient with the “Patient Diary”, before he or she leaves the physician’s office. Accessing the screen To access the “Connecting Memory Card” screen, the user must click on the first icon on the Main Menu Toolbar. The Holter analyzer will immediately display the following screen: Note: the same screen will appear when the user performs one of the following operations: • Identification of the “memory card”, saving patient data before recording (see “Patient Connection” screen). • New patient analysis (see “Patient Connection” screen). • Retain Patient (see “retain”). Galix Holter Analyzer – WinTer Operation Manual 21 Screen Information On this screen, the user will enter the patient data. The user will be able to move from one field to the next one using the TAB key or with the mouse. There are two sections: Patient Information and Optional Data. 6.1 – Patient Information Filling in all these fields is mandatory in order to process the Holter study. a – Date: This shows the date in which the study was performed. The system will automatically take the current date from the PC. Change the current date The following figure shows a small calendar where the user will be able to alter the date that appears on the screen. This calendar will appear if the user clicks on the arrow on the right of the control. Go to the next month Go to the previous b - Start time: this time will be stored in the database as the time the Holter recording began. This data will be taken from the PC. The user will be able to modify these values through the keyboard, as long as these are numerical values. Otherwise the following message will appear: c – ID#, Social Security Number or any identification number which is unique to each patient. Only numbers are allowed in this field. If the user enters letters, periods or any other character, the system will inform the user that there is an error. Galix Holter Analyzer – WinTer Operation Manual 22 d – Last Name: Patient’s last name e – Name: Patient’s name 6.2 – Optional Data a – Address: Patient’s address. b – Telephone: Patient’s phone number. c – Birth date: Patient’s date of birth in month/day/year format. system will inform the user. If the date is not valid the d – Age: If the user entered a valid date the system will automatically calculate the age of the patient. If this is not the case, then this value can be entered with the keyboard. e – Sex: The system accepts (F) for female and (M) for male. f – Weight: The value entered should be in pounds or kilograms. g – Height: The value entered should be in feet/inches or in meters. h– Referred by: Name and last name of the referring physician. i – Physician: Name and last name of the physician who will analyze the study. j – Indications: Symptoms presented by the patient at the time of the study. k - Medications: Medications that the patient is currently taking. 6.3 – Canceling memory card identification The user will be able to exit this screen by clicking on the “Exit” icon located on the left of the current screen toolbar. 6.4 – Completing memory card identification Once the patient data has been entered, the user should click on the “Next” icon located on the right of the Toolbar. Galix Holter Analyzer – WinTer Operation Manual 23 The program will then: • • Record the patient information on the memory card. Ask if you want to print the “Patient Diary” that will be given to the patient. • Inform the user that the card must be removed and inserted into the GBI-3SM Holter recorder. 6.5 - File containing the current patient information If the memory card contains information from a previous patient, the system will ask the user if the card should be overwritten. Selecting “Yes” will delete the file and allow a new ECG recording. If the user selects “No”, the program will go to the Main Menu. Incomplete Patient Information If the user does not provide the required patient data in “Patient Information” and still presses the “Next” icon, the following message will be displayed: Galix Holter Analyzer – WinTer Operation Manual 24 7 – NEW PATIENT 7.1 – Patient Demo If desired, the complete operating sequence of the Holter analyzer can be run with a special program called Demo. This demo program is a valuable tool for learning the operating procedures and features of the Holter program. The demo signal can be found in the following directory: C:\GBIHolter\DemoSignal. In this way, the user can test the system without using a memory card following these steps: Enter the “Holter Configuration” Menu. Access the “Data Source” file folder. Deselect the “Automatic Search” option by clicking on the box. Press the “Browse” button. Click (just once) on the + sign located to the left of each subdirectory until reaching the path: C:\GBIHolter\DemoSignal. Folder: C:\GBI\WinTer\DemoSignal Click on the “OK” icon and exit the Holter Configuration screen. IMPORTANT: Remember that after testing the system with the DemoSignal, the user must return to the ‘Holter Configuration” screen to select the “Automatic Search” option, in order for the system to resume searching the memory card. Access to New Patient screen: Features Used to update the database with the patient’s information and the Holter study data. Used to decompress the ECG signal. To process the ECG signal. Galix Holter Analyzer – WinTer Operation Manual 25 Accessing the screen Prior to starting, the user must insert the memory card in the card reader, in order for the patient data to be automatically transferred, assuming that the “Connecting” process has been carried out. Next, the user must do one of the following: Left click on the “New” icon located in the Main Menu Toolbar The Holter system will show the following message: Then the “New Patient” screen will be displayed. 7.2. - Automatic data update When this window is opened, the program will search for the patient information file (GBI.PAT). If the system finds the file in the “Data Path” indicated in the Holter configuration, all the data will automatically be shown in the corresponding fields on the screen and can be modified by the user before decompression. In any case, the user must complete at least the fields provided in the “Patient Information” panel. Galix Holter Analyzer – WinTer Operation Manual 26 The “Optional Data” panel is not required for the Holter analyzer operation, but is important for the proper maintenance of the database of the patient to be analyzed. 7.3 – Patient Information See “Patient Information” in the “Connecting” section. 7.4 – ECG signal decompression Once the necessary data has been entered, in order to decompress the ECG signal, the user must press on the “Next” icon located on the right of the Toolbar. The program then begins to decompress the ECG signal. It will verify that the data found is correct. If the ECG data is not found the system will show the message below: In the same way, the system will display other error messages that will not allow the signal to be decompressed. These are: The file CRECG.INF could not be created Missing File ECG.DAT The file CRECG.DAT could not be created Incorrect “Data Source” specified Note: There are three other situations (Missing file GBI.INF; Missing file GBI.SES; The file GBI.SES cannot be created). Although they do not cause an interruption of the Holter analysis, it is important to know that these messages have appeared. For this reason, a control file (CRECG.LOG) is created to report these messages. If everything is OK, the system will recognize if one of the following options was selected in the configuration process. Supervised detection and classification Page Scan The screen corresponding to the option selected will appear after the signal is decompressed. If neither option was chosen, then the “Statistical Graphs for 24-hour period” screen is displayed. The following describe certain possibilities that may occur during analysis. 7.5 - Existing patient If a previous Holter study has been done on a patient, entering the identification number or the patient’s name, will automatically display the rest of the patient’s information. Galix Holter Analyzer – WinTer Operation Manual 27 7.6 - Existing patient study Since each ECG recording normally is conducted over a 24-hour period, the system expects to find only one study per day. Thus, the system uses the ID#, and the date of the study to identify the patient. If it finds out that there is already a study on that date for that patient, most probably we are about to make a mistake; for that reason, we are requested to double check this download: If “Yes” is selected, the system will rewrite the patient data and the Holter study data. If “No” is selected, the system will remain in the current screen, without modifying the stored information. 7.7 - More than six studies per patient This system allows a maximum number of 6 Holter studies per patient to be stored in the database. If the program detects that there are already six studies, it will check if there is another study with the same date and will ask the user if he/she wishes to overwrite the study with the message shown previously. But, if a study with the same date does not exist, then the following message will appear: If the “No” option is selected, the system will remain on the same screen. If the “Yes” option is selected, the “Delete Patient Study” window containing all the patient studies will be displayed. Galix Holter Analyzer – WinTer Operation Manual 28 The patient’s information appears in the upper part of the window. In the lower part all the studies with their respective dates, processed hours and the physician who performed the study will be displayed. The boxes on the left of each study are used to select the studies to be deleted in order to leave space for the new study. Once the studies to be deleted are selected, the user must click on the “Delete” icon, and the system will ask to confirm the studies to be deleted. Clicking on “Yes” will delete these studies and clicking on “No” will cancel this action and will remain in the “Delete Patient Study” screen. If the user wishes not to eliminate any of the studies, the Exit” icon should be selected to return to the “New Patient” menu. 7.8 – Closing the current patient file When the user wishes to exit the “New Patient” screen, he/she should click on the “Exit” icon located on the bottom left corner of the screen. Galix Holter Analyzer – WinTer Operation Manual 29 8 – ECG STRIPS PRE-ANALYSIS Features Lets the user know the parameters the system takes into account when detecting and classifying the ECG signal. Allows modification of the parameters (polarity, gain, template, labels, etc) in order to achieve the best detection and classification of the ECG signal. Accessing the screen The user will be able to access the screen after making click on the “Next” button mentioned before on the New Patient screen. Once the signal has been decompressed, the system will show the following screen. Processing Progress Button Bar +/Gain Eightsecond ECG strips Switch Polarity Scroll Bar Change State Quality Channel Index Processing Button: Click this button to start processing the ECG signal + / - Gain: The system will change the gain of the channel selected as shown in the figure below. To change press the buttons (+) or (-) as desired. Galix Holter Analyzer – WinTer Operation Manual 30 Normal Gain Gain decreased Gain increased Switch Polarity: The system will change the polarity of the channel as shown in the following figure. To change Switch press Polarity Inverted Polarity Change State: If one of the three channels has excessive noise, the user has the option to deactivate the channel, and thus, this channel will not be taken into account when detecting and classifying each beat. Only one channel can be deactivated. To deactivate press Change State Deactivated channel color changes to grey Channel quality The first graph below shows the “Quality Index” for each channel. Galix Holter Analyzer – WinTer Operation Manual 31 Each channel will be identified by the colors already designated: channel one is pink, channel two is light blue and channel three is violet. Quality indexes: from 0 to 100 Hours: from 0 to 24 On both sides of this graph, the user will see the scales that indicate the quality of the recording in each channel, which ranges from 0 to 100. The closer the tracings are to 0, the higher the noise and thus, the lower the signal quality, and vice versa. If one of the three channels is deactivated, that channel’s graph is displayed in gray and has a quality index of 0. Channel Quality Index The Channel Quality Index (CQI) is a parameter that estimates the noise content of an ECG signal. This value is calculated minute by minute and is constant during the chosen minute. B means of this parameter, the system is able to choose, for each study, the best quality channels for the analysis, thus improving the analysis results. The CQI has a temporary sensitivity of approximately 15 seconds, or in other words, the noise has to be present at least 15 seconds during the minute of analysis to affect the value of the CQI. This index allows the Analyzer to detect those signal segments, in a particular channel, that could interfere with the process of beat detection and classification. The CQI is coded with values from 0 to 100 where the higher the value of this index, the higher the signal quality. Normally, CQI values range from 65 to 80. CQI values that are 40 or less indicate that the signal is inadequate for analysis. The graphic representation of the CQI allows the user to quickly verify if the Holter recordings obtained is acceptable in terms of signal quality throughout the study. By inspecting this index, it is also possible to determine which segments present anomalies due to different circumstances, such as If the index decreases in a specific channel, this could indicate a loose electrode or a similar defect. If the index decreases simultaneously in all three channels, then the following should be considered: • Muscular movements • Significant heart rate increase • Problems with the recorder Once you finished setting up all the previous parameters, click the following button to start analysis. Galix Holter Analyzer – WinTer Operation Manual 32 9 – ECG STRIPS POST-ANALYSIS Features • • • • • Displays 3-channels, eight seconds ECG strips at 25 mm/sec. Locates the eight seconds strip within the one minute signal displayed. Stores the strips that will later become retained strips. Labels the retained strips. Instantly prints 8, 16 or 24 seconds of the ECG signal. ATTENTION: If the option “Doc&Print” is selected in the Physician Configuration screen the following screen will appear. “Print Reports” screen will be described on chapter 18. Press Cancel to continue with the analysis without printing at this stage. 9.1 – Eight-seconds and one-minute graphs On this screen, two important graphs are displayed. The first one contains eight seconds of the electrocardiographic signal, and the second, the minute that corresponds to these eight seconds. Beat classification The beat label will be placed on it. Each one of the beats detected within the 8-seconds graph, will be labeled as follows: • Normal beat: marked with a dot • Ventricular beat: marked with a V Galix Holter Analyzer – WinTer Operation Manual 33 • • • • Supraventricular beat: marked with an S Artifacts: marked with an X Aberrant: marked with an A Paced Beat: marked with a P Heart Rate and R-R Interval The Heart Rate measured in beats per minute and the R-R Interval in milliseconds are displayed on the screen between two consecutive beats. HR/RR Interval Eight – second ECG strips Oneminute ECG signal Eight-seconds ECG strip In the one-minute graph, the user will see a red frame. This indicates the position within the minute where the eight seconds are represented. To change the current eight-seconds ECG strip The user will be able to use the arrows of the keyboard to move from one side to another of the minute according to the following scheme: Å Arrow Æ Arrow È Arrow Ç Arrow Page up Page Down Goes Goes Goes Goes Goes Goes backwards 100 milliseconds in the signal. forward 100 milliseconds in the signal. backwards 2 seconds in the signal. forward 2 seconds in the signal. forward 1 minute in the signal backwards 1 minute in the signal Also, the same action can be accomplished by using the scroll bar located under the 8-second signal graph. Galix Holter Analyzer – WinTer Operation Manual 34 Advances 8 seconds Backs down 8 seconds Backs down by 1 Button: goes backwards and forward 1-second increments Another way to change the current 8 seconds is by clicking in any place of the one-minute signal. The user clicked this point Current time On the left of the screen, between the two graphs, the time is displayed in Hr:Min:Sec format. 9.2 - Storing strips The user will be able to store up to 32 eight-second strips. Each one of these strips will be saved with the following information: • • • • Strip label Classification of each beat Heart Rate between two beats R-R Interval between two beats Galix Holter Analyzer – WinTer Operation Manual 35 The number of strips to save or to print will be determined by the size of the red panel in the current minute graph. According to user needs, 8, 16 or 24 meaning 1, 2 or 3, 8-seconds strips can be saved or printed (see Changing Strip Length). All the stored strips can be viewed from the Retained Strips screen. To save strips, the user must click on The following screen will appear: Then, the user will be invited to add a label to this strip. Once this is done the program will instantly store the strip on disk. 9.3 – Changing the strip length The length of the strip refers to whether the strips will be saved or printed in strips of 8, 16 or 24 seconds. By default the length is 8 seconds. To change the length, the user should click on the following icon: Galix Holter Analyzer – WinTer Operation Manual 36 In the first graph of the 8-second screen, only the first eight seconds of the minute displayed on the graph will be shown. Strip length: 24 seconds (3 strips of eight seconds each one) If, for example, at the moment of saving a 24 seconds strip, the user gives it a label, the same will be applied only to the first 8 seconds strip, while the remaining two strips will be unlabeled. 9.4 – Printing Strips The user will be able to instantly print the ECG strips from the screen. The quantity of strips to be printed depends on the selected length (see Changing Strip Length). Clicking on Print Strip will begin printing the amount of ECG strips indicated by the user. 9.5 - Interval Measurement When selecting the Cursors button, two vertical bars will appear on the 8-seconds strip screen that will allow us to measure time intervals. Galix Holter Analyzer – WinTer Operation Manual 37 The user can select any of the cursors by clicking on it. Once selected, the cursor can be moved along the strip by dragging it with the mouse (left button kept pressed) or by means of the horizontal arrow keys. The following screen will show us both bars being selected the left one. Notice that a new box appears displaying the time interval measured in milliseconds between the two bars. Cursors Time interval between bars measured If you double-click the box, the reading will change to heart rate. If you don’t have the cursors available, you can click on any sector of the screen and it will display the exact time at that point, as shown in the following figure. 9.6 – Change beats classification This function is used for the edition of beats; you can add, delete and re-classify any beat you want. Galix Holter Analyzer – WinTer Operation Manual 38 To change a beat classification, the user must right click on it and select one of the options displayed in the menu. The options are: • • • • • • • • Normal Ventricular Supraventricular Aberrant Artifact Paced Delete beat Add beat A dot indicates a normal beat and an X indicates of an artifact. 9.7 – Pacemaker Analysis When recording a study with the GBI-3SM Holter recorder, you can detect implantable pacemaker pulses. To visualize the pacemaker spikes recorded click on the following button: The screen will look like this: Galix Holter Analyzer – WinTer Operation Manual 39 Galix Holter Analyzer – WinTer Operation Manual 40 10 – TWENTY FOUR HOURS STATISTICAL GRAPHS Features It provides a quick gauge of the recording quality of each one of the channels. It displays, in a single screen, the heart rate variations, the ST segment deviation, the QT interval and the hourly ventricular and supraventricular ectopics during the 24-hour recording period for each channel. Accessing the Screen • • Pressing the next button if you are in ECG strips screen. Pressing the Trend Graphics button. HR and Tachogram ST values for each channel QT values VEs per hour SVEs per hour 10.1 – Minutes not analyzed The first minutes, which by default are not analyzed, will not be included in the graphs. 10.2 – Heart Rate and Tachogram In the first graph displayed on the screen, the user is able to switch between Heart Rate and Tachogram graphs. By default when this screen is first displayed the graph will represent Heart Rate minute by minute, but by clicking on the “Tachogram” icon, the representation can be changed. When accessing the Tachogram curve, the R-R interval variations, measured in milliseconds are plotted minute by minute. Galix Holter Analyzer – WinTer Operation Manual 41 To return to the Heart Rate graph, the user should select the HR icon. Note: The Tachogram and HR icon disable each other, depending on which graph type is selected 10.3 - Detailed View The user will be able to navigate throughout the entire Heart rate or Tachogram graphs searching for a specific minute using the keyboard or the mouse. With the keyboard: • Up arrow key: moves the cursor 10 minutes to the right. • Down arrow key: moves the cursor 10 minutes to the left. • Left arrow key: moves the cursor 1 minute to the left • Right arrow key: moves the cursor 1 minute to the right. Current minute indicator Current minute pointed with the red Once the cursor is positioned, the corresponding ECG signal can be accessed by double clicking on the cursor, or by pressing the Enter key. 10.4 - ST-Segment Deviation The ST segment deviation (mV) of each channel is automatically measured with respect to the isoelectric line, as seen in the Heart Beat figure below: PQ segment Galix Holter Analyzer – WinTer ST-segment Operation Manual 42 The user can easily identify each channel either by its color code, or by means of the channel indication, on top of the ST trend graph, as shown below: Current channel Pink: Channel 1 Light Blue: Channel 2 Violet: Channel 3 ST-segment value Hours: from 0 to 24 To see the 24-hour ST trend of a different channel the user must click on the channel icon: If one of the three channels has been deactivated, the ST-deviations for that channel will be plotted in gray. Calculation: To calculate the ST-segment deviation, first of all, the QRS peak, isoelectric baseline and J point are located. The ST-segment is then calculated as the amplitude of ECG signal 60 milliseconds after J point. 10.5 – QT Interval Values The QT interval (in milliseconds) is measured from the beginning of the Q wave to the end of the T wave. The end of the T wave is determined as a function of the maximum value of the filtered signal after the peak of the T wave. The QT interval stored and presented on the screen is the maximum of the three derivatives for each beat. QT Interval indexes Hours: from 0 to 10.6 – Ventricular Ectopics (VE) per hour This bar graph represents the ventricular ectopic beats detected per hour. Plot X: 24 hours Plot Y: VE (Ventricular Ectopic Beats) per hour, with automatic scaling Galix Holter Analyzer – WinTer Operation Manual 43 10.7 – Supraventricular Ectopics (SVE) per hour This bar graph represents the Supraventricular Extopics detected per hour. Plot X: 24 hours Plot Y: SVE (SupraVentricular Ectopics) per hour, with automatic scaling To Exit and Record Patient Data If the user wishes to exit the Main Menu from this screen, the “Exit” icon must be selected. The system will prompt the user to confirm the action. Galix Holter Analyzer – WinTer Operation Manual 44 11 – FULL DISCLOSURE Features It displays the 24-hours of ECG signal recorded of a specific channel in a 20-minutes per page format, in order to show the user the quality of the signal stored as well as its content. Accessing the screen • • From the Trends Graphics screen, by clicking on Next By clicking on the full disclosure button. Screen Description This screen contains a total of 20 lines, each one of them displaying one minute of ECG signal; therefore, each scan page displays 20 minutes of the recorded signal. The real time (hh:mm) for each line is shown on the left of the screen. Changing the current channel Galix Holter Analyzer – WinTer Operation Manual 45 To change the current channel, simply click on the the corresponding channel button. If the user clicks on the Ch. 1-2-3 button, all three channels are displayed, in a 10-minutes-per-screen format. 11.1 – Full Disclosure Scroll Commands The Full disclosure toolbar allows the user to scroll the ECG display either automatically or manually. By clicking on the Up/Down arrows, the full screen will scroll backwards/forward automatically. By repeatedly clicking on these arrows, the scrolling speed will change. By clicking on the Pause command (the one between the vertical arrows), the scrolling will stop. The Left/Right arrows will make the display to skip to the previous/next page. 11.2 – Full Disclosure Edition Commands Some of the most important features available at the Full Disclosure section are the abilities to: • Access the normal 8-seconds, 25 mm/seg. display of any beat, by simply double clicking on it on the full disclosure screen. • Re-classify any beat directly from the full disclosure screen, by right-clicking on it. The usual re-classification pop-down menu will appear, where the user can perform the proper selection Galix Holter Analyzer – WinTer Operation Manual 46 • Mark a chain of beats, and re-classify all of them in a single step. By holding the mouse left button pressed and moving the mouse, the user will draw a red frame on the Full Disclosure screen. Then, by right-clicking on any point inside the frame, the reclassification pop-down menu will appear. Then, when the user selects one menu option, all beats inside the frame are re-classified under that category. Galix Holter Analyzer – WinTer Operation Manual 47 12 – ARRHYTHMIA MORPHOLOGIES Features • • It identifies all the templates detected by the system for each channel. The user can change the template labels at will. Accessing the screen • • From the Full Disclosure screen. By clicking on the Morphologies button in the toolbar. Current template, blue background Template`s label Amount of beats associated to the template 12.1 – Templates Templates refer to each one of the possible groups that are formed from similar beats. If one of the beats has been grouped with a template from channel one, it will not be associated with any of the templates of the other two channels. Thus, if a template in channel 1 is changed from VE1 to normal, there may still be a VE1 template in channels two and three. Every template for every channel is independent from those in other channels. The label corresponding to each template and a number representing the number of beats associated with each template are shown below every template. If the label for a template is changed then all those beats are re-classified. Templates will have one of the following labels: Galix Holter Analyzer – WinTer Operation Manual 48 Normal The system may detect more than one normal template. It may happen that one of the channels does not have a normal template. This will only occur if at least one of the other channels has a Normal template detected by the system Label: white dot VE These are templates which differ from the Normal template and which are less frequent than the Normal The user will be able to find a maximum of 7 categories of VE beats Labels: VE SVE These are beats that do not differ substantially from a Normal template, and their incidence is very low. The system does not classify premature SVE templates. The system classifies beats as premature SVE, but not in its template analysis Label: S Artifact These are beats that the system is unable to classify. Label: A 12.2 – Edit morphologies The user is able to view in more detail all the beats that form a template. To do this, the user should select any template and then: Press the Edit icon or Press the ENTER key or Double click on the template. Once this is done the system will display the “Arrhythmia Morphology Categories” screen (see Morphology Categories screen). Change the label of a specific template All the templates are labeled by the program. Nevertheless, the user might disagree with one of the labels and he can change it by selecting the template and then pressing the Reclassify button. Once this is done, the system displays the following screen: Once the new template label has been selected, the user will accept this change, by pressing the Accept button and the small window will disappear. If the Cancel button is pressed the small window will disappear without any changes. Deactivated channel Galix Holter Analyzer – WinTer Operation Manual 49 If a channel has been deactivated, the file folder will also show all the deactivated templates and if selected, the Edit and Label icons on the toolbar will be deactivated as shown in the following figure. 12.3 - Save changes If the user has made some changes and has not selected the Apply icon and wishes to do one of the following: • View the beats that have been associated to a particular template • Exit the screen to see the Significant Events (Next) or the 24-hour Statistical Graphs (Previous). The system will then ask if he/she wishes to save the changes. Important: the user must take into account that changes made on this screen will affect the 24hour statistical graphs, the significant events already calculated and the heart rate variability. Therefore, the user must be very careful with any modifications. We suggest that changes be made in the order of appearance of these screens: first Morphologies, then Morphology Categories and finally Significant Events. Galix Holter Analyzer – WinTer Operation Manual 50 13 - MORPHOLOGY CATEGORIES Features • It shows a detail of each one of the beats that formed a particular morphology. • Displays the eight seconds in which the selected beat can be found. Accessing the screen From the Arrhythmia Morphologies screen 13.1 – Beats For each screen, a maximum of 102 beats (17 columns and 6 rows) will be displayed. The system will indicate the following: Channel corresponding to the beats. Label for this category. Current channel Galix Holter Analyzer – WinTer Label Operation Manual Current page Total pages 51 Eight-seconds ECG strips Six 8-seconds strips (one for each row) are displayed on the left side of the screen. This is where the selected beat will be graphed. When accessing the screen, the first eight seconds of the first beats for each row will be graphed by default. Red circle: Current beat Current beat Eight–seconds ECG strips that contain the current beat. 13.2 - Changing the current beat To change the current beat, click on the desired beat or use the arrows on the keyboard. Å Æ È Ç Goes back a beat within the row. Goes forward one beat within the row. Goes down one beat within the column. Goes up one beat within the column. Galix Holter Analyzer – WinTer Operation Manual 52 The 8-seconds ECG strip graph in the left will also change as the user moves from beat to beat. Change the current beats page If one of the categories contains more than 102 beats, the Next icon will be activated. This icon allows the user to move forward through all the pages of the category. Once the Next icon is selected, the Previous icon will be activated to allow the user to return to the previous pages if necessary. Selection Modes There are three ways of making a selection: Single, Row and All. The first selects a single beat and is the default mode. The second mode selects a complete row. The third one Selects all beats in the page. The figure below shows the screen that appears when choosing to view a row of beats. In this case, the 8-second ECG strips to the left of the screen will not be modified. Galix Holter Analyzer – WinTer Operation Manual 53 13.3 – Detailed view of the beat By double-clicking on a beat, the user will be able to see the selected beat in detail. The beat will be pointed by a red arrow. Red Arrow that indicates the current beat in the morphologies category To go back to the Morphology Categories screen press the Previous button. 13.4 – Changing the beat label The user can change the label for a beat or for a complete row depending on which mode is selected. To make the change the user should select one of the following four icons that appear on the toolbar: Depending on which icon is selected, the colors are: • • • • Black, if Normal is selected. Red, if VE is selected. Blue, if SVE is selected. Yellow, if artifact is selected. Galix Holter Analyzer – WinTer Operation Manual 54 Next, a screen showing beats pertaining to a Normal template on which the following modifications were made is displayed below: In the selection mode Row the complete row was changed from Normal to SVE. In the selection mode Beat two beats were modified: the first from Normal to artifact and the second from Normal to VE. Actual Beat Artifact:: Yellow VE: Red Normal Beat: Black SVE: Blue Verde Save changes If the user has made any changes on this screen, when exiting, using the Previous or Exit icons, the program will prompt the user to save the changes made. If the user selects “Yes” the system will update the corresponding files and the totals next to each template in the “Arrhythmia Morphologies” screen. If the user selects “No” then no modifications will be made. Galix Holter Analyzer – WinTer Operation Manual 55 14 – SIGNIFICANT EVENTS Features It enables a quick identification of the significant events and the amount of each type of event. Accessing the screen • • From the Morphologies screen, clicking on Next button By clicking on the Significant Events button. Significant Events organization The Significant Events are organized in 5 sections, with four subsections each. Most of the names of the sections and subsections are self-explanatory: • Ventricular Events o Ventricular Ectopic o V – Tach and Couplets o Bigeminy V o Trigeminy V • Supraventricular Events o Supraventriculr Ectopic o SV Tachycardia and Couplets o Bigeminy SV o Trigeminy SV • Pause, Apnea, SV Events o Pause o Apnea o ST-Segment+ (ECG with the maximum positive ST deviation) o ST-Segment- (ECG with the maximum negative ST deviation) • HR Events o Maximum HR o Minimum HR o HR Higher than limit (the limit is set up in the configuration menu) o HR Lower than limit (the limit is set up in the configuration menu) • Pacer o o o o Events Pacer Capture (Pacemaker spike detected and beat detected) Capture Failure (Pacemaker spike detected and beat not detected) Oversensing Undersensing The Significan Events screen looks like the following: Galix Holter Analyzer – WinTer Operation Manual 56 The user can enter any of the sections by clicking on the corresponding tab, like the supraventricular events one. The user can enter any of the subsections by clicking on it. The screen will be as follows: The user will be able to access any of the ECG strips on screen by double clicking on it. Galix Holter Analyzer – WinTer Operation Manual 57 15 – SIGNIFICANT EVENTS EDITOR Features • • It shows in detail each one of the events detected by the system. It enables the rejection of those events where the user does not agree with the events detected by the system. Accessing the screen From the Significant Events screen. The Significant Events edition can be performed in two different ways, and the procedure depends on the type of event to deal with. Ventricular and Supraventricular Events edition Ventricular and Supraventricular Events are edited by reclassifying the beats that generate them. For example, being a Ventricular Couplet, a sequence of two consecutive ventricular ectopic beats, to delete a V-Couplet from the classification, we should change, at least, the classification of one of these two beats. This can be done in two different ways: • From the Significant Events Edition screen, which shows many different events of the same nature (see the figure above). On this screen, the user can: o Select one or several events and click on the Reclassify Event button. This procedure will open a pop-down menu from which the user can select the new classification for the selected events. Tip for multiple events selection: To select a single event, the user simply has to click on it: To select the second, third, …, the user has to hold the Control key pressed and click on them, one by one. • o Click on the Reclassify Page button. In this way, all events on screen will be selected and the same menu of above will appear for beats reclassification. o Click on the Reclassify All button. In this way, all events of this kind are reclassified with the same procedure as stated above. From the ECG strip itself (which is accessed by double clicking on any of the events on the Significant Events Edition screen). The corresponding event is opened and the user can reclassify anyone or all of the beats that form the event. NOTE: Performing the reclassification from the Significant Events Edition screen is very fast and easy. On the other hand, in multiple-beats events (like couplets, triplets, bigeminy and tachycardia) all beats that form that event receive the same classification. This might not apply to certain cases, in which the reclassification has to be done from the ECG strip itself, beat by beat. Pause, Apnea, ST, HR and Pacer Events edition • Pause, Apnea, ST, HR and Pacer Events are edited only from the Significant Events Edition screen. On this screen, the user can: o Select one or several events and click on the Reject Event button. This procedure will discard the selected events from this classification. Galix Holter Analyzer – WinTer Operation Manual 58 Tip for multiple events selection: To select a single event, the user simply has to click on it: To select the second, third, …, the user has to hold the Control key pressed and click on them, one by one. o Click on the Reject Page button. In this way, all events on screen will be discarded from this classification. o Click on the Reject All button. In this way, all events of this kind are discarded. Galix Holter Analyzer – WinTer Operation Manual 59 16 – HEART RATE VARIABILITY This system provides all the parameters required for analysis of the Heart Rate Variability as suggested by the European Society of Cardiology and the North American Society of Pacing and Electrophysiolosy and published in the American Heart Association – AHA magazine “Circulation 1996:93:1043-1065” – Heart Rate Variability, Standards of Measurement, Physiology Interpretation and Clinical Use. Accessing the Screen To access the screen press the “Modules” button and then select HRV. 16.1 – Time domain analysis The figure below illustrates the type of graph the user will see when entering the Heart Rate Variability screen. It consists of a histogram representing the time domain analysis of heart rate variations of the patient. Cursor Values Parameter The time domain analysis of the HRV is based on statistical methods. A series of RR intervals (distance from two R wave peaks) is obtained from the ECG recording. From these, only those intervals related to “normal auricular beats” will be taken into account. Galix Holter Analyzer – WinTer Operation Manual 60 A series of parameters are calculated based on these RR intervals. These parameters are used to compare the different patient conditions, such as resting, sleeping, walking, and others with the purpose of evaluating the activity of the autonomous nervous system. The parameters that the system provides are the following: SDNN [msec} Standard deviation of the normal RR interval series. It is an estimate of the Overall HRV. Given that the Variance is mathematically equal to the total spectral potential, the SDNN reflects all the cyclical components responsible for the variability in the recorded period. This variable is dependent on the length of the recording. Triangular Index Total number of normal RR intervals, divided by the height of the HRV histogram of all the normal RR intervals, measured in a discrete scale of 7.8125 miliseconds. (A-Dimensional) This index, which is a geometric method, is not appropriate for short recordings. The principal advantage of this method is the relative insensitivity to the analytical quality of the RR series, due to the robustness to errors in the beat classification. It is an estimate of the overall HRV. SDANN [msec] Standard deviation of the averages of the RR intervals in 5-minute segments. It is an estimate of the long-term components of the HRV. This index is an estimate of the changes of the HRV due to cycles longer than 5 minutes. RMSSD [msec} Square root of the mean of the sum of the squares of differences between the adjacent normal RR intervals. It is an estimate of the short-term components of the HRV. This index is an estimator of the variations of high frequency or short periods in the HRV. 16.2 – Frequency domain analysis The frequency analysis is based on applying the Fast Fourier Transform or FFT. The RR signal is converted to Heart Rate (HR), linearly interpolated and graphed in regular intervals of 0.5 seconds (2Hz). This way, 288 segments that represent 5-minute HR signals are obtained. Each one of these segments is multiplied by a Hanning window to correct the frequency run-ins due to signal truncation. On the tool bar of the Heart Rate Variability screen the user can observe two buttons that correspond to the short-term and long-term frequency analysis. Galix Holter Analyzer – WinTer Operation Manual 61 Short term Heart Rate Variability – STHRV Clicking on the icon below, the program will display the short term frequency domain analysis. The screen that is shown below corresponds to a spectral density analysis (Power Spectral Density – PSD) of the 5-minute segments described earlier. The following parameters are calculated for each of these segments. Total Power [msec2]: Power between the ranges < 0.4 Hz (It is correlated with the RR variance in the segment) VLF [msec2]: Power between the ranges < 0.04 Hz LF [msec2]: Power between the ranges 0.04 – 0.15 Hz HF [msec2]: Power between the ranges 0.15 – 0.4 Hz Heart Rate Spectral Density in the current interval LF/HF Ratio 5-minute current interval Spectral Densities The spectral densities, graphed on the right of this screen, and the central frequencies corresponding to the peaks present on each of the listed parameters, are not fixed and can vary in relation to the changes in the autonomous modulation of the cardiac cycle. Galix Holter Analyzer – WinTer Operation Manual 62 Long Term Heart Rate Variability – LTHRV Clicking on the icon shown below, the system will display the screen with the long-term frequency domain analysis. On the screen shown below there are two graphs. Spectrum of the 24-hour record of normal RR intervals – Average of all the 5-minute spectrums (graph to the right of the screen). This result includes one ultra low frequency or ULF component also mentioned in the short-term analysis. Parameters calculated over this spectrum are the following: Total Power [msec2]: Power between the ranges < 0.4 Hz ULF [msec2]: Power between the ranges < 0.003 Hz VLF [msec2]: Power between the ranges 0.003 – 0.04 Hz LF [msec2]: Power between the ranges 0.04 – 0.15 Hz HF [msec2]: Power between the ranges 0.15 – 0.4 Hz ALFA: slope of the linear interpolation of the specter in logarithmic scale in the < 0.4 Hz range. Galix Holter Analyzer – WinTer Operation Manual 63 Lorenz Graphic To watch Lorenz graphic press the following button: Spectrum on logarithmic scale (graph on the right of the screen). The slope of the spectral curve on logarithmic scale is another of the available parameters. This one is derived from the 1/f (infinity symbol) that represents the 24-hour PSD and is associated with non-linear phenomena present in biological systems, but there is not enough information available on this subject. The system calculates each graph averaging the 288 spectrums previously obtained. Summary and Recommendations for the interpretation of the HRV frequency domain analysis Vagal activity is responsible for HF. There are controversies with respect to the LF components, some studies suggest that the LF (expressed in normalized units) is a quantitative marker of the vagal and sympathetic modulations, and thus, some scientists consider the coefficient LF/HF as a Galix Holter Analyzer – WinTer Operation Manual 64 mirror of the balance between the sympathetic and parasympathetic systems. The interpretations of the low frequency components, VLF and ULF have not been completely figured out. Clinical Utility of HRV Even though, HRV has been the subject of numerous clinical studies, only a general consensus was reached on the clinical utility of HRV in two scenarios. A decrease in HRV can be used as a risk predictor after an Acute Myocardial Infarct, and as an early warning signal for diabetic neuropathy. Risk Assessment after Acute Myocardial Infarct (AMI) The observation that in patients with AMI, the absence of respiratory arrhythmias is associated with an increase in intra-hospital mortality rate represents the first of a long series of reports that have demonstrated the prognostic value of the HRV for the identification of high-risk patients. Decrease in HRV is a powerful predictor of mortality and arrrhythmogenic complications, such as, Sustained Sympathetic Ventricular Tachycardia, in patients after a myocardial infarction. The predictive value of the HRV is independent of other factors established for the stratification of post-infarct risk, such as, decrease in left ventricle ejection fraction, increase in ventricular ectopic activity and presence of late potentials. For the prediction of any cause of mortality, the value of the HRV is similar to the left ventricle ejection fraction. Nevertheless, the HRV is superior in predicting the arrhythmogenic events, such as sudden death and ventricular tachycardia. - Recommendations Summary and recommendations for the interpretation of the predictive value of decreased HRV after Acute Myocardial Infarction. The following should be observed when assessing the prognostic value of HRV in clinical studies that include survivors of an Acute Myocardial Infarction. Decreased HRV is a predictor of mortality and arrhythmogenic complications independent from other risk factors. There is a general consensus that the HRV should be measured a week after the infarct episode. Although the short term HRV provides prognosis information, the HRV measured in 24-hour record is a stronger predictor. The short term HRV can be utilized for an initial assessment of AMI survivors. For prognosis purposes, there is no better measure than the time domain HRV statistic that calculates the total HRV (SDNN or the Triangular index). Some other measures, for example, the ULF spectral density over the 24-hour record, is also useful. A high risk group should be chosen in conjunction with the following variables: SDNN < 50 or a Triangular index < 15. Even, if the predictive value of HRV by itself is modest, it is the most important, and the combination with other risk factors will provide a better diagnosis. Assessment of Diabetic Neuropathy Autonomic neuropathy, as a complication of diabetes Mellitus, is characterized by an extensive and early neuronal degeneration of the small nerve fibers of both the sympathetic and parasympathetic tract. The clinical manifestations are functional disparity and include postural hypotension, persistent tachycardia, gastroenteritis and others. Once the clinical manifestations of the autonomic diabetic neuropathy (AND) take over, the estimated mortality rate after 5 years is 50%. Therefore, the early detection of the autonomic dysfunction is important for risk stratification and subsequent treatment. For patients that present NAD real or suspect, there are three HRV measurements from which to choose: Galix Holter Analyzer – WinTer Operation Manual 65 Simple measurement methods of RR intervals in bed. Time domain measurements over long-term recordings which are more sensitive and reproducible than the short-term recordings. Frequency domain analysis performed under short-term stationary conditions, which is useful for the separation of the sympathetic and parasympathetic components. Long-term measurements in the time domain The HRV calculated from a 24-hour Holter recording is more sensitive than the HRV calculations performed on a resting patient test, such as, the Valsalva maneuver, the orthostatic test, deep breathing test, for the detection of AND. The most frequently used method is the NN50 count and the SDSD. When the NN50 is used with a confidence interval of less than 95% for total counts in the range of 500 to 2000, depending on the patient’s age, approximately half of the patients with diabetes demonstrated abnormally low count values during a 24-hour period. Furthermore, there is a strong correlation between the percent of patients with abnormal counts, and the extent of the autonomic neuropathy determined by conventional methods. In spite of the growing sensibility, these methods of 24 hours, are strongly correlated with other established measurements of HRV, and have demonstrated reproducible results. Similar to the survival of AMI, the patients with AND, are also predisposed to sudden death, but the verdict is still out on whether or not the HRV has a prognostic value for diabetics. Frequency Domain Measurements The following abnormalities in the frequency analysis of HRV are associated with AND: the 1 – Decrease in the spectral power density in all frequency bandwidths. 2 – Lack of LF increase when patient stands up, which is a reflection of the imbalance in Sympathetic response or decreased sensitivity to baroreflex. 3 – Abnormal reduction of the total power density, without changes in the LF/HF coefficient 4 – A slide of the central LF frequency to the left. In patients with severe neuropathies resting in supine position the power spectrum presents very low amplitudes in all spectral components making it difficult to identify the signal from the noise. In these cases it is advisable to carry out the tests with the patients in standing position. Future Investigations connecting changes to the HRV to different cardiopathy and other systemic illness appear every day. This work is based on information prior to 1996, thus, it is advisable to consult more recent documentation as well. To exit this screen, the user can click on any button on the toolbar, Galix Holter Analyzer – WinTer Operation Manual 66 17 – Hourly Table Features: It displays a statistical table, hour by hour, of the complete study. Screen access: From the “Significant Events” screen, or clicking on the Hourly Table button. Each cell shows the value/quantity for the corresponding parameter within a specific hour of the study. As it can be seen, a cell highlighted in a light color indicates a minimum value, while a dark color will highlight a maximum value cell. Open the ECG in a certain one-hour period The user can instantly visualize the ECG corresponding to any one-hour period in the table; to do it, simply click on the one-hour period you want to open. Galix Holter Analyzer – WinTer Operation Manual 67 The following screen will appear: Current time Bar Graph When we click on any of the parameters in the table, the lower part of the screen will display a bar graph corresponding to the selected classification (e.g.: Beats, VE, SVE, ST C1) X Axis: Time – Y Axis: Values of the selected parameter Pacemaker Mode Hourly Table In case the study was performed to a patient with the GBI-3SM Holter Monitor in Pacemaker Mode, we will have the possibility to access a special Pacemaker table, by clicking on the PM Table button: Galix Holter Analyzer – WinTer Operation Manual 68 The Hourly Table will change to the following format: To go back to the conventional Hourly Table, click on the Standard Table button. Galix Holter Analyzer – WinTer Operation Manual 69 18 – RETAINED STRIPS Features: It displays all retained ECG strips, and allows their edition. Screen access: • • From the “Significant Events” screen By clicking on the Hourly Table button. If we click on the Hourly Table button and there are no strips retained, the following message appears: All the 8-seconds ECG strips that have been retained in the course of the 24-hour analysis can be visualized and reviewed. A maximum of 32 eight-second ECG strips in chronological order can be stored. These strips can be accepted or rejected individually or all together. The 25mm/sec ECG strips retained may be visualized in screen by clicking twice on the left button of the mouse. All the remaining ECG strips may be printed later by selecting the corresponding option in the printing menu. Galix Holter Analyzer – WinTer Operation Manual 70 19 – PRINTING REPORTS Features Identification of the reports to be printed. Screen access • • • From the Hourly Table screen, by clicking on the Next button (if strips have not been saved) From the Retained Strips screen, by clicking on the Next button (if strips have been saved) By clicking on the Print Menu button Through the Holter Configuration selections, the user chooses which reports are going to be printed by default (see “Holter Configuration” screen). The chosen reports are marked in the box next to each option. These options can be temporarily modified, but the selections will always revert back to the default options when re-entering this screen. To make permanent changes on this screen the user should access the second folder of the “Holter Configuration” screen from the “Main Menu,” and select the Reports option where the desired selections may be chosen. Galix Holter Analyzer – WinTer Operation Manual 71 Once the user has included all the desired pages in the final report, the Print icon should then be selected. To exit this screen without printing, simply select Cancel and the system will go back to the previous screen. When selecting the “Conclusions” icon in the upper portion of this screen, the user will be able to enter conclusions for the study performed. The following screen will appear: If the “Automatic Conclusion” option in the “Physician Configuration” screen is selected, the program will automatically write some lines in the conclusion’s field. Otherwise, the screen will be blank. Report Print Preview The View button allows the Holter Report Summary print preview and its edition After clicking on it, the report preview will appear: Galix Holter Analyzer – WinTer Operation Manual 72 By means of the scroll bar on the right, the whole preliminary report can be viewed. The lower part of the report contains the details and the conclusions. Those details are a series of data that are already included in different parts of the report, and, here, they are summarized. This details section can be ommited by de-checking this option from the Print Menu. In this case, all the lower part of the report is left for conclusions printing, which are entered manually by the operator. Any of the data in the report preview can be edited by double clicking on it, by means of the following windows: If it is a numeric value, the user will be able to enter the new one. Galix Holter Analyzer – WinTer Operation Manual 73 If the parameter has an associated time of occurrence, the window to enter it will be the following: By pressing the Erase button, both edition boxes will be cleared. The patient personal data can be modified by clicking on the Patient Data button, in the Print Menu. The following screen will appear: NOTE: The Institution data CANNOT BE MODIFIED FROM THIS MENU. Galix Holter Analyzer – WinTer Operation Manual 74 Full-Disclosure Printing If the “Full Disclosure” box is selected, the user can select to print 1 or 2 hours per page of ECG signal. Thus, for a 24-hour study 24 or 12 pages can be printed respectively. The user can also select the number of hours to be printed as shown in the following figure. In order to do this, the user should select the “Hours” button and then click on each of the hours he/she wishes to print. As the selection continues, the hours selected will remain “highlighted” indicating that they have been selected. To de-select an hour press its corresponding icon once more. Each hour will be printed on a different page. Selected hours Note: For good quality Full-Disclosure printing, make sure that the printer graphic properties have the option “Use Raster graphics” instead of “Use vector graphics” selected. Galix Holter Analyzer – WinTer Operation Manual 75 20 – RETRIEVE STORED PATIENT INFORMATION Features • • • It enables modification of the patient’s information. It allows to review the patients analyzed and stored in Summary or Complete format. It displays Retained patients. Accessing the screen From the Main Menu, pressing on the “Open” icon located in the toolbar. 20.1 – Store patient files There are three ways of storing patient files: In Summary form: The user chooses to save only the files necessary to generate printed reports. These files allow the user to view, but not modify, the information. The advantage of this storage system is that the patient files take up to 600 Kbytes, assuming the operator has stored 32 eightsecond strips. The disadvantage of this storage system is that once stored in this way the data cannot be modified. Galix Holter Analyzer – WinTer Operation Manual 76 In Complete form: The user chooses to save all the files generated by the Holter analyzer system together with the 24-hour ECG signal. The advantage of this system is that the user can modify data, conclusions and study reports. The disadvantage of this format is that each patient study takes at least 34 Mbytes on the hard disk. Patient Retained: The 24-hour ECG signal for this patient has been decompressed, and stored for future analysis. Patient Information Patient files are organized by identification number, in ascending order. If a particular patient’s last name is repeated, the list of last names will show it only once, but in the list of first names those that share a last name will be shown one by one. Searching for a particular patient To find a particular patient, the user can enter the identification number and the system will search the database to see if it can find a match. For example: In the following figure the user has only entered the number “12”, and the system shows the first patient starting with that number and the other in ascending order. The user can also click on the pop down arrow shown below and select the patient that he/she is looking for. Arrow that unfold all the ID´s found in the Database Another method consists of searching by the patient’s first and last name. The lower part of the screen shows all the studies performed on a particular patient, a maximum of 6 stored in the database. Current study Icons that indicate if the current study can be modified or not. Patient stored in complete format: If when selecting one of the current patient’s studies, the “View stored studies” and “Reprocess” icons are activated, then this particular patient study was stored in complete form and thus can be modified and reprocessed. Galix Holter Analyzer – WinTer Operation Manual 77 Important: If the user decides to reprocess a stored study the analysis, corrections and diagnosis will be eliminated. It is like processing the ECG study for the first time. Patient file stored in summary format: If, when selecting a particular study, only the “View stored study” icon is activated, then the patient study has been saved in summary form, and thus this study can be viewed, but not modified. Reducing the filesize of a study stored in complete format (changing to summary format) To reduce the size of a study, click on the "Reduce Study" button; the study will, then, be stored in summary format. 20.2 – Study selection To select a particular study the user should click on the study. View studies retained If there are retained studies, these can be viewed by selecting the “View Retained” icon in the toolbar. The program will then search through the retained patients and display them on the screen. The “View stored studies” and “Reprocess” icons will no longer be available. The “Process” icon will be available as it is the only function that can be performed. Selected icon Galix Holter Analyzer – WinTer Operation Manual Processes the study of the retained patient 78 21 – ERASE PATIENTS The user can erase a patient’s record and all the reports belonging to that patient by selecting the “Open” option (Open Patient) in the Main Menu and clicking on the “Erase” button (bottom left part of the screen). The program prompts the user to confirm the deletion of the patient’s records. The following screen will appear. Galix Holter Analyzer – WinTer Operation Manual 79 22 – STORE PATIENT INFORMATION Features Enables to download the patient information without analyzing it. Accessing the screen From the toolbar on the Main Menu, select the “Retain” icon. This function is useful when the user wishes to download and decompress the files from a “memory card” to the hard disk. In this case the signal will be decompressed and stored together with the patient information until the user decides to perform the analysis. This is the same screen accessed when connecting a memory card or when analyzing a new patient. Once all the data is entered, the user should select the “Next” icon: Galix Holter Analyzer – WinTer Operation Manual 80 The system will store the study and then show the following message: To exit the screen To exit this screen, select the “Close” icon and the program will return to the Main Menu. Galix Holter Analyzer – WinTer Operation Manual 81 23 – MORE THAN 24-HOURS RECORDING In case more than 24 hours have been recorded with the Galix GBI-3SM Holter Recorder, the WinTer analysis program will detect automatically this recording length and will introduce the following changes: A- Trend Graphics: A new Day button will be placed; it will enable to view the days 1, 2 or 3, corresponding to the first, second and third recorded day (maximum 72 Hours) B- Full Disclosure: No difference will be noticed at first sight, but the user will be able to scroll the signal to the end. The day appears on the top-left part of the screen. C- Morphologies and Significant Events: In both screens, the events shown will correspond to the total numbers recorded. D- Hourly Table: In this case, the table also extends for all the recorded time. E. Print Menu: When more than 24 hours are recorded, it enables to print the trend graphics and the hourly table corresponding to the different recorded days. Galix Holter Analyzer – WinTer Operation Manual 82 24 - WARRANTY GALIX BIOMEDICAL INSTRUMENTATION Limited Warranty GALIX Biomedical Instrumentation provides to the original purchaser the following limited warranty from date of invoice. All serialized parts 18 months Accessories 90 days GALIX Biomedical Instrumentation warrants each instrument to be free from defects in material and workmanship. Liability under this warranty covers servicing of the instrument when returned from the customer’s facility prepaid to the factory. GALIX Biomedical Instrumentation will repair any component(s) or part(s) that is finds to be defective during the period of this limited warranty. Should a defect become apparent, the original purchaser shall first notify GALIX Biomedical Instrumentation of the suspected failure. The instrument should be carefully packaged and shipped prepaid to: GALIX BIOMEDICAL INSTRUMENTATION Service Department 2555 Collins Avenue, Suite C-5 Miami Beach, FL 33140, U.S.A. Tel.: (305) 534-5905 Fax: (305) 534-8222 Your instrument will be repaired in the shortest possible time and returned by the same shipping method as received by the factory. This limited warranty is void if the instrument has been damaged by accident, misuse, negligence, act of God, or if the instrument has been serviced or modified by any person not authorized by GALIX Biomedical Instrumentation. Equipment distributed by GALIX Biomedical Instrumentation such as, but not limited to personal computers and printers will carry the original equipment manufacturer’s warranty and will not be warranted by GALIX Biomedical Instrumentation. This limited warranty contains the entire obligation of GALIX Biomedical Instrumentation and no other warranties expressed, implied or statutory are given. No representative or employee of GALIX Biomedical Instrumentation is authorized to assume any further liability, or grant any further warranties except as set herein. GALIX BIOMEDICAL INSTRUMENTATION 2555 Collins Avenue, Suite C-5 Miami Beach, FL 33140, U.S.A. Tel.: (305) 534-5905 Fax: (305) 534-8222 E-mail: [email protected] Galix Holter Analyzer – WinTer Operation Manual 83