1
the possibilities
Thankyouforpurchasingthis Samsungproduct.
Toreceivea morecompleteservice
pleaseregisteryourproductat
www.samsung.com/global/register
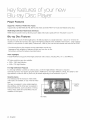
key features of
r NOW
Player Features
Supports a Variety of Video Disc Types
Supports Blu-ray (BD-ROM, BD-RE, BD-R), DVD Video and DVD-RW/-R (V mode and finalized only) discs.
HDMI (High Definition Multimedia Interface)
HDMI reduces picture noise by allowing a pure digital video/audio signal path from the player to your TV.
Blu-ray
Disc Features
Blu-ray Discs can store 25 GB (single layer)or 50 GB (dual layer)on a single sided disc - about 5 to 10 times the
capacity of a DVD. Blu-ray Discs also support the highest quality HD video available in the industry - Large capacity
means no compromise on video quality. Furthermore, a Blu-ray Disc has the same familiar size and look as a DVD.
* The following Blu-ray Disc features are disc dependant and will vary.
Appearance and navigation of features will also vary from disc to disc.
Not all discs will have the features described below.
Video highlights
The BD-ROM format supports three highly advanced video codecs, including AVC, VC-1, and MPEG-2.
HD video resolutions are also available:
• 1920 x 1080 High Definition
1280 x 720 High Definition
For High-Definition
Playback
To view high-definition contents on a Blu-ray Disc, an HDTV (High Definition Television)is required.
Some Blu-ray Discs may require using the player's HDMI OUT to view high-definition content. The ability to view
high-definition content on Blu-ray Discs may be limited depending on the resolution of your TV.
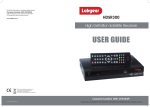
Graphic planes
Two individual, full HD resolution (1920x1080)
video layers are available, on top of the HD video
layer.
One layer is assigned to video-related graphics
(like subtitles), and the other layer is assigned to
interactive elements, such as buttons or menus.
Various wipes, fades and scroll effects may be
available on both layers.
Graphic
I
HD Video
2 Engl sh
I
Planes
Menu graphics
Support full color resolution graphics and animation, thereby greatly surpassing the capabilities of DVD-Video.
Unlike DVD, Menus can be accessed during video playback.
Menu sounds
When you highlight or select a menu option on a disc, sounds can be heard such as button clicks or a voice-over
explaining the highlighted menu choice.
Multi-page/PopUp
Menus
Unlike the DVD-Video, playback is not interrupted each time a new menu
screen is accessed. Due to Blu-ray Disc's ability to preload data from the
disc without interrupting playback, a menu may consist of several pages.
You can browse through the menu pages or select different menu paths,
while the audio and video continues playing in the background.
Interactivity
Certain Blu-ray Discs may contain Animated menus and Trivia games.
User Browsable Slideshows
With Blu-ray Discs, you can browse through various still pictures while the audio remains playing.
Subtitles
Depending on what is contained on the Blu-ray Disc, you may be able to select different font styles, sizes and colors
for the subtitles. Subtitles may also be animated, scrolled or faded in and out.
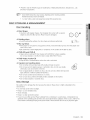
WHAT'S
INCLUDED
Check for the supplied accessories below.
o URCabte
Engl sh 3
WARNING
TO REDUCE THE RISK OF ELECTRICSHOCK, DO NOT REMOVE THE COVER(OR BACK).
NO USER-SERVICEABLEPARTS ARE INSIDE. REFER SERVICINGTO QUALIFIEDSERVICE PERSONNEL.
CAUTION
TOREDUCE
THERISKOFELECTRIC
ThelightingflashandArrowhead
within CAUTION:
TriangleIsawarningsignalertingyouof SHOCK,
DONOTREMOVE
COVER
(ORBACK)
NO
USER
SERVICEABLE
PARTS
INSIDE,
REFER
dangerous
voltageInsidethe product
SERVICING
TOQUALIFIED
SERVICE
PERSONNEL,
Theexplanation
pointwithinthetriangle
isa warningsignalertingyouof
importantinstructions
accompanying
the product.
WARNING
• To reduce the risk of fire or electric shock, do not expose this appliance to rain or moisture.
,, To preventinjury,this playermust be securelyattachedto the floor/wallinaccordancewith the installationinstructions.
Note to CATV system installer
This reminder is provided to call CATVsystem installer's attention to Article 820-40 of the National Electrical Code
(Section 54 of Canadian ElectricalCode, Part I) that provides guidelines for proper grounding and, in particular,
specifies that the cable ground shall be connected to the grounding system of the building as close to the point of
cable entry as practical.
FCC NOTE (for U.S.A):
This equipment has been tested and found to comply with the limits for a Class B digital device, pursuant to Part 15
of the FCC rules. These limits are designed to provide reasonable protection against harmful interference in a
residential installation. This equipment generates, uses and can radiate radio frequency energy and, if not installed
and used in accordance with the instructions, may cause harmful interference to radio or television reception, which
can be determined by turning the equipment off and on.
The user is encouraged to try to correct the interference by one or more of the following measures.
,, Reorient or relocate the receiving antenna.
,, Increase the separation between the equipment and receiver.
• Connect this equipment into an outlet on a circuit different from that to which the receiver is connected.
• Consult the dealer or an experienced radio/TV technician for help.
This class B digital player meets all requirements of the Canadian Interference - Causing Equipment Regulations.
CLASS 1 LASER PRODUCT
Use of controls, adjustments or performance of procedures other than those specified herein may result in
hazardous radiation exposure.
CAUTION
THIS PRODUCT UTILIZES A LASER. USE OF CONTROLS OR ADJUSTMENTS OR PERFORMANCEOF
PROCEDURESOTHER THAN THOSE SPECIFIED HEREINMAY RESULT IN HAZARDOUS RADIATION
EXPOSURE.DO NOT OPEN COVER AND DO NOT REPAIR YOURSELF. REFERSERVICING TO QUALIFIED
PERSONNEL.
4 safety nformation
Note"
,, This unit can be used only where the power supply is AC 120V, 60Hz. It cannot be used elsewhere.
This Blu-ray Disc Player is designed and manufactured to respond to the Region Management Information.
If the Region number of a Blu-ray Disc/DVD disc does not correspond to the Region number of this Blu-ray Disc
Player, the Blu-ray Disc Player cannot play the disc.
The product unit accompanying this user manual is licensed under certain intellectual property rights of certain
third parties. This product is covered by one or more of the following U.S. patents:
5,060,220 5,457,669 5,561,649 5,705,762 6,043,912 6,438,099 6,467,061 6,556,521 6,578,163 6,697,307
6,728,474 6,771,891 6,894,963 6,895,593 6,937,815 6,996,327 7,009,926 7,085,221 7,088,649 7,092,327
7,099,566 7,123,564 7,142,493 7,142,495 7,145,861 7,146,624 7,151,729 7,161,879 7,164,647 7,167,437
7,173,891 7,177,250 7,194,187 7,203,891 7,209,423 7,210,067 7,228,062 7,245,566 7,245,567 7,257,065
7,263,045 7,269,110 7,272,086 7,272,106 7,280,460 7,283,729 7,286,454 7,304,938
This product is covered by the following U.S. patents:
US4,930,158 US4,930,160
This license is limited to private non-commercial use by end-user consumers for licensed contents.
No rights are granted for commercial use. The license does not cover any product unit other than this product unit
and the license does not extend to any unlicensed product unit or process conforming to ISO/IEC 11172-3 or ISO/
IEC 13818-3 used or sold in combination with this product unit.
The license only covers the use of this product unit to encode and/or decode audio files conforming to the ISO/IEC
11172-3 or ISO/IEC 13818-3. No rights are granted under this license for product features or functions that do not
conform to the ISO/IEC 11172-3 or ISO/IEC 13818-3.
PRECAUTIONS
Important
Safety Instructions
Read these operating instructions carefully before using the unit. Follow all the safety instructions listed below. Keep
theseoperatinginstructionshandyfor futurereference.
1)
Read these instructions.
2
Keep these instructions.
3
Heed all warnings.
4
Follow all instructions.
5
Do not use this player near water.
6
Clean onlywith drycloth.
7
Do not block any ventilation openings, install in accordance with the manufacturer's instructions.
8
Do not install near any heat sources such as radiators, heat registers, or other player (including amplifiers) that
produce heat.
9)
The polarized or the grounding type plug has an important safety purpose. A polarized plug has two blades
with one wider than the other. A grounding type plug has two blades and a third grounding prong. The wide
blade or the third prong are provided for your safety. If the provided plug does not fit into your outlet, consult an
electrician for replacement of the obsolete outlet.
10) Protect the power cord from being deformed or pinched particularly at plugs, convenience receptacles, and the
point where they exit from the player.
11) Only use attachments/accessories specified by the manufacturer.
12) Use only with the cart, stand, tripod, bracket, or table specified by the manufacturer,
or sold with the player. When a cart is used, use caution when moving the cart/player
combination to avoid injury from tip-over.
13) Unplug this player during lightning storms or when unused for long periods of time.
14) Refer all servicing to a qualified service personnel. Servicing is required when the
player has been damaged in any way, such as power-supply cord or plug is damaged, liquid has been spilled
or objects have fallen into the player, the player has been exposed to rain or moisture, does not operate
normally, or has been dropped.
English 5
Handling
Cautions
,, Before connecting other components to this Blu-ray Disc Player, be sure to turn them all off.
• Do not move the Blu-ray Disc Player while a disc is being played as the disc may be scratched or broken, or the
Blu-ray Disc Player's internal parts may be damaged.
• Do not put a flower vase filled with water or any small metal objects on the Blu-ray Disc Player.
• Be careful not to put your hand into the disc tray.
• Do not place anything other than the disc in the disc tray.
• Exteriorinterferencessuch as lightning and static electricitycan affect the normaloperation of this Blu-ray Disc Player.
Ifthis occurs, turn the Blu-ray Disc Playeroff and on again with the POWER button, or disconnect and then
reconnect the AC power cord to the AC power outlet. The Blu-ray Disc Playerwill operate normally.
• Be sure to remove the disc and turn off the Blu-ray Disc Player after use.
• Disconnect the AC power cord from the AC outlet when you don't intend to use the Blu-ray Disc Player for long
periods of time.
,, To clean a disc, wipe it in a straight linefrom the inside to the outside of the disc.
• Do not expose the player to any liquid.
• When the AC plug is connected to a wall outlet, the player will still draw power (standby mode) when it is turned
off.
• The player should not be exposed to dripping or splashing of any liquid and no objects filled with liquids, such as
vases, should be placed on the player.
• To disconnect the player from the mains, the plug must be pulled out from the mains socket, therefore the mains
plug shall be easily accessible.
Maintenance
of Cabinet
For safety reasons, be sure to disconnect the AC power cord from the AC outlet.
• Do not use benzene, thinner, or other solvents for cleaning.
• Wipe the cabinet with a soft cloth.
Restrictions
on Playback
• This player may not respond to all operating commands because some Blu-ray Disc, DVD, CD discs allow
specific or limited operation and features during playback.
Please note that this is not a defect in the player.
• Samsung cannot assure that this player will play every disc bearing the Blu-ray Disc, DVD or CD logo because
disc formats evolve, and problems and errors may occur during the creation of Blu-ray Disc, DVD, CD software
and/or the manufacture of discs.
Please contact the SAMSUNG customer care center if you have questions or encounter difficulty in playing Bluray Disc, DVD, CD discs in this player. Also, refer to rest of this Manual for additional information on playback
restrictions.
6 safety nformation
content
KEY FEATURES
OF YOUR NEW
BLU=RAY DISC PLAYER
SAFETY
INFORMATION
GETTING
STARTED
DESCRiPTiON
REMOTE
CONTROL
CONNECTIONS
3
What's included
4
5
Warning
Precautions
9
Before using the User's Manual
10
13
Disc Type and Characteristics
Disc Storage & Management
14
Front Panel
15
16
Front Panel Display
Rear Panel
17
Tour of the Remote Control
18
Setting the Remote Control
18
19
Regarding the battery
Controllable TV Codes
20
Connecting to a TV with an HDMI Cable
(Best Quality)
HDMI Auto Detection Function
21
22
23
24
25
26
27
BASIC
Connecting to a TV with DVI Cable
(Best Quality)
Connecting to a TV (Component)
(Better Quality)
Connecting to a TV (VIDEO) (Good Quality)
Connecting to an Audio System (2 Channel
Amplifier)
Connecting to an Audio System (Dolby
Digital, DTS Amplifier)
28
Connecting to an Audio System (HDMI
supported Amplifier)
Connecting to samsung's update server
FUNCTIONS
OF YOUR
BLU=RAY DISC PLAYER
29
Before Playing
30
30
31
31
32
On-Screen Menu Navigation
Playing a Disc
Setting the Power On/Off Beep sound
Using the Search and Skip Functions
Slow Motion Play/Step Motion Play
SYSTEM
SETUP
33
Setting the Clock
LANGUAGE
SETUP
34
Setting up the Language Options
Engiish 7
content
AUDIO
SETUP
35
Setting up the Audio Options
DISPLAY
SETUP
37
Setting up the Display Options
HDMI
SETUP
40
Setting up the HDMI setup options
PARENTAL
SETUP
42
Setting up the Parental Lock
NETWORK
SETUP
44
45
TCP/IP Setting
Proxy Setting
45
46
NTP server setting (Used to Retrieve Time
Information from NTP server)
Mac Address
47
System Device Management
48
50
Firmware Upgrade
System Information
51
52
53
54
Using the Display Function
Using the Disc Menu & Popup/Title
Repeat Play
Selecting the Audio Language
55
55
56
57
Selecting the Subtitle Language
Changing the Camera Angle
BONUSVIEW Settings
Using the Bookmark Function
59
59
60
60
Playing an Audio CD(CD-DA)
Audio CD(CD-DA) Screen Elements
Buttons on the Remote Control used for
Audio CD (CD-DA) disc playback
Repeat Audio CD(CD-DA)
62
Troubleshooting
64
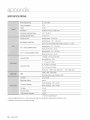
Specifications
PERSISTENT
STORAGE
MANAGEMENT
SYSTEM
UPGRADE
il
WATCHING
LISTENING
A MOVIE
TO MUSIC
TROUBLESHOOTING
APPENDIX
2
8 contents
¸
Menu
aett na
BEFORE USING THE USER'S MANUAL
Make sure to check the following terms before using the user's manual.
Icons that will be used in this manual
m
Term
Defin tion
BD-ROM
This involves a function available on a BD-ROM.
This involves a function available on the BD-RE.
This involves a function available on the BD-R.
About
DVD-VIDEO
This involves a function available on DVD-Video or DVD-R/DVD-RW discs
that have been recorded and finalized in Video Mode.
DVD-RW
This involves a function available on DVD-RW. (V mode and finalized only)
DVD-R
This involves a function available on DVD-R. (V mode and finalized only)
Aua_o CD
This involves a function available on an audio CD-RW/CD-R (CD-DA
format).
Note
This involves tips or instructions on the page that help each function
operate.
the use of this user's
manual
1) Be sure to be familiar with Safety Instructions before using this product. (See pages 4-6)
2) Ifa problem occurs, check the Troubleshooting section. (See pages 62-63)
Copyright
02008 Samsung Electronics Co.,Ltd.
All rights reserved; No part or whole of this user's manual may be reproduced or copied without the
prior written permission of Samsung Electronics Co.,Ltd.
English 9
qett nq st rtod
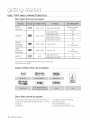
DISC TYPE AND CHARACTERISTICS
Disc types that can be played
Dnu,,_:RO,v,
BD_RE/BD=R
DVD:VIDEO
_
...........
.,,==_
AUDIO
+ VIDEO
AUDIO
+ VIDEO
Singlesided(25GB/50GB)
Playingtimedepends
ontheTitle
Singlesided(5inches)
240
Doublesided(5inches)
480
Singletided(31/2 inches)
Doublesided(31/2 inches)
80
160
VIDEO
DVD:RW
(Vmodeand
finalizedonly)
Rw
DVD-R
(Vmodeand
finalizedonly)
AUDIo@
AUDIO
+ VIDEO
5 inches(4.7GB)
480
(EX'Extended
Play)
AUDIO
+ VIDEO
5 inches(4.7GB)
480
(EX'Extended
Play)
AUDIO
_
Singlesided(5inches)
74
Singlesided(3 1/2 inches)
20
,, This player is compatible with the NTSC color system only.
• PAL discs will not play.
Logos
of Discs that can be played
r_D_
DiGiTAL.
Bu_rayDisc
ISD
PLUS
DobyDgitalPlus
°
TI=IIJI_
DIGITAL
SOUND
Diqta Aude
NTSC
%lby_rueHD
Discs that cannot
be played
• Blu-ray Discswith a regioncode other than "Region A".
,, 3.9 GB DVD-RDiscfor Authoring.
• DVD-Videowith a regionnumber other than "1" or "ALL"
_,HD DVD
• DVD-RAM
• DVD-RW(VRmode)
,, DVD-ROM/PD/MV-Disc,etc
_,CVD/CD-ROM/CDV/CD-G/CD-I/LD
10 gettng started
[Note]
• Some commercial discs and DVD discs purchased outside your region may not be playable with this
product. When these discs are played, either "No disc." or "Please check the regional code of the
disc." will be displayed.
• If a DVD-R/-RW disc has not been recorded properly in DVD video format, it will not be playable.
• The unit cannot play CD-RW/CD-R and DVD-RW/-R recorded content such as divx, avi, mpg, mov,
wma, mp3,digital photo view(JPEG)file.
Region
code
Both the Blu-ray Disc Player and the discs are coded by region. These regional codes must match in
order to play the disc. If the codes do not match, the disc will not play.
The Region Number for this Blu-ray Disc Player is described on the rear panel of the Blu-ray Disc Player.
DiscTyPe
_
Regioncode
Blu-ray
_
DVD--VIDEO
@
Area
North
America,
Central
America,
South
America,
Korea,
Japan,
Taiwan,
Hong
Kong
andSouth
East
Asia,
Europe,
Greenland,
Frenchterritories,MiddleEast,Africa,Australia
andNewZealand,
India,China,Russia,CentralandSouthAsia,
Area
DVDRegionCode
Blu-ray
1
TheU,S,,
U,S,territories
andCanada
2
Europe,
Japan,
theMiddle
East,
Egypt,
South
Africa,
Greenland
3
Taiwan,
Korea,
thePhilippines,
indonesia,
H0ng
K0ng
4
Mexico,
South
America,
Central
America,
Australia,
NewZealand,
Pacific
islands,
Caribbean
5
Russia,
Eastern
Europe,
India,
mostofAfrica,
North
Korea,
Mongolia
6
China
Disc Compatibility
Blu-ray Disc is a new and evolving format. Accordingly, disc compatibility issues are possible. Not all
discs are compatible and not every disc will play back. For additional information, refer to the
Compliance and Compatibility Notice section of this Manual. If you encounter compatibility problems,
please contact the SAMSUNG customer care center at 1-800 SAMSUNG. This Samsung Blu-ray Disc
Player (BD-P1500) supports only the BD-ROM Profile 1 version 1.1 specification.
®
_ Playbackmaynot workforsometypesof discs,or whenspecificoperations,suchasanglechangeandaspect
ratioadjustment,arebeingperformed.Informationaboutthe discsis writtenin detailon the discbox.Please
referto thisif necessary.
_ Donot allowthe discto becomedirtyor scratched.Fingerprints,dirt,dust,scratchesor depositsof cigarette
smokeonthe recordingsurfacemaymakeit impossibleto usethe discfor playback.
_ DiscswithPALprogramsrecordedonthemcannotbeplayedusingthisproduct.
_ WhenaBD-Javatitleisplayed,loadingmaytakelongerthananormaltitle,orsomefunctionsmayperformslowly.
English 11
aett na
Disc Types
"**.BD-ROM
Blu-ray Disc Read Only Memory. A BD-ROM disc contains pre-recorded data. Although a BD-ROM
may contain any form of data, most BD-ROM discs will contain movies in High Definitionformat, for
playback on Blu-ray Disc Player's. This unit can play back pre-recorded commercial BD-ROM discs.
***,BD-RE/BD-R
Blu-ray Disc Rewritable/Blu-ray Disc Recordable. BD-RE/BD-R is the ideal format for making backups,
or recording personal video.
****DVD-Video
A digital versatile disc (DVD)can contain up to t 35-minutes of images, 8 audio languages and 32
subtitle languages. It is equipped with MPEG-2 picture compression and Dolby Digitalsurround,
allowing you to enjoy vivid and clear theatre quality images.
When switching from the first layer to the second layer of a dual-layered DVD Video disc, there
may be momentary distortion in the image and sound. This is not a malfunction of the unit.
Once a DVD-RW/-R recorded in Video Mode is finalized, it becomes DVD-Video. Pre-recorded
(pre-stamped) commercial DVDs with movies are also referred to as DVD-Videos. This unit can
play back pre-recorded commercial DVD discs (DVD-Video discs) with movies.
****Audio CD
, An audio disc on which 44.1 kHz PCM Audio is recorded.
, This unit can play back CD-DA format audio CD-RW and CD-R discs.
, The unit may not be able to play some CD-RW or CD-R discs due to the condition of the recording.
+ CD-RW/CD-R
, Usea 700MB(80 minutes) CD-RW/CD-R disc. If possible, do not use a 800MB(90 minutes) or
above disc, as the disc may not play back.
,, Ifthe CD-RW/CD-R disc was not recorded as a closed session, you may experience delays when
playing back the beginning of the disc or all recorded files may not play.
Some CD-RW/CD-R discs may not be playable with this unit, depending on the device which was
used to burn them. For contents recorded on CD-RW/CD-R media from CDs for your personal
use,playability may vary depending on contents and discs.
¢ DVD-R Disc Playback
,, Once a DVD-R recorded in Video Mode is finalized, it becomes DVD-Video.
This unit can play back DVD-Rdiscs recorded and finalizedwith a DVD video recorder. It may not be
able to playsome DVD-Rdiscs dependingon the disc and the condition of the recording.
¢ DVD-RW Disc Playback
, Playback can be performed with DVD-RW discs recorded in the Video Mode and finalized.
Once a DVD-RW recorded in Video Mode is finalized, it becomes DVD-Video. Ability to play back
may depend on recording conditions.
Disc Format
.**, DVD-RW/-R
(V)
• This is a format that is used for recording data on a DVD-RW or DVD-R disc. The disc can be
played by this Blu-ray Disc Player once it has been finalized.
•***AVCHD (Advanced
Video Codec High Definition)
• This player can playback AVCHD format discs. These discs are normally recorded and used in
carncorders.
,, The AVCHD format is a high definition digital video camera format.
The MPEG-4 AVC/H.264 format is capable of compressing images at higher efficiency than that
of the conventional image compressing format.
Some AVCHD discs use the "x.v.Color" format.
This player can playback AVCHD discs using "x.v.Color" format.
"x.v.Color" is a trademark of Sony Corporation.
12 g÷[tng started
"AVCHD" and the AVCHD logo are trademarks of Matsushita Electronic Industrial Co., Ltd.
and Sony Corporation.
®
_ SomeAVCHD
formatdiscsmaynot play,dependingon the recordingcondition.
AVCHDformatdiscsneedto befinalized.
_ "x.v.Color"offersa widercolorrangethan normalDVDcamcorderdiscs.
DISC STORAGE
& MANAGEMENT
Disc Handling
.;, Disc Shape
Use discs with regular shapes. If an irregular disc (a disc with a spedal
shape) is used, this Blu-ray Disc Player may be damaged.
©O x
.;, Holding discs
,, Avoidtouchingthe surfaceof a disc whererecordingis performed.
*;* Blu-ray Discs
, If the player is not used for a long period of time, remove the Blu-ray Disc from the player and
store it in its case.
,, Be careful not to leave fingerprints or scratches on the surface of the Blu-ray Disc.
¢ DVD-RW and DVD-R
, Clean with an optional PD disc cleaner (LF-K2OODCA1where available).
Do not use cleaners or cloths for CDs to clean DVD-RW/-R discs.
*;* DVD-Video, Audio-CD
, Wipe off dirt or contamination on the disc with a soft cloth.
¢ Cautions on handling discs
Do not write on the printed side with a ball-point pen or pencil.
Do not use record cleaning sprays or antistatic. Also, do not use volatile
chemicals, such as benzene or thinner.
Do not apply labels or stickers to discs. (Do not use discs fixed with exposed
tape adhesive or leftover peeled-off stickers.)
Do not use scratch-proof protectors or covers.
Do not use discs printed with label printers available on the market.
Do not load warped or cracked discs.
Disc Storage
Be careful not to damage the disc because the data on these discs is highly vulnerable to the
environment.
Do not keep under direct sunlight.
,, Keep in a cool ventilated area.
Store vertically.
Keep in a clean protection jacket.
Ifyou move your Blu-ray Disc Playersuddenly from a cold place to a warm place, condensationmay
generateon the operating parts and lens and cause abnormaldisc playback. If this occurs, wait for two
hours before connectingthe plug to the power outlet. Then insertthe disc and try to play back again.
English 13
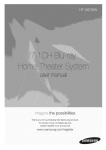
_i
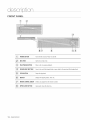
POWER
BLI_ON
Turnsthe Bin-rayDiscPlayeronandoff,
DISCTP_,Y
Openstoaccepta disc,
P ,¥,PAOSEBO
P,aysad
oN scorpausesp,ayback,
_]
_
SEARcH/SKIP
Bu_ONS
Goesto thenexttitle/chapter/track
or goesbackto theprevious
title/chapter/track,
sTOPBu_ON
Stopsdiscplayback,
DISPLAY
Displays
theplayingstatus,time,etc,
REMOTE
CQNTROLSENSoR
Detectsanysignalfromtheremotecontrol,
oPEN/cLosE
14 description
Opensandclosesthedisctray,
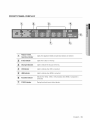
FRONT PANEL DISPLAY
[2
P!ayback-related,
OpenZClose
indicatoi
Lightswhenplayback-related
andopen/closebuttonsareselected
In Discindicator
Lightswhena discis inthe tray.
[_
[[_
Lightsto indicatethe disctype inthetray.
USBIndicator
[_
Lightsto indicatewhenUSBis connected.
Lightsto indicatewhenHDMIis connected.
Resolution d!CatO
r
Indicatesthe 1080p,1080ior 720presolutionwhenHDMIor Component
is
connected.
STATUSlid!Cator
Playingtime/cloc!dcurrent
statusindicator.
Engl sh 15
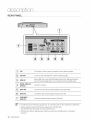
iilii
!
I_AN
TheLANjackis usedtoconnectto Samsung's
serverforfirmwareupdates,
USBHOST
Youcanuseonlya USBflashdriveto performsoftwareupgrades,
[3
HDMIOUT
Usinga HDMcable,connectthisHDMIoutputterminalto the HDMIinputterminalon
,our1Vforthebestqualitypictureoron yourReceiver
forthe bestqualitysound,
4
DIGITAL
AUDIOOUT
(OPTICAL)
Connects
to a Receiver,
AUDIOOUT
Connects
to theaudioinputofexternalequipmentusingaudiocables,
VIDEOOUT
Connects
the inputof externalequipment
usingavideocable,
COMPONENT
VIDEOOUT
Connects
to equipment
havingComponent
videoinput,
_6
{_
_ TheUSBHostjackisfor firmwareupgradesonly,Youcannotplayaudioor videocontentfroma USBdevice,
_ Softwareupgradesusingthe USBHostjacksupportsonlya USBflashdrive,
OtherUSBdevices(ex,
MP3player)arenot guaranteedto work,
_ USBflashdriveswiththe bulkydimensioncannotbe insertedwhenan HDMIcableor a LANcableis
connected,
16 description
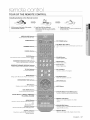
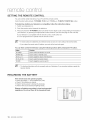
TOUR OF THE REMOTE CONTROL
Installing
t.
batteries
in the Remote
Control
Liftthecoveratthebackoftheremote
Control upward as shown.
2. installtwoAAAsizebatteries.
Make sure to match the ,+'! and !'-!! ends
of the batteries with the diagram inside the
3.
Repiacethecover:
Assuming typical TV usage, the batteries
for about one year.
last
compartment.
OPEN/CLOSE
Buttons I
To open and close the disc tray.
POWER
Button
TV POWER
INPUT
Button
SEL
Button
After setup, allows you to set the input
TV.
CANCEL
SLOW
Each time this button
is pressed,
source on your
Button
Button
the disc will play
slowly.
;E Button
Press to pause a disc.
REVERSE/FORWARD
SKIP Buttons
Press to skip backwards or forwards.
Button
Press to stop a disc.
REVERSE/FORWARD
SEARCH Button_
Press to search a disc backwards or forwards.
PLAY Button
Press to play a disc.
TV VOL
TV volume adjustment
TV OH Button
Use this to select a TV program.
MENU Button 1...-,
Brings up the Blu-ray Disc Player's setup menu.
TV MUTE Button
Mutes the speakers of your TV.
ENTER/DIRECTION
INFO Button
Displays current setting or disc status.
DISC MENU Button
Use this to enter the disc menu.
COLOR
Buttons
POPUP MENU/TITLE
MENU Button
Use this to enter the popup menu/title menu.
: RED(A), GREEN (B),
YELLOW(C), BLUE(D)
REPEAT
AUDIO
Use this to access
various audio functions
(Blu-ray
MARKER
on a
disc
SUBTITLE
subtitle
Button
of a certain
Disc/DVD).
BONUSVIEW
Button
Use this to turn on or off the BONUSVIEW
Button
Use this to bookmark a position while playing a disc.
Press this to switch the Blu-ray
A-B
Allows you to repeat playback
section.
Button
Button
Disc/DVD's
supported
I
Blu-ray
function
on
Discs.
I REPEAT Button
Allows you to repeat a title, chapter, track or disc.
language.
Englsh 17
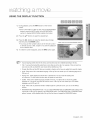
SETTING
THE REMOTE CONTROL
You can control certain functions of your TV with this remote control.
Controlfunctionbuttonsinclude:TV POWER,TVOH A/V,
TVVOL +/-, TVMOTE,TV INPUTSEL button.
To determine whether your television is compatible, follow the instructions below.
1. Switch your television on.
2. Point the remote control towards the television.
3. Press and hold the TV POWER button and enter the two-figure code corresponding to the brand of
your television, by pressing the appropriate number buttons. (see the next page for the code list).
Ifyour television is compatible with the remote control, it will switch off.
It is now programmed to operate with the remote control.
(_
If severalcodesareindicatedforyourtelevisionbrand,try eachoneinturn untilyoufindonethat works.
Ifyou replacethe remotecontrol'sbatteries,you nlustsetthe brandcodeagain.
You can then control the television using the following buttons after pressing the "IV button.
Button
TVPOWER
Function
Usedto switchthetelevision
onandoff.
TVINPUT
SEL
Usedto selectan externalsource.
TVV0L(+/-)
Usedto adjustthe volumeofthetelevision.
TVCH(A/V)
Usedto selectthedesiredchannel.
TVMUTE
Usedto togglethesoundonandoff.
(_
Thefunctionslistedabovewill not necessarily
workon alltelevisions.Ifyou encounterproblems,operatethe
televisiondirectly.
REGARDING
THE BATTERY
If the remote does not operate properly:
• Check the polarity +/- of the batteries (Dry-Cell)
• Check if the batteries are drained.
Check if remote sensor is blocked by obstacles.
Check if there is any fluorescent lighting nearby.
Dispose of batteries according to local environmental
regulations. Do not put them in the household trash.
18 remote control
+
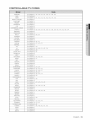
CONTROLLABLE
SAMSUNG
AIWA
ANAM
BANG & OLUFSEN
TV CODES
TV POWER+01, +02, +03, +04, +05, +06, +07, +08, +09
TV POWER+82
TV POWER+10, +11, +12, +13, +14, +15, +16, +17, +18
TV POWER+57
BLAUPUNKT
TV POWER+71
BRANDT
TV POWER+73
BRIONVEGA
TV POWER+57
CGE
TV POWER+52
CONTINENTAL EDISON
TV POWER+75
DAEWOO
EMERSON
FERGUSON
FINLUX
FORMENTI
TV POWER+19, +20, +23, +24, +25, +26, +27, +28, +29, +30, +31, +32, +33, +34
TV POWER+64
TV POWER+73
TV POWER+06, +49, +57
TV POWER+57
FUJITSU
TV POWER+84
GRADIENTE
TV POWER+70
GRUNDIG
TV POWER+49, +52, +71
HITACHI
IMPERIAL
TV POWER+60, +72, +73, +75
TV POWER+52
JVC
LG
TV POWER+61, +79
TV POWER+06, +19, +20, +21, +22, +78
LOEWE
TV POWER+06, +69
LOEWE OPTA
TV POWER+06, +57
MAGNAVOX
TV POWER+40
METZ
TV POWER+57
MITSUBISHI
MIVAR
TV POWER+06, +48, +62, +65
TV POWER+52, +77
NEC
TV POWER+83
NEWSAN
TV POWER+68
NOBLEX
TV POWER+66
NOKIA
TV POWER+74
NORDMENDE
TV POWER+72, +73, +75
PANASONIC
TV POWER+53, +54, +74, +75
PHILIPS
TV POWER+06, +55, +56, +57
PHONOLA
PIONEER
TV POWER+06, +56, +57
TV POWER+58, +59, +73, +74
RADIOLA
RADIOMARELLI
TV POWER+06, +56
TV POWER+57
RCA
REX
TV POWER+45, +46
TV POWER+74
SABA
SALORA
TV POWER+57, +72, +73, +74, +75
TV POWER+74
SANYO
SCHNEIDER
TV POWER+41, +42, +43, +44, +48
TV POWER+06
SELECO
SHARP
TV POWER+74
TV POWER+36, +37, +38, +39, +48
SIEMENS
TV POWER+71
SINGER
TV POWER+57
SINUDYNE
TV POWER+57
SONY
TELEAVA
TV POWER+35, +48
TV POWER+73
TELEFUNKEN
THOMSON
THOMSON ASIA
TOSHIBA
TV POWER+67, +73, +75, +76
TV POWER+72, +73, +75
TV POWER+80, +81
TV POWER+47, +48, +49, +50, +51, +52
WEGA
TV POWER+57
YOKO
TV POWER+06
ZENITH
TV POWER+63
English 19
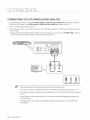
This section involves various methods of connecting the Blu-ray Disc Player to other
external components such as a TV.
CONNECTING
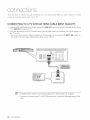
1,
TO A TV WiTH AN HDMi CABLE (BEST QUAUTY)
Using an HDMI-HDMI cable (not included) connect the HDMI OUT terminal on the rearof the Blu-ray Disc Player
to the HDMI IN terminal of your TV.
2. Press the input selector on your TV remote control until the HDMI signal from the Blu-ray Disc Playerappears on
your TV screen.
Ifyou have set the remote control to operate your TV (see pages 18-19), press the TV INPUT SEL. button on
the remote control and select HDMI as the external source of the TV.
_ Ifthe HDMIcableis connectedor removedduringplaybackofa CDDA,the playerwill stop playing.
_ Ifthe playeris connectedto yourTVin HDMI108% outputmode,you mustuse Highspeed(category2)
HDMI
cable.
20 connections
HDMi AUTO DETECTION
FUNCTION
The player's video output will automatically change to HDMI output resolution when connecting an HDMI cable
while power is on (see page 39).
_ DependingonyourTV,certainHDMIoutputresolutionsmaynot work.
Pleasereferto the user'smanualof yourTV.
_ Ifan HDMIcableis connectedfromthe playerto aTV,the Blu-rayDiscPlayer'soutputis setto HDMIoutput
resolutionautomatically
within10 seconds.
_ IfComponentandHDMIarebothconnected,HDMImodeis automaticallyselected.(Seepage39)
_ Whenyouconnectthe playerto the TVusingthe HDMIcableforthe first time or to a newTV,the HDMIoutput
resolutionwill beautomaticallysetto the highestprovidedbythe TV.
_ IfyouconnectaSamsungTVto the Blu-rayDiscPlayerusingan HDMIcable,the playercanbe easilyoperated
usingthe TVremotecontrol.(Thisis onlyavailablewithSamsungTVsthatsupportthe Anynet+feature.)(See
pages40-41)
HDMI (High Definition Multimedia Interface)
HDMI is an interface that enables the digital transmission of video and audio data with just a single
connector.
Using HDMI, the Blu-ray Disc Player transmits a digital video and audio signal and displays a vivid
picture on a TV having an HDMI input jack.
,, HDMI connection description
HDMI connector - Supports video and digital audio data (LPCM or Bitstream).
- HDMI outputs only a pure digital signal to the TV.
- If your TV does not support HDCP (High-bandwidth Digital Content Protection), random noise
appears on the screen.
,, Why does Samsung use HDMI?
Analog TVs require an analog video/audio signal. However, when playing a Blu-ray Disc/DVD, the data
transmitted to a TV is digital. Therefore either a digital-to-analog converter (in the Blu-ray Disc Player)
or an analog-to-digital converter (in the TV) is required. During this conversion, the picture quality is
degraded due to noise and signal loss. HDMI technology is superior because it requires no D/A
conversion and is a pure digital signal from the player to your TV.
,, What is the HDCP?
HDCP (High-band width Digital Content Protection)is a system for protecting Blu-ray Disc/DVD
content outputted via HDMI from being copied. It provides a secure digital link between a video
source (PC, DVD. etc) and a display device (TV, projector, etc). Content is encrypted at the source
device to prevent unauthorized copies from being made.
,, What is Anynet+?
Anynet+ is a convenient function that offers linked operation of this unit through Samsung TVs with the
Anynet+ feature.
- If your Samsung TV has an _ynet_ logo, then it supports the Anynet+ function.
- If you turn on the player and insert a disc, the player will start playing the disc, and the TV will turn on
automatically and switch to HDMI mode.
- If you turn on the player and press the Play button with a disc already inserted,the TV will
immediately turn on and switch to HDMI mode.
English 21
CONNECTING
TO A TV WITH DVI CABLE (BEST QUALITY)
1. Using the HDMI-DVI cable (not included), connect the HDMI OUT terminal on the rear of the Blu-ray Disc Player
to the DVI IN terminal of your TV.
2. Using the audio cables, connect the AUDIO (red and white) OUT terminals on the rear of the Blu-ray Disc
Player to the AUDIO (red and white) IN terminals of your TV.
Turn on the Blu-ray Disc Player and TV.
3. Press the input selector on your TV remote control until the DVIsignal from the Blu-ray Disc Player appears on
your TV screen.
• If you have set the remote control to operate your TV (see pages 18-19), press the TV INPUT SEL. button on
the remote control and select HDMI as the external source of the TV.
Connecting the HDMI cable while the Blu-ray Disc Player's power is on will result in the player's video output being
changed to HDMI mode automatically (see page 39).
Dependingon yourTV,certainHDMIoutputresolutionsmaynot work.
Pleasereferto the user'smanualofyourTV.
If an HDMI-DVI
cableis pluggedintothe TV,the Blu-rayDiscPlayer'soutputresolutionissetto HDMI
automaticallywithin10 seconds.
If Component
andHDMIarebothconnected,HDMImodeis automatically
selected.(Seepage39)
Whenyouconnectthe playerto the TVusingthe HDMIcableforthe first timeor to a newTV,the HDMIoutput
resolutionwill be automaticallysetto the highestprovidedbythe TV
Ifthe HDMIcableis connectedor removedduringplaybackofa CDDA,the playerwill stop playing.
22 connections
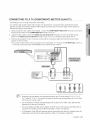
CONNECTING
TO A TV (COMPONENT)
(BETTER QUALITY)
- Connecting to your TV using Component video cables.
- You will enjoy high quality images with accurate color reproduction. Component video separates the picture
element into black and white(Y), blue(PB),red(PR)signals to present clear and clean images. (Audio signals are
delivered through the audio output.)
1. Using Component video cables (not included), connect the COMPONENT VIDEO OUT terminals on the rear of
the Blu-ray Disc Player to the COMPONENT IN terminals of your TV.
2. Using the audio cables, connect the AUDIO (red and white) OUT terminals on the rear of the Blu-ray Disc
Player to the AUDIO (red and white) IN terminals of your TV. Turn on the Blu-ray Disc Player and TV.
3. Press the input selector on your TV remote control until the Component signal from the Blu-ray Disc Player
appears on the TV screen.
• If you have set the remote control to operate your TV (see pages 18-19), press the TV INPUT SEL. button on
the remote control and select COMPONENT as the external source of the TV.
AUDIO IN
®
COMPONENTiN
Dependingonthe manufacturer,
the componentterminalson yourTVmaybemarked"R-Y,B-Y,Y" or "Cr,
Cb,Y" insteadof "Pr,Pb,Y". Thenumberandpositionof terminalsmayvary dependingonthe TVset. Please
referto the user'smanualofyourTV.
Youcanselectfrom avarietyd resolutionsettingsfor Blu-rayDiscssuchas 1080i,72%, 48% and480i,
dependingonthe disctype.(Seepage39)
Theactualresolutionmaydifferfromthe settinginthe SETUPmenuif bothComponentandHDMIcablesare
connected.Theresolutionmayalsobe differentdependingon the disc.(Seepage39)
InDVDplayback,if bothHDMIandComponent
jacksareconnectedandyou selectthe Componentmode,the
DisplaySetupmenuwill showthe outputresolutionas 1080p.Theresolutionis actually480i.
Engl sh 23
CONNECTING
TO A TV (VIDEO) (GOOD QUALITY)
1. Using video/audio cables, connect the VIDEO (yellow) / AUDIO (red and white) OUT terminals on the rear of
the Blu-ray Disc Playerto the VIDEO (yellow) / AUDIO (red and white) IN terminals of your TV.
2. Turn on the Blu-ray Disc Player and TV.
3. Press the input selector on your TV remote control until the Video signal from the Blu-ray Disc Player appears on
the TV screen.
• If you have set the remote control to operate your TV (see pages 18-19), press the TV INPUT SEL. button on
the remote control and select VIDEO as the external source of the TV.
Noisemaybegeneratedif the audiocableis placedtoo closeto the powercable.
Ifyou wantto connectto an Amplifier,pleasereferto the Amplifierconnectionpages.(Seepages25-27)
Thenumberandpositionof terminalsmayvarydependingon yourTVset. Pleasereferto the user'smanualof
yourTV.
Ifthereis onlyoneaudioinputterminalon theTV,connectit to the [AUDIO0UTJ[left](white)terminalofthe
BlumayDiscPlayer.
TheVIDEOsourceis alwaysoutputin480i resolutionregardlessof the resolutionsetinthe SETUPmenu.
(Seepage39)
24 connections
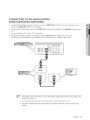
CONNECTING
TO AN AUDIO SYSTEM
(2 CHANNEL
AMPLiFiER)
1. Using the audio cables, connect the AUDIO (red and white) OUT terminals on the rear of the Blu-ray Disc
Player to the AUDIO (red and white) IN terminals of your Amplifier.
2. Using the video signal cable(s), connect the HDMI, COMPONENT or VIDEO OUT terminals on the rear of the
Blu-ray Disc Player to the HDMI, COMPONENT or VIDEO IN terminal of your TV as described on pages 20 to
24.
3. Turn on the Blu-ray Disc Player, TV and Amplifier.
4. Pressthe input select button of the Amplifierto selectthe external input inorder to hear sound from
the Blu-rayDisc Player. Refer to your Amplifier's user manual to set the Amplifier's audio input.
2-Channelstereoamp
i
®
Red
Whit_e
Manufacturedunderlicensefrom DolbyLaboratories."Dolby"andthe double-Dsymbolaretrademarksof
DolbyLaboratories.
ManufacturedunderlicenseunderU.S.Patent#: 5,451,942;5,956,674;5,974,380;5,978,762;6,487,535
&otherU.S.andworldwidepatentsissued& pending.DTSis a registeredtrademarkandthe DTSIogos,
Symbol,DTS-HDandDTS-HDAdvancedDigitalOutaretrademarksof DTS,Inc.© 1996-2007DTS,Inc.All
RightsReserved.
Engl sh 25
CONNECTING
(DOLBY
TO AN AUDIO SYSTEM
DIGITAL,
DTS AMPLIFIER)
1. Using the optical cable (not included), connect the DIGITAL AUDIO OUT (OPTICAL) terminal on the rear of the
Blu-ray Disc Player to the DIGITAL AUDIO IN (OPTICAL) terminal of your Amplifier.
2. Using the video signal cable(s), connect the HDMI, COMPONENT or VIDEO OUT terminals on the rear of the
Blu-ray Disc Player to the HDMI, COMPONENT or VIDEO IN terminals of your TV as described on pages 20 to
24.
3. Turn on the Blu-ray Disc Player, TV, and Amplifier.
4. Press the input select button of the Amplifier to select the external input in order to hear sound from
the Blu-ray Disc Player. Refer to your Amplifier's user manual to set the Amplifier's audio input.
_ Pleaseturn thevolumedownwhenyouturnon theAmplifier,Suddenloudsoundmaycausedamagetothe
speakersandyourears,
_ Pleaseset the audiointhe menuscreenaccordingtothe Amplifier,(Seepages35-36)
_ Thepositionofterminalsmayvarydepending
ontheAmplifier,Pleaserefertothe user'smanualof yourAmplifier,
_ Whenusingthisconnection,discswithLPCMaudiosoundtrackswill onlybeheardoverthe fronttwo
channels,
26 connections
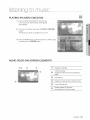
CONNECTING
TO AN AUDIO SYSTEM
(HDMi SUPPORTED
AMPLIFIER)
1. Using the HDMI-HDMI cable (not included), connect the HDMI OUT terminal on the rear of the Blu-ray Disc
Player to the HDMI IN terminal of your Amplifier.
2. Using the HDMI-HDMI cable, connect the HDMI OUT terminal of the Amplifier to the HDMI IN terminal of your
TV.
3. Turn on the Blu-ray Disc Player, TV, and Amplifier.
4. Press the input select button of the Amplifier to select external input in order to hear sound from
the Blu-ray Disc Player. Refer to your Amplifier's user manual to set the Amplifier's audio input.
_ Pleaseturnthe volumedownwhenyouturn onthe Amplifier,Suddenloudsoundmaycausedamageto the
speakersandyourears,
_s Pleasesetthe audiointhe menuscreenaccordingto the Amplifier,(Seepages35-36)
_ Thepositionof HDMIterminalsmayvarydepending
ontheAmplifier,Pleasereferto theuser'smanualofyour
Amplifier,
Engiish 27
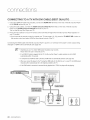
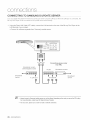
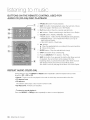
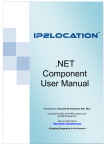
CONNECTING
TO SAMSUNG'S
UPDATE
SERVER
You can update the player's firmware va Samsung's serverusng the LAN ack. When the LAN ack s connected, the
Blu-ray Dse Playerwll be connected to the update sewer automat eally.
1. Using the Direct LAN Cable (UTP cable), connect the LAN terminal on the rear of the Blu-ray Disc Player to the
LAN terminal of your modem.
,, Connect for software upgrades from Samsung's update server.
To LAN aort
Broadband modem
I
(with integrated router)
/
Connecting
using a router
(e.g. DSL)
Router
Broadband modem
/
Broadband'_
service
_?_
To LAN port
/
t
[
t
t
To LAN port
Broadband
service
_ InternetaccesstoSamsung's
updateservermaynotbeallowed,depending
ontherouteryouuseor the ISP'spolicy.
Formoreinformation,
contactyourISP(InternetServiceProvider).
_ ForDSLusers,pleaseusea routerto makea networkconnection.
28 connections
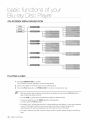
o f nations of
f
This section introduces basic playback functions and playback by disc type.
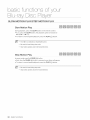
BEFORE PLAYING
• Turn on your TV and set it to the correct Video Input (the input the Blu-ray Disc Player is connected to).
If you connected an external Audio System, turn on your Audio System and set it to the correct Audio Input.
After plugging in the player, the first time you press the POWER button, this screen comes up:
Ifyou want to select a language, press a NUMBER button.
(Thisscreen will only appear when you plug inthe player for
the first time.) If the language for the startup screen is not set,
the settings may change whenever you turn the power on or
off. Therefore, make sure that you select the language you
want to use. Once you select a menu language, you can
change it by pressing the _ button on the front panel of the
unit for more than 5 seconds with no disc in the unit. Then the
MENU LANGUAGE SELECTIONwindow appears again
where you can reset your preferred language.
®
Discswhichcannotbe playedon thisplayer.
HDDVD
• DVD+RW
•
DVD-ROM
o DVD-RAM
•
CD-ROM
• CVD
•
SuperAudioCD(exceptCDlayer)
•
DVD+R
CDV
CDq
CDGsplayaudioonly,not graphics.
Discswhichcan be playedonthis player(Forthe followingdiscs,the abilityto playbackmay dependon
recordingconditions.)
BD-ROM
• BD-RE
• BD-R
DVD-R
• DVD-RW(Vmode) o CD-RW/CD-R
Theunitmay notplaycertainCD-RW/CD-R
andDVD-Rdueto the disctypeor recordingconditions.
Blu-rayis a newandevolvingformat.Accordingly,disccompatibilityissueswithnewandexistingformatdiscs
arepossible.Notall discsarecompatibleandnot everydiscwill playback.
Foradditionalinformation,referto the DiscTypeandCharacteristics
andCompliance
andCompatibilityNotice
sectionsof thisManual.If youencountercompatibilityproblems,pleasecontactSAMSUNG
customercare
center.
Theunit cannotplayCD-RW/CD-R
andDVD-RW/-R
withrecordedcontentsuchas divx,avi,mpg,mov,wma,
rnp3,digitalphotoview(JPEG)
file.
Engl sh 29
b ¢'o funot one of yot
ON-SCREEN
F
MENU NAVIGATION
[ viaoo/
[ MosicI
PLAYING
A DISC
1. Press the OPEN/CLOSE ((_-_)
button.
The STANDBY indicator light goes out and the tray opens.
2. Place a disc gently into the tray with the disc's label faring up.
3. Press the PLAY (_) button or OPEN/CLOSE (1"-})button to close the disc tray.
Whenyoustopdiscplay,the playerrememberswhereyou stopped,sowhenyou pressPLAY(L_)button
again,it will pickupwhereyou leftoff,
Pressthe STOP(_._)buttontwiceduringplaybackto disablethe Resumefunction,
Topausethe playback,pressthe PAUSE(¢j£)buttonduringplayback,
Toresume,pressthe PLAY((_) button,
Ifthe playeris leftinthe stop modemorethan5 minuteswithoutanyuserinterface,a screensaverwill appear
on yourTV,If the playeris leftinthe screensavermodefor morethan 30 minutes,the powerwill
automatically
turn off exceptduringplaybackof an CDDA(AutomaticPower-0ffFunction),
If no inputis enteredfor morethan5 minutesinpausemode,the operationwill stop (exceptfor someBlu-ray
discs),
30
basc functions
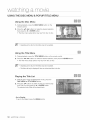
SETTING THE POWER ON / OFF BEEP SOUND
When you turn the player on or off, a beep sound is produced.
1. With the unit in Stop mode, press the MENU button.
2. Press the ,_T buttons to select Setup, then press the ENTER or _- button.
3. Press the ,_T buttons to select System Setup, then press the ENTER or _- button.
4. Press the ,_T buttons to select Power On/Off sound, then press the ENTER or _- button.
5. Press the ,_T buttons to select Off or On, then press the ENTER or _- button.
6. Press the MENU button to exit the setup menu.
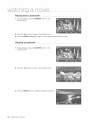
USING THE SEARCH AND SKIP FUNCTIONS
During play, you can search quickly through a chapter or track, and use the skip function to jump to the next
selection.
Searching
through
a Chapter
or Track
During playback, press the SEARCH (_ G)
button.
• Ifyou press the SEARCH (G) button, the playback speed is increased to
_,_ X2 _,_ X4 _,_ X8 _,_ X16 _,_ X32 _,_ X128
• Ifyou press the SEARCH (_) button, the playback speed is increased to
X2_X4_X8_X16_X32_X128
• To return to normal speed playback, press the PLAY (_) button.
_[}_
Nosoundis heardduringsearchmode.
Skipping
Tracks
During playback, press the SKIP (O O)
button.
When playing a Blu-ray Disc/DVD, if you press the SKIP (0) button, it moves to the next chapter. Ifyou
press the SKIP ('O) button, it moves to the beginning of the chapter. One more press makes it move
to the beginning of the previous chapter.
Engiish 31
b ¢'o funot one of yot
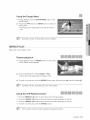
SLOW MOTION
PLAY/STEP
Slow Motion
MOTION
F
PLAY
Play
During playback, press the SLOW button on the remote control.
• If you press the SLOW button, the playback speed is reduced to
1_1/8 I_ 1/4 _ 1/2
• To return to normal speed playback, press the PLAY ((3) button.
_* This(Q) iconindicatesan invalidbuttonpress.
_* Nosoundis heardduringslowmode.
_ Slowmotionoperatesonlyintheforwarddirection.
Step Motion
Play
In pause mode, press the PAUSE (_) button.
,, Each time the PAUSE (_p)button is pressed a new frame will appear.
• To return to normal speed playback, press the PLAY ((_) button.
[_
_ Nosoundis heardduringstepmode.
_ Stepmotionoperatesonlyinthe forwarddirection.
32
basc functions
.......
_*
C
For your convenience,
home environment,
you can set this player's features for the best use in your
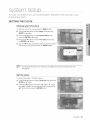
SETTING THE CLOCK
Choose your time zone
1. With the unit in Stop mode, press the MENU button.
2. Press the A _r buttons to select Setup, then press the
ENTER or _ button.
3. Press the A _' buttons to select System Setup, then
press the ENTER or _ button.
4. Press the A T buttons to select Time Zone, then press
the ENTER or _ button.
5. Use the 4 _ button to place the cursor to the appropriate
time zone for your area and press the ENTER button.
YoushouldsetNTPServerto "On"beforeyoucan configurethe correcttime settingforyourarea,
(seepage45)
Set the clock
To setup, follow steps 1 through 3 above.
4. Press the A _r buttons to select Clock Set, then press the
ENTER or _ button.
5. Press the 4 _ buttons to move to "da."(date), "hr" (hour),
and "min" (minute). Set the date and time by pressing the
A T buttons, then press the ENTER button.
Engl sh 33
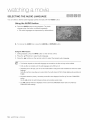
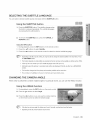
SETTING
UP THE LANGUAGE
OPTIONS
Once you set the audio, subtitle, disc menu and player menu language options, they will be applied automatically
every time you watch a movie.
Ifyou wantto choosea differentaudioandsubtitlelanguagewhileplayinga disc,youcanalsousethe disc
menuto makethe selection.
1. With the unit in Stop mode, press the MENU button.
2. Press the • T buttons to select Setup, then press the
ENTER or _- button.
3. Press the A _' buttons to select Language Setup, then
press the ENTER or _ button.
Language setup menu will be displayed.
4=
Press the A T buttons to select the desired language
option, press the ENTER or _- button.
• Audio : For the disc audio language.
Subtitle : For the disc subtitles.
Disc Menu: For the disc menu contained on the disc
Menu: For the on-screen menu of your Blu-ray Disc
Player.
5. Press the A T buttons to select the desired language, then press the ENTER button.
Pressthe RETURNor 4 buttonto returnto the previousmenu.Pressthe MENUbuttonto exitthe menu.
Theselectedlanguagewill onlyappearif it is supportedon the disc.
34
language setup
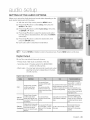
SETTING
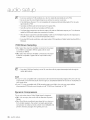
UP THE AUDIO OPTIONS
Allows you to set up the Audio device and sound status depending on the
audio system being used with the player.
1, With the unit in Stop mode, press the MENU button.
2. Press the • _r buttons to select Setup, then press the
ENTER or _ button.
3, Press the A T buttons to select Audio Setup, then press
the ENTER or _ button.
4, Press the A T buttons to select the desired audio option
from the options described below, then press the ENTER
or _ button.
5, Press the A T buttons to select the desired item, then
press the ENTER button.
6o Each audio option is described in detail below.
Pressthe RETURN
or 4 buttonto returnto the previousmenu.Pressthe MENUbuttonto exitthe menu.
Digital
Output
Bin-ray Discs may includethree audio streams.
- Primary Audio : Main audio soundtrack of the disc
- Secondary Audio : Provides audio for the BONUSViEW
window of a Bin-ray Disc.
- Effect Audio : You may hear menu prompt sounds (etc.)when
selecting menu items (depending on the disc),
on a Bin-ray Disc.
Digital Output
Selections
iiii !iii iii!ii!ii!i
iii
i i ! i i i! i! ! !i !!i !i!i!i!i i!i ii!!!i!i !i!iii!ii!ii!
i i ii!i!!iiiiiiiii!iiii
i i ii ii ii ii! !ii! iii!i!iii
iiii !i ii i ii iiii
PCM
YoucanenjoyPrimary,
Secondary
andEffectaudio
Decodes
Primary,
Secondary together,
andEffectaudiostreams
YoucanalsoenjoyDolby
TrueHD
soundevenif your
together
intoPCMaudio,
receiver
cannotdecode
Dolby
TrueHU,
Decodes
Primary,
Secondary
YoucanenjoyPrimary,
Secondary
andEffectaudio
(Re encode)togetherintoPCMaudio,then
re-encodes
thePCMaudiointo together,
DTSbitstream,
Bitstream
andEffectaudiostreams
Recommended
choiceifyou
haveanHDMI1,1or HDMI1,2
YoucannothearDTS-HD
sound receiver
whichcannotdecode
MA,
withthissettingevenif youhave DTS-HD
anHDMI1,3receiver
whichhas Alsorecommended
if youare
DTS-HD
decoding
capability, usinganopticalcableforaudio
andyourreceiver
cannotdecode
DolbyDigitalor DTS,
Recommended
choiceifyou
Audioqualitymaybelowerthan don'thaveanHDMIsupported
PCMor Bitstream
(Audiophile) receiver,
buthavea receiver
with
setups,
anOpticalinputthatcandecode
DTS,
Outputs
onlythePrimary
audio YoucanenjoyDTS-HD
sound
isoundtrack
(mainsoundtrack ifyouhaveHDMI1,3receiver YouwillnothearSecondary
and
v*uu__t'^"_i_Zhi!Z'
ofthemovie)sothatyour
whichhasDTS-HD
decoding Effectaudio,
receiver
candecode
theaudio
capability,
bitstream,
BitStream
Recommended
choiceifyou
haveanHDMI1,3receiver
whichhasDTS-HD
decoding
capability,
Engl sh 35
Ifyou haveselecteda LPCMsoundtrackon a disc,the outputwill automaticallybesetto PCM.
Besureto selectthe correctDigitalOutputor youwill hearnosoundor a loud noise.
Ifthe HDMIdevice(Receiver,
TV)is not compatiblewithcompressedformats(Dolbydigital,DTS),the audio
signaloutputsas PCM
Secondary
andEffectaudiowill not beheardwith regularDVDs.
SomeBlu-rayDiscsdo not haveSecondaryandEffectaudio.
ThisDigitalOutputsetupdoesnot effectthe analog(L/R)audioor HDMIaudiooutputto yourTV.It effectsthe
opticalandHDMIaudiooutputwhenconnectedto a receiver.
Whenthe playeroutputsHDaudiobitstream(Dolby
TrueHDor DTS-HDMasterAudio)fromthe Opticaljackto
an HDMI1.3 receiveronly2 channelPCMaudiowill be heard.
Ifyou playMPEGaudiosoundtracks,audiosignaloutputsPCMregardlessofDigitalOuptutSelections(PCM
or
Bitstream).
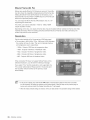
PCM Down Sampling
• On : Select this when the Amplifier connected to the player
is not 96KHz compatible. 96KHz signals will be down
converted to 48KHz
Off : Select this when the Amplifier connected to the player
is 96KHz compatible. Signals will be output without any
changes.
(_
EvenwhenPCMDownSamplingissetto Off,somediscswill onlyoutputdownsampled
audiothroughthe
opticaldigitaloutputs.
HDMI
if your TV is not compatible with compressed multi-channel formats (Dolby Digital, DTS),the unit may
output PCM 2ch downmixed audio even though you set Bitstream(either Re-encode or Audiophile) on
your setup menu.
if your TV is not compatible with PCM sampling rates over 48kHz, the unit may output 48kHz
downsampled PCM audio even though you set "PCM Down Sampling" as "Off".
Dynamic
Compression
This is only active when a Dolby Digital signal is detected.
Off : You can enjoy the movie with the standard Dynamic
Range.
On : When Movie soundtracks are played at low volume or
from smaller speakers, the system can apply appropriate
compression to make low-level content more intelligible and
prevent dramatic passages from getting too loud.
36 audio setup
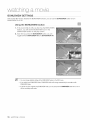
SETTING
UP THE DISPLAY OPTIONS
This function allows you to setup the TV screen settings. This function
depends on the disc or TV type. it may not work with some discs or TVs.
1. With the unit in Stop mode, press the MENU button.
2. Press the A _r buttons to select Setup, then press the
ENTER or _ button.
3. Press the A T buttons to select Display Setup, then
press the ENTER or _ button.
Video setup menu will be displayed.
4. Press the A T buttons to select the desired display option
from the options on the following pages.
5. Press the A T buttons to select the desired sub-menu
item from a video display option, then press the ENTER
button.
6o Each video option is described in detail below.
(_
Pressthe RETURN
or 4 buttonto returnto the previousrnenu.Pressthe MENUbuttonto exitthe rnenu.
TV Aspect
Depending on the type of television you have, you may want to adjust the screen setting. (aspect ratio)
4:3 LetterBox:
Selectwhenyouwanttoseethetotal16:9
ratioscreenBlumayDisc/DVD
supplies,
eventhoughyouhaveaTVwitha 4:3 ratio
screen.Blackbarswillappearatthetop
andbottomofthe screen.
4:3 Pan-Scan:
Select
whenyouwanttoseethe16:9video
supplied
bytheBh-rayDiso/DVD
without
the
blackbarsontopandbottom,
eventhough
you
have
a TVwitha4:3ratioscreen(Extreme
leftand
rightportion
ofthemovie
picture
willbecutoft).
16:9Wide:
Youcanviewthefull16:9pictureonyourwidescreen
TV.
16:9Normal:
Certainmovies(4:3
source)will bedisplayedin4:3 Pillarbox(blackbarson sidesof picture)if
16:9normalis selected.
Dependingonthe disctype,someaspectratiosmaynot beavailable.
Ifyouselectan aspectratiowhichis differentthanthe aspectratioofyourTVscreen,thenthe picturemight
appearto be distorted.
Engl sh 37
Movie
Frame (24 Fs)
Movies are usually filmed at 24 frames per second. Some Bluray discs have the capability of playing back at this frame rate.
Setting the Movie Frame (24Fs) feature to ON allows you to
adjust the Blu-ray Disc Player's HDMI output to 24 frames per
second for improved picture quality.
You can enjoy the Movie Frame (24Fs)feature only on a TV
supporting this frame rate.
This menu can only be selected in 1080i or 1080p HDMI
output resolution modes.
Depending on the disc, two types of frame rates may be included: Movie material (24 frame) and Video
material (30 frame). When the setting switches between Movie( 24 frame) and Video (30 frame), the
screen may blink for a few seconds.
Resolution
Setsthe outputresolutionofthe ComponentandHDMIvideosignal.
• The number in 480i, 480p, 720p, 1080p and 1080i indicates
the number of lines of video. The i and p indicate interlace
and progressive scan, respectively.
- 1080p : Outputs 1080 lines of progressive video.
- 1080i : Outputs 1080 linesof interlaced video.
- 720p : Outputs 720 linesof progressive video.
- 480p : Outputs 480 linesof progressive video.
- 480i: Outputs 480 lines of interlaced video.
If the connected TV does not support Movie Frame or the
selected resolution, you will see the following message:
If you select "Yes" and the resolution is not supported, the
TV's screen will be blank. Please wait for 15 seconds and
the resolution will be reverted to the previous value
automatically.
Ifthe screenis blank,pressandholdthe _1 buttononthe front ofthe playerfor morethan5 seconds
(nodiscinserted).All settingsarerestoredto the factorydefault.Followthe stepson the previouspageto
accesseachmodeandselectthe DisplaySetupthatyourTVwill support.
Whenthe factorydefaultsettingsarerestord,all the userdatastoredinthe persistentstoragewill be deleted.
38 dispIsy setup
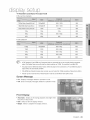
•,*_Resolution according to the output mode
,, Blu-rayDiscplayback
1080p,MovieFrame(24Fs)
off
1080p@60F
480i/ 1080i
480i
1080p/1080i,
Movie
Frame
(24Fs)on
1080p@24F
480i/ 1080i
480i
1080i,MovieFrame(24Fs)off
1080i
1080i
480i
720p
72%
72%
480i
480p
48%
480i/ 480p
480i
480i
48%
480i
480i
,, DVD playback
[_
1080p
1080p@60F
480i/480p
480i
1080i
1080i
480i/480p
480i
720p
72%
480i/480p
480i
48%
48%
480i/480p
480i
480i
48%
480i
480i
InDVDplayback,if bothHDMIandComponent
jacksareconnectedbutyouarecurrentlyviewingcomponent
output,the DisplaySetupmenuwill showtheoutputresolutionas 1080p.Theresolutionisactually480i.
Thisplayerhasthe HDMIAutoDetectFeature.Whenthe playeris first connectedto aTVviaHDMI,the player's
outputwill besetautomatically
to HDMI.
Ifthe HDMIAutoDetectionfeaturedoesnotwork,youcan'tselectthe 108% resolutionor MovieFrame(24Fs).
_ TheBlu-rayDiscmusthavethe 24 framefeatureinorderto usethe MovieFrame(24Fs)mode.
Screen
Message
• On : Displays messages related to operation mode.
Off : Does not display messages related to operation mode.
Front Display
• Automatic : Display is dim during playback and bright when
the unit is in Stop mode.
• Dim : Select to dim the display window.
• Bright : Select to brighten the display window.
Engl sh 39
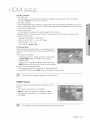
SETTING
UP THE HDMI SETUP OPTIONS
1. With the unit in Stop mode, press the MENU button.
2. Press the A T buttons to select Setup, then press the
ENTER or _ button.
3. Press the A _' buttons to select HDMI Setup, then press
the ENTER or _ button.
HDMI setup menu will be displayed.
4. Press the AT buttons to select the desired display option
(Anynet or Format),then press the ENTER or _ button.
Anynet+
(HDMI-CEC)
(Only Samsung
products)
When HDMI is set to on, you can operate the Anynet+ function.
• On : Anynet+ functions will work.
Off : Anynet+ function will not work.
What is Anynet+?
Anynet+ is a convenient function that offers linked operations with other Samsung products with the
Anynet+ feature.
You can operate this unit using a Samsung TV remote control or power on your Samsung TV and Home
theater and start disc playback simply by pressing the PLAY button on the TV's remote.
(_
Thisfunctionis notavailableif the HDMIcabledoesnotsupportCEC,
To use Anynet+
1. Connect the Blu-ray Disc Player to a Samsung TV with an HDMI cable. (See pages 20-21)
2. Set the Anynet+ (HDMI CEC) to "On" on your Blu-ray Disc Player.
3. Set the Anynet+ function on your TV. (Seethe TV instruction manual for more information.)
40
HDMH setup
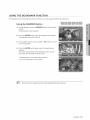
Anynet+ Functions
• One touch play
You can power on your Samsung TV and Home Theater, and play the disc in this unit simply by
pressing the PLAY button on the TV's remote.
One touch watching
Select "Watching Blu-ray Disc Player" or "Connected to Blu-ray Disc Player" (depending on your TV's
menu) in the Anynet+ menu on the TV. The Blu-ray Disc Playerwill automatically turn on and the TVwill
be switched to HDMI mode.
Remote control Link
You can operate this player with your Samsung TV remote control.
Available buttons on the Samsung TV remote: These buttons work the same as this Blu-ray Disc
player's remote control.
- Playback control buttons' Q _ _ Q
- Menu operation button, ds_<_._ _
- Numeric buttons '_
~
- Color buttons ' _ _ _
_ (_)
"IV Anynet+ Menu
When you press the Anynet+ button on your Samsung TV's
remote control, the following On-Screen Display (OSD)will be
shown.
Blu-ray Disc Player Menu
- When playing a movie : brings up the disc's menu (same
as DISC MENU button on the Blu-ray Disc Player's
remote control)
- In Stop mode : brings up the SETUP menu (same as the
MENU button on the Blu-ray Disc Player's remote control.)
Blu-ray Disc Player Operation Menu
- When playing a DVD VIDEO, DVD-RW/-R, BD-ROM, BD-RE :
shows INFO OSD (sameas INFO button on the player's remote control)
Thesemenusmaylookdifferentdependingon yourSamsungTV.
HDMI Format
You can optimize the HDMI output for connection to a TV or
Monitor.
o TV : Select if connected to a TV via HDMh
o Monitor : Select if connected to a Monitor via HDMh
If the player is connected to a TV, the Monitor option is
unavailable.
TVor monitorhasto beconnectedto the playerbeforeyouselectthis option.
Engl sh 41
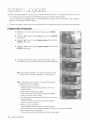
SETTING
UP THE PARENTAL
LOCK
The Parental Lock function works in conjunction with Blu-ray Disc/DVDs that have been assigned a rating which
helps you control the types of Blu-ray Disc/DVDs that your family watches. There are up to 8 rating levels on a disc.
1. With the unit in Stop mode, press the MENU button.
2. Press the ,L T buttons to select Setup, then press the
ENTER or _ button.
3.
Press the A • buttons to select Parental Setup, then
press the ENTER or _ button.
When you operate your Blu-ray Disc Player for the first
time, the "Enter New password" message will be
displayed.
4.
Enter the 4-digit password using the number buttons on
the remote control.
The "Confirm the password" message will be displayed.
Enter your password again.
5. Press the ENTER or _ button to select Parental Lock.
6. Press the A T buttons to select On or Off, then press the
ENTER button.
Pressthe RETURNor 4 buttonto returnto the previousmenu,Pressthe MENUbuttonto exitthe menu,
If you forgot
your password
1. Remove the disc.
2. Press and hold the ,_ button on the front panel for 5 seconds or more.
• All settings will revert to the factory settings.
_j
42
Whenthe factorydefaultsettingsarerestored,allthe userdatastoredinthe persistentstoragewill bedeleted,
parenta setup
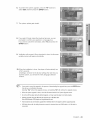
Setting
the Rating
Level
1. Press the ,L _' buttons to select Rating Level, then press
the ENTER or _ button.
2. Press the A T buttons to select the rating level you want,
then press the ENTER button. For example, if you select
up to Level 6, discs that contain Level 7, 8 will not play.
A larger number indicates that the program is intended for
adult use only.
Level 1 is the most restrictive and Level 8 is the least.
Changing
the Password
1. Press the A _' buttons to select New Password, then
press the ENTER or _ button.
2. Enter the 4-digit password using the number buttons on
the remote control. The "Enter New password." message
will be displayed.
3. Enter your password again using the number buttons on
the remote control.
Engl sh 43
mork
SetLJQ
I
You can update your playervb Samsung's server,
Follow the steps below to ensure the best connection to the Internet for your player,
To obtain information on the proper settings, check the network settings on your computer or
contact your Internet provider,
TCP/IP
SETTING
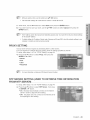
1. With the unit in Stop mode/No Disc mode, press the
MENU button.
2. Press the A T buttons to select Setup, then press the
ENTER or _ button.
3. Press the A • buttons to select Network Setup, then
press the ENTER or _ button.
4. Press the A T buttons to select TOP/IP, then press the
ENTER or _ button.
5. Press the A T buttons to select DHOP, then press the
ENTER button.
If DHCPis setto On,youcan'tselectIPAddress,Subnet
Maskor Gateway.
If DNSisset toAutomatic,youcan'tselectPrimary/
SecondaryDNS.
8. Press the A T buttons to select a desired item, then press the ENTER button.
• if DHCP is set to Off and, DNS to
Manual, enter your IP Address,
Subnet Mask, Gateway and Primary
DNS settings (Secondary DNS is
optional).
D available
If DHCP is set to On and, DNS to
Manual, enter your Primary DNS
setting (Secondary DNS is optional).
Setup not available
Setup available
if DHCP is set to On and, DNS to
Automatic, you don't need further or
additional settings.
D not available
44
network setup
I_
Whenyouselectan item,usethe numberand,&_' 4 _- buttons.
Ifthe automaticsettingsdon't workthenthe customershouldcalltheirISP.
7. When done, use the AT buttons to select Save, then press the ENTER button.
8. if you don't want to save your work, use the A _' 4 _- buttons to select Cancel, then press the
ENTER button.
®
TheIPaddressusedinthismanualis for illustrativepurposesonly.Youmustreferto the yournetworksettings
for the actualIPaddress.
Toobtainsettingsfor IPaddress,Subnetmask,GatewayandPrimaryDNS,checkthe networksettingsinyour
computeror contactyourinternetserviceprovider.
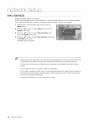
PROXY SETTING
A proxy serverservices requests by forwarding them to other servers.
Ifyou are required to configure the proxy setting, enter the settings specified by the ISP.
To setup, follow steps 1 to 3 in "TCP/iP Setting" on page 44.
4. Press the ,L _r buttons to select Proxy, then press the
ENTER or _- button.
• Server
Port
User
Password
I_
Formoreinformation,contactyourISP(InternetServiceProvider).
NTP SERVER SETTING
FROM NTP SERVER)
(USED TO RETRIEVE TIME INFORMATION
To setup, follow steps 1 to 3 in "TCP/IP Setting" on page 44.
4. Press the A _' buttons to select NTP Server, then press
the ENTER or _- button.
On :the player automatically connects to the Internet
server in order to adjust the time setting.
Off : the player does not connect to the Internet server
for adjusting the time setting.
Engl sh 45
MAC ADDRESS
Displaysthe MAC address of the player.
A MAC address(Media Access Control address) is a unique identifierattached to most network adapters.
it is a address that acts like a name for a particular network adapter, it cannot be changed.
1. With the unit in Stop mode/No Disc mode, press the
MENU button.
2. Press the A T buttons to select Setup, then press the
ENTER or _ button.
3. Press the A _' buttons to select Network Setup, then
press the ENTER or _ button.
4. Press the A T buttons to select Mac Address, then press
the ENTER or _ button.
The MAC address appears.
(_
Samsungshallnotbe responsiblefor anymalfunctionor failedoperationdueto Internetconnectionfailureor a
communicationerror.NeitherSamsungshallbe responsibleforfailureofthe user'sInternetconnection.
Youmaynot beableto accesssomeInternetservicesdependingon the limitationsof yourInternetservice
provider.
Anyfee chargedfor Internetconnectionis solelyyourresponsibility.
A DSLmodemis neededto useDSLservice.Youmay haveagreedwithyourISP(InternetServiceProvider)on
the numberof concurrentinternetconnectiondevices.Underthe agreement,yourPCandBlu-rayDiscPlayer
maynot usethe networksimultaneously.
Youmaynot beallowedto usea routerunderyourISP'spolicy.
46
network setup
Persistent Storage (Internal Flash Memory) is built-in memory on the player for
storing Blu-ray Disc content, Playback of the content in persistent storage is
dependent on the disc,
SYSTEM
DEVICE MANAGEMENT
You can manage user data stored in persistent storage.
1. With the unit in Stop mode/No Disc mode, press the
MENU button.
2. Press the A _' buttons to select Setup, then press the
ENTER or _ button.
3.
Press the A _' buttons to select System Setup, then
press the ENTER or _ button.
4.
Press the A _' buttons to select Persistent Storage
Management, then press the ENTER or _ button.
5.
Press the A T buttons to move to the sub-directory, then
press the ENTER or _ button.
- To delete a Content directory Usethe A • button to select a directory to delete and press
the BLUE(D) button.
MenuName
Highlight
i
Device Information
Description of Device(Storage) Information on the Player
• Total Size ' Total size of the Device(Storage).
Available Size ' Available size of the Device(Storage).
List
Help Area
Scroll Bar
Inmostcases,theContents
directorystoresrelatedfilesto eachtitle.
(Thesedirectoriescontaindownloaded
filesfromtheDisc)
PresstheRED(A)buttonintheContentlistto moveuptothe Device(Storage)
directory.
Memorysizeinformation
onthecurrentdeviceis locatedtothe rightofthecontentlist.
Engl sh 47
system LAr ar
J
I
_.J
Samsung may offer upgrades to your Blu-ray Disc Player'sfirmware in the future. To upgrade this firmware you must :
1. Go to samsung.com and refer to the 'SUPPORT' page to download the latest firmware.
You can use a CD or a USB flash drive to perform the firmware upgrade. For more information, see "Upgrade
Manual" at the website mentioned above.
or
2. Connect this player's LAN terminal to the LAN terminal on your modem (seepage 28) and follow the steps below.
FIRMWARE
UPGRADE
1. With the unit in Stop mode/No Disc mode, press the MENU
button.
2. Press the AT buttons to select Setup, then press the ENTER
or _ button.
3. Press the • T buttons to select System Setup, then press the
ENTER or _- button.
4. Press the A T buttons to select System Update, then press the
ENTER or _- button.
5. The player will check the cable or network connection status
automatically. The connection checking window will be displayed.
[] Ifthe upgrade is possible : You will see information on the
current and new versions of firmware in a message box.
[] Ifthe upgrade is not possible : You will see the following
description in the message box.
• Ifthe cable is not connected :
"Ethernet cable is not connected. Please, check the
Ethernet cable"
• Ifthe network connection has failed :
"This system cannot connected to internet for update.
Please, check the network setup"
• If no latest version is released (the latest version has been
already installed) :
"The latest version of the firmware is already installed.
There is no need to update."
• Ifthere is a disc in the player :
"Please maintain "No Disc" state for network update."
This indicates that you must remove all discs from the unit to perform the update.
• Ifthe server service is not available :
" Update Server is under maintenance. Please try again later."
48_ system
upgrade
6oToperform
thesystem
upgrade,
press
the4 _ buttons
to
select
Startandthenpress
theENTER
button.
7. The system update gets started.
8. If you select Cancel during the download process, you are
prompted to confirm your selection in a message box.
If you want to cancel the download, select Yes and press the
ENTER button.
9. Verification will proceed. When download is done, the firmware
update process will begin automatically.
10. When the installation is done, the player will automatically turn
off in 5 seconds.
All settings will revert to the factory settings the next time you
start the system, you will see the menu language selection
window.
Ifyouwantto cancelthe upgradeinthe processof downloadingthe upgradedata,pressthe ENTERbutton.
Youwill seea confirmationmessage.
Selecting"Yes" will endthe upgradeprocess,andselecting"No" will continuethe upgradeprocess.
Whenthe systemupgradeis done,checkthefirmwaredetailsinthe SystemUpgrademenu.
DonotturnofftheplayerduringtheSystem
Upgrade,
asit maycausetheplayertonotworkproperly.
Software
upgrades
usingthe USBHostjacksupports
onlya USBflashdrive.
OtherUSBdevices(ex.
MP3player)
arenotguaranteed
towork.
Thereshouldbeonlyonefirmwareupgrade
fileinUSBflashdrivefortheplayertoperformupgrade
properly.
USBflash driveswiththe bulkydimensioncannotbe insertedwhenan HDMIcableor a LANcableis
connected.
Engl sh 49
system LAr ar
J
I
SYSTEM
_.J
INFORMATION
When the firmware upgrade is done, check the firmware details by following the steps below.
1. With the unit in Stop mode/No Disc mode, press the
MENU button.
2. Press the A T buttons to select Setup, then press the
ENTER or _ button.
3. Press the A _' buttons to select System Setup, then
press the ENTER or _ button.
4=
Press the A T buttons to select System Information,
then press the ENTER or _ button.
You can see detailed information about the current
firmware.
5o Press the ENTER button to select OK.
System Setup menu will be displayed.
50 system upgrade
\
USING THE DISPLAY
FUNCTION
1. Duringplayback, pressthe INFO button on the remote
control.
• Ifthe current title of a Blu-ray Disc has the BONUSVIEVV
feature, press the INFO button in the BONUSVIEW
section to display BONUSVIEW-related information.
2. Pressthe A T buttons to select the desired item.
3. Pressthe 4 _- buttons to make the desiredsetup change
and then press the ENTER button.
You may use the number buttons of the remote control
to directly access a title, chapter or to start the playback
from a desired time.
<INFO menu for the BONUSVIEW section>
4. To make the screen disappear, pressthe INFO button again.
®
Ifyouareplayingcontentsfromtheinfomenu,somefunctionsmaynotbeenableddepending
onthe disc.
Title :Toaccessthe desiredtitle whenthereismorethanoneinthe disc.Forexample,if thereismorethan
onemovieon a BlumayDisc/DVD,eachmoviewill be identifiedasa Title.
Chapter:MostBlumayDisc/DVDdiscsarerecordedinchapterssothatyoucanquicklyfind a specificchapter.
Audio: Refersto the film's soundtracklanguage.A BlumayDisccancontainupto 32 audiolanguagesanda
DVDup to 8.
PlayingTime:Allowsplaybackofthe filmfrom a desiredtime.Youmustenterthe startingtime
asa reference.Thetime searchfunctiondoesnot operateon somediscs.
Subtitle: Refersto the subtitlelanguagesavailableinthe disc.Youwill be ableto choosethe subtitle
languagesor, if you prefer,turnthemoff fromthe screen.A BlumayDisccan containup to 255 subtitle
languages,anda DVDupto 32.
Angle: Whena Blu-rayDisc/DVDcontainsmultipleanglesof a particularscene,you canusethe ANGLE
function.
BONUSVlEW
Video/BONUSVlEW
Audio:You canmakeBONUSVlEW
Videoor BONUSVlEW
Audiosettingsif the
currenttitle of a BlumayDiscappearsinthe BONUSVlEW
section.TheBONUSVlEW
Video/ BONUSVlEW
Audio
options,however,will be disabledwitha BhmayDiscthatdoesnot supportthe BONUSVlEW
feature.
Engl sh 51
USING THE DiSC MENU & POPUP/'RTLE
MENU
Using the Disc Menu
1. During playback, press the DISC MENU button on the
remote control.
2. Press the A T 4 _ buttons to make the desired selection,
then press the _ or ENTER button.
• The Disc menu setup items may vary from disc to disc.
_}
Dependingon the disc,the DiscMenumaynot beavailable.
Using the Title Menu
1. During playback, press the TITLE MENU button on the remote control.
2. Press the A T 4 _ buttons to make the desired selection, then press the ENTER button.
The Title menu setup options may vary from disc to disc.
_}
Dependingon the disc,the TitleMenumaynot be available.
TitleMenuwill onlybe displayedif thereareat leasttwotitlesinthe disc.
Playing
the Title List
1. With the unit in Stop mode/Playback mode, press the
DISC MENU or TITLE MENU button.
2. Press the A T buttons to select an entry you want to play
from Title List, then press the _ or ENTER button.
The selected entry (title)will be played back.
- Go to Playlist To go to the Playlist, press the RED(A) button
52 watching a movie
Using the Popup
Menu
1. During playback, press the POPUP MENU button on the
remote control.
2. Press the A T 4 _- buttons or ENTER button to select the
desired menu.
• The Popup menu setup options may vary from disc to
disc.
Dependingonthe disc,the PopupMenumaynotbe available.
REPEAT PLAY
Repeat the current chapter or title.
Repeat
playback
1. During playback, press the REPEAT button on the remote
control. Repeat screen appears.
2. Press the A T buttons to select Chapter or Title.
Blu-ray Disc/DVD repeats play by chapter or title.
3. To return to normal play, press the REPEAT button again, then press the A T buttons to select Off.
(_
Dependingonthe disc,the Repeatfunctionmaynot beavailable.
Using the A-B Repeat
function
1. Press the REPEAT A-B button on the remote control during playback.
2. Press the REPEAT A-B button at the point where you want repeat play to start (A).
3. Press the REPEAT A-B button at the point where you want repeat play to stop (B).
4. To return to normal play, press the CANCEL button.
(_
PointB cannotbeset until5 secondsof playbackhaselapsedfrom pointA.
Engl sh 53
SELECTING
THE AUDIO LANGUAGE
You can select a desired audio language quickly and easilywith the AUDIO button.
Using the AUDIO button
1. Press the AUDIO button during playback. The Audio
changes when the button is pressed repeatedly.
• The audio languages are represented by abbreviations.
2. To remove the AUDIO icon, press the CANCEL or RETURN button.
Using the INFO button
1. During playback, press the INFO button on the remote control.
2. Press the A _' buttons to select Audio language.
3. Press the 4 _ buttons on the remote control to select the desired audio language.
Thisfunctiondependson whataudiolanguagesareencodedon the discandmay notbe available.
A BlumayDisccancontainup to 32 audiolanguagesanda DVDup to 8.
Dependingon the disctype,youcan usetheAudiobuttonto changethe audiosoundtrackaswellasthe audio
language.
SomeBlu-rayDiscsmayallowyouto selecteitherthe multi-channelLPCMor Dolbydigitalaudiosoundtrackin
English.
Informationaboutthe primary/secondarymodewill bealsodisplayedif the Bh-ray Dischasa BONUSVlEW
section.
Usethe 4 _ buttonto switchbetweenprimaryandsecondaryaudiomodes.
The 4 _ indicatorwill not be displayedon the screenif the BONUSVlEW
sectiondoesnot containany
BONUSVIEW
audiosettings.
54_ watching a movie
SELECTING
THE SUBTITLE
LANGUAGE
You can select a desired subtitle quickly and easily with the SUBTITLE button.
Using the SUBTITLE
button
1. Press the SUBTITLE button. The subtitle changes when
the button is pressed repeatedly. The subtitle languages
are represented by abbreviations.
2. To remove the SUBTITLE icon, press the CANCEL or
RETURN button.
Using the INFO button
1. During playback, press the INFO button on the remote control.
2. Press the A _' buttons to select Subtitle.
3. Press the 4 _- buttons on the remote control to select the desired subtitle language.
®
Dependingonthe Blu-rayDisc/DVD,youmay beableto changethe desiredsubtitleinthe DiscMenu.Press
the DISCMENUbutton.
Thisfunctiondependsonwhatsubtitlesareencodedonthediscandmaynotbe available
onall Blu-rayDisc/DVDs.
A Blu-rayDisccancontainupto 255subtitlelanguagesanda DVDupto 32.
Information
aboutthe primary/ secondarymodewill be alsodisplayedif the Blu-rayDischasa BONUSVlEW
section.
Thisfunctionchangesboththe primaryandsecondarysubtitlesatthe sametime.
The number of subtitles is the sum of primary and secondary ones.
CHANGING
THE CAMERA
ANGLE
When a Blu-ray Disc/DVD contains multiple angles of a particular scene, you can use the ANGLE function.
Using the ANGLE
function
1. During playback, pressthe INFO button on the remote control.
2. Pressthe A _' buttons to select Angle,
3. Press the 4 _ buttons or you can use the number buttons
on the remote control to select the desired angle.
(_
Ifthedischasonlyoneangle,thisfeaturewon'twork.Currently,
veryfewdiscshavethisfeature.
Depending
onthe disc,thesefunctionsmaynotwork.
Engl sh 55
BONUSVIEW
SETTINGS
If the current Blu-ray Disc features the BONUSVIEW function, you can use the BONUSVEW button to turn
BONUSVIEW On or Off.
Using the BONUSVIEW
button
1. If the current title of a Blu-ray Disc has the BONUSVIEW
feature, you will see the BONUSVlEW icon in the
BONUSVlEW section on the play screen.
2. Each time you press the BONUSVEW button, you can
toggle between BONUSVIEW On and BONUSVIEW Off.
Youcanchangedetailedsettingsof the BONUSVIEW
featureinthe INFOmenu.
Ifyou switchfrom BONUSVlEW
Video,BONUSVlEW
Audiowill changeautomaticallyinaccordancewith
BONUSVlEW
Video.
Ifthe BhmayDiscsupportsonlyBONUSVlEW
Audio,youcanjustpressthe BONUSVlEW
buttontoturn on or
off the secondaryaudiomode.
56 watching a movie
USING THE BOOKMARK
FUNCTION
This features lets you bookmark sections of a DVD so you can quickly find them at a later time.
Using the MARKER
button
1. During playback, press the MARKER button on the remote
control.
The Bookmark screen appears.
2. Press the ENTER button when the desired scene appears.
The selected scene will be stored.
3. To bookmark another section, press the _ _, buttons to move
to the next position.
4. Press the ENTER button agan when the desired scene
appears.
The scene will be stored at the selected position and the
bookmark time information will be shown.
• Repeat above to bookmark other positions.
You can bookmark up to 8 scenes.
iiiiiiiii
!li
iiiii'ii!
]]]]
iiiiiii!i
_
(_
Whenthe disctrayis openedandthenclosed,bookrnarkinforrnationwill be lost,
Engl sh 57
Playing
back a bookmark
1. During playback, press the MARKER button on the
remote control.
2. Press the _ _ buttons to select a bookmarked scene.
3. Press the ENTER or PLAY(_)
Clearing
button to start playing from the selected scene.
a bookmark
1. During playback, press the MARKER button on the
remote control.
2. Press the _ _ buttons to select a bookmarked scene.
3. Press the RED(A) button to delete the selected bookmark.
58 watching a movie
PLAYING AN AUDIO CD(CD-DA)
1. Insert an Audio CD(CD-DA) into the disc tray.
For an audio CD, the first track will be played
automatically.
2. To move to the Music List, press the STOP or RETURN
button.
The Music List screen is displayed on your TV.
3. Press the A T buttons to select the track you want to play,
and then press the ENTER button.
AUDIO CD(CD-DA)
SCREEN
ELEMENTS
E/
Displays
the mediatype.
[2_
Currenttrack(song)
Displays
the numberofthetrackcurrentlybeing
played.
PlayStatusBar.
Displays
thecurrentplayindex,totaltracknumber.
I51
61
Current/TotalPlayTime.
Displays
availableCOLOR
buttons.
(seenextpagefor Colorbuttonusage).
Engl sh 59
BUTTONS
ON THE REMOTE CONTROL
USED FOR
AUDIO CD (CD-DA) DISC PLAYBACK
1. PAUSE (@) button: Pauses playback.
2. SKIP (_@)button: During playback, plays the next track. Moves
to the next page inthe Music List or the Playlist.
3. PLAY (Q) button: Playsthe currently selected track.
4. _, T buttons : Selects a track(song) in the Music List or Playlist.
5. COLOR buttons: RED(A),GREEN(B),YELLOW(C)
°°°°°°i
I3}
• RED(A)button ' Selectsthe PlayMode(Repeat)during playback.
• GREEN(B)button ' Go to Playlistfrom Music List or go to
Music list from Playlist.
• YELLOW(C) button : Playlist play.
6. 4_ buttons
: Plays the applicable track, according to the current position.
4 : Moves to the menu.
7. ENTER button : Plays the selected track (song).
8. STOP ((.}) button: Stops a track(song).
9. Press the SEARCH (G}®) buttons : Fast Play.
10. SKIP ({_})button: If you pressed this button after three seconds
of playback, the current track will be replayed from the
{5}
beginning. But,if you pressed this button within three seconds
after playback starts, the previous track will be played.
Also used to move by the page in the Music List or the Playlist.
REPEAT AUDIO CD(CD-DA)
Duringplayback, pressthe REPEAT or RED(A)button repeatedlyto selectthe repeatmode you want.
Normal ,_ Q'_ "* 6_._--* C_
• Normal :Tracks on a disc are played in the order in which they were recorded on the disc.
_,Q'_ Repeat Track
_,C_ Random
The random option plays a disc's track in random order.
,, 6_@Repeat All : All tracks are repeated.
=To return to normal playback =
Press the REPEAT or RED(A)button repeatedly to return to normal playback.
60
istenng
to music
Playlist
You can create a playlist with up to 99 tracks.
1. insert an Audio CD(CD-DA) into the disc tray.
For an audio CD, the first track will be played automatically.
2. To move to the Music List, press the STOP or RETURN
button.
The Music List screen is displayed.
3. Press the GREEN(B) button.
4. Press the A T buttons to select a track, then press the
ENTER button to add it to the Playlist. Repeat this
procedure to add additional tracks.
5. if there is an undesired track in the playlist, press the J,T
button to select that track, and then press the ENTER
button.
• The selected track will be deleted.
6. Press the YELLOW(C) button to play the selected tracks.
When the track is finished, the next track will automatically
play.
7. To edit the Playlist, press the STOP or RETURN button.
8. To go to the Music List, press the Green(B) or RETURN
button.
(_
MP3andJPEGdiscscannotbeplayedinthis player,
Engl sh 61
Before requesting service, please check the following.
Nooperationcanbe performedwith the
remotecontrol.
® Checkthebatteries
in theremotecontrol.Theymayneedreplacing.
* Operate
theremotecontrolata distanceofno morethan20 feet.
* Remove
batteriesandholddownoneor morebuttonsforseveralminutes
to drainthemicroprocessor
insidetheremotecontrolto resetit. Reinstall
batteries
andtryto operate
theremotecontrolagain.
Discdoesnotplay.
® Ensure
thatthediscisinstalledwiththelabelsidefacingup.
* Checktheregionnumberof theBlu-rayDisc/DVD.
DiscMenudoesnotappear.
* Checkif thedischasa Menu.
TheQ iconappearson thescreen.
o
Thisiconappears
whenan invalidbuttonis pressed.
o
Thefeatures
or actioncannotbecompleted
atthistimebecause:
1.TheBlu-rayDisc/DVD's
software
restricts
it.
2.TheBlu-rayDisc/DVD's
software
doesn'tsupportthefeature(e.g.,angles)
3.Thefeatureisnotavailable
atthemoment.
4.You've
requested
a titleorchapter
number
orsearch
timethatisoutofrange.
Playmodediffersfrom theSetupMenu
selection.
* Someof thefunctionsselectedintheSetupMenumaynotworkproperly
ifthediscisnotencoded
withthecorresponding
function.
Thescreenratiocannotbe changed,
* TheScreenRatioisfixedonyourBlu-rayDisc/DVDs.
• Thisisnota problemwiththeplayer.
Noaudio.
* MakesureyouhaveselectedthecorrectDigitalOutputintheAudio
OptionsMenu.
Thescreenis blocked
* Pressthe_,_1button(infrontpanel)for morethan5 seconds
withnodisc
inside.Allsettingswillreverttothefactorysettings.
Whenthefactorydefaultsettingsarerestored,
alltheuserdatastoredin
thepersistent
storagewillbe deleted.
If the NDMIoutputisset to a resolution
yourTVcannotsupport(forexample,
1080p),youmaynot seea pictureon
yourTV.
62 troub eshooting
* Pressthe_,_1button(infrontpanel)for morethan5 seconds
withnodisc
inside.Allsettingswillreverttothefactorysettings.
* Whenthefactorydefaultsettingsarerestored,
alltheuserdatastoredin
thepersistent
storagewillbe deleted.
Forgot
password
® Pressthe_,_1button(infrontpanel)formorethan5 seconds
withno disc
inside.Allsettingsincludingthepasswordwillrevertto thefactory
settings.Don'tusethisunlessabsolutely
necessary.
• Whenthefactorydefaultsettingsarerestored,
alltheuserdatastoredin
thepersistent
storagewillbedeleted.
ffyouexperience
other
problems.
® Gotothecontentsandfindthesectionoftheinstruction
manualthat
contains
theexplanations
regarding
thecurrentproblem,andfollowthe
procedure
onceagain.
If theproblem
stillcannotbesolved,pleasecontactyournearestSamsung
authorized
servicecenteror call1-800-SAMSUNG.
Thepicture
isnoisy
ordistorted
® Makesurethatthediscisnotdirtyor scratched.
® Cleanthedisc.
NoHDMI
output.
® Checktheconnection
between
theTVandtheHDMIjackoftheBlu-rayDisc
Player.
CheckifyourTVsupports
480p/720p/1080i/1080p
HDMIinput
resolution.
Abnormal
HDMI
output
screen.
(_
If randomnoiseappears
onthescreen,itmeansthatTVdoesnotsupport
HDCP(High-bandwidth
DigitalContentProtection).
_ Whenthe factorydefaultsettingsarerestored,allthe userdatastoredinthe persistentstoragewill be deleted,
Engiish 63
SPECIFICATIONS
PowerReqJ_rements
AC120V,60Hz
PowerConsumption
28W
Weigh1
6.3 Ibs
Dimensions
16.9(W)X 10.6(%X2.3(H)inches
Operating
Temperature
Range
+41°Fto +95°F
Operating
HumidityRange
10%to75%
BD(Blumay
Disc)
ReadingSpeed:4.917m/sec
ReadingSpeed:3.49 - 4.06m/sec.
DVD(DigitalVersatileDisc
Approx.PlayTime(SingleSided,SingleLayerDisc): 135rain.
ReadingSpeed:4.8 - 5.6 m/sec.
CD:5 inches,COMPACT
DISC)
CD. 3 1/2 ncnesCOMPACT
DISC
MaximumPlayTime:74 rain.
ReadingSpeed:4.8 - 5.6 m/sec.
MaximumPlayTime:20 rain.
1 channel:1.0 Vp-p(75Oload)
Composite
Video
Blumay/DVD
Disc:480i
Y: 1.0Vp-p(75Oload)
Pr: 0.70Vp-p(75Oload)
Component
Video
Pb: 0.70Vp-p(75Oload)
BlumayDisc: 1080i,720p,480p,480i
HDMI
DVD:480p,480i
10SOp,1080i,720p,480p
PCMmultichannel
audio,Bitstream
audio
2 Channel
h(1/h),R(2/R)
DigitalAudioOutput
Optical
48 kHzSampling: 4 Hzto 22 kHz
*Frequency
Response
96 kHzSampling: 4 Hzto 44 kHz
*S/NRatio
11ODD
*Dynamic
Range
lOOdB
*TotalHarmonicDistortion
0.003%
*: Nominal specification
- Samsung Electronics Co., Ltd reserves the right to change the specifications without notice.
- Weight and dimensions are approximate.
64 appendix
COPY PROTECTION
BecauseAACS (AdvancedAccess Content System)
is approved ascontent protection systemfor Blu-ray
Discformat, similarto use of CSS(Content
ScrambleSystem)for DVDformat, certain
restrictionsare imposedon playback,analog signal
output, etc., of AACS protected contents.The
operationof this product and restrictionson this
product may vary dependingon yourtime of
purchaseas those restrictionsmay be adopted and/
or changed byAACS afterthe productionof this
product. Furthermore,BD-ROMMark and BD+ are
additionallyusedas content protection systemfor
Blu-rayDisc format, which imposescertain
restrictionsincludingplaybackrestrictionsfor BDROM Mark and/or BD+ protected contents.To
obtain additionalinformationon AACS, BD-ROM
Mark, BD+, or this product, pleasecontact
SAMSUNGcustomer care center.
Many Blu-rayDisc/DVDdiscs are encoded with
copy protection.Because of this, you shouldonly
connect your Blu-rayDiscPlayerdirectlyto your TV,
not to a VCR. Connectingto a VCR resultsina
distorted picture from copy-protected Blu-rayDisc/
DVD discs.
This product incorporatescopyrightprotection
technologythat is protected by methods claimsof
certain U.S. patentsand other intellectualproperty
rightsowned by MacrovisionCorporation and other
rightsowners. Useof this copyright protection
technologymust be authorizedby Macrovision
Corporationand is intendedfor home and other
limitedviewing uses only, unlessotherwise
authorizedby MacrovisionCorporation. Reverse
engineeringor disassemblyis prohibited.
,, Thisdeviceis protectedby U.S.PatentNos.6,836,549;
6,o81,747;7,050,698;6,516,1o2,and5,580,936.
,, Underthe U.S.Copyrightlaws and Copyright laws
of other countries,unauthorizedrecording, use,
display,distribution, or revisionof television
programs, videotapes,Blu-rayDiscs, DVDs,and
other materialsmay subjectyou to civiland/or
criminalliability.
,, For Blu-ray Disc Players progressive scan
output : CONSUMERSSHOULDNOTETHAT NOT
ALL HIGH DEFINITIONTELEVISIONSETSARE
FULLYCOMPATIBLEWITHTHISPRODUCTAND
MAYCAUSEARTIFACTSTO BE DISPLAYEDIN
THE PICTURE.IN CASE OF PROGRESSIVESCAN
PICTUREPROBLEMS,IT IS RECOMMENDED
THATTHE USERSWITCHTHE CONNECTIONTO
THE 'STANDARDDEFINITION'OUTPUT.IFTHERE
AREQUESTIONSREGARDINGOUR TVSET
COMPATIBILITYWITHTHISPRODUCT,PLEASE
CONTACTOUR CUSTOMERSERVICECENTER.
Compliance
and Compatibility
Notice
NOT ALL discs are compatible
,, Subjectto the restrictionsdescribedbelowandthosenoted
throughoutthis Manual,includingthe DiscTypeand
Characteristicssectionof thisManual,disctypes thatcanbe
playedare:pre-recordedcommercialBD-ROM,DVD-Video,
and
AudioCDdiscs;BD-RE,BD-R,DVD-RW/ DVD-Rdiscs;and
CD-RW/CD-R
discs.
• Discsotherthan the above cannot and/or is not intendedto
be played by this player.And some of the above discs may
not play due to one or more reasons providedbelow.
,, Samsungcannot assurethat this playerwill play everydisc
bearingthe BD-ROM,BD-RE,BD-R, DVD-Video,DVD-RW/
DVD-RandCD-RW/CD-RIogos,and this playermay not
respondto all operatingcommands or operateall featuresof
everydisc.Theseand otherdisc compatibilityand player
operationissueswith new and existingformat discsare
possiblebecause:
- Blu-rayis a new and evolvingformat and this playermay
not operate all featuresof Blu-ray Discsbecausesome
features may be optional,additionalfeatures may have
been added to the Blu-rayDiscformat after the production
of this player,and certainavailablefeatures may be subject
to delayed availability;
- not all new and existing disc format versionsare supported
by this player;
- new and existingdisc formats may be revised,changed,
updated, improved and/or supplemented;
- some discs are produced ina mannerthat allowsspecific
or limited operation andfeature during playback;
- some features may be optional, additionalfeatures may
have been added after the production of this playeror
certain availablefeatures may be subject to delayed
availability;
- some discs bearing the BD-ROM, BD-RE, BD-R,
DVD-Video,DVD-RW/DVD-Rand CD-RW/CD-RIogos
may stillbe non-standardizeddiscs;
- some discs may not be playeddepending on their physical
state or recording conditions;
- problemsand errors can occur duringthe creationof Bluray Disc, DVDsoftwareand/or the manufactureof discs;
- this player operates differentlythan a standard DVDplayer
or other AV equipment;and/or
- for reasons noted throughout this Manualand for other
reason(s)discoveredand posted by SAMSUNGcustomer
care center.
• Ifyou encounter disc compatibility or playeroperation
problems, pleasecontact SAMSUNGcustomer care center.
You may also contact SAMSUNGcustomer carecenter for
possible updateson this player.
• Foradditionalinformationon playback restrictionsand disc
compatibility,referto the Precautions,Before Readingthe
User's Manual,DiscTypes and Characteristics,and Before
Playingsections of this Manual.
English 65
iiiiiiii
iiiiiii
iiiiiii
iiiiiii
iiiiiii
iiiiiii
iiiiiiiiii
iiiiiiii
iiiii@i
This SAMSUNG brand product, as supplied and distributed by SAMSUNG ELECTRONICS AMERICA, INC. (SAMSUNG) and delivered
new, in the original carton to the original consumer purchaser, is warranted by SAMSUNG against manufacturing defects in materials and
workmanship
for the following limited warranty period:
One (1} Year Parts / Ninety Days (90} Labor
This limited warranty begins on the original date of purchase, and is valid only on products purchased and used in the United States, and
does not include transportation, installation, removal or reinstaltation. Warranty repairs must be performed by SAMSUNG's authorized
service center. To receive warranty service, the original dated bill of sale must be presented upon request as proof of purchase to
SAMSUNG or SAMSUNG's authorized service center. Transportation to and from the service center is the responsibility of the purchaser.
SAMSUNG will repair or replace this product, at our option and at no charge with new or reconditioned parts, if found to be defective
during the limited warranty period specified above. The product must be returned during the warranty period with transportation charges
prepaid to SAMSUNG's designated service center. Prior to returning any product for warranty service, the purchaser must contact
SAMSUNG for problem determination and service procedures. SAMSUNG does not warrant uninterrupted or error-free operation of the
product.
All replaced parts and products become the property of SAMSUNG and must be returned to SAMSUNG. Replacement parts and products
assume the remaining original warranty, or ninety (90) days, whichever is longer.
This limited warranty covers manufacturing defects in materials and workmanship encountered in normal, noncommercial use of this
product and shall not apply to the following, including, but not limited to: damage which occurs in shipment; applications and uses for
which this product was not intended; failures or problems which are caused by products or equipment not supplied by SAMSUNG;
accidents, misuse, abuse, neglect, misapplication, fire, water, lightning or other acts of nature; incorrect electrical line voltage, fluctuations
or surges; damage caused by improper or faulty installation; improper connection with any peripheral; product alteration or modification;
improper or unauthorized repair; cosmetic damage or exterior finish; product with altered serial numbers; failure to follow operating
instructions, customer adjustments, maintenance and environmental instructions that are covered and prescribed in the instruction book;
use of non-SAMSUNG or unauthorized parts, supplies, accessories or equipment which damage this product or result in service problems;
failures or problems due to incompatibility with other equipment.
No person, agent, distributor, dealer or company is authorized to change, modify or extend the terms of these warranties in any manner
whatsoever. The time within which an action must be commended to enforce any obligations of SAMSUNG arising under the warranty or
under any statute, or law of the United States or of any state thereof, is hereby limited to ninety (90) days from the date you discovered or
should have discovered the defect. This limitation does not apply to implied warranties arising under state law, if any.
SAMSUNG does not warrant (i) disc compatibility with new and existing format discs or (ii) error free playback in full compliance with
specifications of the compatible disc formats, and SAMSUNG shall not be liable for any data loss recorded in your discs.
SAMSUNG's responsibility shall be limited to appropriate warranty services during the warranty period through SAMSUNG customer care
center. If you encounter compatibility or data toss problems, please contact SAMSUNG customer care center.
THERE ARE NO EXPRESS WARRANTIES OTHER THAN THOSE LISTED AND DESCRIBED ABOVE, AND NO WARRANTIES
WHETHER EXPRESS OR IMPLIED, INCLUDING, BUT NOT LIMITED TO, ANY IMPLIED WARRANTIES OF MERCHANTABILITY OR
FITNESS FOR A PARTICULAR PURPOSE, SHALL APPLY AFTER THE EXPRESS WARRANTY PERIODS STATED ABOVE, AND
NO OTHER EXPRESS WARRANTY OR GUARANTY GIVEN BY ANY PERSON, FIRM OR CORPORATION WITH RESPECT TO
THIS PRODUCT SHALL BE BINDING ON SAMSUNG. SAMSUNG SHALL NOT BE LIABLE FOR LOSS OF REVENUE OR PROFITS,
FAILURE TO REALIZE SAVINGS OR OTHER BENEFITS, OR ANY OTHER SPECIAL, INCIDENTAL OR CONSEQUENTIAL DAMAGES
CAUSED BY THE USE, MISUSE OR INABILITY TO USE THIS PRODUCT, REGARDLESS OF THE LEGAL THEORY ON WHICH
THE CLAIM IS BASED, AND EVEN IF SAMSUNG HAS BEEN ADVISED OF THE POSSIBILITY OF SUCH DAMAGES. NOR SHALL
RECOVERY OF ANY KIND AGAINST SAMSUNG BE GREATER IN AMOUNT THAN THE PURCHASE PRICE OF THE PRODUCT
SOLD BY SAMSUNG AND CAUSING THE ALLEGED DAMAGE. WITHOUT LIMITING THE FOREGOING, PURCHASER ASSUMES
ALL RISK AND LIABILITY FOR LOSS, DAMAGE OR INJURY TO PURCHASER AND PURCHASER'S PROPERTY AND TO OTHERS
AND THEIR PROPERTY ARISING OUT OF THE USE, MISUSE OR INABILITY TO USE THIS PRODUCT SOLD BY SAMSUNG NOT
CAUSED DIRECTLY BY THE NEGLIGENCE OF SAMSUNG. THIS LIMITED WARRANTY SHALL NOT EXTEND TO ANYONE OTHER
THAN THE ORIGINAL
PURCHASER
OF THIS PRODUCT,
IS NONTRANSFERABLE
AND STATES YOUR EXCLUSIVE
REMEDY.
Some states do not allow limitations on how long an implied warranty lasts, or the exclusion or limitation of incidental or consequential
damages, so the above limitations or exclusions may not apply to you. This warranty gives you specific legal rights, and you may also
have other rights which vary from state to state.
To obtain warranty service, please contact SAMSUNG customer care center.
Contact SAMSUNG WORLD WIDE
If you have any questions or comments relating to Samsung products, please contact the SAMSUNG customer care
center.
!_!_!_!_!!l!l!l_!:_!!!_i_i_!_ii_ii_ii_ii_i_i_i_ii_!_!_!_i_!!_!_!_ii_!_!_i_!i_i_i_i
¸_i!_i!_i_i_i!_!_!i_!i_i_i_i_iii!_!!_i_i_!_!!_!i_!_!!_i!_!!!_!!
iiii_!_!_i!_i_i_!_!i_!i_!_!_!_!_!_!_!_
¸!_!_i_!i_i_i_i_i_i_i_i_i_i_i_i_
!iii!i!i!i!i:i!i!i:i!ili
¸ii_ii
¸ii_i!iiiiii_ii!i!!i_!i!iii_i_!i_ii!i_i_!i!ii_i_!i_i!ii_iiii_ii!i!_i_ii_ii_i_!i_i!!i_!!ii_i_i_i_i_!i_!i_i_i_!i_!_!_!
North
Latin
Amedca
America
CANADA
1-800-SAMSUNG(726_7864)
www.samsung.com/ca
MFXICO
01-800-SAMSUNG(726_7864)
www.samsung.com
U.S.A
1-800-SAMSUNG(726_7864)
www.samsung.com
ARGENTINE
0800-333-3733
www.samsung.oom/ar
BRAZIL
0800-124-421
CHILE
800-SAMSUNG(726-7864)
NICARAGUA
00-1800-5077267
HONDURAS
800-7919267
COSTA RICA
0-800-507-7267
www.samsung.comAafin
ECUADOR
1-800-10-7267
www.samsung.comAafin
EL SALVADOR
800-6225
www.samsung.comAafin
GUATEMALA
1-800-299-0013
www.samsung.cornAatin
JAMAICA
1-800-234-7267
www.samsung.comAafin
PANAMA
800-7267
www.samsung.comAafin
PUERTO RICO
1-800-682-3180
www.samsung.oomAafin
REP. DOMINICA
1-800-751-2676
TRINIDAD & TOBAGO
1-800-SAMSUNG(726_7864)
www.samsung.comAafin
www.samsung.comAafin
VENEZUELA
0-800-100-5303
www.samsung.comAafin
COLOMBIA
01-8000112112
www.samsung.oom.co
BELGIUM
0032 (0)2 201 24 18
www.samsung.oom/be
, 4004-0000
www.samsung.com
www.samsung.oom/d
844 000 844
OZEOHREPUBUO
DENMARK
70 70 19 70
FINLAND
030-6227
FRANCE
Europe
CIS
Asia
Middle
Pacific
East &
Africa
Distributor pro Ceskou republiku:
Samsung Zrt., _eska organiza6ni slo2ka
Vysko8ilova 4, 14000 Praha 4
www.samsung.com/dk
515
3260 SAMSUNG
www.samsung.com/oz
www.samsung.com/fi
(_ 0,15/Min),
www.samsung.com
08 25 08 65 65 (_ 0,15/Min)
GERMANY
01805-
HUNGARY
06-80-SAMSUNG(726-7864)
www.samsung.com
ITALIA
800-SAMSUNG(726-7864)
www.samsung.com
LUXEMBURG
0035 (0)2 261 03 710
NETHERLANDS
0900-SAMSUNG(726-7864)
NORWAY
815-56
POLAND
0 801 801 881 , 022_607_93_33
www.samsung.com/pl
PORTUGAL
80820_SAMSUNG(726-7864)
www.samsung.corn/pt
SLOVAKIA
0800-SAMSUNG(726-7864)
www.samsung.com/sk
SPAIN
902 10 11 30
www.samsung.corn
SWEDEN
0771-400
U.K
EIRE
0845 SAMSUNG
0818 717 100
AUSTRIA
0800-SAMSUNG(726-7864)
www.samsung.com/at
SWITZERLAND
0800-SAMSUNG(726-7864)
www.samsung.com/ch
RUSSIA
8-800-555-55-55
www.samsung.com
KAZAHSTAN
8-10-800-500-55-500
www.samsung.kz
UZBEKISTAN
8-10-800-500-55-500
www.samsung.uz
KYRGYZSTAN
00-800-500-55-500
TADJIKISTAN
8-10-800-500-55-500
UKRAINE
8-800-502-0000
www.samsung.com
LITHUANIA
8-800-77777
www.samsung.lt
LATVIA
800-7267
www.samsung.comAv
ESTONIA
AUSTRALIA
800-7267
www.samsung.ee
www.samsung.com
NEW ZFALAND
0800SAMSUNG(726-7864)
CHINA
800-810-5858,010-6475
HONG KONG
3698-4698
www.samsung.com/hk
INDIA
3030 8282 , 1800 110011
www.samsung.corn
INDONESIA
0800-112-8888
www.samsung.com
JAPAN
0120-327-527
www.samsung.com/jp
MALAYSIA
1800-88-9999
www.samsung.com/my
PHILIPPINES
1800-10-SAMSUNG(726-7864)
www.samsung.com/ph
SINGAPORE
1800-SAMSUNG(726-7864)
www.samsung.com
THAILAND
1800-29-3232,02_689-3232
www.samsung.com
TAIWAN
0800-329-999
www.samsung.com/tw
VIFTNAM
1 800 588 889
www.samsung.corn
TURKEY
444 77 11
SOUTH AFRICA
0860-SAMSUNG(726-7864
U.A.E
800-SAMSUNG
SAMSUNG(726-7864)(_
0,14/Min)
www.samsung.com
w_,_v.samsung.com/be
(_ 0,10/Min)
480
www.samsung.com/nl
www.samsung.com/no
200
www.samsung.com/se
(7267864)
www.samsung.com
www.samsung.corn/ie
1300 362 603
www.samsung.com/nz
1880
www.samsung.corn
www.samsung.corn
(726-7864),
)
www.samsung.com
8000-4726
_w.samsung.com
QUESTIONS
OR COMMENTS?
I ¸
COUNTRY=
I
CALL
I
OR VISIT US ONLINE AT
1-800-SAMSUNG
IN THE US
(7267864)
WRITE
Samsung Electronics America, Inc.
www.samsung.com
105 Challenger Road Ridgefield Park,
NJ 07660-0511
AK68-01608A