1
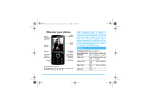
User’s manual
C1 & C8
E-tricycle user’s manual
Copyright of the user’s Manual is reserved by E-Bikes from Sweden.
Descriptions and photos contained in the Maintenance Manual are for
reference only. They may differ from the products.
Before using our product, please read this manual carefully and
correctly realize the basic operation function and method. Technical
specifications, performance parameters as well as maintenance and
adjustment data in the Manual are determined as per the latest situations,
which may become out-of-date as future modifications are made to the
product. Please understand that we will not give any notification in this case
and we will not take any consequent responsibility. Copyright of any part of
the Manual is the property of E-Bikes from Sweden. Any unit and individual
may not reproduce any part of the Manual without written consent of EBikes from Sweden. Any suggestion or advice as for the design,
manufacturing, quality, etc. of the e-tricycle will be welcomed for timely
improvement.
In any case want to further understanding our product,please contact
local service center or Service hot line, we will provide you top quality and
efficient service.
Before using our product,please read this manual carefully
danger
1.Strictly abide by the traffic laws and keep safe
driving.
2.To keep safe,forbid driving after consume
alcohol or any drugs.
3.Forbid take to any competition,we will not take
any responsibility due to the competition caused
mechanical accident and pensonal injury.
4.Forbid cardiopath,deaf-mute,disable and
people have or ever had mental disease to drive
this vehicle.
warning
1.Wearing protection equipment like
helmet,glasses,glove etc.
2.Forbid hanging things on the handlbar which will
affect driving safty.
3.Please choose our oringinal adapted
charger,otherwise may damage battery.
4.Forbid wearing loose clothes or babooshs which
easy to hook on the pedals.
attention
1.The maximum loading capability is 250kg。
2.Do not introduce any unauthorized modification
on the vehicle that will affect reliability,stability,and
comfort performance.
3.To avoid battery damage,full charge the battery
at one time,do not put upside down during
charging,do not use high pressure water wash this
vehicle in case any damage on electric component
which will increase the acaccident risk
suggestion
1.This manual is one of a must-have,you should
attached it when you resell this vehicle to others.
2.Full charge the battery to avoid damage in case
of you will not use this vehicle for a long time.
3.Do not lend this vehicle to who are not know
how to operation.
1.instrument
2.Front shock absorber
3.Front brake
4.Front wheel
5.Parking brake pedal
6.Seat
7.Cargo box
8.Rear left wheel
9.Tail lamp
■we are not mention all category due to a continuous improvement
Instrument
Function of instrument indicated as below:
items
Function description
1.Speed meter
Display the vehicle speed
2.Left turn
signal
When the left turn signal light
open, the”
” flashing
3.Right turn
signal
When the right turn signal light
open, the”
” flashing
4.High beam
signal
When the high beam open, the
“
”light
5.electricity
meter
Display the current electric
energy, when the red light
flashing means energy quite low
need recharge asap
6.Ignition lock
When the key turn to”
”,
circuit open to be start up, the
key can’t took out. When the
key turn to”
”, circuit close
not able to be start up, the key
is free to take out
Right switch assembly
Function of Right switch indicated as below:
items
Function description
1.Lights switch
Switch to”
” ,the front light
circuit open. Switch to”
” ,the
instrument backlight, tail lamp,
position light circuit open.
Switch to” ● ” ,the lighting
system close
2.Reversing
light
Switch to left to be move
forward, switch to right to be
move reverse
3.Acceleration
grip
Control the speed of vehicle
Left switch assembly
Function of Left switch indicated as below:
items
Function description
1.dimmer switch
When you need high beam,
switch to”
”, When you need
low beam, switch to”
”.
2.turn light
switch
When you change the driving
direction, witch to” ” the left
turn light turn on, witch to” ”
the right turn light turn on
3.Horn button
When you need sound horn,
press” ”button.
Charger and battery
Charge the battery
first well connect the out put plug of charger to
the input plug seat, then put the input plug of
charger to the power socket. you will find red light on
charger is turn on that means in charging, after 7to 8
hours, the green light will turn on indicate full
charged,you may keep charging for 1 to 2 hours to
finish. To finish charging, first you should shut down
the charger power then take off the plug from battery
input plug seat. choose our original charger or
appointed charger.
Charger and battery
Attention:
1.The rated voltage and current must match with the charger during charging, and the pole of the plugs and plug seat must
stay the same, otherwise will damage the battery.
2.Make sure the charger away of water and humidity, store and use in dry environment, handled with care.
3.Do not put battery in a closed container, do not close to blazing fire, do not throw to fire and water, do not direct expose
to solarization.
4.Must replace the battery when the case broke or found leakage.
5.The ambient temp should keep within 10℃~30℃ and keep well-ventilated during charging, high temp will affect the
charge efficiency, even caused salinization of solution and then damage the battery.
6. When failure happen, must let the specialized persons to handle.
7.Do not throw waste battery to fire and water, callback following local laws and regulations.
Warning:
1.Forbid touching or opening the charger due to a high voltage current to avoid electric shock.
2.During charging, the charger will emit heat, to avoid fire disaster or explosion and lead personal injury, keep charging at
well-ventilated position, do not close to inflammable and explosive like carpet, wooden floor etc.
3.At the case of the indication light do not change the color( to green) more than 8 hours, keep indicating red, stop
charging immediately and take to service department to inspect.
check-up before use
Check-up according the below items to ensure drive safety
No.
items
Check-up content
1
battery
whether the battery have enough power
2
Transmission device
Whether the propulsion motor and controller is work properly
3
lubrication oil
Whether the lubrication oil go bad; whether the volume is enough
4
brake pedal
whether the drop and engage are normal
5
shock absorber
whether the suspension is work properly
6
Acceleration grip
check the flexibility of acceleration grip
7
steering mechanism
Check the flexibility and stability of steering mechanism
8
tyre / wheel
Check the pressure and wearing situation
9
lighting and signal indication
Check all lighting lamp, signal light and indicating lighting,
whether they are work properly
10
brake
Check the wearing of the brake shoe, whether the brake
performance are good
11
Standard fasteners
Whether have any loose or fall off
Driving operation
items
instructions
1. Ignition lock
(open)
When the key turn to”
open to be start up
”, circuit
2. Acceleration
grip
Lightly Turn the grip to rear side
(anticlockwise), the speed smoothly
change from 0~20km/h
When arrive at the destination, park the vehicle to a flat
place, turn the key to ”
”,take off key, draw back parking
brake pedal, lock the vehicle to keep safety
warning
In the situation of “motor overspeed”, use left hand grasp
the brake pedal to stop the vehicle immediately and use
right hand to shut down power, took off the key, push the
vehicle to the service department to inspect
rear brake
Rear brake adopt drum brake, stable brake performance,
safe and reliable. maintenance of drum brake should follow
the below procedure:
1.Check the free stroke of rear brake pedal ,ensure the
free stroke within the standard value
2.When found the return of pedal not well or interference
with others, disassemble the rear brake machanism to
inspect and add lubrication oil
3.Release the tight nut of connecting rod, adjust the nut to
rear direction until the free stroke of pedal reach the
standard scope, then press the pedal for a few times and
check the rear whether it can be rotating freely.
Standard scope of rear brake pedal:20mm~30mm
attention
1.Must verify the free scope of rear brake pedal after
reassemble the rear wheel.
2.Choose our original parts when you need change the
brake shoe.
3.Maintenance in our service department termly
propulsion motor
This vehicle adopt DC brushless motor, provide strong climbing capability, high speed, low
driving current, long range, good slide effect
1.Water go into the motor will decrease the insulation, in that
case, disassemble the motor and leak the water, then use blower
or solarization to dry it, after this check the resistance and
repeat the operation to check the sensor, replace it when found
damage.
2.Must ensure the battery have enough power, otherwise, will
affect the consecutive running range and driving power of motor.
attention
Low speed brush motor and high speed brush motor can
not exchange directly
Low speed brushless motor and high speed brushless
motor can not exchange directly
NO.
Failure
reason
Remove method
1
Acceleration grip out
of order or can’t reach
the Max. speed
Battery voltage below level, wire loose
inside the grip, spring inside the grip is
stucked or not work
Recharge the battery, welding the wire,
clean or replace the grip
2
Motor not work when
power on
Battery voltage below level, wire loose
inside the grip, connecting plug of
motor have loose or damaged
welding the wire, look for professional of
service department to repair
3
consecutive running
range below level
Tyre pressure is not enough, not full
charged or charger fault, too much
upslope, large adverse wind,
frequently brake, loading too much,
battery ageing or damaged
Full charge battery, check the connecting
plug, replace battery
4
Charger can not work
the charger has no power input or plug
not well connected with plug seat, the
fuse of charger or battery box has
burn ,connecting wire of battery loose
Fix plug and plug seat, replace fuse,
welding connecting wire
5
others
internal breakdown of motor, controller,
charger, battery
look for professional of service
department to repair, do not open it by
yourself, otherwise will lose our quality
guarantee
electrical schematic diagram
technical specification and performance parameter
项目
500W
650W
800W
Dimension(mm)
2830×950×1050
2830×950×1050
2830×950×1050
Ground Clearance (mm)
125
125
125
Curb Weight (kg)
180
180
180
Load Capacity (kg)
200
200
250
Energy Consumption per 100KM(kw.h)
1.5
1.5
1.5
Max. Speed (km/h)
≤40
≤40
≤40
Max Climbing Capacity(°)
≥8
≥8
≥8
Range (km)
≥ 40
≥ 40
≥ 40
Max. Driving Noise (db A)
≤65
≤65
≤65
battery
Capability (Ah)
20
20
20
Rated voltage (v)
60
60
60
type
Brushless DC
Differential motor
Brushless DC
Differential motor
Brushless DC
Differential motor
Rated voltage (v)
60
60
60
500W
650W
800W
gear-box & Gearshift
Available (optional)
Available (optional)
Available (optional)
Under Voltage Protection (V)
52
52
52
Over Current Protection (A)
45
45
45
Blockage Protection
Available
Available
Available
Brake Mod
low-level logic
low-level logic
low-level logic
Reverse Function
Available
Available
Available
Motor
Rated consecutive
power output
technical specification and performance parameter
项目
1000W
1500W
2000W
Dimension(mm)
2830×950×1050
3110×1100×1250
3110×1100×1250
Ground Clearance (mm)
125
130
130
Curb Weight (kg)
180
400
430
Load Capacity (kg)
250
400
500
Energy Consumption per 100KM(kw.h)
1.5
2
2.5
Max. Speed (km/h)
≤40
≤40
≤40
Max Climbing Capacity(°)
≥8
≥12
≥15
Range (km)
≥ 40
≥ 40
≥ 40
Max. Driving Noise (db A)
≤65
≤65
≤65
battery
Capability (Ah)
20
120(optional)
120(optional)
Rated voltage (v)
60
60
60
type
Brushless DC
Differential motor
Brush DC
Differential motor
Brush DC Differential
motor
Rated voltage (v)
60
60
60
1000W
1500W
2000W
gear-box & Gearshift
Available (optional)
N.A
N.A
Under Voltage Protection (V)
52
N.A
N.A
Over Current Protection (A)
45
N.A
N.A
Blockage Protection
Available
N.A
N.A
Brake Mod
low-level logic
low-level logic
low-level logic
Reverse Function
Available
Available
Available
Motor
Rated consecutive
power output