1
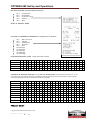
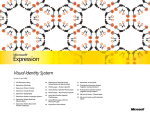
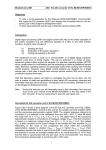
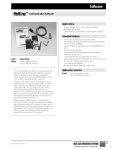
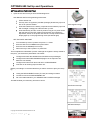
OPTIMAS 680 Set Up and Operations
SETTING UP FOR THE FIRST TIME
1. Open the box and check you have the following items
User Manual and Text Programming insert sheet.
57mm thermal roll
Two key sets OP (operator) and MA (manager) Drawer Keys (to lock
but not to open the drawer
Insert the batteries in the battery compartment and load the paper roll
with a straight cut edge just under the take up roller.
Insert the MA key and turn to the P position. Plug in to a power outlet
with the switch in the OFF position and now with the CLEAR key
depressed, switch on the power and wait till a receipt issues and the
display lights up in the programming mode (see below right)
SET THE DATE AND TIME
Cash Register Image
Contents of Box
Turn the MA key to the P position and press 1 > CASH
Enter the date as YYYYMMDD and press CASH
Enter the time as HHMM (24 hr format)
Return the key to the R position or press ESC
This completes the initialization process. Although the register is strictly usable at
this point, you will need to personalise it as follows
Configure and enter the HEADER and FOOTER receipt messages
Configure and name DEPARTMENTS (flag for tax as required. The
default is non taxable)
Configure and name PLU items and link to a DEPARTMENT
Test and run all clearing reports before use.
Batteries Installed
Before proceeding it is recommended that you take a moment to plan your setup
by ;
Listing the DEPARTMENT names (12 Char) and noting tax status
List the PLU items and DEPARTMENT link
Fill in the tables below for your HEADER and FOOTER messages
This will facilitate your data entry and reduce errors.
Initialization Receipt
Half Reset Receipt
Copyright 2011 SYDNEY CASH REGISTERS PTY LTD
Pageof
Page
1
of 4
OPTIMAS 680 Set Up and Operations
RECEIPT HEADER uses the standard 5 lines for;
Line 1
Line 2
Line 3
Line 4
Line 5
Company Name
Street Address
City State Post Code
Separator --------Blank
BODY OF RECEIPT HERE
FOOTER or COMMERCIAL MESSAGE is configured for 10 lines for:
Line 1
ABN xx xxx xxx xxx
Line 2
*Indicates
Line 3
Taxable Supply
Line 4
Tax Invoice
Line 5
Blank
Line 6 Message
Line 7 Message
Line 8 Message
Line 9 Message
Line 10 Message
HEADER MESSAGE 5 LINES .Default setting when initialised
Company
Address
City State Code
Separator
*
*
*
*
*
*
*
*
*
*
*
*
*
*
*
*
*
*
*
*
*
*
Blank
COMMERCIAL MESSAGE (FOOTER) In Program mode Press 10>CASH>10>CASH
This will set lines to the maximum of 10. You can
now use lines 6 to 10 for your message. When you have completed your message press ESC and return the key to R position or continue to enter the
required text pressing CASH at the end of each entry then press ESC when you are done
ABN
A
B
N
*
I
N
D
I
C
A
Taxable Supply
T
A
X
A
B
L
E
Tax Invoice
T
A
X
I
N
V
*Indicates
Blank
Line 6
Line 7
Line 8
Line 9
Line 10
PRODUCT SET UP
Copyright 2011 SYDNEY CASH REGISTERS PTY LTD
Pageof
Page
2
of 4
T
O
E
S
S
U
P
I
C
E
P
L
Y
*
*
OPTIMAS 680 Set Up and Operations
SETTING THE DEPARTMENTS
Turn the MA key to the P position and press 2>CASH (Department Settings). Now enter the text from
your list and press CASH at the end of entry and you will automatically move to the next DEPT.
If the department is taxable use the DWN ARROW to navigate to the FLAG setting and RIGHT
ARROW to move to the last digit where you will enter 1. When you link a PLU to this department it will
show as taxable (see example above)
SETTING THE PLUs (Price Look Up Items)
Turn the MA key to the P position and press 3>CASH (PLU Settings). Now enter the text from your
list and press CASH at the end of entry and you will automatically move to the next PLU. Follow the
steps below to configure your items.
For PLU x press x DSGN and arrow down (where x= the required plu #)
Enter the TEXT and press CASH
Enter the PRICE and press CASH
Enter the Enter the department LINK and press CASH
Press ESC to finish then return the key to R position
NAVIGATION KEYS IN PROGRAM MODE
Most commonly used keys from the PROGRAMMING KEY SHEET
Use these keys on the programming keypad to
navigate thru the various settings in the programming
mode (Departments and PLUs)
Escape key to return to the main menu from any
submenu in programming menu. Next step from here
is to retun the key to R or L position to exit
programming
This is a navigation key to got to a specific dept or PLU
instead of using the PGUP or PGDWN key
Pressing this key when in the specific program mode
will print out the programming details
Use to step thru Departments or PLUs after you enter
that particular mode eg 2 >CASH then PGDN to go to
Dept 2 and so on. Use to edit existing programming
mostly.
This key is the same as the CASH key on the operation
keypad.
Copyright 2011 SYDNEY CASH REGISTERS PTY LTD
Pageof
Page
3
of 4
OPTIMAS 680 Set Up and Operations
the settings shown here are set on initialization and should not be changed.
Please contact SYDNEY CASH REGISTERS if you wish to make any
changes from the standard.
The report here is the FULL SALES REPORT .
If you want to see a breakdown by item then
please run the PLU report.
DEFAULT FLAG SETTINGS
SAMPLE Z REPORT
The display shows the required report number
so just enter that number and press CASH. Use
the PGDWN key to move down thru the reports
After you have checked and cleared your
reports, you can insert a USB drive in the back
of the unit and back up your programming data,
1 for everything except the PLU and 2 for the
PLU (this may take up to 15 min because it
backs up all 6000 items.
Back up your program to a USB by turning the key to Z and press 4 > CASH, 2 > CASH, 1 > CASH
(See also Page 69 of the manual but mainly follow the prompts on the display.
THAT’S IT
Copyright 2011 SYDNEY CASH REGISTERS PTY LTD
Pageof
Page
4
of 4