1
hypercyclic user guide
Page 1 of 28
hypercyclic 1.5
User Guide
(c) 2013 altalogix bvba - all rights reserved.
www.mucoder.com/hypercyclic
VST versions use VST Plugin Technology by Steinberg.
Standalone Windows version uses ASIO Technology by Steinberg.
VST and ASIO are a trademark of Steinberg Soft- und Hardware GmbH.
All other trademarks are the trademarks of their respective owners.
10/08/2013
hypercyclic user guide
Page 2 of 28
Table Of Contents
• Introduction
• Parameter Reference
◦ Midi Panel
◾ midi from
◾ channel (from)
◾ midi to
◾ channel (to)
◦ Trigger Panel
◾ step
◾ velocity
◾ gate
◦ Groove Panel
◾ groove
◾ width
◾ beats
◦ Arp Panel
◾ arp mask
◾ doubling
◦ LFO Panel
◾ LFO
◾ shape
◾ frequency
◾ per
◾ level
◾ dc offset
◾ phase
◾ noise
◾ pulse width
◦ Synth Panel
◾ gain
◦ Header Panel
◾ preset
◾ transport buttons
◾ bpm, time signature, songposition
◾ file button
◾ help button button
◦ Standalone Pull-down Menu
◾ File menu
◾ Settings menu
◾ Help menu
• Setting up hypercyclic with your host application
◦ Ableton Live 6.0.7 (Windows, Mac OSX)
◦ Cubase 4.0.3 (Windows, Mac OSX)
◦ Energy XT2 (Windows, Linux)
◦ Logic 7.2 Express (Mac OSX)
10/08/2013
hypercyclic user guide
Page 3 of 28
Introduction
Hypercyclic is an LFO-driven MIDI arpeggiator, gate effect and step sequencer for
mangling MIDI input chords. Two tempo-synced LFOs can be used to modulate various
parameters to create interesting rhythmhic effects and chord variations. A unique feature
is the possiblity to modulate the sequencer step size itself, which is useful for creating
glitchy stuttering effects.
The product is further complemented by a groove function for playing slightly off the beat.
The groove parameters can also be modulated over time by the LFOs, adding to the
rhythmic variation
The sweetspot for hypercyclic is the narrow border between chaos and regularity. Or, in
other words, how to induce a certain pleasant randomness, yet forcing everything to align
again on the bar or beat boundaries.
The main use for hypercyclic is to generate midi that can be recorded and/or sent to other
plugins. However it also features a simple built-in synth for testing purposes.
Supported platforms are Windows (standalone, vst), Mac (standalone, vst, au) and Linux
(standalone, vst).
10/08/2013
hypercyclic user guide
Page 4 of 28
Parameter Reference
MIDI Routing Panel
midi from This parameter controls where hypercyclic gets its midi input from.
You can choose from either the built-in options or from midi input
devices on your system. The built-in options are:
• Not connected. Hypercyclic will receive no midi input
• Demo me! (chords). Hypercyclic will receive midi from a built-in
polyphonic demo track, containing a set of sustained chords.
This will be looped.
• Demo me! (bass). Midi will be received from a built-in
monophonic demo track, containing a set of sustained single
notes. This will be looped.
• VST/AU host. Hypercyclic will receive midi from the VST or AU
host application. This does only apply to VST or AU plugin
versions.
• Configure... Select this to configure extra midi input devices that
are present on your system. This will show the midi settings
dialog box. In the left column, check any input devices you like
to use as direct input for hypercyclic. Then, when returning from
the dialog, select one of the new devices in the midi from
combo box.
This parameter can be assigned to the mouse wheel. Click on the
to assign or un-assign. Almost all other
mouse wheel button
parameters can be assigned to the mouse wheel this way, but only
one at a time. Note that your mouse cursor has to be somewhere
within the hypercyclic window boundary for this to work.
channel Selects the input channel (1..16) that hypercyclic will receive midi
(from) from. When set to All midi will be received from any channel. In case
of doubt leave it to the default setting of All.
midi to This parameter controls where hypercyclic sends its midi output to.
You can choose from either the built-in options or from midi output
devices on your system. The built-in options are:
• Not connected. Hypercyclic will not send any midi output
• VST host. Hypercyclic will send midi to the VST host
application. This does only apply to VST plugin versions.
Note: if the host supports it, this is the preferred way of
outputting midi to the host, providing lowest latency and good
integration with audio rendering/bouncing functions. If your
preferred host or plugin format (e.g. AU) does not support this,
then the only other option is to send midi to a so-called midi
loopback adapter. Midi sent to a loopback adapter can be
received elsewhere on your system, by selecting that same
10/08/2013
hypercyclic user guide
Page 5 of 28
loopback adapter as the midi input device. On Windows, a freely
available loopback adapter is Midi Yoke. On Mac OSX, a builtin
loopback adapter is available, called the IAC Bus. However,
some extra latency is to be expected from the detour via the
loopback adapter, and timing may fluctuate.
• Built-in test synth. Midi will be sent to a test synth built-in into
hypercyclic. This is a very simple device, but is useful for quick
checking if hypercyclic is working correctly. You are likely to
obtain better sonic results by routing midi to an external synth of
your choice, e.g. a VSTi or AU synth plugin.
• Configure... Select this to configure extra midi output devices
that are present on your system. This will show the midi settings
dialog box. In the right column, check any output devices you
like to use as direct output for hypercyclic. Then, when returning
from the dialog, select one of the new devices in the midi to
combo box.
channel (to) Selects the output channel (1..16) that hypercyclic sends midi to. In
case of doubt leave it to the default setting of 1.
10/08/2013
hypercyclic user guide
Page 6 of 28
Trigger Panel
step The step size controls the time interval between successively
triggered chords. The range is from once every 8 quarter notes to
once every 1/64th note. In the plugin versions, the speed is
synchronized with the host BPM setting. The standalone version
allows to set its own BPM value.
The trigger will fire only as long as hypercyclic is receiving midi and is
detecting note-on states. Or simply said, triggers fire as long as you
hold down at least one midi keyboard key. Also the hypercyclic
transport must be running for triggers to fire (see also the section
about the transport buttons in the header panel).
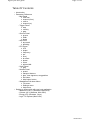
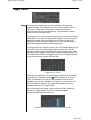
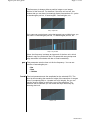
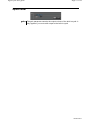
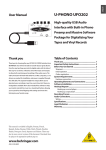
The trigger interval is visually shown in the LFO status display (top of
LFO panel). The LFO status display always shows the currently
playing bar. Each trigger is represented by a rectangle with a width
corresponding to trigger interval and a a height corresponding to the
LFO value at the start of the trigger interval. It's also indicated which
is the currently active trigger within the bar.
trigger interval = 1/8 note
This step size parameter can be modulated. Modulation is enabled
by clicking the modulation button
and selecting one of the two
LFOs. If modulation is turned on, the parameter control will be
disabled until you turn modulation off again. The current step size
after modulation is shown in the trigger status display, which is
located at the top of the trigger panel.
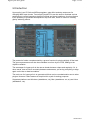
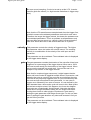
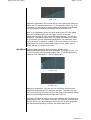
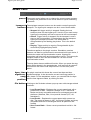
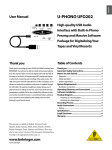
When modulated, the trigger interval varies over time, leading to
changes in trigger rhythm. This can be used for regular
accelerations/decelerations like this:
trigger interval is modulated by LFO sawtooth curve, no noise
10/08/2013
hypercyclic user guide
Page 7 of 28
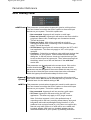
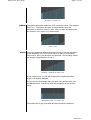
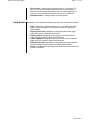
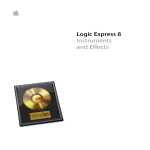
But even more interesting, if noise is turned up at the LFO, it can be
used for glitch-like effects (i.e. slight random deviations in trigger step
size):
as before, but with LFO noise set to 5%
Note that the LFO waveforms are sampled each time the trigger fires,
at which moment all modulated parameters receive their new value.
Therefore the longer the trigger interval, the slower the updates occur
to modulated parameters. This is no problem as all parameters only
have an effect at note-onset (e.g. velocity, pitch), but not during the
note itself. More about this in the section about the LFO panel.
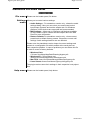
velocity This parameter controls the velocity of triggered notes. The higher
the parameter value, the louder the note will sound. The resulting
velocity is a combination of the velocity of the midi input and this
parameter.
This parameter can be modulated. The modulated value is displayed
in the trigger status display.
gate The gate parameter controls the duration of the note after it has been
triggered, as a percentage of the trigger interval. When set to 100%
the note sounds exactly for the duration of the trigger interval. When
set to zero the note will not sound at all. You can also set it to a
multiple of up to 400% of the trigger interval.
Note that for complex trigger sequences, it might happen that the
same midi note number is triggered multiple times in succession, and
whereby the note-on event for the next note occurs before the noteoff event of the previously triggered note. Or you could also say that
two note-on/note-off sequences are interleaved, i.e. two note-on
events occur followed by two note-off events. It is not defined by the
MIDI standard how a host and/or synth will react to this. Most synths
will activate multiple voices if this happens, but it can also happen
that notes are unintentionally foreshortened. Note also that some
hosts tend to merge interleaved notes into one single note before
routing them further to other plugins. Experiment in that case by
setting the gate parameter until things sound right. For this you best
start by setting the gate duration very short and increase it until you
get the effect you want.
This parameter can be modulated. The modulated value is displayed
in the trigger status display.
10/08/2013
hypercyclic user guide
Page 8 of 28
Groove Panel
groove The term groove refers to the practice of playing certain notes not on
the beat, but slightly earlier or slightly later. This can generate a
pleasant ('groovy') effect when combined with percussion or bass
tracks that are tightly fitting the beat. The groove parameter controls
how early or how late the triggered notes will sound. It ranges from -1
(about half a beat early) to +1 (about half a beat late).
This parameter can be modulated. The modulated value is shown in
the groove status display, at the top of the groove panel.
width The groove width parameter controls the zone around the beat
starting point to which groove is applied. Only within that zone,
triggers will be affected by the groove acceleration/delay. When set
to 1 the zone comprises about half a beat duration before and half a
beat duration after. Typically you would set it to a smaller value,
affecting only those triggers that are near enough to the grooved
beat. Listening and experimenting helps here.
Note that applying groove to a beat will not just move the trigger in
time, but affects time itself. For instance, when groove is negative
(the beat will come early) hypercyclic will actually accelerate time
until the position of the early beat is reached, and then slow down
time again gradually to get back to normal time after the early beat
has passed and before the next, non-grooved beat is due. The width
parameter then controls the width of the zone during which time is
compressed/expanded.
This parameter can be modulated. The modulated value is shown in
the groove status display, at the top of the groove panel.
beats The groove beats parameter controls which beats within a bar are
affected by the groove settings. You can select individual beats, but
also common combination of beats, such as the odd or even beats. If
you select no beats at all, groove will not be active.
This parameter can be modulated. The modulated value is shown in
the groove status display, at the top of the groove panel. Check out
the factory preset called 'groove tour'. This modulates the beat
parameter very slowly using a sawtooth curve spread over 32 bars.
The effect is that you get a slow walkthrough of all values of the beat
parameter which repeats every 32 bars. Varying the groove beat
pattern from time to time can freshen up an otherwise static rhythm.
10/08/2013
hypercyclic user guide
Page 9 of 28
Arp Panel
arp mask The arp mask parameter controls which notes of the source chord
are actually triggered. Suppose we play a source chord on our
keyboard consisting of three notes (a triad). If the arp mask is set to
Note 1, only the root note (lowest) of the triad will be triggered. If the
arp mask is set to Note 2, only the second note will be taken, etc. If
the arp mask is set to Note 1+2 both the first and the second note
will be triggered. And so forth. If the arp mask is set to All notes the
entire source chord will be used.
This parameter can be modulated. The modulated value is shown in
the arp status display, at the top of the arp panel.
Note that hypercyclic is different from traditional arpeggiators, in that
you will not find a parameter for setting the arpeggio pattern (up,
down, etc.). Instead, you would use modulation on the arp mask
parameter to obtain the same effect. For instance, applying a
sawtooth LFO curve to this parameter would generate an 'up'
arpeggio pattern, a triangular curve would generate an 'up-down'
pattern, etc. However, since you can tweak the LFO curve into more
complex forms, more complex patterns than this are possible. In
particular, you can also use the LFO to control the sequence of
combinations of chord notes, add random deviations, etc.
The drawback is that it takes some tweaking of LFO curves,
amplitude, DC offset and such to get the desired effect. On the
positive side, this experimentation can lead to less stereotypic and
sometimes surprisingly pleasant results.
doubling The doubling parameter controls whether or not extra octaves
(below), fifths (above) or fourths (below) are added to the triggered
chord. Combinations are also possible. The intervals generally are
not very dissonant, but the fifths and fourths might interfere with
certain scales and keys. So it's advised to listen first.
The doubling is applied to each note within the chord and only after
the arp mask has been applied to the source chord.
This parameter can be modulated. The modulated value is shown in
the arp status display, at the top of the arp panel.
10/08/2013
hypercyclic user guide
Page 10 of 28
LFO Panel
LFO These radio buttons control which one of the two low frequency
oscillators (LFO) is selected for editing. Both LFOs are continuously
runnning, but only the selected LFO will respond to the knobs in the
LFO panel.
shape The shape parameter controls the shape of the LFO waveform.
There is a choice of common waveforms, such as
•
•
•
•
•
Sawtooth up.
Sawtooth down.
Triangle.
Sine.
Square. Note that for this shape you can also vary the pulse
width (see next)
• Flat. This is a constant flat DC signal, not really a waveform. Is
useful with the DC offset parameter (see next) to give modulated
parameters constant values, e.g. to get an idea of their ranges.
Is also useful with the noise parameter (randomization, see next)
to create a random waveform that's equally distributed.
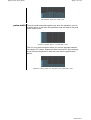
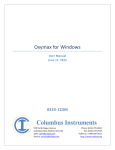
frequency The frequency is the number of times the LFO cycles through its
waveform per time unit. For instance, if the frequency is set to 1 and
the time unit to Bar, the waveform loops exactly once per bar. We
can also say that the wavelength of the LFO is 1 bar in that case.
You can spot this easily by looking at the LFO waveform display :
you will see that the curve of the waveform takes up the entire width
of the waveform display (which is always 1 bar long).
freq = 1 per bar
10/08/2013
hypercyclic user guide
Page 11 of 28
The frequency is always either a positive integer or an integer
division of the time unit. For instance if the time unit is a bar, this
means that you can have (increasingly faster) frequencies of 1 cycles
or wavelengths per bar, 2 wavelengths, 3 wavelengths, etc.
freq = 2 per bar
Or in case you want slower cycles that spread over multiple bars, you
can have 1/2 wavelengths per bar, 1/3 wavelengths per bar, etc.
freq = 1/2 per bar
(Note: the frequency is always an harmonic of the time unit, which
makes it easy to synchronize the LFO speed with song tempo and
align waveform boundaries with bar or beat boundaries).
per This parameter sets the time unit for the frequency. You can set
number of wavelengths per...
• Bar
• Beat
• 1/4 Note
level The level parameter sets the amplitude for the selected LFO. The
level is about scaling the maximum height of the waveform. It ranges
from 0 (completely flat) to 1 (scaled out to full height). So you can
use the level to flatten or raise the curve of the waveform. For
instance with a sawtooth you can make the slope less steep by
lowering the level.
level = 1.0
10/08/2013
hypercyclic user guide
Page 12 of 28
level = 0.75
Applied to modulation, this means that you can reduce the maximum
value the LFO samples reach from 1.0 to something lower, e.g. 0.75
Therefore you can use it to set the ceiling of the range of modulated
values that the modulated parameters will get from the LFO.
Note: it is enlightening to turn the level knob of the LFO and watch
how the modulated values of the trigger, groove and/or arp
parameters change in their respective status displays. You will see
that the 0..1 amplitude value of the LFO gets translated into a value
in the domain of those modulated parameters. For instance a value
of 0.5 at the LFO, results in a value of 50 for the velocity if velocity is
modulated. For this the flat waveform type is most useful, since it
keeps the values constant over time.
dc offset The DC offset parameter sets a constant amount to be
added/subtracted to/from the LFO amplitude. The range is from -1 to
1. If the resulting value becomes higher than 1 it will be clipped at 1.
Likewise if it's lower than 0, it will be clipped at 0.
dc offset = 0.5
dc offset = -0.5
Applied to modulation, you can use it to control the minimum and
maximum amplitude the LFO samples will have. Therefore you can
use it to control the floor and ceiling of the range of modulated values
that the modulated parameters will get from the LFO.
Typically, DC offset is used in conjunction with the level parameter to
fit the slope of the curve within the range. For instance, you can raise
the DC offset to 0.5 and decrease the level to 0.5 to get a slope that
still fits the window ceiling vertically, but which starts at 0.5.
10/08/2013
hypercyclic user guide
Page 13 of 28
dc offset = 0.5, level = 0.5
phase The phase parameter rotates the LFO waveform in time. The range is
from 0 to 1. The higher the value of the parameter the more
waveform is shifted to the left in time. Use it to align waveforms with
key events in your music (e.g. beat onsets).
phase = 0.25
noise The noise parameter adds a controlled amount of random deviation
to the amplitude of the LFO. When set to 0, there is no deviation.
When set to 100%, the deviation is maximized. The deviating values
are always clipped between 0 and 1.
waveform = sawtooth up, noise = 10%
At low noise levels, you will still recognize the original waveform
shape, only slightly distorted.
If it is just pure randomness that you need, you can best start from
the flat waveform. First set its level to the midpoint of the desired
value.
flat waveform, level = 0.5, noise = 0%
Then add noise to get controlled deviation around the midpoint.
10/08/2013
hypercyclic user guide
Page 14 of 28
flat waveform, level = 0.5, noise = 10%
pulse width The pulse width parameter applies only when the waveform is set to
a square wave. In that case this parameter sets the width of the peak
of the square wave.
waveform = square, level = 1.0, pulse width = 0.25
This is a very useful waveform when you need to alternate between
two steady LFO values. Experiment with level and DC offset setttings
to set the exact amplitude for both the pulse and the gap between
pulses.
waveform = square, level = 0.4, DC offset = 0.2, pulse width = 0.25
10/08/2013
hypercyclic user guide
Page 15 of 28
Synth Panel
gain The gain parameter controls the output volume of the built-in synth. It
only applies if you route midi output to the built-in synth.
10/08/2013
hypercyclic user guide
Page 16 of 28
Header Panel
preset The preset control allows you to change the current preset program.
Tip: assign this parameter to the mouse wheel for quick auditioning
of presets.
transport The stop/start transport buttons can be used to control hypercyclic
buttons transport. The hypercyclic transport can be in one of three states:
• Stopped. All trigger activity is stopped. Starting the host
transport does not start hypercyclic. Use this if you want to stop
hypercyclic completely and not be synced to the host transport.
• Armed. Trigger activity is stopped, but the transport is now a
slave to the host transport. If you start/stop the host transport,
hypercyclic transport will follow. The armed state is
recognizeable by the flashing play button. This is the default
state.
• Playing. Trigger activity is ongoing. Recognizeable by the
continuously highlighted play button.
The above applies to the plugin versions. Standalone versions
however can also be synchronized to an external midi input device, if
that device sends midi synchronization events. Hypercyclic
recognizes midi start, stop and song position events. The hypercyclic
transport needs to be in the armed state for it to react to midi
synchronization events.
The stop button has an additional function. When you press the stop
button while already in the stopped state, it will send an all-notes-off
command to the current midi output device. Use this as a panic
button.
bpm, time
signature,
song
position
For plugin versions this shows the current host bpm and time
signature settings. It also shows the current host song position in
bars, beats. For the standalone version, you can edit both the bpm
and the time signature fields, by clicking on them.
file button Clicking on the file button shows a pop-up menu with storage-related
functions:
• Load Preset Bank... Replaces the current preset bank with a
preset bank on disk. The bank is always in VST .fxb format.
Banks are binary compatible and can be exchanged across all
platforms (Windows, Mac, Linux) and all formats (VST, AU,
standalone)
• Load Preset... Replaces the current preset with a preset on
disk. The preset is always in VST .fxp format. Presets are binary
compatible and can be exchanged across all platforms and
formats
• Save Preset Bank... Saves current preset bank to disk in .fxb
format.
10/08/2013
hypercyclic user guide
Page 17 of 28
• Save Preset... Saves current preset to disk in .fxp format. Tip:
you can use the save/load preset functions as a copy/paste
function, by first saving a preset to disk, then changing current
preset no. and reloading the preset into the new preset slot.
• Rename Preset... Change name of current preset
help button Clicking on the help button shows a pop-up menu with help functions:
• Help... Opens the central help panel. You can also open/close
this panel by clicking on the small arrow at the top left of the
central panel.
• Hypercyclic home. Navigates to the hypercyclic home page
using the system's default web browser
• Online manual. Navigates to the hypercyclic online manual
page using the system's default web browser
• Latest updates. Navigates to the hypercyclic online download
page using the system's default web browser
• Download presets. Navigates to the hypercyclic online preset
download page using the system's default web browser
• About... Opens the central help panel and shows about box with
license information
10/08/2013
hypercyclic user guide
Page 18 of 28
Standalone Pull-down Menus
File menu Please see the header panel, file button.
Settings Allows you to control various settings:
menu
• Audio Settings... For standalone version only : shows the audio
settings dialog. Here you can select your sound card, select
input/output channels and set the sample rate. On Windows
platforms, ASIO devices are supported and recommended.
• Midi Settings... Allows you to configure midi devices available
for input and/or output. Please see the chapter about the Midi
Panel for more information.
• Restore Defaults For standalone version only : clears current
preset bank to default factory presets. Clears also current midi
settings. Audio settings however are not affected.
Please note: the standalone version keeps its current settings and
presets in a configuration file which resides at the usual place at
each respective platform. In case of problems you can delete this file
in order to revert to factory defaults.
• Windows Vista.
C:\Users\YourName\AppData\Roaming\hypercyclic
• Windows XP. C:\Documents and
settings\YourName\Application Data\hypercyclic
• Mac OSX. /users/YourName/library/preferences/hypercyclic
• Linux Ubuntu /home/YourName/.hypercyclic/hypercyclic
The plugin versions store their settings in their respective host project
files.
Help menu Please see the header panel, help button.
10/08/2013
hypercyclic user guide
Page 19 of 28
Setting up hypercyclic with your host application
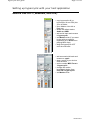
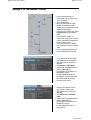
Ableton Live 6.0.7 (Windows, Mac OSX)
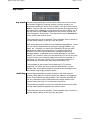
• copy hypercyclic.dll (or
hypercyclic.vst on OSX) into
your vst folder
• open Ableton Live with a
blank set
• delete the default tracks
Audio and MIDI
• add a midi track and rename
to hypercyclic
• set Monitor to In (if you want
to play with an external
keyboard; set to Auto when
playing MIDI clips)
• drag the hypercyclic VST
onto the midi track
• add a second midi track and
rename to synth
• drag a synth of your choice
onto the track
• set the combo MIDI From to
1-hypercyclic
• change the combo
immediately below from
Post-FX to hypercyclic
• set Monitor to In
10/08/2013
hypercyclic user guide
Page 20 of 28
• in hypercyclic change midi
to to VST host
• make sure the play button is
armed (flashing) in
hypercyclic (if not arm it by
pressing it once)
• in Live, press the play
transport button. You should
hear the demo chords
playing via your synth.
• in hypercyclic, change midi
from to VST/AU host
• make sure the play button is
armed (flashing) in
hypercyclic (if not arm it by
pressing it once)
• in Live, press the play
transport button.
• play your external keyboard.
You should hear what you
play processed by
hypercyclic and sent to your
synth
• in Live, on the hypercyclic
track, set Monitor to Auto
• add a midi clip to the
hypercyclic track
• start the Live midi clip. You
should hear the midi clip
processed by hypercyclic
and sent to your synth.
10/08/2013
hypercyclic user guide
Page 21 of 28
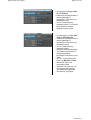
Cubase 4.0.3 (Windows, Mac OSX)
• copy hypercyclic.dll (or
hypercyclic.vst on OSX) into
your vst folder
• open Cubase
• select Empty as project type
• hit F11 to bring up the VST
Instruments list
• add hypercyclic as first VST
instrument
• answer create when asked
to associate a midi track with
this instrument
• add your synth of choice as
second VST instrument (e.g.
Halion)
• answer create when asked
to associate a midi track with
this instrument
• In Cubase, click on the
second midi track, the one
that is associated with your
synth
• click on the input symbol
for this track
• change it from All Midi
Inputs to hypercyclic
• still on this synth track, click
on the speaker symbol, and
make sure it's orange
• click on the hypercyclic midi
track
• click on the edit symbol
on the hypercyclic track
• the hypercyclic UI should
appear
• set midi to to VST host
• make sure the play button is
armed (flashing) in
hypercyclic (if not arm it by
pressing it once)
• hit the transport button in
Cubase. You should hear the
demo chords playing through
your synth
10/08/2013
hypercyclic user guide
Page 22 of 28
• if you don't hear anything
and you are using Halion :
don't forget to select a preset
for Halion
• click on the edit symbol
on the hypercyclic track
• the hypercyclic UI should
appear
• set midi from to VST/AU
host
• make sure the play button is
armed (flashing) in
hypercyclic (if not arm it by
pressing it once)
• hit the transport button in
Cubase.
• play on your external
keyboard : you should hear
what you play processed by
hypercyclic and sent to your
synth
• add a midi clip to the
hypercyclic track and start
the transport from the
beginning of that clip : you
should hear the midi clip
processed by hypercyclic
and sent to your synth
10/08/2013
hypercyclic user guide
Page 23 of 28
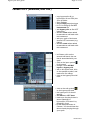
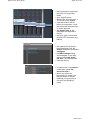
Energy XT2 (Windows, Linux)
• copy hypercyclic.dll (or
hypercyclic.so on Linux) into
your vst folder
• open EnergyXT2
• bring up the Comps view
• delete all samplers and
sequencers (leave midi input,
audio input/output)
• from the VST plugin list, drag
hypercyclic to the comps
view
• from the VST plugin or
comps list, drag your synth of
choice as second instrument
to the comps view
• from the comps list, drag a
new sequencer to the comps
view
• wire everything together as
in the illustration to the left
• in comps view double click
the hypercyclic component
• the hypercyclic UI should
appear
• set midi to to VST host
• make sure the play button is
armed (flashing) in
hypercyclic (if not arm it by
pressing it once)
• hit the transport button in
EnergyXT. You should hear
the demo chords playing
through your synth
• double click again on the
hypercyclic component
• the hypercyclic UI should
appear
• set midi from to VST/AU
host
• make sure the play button is
armed (flashing) in
hypercyclic (if not arm it by
pressing it once)
• hit the transport button in
EnergyXT2.
10/08/2013
hypercyclic user guide
Page 24 of 28
• play on your external
keyboard : you should hear
what you play processed by
hypercyclic and sent to your
synth (assuming your
keyboard was already set up
as midi input device in
EnergyXT2)
• in the sequencer component,
add a midi clip to the
hypercyclic sequencer track
and start the transport from
the beginning of that clip :
you should hear the midi clip
processed by hypercyclic
and sent to your synth
10/08/2013
hypercyclic user guide
Page 25 of 28
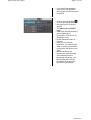
Logic 7.2 Express (Mac OSX)
• in Finder, open
Applications, Utilities,
Audio Midi setup
• click the Midi Devices tab
• double click IAC driver
• click Ports tab
• if it says No Available Ports
then click Add Port
• You should see IAC Bus 1
as new port
• Note: this creates a midi
loopback port. This can be
used to route midi output
from hypercyclic back into
Logic
10/08/2013
hypercyclic user guide
Page 26 of 28
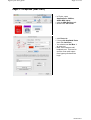
• copy hypercyclic.component
into your AU component
folder
• open Logic Express
• double click on Instrument 1.
The mixer should appear
• click and hold on the I/O
button for Instrument 1 until
the instrument selection popup menu appears.
• add hypercyclic as AU
instrument, as depicted to
the left
• add your synth of choice as
second VST instrument (e.g.
Halion)
• the hypercyclic UI should
have appeared. Click the
midi to combobox and select
Configure..
• the Midi Settings dialog
should appear. In the right
column select IAC driver
IAC bus 1 as output device
• close the dialog
• In hypercyclic, in the midi to
combo box, select IAC
driver IAC bus 1
• before you leave the
hypercyclic UI, make sure
the play button is armed
(flashing) in hypercyclic (if
not arm it by pressing it
once)
10/08/2013
hypercyclic user guide
Page 27 of 28
• Go back to the Logic mixer
• Click the I/O button for
Instrument 2 and select a
synth of your choice (EFM1
in this example)
• Go back to the Logic
arrangement window
• Hit the transport button in
Logic.
• Click on Instrument 2 (your
synth) in the arrangement
window in order to monitor it
and feed it midi
• You should hear the
hypercyclic demo chords
being sent to your synth
• Go back to the hypercyclic UI
• Change midi from to
VST/AU host
• Go back to the Logic
arrangement window
• Add a midi clip to the
hypercyclic track
• Hit the transport button in
Logic, and make sure
transport starts at the
beginning of the midi clip.
Preferably set the clip to
loop. We assume also that
the hypercyclic transport was
armed correctly.
10/08/2013
hypercyclic user guide
Page 28 of 28
• Click on Instrument 1 in the
arrangement window (the
hypercyclic instrument)
• Then, while holding the shift
key (!), click on Instrument 2
in the arrangement window
in order to monitor it and
feed it midi
• You should hear the midi clip
being processed by
hypercyclic and sent to your
synth
10/08/2013