1
User’s Manual
A Graphical Designer for Creating Acrobat JavaScript Dialogs
Plug-in for Adobe ® Acrobat ® Professional, Standard, Versions 6, 7, 8, and 9
Version 1.1
Copyright © by WindJack Solutions, Inc. 2005
http://www.windjack.com
June 2005
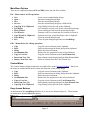
Table of Contents
Acrobat JavaScript Dialogs..................................... 3
What are they? ............................................................................................................................ 3
Layout Rules ............................................................................................................................... 5
AcroDialogs.................................................... 5
Activating the AcroDialogs Window.......................................................................................... 7
Window Layout .......................................................................................................................... 7
Sub-Windows.......................................................................................................................... 7
Main Menu Options ................................................................................................................ 8
File – Menu choices for file operations .............................................................................. 8
Edit – Menu choices for editing operations ........................................................................ 8
Context Menu.......................................................................................................................... 8
Easy Access Buttons ............................................................................................................... 8
JavaScript Editor......................................................................................................................... 9
Opening and Saving Files ........................................................................................................... 9
C:\Program Files\Adobe\Acrobat 7.0\Acrobat\Javascripts\JSADM ................................ 10
Creating JavaScript Dialogs................................... 10
Your First Dialog with AcroDialogs......................................................................................... 10
Testing a Dialog........................................................................................................................ 10
Setting Element Properties........................................................................................................ 11
Adding elements ....................................................................................................................... 12
Moving Elements ...................................................................................................................... 12
Resizing Elements..................................................................................................................... 13
Laying Out Complex Element Configurations ......................................................................... 13
Labeled Edit Box .................................................................................................................. 15
Radio Button Cluster............................................................................................................. 16
Copy/Paste Elements ................................................................................................................ 17
User Elements ........................................................................................................................... 17
Dialog Element Properties..................................... 18
JavaScript Properties................................................................................................................. 18
Using Font Properties ........................................................................................................... 18
Radio Button Properties........................................................................................................ 18
Tabbing ................................................................................................................................. 18
Hot Keys ............................................................................................................................... 19
Special Properties...................................................................................................................... 19
Dialog Properties .................................................................................................................. 19
Element Properties ................................................................................................................ 20
Setting and Getting Data from the Dialog...................... 21
Using Radio Buttons ................................................................................................................. 22
Using Lists ................................................................................................................................ 23
List Box Element .................................................................................................................. 23
Tree List Element.................................................................................................................. 25
Using the Dialog Script with Acrobat.......................... 27
Dialog in a PDF Form Field Button.......................................................................................... 27
Dialog in a Folder Level Script................................................................................................. 28
Dialog in an FDF file ................................................................................................................ 30
Dialog in an XFA form (Live Cycle Designer) ........................................................................ 31
Creating Dialog Wizards....................................... 32
About: WindJack Solutions, Inc................................ 34
AcroDialogs User’s Manual
Dialogs in Acrobat JavaScript
When Adobe released Acrobat 7 they documented the most useful UI feature they have ever
created for Acrobat JavaScript-fully featured dialog boxes (see the Acrobat 7.0 JavaScript
Reference). One of the most exciting things about this feature is that it’s not new. It was
originally implemented in Acrobat 6, but undocumented, so it’s available to a much larger
audience than just those who’ve updated to Acrobat 7.
The following two sections explain the basics of what Acrobat JavaScript dialogs are and how to
use them. As you’ll see, while they are the most sophisticated and useful UI device ever
conceived for Acrobat JavaScript, they are also very complex beasts that are a pain in the rear to
program. That’s where AcroDialogs comes in. It is a graphical dialog designer that massively
simplifies the process of creating JavaScript Dialogs for Acrobat. In fact, for most of the dialogs
you’ll be creating you won’t need to enter a single line of code. AcroDialogs writes all the code
for you. All you have to do is hook the dialog code into Acrobat, or a PDF file, so it can be used.
All of this is explained in the following sections with lots of examples. Please be patient and
read all of it. To get the most out of this exciting new Acrobat feature you will need the
background and specific usage information given here.
What are they?
Dialog boxes are any window that contains form-like elements for collecting data from or
presenting data to the user. You use them all the time. In Acrobat JavaScript the
app.alert()and app.response()methods both display a simple dialog box. But now
you can create complex dialog boxes with buttons, check boxes, radio buttons, lists, text boxes,
images, and more. You can arrange these elements in any layout configuration to provide your
users with sophisticated input panels. You can do all of this with Acrobat JavaScript, which
means that once the dialog is created it is compatible with Reader, and the Mac versions of
Acrobat.
The code for using a JavaScript Dialog can be broken into two distinct parts. These parts are the
Dialog Object Literal and the dialog execution. The Dialog Object Literal is a single object
declaration that describes everything about the dialog and its elements. The execution code sets
up the input parameters to the dialog, displays it, and collects the response data. AcroDialogs
creates both parts for you.
The Dialog Object Literal is a very complex object and has very specific rules for its structure.
The code for creating a Dialog Object Literal can be broken into two areas, the visual layout
and properties of the dialog elements, called the description, and a set of functions that support
the operation of the dialog, called handlers.
Shown below is a very simple Dialog Object Literal.
var TestDlg1 =
{
description:
{
name: "My Test Dialog",
elements:
[
{
type: "view",
elements:
[
{
item_id: "sta1",
name: "Check the box",
type: "static_text",
},
{
item_id: "Chk1",
name: "Check Box",
type: "check_box",
}
]
},
{
type: "ok_cancel",
},
]
}
};
At the top level this object has a single member named description. This is the member that
contains all the visual layout information and properties for the dialog and its elements.
Normally there is also a set of dialog handler functions that are also top level members. They
were left out of this example to simplify the code. They are optional, but necessary for any type
of interactive dialog. For example: there is one handler for initialization, one for committing
results on Ok, and one for each element that requires an action (see Dialog Properties)
Within the description member, the dialog’s title is given in the name property; this is
the only dialog level information present in this example. The elements entry contains the list
of elements to be used on the dialog. The first element is of type view. Views are container
elements used to group other elements. This one contains two other elements, a static_text
and a check_box. Both of these elements have an item_id and a name property. The
optional item_id is a unique 4 character identifier used by Dialog Object functions to operate
on the element. NOTE: It is important to understand that an item_id must be exactly 4
characters long. If an item_id is any other length besides 4 characters, the dialog will fail.
The name property is usually a label that appears on the element, such as Cancel on the cancel
button. The last element in the description is an ok_cancel button. This element has
special properties and is actually two buttons, an Ok button, and a Cancel button. When the user
selects the Ok button, the final commit function is called before the dialog is closed. When the
user selects the Cancel button, the dialog is immediately closed and any data in it is discarded.
The simplest way to execute (display) this Dialog Object Literal is with a call to the App Object
method:
app.execDialog(TestDlg1);
You can copy and paste the code above into the console window to try it out. You should see a
dialog that looks like the one below.
All dialogs created in Acrobat JavaScript are modal. Modal dialogs block all user input to the
main application until they are dismissed. This is the typical case with dialogs. Acrobat
JavaScript does not allow non-modal dialogs, also called floating windows, because they float
above the main application but do not block input/access to it.
Layout Rules
The dialog description shown above does not contain any size or position information for
the dialog elements. So how does Acrobat know how big to make them and where to place
them? In order to simplify creating the dialogs in JavaScript, Acrobat uses relative element
placement. There are no absolute coordinates for placing elements. They are simply lined up on
the dialog in the order in which they appear in the description. This is an important concept
to understand when designing a dialog. All elements that are at the same level, i.e. in the same
elements array, are arranged together. They are lined up either horizontally or vertically,
depending on the align_children property of their parent element. An individual element
can modify the arrangement imposed by its parent container with its own alignment, but it
can’t override it.
Alignment is only one part of the layout. Size is also important. Each element has a minimum
size that’s determined by its own nature plus any text it may contain. In the absence of specific
height and width parameters, this minimum size is used. For most element types, size properties
that are set smaller than the natural minimum are ignored.
The example above has two top level elements, a view and the ok_cancel buttons. These
elements are arranged side by side. The view contains two elements which are arranged one on
top of the other, a static_text and a check_box. Both these elements are sized to fit the
text of their respective name properties. The view element is automatically sized to fit the two
items it contains.
AcroDialogs
If you groaned when you saw what it takes to create a simple dialog, imagine the difficulty in
getting a complex dialog right. Using the minimal JavaScript editor that's built into Acrobat will
unfortunately mean that the coding/test cycle for a structure like this is very time consuming,
because you can’t see the effect of what you’re doing in the coding phase. You have to
constantly switch back and forth between the JavaScript editor and Acrobat's viewing mode to
see if what you’ve written in code matches what you want to see on the dialog. As the dialog
becomes more complex the difficulty grows exponentially. To compound the problem even
further, Acrobat's built-in debugger does not work with the JavaScript Dialog object. So, get a
bracket out of place, whoa, have fun finding it. We know from experience how frustrating it can
be to write code for these dialogs. That's why we created AcroDialogs.
AcroDialogs for Acrobat is a graphical editor that creates the dialog JavaScript code for you, and
does it perfectly every time. You'll never be burdened by that debugger limitation, or have to
slog through a mountain of code in a bare bones editor. With AcroDialogs all you do is add and
arrange the dialog elements you want, and then add in the extra bits of code, if any, that you need
for your own special functions. The Designer keeps track of everything else for you. You can
easily rearrange, resize, copy, and paste elements (so you don’t have to keep recreating them).
You can work with multiple dialogs simultaneously. You can create dialog wizards, complete
with Next, Previous, and Finish buttons. AcroDialogs makes complex wizards easy and
accessible to the novice JavaScripter.
AcroDialogs displays the best approximation of the dialog box so there will be slight differences
in the sizing of certain elements between Acrobat and AcroDialogs. If you want to see how
Acrobat will display the dialog, just click the Test button and Acrobat will show a fully
functioning instance of your dialog.
If you are already a JavaScript developer this tool will shave hours, if not days, off a project that
includes dialogs. If you discounted the use of dialogs in your project because of the difficulty in
development, think again. If you’re new to JavaScript, then a powerful user interface you may
never have considered using is now available to you.
AcroDialogs doesn’t just create the dialog code, it allows you to test it during the development
process as well. AcroDialogs creates code that is instrumented for maximum functionality by
providing functions and variables that set and returns the values in the dialog elements. When
you save your design to a file it appends a working example of how to use the Dialog Object
Literal it generated. All you have to do is cut and paste this code to the location in Acrobat or a
PDF where you want the dialog to be executed.
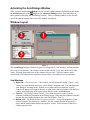
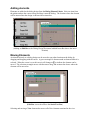
Activating the AcroDialogs Window
After you have installed AcroDialogs you can activate it from either the AcroDialogs item under
the Advanced menu, or the
button on the Advanced Editing toolbar. Selecting either of
these options will display the AcroDialogs window. This is a floating window so you can still
use all the other Acrobat features while this window is displayed.
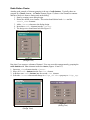
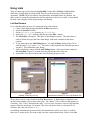
Window Layout
Figure 1
The AcroDialogs Designer Window (Figure 1) is composed of 3 sub-windows, a menu bar and a
set of easy access buttons. The window can be resized with the “Grip” area on the lower right
corner. Resizing from other areas of the window will not work. The sub-windows can be
resized with a Click/Drag on the separators between them. All window sizes are persistent.
Sub-Windows
1) Right Side – The Design View. This is where you will design the dialog. Figure 1, item
1 shows two open dialogs in this area. Each dialog is assigned a tab. You can display an
open dialog by selecting its tab. If there are too many tabs to be displayed, a scroll
control will appear to the right of the tabs. A right click in this sub-window will display a
context menu with many of the same options that are on the main Edit menu.
2) Top Left – The Dialog Element Palette. A list (with descriptive icons) of all the
elements available for placement on the Dialog design. Drag and drop elements from this
list onto the active dialog design in the work area (Figure 1, item 1).
3) Bottom Left – The Dialog Element Properties Browser. A list of all properties for the
selected element. The list has two columns. The left column displays the property’s
name, and the right column displays the property’s value. Select an entry in the list to
edit the property value.
Main Menu Options
There are two application menus (File and Edit) on the top left of the window.
File – Menu choices for file operations
• New
- Create a new nominal dialog design.
• Open…
- Open an existing dialog design.
• Save
- Save the current dialog design.
• Save as…
- Save the current dialog design to a different file.
• Copy Dlg JS to Clipboard
- Copy Dialog JavaScript code to the clipboard.
• Test Dialog
- Use Acrobat to execute code for the current dialog design.
• Make Wizard…
- Create a dialog wizard from all open dialog designs.
• Test Wizard…
- Generate code for a wizard and use Acrobat to execute it.
• Copy Wizard to Clipboard - Generate and copy wizard JavaScript code to clipboard.
• Close Dialog
- Close the current dialog design.
• Exit
- Close all open dialog designs and exit AcroDialogs.
Edit – Menu choices for editing operations
• Copy
- Copy the selected element to the clipboard.
• Paste
- Paste an element into the dialog design from clipboard.
• Delete
- Delete the selected element.
• Set Minimum Size
- Remove the size properties for the selected element.
• Copy to User list…
- Copy the selected element to the User Element List.
• Paste from User List
- Paste element into dialog design from User Element List.
• Remove from User List…
- Delete an element from the User Element List.
Context Menu
The Context Menu is displayed when the user right clicks on the Designer Window. Entries on
the menu are enabled based on the current selection state of the dialog design.
•
•
•
•
•
•
•
Copy
Paste
Delete
Set Minimum Size
Copy to User list…
Paste from User List
Copy Dlg JS to Clipboard
- Copy the selected element to the clipboard.
- Paste an element into the dialog design from the clipboard
- Delete the selected element.
- Remove the size properties for the selected element.
- Copy the selected element to the User Element List.
- Paste element into dialog design from User Element List
- Copy Dialog JavaScript code to the clipboard
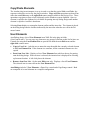
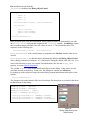
Easy Access Buttons
At the bottom of the AcroDialogs Window are 9 easy access buttons (Figure 2). These buttons
are shortcuts to selected File menu choices.
Figure 2
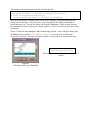
JavaScript Editor
For editing JavaScript, AcroDialogs has a simple built-in text editor, but it also allows you to
specify an external editor of your choice to use instead. To use your own editor:
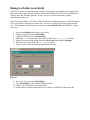
1. From the Acrobat menu bar select Edit > Preferences > AcroDialogs…
2. Select Use external JavaScript editor (Figure 3).
3. Browse to, or type the path to the editor application of your choice.
Figure 3
It is recommended that you use an editor that loads and shuts down quickly, to preserve your
sanity. There are many good editors available, and several leading editors are documented in the
Acrobat JavaScript Scripting Guide. NotePad.exe and similar editors work very well. Our
favorite at Windjack Solutions is the Developers JavaScript Editor from Next Generation. There
is a free version that provides searching, line numbers, and chroma-coding for JavaScript at:
http://www.ngweb.biz/software/djsedit.shtml
If you are interested in open source software there is the SCIntilla based editor SciTE at:
http://www.scintilla.org/SciTE.html
If you like SCIntilla but would like more features without compromising speed, see AnyEdit at:
http://www.anyedit.org/
Both these general purpose editors are fast and provide all the basic tools needed for
programming, including the features mentioned above. If you prefer a free editor with built-in
scripting capabilities, then NoteTab may be what you need. You can find it at:
http://www.notetab.com
If you are new to programming you may be more comfortable with the look and feel of a word
processor. However, word processors are usually not recommended for writing code, but there is
one exception that we know of. PolyEdit is a conventional word processor, but it also has
features like line numbers, chroma-coding, regular expression search, clipboard manager, and a
code snippet library that are useful for writing code. There is also a free version called CryptEdit.
You can find them at: http://polyedit.com/
Opening and Saving Files
Dialog designs are loaded and saved in XML files with the .xadm extension. A description of
this XML format (called the XADM format) is provided in the same folder as the plug-in in the
JSADM.DTD file. Each of the dialog elements is wholly contained in a section of the XADM
file, including all initialization parameters and associated JavaScript. This configuration allows
each dialog element to be manipulated independently of the rest of the dialog design.
Dialog design files may be loaded from and saved to any location on your hard drive but the
preferred location is a sub-folder of the Acrobat global JavaScript’s folder called JSADM.
Typically the full path to this folder is:
C:\Program Files\Adobe\Acrobat 7.0\Acrobat\Javascripts\JSADM
The full JavaScript for the dialog is saved in a separate JavaScript (*.js) file at the same time the
XADM (dialog design) file is saved. The code in the JavaScript file can be divided into 3 parts.
The top part will contain special variable declarations and Code Above. Code Above is a block
of JavaScript that’s entered from a top level dialog property (see Special Properties in the
section: Dialog Elements and Their Properties). This top section is followed by the declaration
of the Dialog Object Literal. This object will contain variables for each dialog element that
contains data and some helper functions, as well as the ordinary members (as described in the
Acrobat 7 JavaScript Reference). At the end of the file will be an example of how to use this
particular dialog. This example code will feature a variable for each data element on the dialog
and code for displaying the dialog and handling its return value.
Creating JavaScript Dialogs
Your First Dialog with AcroDialogs
To create a new dialog design, activate AcroDialogs by clicking on the
button on the
Acrobat Advanced Editing toolbar. Now click on the New button at the bottom of the
AcroDialogs window. Voila, you have a new dialog design.
The New Dialog is the starting point for building your own custom dialog. It is created with a
set of default elements to help you get started. Most are optional and can be deleted and replaced
with other elements. The default elements include two view elements. The top level view is
required for all dialog designs. In the Design Window it is shown as a grey rectangle just inside
the bounds of the dialog. It cannot be selected and other elements cannot be placed outside of it.
It forms the root view that contains all other elements. The second view on the New Dialog is
shown as a blue rectangle and contains a single Static_Text element with the words “Put
Dialog Controls Here.” At the same hierarchy level as the second view element and below it is
an ok_cancel element. Every dialog should have a button for exiting the dialog. If you don’t
use one of the predefined ok buttons then you will need to create a custom button for this
purpose. If you do create a dialog without an exit button then the keystrokes Alt-F4 will close
the dialog.
Testing a Dialog
To immediately test your dialog, click on the Test button. AcroDialogs generates the full code
for the JavaScript dialog and executes it through Acrobat. If there are no errors in the JavaScript,
the dialog will be displayed exactly as it will appear when you put it to real use. Because
AcroDialogs is using Acrobat to execute the full JavaScript code, the dialog will also function
exactly like it will in real use.
It’s possible for you introduce errors into the dialog JavaScript when you edit certain dialog
element properties. Most often these are properties that represent JavaScript code or additional
members that are added to the Dialog Description Object. In most cases, these errors will be
displayed in the console window. You can use AcroDialogs with the Console Window open, so
do this whenever necessary.
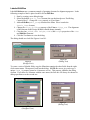
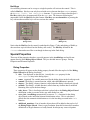
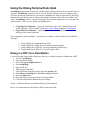
Setting Element Properties
Each element on a dialog, and the dialog itself, have a set of associated properties. These
properties are displayed in the Properties list when an element is selected on the design view.
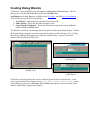
Create a new dialog and try selecting the dialog and different elements while observing the
Properties list. Figure 4 shows the list for a newly created dialog, and Figure 5 shows the
properties for the static text element on that dialog.
Figure 4
Figure 5
(New Dialog Properties)
(Static Text Properties)
Notice that both lists contain some common properties. The first property will always be the
type attribute. It indicates the element type and it is the only property that cannot be edited.
All other properties can be edited by clicking on the item in the list. Any property that contains
plain, single line text (name, item_id, etc.) can be edited in place. For properties which have
to be selected from a list of options (bold, italic, alignment, etc.) a drop down list is
provided. Other properties like the init_data for a list, multi-line text, and image data
require a special data entry mechanism. For these properties a button will appear to the right of
the property on the list. Pushing the button will activate whatever mechanism is necessary for
entering the required data.
Adding elements
Elements are added to the dialog design from the Dialog Element Palette. Select an item from
the palette and use the cursor to drag and drop it onto the dialog. The location where the element
will be inserted into the design is shown with an insert bar.
Figure 6
(Adding an Edit Box to the Dialog Design, horizontal reddish Insert Bar shows the insert
location)
Moving Elements
An element already on a dialog design can be moved to any other location on the dialog by
dragging and dropping with the cursor. A green rectangle is drawn around an element when it is
selected. When the cursor is over this area it will change to to indicate the element can be
moved. The selection rectangle moves with the mouse drag, and an insert bar shows where the
element will be moved to.
Figure 7
(Edit Box is moved to above the Static Text Box)
Selecting and moving a View element also moves all of the elements contained in the view.
Resizing Elements
The selection box has 8 gripper squares for resizing. Moving the
cursor over one of these squares will change the cursor to indicate
the direction in which the element can be resized. Resizing an
element this way sets the element’s width and height properties.
The Element’s size properties can also be set manually in points or
characters, a character is about 10 points. The width and height
properties use points and the char_width and char_height properties use characters. If
both the character and point properties are set, the largest value is the one most likely to be used.
However, there are differences between the element types in Acrobat 6 and 7, and some elements
will ignore these parameters if they are less than the minimum size.
If height and width properties are not specified, each element will take on its minimum size.
You can remove all of the size properties at once with the Set Minimum Size menu item,
available on the Context Menu and the Edit Menu.
Laying Out Complex Element Configurations
From the section on Dialog Layout Rules we know that dialog elements cannot have absolute
placement. Elements have a minimum size and are placed either on top of each other or side by
side depending on their alignment attribute. The dialog is then sized to accommodate all the
elements. Views and clusters are elements that can contain other elements. They are used in
place of absolute positioning to create complex configurations.
The default New Dialog (Figure 8) comes with two View elements. The top level view is
required for all dialog designs. In the Design Window it is shown as a grey rectangle just inside
the bounds of the dialog. It cannot be selected and other elements cannot be placed outside of it.
It forms the root view that contains all other elements.
The second view on the New Dialog is shown as a blue rectangle and contains a single Static
Text element with the words “Put Dialog Controls Here.” By default the align_children
property of a view or cluster is set to align_left which stacks the contained elements on top
of one another with their left edges aligned against the left side of the view. Individual elements
can also affect their own alignment. Figure 8 shows a change in element alignment (to
align_right) for the Edit Box that was added in a previous section.
The align_children property for the view is set to align_left. In the absence of a
specific element alignment property, all the child elements in a view will inherit the view’s
align_children property.
NOTE: There is one special exception to the general alignment rules. The ok, ok_cancel,
and ok_cancel_other elements are stuck at align_right. Changing the alignment
property on these elements will have no effect on their actual alignment in the dialog.
Figure 8
There are 8 possible alignment values
Type
align_left
align_right
align_center
align_top
align_fill
Group Arrangement (align_children)
Stacked Vertically
Stacked Vertically
Stacked Vertically
Side by Side, Horizontal
Stacked Vertically
align_distribute Side by Side, Horizontal
align_row
align_offscreen
Side by Side, Horizontal
Elements overlaid on top of one
another
Individual Elements (alignment)
Horizontal Left Alignment
Horizontal Right Alignment
Horizontal Center Alignment
Vertical Top Alignment
Element expands horizontally to
fill extra space
Elements are spaced evenly across
the width of the container
Vertical Center Alignment
Top Left Alignment
Labeled Edit Box
Labeled Edit boxes are a common example of grouping elements for alignment purposes. In the
following example a label is placed to the left of an Edit Box.
1. Start by creating a new dialog design.
2. Select the default Static_Text element (the one that has the text “Put Dialog
Controls Here”). Change the name property to “First Name:”
3. Add an Edit Box (edit_text) element to the View. Place it under the
Static_Text element.
4. Change the align_children property of the View to align_row. The alignment
of the elements in the Design Window should change instantly.
5. Clear the char_width, char height, width, and height properties of the view
and Edit Box elements.
6. Click the Test button to view the dialog.
The dialog should now look like Figures 9 and 10:
Figure 10
Figure 9
(Dialog Test)
(Design View)
To create a series of labeled fields, copy the View that contains the other fields from the rightclick context menu. Then paste it back into the dialog. NOTE: Be sure to give each copy a
unique item_id property (must be 4 characters or less). This property identifies the dialog
element. If you have two elements with the same name, the first one will always be chosen for
dialog operations over the second one.
Figure 12
(Dialog Test)
Figure 11
(Designer View)
Radio Button Cluster
Another good example of element grouping is the use of radio buttons. Typically these are
grouped in a Cluster element. A Cluster element (Figure 13) draws a line around its contents
and has a label so it forms a distinct unit on the dialog.
1. Start by creating a new dialog design.
2. Delete the default view element. This action should delete both view and the
static_text elements.
3. Add a cluster element to the dialog design.
4. Insert three radio elements into the cluster.
5. The design view should now look like Figure 13.
Figure 13
(Design View)
But what if you want two columns of buttons? You can create this arrangement by grouping the
radio buttons with View elements inside the cluster (Figures 14 and 15).
1.
2.
3.
4.
Insert two view elements into the cluster.
Move all 3 radio buttons into the first view element.
Add three more radio buttons into the second view element.
Select the cluster element and change its align_children property to align_top.
Figure 15
Figure 14
(Design View)
(Dialog Test)
Copy/Paste Elements
The Acrobat plug-in environment is set up in such a way that the typical Ctrl-c and Ctrl-v key
sequences cannot be received by the plug-in window. Copy and Paste operations are done from
either the main Edit menu or the right-click context menu available in the Design View. These
operations copy/paste to/from a local clipboard, not the Windows system clipboard. Once an
element is copied to the clipboard it is available for pasting into any dialog design until another
element is copied or Acrobat is shut down.
Selecting Paste displays a rectangular element outline and the insert bar. The element is placed
on the dialog design into the location indicated by the insert bar when the user clicks the left
mouse button.
User Elements
AcroDialogs keeps a list of User Elements in an XML file in the plug-in folder
(UserControls.xml). You can copy any element or any group of elements to this list for later use.
Controls for using the User Element List are provided on both the main Edit menu and the
right-click context menu.
•
Copy to User List – Asks the user to name the entry then adds the currently selected element
to the User Element List. If the element is a container, all the contained elements are also
copied.
•
Paste from User List – Displays a list of User Elements from which to choose for pasting
onto the dialog design. When an item is selected, the insertion bar is displayed for selecting
a placement location. A left-click places the element.
•
Remove from User List – On the main Edit menu only. Displays a list of User Elements.
The selected item is removed from the User Element List.
AcroDialogs includes 2 User Elements, a Paper Size control and a Page Range control. Both
are composed of several elements in a complex configuration.
Dialog Element Properties
Most of the properties listed for each element are the same as those shown in the Acrobat
JavaScript Reference, but there are a few properties in the list that are specific to AcroDialogs.
These properties are included to cover various aspects of dialog design so you should never have
to manually edit the dialog JavaScript code before final use.
JavaScript Properties
These are all the properties that can be included in the Dialog Object Literal and are listed in
the Acrobat JavaScript Reference. All elements share some common properties like type and
size attributes. There are several other properties shared by most of the element types, like name
and item_id. Some properties are specific to a particular element type, like the password
property for an edit_text element. There are also some property compatibility differences
between Acrobat 6 and 7.
Most of these properties have obvious functions and/or are well explained in the JavaScript
Reference, but there are a few properties, like the size properties discussed in Resizing Elements,
that need more explanation.
Using Font Properties
The bold and italic properties are defined for every element type that can display text.
These properties work only if the font property is set to palette.
Radio Button Properties
Radio buttons are fundamentally different from other controls because they act as a group, rather
than individually. The group_id is provided as a way for Acrobat to determine which radio
buttons are associated with each other. All radio buttons with the same group_id will act
together. Acrobat 6 is a bit more lenient than 7 on this score and will group buttons that don’t
have this property set, while Acrobat 7 will leave them ungrouped. For this reason AcroDialogs
will force this value to GRP1 if it is not set.
Tabbing
The focus on individual dialog elements can be changed with the tab key, both in design mode
and at run time. By default, the first element in the Dialog description is the active element
on dialog startup. Pushing the tab key changes the focus to the next element in the Dialog
description and so on.
In design mode the order is fixed, but the runtime tabbing order can be controlled with the
following properties:
first_tab – Dialog Property List
next_tab – Element Property List, applies only to elements that can receive the focus.
Each of these parameters should be set to the item_id of an element on the dialog that can
receive the keyboard focus. If first_tab is set, then next_tab must also be set in each
element that will be in the tabbing order. If first_tab is not set then setting next_tab
doesn’t do anything. Here again, Acrobat 6 is more forgiving than Acrobat 7. Acrobat 6 will
automatically tab to elements that do not have next_tab set, or have it set to a non-existent
item_id. Acrobat 7, on the other hand, follows the tabbing order verbatim and will ignore
elements that are not set up correctly.
Hot Keys
Several dialog elements can be set up so a single keystroke will activate the control. This is
called a Hot Key. Hot keys can only be used with active elements that have a name property,
the button, radio, and check_box elements. To give one of these element types a
Hot Key simply place an ampersand (&) in the name text. The character following the
ampersand is now the Hot Key for that element. Hot Keys are case insensitive so pressing the
key with no other modifier keys will now activate the control.
Figure 16
(Design View)
Figure 17
(Dialog Test)
Notice that the Hot Key for the control is underlined in Figure 17 (the underlining of HotKeys
does not show up in Acrobat 6 but the Hotkey still works). The Hot Key defined for the
cluster element has no effect even though it shows up in the final dialog.
Special Properties
These are all the properties that have a special purpose in the AcroDialogs tool and do not
appear directly in the Dialog Object Literal. They are divided into two groups: Dialog
Properties and Element Properties.
Dialog Properties
These properties all appear on the dialog property list and affect the top level of the Dialog
Object Literal in the dialog JavaScript.
• title: Text displayed on the title bar. Actually the name property for the
description entry in the dialog object.
• name: (required) The variable name used for the dialog object in the JavaScript code.
• commit: The dialog’s commit function, called when the Ok button is pressed.
• destroy: The dialog’s destroy function, called when the dialog is destroyed (closed).
• validate: The dialog’s validate function, called when any element data is modified.
Returning false rejects the data change.
• code_above: This is JavaScript code that is placed above the Dialog Object Literal
declaration so that it executes before any other dialog box code.
• extra_init: AcroDialogs automatically creates an init function for the dialog
object based on the individual element initialization values. This is code that is
placed after the automatic initializations so it is the last thing executed in the init
function.
• additional_members: List of member objects that will be added to the top level of
the Dialog Object Literal. Data is copied verbatim from this list into object member
definitions so illegal characters or badly formed JavaScript may cause exceptions.
Element Properties
These properties appear in the lists of those element types they apply to. They can affect the
Dialog Object Literal at the top level or at the element level.
• variable_Name: Available on data elements only. A top level member of the Dialog
Object Literal that represents the value of the element. For use by code that uses the
Dialog Object Literal, not for code used inside a dialog. This variable is used to
initialize a dialog box element on startup and then to save the element value when the
dialog is closed.
• action: Many of the different element types can execute some JavaScript when they
are clicked on. This property is used to enter this code. The code is used to create a
member function at the top of the Dialog Object Literal. The element’s item_id
property is used as the name for this function.
• enable: Initial state of the element. The dialog.enable() function is called on
startup from the dialog’s init member. This value is used to build an input object
for this call.
• init_data: Available on data elements only. Initial data for the element. The form
this data takes is different for each element type. It is used to build the initialization
call to the dialog.load() function.
• image: Image Element only. This property is used to acquire the image that will be
displayed on the element. Images can be selected from any image element on an
open PDF, or from an image file. Image data is converted to a hexadecimal string. In
the dialog’s JavaScript file the image data will appear at the top of the file in a string
declaration.
• ok_action: ok, ok_cancel, and ok_cancel_other element types. JavaScript
code executed when the Ok button is pressed. This code is executed after the commit
function.
• cancel_action: ok_cancel, and ok_cancel_other element types. JavaScript
code executed when the Cancel button is pressed.
• other_action: The ok_cancel_other element only. JavaScript code executed
when the Other button is pressed.
• ok_enable: ok, ok_cancel, and ok_cancel_other element types. Initial state
of the Ok button.
• cancel_enable: ok_cancel, and ok_cancel_other element types. Initial state
of the Cancel button.
• other_enable: The ok_cancel_other element only. Initial state of the Other
button.
Setting and Getting Data from the Dialog
When AcroDialogs generates the dialog JavaScript it adds some extra code to make using the
dialog easier. Basically it adds two things: a function for activating the dialog, and member
variables for each data element on the dialog. The member variables are for initializing the data
elements and capturing the data after the dialog is closed.
At the end of each dialog JavaScript file is a working usage example for the dialog. Figure 18
shows a simple dialog, along with the property list (Figure 19) for the selected element and the
example code that appears at the end of its JavaScript file. The dialog contains a single data
element, the selected Edit Box. The variable name property for this element is set to
strData1. This is the variable external code will use to access the data element.
Figure 19
Figure 18
// Example Code
JSADMDlg3.strData1 = "Hello There";
if("ok" == JSADMDlg3.DoDialog())
{
console.println("edt3:"+JSADMDlg3.strData1);
}
In this example, the initial value for the edit_text data element is set in the first line of code.
JSADMDlg3.strData1 = "Hello There";
JSASMDlg3 is the name of Dialog Object Literal and strData1 is the variable that
represents the data element. The second line of code activates the dialog with the DoDialog()
function and tests the return value when the dialog is closed:
if("ok" == JSADMDlg3.DoDialog())
The dialog generally returns the ID of the button that closed the dialog, either ok or cancel. In
Acrobat 7 the dialog function dialog.end(strRtn) closes the dialog and returns the
strRtn parameter. This functionality doesn’t work properly in Acrobat 6.
The data variable is only set if the dialog was closed with the ok button. The new value is
retrieved with the same JSADMDlg3.strData1 variable that was used to set it. In the
example this value is printed to the console window.
The edit_text element can also be used with a numeric value in exactly the same way a
string value is used. Other data elements have different data types so their variables are handled
differently.
• Check Boxes – (Boolean value) The variable is set to and returns true/false.
• Radio Buttons – (String value) The variable is set to and returns the item_id of the
selected radio button.
• Popup Edit (Combo Box), List Box, and Tree List – These are all variations on the
basic List element. The variable is set to or returns an array of strings representing the
path to the selected item. Only the variable for the Tree List will contain more than one
element.
Using Radio Buttons
Radio buttons require some special attention. They are the only dialog element where a group of
them act like a single element. To create a group of radio buttons:
1.
2.
3.
4.
5.
Create a new dialog design.
Delete the default static_text element.
Add 3 radio buttons.
Change the group_id property of all the radio buttons to Sel1.
Change the variable_Name property of the first radio button in the group to
strSelect1. Changing this property on any of the other buttons in the group will have
no effect. If the variable_Name property is not set AcroDialogs uses the group_id
property to create a variable name.
6. Change the init_data property of the second button in the group to true.
Now we have a dialog with three radio buttons. Unless you changed them, the item_id’s of
the buttons are Rad1, Rad2, and Rad3. All the radio buttons are part of the Sel1 group and
the second button is the default selection. Save the dialog and look at the example at the bottom
of the JavaScript file.
JSADMDlg1.strSelect1 = "Rad1";
if("ok" == JSADMDlg1.DoDialog())
{
console.println("Sel1:" + JSADMDlg1.strSelect1);
}
There is a single variable for the entire radio button group, strSelect1. It is initialized to the
item_id of the selected button. When the dialog box is closed it returns the item_id of the
selected button in this variable.
Using Lists
There are three types of list elements: Popup Edit (Combo Box), List Box, and Tree List.
While they all look different on the dialog, they all use the same types of data and basic
operations. NOTE: These lists all have one particularly frustrating feature in common. An
entry on the list cannot be selected unless the last character for the text is visible, so lists should
be made wide enough to fit the largest string it will display.
List Box Element
Let’s walk through the process of creating and using a list element.
1. Create a new dialog design and add a List Box element to it.
2. Select the List Box element.
3. Set the variable_name property to List1Select.
4. Select the init_data property and then press the Edit… button.
5. The List Editor will appear. This editor is for adding list entries. The same editor is
used for all the list types and some other things, with small variations in the editor
controls.
6. To get started press the Add Sibling button. Use the List Entry dialog (Figure 20) to
enter the entry’s name and value. The value is only important for code that operates in
Acrobat 7. Press Ok on the entry dialog.
7. Add a couple more entries with the Add Sibling Button. Select one of these and press
Set as Default (Figure 21) to make that entry the default value of the list.
8. Select Ok to save the list entries, then save the dialog design to a file.
Figure 20
Figure 21
(Adding First Entry to List)
(Initialization Entries for List with Default Set)
These entries will be used to initialize the List Box element. A List element is initialized with
an object that contains a list of name/value pairs. The “Name” is the visible text that appears on
a list entry. The “Value” determines the entry’s selected state, a positive value for selected and a
negative value for unselected. In Acrobat 7 the value can also be used as a list entry ID. In
Acrobat 6 the value can only be +1 or -1.
AcroDialogs automatically generates all the list initialization code for you, but it is useful to
know how it works in case you want to add your own custom initialization. Below is the List
Box initialization code from the
initialize method in the Dialog Object Literal:
var listlst1 =
{
"aaa": -1,
"bbb": -1,
"ccc": -1,
};
this.SetListSel(listlst1, this.List1Select);
var dlgInit =
{
"lst1": listlst1,
"edt1": this.stredt1,
"edt2": this.stredt2,
};
dialog.load(dlgInit);
In the first part of the code the initialization values (entered earlier) are formatted for use with
the dialog.load() function and assigned to the listlst1 variable. AcroDialogs creates
this list without setting a default value, all values are set to -1. The list default value is set
separately in the following line.
this.SetListSel(listlst1, this.List1Select);
this.List1Select is the variable name we assigned to the List Box element when it was
created.
this.SetListSel() is a function that’s automatically added to the Dialog Object Literal
when a dialog contains a list element. It’s a function for setting the default value for a list. You
can use this function for your own custom list initialization code (See the extra_init
property in section Special Properties).
The variable dlgInit is the actual initialization object for the dialog. It has entries in it for
each data element on the dialog. In this case, the dialog also contains two edit boxes.
Everything up to this point was setup, the actual dialog element initialization takes place in the
last line:
dialog.load(dlgInit);
The Example code at the bottom of the saved JavaScript file shows how to get and set data from
the list element on the dialog.
// Example Code
JSADMDlg1.stredt1 = "Apples";
JSADMDlg1.stredt2 = "Oranges";
JSADMDlg1.List1Select = ["bbb"];
if("ok" == JSADMDlg1.DoDialog())
{
console.println("edt1:" + JSADMDlg1.stredt1);
console.println("edt2:" + JSADMDlg1.stredt2);
console.println("lst1:" + JSADMDlg1.List1Select);
}
Figure 22
(Dialog immediately after
initialization)
Tree List Element
We’ll use the same process outlined above to create and use a hier_list_box (Tree List).
Tree lists set, display, and return hierarchical data, but are still very similar to regular lists.
There are two key differences in the process for entering initialization data and how the tree’s
value is used. These differences will be discussed in the following steps.
1.
2.
3.
4.
5.
6.
7.
Create a new dialog design
Change the dialogs name property to TreeTstDlg.
Add a Tree List element to it.
Select the Tree List element.
Set the variable_name property to TreeData.
Select the init_data property and then press the Edit… button.
The Tree List Editor will appear (Figure 23). This editor is nearly identical to the List
Box entry editor (Figure 20) except for the addition of a few buttons.
a. Add Child – Adds a child entry to the current selection.
b. Left – Moves the selected entry to its parent’s level in the hierarchy.
c. Right – Makes the selected entry a child of the next sibling entry on the list.
Figure 23
Figure 24
(Entering Tree List Entries)
(Moving an Entry to a New Location in the Tree,
“Larry” is Moved to the Right of “Mo.”)
8. Add some entries to the list. Make a hierarchy of entries using the Add Child, Left and
Right buttons.
9. Use the Set as Default button to set the default item. In Figure 24 above Citrus >
Orange > Valencia is selected as the default value. For purposes of this example, make
your selection a similar depth in the hierarchy.
10. Select OK to save the list entries, then save the dialog design to a file.
11. Open the dialog’s JavaScript file in your favorite JavaScript Editor.
The example code at the bottom of the file will look like this:
// Example Code
TreeTstDlg.TreeData = ["Citrus","Orange","Valencia"];
if("ok" == TreeTstDlg.DoDialog())
console.println("tre1:" + TreeTstDlg.TreeData);
The tree is initialized to its default value with an array of strings. Each string represents one
level of the list hierarchy. The selected tree entry returned from the dialog is formatted in
exactly the same way. Execute the dialog code with the Test button. Select an entry from the
tree, and then look at the results in the console window. Try this a few times to get a feel for how
it all works.
Figure 25 shows the entry Stooges > Mo > Larry being selected. After closing the dialog with
the OK button, the variable TreeTstDlg.TreeData is set to an array of strings that
represent the selection. This array is displayed on the console window as shown below right.
tre1:Stooges,Mo,Larry
(Data Displayed in Console window after dialog is
closed)
Figure 25
(Selecting an Entry on a Tree List)
Using the Dialog Script with Acrobat
AcroDialogs generates the JavaScript code that creates a dialog, but how do you use this code in
Acrobat? AcroDialogs writes this code to a JavaScript file whenever you save a dialog design.
All of the JavaScript is plain text so you can use a standard text editor to open the file, then copy
and paste the code directly into Acrobat or into another JavaScript file for use in a Folder Level
script. AcroDialogs can also copy the dialog code directly to the clipboard, so you can paste the
code anywhere. There are two options on the File menu:
•
•
Copy Dlg JS to Clipboard – Copies the JavaScript code for the current Dialog to the
system clipboard. Also available via the Easy Access Buttons and the Context Menu.
Copy Wizard to Clipboard – Copies the JavaScript code for a Wizard (multiple
Dialogs) to the system clipboard.
Four examples are discussed below. An interactive example, or file attachment is provided for
each type.
1.
2.
3.
4.
Using a dialog in a traditional Form Field.
Using a dialog in a Folder Level JavaScript (Acrobat plugin).
Using a dialog in an FDF File, for easily importing stored scripts.
Using a dialog in an XFA (Live Cycle Designer) form.
Dialog in a PDF Form Field Button
Use the following steps to add a dialog box (one you’ve already created) to a Button on a PDF.
1. Activate AcroDialogs.
2. Open any dialog design.
3. Press the Copy to Clipboard button.
4. Exit AcroDialogs.
5. Open a PDF file.
6. Add a button to the PDF.
7. From the Button Properties Dialog select the Actions Tab.
8. Select Run a JavaScript from the Select Action pull down.
9. Press the Add button.
10. Paste the Dialog JavaScript into the JavaScript Editor.
11. Close the editor and the Button Properties dialog.
That’s it. When the button is pressed the dialog will be displayed.
Here’s an example that uses the dialog to fill in some form fields:
Dialog in a Folder Level Script
Folder level scripts are sometimes used as light weight plug-ins, performing some complex task
that can be done with Acrobat JavaScript. Often you need this task to have some flexibility to it.
Dialogs make this flexibility possible, giving you a way to collect potentially complex
information from the user.
In the following example we’ll build a folder level script for flattening pages in a PDF document.
The script will be activated from a menu item. We’ll use a dialog to get a page range from the
user. The elements for this dialog are already on the User Element List, so building it is going
to be easy.
1.
2.
3.
4.
5.
6.
7.
Activate AcroDialogs and create a new dialog.
Change the dialog’s name to FlattenDlg.
Change the dialog’s title to Flatten Pages.
Delete the view element, this action will also delete the static_text element.
Right click on the dialog design and select Paste from User List > PageRange.
Insert the new element above the ok_cancel button.
Figure 26 shows what the dialog design should look like.
Figure 26
8. Save it to a file, preferably FlattenDlg.js.
9. Copy FlattenDlg.js to the Acrobat Javascript folder.
10. Open it with your favorite JavaScript Editor.
11. At the bottom of the file change the usage example to look like the following code.
function DoFlattenDlg()
{
FlattenDlg.strGRP1 = "rAll";
FlattenDlg.strStrtPg = this.pageNum;
FlattenDlg.strEndPg = this.numPages;
if( "ok" == FlattenDlg.DoDialog( ) )
{
switch( FlattenDlg.strGRP1 )
{
case "rAll":
this.flattenPages( 0, this.numPages – 1 );
break;
case "rCur":
this.flattenPages( this.pageNum );
break;
case "rFro":
this.flattenPages( Number( FlattenDlg.strStrtPg ),
Number( FlattenDlg.strEndPg ));
break;
}
}
}
app.addMenuItem( {
cName:"Flatten Pages",
cParent:"Document",
cEnable: "event.rc = ( app.doc != null ); ",
cExec:"DoFlattenDlg( )"} );
Three basic changes were made to the original example code.
1. The entire example code was enclosed in a function.
2. The console.println() statements were replaced with a switch. This is where
the results of the dialog input are used to flatten pages in the current PDF.
3. A new menu item is added to Acrobat’s Document Menu for activating the Flatten
Script.
This folder level JavaScript file will be executed the next time Acrobat is restarted.
Dialog in an FDF file
FDF (Forms Data Format) is the most flexible of all the data formats that can be used to import
and export form data from a PDF. An FDF file that is imported into a PDF can include several
different scripts, a “Before” script, an “After” script, document scripts, and field scripts. For this
example we’re interested in the “After” script, which executes After the data from the FDF file is
loaded into the form fields. An FDF file that contains a simple dialog JavaScript is shown below.
%FDF-1.2
1 0 obj
<</FDF
<<
/JavaScript
<<
/After 4 0 R
>>
>>
>>
endobj
4 0 obj <<>>
stream
var JSADMDlg1 =
{
DoDialog: function(){return
app.execDialog(this);},
description:
{
name: "JSADM Dialog",
elements:
[
{
type: "view",
elements:
[
{
name: "Your Request Has Been
Granted",
type: "static_text"
},
{type: "ok"},
]
},
]
}
};
JSADMDlg1.DoDialog();
endstream
endobj
trailer << /Root 1 0 R >>
%%EOF
This FDF simply displays a message
when it is imported into a PDF file.
FDF files are commonly used to return
information back to Acrobat from a
server after a form submission. A
dialog is a good way to inform the user
that a form has been submitted or
display an error message. Messages
are useful but you can use this
mechanism for much more. You can
use a dialog to request additional info
or to fill in and re-submit missing
fields.
This FDF is in a file attachment in this
manual. Use the button below to
extract it. Use the menu item:
File > Form Data > Import Data to Form
to test the FDF Dialog.
Dialog in an XFA form (Live Cycle Designer)
XFA PDF files can execute most of the regular Acrobat app and doc level JavaScript.
Unfortunately, code cannot be entered from most of the familiar places, it has to be entered from
Live Cycle Designer. Use the following steps to enter a dialog script into an XFA document.
1.
2.
3.
4.
Create a Dialog and copy its JavaScript to the clipboard.
Open or create an XFA document in Live Cycle Designer 7.
Add a button to the document or select an existing form field.
Display the Script Editor. You’ll find it on the Window menu. After it’s visible, resize it
so that it’s large enough to work in.
5. From the Show pull down, select the click event, or any other event that’s suitable for
your purpose.
6. Paste the dialog code into the Script edit area.
Field values are accessed very differently in XFA than in regular Acrobat forms so if the dialog
is for operating on form fields you’ll need to understand something about XFA JavaScript. The
official Adobe documentation on XFA is at:
http://partners.adobe.com/public/developer/xml/index_arch.html
Creating Dialog Wizards
A Wizard is a series of dialog boxes tied together with Previous and Next buttons. The last
dialog in the series has the Next button replaced by a Finish button.
AcroDialogs has Wizard functions, available on the File Menu and the Easy Access Buttons.
All functions generate the Wizard JavaScript.
1. Test Wizard – Immediately executes the Wizard JavaScript.
2. Make Wizard – Writes the Wizard JavaScript to a file.
3. Copy Wizard to Clipboard – Writes the Wizard JavaScript to the system clipboard.
Only available on the File menu.
The Wizard is created by concatenating the JavaScript from all the open dialog designs. It orders
the Wizard dialogs using the same order as the tab bar at the top of the Designer View. Change
the order by grabbing and dragging one of the tabs with the mouse. A green vertical line
indicates the insertion point (Figure 28).
Figure 28
(Moving Tab)
Figure 27
(Design View)
Figure 29
(After Move)
A Wizard is created by placing the code for each dialog into the same JavaScript file. As the
code is generated the first occurrence of an ok, ok_cancel, or ok_cancel_other button
in each dialog is replaced by a Previous, Next, Cancel button group. Some JavaScript is also
added to each dialog to support these buttons.
The code for controlling all the dialogs is placed at the end of the Wizard JavaScript file. The
Design View shown above has 4 open dialog designs, Step1 thru Step 4. The controlling
JavaScript for these dialogs is shown below.
var dlgArr_Step1_Wizard =
[Step1,Step2,Step3,Step4,];
var cRtnCode = "next";
var i=0;
WizLoop:
While((cRtnCode == "prev") || (cRtnCode ==
"next"))
{
cRtnCode =
dlgArr_Step1_Wizard[i].DoDialog();
if(cRtnCode.length == 0)
cRtnCode = dlgArr_Step1_Wizard[i].result;
switch(cRtnCode)
{
case "prev":
i--;
break;
case "next":
i++;
break;
default:
break WizLoop;
}
}
if(cRtnCode == “done”)
…..Process Data …..
The variables stored in the array [Step1, Step2, Step3, Step4] are the Dialog Box Literals. An
index variable i is used to keep track of the current dialog. It’s initialized to zero and
incremented or decremented depending on the return value from the DoDialog() call. The
last dialog returns done if it is closed with the Finish button.
The Wizard code appears to have a slight redundancy in the following area.
if(cRtnCode.length == 0)
cRtnCode = dlgArr_Step1_Wizard[i].result;
This is a workaround for Acrobat 6, which doesn’t return values from the dialog.end()
function.
About: WindJack Solutions, Inc.
Our mission is to make Acrobat and PDF easier to use and more accessible to everyone. We
accomplish this mission by writing articles, teaching JavaScript classes, creating educational
materials, lecturing at conferences, answer question on the PDF forums, being as involved as we
can in the PDF community, and of course creating our line of products which are intended to
assist PDF document designers and developers get the most out of PDF.
PDF CanOpener: This is our first product. It allows the user to view and edit the internal COS
object structure of a PDF file. This tool is essential for all PDF Developers or anyone who wants
to know more about PDF internals.
AcroButtons: Our first JavaScript tool, it’s for creating customized Acrobat toolbar buttons.
AcroButtons is a companion to AcroDialogs. Like AcroDialogs, it generates complex JavaScript
code that would be nearly impossible, or at least pretty painful! to create otherwise. Toolbar
buttons are most often used to automate Acrobat, essentially creating an Acrobat Macro. But
JavaScript toolbar buttons can be used for much more since they can also be embedded into a
PDF.
AcroPack Demo: This is a free download that shows the incredible power that can be achieved
by using AcroButtons and AcroDialogs together. Once installed this JavaScript file puts a set of
3 buttons on Acrobat’s toolbar. Each button is a separate tool and when activated will display a
dialog box. Download at: http://www.windjack.com/products/freestuff.html
If you have any questions or issues about AcroDialogs, or any of our other tools, please visit us
at: http://www.windjack.com
Contact Us:
[email protected]
Product Info:
[email protected]