1
AcroButtons User’s Manual
Windjack Solutions
AcroButtons© User’s Manual
by Windjack Solutions
Version 1.0.01
AcroButtons is an Adobe® Acrobat® plug-in that gives you the ability to easily create custom Acrobat® Toolbar
Buttons with the graphic design and JavaScript functionality of your choice. Before AcroButtons, this
functionality, which is built into Acrobat® 6.0, was only available to JavaScript Experts. With AcroButtons this
powerful functionality is now just a few clicks away for anyone who authors PDF Documents.
These toolbar buttons, including the image data, are really folder level JavaScripts, so the buttons you create can
perform any action that can be done in JavaScript. Once created, the JavaScript file for the button is completely
portable and independent of the AcroButtons Tool. It can be used by anyone with Acrobat® 6.0, including
Reader 6, and on any platform (Windows, Mac, or UNIX). Additionally, AcroButtons can embed the button
JavaScript into a PDF Document, so the button travels with the document and is visible on the Acrobat®
Toolbar only when the document is open.
The QuickSelect and JavaScrippets features make creating useful toolbar buttons fast and easy. Several other
features are also provided to make testing and modifying your button a snap. All this is done from the
AcroButtons Tool inside Acrobat®, as opposed to the traditional method of modifying folder level scripts in an
external text editor and then restarting Acrobat® every time a change is made.
To get started right away making your own toolbar buttons, see the AcroButtons Quick Start Guide in this
document.
Requirements:
•
•
Adobe®Acrobat® version 6
Microsoft® Windows XP or 2000
Page 1 of 35
AcroButtons User’s Manual
Windjack Solutions
Accessing AcroButtons Functionality
AcroButtons places 5 menu items in the Advanced Editing Menu and 1 button,
Toolbar.
on the Advanced Editing
Toolbar Button
Press this to create a new toolbar button. Same as the Create New AcroButton menu option.
Menu Items
•
•
•
•
•
Create New AcroButton – Starts creation of a new toolbar button.
(See Creating AcroButtons).
Remove an AcroButton – Displays a list of all buttons on the Acrobat® Add-on Tools, from which you can
choose any number to delete. If the button is an AcroButton, i.e. created with this tool, and it has an
associated file in the JavaScript folder, it will be displayed with the AcroButtons Symbol, . A check box
at the bottom of this dialog box gives you the option to delete the JavaScript file associated with the button.
AcroButton Setup Panel – Utility to access all parameters for AcroButtons including the associated
JavaScript actions. Doesn’t include image control.
(See AcroButtons Setup Panel).
Copy an AcroButton – The toolbar button JavaScript file contains several variable and function names that
have to be renamed for a copy of this file to work properly. You can do this operation manually, however
we recommend using this utility function.
Embed an AcroButton into a PDF Document – Provides the ability to embed the toolbar button
JavaScript into a PDF document.
(See Embedding Toolbar Buttons into a PDF).
Page 2 of 35
AcroButtons User’s Manual
Windjack Solutions
Creating AcroButtons
Basic Steps
To begin, click on either (located on the Advanced Editing Tool bar) or the
Advanced–>AcroButtons–>Create New AcroButton menu option.
There are 4 steps to creating a new AcroButton:
1. Select the image to appear on the button face.
2. Prepare the image for placement on the button.
3. Name the file the button JavaScript will be written to.
4. Setup the button parameters.
When these steps are complete AcroButtons will create a new JavaScript file in Acrobat’s “JavaScripts” folder,
and put the button this JavaScript creates on the “Add-on Tools” Toolbar.
Selecting a Button Image
The first step in creating an AcroButton is to select an image to appear on the face of the button. This image
can be selected in one of three ways from the Image Source dialog box, which appears immediately after
button creation is started.
• Quick Select – Opens the Quick Select PDF containing over 250 icon images from which you can choose
with a point and click of the mouse. All of these images have been sized correctly and require no image
editing. Quick Select bypasses step number 2 (image preparation) by applying default size and masking
parameters set in the Preferences dialog. Quick Select can also be used with any open PDF, i.e. it will
apply the default image preparation parameters to any object selected from a PDF, including an entire page.
(See Using Quick Select and the Quick Select Tutorial).
•
From an Already Open PDF Document – Allows point and click selection of any graphical object on an
open PDF document of your choice, including the entire page. The cursor changes to indicate the type of
object the mouse is over.
– Indicates a PDF Raster Image Object.
– Indicates a PDF Vector Graphics Object, used in Form Field and Annotation Appearances.
– Indicates clicking the mouse will import the entire page.
•
Image File – Opens the Acrobat® Image Browser. Nearly any type of image file can be imported (.PDF,
.bmp, .jpg, .gif, etc.).
More Details on Image Selection are given in the Button Images and Quick Start sections of this document.
Page 3 of 35
AcroButtons User’s Manual
Windjack Solutions
Preparing an Image to Put on a Button
In this step AcroButtons displays the Image Editor Dialog. Use this dialog to set up the image for use as a
toolbar button. There are two main characteristics of the image that need to be set here, the image size and the
transparency mask.
Sizing the Image
The image used on a toolbar button can’t be so tall or wide that it takes up all the space around it or seriously
diminishes the size of the document window. AcroButtons restricts button sizes to less than 32 pixels high and
150 pixels wide (standard Acrobat® toolbar buttons are 20x20 pixels). Anything larger than this can cause
Acrobat® operating problems when it attempts to load it. The following 5 features of the Image Editor are for
helping you size the image properly.
•
Crop Box Display – Show’s the final image size. If either the width or height is larger than
acceptable (150x32), that parameter is displayed in red text. The image’s full dimensions are used if no
cropping rectangle is present.
•
Crop Tool – Toggles the cropping tool on and off. Draw a rectangle with this tool to cut out the
area of the image you want on the button. The cropping rectangle is drawn with resizing tabs on all the
corners and sides. These tabs can only be used when the cropping tool is selected.
•
Auto Crop – Draws a 20x20 pixel (toolbar standard) crop box at the center of the image display, or
resizes the current crop to 20x20.
•
Auto Scale – Sets the image scaling so the current crop is 20x20 pixels. It scales the entire image to
20x20 if a cropping rectangle is not present.
•
The Scaling Slider – Sets the exact scaling factor anywhere from 10% to 600%. Use the and buttons
to increment or decrement the scaling by 1%. You can use these buttons to set the scaling beyond the limits
of the slider.
Making a Transparency Mask
This feature is optional, but it can greatly improve the look of your button. With many images you’d like only
certain parts of the image to be displayed, and other parts to be transparent. Preparing an image for transparent
areas is called masking. Some images come with a built–in mask and some don’t. Either way AcroButtons lets
you create your own mask or use an existing one.
There are many different ways to create a mask. AcroButtons uses a list of colors and a fuzziness number.
Every pixel in the image whose color matches a color in the list is rendered transparent. A fuzziness number
greater than zero forces pixels with a color close to any of the colors in the list to also be rendered transparent.
The greater the fuzziness number, the greater the number of pixels that are rendered transparent.
The following features of the Image Editor are for helping you to create an image mask.
Page 4 of 35
AcroButtons User’s Manual
•
Windjack Solutions
Color Selection Tool – Use this tool to select colors from the image into the Mask.
•
Color List – Shows all the colors previously selected into the list. You are allowed a
maximum of 25 colors. Empty slots display with a red X.
•
Color De-selection Tool – Use this tool to remove colors from the Mask. Select colors from
either the image or the Color List.
•
Current Color Display – The color that either of the Eye Dropper Tools is currently over is displayed
in a small square directly above the Fuzziness Slider. The RGB value of this color is displayed to the
right.
•
Fuzziness Slider – Sets the size of the color distance used to include additional pixels into the Mask.
•
Background Color – Use the different background colors for a better visual determination of how well
your mask is working. Select this color into the Mask if your image already has transparency.
Images Already Including Transparency
You’ll know that your image has transparency because the background color will show through parts of it.
Change the background color back and forth to be sure. The background color is not automatically selected into
the color list. So before you exit this dialog set the background color that shows off your image best. Then
select it into the Mask. The ideal background color is not necessarily the one that looks best with your image.
It’s the color that is farthest from every other color in the image you want to be visible.
Naming an AcroButton
For this step AcroButtons displays the File Save Dialog. The button and all of its internal parameters will be
named based on what you type here. For this reason you cannot use names with spaces in them or special
characters. The ‘_’ character is acceptable, but don’t use any other symbols or punctuation.
Although this is the normal File Save Dialog, if you select a folder other than the one given, AcroButtons, and
probably Acrobat®, will no longer be able to see and use this file. So don’t change the save folder.
If you select a file that already exists, AcroButtons will only overwrite the image part of the JavaScript file.
The button’s JavaScript action and all other button parameters will remain intact. In the next step of this
process, these parameters will be displayed in the Setup Panel.
Note: Be careful with Button Names. Acrobat® cannot load two buttons with the same name. If you
embed buttons into PDF files, you may occasionally have a button already on the toolbar with the same name as
one in a PDF you are trying to open. The only effect of this is that you will get a warning message and the
button in the document will not load, although will probably still work. If it doesn’t work simply close the PDF
file and re-open it. This action will remove the offending button from the toolbar and then refresh it from the
PDF.
Page 5 of 35
AcroButtons User’s Manual
Windjack Solutions
Setting up Button Parameters
The final step in creating a button is to set up the button parameters. For this, AcroButtons provides the “Setup
Panel” dialog. All the parameters this dialog sets have defaults, so you can click the “OK” button if you just
want to look at your button. You can edit these parameters at anytime after creation by selecting the
Advanced–>AcroButtons–>Edit an AcroButton menu option.
AcroButtons Setup Panel
•
Button ToolTip – The text entered here appears in a ToolTip popup when the cursor hovers over your
button.
•
Button Position on Toolbar – Select the position on the toolbar for the AcroButton. If this is the first
AcroButton created the position will be -1 (end of list). If you have a list of AcroButtons already created
you can use the pull down menu to select the position of the new AcroButton.
Note: Position ‘0’ is supposed to put the button at the first position on the toolbar. However, at this time,
this appears to be a bug in the “app.addToolButton” function. A ‘0’ position will put the button at the end
of the toolbar and supercede any buttons set at position ‘-1.’
•
Button Enable – Sets the condition under which this button is enabled. If this condition is not met the
button is ‘grayed out.’ Two Options are provided.
1. When a Document is Open – Button is enabled only when a PDF Document is open in Acrobat®.
2. Always – Button is always enabled.
Both these options write a specific one line JavaScript into the JavaScript file. You may change this code to
fit your own needs by editing this file.
(See the JavaScripts section of this document.)
•
JavaScript Action Text – Enter the JavaScript code here you want this button to execute. Enter your code
manually and/or from the JavaScrippets menu. Selecting a JavaScrippet appends code to the existing text.
It does not overwrite it.
•
Trash Button – clears all text from the JavaScript Action.
•
JavaScrippets – Press this button to display a menu of common and useful JavaScrippets ready for use.
You will most likely want to modify this code to suite your own purpose. After a JavaScrippet is selected
from the menu, it is displayed in the JavaScrippet Pre-Viewer for your inspection. Clicking on the “Use
This JavaScrippet” will append this code to the bottom of the existing JavaScript Action Text. The
JavaScrippet Pre-Viewer also gives you the option of using the JavaScrippets “Name” or “Description” as
the button’s tooltip.
You can modify the existing JavaScrippets list or create your own.
(See Making Your Own JavaScrippets)
Page 6 of 35
AcroButtons User’s Manual
Windjack Solutions
Button Images
Making an image that looks good and conveys meaning with very few pixels has been a constant challenge
since graphics first started appearing on computer screens. AcroButtons helps you out by providing a set of
common icon images for you to choose from on the Quick Select PDF. These images are all properly sized,
masked, and royalty free. With a quick search on the internet you’ll find many, many more images that also fit
this description. For the more graphically inclined, you can use the AcroButtons Image Editor to import and
prepare images that aren’t quite suitable for immediate use. Be aware that not all images will work in the tiny
space of a button, particularly if the image requires a great deal of scaling, and some images simply won’t mask
well. But it is surprising what will work well, it’s not always obvious.
Using Quick Select
Quick select is the fastest way to make a button.
1. Select Quick Select from the Image Source Dialog at the beginning of the creation process.
2. The Quick Select document, a set of over 250 icons instantly appears.
3. Just point and click to choose an image, the Quick Select document automatically closes, and you are
practically done making a button.
You are not restricted to only selecting images from this document. Quick Select uses a set of default
parameters, selected in the Preferences Dialog, to create a button image. It will apply these defaults to any
image you select from a PDF Document, including an entire page. Just uncheck the “Don’t Open QuickSelect
Doc” checkbox on the Image Source Dialog when you start the button creation process.
(See the tutorial Quick Select with Images from any PDF document for more information.
But what if you want to Quick Select an image that’s on a web page, or any other document that’s not PDF?
With just a small amount of extra effort you can do this too.
Importing Images from Other Sources
Any document that can be converted into a PDF file can be used by Quick Select. Web pages provide the best
source for this type of document. There are several that contain huge lists of royalty free images perfectly suited
for Quick Select. Simply find the web page you want and convert it to a PDF File. Most of the time Acrobat®
will keep the original image size and mask intact, but this is not always true for conversions from Word Files
and depends on your conversion application. This file is now ready for Quick Select.
The best results are obtained from images close to the desired size and either already containing a mask or have
a background matching one of the masking colors in the Quick Select Preferences. Quick Select always uses
the existing mask if one exists.
Quick Select Preferences
If you select images from a PDF file other than the Quick Select PDF you may need to change these parameters
to get the best results.
• Button Height – Choice of 20 or 32 pixels. The button’s width is scaled proportionately and cropped on
the right side to a maximum 150 pixels. 20 pixels is the Acrobat® standard button height. 32 pixels can
make a more complex image look better and make your button stand out.
Page 7 of 35
AcroButtons User’s Manual
•
•
Windjack Solutions
Mask Color – Eight choices for the default masking color, the standard gray scale colors and each of
the primaries. You should be able to easily tell if an image has a background intended to be used as a
mask just by looking at it. Neutral gray and white are typical backgrounds. However, you may find
images that use a red or green mask. Blue is unusual, it is included in the preferences for completeness.
If your image already has a mask, (most GIF and PDF files do) pick a color from this list that does not
match any of the colors in the image.
Fuzziness – Even if an image already has a mask, scaling can cause pixels at the edge of the image
proper to blend with the default background. This blending dilutes the pureness of the mask and has the
effect of producing a halo around your image. A little bit of fuzziness in the mask color selection can
usually clean this up.
Modifying the Quick Select Document
The Quick Select PDF document provided with AcroButtons can be modified by adding images to it and
deleting images from it. In addition, you can create your own Quick Select document to use with AcroButtons.
The Quick Select document is located in the folder
<Acrobat 6.0 Installation Folder>\Acrobat\plug–ins\Windjack\AcroButtons_QuickSelect.pdf.
Typically the <Acrobat 6.0 Installation Folder> is C:\Program Files\Adobe\Acrobat 6.0\
WARNING: Before making any modifications to this file make a backup copy.
•
Adding Images to the Quick Select Document
Two easy methods:
1. The easiest method is to create a Button Form Field on the Quick Select document and then import
the image into it.
a. Select the Button Tool from the Acrobat® Advanced Editing Toolbar.
b. Draw a square onto the document. The Button Properties dialog will appear.
c. In the Appearance tab choose No Color and No Fill Color. In the Options tab–> Layout select
Icon Only, then click Choose Icon. Enter the file name of the image or use the browser to locate
it. Change the File Type to the correct type for the image file (Ex. BMP, JPEG, GIF, PNG).
d. The image will be drawn in the Sample window. If the image is correct, click OK. Click Close.
To view the new Quick Select image click on the Hand tool.
2. You can also paste images copied to the clipboard from another application with the Paste
Clipboard Image command. This command is located on the pulldown for the Attach File tool,
which is on the Advanced Commenting toolbar.
a. Select an image in another application, like Photoshop or Paint. Copy it to the Clipboard.
b. In Acrobat open the PDF file you are going to paste the image into.
c. Select the Paste Clipboard Image command.
d. The cursor should change to a ‘+’. Click and drag to draw a rectangle on the page.
Page 8 of 35
AcroButtons User’s Manual
Windjack Solutions
e. The clipboard image should now be on your document. You can use the cursor to move and
resize this image.
NOTE: Images should be suitable for 20x20 pixels or 32x32 pixels and have an appropriate
background or no background.
3. Deleting Images from the Quick Select Document – DON’T. Make a copy of the Quick Select
document and delete images from the copy to customize it.
4. Creating a new Quick Select Document– Any PDF File can be used as the Quick Select File.
a. First, rename the AcroButtons_QuickSelect.pdf file so you have a backup you can use later.
b. Then rename your PDF File to AcroButtons_QuickSelect.pdf.
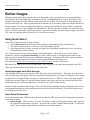
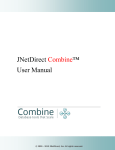
AcroButtons Image Editor
This dialog is used for basic image preparation. The only real requirement for a button image is that it is small
enough to fit on the toolbar. But much more is provided here to help you make the most of your image. Below
are two screen-shots showing the controls for the Image Editor.
The features in this dialog can be divided into 3 categories.
Page 9 of 35
AcroButtons User’s Manual
Windjack Solutions
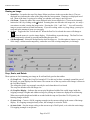
Viewing an Image
•
•
•
•
Status Bar – Located at the top of the Image Editor (not shown in the screen shot above). The text
displayed here indicates the status of the image after the last operation. Warnings are displayed in red
text. Most of the time it’s going to be telling you whether your image is too big or not.
(16) Zoom – Zooms the entire edit screen (depicted in the screen-shot below). Zoom can be instantly
returned to 100% by clicking on the button. Zooming does not affect the real image size, it is only a
convenience to make viewing the image easier. Pressing the ‘Ctrl +’ and ‘Ctrl –’ keys will cause the
image to zoom in and out in small increments. If you are working with a very large image, you may be
restricted in the amount of zoom you can apply.
(1) Pan – Toggles the Pan Tool on and off. When the Pan Tool is selected the cursor will change to
when the mouse is over the image display. Click and drag to pan the image. The Pan Tool can
also be temporarily selected by pressing and holding the space bar.
(10) Background – Selects the background to draw the image on. Use this option to improve your view
of the image, validate mask transparency, and make use of the existing transparency in an image.
Crop, Scale, and Rotate
These options are for formatting your image to fit well and look good on the toolbar.
•
(2) Crop Tool – Toggles the Crop Tool on and off. Use this tool to draw a rectangle around the part of
the image you want displayed on the button. The current size of the crop on the scaled image is shown in
the Crop Box Display.
The sizing tabs on the crop rectangle can only be used when this tool is selected.
The crop size defaults to the full image size.
•
(9) Crop Box Display – Indicates the current pixel height and width of the scaled image inside the
cropping rectangle. Heights and widths too large for placing on a button are displayed in red lettering.
When an acceptable height and width are reached with the crop tool (less than 32x150 pixels), the
lettering changes to black.
•
(5) Auto Crop – Creates a 20x20 cropping rectangle (at the current scaling) in the center of the image
display. If a cropping rectangle already exists, this rectangle is resized to 20x20.
•
(6) Auto Scale – Sets the image scaling so the current crop is 20x20 pixels, or it scales the entire image
if a cropping rectangle is not present.
Page 10 of 35
AcroButtons User’s Manual
Windjack Solutions
•
(7) Flip Vertical – Flips entire image vertically.
•
(8) Flip Horizontal – Flips entire image horizontally.
•
(17) Scale Slider – Sets the exact scaling factor anywhere from 10% to 600%. The scaling can be
instantly returned to 100% by clicking on the button. Use the
and buttons to increment or
decrement the scaling by 1%. You can use these buttons to set the scaling beyond the limits of the
slider.
•
(18) Rotate Slider – Sets the image rotation in a continuous range from 0º to 360º with a 1º resolution.
Use the
and buttons to increment or decrement the rotation by 1º. Quick rotation buttons ( ) are
provided to instantly set the rotation to 0º, 90º, 180º, 270º, and 360º.
Masking
•
(3) Add Mask Color – Toggles the Color Select Tool on and off. Use this tool to add colors to the
color list.
•
(4) Subtract Mask Color – Toggles the Color Deselect Tool on and off. Use this tool to remove colors
from the color list. Colors can be selected from either the image or the Mask Color List.
•
(11) Display Mask CheckBox – When checked, pixels in the image meeting the masking criteria are
rendered transparent, i.e. they are drawn in the background color.
•
(12) Current Color – Displays the color the mouse is over when either of the Eyedropper Tools are
selected.
•
(13) Current Color (RGB value) – Displays the RGB value of the color the mouse is over when either
of the Eyedropper Tools are selected.
•
(14) Fuzziness – Sets the size of the color distance used to include additional pixels into the Mask.
•
(15) Mask Color List – Shows all the colors selected into the list. A maximum of 25 colors are allowed.
Empty slots display a red X.
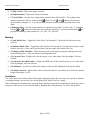
Limitations
You are not allowed to exit this dialog if the image resulting from the edits is too large to be placed on a button.
A warning message is given when you exit this dialog if the Mask Color list is empty.
Due to floating point rounding errors, an image that is displayed as inside the acceptable size limits may cause a
sizing error when you try to exit from this dialog. Bumping the scaling down by 1% will fix this problem.
Page 11 of 35
AcroButtons User’s Manual
Windjack Solutions
JavaScripts
Many large applications use some sort of internal scripting language as a way of automating tasks. JavaScript is
the programming language Acrobat® uses as its’ internal “Scripting” language. Acrobat’s implementation of
JavaScript is more than just a way of allowing you to automate repetitive tasks though. There are actually more
things that you can do with it than if you were just clicking through the menus and toolbars. JavaScript is also
one of the most powerful ways to add interactivity to your documents. In Acrobat®, JavaScript can operate at
several different security levels, depending on where the JavaScript is physically located, the version and type
of Acrobat, and on special security features build into a document. The two most important of these levels for
AcroButtons are “Folder” and “Document.”
See the Acrobat® JavaScript Reference for more information.
http://partners.adobe.com/asn/acrobat/sdk/public/docs/AcroJS.pdf
Basics
Folder Level
Folder Level JavaScript code is kept in files with a .js extension. Acrobat® looks for these files at startup in two
different locations.
Public JavaScripts Folder – <Acrobat 6.0 Installation Folder>\Acrobat\Javascripts
Your Private JavaScripts Folder –
<Documents and Settings>\<User Name>\Application Data\Adobe\Acrobat\6.0\JavaScripts
Folder Level scripts are the place to put code to automate a repetitive or difficult task, or to do something you
could never do with the regular Acrobat® menu commands, like create a new blank PDF file.
WARNING: Acrobat comes with 5 Folder Level JavaScript files. These files are very important.
• aform.js
• ADBC.js
• annot.js
• debugger.js
• media.js
Do not delete these files. They are very good reading and contain a multitude of useful utility functions that
you can use in any script you write.
Document Level
Document Level JavaScripts are stored in a PDF Document. They can exist in several different locations, and
levels, within a document. Scripts can be attached to Form Field Objects, like buttons and edit boxes, or they
might be set up to execute when the document is opened or closed.
Because of security restrictions on documents, a Document Level JavaScript has less access than a Folder Level
JavaScript. For example, a Document Level JavaScript can’t access another document unless that document
allows it. There are other and more complex restrictions on JavaScripts (see the Acrobat JavaScript Reference).
Page 12 of 35
AcroButtons User’s Manual
Windjack Solutions
AcroButtons JavaScript Files
AcroButtons creates Folder Level JavaScripts and stores them in the Public JavaScripts Folder. If you move an
AcroButtons JavaScript file into your private folder it will operate normally, but AcroButtons will not be able to
interact with it. This file is very portable and will work with any Acrobat® 6.0 or Reader 6.0.
Note: Reader has restrictions on the JavaScript it will execute.
AcroButtons is able to interact with the files it creates because it places XML style tags throughout the file and
enforces some formatting restrictions. The tags are embedded in comments so they do not interfere with the
JavaScript. You are free to edit these files, and in some cases it is recommended, but be careful of the tags.
There are three locations within the file that may be of interest to you.
1. Between the <CodeAbove> and </CodeAbove> tags.
Code placed here is mostly ignored by AcroButtons and is stripped from the file before it is embedded in
a PDF Document.
2. Between the <JSCodeSnippet type=ButtonCommand> and </JSCodeSnippet> tags
The code here is executed when your button is clicked.
3. Between the <JSCodeSnippet type=ButtonEnable> and </JSCodeSnippet> tags
The code here controls the Button Enable.
The large block of hexadecimal text at the top of the file is the image data. Acrobat® expects this data to have
a length that exactly matches the given dimensions of the image. Do not edit this code or any of the code that
immediately follows it unless you know what you are doing.
Running, Editing, and Debugging AcroButtons JavaScripts
While in Acrobat®, you can always re-edit your button JavaScripts with the menu option
Advanced–>AcroButtons–>Edit an AcroButton
This menu option displays the Setup Panel, where you can edit your code. After you have completed your edits
and pressed the OK button, AcroButtons essentially recreates the button with the new JavaScript action. It does
this by attaching the code to a hidden document so you don’t have to restart Acrobat to try your code. While this
method allows you to change and test your code quickly, it has two drawbacks. First, the code is essentially
running at the document level instead of Folder Level, so there are some security restriction that mean with
some scripts you may have to restart Acrobat. Second, it does not allow you to use the Acrobat JavaScript
Debugger to step through the code.
Your best results will be achieved by testing your button while at the same time watching the JavaScript
Console Window in Acrobat’s Debugger. All errors are reported here, but because of the way AcroButtons
loads the button script into Acrobat®, line #1 is always given as the location of the error, so you may at some
point really need to use the debugger.
To use the Acrobat JavaScript Debugger, close Acrobat® and restart it. This forces Acrobat® to reload your
button JavaScript. At this point, the debugger is aware of your code, so you can set break points in it and the
line numbers are reported correctly for errors in the console window.
See the Acrobat JavaScript Guide for details about debugging JavaScripts
http://partners.adobe.com/asn/acrobat/sdk/public/docs/AcroJSGuide.pdf
Page 13 of 35
AcroButtons User’s Manual
Windjack Solutions
JavaScrippets
JavaScrippets are short sections of JavaScript that can easily be included in the code AcroButtons executes. A
short list of JavaScrippets comes with AcroButtons in the “JavaScrippets.jsx” file. This file is placed in the
Windjack subfolder of the Acrobat Plug-ins directory. This is the same directory where the AcroButtons.api
lives.
These JavaScrippets are accessed from the “JavaScrippets” button on the Setup Panel. All JavaScrippets in this
file appear in a popup menu when this button is pushed.
(See the JavaScrippets Reference for specific information on the JavaScrippets included with AcroButtons.
Making Your Own JavaScrippets
All the JavaScrippets can be modified, added to, or customized by editing the JavaScrippets.jsx file. You can
also create your own JavaScrippets file by copying the format of the one provided.
A simple XML format is used in this file. There are no Document Prolog, Type, or Schema definitions. The
first line of the file is the <JavaScrippets> tag, which is the root node for the document. This is followed by a
series of <JavaScrippet> </JavaScrippet> tags. These tags contain the actual JavaScrippets.
Each <JavaScrippet> tag has a “name” and a “desc” attribute. The values of these attributes appear in the
JavaScrippets preview window when a JavaScrippet is selected from the popup menu. The “name” attribute is
required.
You may not use the angle bracket characters ‘<’ and ‘>’ within the <JavaScrippet> tags. Use “<” and
“>” instead. This text will be replaced by the appropriate symbol when the code is brought into the Setup
Panel.
Embedding Toolbar Buttons into a PDF Document
One of the really great features Adobe® built into Acrobat® 6 was the ability to use the “app.addToolButton”
JavaScript command from inside a Document Level JavaScript. You can’t add a menu from the Document
Level, so this is the only way to create a Document Control that’s outside the document. This feature is a great
way to access functionality you want available from anywhere on the document without having to put a button
on every page. For example: a reference document might place a “GoTo Index” button on the toolbar. A very
long form could use an always visible “Submit” button, and a brochure could have an always clickable “Buy
Now” button.
Toolbar buttons created from a document have the same security restrictions as all other Document Level
scripts. Plus, the button will only work for the document it is embedded in. If another PDF Document has the
mouse and keyboard focus, the button simply won’t do anything.
AcroButtons embeds the button JavaScript at the top level in the document. This means the code is executed
when the document is opened. AcroButtons also places one line of code in the document’s “Will Close” action
for removing the button from the toolbar.
You can edit this code in the Acrobat® JavaScript Editor. Use the menu options:
•
Advanced–>JavaScript–>Document JavaScripts – For the main button script.
Page 14 of 35
AcroButtons User’s Manual
•
Windjack Solutions
Advanced–>JavaScript–>Set Document Actions – For the “Will Close” action.
Button Names
Before button JavaScript is embedded into a document, the names of the button itself and some of the functions
are renamed so they don’t cause a conflict with the button already on the toolbar. Unless you dig into the
JavaScript, you won’t see any of these except the Button Name, which you’ll see in the button listing when you
use the Remove an Acrobutton menu option. Buttons that have been embedded will be appended with
“_embedded.”
Toolbar Buttons must be unique. Acrobat will not load two buttons with the same name. AcroButtons tries to
keep track of possible naming problems, but you must also be careful. AcroButtons will not allow you to add a
button to a document already containing a button with the same name. However, it is very possible if you do a
lot of embedded buttons that you will try to open two documents containing buttons with the same name. These
name collisions are fairly benign. The biggest problem they can cause is stopping execution of all of the
document’s JavaScripts, so nothing happens after the collision occurs. AcroButtons includes code in the button
JavaScript to catch the exception the name collision causes, report it to you in an alert box, and continue
execution of the rest of the Document code.
There is a situation where you are guaranteed to have name collisions, editing the Document JavaScripts of a
PDF that has a toolbar button embedded in it. When you close the Document JavaScripts Dialog, Acrobat tries
to reload and run all of these scripts. But because this document already has a button on the toolbar, running the
button JavaScript again will cause a name collision. No real problem is caused, but you get a dialog for every
name collision. Fortunately there is a solution. In the JavaScrippets that come with AcroButtons, there is one
called Toggle Name Collision Reporting. Make a button with this script. Be sure to edit the button code
according to the instructions in the comments.
Removing Embedded AcroButtons from a Document
1. Delete the main button JavaScript.
a. Use the menu option Advanced–>JavaScript–>Document JavaScripts
to display a list of all the Document Level scripts in this file.
b. Select the JavaScript containing the button you want to delete. If you are not sure of the
button’s name, a window at the bottom of the dialog shows the actual code. You should be able
to recognize the tooltip of your button close to the bottom of this text.
c. Click on the Delete Button. Done.
2. Remove a line of code from the “Will Close” action.
a. Use the menu option Advanced–>JavaScript–>Set Document Actions
b. Select “Document Will Close” from the list
c. Click on the “Edit…” button
d. Now find the line of code that looks like
app.removeToolButton('JSButton<button name>');
matching the name of your button.
e. Delete this line.
f. Exit the JavaScript Editor.
3. Remove Button From Toolbar
Page 15 of 35
AcroButtons User’s Manual
Windjack Solutions
a. Use Advanced–>JavaScript–>Remove an Acrobutton…
b. Select the name of the button you want to remove.
c. Click on OK.
Page 16 of 35
AcroButtons User’s Manual
Windjack Solutions
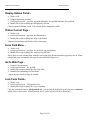
AcroButtons© Quick Start Guide
There are two ways to start making your own Acrobat Toolbar Button.
button on Acrobat’s Advanced Editing Toolbar.
1. Press the
If this toolbar is not visible, then activate it from the menu option
View–> Toolbars–> Advanced Editing.
2. Select the menu option
Advanced–>AcroButtons–>Create New AcroButton
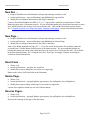
Each of these methods starts the process of creating a new toolbar button. There are 4 steps to this process.
1.
2.
3.
4.
Select the image to appear on the button face.
Prepare the image for placement on the button.
Name the file the button JavaScript will be written to.
Setup the button parameters.
The first dialog in this process is the Image Source. This dialog gives you 3 options for selecting the image to
be placed on the button. The Quick Select option is by far the easiest option for getting a button fast. The other
two options give you a much greater range of image selection, but require you to do some image preparation.
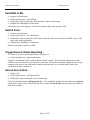
Quick Select Method:
This method lets you choose from over 250 pre-defined images provided with AcroButtons. These icon images
are ready to be placed on the toolbar with no image preparation required.
The following example creates a “Next Page” button.
1. Press the Button
.
2. In the Image Source dialog check Quick Select.
Make sure Don’t Open Quick Select Doc is UN-Checked.
3. Click OK.
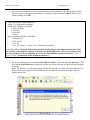
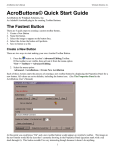
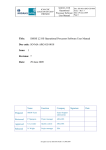
4. The Quick Select PDF document will open. Below is a small section of the Quick Select PDF
document. As the cursor passes over an image on the page, the outlines of the image are highlighted and
Page 17 of 35
AcroButtons User’s Manual
Windjack Solutions
text is added to the cursor that indicates the type of image that will be selected on a click. For this
exercise choose the Right Arrow image.
5. Place the cursor on the Right Arrow and click once.
This completes Image Selection.
6. The next dialog is for choosing the name of the Button’s JavaScript file. The name of this file is also
the name of the Button. Do not change the Save in directory.
Enter NextPage.
Note: Do not use spaces in the file name.
7.
Click Save.
8. In this step the AcroButtons Setup Panel provides all the rest of the information needed to make the
button. Defaults are provided for all values, so if you just want to see the image on the button without
JavaScript functionality, you can skip to #14. You can Edit the file and add JavaScript functionality
later.
Page 18 of 35
AcroButtons User’s Manual
Windjack Solutions
9. ToolTip. This is the helpful text that pops up if the cursor hovers over your button for more than a
second or two.
Enter “Goto Next Page”
10. Button Position – From the left edge of the button bar. New buttons always default to -1, which is the
end of the list.
Leave as is.
11. Button Enable – This condition is used to determine when to Enable the button. When the button is
disabled, it’s Grayed Out.
Leave as is.
12. JavaScrippets – Press this button to see the list of included JavaScrippets (short JavaScript
Programs).
Press this button and Select Next Page.
13. Selecting a JavaScrippet brings up the JavaScrippet Pre-viewer dialog. Use this dialog to verify this
is the JavaScript you want to use.
You may also use this dialog to select the text to be used for the Button’s tooltip.
Leave the ToolTip set at Don’t change Existing ToolTip and press Use This JavaScrippet.
Page 19 of 35
AcroButtons User’s Manual
Windjack Solutions
14. The code for the selected JavaScrippet now appears appended to the code already entered in the
JavaScript entry box of the Setup Panel. You can edit this code to suit your needs or select another
JavaScrippet to append to this one.
Leave the current code as is and press OK.
15. The AcroButton with the Next Page image and JavaScript function is now on the Acrobat Add-on
Tools Toolbar. The button will appear grayed out on the toolbar since we chose to enable the button
only “When a Document is Open.” Open any PDF document to enable the button. Notice the ToolTip,
and if your document has multiple pages click on your new Next Page button, the page view changes
appropriately. Pretty Cool!
NOTE: AcroButtons Quick Select can also be used with images from any PDF document. Please see the
Tutorial “Using AcroButtons Quick Select with Images from any PDF Document.”
Have fun playing with AcroButtons! There are more things you can do with this tool than we can think of, but
if you have any special requests please let us know.
Any problems, questions or suggestions please send us email: [email protected].
Page 20 of 35
AcroButtons User’s Manual
Windjack Solutions
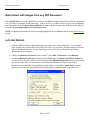
Quick Select with Images from any PDF Document
In the “Quick Start” tutorial we showed how to create AcroButtons using the Quick Select PDF document with
over 250 ready to go images for the button face. In this exercise, we’ll show two new ways to use AcroButtons.
You’ll learn how to use the Quick Select Method with images chosen from any open PDF document, and how
to use the 32 pixel height option in the Preferences menu.
NOTE: For detailed information on selecting images appropriate for AcroButtons please see the Button Images
section.
Let’s Get Started:
1. Open the PDF document containing the image you want to use for the button face. Your company
logo would be an excellent choice, but since I can’t show you yours here, for this example I’ll use the
logo for Windjack Solutions. For the JavaScrippet action we’ll put up a dialog box providing
information on the company.
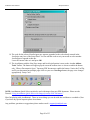
2. Change AcroButtons Preferences in the Acrobat® menu Edit–>Preferences–>AcroButtons.
3. In the AcroButtons Preferences dialog box check 32 pixels in the Quick Select Button Height box.
For this exercise we won’t make any more changes to AcroButtons Preferences but note that you can
also select from a choice of mask colors, and turn the AcroButtons ToolTips on and off here.
Quick Select automatically scales all images to this height. It is possible to Quick Select an entire
page for your image, but large reductions can produce poorer quality images on the button face.
Page 21 of 35
AcroButtons User’s Manual
Windjack Solutions
4. Activate Button Creation by clicking on the AcroButtons icon
.
5. In the AcroButtons Image Source Dialog check Quick Select. Since we won’t be using an image
from the Quick Select document, check the Don’t Open Quick Select Doc box.
6. Click OK.
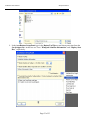
7. Place the cursor over the image for the button face. AcroButton’s cursor will indicate object type
(forms, pages, images, etc.) as it passes over them. Click on the image.
8. Enter the name for the new file (using no spaces) – in this case WindjackSolutionsLogo. Click Save.
Page 22 of 35
AcroButtons User’s Manual
Windjack Solutions
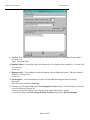
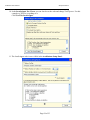
9. In the AcroButtons Setup Panel type in the Button ToolTip text and choose an action from the
JavaScrippet list– in this case we’ll use “Windjack Solutions Information” and “Display Alert
Box,” respectively.
Page 23 of 35
AcroButtons User’s Manual
Windjack Solutions
10. In the JavaScrippet Pre-Viewer you can check over the code and change ToolTip text. For this
example we’ll leave everything as is.
Click Use This JavaScrippet.
11. The JavaScrippet code is now visible in the AcroButtons Setup Panel–
Page 24 of 35
AcroButtons User’s Manual
Windjack Solutions
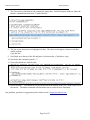
12. Next we need to modify the code to show information on the company. The code in the box below
shows how this JavaScrippet was modified to our purpose– the text entered is Bold. When you are
finished editing, click OK.
// This Function Has 4 input parameters
// cMsg: Text Displayed in AlertBox
// nIcon: Icon to display in AlertBox
//
0: Error (default)
//
1: Warning
//
2: Question
//
3: Status
// nType: Buttons to display on AlertBox
//
0: OK (default)
//
1: OK, Cancel
//
2: Yes, No
//
3: Yes, No, Cancel // cTitle: Text on Title Bar of AlertBox
app.alert({cMsg: "Windjack Solutions has been developing plug-ins and Adobe solutions since 1997.
Our specialty is the rapid development of modules and small applications. We have developed and/or
were team members in the development of several successful products on the market today", nIcon: 3,
nType: 0, cTitle: "Information about Windjack Solutions"});
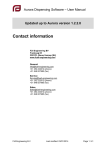
13. The new AcroButton is now on the Acrobat Add-on Toolbar. Notice the larger 32 pixel size. Click
on it and the Alert Dialog box will pop-up with the title and information we typed in about Windjack
Solutions.
Note: The Red Line is on the button image because this example was done with an Evaluation Copy.
Be sure to enter your paid for Serial Number in the AcroButtons About Box to produce buttons
without the red line.
Page 25 of 35
AcroButtons User’s Manual
Windjack Solutions
Now is that cool or what? This example shows how to use just one of the JavaScrippets included with
AcroButtons. Check out the others too- there are sure to be a few that will help your Document Process.
Any problems, questions or suggestions please send us email: [email protected].
Page 26 of 35
AcroButtons User’s Manual
Windjack Solutions
Using the New Doc, New Page, and Apply Template JavaScrippets
All three of these JavaScrippets contain code that for security reasons cannot be executed directly from a
Toolbar Button. You will have to manually edit the button’s JavaScript file to set it up properly.
1. Create a button and Select one of the JavaScrippets named in the title of this section. Notice there is
code commented out at the beginning of the JavaScrippet and there are some instructions in the
comments above it.
2. Close Acrobat®.
3. Start Windows Explorer and navigate to Acrobat’s Public JavaScript Directory. Usually this is located
at:
C:\Program Files\Adobe\Acrobat 6.0\Acrobat\Javascripts
4. Look for the file named <Your Button Name>.js
5. Load this file into your favorite JavaScript Editor. If you don’t have one, use Notepad.
6. The top of the file looks like this (See box below). Acrobuttons inserts tags into the comments so it can
recognize it as an AcroButtons JavaScript file. The real button code begins below the <AcroButtons>
tag.
The <CodeAbove> Block is where the extra code in the JavaScrippet should be placed. The code placed
here is executed when Acrobat® starts up. Code executed at startup has very high security rights. This
is how we are going to get around the restrictions on code executed from a ToolBar Button.
Page 27 of 35
AcroButtons User’s Manual
Windjack Solutions
7. The First section of the button code contains the image data. Scroll Down past all this to where the
button’s command function starts. It looks like this-
8. The line we are interested in is highlighted in blue. The other JavaScrippets with extra code have
similar sections.
Copy this line.
9. Scroll back up to the top of the file and paste it in between the <CodeAbove> tags.
10. Now delete the comment symbols “//”.
11. Your code should now look like this-
12. Restart Acrobat®. You should have a new menu item at the bottom of the “File” menu called “New
Document”. The button command calls this menu item to create the New Document.
Any problems, questions or suggestions please send us email: [email protected].
Page 28 of 35
AcroButtons User’s Manual
Windjack Solutions
JavaScrippets Reference
Add Current Date to Doc •
•
•
Works As Is
JavaScript Functions – doc.getField, doc.addField, util.printd doc.getPageBox, new Date()
Modify this script to change the text field placement and date format.
Places the Current Date in a Text Field at the Top of the First Page. Only creates the field if it doesn’t
already exist.
Add File Name to Doc •
•
•
Works As Is
JavaScript Functions – doc.getField, doc.addField, doc.getPageBox, doc.path
Modify this script to change the text field placement and path format.
Places the Document's Name and Path at the Top of the First Page. Only creates the field if it doesn’t
already exist.
Add Modified Date to Doc •
•
•
Works As Is
JavaScript Functions – doc.getField, doc.addField, getPageBox,
Modify this script to change the text field placement and date format.
Places the Document's Last Modified Date in a Text Field at the Top of the First Page. Only creates the
field if it doesn’t already exist.
Add Next/Prev Page Buttons to Doc •
•
•
•
Works As Is
Requires restarting Acrobat
JavaScript Functions – app.alert, doc.getField, doc.addField, doc.getPageBox
Modify this script to change the button placement and style.
Adds Previous and Next Page Buttons to either the current page or all pages in the document.
Page 29 of 35
AcroButtons User’s Manual
Windjack Solutions
Apply Template to Doc •
•
•
Requires Modification of the Button JavaScript and restarting Acrobat to work.
JavaScript Functions – doc.getField, field.browseForFileToSubmit, doc.insertPages,
doc.createTemplate, template.spawn, doc.deletePages, app.execMenuItem
Modify this script to change how the template is applied.
User uses the Get File Dialog to choose a PDF to use as a template. This file is appended to the end of the
current document. Then it is turned into a template and applied to all pages of the Document. Very few of
these operations can be done from a Toolbar Button Script because of document security. We get around
that problem by placing all the important code in a menu item, which does have the security level to execute
this code. Then call the menu item from the button. See “Using the New Doc, New Page, and Apply
Template JavaScrippets” section for detailed instructions.
Author Alert Box •
•
•
•
Requires Customization
JavaScript Functions – app.alert
Modify this script to customize the Author Information.
Intended for Embedding in a Document.
Displays Author’s Information in an Alert Box.
Change Annot Opacity •
•
•
Works As Is
JavaScript Methods – doc.getAnnots, doc.getAnnot, app.popUpMenu
Modify this script to change the Annotation properties affected.
Displays a menu of Annotation’s Name These names are created automatically by Acrobat, so they don’t
look like much. When the user selects an annotation, that annotations opacity is toggled between .5 and 1.
At 0.5 opacity the annotation has a water marked look. Use this script as a starting point for creating a tool
to change an annotation the way you want it.
Create Custom Text Field •
•
•
Requires Customization
JavaScript Methods – app.alert, doc.addField, doc.getPageBox, field.setAction
Modify this script to customize the field’s look.
Creates a very customized text form field in the center of the screen. Use this script as a starting point for
scripts that create custom form fields.
Page 30 of 35
AcroButtons User’s Manual
Windjack Solutions
Create Menu Report •
•
Works As Is
JavaScript Methods – app.listMenuItems, report.writeReport report.divide, report.indent, report.outdent,
thermometer.begin, thermometer.end, app.popupMenuEx
Creates a new PDF Document containing a very useful list of Menu Item Names exactly as you need them
to call the app.executeMenuItem.
Delete All Fields W/Name •
•
•
Works As Is
JavaScript Methods – doc.getField, doc.removeField, app.popUpMenu
Modify this script to change the action applied to the Field.
Displays a menu of field names. The selected field is deleted from the document. Use this script as a
starting point for any script that applies an operation to a Form Field.
Disclose PDF •
•
•
Works As Is
JavaScript Methods – doc.addScript
Modify this script to change the JavaScript that is added to the Document
Adds a Document JavaScript to the current Document, in this example the script changes the Disclosed
property of the document when it is opened by Acrobat. You could substitute your own JavaScript for this
one.
Display Alert Box •
•
•
Requires Customization
JavaScript Functions – app.alert
Modify this script to customize the alertbox message, title, Icon, and buttons.
Use this script as an example anytime you need to display an alert box.
Display Annot Flags •
•
•
Works As Is
JavaScript Functions – app.alert, app.popUpMenu, doc.getAnnots,
Modify this script to display different information.
Creates a menu of Annotation names. The values of the Annotation’s flags are displayed in an alert box.
Page 31 of 35
AcroButtons User’s Manual
Windjack Solutions
Display Hidden Fields •
•
•
•
Works As Is
Requires Restarting Acrobat
JavaScript Functions – app.alert, app.popUpMenuEx, doc.getNthFieldName, doc.getField
Modify this script to change the field property affected.
Creates a menu of Hidden Fields. The selected field is changed to visible.
Flatten Current Page •
•
•
Works As Is
JavaScript Functions – app.alert, doc.flattenPages
Modify this script to change the range of the flatten.
Flattens all Annotations and Fields on the current page.
Form Field Menu •
•
•
Works As Is
JavaScript Functions – app.alert, doc.getField, app.popUpMenu,
Modify this script to change the action on selected field.
Shows how to create a menu filled with all Form Fields in the document and the pages they are on. When
selected the view is changed to the page the selected Field Widget is on.
GoTo Web Page •
•
•
•
Requires Customization.
JavaScript Functions – doc.getURL
Modify this script to change the Web Page URL.
Intended for Embedding in a Document.
. Opens the specified Web Page in Acrobat.
Lock Form Fields •
•
•
Works As Is.
JavaScript Functions – AFSignatureLock
Modify this script to change the scope of locking.
Calls the predefined function AFSignatureLock, you can find the definition for this function in aform.js,
which comes with Acrobat. All this function does is set the specified fields to Read Only.
Page 32 of 35
AcroButtons User’s Manual
Windjack Solutions
Mail Form Data •
•
•
•
Requires Customization.
JavaScript Functions – doc.mailForm
Modify this script to change the email Recipient.
Intended for Embedding in a Document.
eMails Form Data to the specified recipient with no user interaction. Email is placed in the user’s email
outbox, but is not actually sent.
Mail PDF File •
•
•
Requires Customization.
JavaScript Functions – doc.mailDoc, app.response
Modify this script to change the email Recipient, subject, and message.
User is asked for a recipient name. The PDF file is then attached to an email message and placed in the
user’s email outbox.
Make Web Links •
•
Works As Is.
JavaScript Functions – doc.addWebLinks, app.alert
Scans Page for text in URL format, Adds a Link Annotation over the URL text.
Move Page Down •
•
•
Works As Is.
JavaScript Functions – doc.movePage
Modify this script to change the action of the move.
Moves The Current Page to After the Next Page.
Move Page Up•
•
•
Works As Is.
JavaScript Functions – doc.movePage
Modify this script to change the action of the move.
Moves The Current Page to Before the Previous Page.
Next Page •
•
Works As Is.
Modify this script to change the action to Previous page (this.pageNum -= 1;).
Changes Page View to the next page.
See “Using the New Doc, New Page, and Apply Template JavaScrippets” section for detailed instructions.
Page 33 of 35
AcroButtons User’s Manual
Windjack Solutions
New Doc •
•
•
Requires Modification of the Button JavaScript and restarting Acrobat to work.
JavaScript Functions – app.execMenuItem, app.addMenuItem, app.newDoc
Modify this according to instructions in the script’s comments.
Creates a New Blank Standard size PDF (8.5” x 11”), app.newDoc cannot be executed from a Toolbar
Button Script because of document security. We get around that problem by placing this function in a menu
item, which does have the security level to execute this code. Then call the menu item from the button.
See “Using the New Doc, New Page, and Apply Template JavaScrippets” section for detailed instructions.
New Page •
•
•
Requires Modification of the Button JavaScript and restarting Acrobat to work.
JavaScript Functions – app.execMenuItem, app.addMenuItem, this.newPage
Modify this according to instructions in the script’s comments..
Adds a New Blank Standard size Page (8.5” x 11”) to the end of the document, doc.newPage cannot be
executed from a Toolbar Button Script because of document security. We get around that problem by
placing this function in a menu item, which does have the security level to execute this code. Then call the
menu item from the button. See “Using the New Doc, New Page, and Apply Template JavaScrippets”
section for detailed instructions.
Reset Form •
•
•
Works As Is
JavaScript Functions – app.alert, doc.resetForm
Modify this script to change the reset action to a single page.
Removes the values of all form fields in the Document.
Resize Page •
•
•
Works As Is
JavaScript Functions – app.popUpMenu, app.response, doc.getPageBox, doc.setPageBoxes
Modify this script to change which page’s reset action it is applied to.
Lets the user expand or shrink any one side of the document.
Reverse Pages •
•
Works As Is
JavaScript Functions – app.popUpMenu, app.response, doc.getPageBox, doc.setPageBoxes
Reverses the ordering of all pages in the Document.
Page 34 of 35
AcroButtons User’s Manual
Windjack Solutions
Send Mail to Me •
•
•
•
Requires Customization.
JavaScript Functions – app.mailMsg
Modify this script to change the email Recipient, subject, and message.
Intended for Embedding in a Document.
Invokes the users email program. Fills in the recipient, subject and message fields.
Submit Form •
•
•
•
Requires Customization.
JavaScript Functions – doc.submitForm
Modify this script to change the URL used to submit the form, the data format to XFDF or any of the
many other submit parameters.
Intended for Embedding in a Document.
Submits Form Data to a Server as FDF.
Toggle Name Collision Reporting •
•
Works As Is, But a small modification will improve it.
JavaScript Functions – global.setPersistent
Toggle the AcroButtons Name Collision Report Global Variable. This JavaScript changes how name
collision errors are reported by your Button’s JavaScript. The small modification suggested in the script’s
comments will improve your interaction with the button and show you a toolbar button feature that
Acrobuttons doesn’t currently set.
Unlock Form Fields •
•
•
Works As Is.
JavaScript Functions – AFSignatureLock
Modify this script to change the scope of unlocking.
Calls the predefined function AFSignatureLock. You can find the definition for this function in aform.js,
which comes with Acrobat. All this function does is turn off the Read Only flag for the specified fields to
make them writable.
Page 35 of 35