1
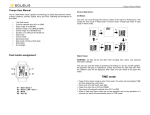
DK SWITCH USER MANUAL
Safety
Do not use the switch
with wet hands. You could
cause an electric leak or
injure yourself.
Do not install the switch
when the main power supply
is ON. An electric shock
might occur.
Installation
WARNING !
Make sure the main power supply is turned OFF when installing the switch.
Basic wiring knowledge is required to ensure no injury and/or damage will be inflicted onto the user
and/or switch.
Tools needed: Screwdriver
First, turn ON the switch for the particular section (the section where you want to install the <DKSwitch>). Next, turn
OFF the fuse on the main fuse box one by one to identify the sections’ fuse. Alternatively, you may choose to turn
OFF the main power supply.
Remove the old wall switch by unscrewing the screws (normally covered by a plug)
Identify the wires; Common Live(L), Load 1(T1), Load 2(T2), etc. (The Loads can either be ceiling fan or lighting
load)
Once you have identified them, unscrew the wires from the old wall switch.
Insert the Common Live wire to the gang with the label (L) on the <DKSwitch>. Secure the gang screw.
Insert the Load 1 into the (T1) slot. Secure the gang screw. Insert any additional load wires to the other gangs. Secure
the gang screws.
Place the <DKSwitch> back to the original switch position and secure the screws.
Turn the main power supply back ON.
Troubleshooting
<DKSwitch> is designed to operate the best at its specified load. However, minor problems might arise even if it is used
properly. With such cases, users are advised to read through the following steps. Keep in mind that only trained electricians
are able to troubleshoot the circuitry of the switches, and therefore it is not advised to dismantle the switches' circuit.
If the light does not turn ON:
Check if
the main power supply is turned ON
if not:
►turn ON the main power supply.
►if it still does not work, please read through
the bulb or fluorescent light is burnt out
►replace the bulb or the florescent light
there is loose wiring
►<Check the Installation section of this manual>
If the fluorescent light flickers
►replace the fluorescent starter
the fuse is broken
►change the fuse (2A)
the remote control’s batteries' power depleted
►change the batteries
the fluorescent starter is defective
►replace the starter
there is a faulty switch
►please call the distributor(?)
1
How to change the fuse
Press here
dfgdfgdfsg
fger open
the front
1.Turn OFF the main power supply.
cover
2. Open the front of cover switch by press
the place that shown by the arrow .
1. Open the fuse cover by using screwdriver (no need to open all
of fuse cover)
2. Then replace the broken fuse with new 2 Amp fuse.
Features
Wall Switch AND Remote Control Buttons
You can choose to manually turn ON the switch or use the Remote Control (up to 15 meters)
Set Your Own Buttons:
You can turn ON/OFF any set of lights by assigning a single load or a group of loads to any
button on the remote control
Turn ON one or more loads by pressing a single button
Sleep Timer:
<DKSwitch> has a Sleep Timer, designed to switch OFF the lights after a period of time. (15, 30, 45, 60 minutes
interval)
Suitable for switching off lights at night.
Open Circuit:
<DKSwitch> is designed with open circuit detection.
If one or more gang at the <DKSwitch> is an open circuit, the gang would not function when turn ON.
However, if other gangs that are functioning are turned ON, the open circuit gang can be turned ON.
Open circuit gangs would not cause hazard or wastage.
Power Failure:
<DKSwitch> is design to keep current on/off states throughout period of power failure.
Under cases where power supply recover from failure, the switched would be brought back to their state before power
failure happen; gangs that were ON would be brought back ON automatically within 3 to 12 seconds.
1
Remote Control features
Red LED
Green LED
ON All
OFF All
Channel A
Channel B
0 to 9 Button
Sleep Timer
Cancel
Shows that Remote Control is functioning.
Shows that Sleep Timer is activated?.
To (switch) ON all of the <DKSwitch> at the same time.
To (switch) OFF all of the <DKSwitch> at the same time.
Setting the <DKSwitch> from 1 to 10 (I dont get it).
Setting the <DKSwitch> from 11 to 20.
ON/OFF <DKSwitch>.
To switch OFF the lights after a period of time. (15, 30,
45, 60 minutes interval)
To Cancel the settings.
2
3
5
7
4
2
6
8
9
How to switch ON/OFF:
1
2
3
To switch ON/OFF a load, press the switch according to the gang it is
connected to.
4
or
Press the button on the
remote control.
.
Before you can use your remote control to control your lightings, you have to set the buttons according to
the lights you wish to turn ON.
1.Press and HOLD
2. Wait until the switch starts blinking,
the desired switch
1
2
3
4
press number 1 button on the
remote control or any other
preferred button while still holding
the wall switch button. When the
blinking stops, the button is set
1 or any
3. To group 2 or more loads to
one button, press the 2nd switch;
Repeat step two.
1
3
2
4
How to Use the Sleep Timer:
1. To activate the Sleep Timer you 2. Next, press the button on the remote
need to press the TIMER SELECT
button to select the timer (15, 30,
45, 60 minutes time interval)
control unit you want to set the timer to. 3.
The wall switch button will blink indicating1.
that it has the timer set
3
3. To cancel the timer simply
press the button that you set to use
the sleep timer
How to Use Switch Timer for DK20
1.
To choose 12 hours ON, 12
hours OFF
To choose 4 hours ON, 20
hours OFF
To choose 1 hour ON, 23
hours OFF
To choose scene changing
mode
1) Press on any gang you
want to set for timing When
LED is OFF and hold on
pressing until the switch
starts blinking. (Do not
release the key until step 3
completed).
1) Press on any gang you
want to set for timing When
LED is OFF and hold on
pressing until the switch
starts blinking. (Do not
release the key until step 3
completed).
1) Press on any gang you
want to set for timing When
LED is OFF and hold on
pressing until the switch
starts blinking. (Do not
release the key until step 3
completed).
1) Press on any gang you
want to set for timing When
LED is OFF and hold on
pressing until the switch
starts blinking. (Do not
release the key until step 3
completed).
2) Press on Sleep button in4.
Remote Control Unit, 45 min
LED will be ON.(step 3 must
be completed before 45 min
turned OFF
2) Press on Sleep button in
Remote Control Unit, 60 min
LED will be ON.(step 3 must
be completed before 60 min
turned OFF
2) Press on Sleep button2.
in Remote Control Unit, 15
min LED will be ON.(step 3
must be completed before
15 min turned OFF
3.
2) Press on Sleep button
in Remote Control Unit, 30
min LED will be ON.(step
3 must be completed before
30 min turned OFF
3) Press:
“1” The mode will start after 1 hour delay .(ex. If press “2” the mode will start after 2 hours delay and so on until
9).
“B” then press “0” it will start after 30 min(s) delay. (ex. If press “1” the mode will start after 1.5 Hours delay
and so on until 9).
4) Press “ON ALL” if want to adding another 10 Hours for the current setting delay.
TIPS: 1. The setting for turn ON the mode after 23 Hours can be made by follow the step 1 to 2 then step 3 press the button “3”
and press “ON ALL” twice. Thats means we put 3 hours delay and add 10 hours 2 times and all become 23Hours.
(P/S: the setting must be done within the SLEEP TIMER according to mode that been chosen).
2. Mode can be CANCEL by pressing the wall switch until the LED blinking then press OFF ALL.
4