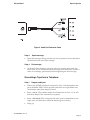
1
Telephone Line Simulator
TLS-4A and TLS-5X
User’s Manual
40-400-00033, Rev. C
Note
This manual covers Models TLS-4A-01 and TLS-5X-01.
In this manual, all references to Model TLS-4A also apply to the Model TLS-5X, which is a form-, fit-,
and function-equivalent unit.
Copyright Notice
Copyright © 1994 - 2003 Teltone Corporation
All Rights Reserved
Trademarks
Teltone is a registered trademark of Teltone Corporation.
Windows is a registered trademark of Microsoft Corporation.
Other company and product names may be trademarks or
registered trademarks of their respective owners.
Teltone Corporation
Bothell, Washington 98021 USA
Customer Service: 425-951-3388
Technical Support: 425-951-3390
Fax: 425-487-2288
Email: [email protected]
Website: www.teltone.com
40-400-00033, Rev. C
Reference Manual
Contents
Contents
IMPORTANT SAFETY INSTRUCTIONS. . . . . . . . . . . . . . . . . . . . . . . . . . . . . . . . . . . . . . . iii
COMPLIANCE INFORMATION . . . . . . . . . . . . . . . . . . . . . . . . . . . . . . . . . . . . . . . . . . . . . iv
Chapter 1: Overview . . . . . . . . . . . . . . . . . . . . . . . . . . . . . . . . . . . . . . . . . . . . . . . . . . . . . . . . . 1
Table 1 Front Panel Switch Functions . . . . . . . . . . . . . . . . . . . . . . . . . . . . . . . . . . . 3
Table 2 LED Indicators . . . . . . . . . . . . . . . . . . . . . . . . . . . . . . . . . . . . . . . . . . . . . . . . 3
Chapter 2: Feature Applications . . . . . . . . . . . . . . . . . . . . . . . . . . . . . . . . . . . . . . . . . . . . . . . 4
Uses for Off-Hook Modes . . . . . . . . . . . . . . . . . . . . . . . . . . . . . . . . . . . . . . . . . . . . . 5
Uses for Hunt Mode . . . . . . . . . . . . . . . . . . . . . . . . . . . . . . . . . . . . . . . . . . . . . . . . . 6
Chapter 3: Installation. . . . . . . . . . . . . . . . . . . . . . . . . . . . . . . . . . . . . . . . . . . . . . . . . . . . . . . . 7
Demonstrating Equipment . . . . . . . . . . . . . . . . . . . . . . . . . . . . . . . . . . . . . . . . . . . . 7
Restoring Defaults. . . . . . . . . . . . . . . . . . . . . . . . . . . . . . . . . . . . . . . . . . . . . . . . . . . . 8
Testing Installations . . . . . . . . . . . . . . . . . . . . . . . . . . . . . . . . . . . . . . . . . . . . . . . . . . 8
Figure 1 Telephone Line Simulator (TLS-4A) . . . . . . . . . . . . . . . . . . . . . . . . . . . . . 9
Chapter 4: Operation. . . . . . . . . . . . . . . . . . . . . . . . . . . . . . . . . . . . . . . . . . . . . . . . . . . . . . . . 10
Setting up a conference call . . . . . . . . . . . . . . . . . . . . . . . . . . . . . . . . . . . . . . . . . . 10
Transferring a call . . . . . . . . . . . . . . . . . . . . . . . . . . . . . . . . . . . . . . . . . . . . . . . . . . 10
Using the Audio Port . . . . . . . . . . . . . . . . . . . . . . . . . . . . . . . . . . . . . . . . . . . . . . . . 12
Making a Tape on a Tape Recorder . . . . . . . . . . . . . . . . . . . . . . . . . . . . . . . . . . . . 12
Generating a Tape from a Telephone. . . . . . . . . . . . . . . . . . . . . . . . . . . . . . . . . . . 13
Figure 2 Audio Port Connector Cable. . . . . . . . . . . . . . . . . . . . . . . . . . . . . . . . . . 13
Playing a Message from the Audio Port . . . . . . . . . . . . . . . . . . . . . . . . . . . . . . . . 14
End of Message Tape Sequence . . . . . . . . . . . . . . . . . . . . . . . . . . . . . . . . . . . . . . . 16
Figure 3 End of Message Tape Sequence. . . . . . . . . . . . . . . . . . . . . . . . . . . . . . . . 16
Chapter 5: Testing Equipment and Installations . . . . . . . . . . . . . . . . . . . . . . . . . . . . . . . . 17
Testing Key Systems or PBX Lines . . . . . . . . . . . . . . . . . . . . . . . . . . . . . . . . . . . . . 17
Manual Continuous Ring Test . . . . . . . . . . . . . . . . . . . . . . . . . . . . . . . . . . . . . . . . 17
Line Wiring/Basic Function Test . . . . . . . . . . . . . . . . . . . . . . . . . . . . . . . . . . . . . . 17
Nonstandard Ring Cadence Test . . . . . . . . . . . . . . . . . . . . . . . . . . . . . . . . . . . . . . 18
40-400-00033, Rev. C
Page i
Telephone Line Simulator 4A
Dial Pad Check . . . . . . . . . . . . . . . . . . . . . . . . . . . . . . . . . . . . . . . . . . . . . . . . . . . . . 18
Telephone Handset Check . . . . . . . . . . . . . . . . . . . . . . . . . . . . . . . . . . . . . . . . . . . 19
Call Progress Tone Test . . . . . . . . . . . . . . . . . . . . . . . . . . . . . . . . . . . . . . . . . . . . . . 19
Test Numbers. . . . . . . . . . . . . . . . . . . . . . . . . . . . . . . . . . . . . . . . . . . . . . . . . . . . . . . 19
Figure 4 Clip Cable Connectors (Used with Terminal Block) . . . . . . . . . . . . . . 21
Figure 5 Key System Test Connections . . . . . . . . . . . . . . . . . . . . . . . . . . . . . . . . . 21
Chapter 6: Programming . . . . . . . . . . . . . . . . . . . . . . . . . . . . . . . . . . . . . . . . . . . . . . . . . . . . 22
Types of Commands . . . . . . . . . . . . . . . . . . . . . . . . . . . . . . . . . . . . . . . . . . . . . . . . . 22
Command Format . . . . . . . . . . . . . . . . . . . . . . . . . . . . . . . . . . . . . . . . . . . . . . . . . . 23
Command Dictionary . . . . . . . . . . . . . . . . . . . . . . . . . . . . . . . . . . . . . . . . . . . . . . . 24
Systemwide Commands. . . . . . . . . . . . . . . . . . . . . . . . . . . . . . . . . . . . . . . . . . . . . . 28
Per-line Commands . . . . . . . . . . . . . . . . . . . . . . . . . . . . . . . . . . . . . . . . . . . . . . . . . 32
Chapter 7: Warranty, Troubleshooting, and Return . . . . . . . . . . . . . . . . . . . . . . . . . . . . . 41
Warranty Information . . . . . . . . . . . . . . . . . . . . . . . . . . . . . . . . . . . . . . . . . . . . . . . 41
Troubleshooting . . . . . . . . . . . . . . . . . . . . . . . . . . . . . . . . . . . . . . . . . . . . . . . . . . . . 41
Figure 6 Fuse Holder Location . . . . . . . . . . . . . . . . . . . . . . . . . . . . . . . . . . . . . . . . 41
Return Procedures. . . . . . . . . . . . . . . . . . . . . . . . . . . . . . . . . . . . . . . . . . . . . . . . . . . 42
Technical Support . . . . . . . . . . . . . . . . . . . . . . . . . . . . . . . . . . . . . . . . . . . . . . . . . . . 43
Chapter 8: Electrical Specifications . . . . . . . . . . . . . . . . . . . . . . . . . . . . . . . . . . . . . . . . . . . . 44
Chapter 9: Ordering Information . . . . . . . . . . . . . . . . . . . . . . . . . . . . . . . . . . . . . . . . . . . . . 46
Appendix A: Glossary. . . . . . . . . . . . . . . . . . . . . . . . . . . . . . . . . . . . . . . . . . . . . . . . . . . . . . . 47
Appendix B: Programming Quick Reference . . . . . . . . . . . . . . . . . . . . . . . . . . . . . . . . . . . 48
Index . . . . . . . . . . . . . . . . . . . . . . . . . . . . . . . . . . . . . . . . . . . . . . . . . . . . . . . . . . . . . . . . . . . . . 51
Page ii
Reference Manual
Contents
IMPORTANT SAFETY INSTRUCTIONS
When using your telephone equipment, basic safety precautions should always
be followed to reduce the risk of fire, electric shock, and injury to persons,
including the following:
1. Read and understand all instructions.
2. Follow all warnings and instructions marked on the product.
3. Unplug this product from the wall outlet before cleaning. Do not use liquid
cleaners or aerosol cleaners. Use a damp cloth for cleaning.
4. Do not use this product near water, for example, near a bath tub, wash bowl,
kitchen sink, or laundry tub, in a wet basement, or near a swimming pool.
5. Do not place this product on an unstable cart, stand, or table. The product may
fall, causing serious damage to the product.
6. Slots and openings in the cabinet and the back or bottom are provided for
ventilation. To protect it from overheating, these openings must not be blocked
or covered. The openings should never be blocked by placing the product on a
bed, sofa, rug, or other similar surface. This product should never be placed near
or over a radiator or heat register. This product should not be placed in a built-in
installation unless proper ventilation is provided.
7. This product should be operated only from the type of power source indicated
on the marking label. If you are not sure of the type of power supply to your
home, consult your dealer or local power company.
8. Do not allow anything to rest on the power cord. Do not locate this product
where the cord will be abused by persons walking on it.
9. Do not overload wall outlets and extension cords as this can result in fire or
electric shock.
10. Never push objects of any kind into this product through cabinet slots as they
may touch dangerous voltage points or short out parts that could result in fire or
electric shock. Never spill liquid of any kind on the product.
11. To reduce the risk of electric shock, do not disassemble this product, but take
it to a qualified serviceman when some service or repair work is required.
Opening or removing covers may expose you to dangerous voltages or other
risks. Incorrect reassembly can cause electric shock when the appliance is
subsequently used.
12. Unplug this product from the wall outlet and refer servicing to qualified
service personnel under the following conditions:
A. When the power supply cord or plug is damaged or frayed.
B. If liquid has been spilled into the product.
C. If the product has been exposed to rain or water.
D. If the product does not operate normally by following the operating
instructions. Adjust only those controls that are covered by the operating
instructions, because improper adjustment of other controls may result in damage
and will often require extensive work by a qualified technician to restore the
product to normal operation.
E. If the product has been dropped or the cabinet has been damaged.
F. If the product exhibits a distinct change in performance.
40-400-00033, Rev. C
Page iii
Telephone Line Simulator 4A
COMPLIANCE INFORMATION
Part 15 Class A Notice: This equipment has been tested and found to comply with the limits for a Class A digital
device, pursuant to Part 15 of the FCC Rules. These limits are designed to provide reasonable protection against
harmful interference in a commercial environment. This equipment generates, uses, and can radiate radio
frequency energy and, if not installed and used in accordance with the instruction manual, may cause harmful
interference to radio communications. Operation of this equipment in a residential area is likely to cause harmful
interference, in which case the user will be required to correct the interference at his own expense.
Page iv
Reference Manual
Chapter 1: Overview
Chapter 1: Overview
This manual describes the Telephone Line Simulator-4A which tests
telephones and other telecommunications devices.
The TLS-4A Telephone Line Simulator offers a convenient means for setting
up temporary “telephone lines” to demonstrate or test equipment where
actual central office lines are not easily available. The TLS-4A provides four
simulated lines, two “talk paths” or connections, and an audio interface port,
making it a versatile device for a variety of applications including:
·
Demonstrating or testing telecommunications devices such as
telephone sets, fax machines, and modems. Two simultaneous,
independent conversations can be set up over the four lines.
·
Playing prerecorded presentations over a line when the telephone
handset is lifted (for example, at trade show or museum displays)
·
As a teaching aid with the audio port configured to allow monitoring
and/or recording of a telephone conversation (for example, when
teaching children to use “9-1-1”)
·
Testing telephone or key system installations
·
Limited testing of loop start PBX installations
Static Protection
Use standard precautions in discharging electrostatic buildup before
operating this equipment or any other electrical equipment.
Features
·
Programmable operations:
—Two phone numbers for each line
—Forced disconnect
—Hot line (“ringdown”) number
—Ring cadence 1-3 rings
—Hunt groups
—Immediate or dial access to audio port
—Tone or recorded message when an invalid number is dialed
—Monitor mode (allows recording phone calls for training use)
—PBX-like operations: call transfer, add on, hook flash
—Timing adjustments
—Second dial tone simulates outside line access
—Tone following disconnect
·
Provides four lines and two connections
·
Portability and quick, convenient setup
40-400-00033, Rev. C
Page 1
Telephone Line Simulator 4A
·
Accepts tone and rotary input
·
Ringing voltage source with short circuit protection
·
AC powered (battery not required)
·
Non-volatile memory (battery not required)
·
Generates precise call progress tones
·
Ground reference jack
·
-48 V ground referenced line voltage
·
Audio port
Calling Operations
The TLS-4A provides dial tone to a line when the telephone handset is lifted.
When a rotary dialed or tone digit is detected, dial tone stops. If a number is
misdialed, reorder tone (or another programmable tone) is sent to the caller or
the caller is connected to the audio port (see command 31 on page 34).
When a valid number has been dialed, ringback tone is sent to the caller and
the called line rings. When the called line answers, ringback tone stops and a
connection is established between the parties. When either party goes
on-hook, the off-hook line receives about 2 seconds (default) of silence,
followed by dial tone, or Cutoff on Disconnect. See command 38, Forced
Disconnect, on page 38 for more information.
Physical Description
The TLS-4A is a portable unit weighing just over 4 pounds. A detachable
power cord is supplied with the TLS-4A. As shown in Figure 1, the front panel
provides: four modular RJ-11 jacks for connection of the equipment to be
demonstrated or tested, a multifunction switch (see Table 1), and the
indicators listed in Table 2. A 5-pin DIN jack on the back panel enables
sending or receiving audio to/from any line. The audio is turned on or off by a
software-driven relay. A fused, modular AC power jack and an optional
chassis ground reference point are also located on the back of the unit.
For key telephone and PBX line testing, a modular/alligator clip cable can
(Figure 4) enable connection of lines from a
terminal block to the TLS-4A.
Page 2
Reference Manual
Chapter 1: Overview
Table 1 Front Panel Switch Functions
Position
Top
Label
MAN/RING
Functions
Momentary contact position with multiple uses:
(1) Restore defaults: Within 1 second of turning power
ON, press and hold for 5 seconds to clear all
programming and restore default options. Release after
the POWER light turns ON.
Caution: Do not use the MA N/RING feature at power
up.
(2) Manual ring: With Line 1 on-hook, press and hold to
ring Line 1. Ringing continues until the switch is
released.
Center
ON
Bottom
OFF
(3) Programming mode: With Line 1 off-hook, and all
other lines on-hook, press and hold for 1 second to
place the TLS-4A in programming mode.
POWER ON (Press and release the top portion of the
switch.)
POWER OFF
LED Operation
The table below explains how the LEDs on the TLS-4A front panel operate and
what the different blinking patterns indicate.
Table 2 LED Indicators
Indicator
Line 1—Line 4
State
ON
Flashing (fast
on/off)
Blinking (slow
on/off)
Half brightness
PWR
Slow blinking
AUDIO
ON
Description
Line is off-hook
Line is ringing
Programming mode: Line is
selected for programming
During dialing, indicates that a
valid DTMF digit is present
Power is present and processor
is running normally
Audio control lead is on
40-400-00033, Rev. C
Page 3
Telephone Line Simulator 4A
Chapter 2: Feature Applications
The TLS-4A offers an array of programmable features to suit a variety of
applications.
Two Numbers Per Line
Each of the four lines can be assigned two telephone numbers, each number a
maximum of 16 digits long.
This feature may be used to program one number with a standard ring
cadence and the other with a nonstandard ring cadence. Another use might be
to assign all four lines the same second number in order to setup a hunt group
or ring all telephones with one call.
Ring cadences on the second phone number can be varied, confirmation and
error tones disabled, and audio port access blocked from certain lines. Hot line
(“ringdown”) numbers and hunt groups can be setup. These and other
programmable features are described in Chapter 6. The unit is programmed
by connecting a tone (DTMF) telephone to the unit and entering digit codes.
Audio Port
The audio port can be configured for immediate or dial access or as a monitor,
may allow single or multiple lines to be connected simultaneously, and can
vary the method of turning off the recorded message.
Distinctive Ringing
The ring cycle timing for the first number on each line is always the standard 2
seconds on, 4 seconds off. The ring cycle timing for the second number on each
line is programmable. (See Programming.) This gives the ability for each line
to have two different ring cycles by simply dialing the two different numbers
associated with that line.
Group Ringing
It is possible to have a group of phones that can be rung simultaneously, yet
still be able to ring them individually. By programming different first numbers
for each line, but the same second number for each line, and having the hunt
mode set to “ring all”, dialing the first numbers will ring an individual phone
(with standard ringing), and dialing the second number will ring all the
phones simultaneously (with distinctive ringing).
Page 4
Reference Manual
Chapter 2: Feature Applications
Invalid Number
You can program how the TLS-4A will respond to an invalid number. It can
respond with busy tone, reorder tone, ringback tone, silence, or it can connect
the calling line to the audio port. Regardless of the response you select, there
will be a delay before the response is activated.
If an invalid number beginning with any number other than “1” is dialed,
the TLS-4A will respond after 7 digits have been entered or after 8 seconds
have passed.
-orIf an invalid number beginning with “1” is dialed, the TLS-4A will simulate
the telephone network’s delay by waiting until 11 digits have been entered or
8 seconds have passed since the last digit was entered.
If you program the TLS-4A to connect invalid numbers to the audio port, calls
arriving when the audio port is already in use will get busy tone.
Uses for Off-Hook Modes
A detailed explanation of command 32, Off-Hook Modes, is provided in
Chapter 6.
Standard Mode
This provides normal dialing features.
Hot Line Mode
Hot line mode is normally used to ring one phone automatically the moment
you pick up another. To use this feature, program the off-hook mode for the
line from which you will make the call as “hot line” (see Chapter 6 for details).
Program the “revert/hotline” number to the first or second number of the line
you wish to ring. When you go off-hook on the originating line, ringback will
be heard, and the destination line will ring.
Silent Mode
This mode can be used to provide silence when you go off-hook. To use this
feature, program the off-hook mode for “silence”. Any or all of the lines can be
used in this way.
40-400-00033, Rev. C
Page 5
Telephone Line Simulator 4A
Uses for Hunt Mode
Hunt Mode, command 35, can be used to Simulate Trunk Groups/Telethons.
Please see Chapter 6 for a detailed explanation of this command.
Ring First/Ring Next/Ring All
When Hunt mode is set to “ring first available”, “ring all”, or “ring next” with
multiple lines set to the same phone number, it simulates a group of lines with
a single pilot number (like the trunks into a PBX system). “Ring first available”
will always ring the lowest non-busy line. This will cause the lowest line to
receive the most calls. “Ring next” will ring the next non-busy line in sequence
above the last one to have rung. “Ring all” will ring all the lines until one goes
off-hook.
Page 6
Reference Manual
Chapter 3: Installation
Chapter 3: Installation
Caution: The TLS-4A generates up to 95 VAC ringing voltage. Be sure the
TLS-4A power switch is off before handling cord ends.
Step 1:
·
Connect the AC power cord to the TLS-4A and to the wall receptacle.
Step 2:
·
Chassis ground (optional)
If a chassis ground is required, plug a 0.080-inch diameter pin probe into
the chassis ground reference Jack on the back panel. The location is shown
in Figure 1.
Step 5:
·
Turn on power
Turn the TLS-4A power switch on.
Step 4:
·
Connect telephones
Plug up to four telephones or other telecommunications devices into the
line jacks on the TLS-4A front panel.
Step 3:
·
Connect power cord
Audio port (optional)
To generate or play a recorded tape message, refer to Generating a Tape,
later in this chapter.
Demonstrating Equipment
Caution: The TLS-4A generates 95 V ringing voltage. Be sure the TLS-4A power
switch is off before handling any cord ends.
To demonstrate equipment, do the following:
·
With two devices connected to the TLS-4A, place a call from one device to
the other by dialing the number of the other device. The default numbers
for Lines 1 through 4 are 101 through 104, respectively.
Note: If you wish, you can change the phone number for any line to any digit
string from 1 through 16 digits by reprogramming the line as described in
Chapter 6.)
·
When the other line rings, answer the call. A connection should be
established and equipment features can be demonstrated.
·
When the call is completed, hang up both devices.
40-400-00033, Rev. C
Page 7
Telephone Line Simulator 4A
Restoring Defaults
If your TLS-4A does not operate as expected, a previous user’s feature
programming may be the cause. To restore the unit to default operating
conditions:
·
Be sure all phones are on-hook, then toggle the front panel switch to OFF,
then to MAN/RING and hold until the POWER LED comes on, then
release.
·
Read the previous section (Demonstrating Equipment) to place a call from
any line to any other.
-or-
·
Enter **99## to access programming mode and enter: *00#0#*00#0#
Testing Installations
The procedures below assume that the TLS default settings have not been
changed. If you have trouble with any of the following procedures, the TLS
may have been programmed already.
Testing key system and PBX lines
·
Connect the TLS-4A lines to Tip and Ring of PBX or key system central
office loop start trunks (E&M, DID, or ground start trunks cannot be tested
with the TLS-4A).
·
If a ground reference is required, connect a 0.080-inch diameter pin tip
probe to the chassis ground reference jack on the unit back panel (Figure
1).
Figure 4 shows the pin connections for the alligator clip cables used to connect
TLS-4A lines to a terminal block.. Please see Figure 5
in Chapter 5 for a generalized diagram of key system test connections.
Caution: When ringing is applied, the Ring lead of the modular jacks carries
up to 95 VAC referenced to ground (alternating polarity). Be sure the
TLS-4A power switch is off before handling any cord ends.
Page 8
Reference Manual
Chapter 3: Installation
Figure 1 Telephone Line Simulator
40-400-00033, Rev. C
Page 9
Telephone Line Simulator 4A
Chapter 4: Operation
Setting up a conference call:
Flash detection (command 34) must be enabled (default) in order to set up a
conference call or transfer a call by executing the steps below. If you are
unable to add a third party or transfer a call, enable flash detection as
described on the next page. If flash detection is disabled, a flash will be treated
as a disconnect.
Step 1:
·
Connect devices to at least three TLS-4A lines.
Step 2:
·
Flash the line
Press the FLASH button (if the telephone has one) or momentarily press
the button in the telephone handset cradle.
Step 4:
·
Establish call
Establish a call between two parties as described in Demonstrating
Equipment on page 7.
Step 3:
·
Connect devices
Dial third number
Dial a third number.
Step 5:
Flash the line
·
After the third party answers, send a flash to reconnect the second party.
·
With three parties connected, you can add a fourth party by repeating
Steps 3 through 5.
Transferring a call:
Step 1:
·
With devices connected to three or more TLS-4A lines, establish a call
between two parties.
Step 2:
·
Page 10
Establish call
Flash the line
Execute a flash as described above, then dial the third party.
Reference Manual
Chapter 4: Operation
Step 3:
·
Hang up on answer
After the third party answers, hang up.
To use the audio port:
·
See the Using the Audio Port section.
To test equipment functioning:
·
See Chapter 5.
To enable flash detection:
This procedure is not necessary unless flash detection was disabled by a
previous user.
Step 1:
·
Lift the handset. Press and hold the switch in the MAN/RING position
until the Line 1 light blinks and confirmation tone (three beeps) is heard.
Step 2:
·
Access Program Mode On Line 1
Enter command
With a telephone plugged into Line 1, enter the following:
*34#1#
·
Listen for three beeps indicating that the command is accepted. If you do
not hear the beeps, refer to Chapter 6, Programming.
Step 3:
·
Hang up
Hang up the telephone.
On Lines 2, 3, or 4:
Step 1:
Access Program Mode
·
Lines 2, 3, and 4 must be on-hook. Lift the handset at the telephone
connected to Line 1.
·
Press and hold the switch in the MAN/RING position until the Line 1 light
blinks and you hear three beeps.
40-400-00033, Rev. C
Page 11
Telephone Line Simulator 4A
Step 2:
Select line and enable flash detection
·
Enter the command *02#, *03#, or *04#, as appropriate. The associated line
light will begin blinking.
·
Enter: *34#1#
·
Listen for the three confirmation beeps. If you do not hear the beeps, see
the programming instructions.
·
Hang up the telephone.
Using the Audio Port
The section below tells you how to generate a tape recorded message and play
the message over a TLS-4A line. You can record messages in either of two
ways:
·
on the tape recorder (use of an external microphone is recommended)
-or-
·
using a telephone.
Tape Recorders
Please use tape recorders without automatic or dynamic level control because
automatic level control can amplify background noise, ruining the silent
period at the end of the message.
Notes: (1) Always use a new tape or one that has been erased because the
TLS-4A looks for three seconds of silence followed by a sound for an
“end-of-message” indication. See “End of Message Tape Sequence” at
thend of this section.
(2) Be sure the tape used is the correct bias type for the recorder.
Making a Tape on a Tape Recorder
The commands used in the following steps are explained in Chapter 6:
Programming.
Step 1:
·
Connect a microphone to the cassette recorder/player.
Step 2:
·
Page 12
Connect microphone
Turn on player
Turn on the cassette recorder/player and press the RECORD button.
Reference Manual
Chapter 4: Operation
Figure 2 Audio Port Connector Cable
Step 3:
·
Speak the message, taking care that you do not pause for more than three
seconds before the end of the message.
Step 4:
·
Speak message
End message
At the end of the message, pause for at least 3 seconds, then speak one
more word. If you wish to record the message more than once, or make a
series of recordings, pause briefly before beginning the next message.
Generating a Tape from a Telephone
Step 1:
Program audio port
·
With a tone (DTMF) telephone connected to Line 1, lift the handset and
press the MAN/RING switch position until the Line 1 light blinks and
confirmation tone (three beeps) is heard.
·
Enter: *33#1# (This enables Audio Port Permission for Line 1. You will
hear three beeps if the command is accepted.)
·
Enter: *05#1#0#0# (This configures the audio port for immediate access,
single user, and disconnect when the handset goes on-hook.)
·
Hang up.
40-400-00033, Rev. C
Page 13
Telephone Line Simulator 4A
Step 2:
Connect player
·
Connect a cassette recorder/player to the TLS-4A.
·
Using a standard cassette player cable (not supplied) with a 5-pin DIN
connector at one end and three connectors at the other (refer to Figure 2).
·
Plug the 5-pin DIN connector into the TLS-4A AUDIO port.
·
Plug the connectors at the other end of the cable to the cassette
recorder/player as follows:
—Connect the small gray cable (see Note, below) to the REMOTE jack.
—Connect the large gray (see Note, below) cable to AUX. (If the machine
has no AUX jack, or the recording is unsatisfactory, connect this cable to
MIC.)
·
Leave the black cable unconnected for recording (it should be connected
for playback).
Note: Cable colors will vary depending on manufacturer.
Step 3:
·
Turn on the cassette recorder/player and press the RECORD button.
Step 4:
·
Speak message
Speak the message, taking care that you do not pause for more than three
seconds before the end of the message.
Step 6:
·
Lift handset
Lift the Line 1 telephone handset. The AUDIO light turns on.
Step 5:
·
Turn on player
End message
At the end of the message, pause for at least 3 seconds, then press any digit
key (0-9) or speak a word. If you wish to record the message more than
once, or make a series of recordings, pause briefly before beginning the
next message.
Playing a Message from the Audio Port
Follow these instructions to play a message through the TLS-4A audio port to
a line. This is the default mode, Step 1 is only necessary if you have changed the
default settings.
Page 14
Reference Manual
Chapter 4: Operation
Step 1:
Program audio port
Program the TLS-4A audio port as follows:
·
With a tone (DTMF) telephone connected to Line 1, lift the handset and
press the MAN/RING switch position until the Line 1 light blinks and you
hear a confirmation tone (three beeps).
·
To enable Audio Port Permission for Line 1, enter: *33#1#
·
Listen for three beeps if the command is accepted.
·
To configure the audio port for immediate access, single user, and
disconnect at end-of-message, enter: *05#1#0#1#
·
Listen for three beeps and hang up.
Step 2:
Connect Audio Source
·
Using a standard cassette player cable (not supplied) with a 5-pin DIN
connector at one end and three connectors at the other (refer to Figure 2).
·
Plug 5-pin DIN connector into the TLS-4A Audio port.
·
Plug the connectors at the other end of the cable to the audio source as
follows:
—Connect the small gray cable to the control jack.
—Connect the black cable to the audio output from the source.
—(The large gray cable is not used.)
Note: Cable colors will vary depending on manufacturer. See Figure 2.
·
Apply power and turn on the audio source (e.g., tape recorder).
Step 3:
Play message
·
Lift the Line 1 telephone handset. The message will begin playing. At the
end of the message, the TLS-4A will turn off the cassette player.
·
Hang up.
·
Each time the telephone handset is lifted, the message will be repeated
(continuous loop tape) or the next message will be played (normal tape).
To cancel immediate access, lift the handset on Line 1 and press the
MAN/RING switch position until the Line 1 light blinks. Then enter the
following:
*05#2## (This specifies dial access, single user, disconnect at on-hook.
Hang up.)
40-400-00033, Rev. C
Page 15
Telephone Line Simulator 4A
End of Message Tape Sequence
1. Silence
2. Voice
3. Silence
(3 sec)
5. Silence
6. Next
4. Single cue word or tone
1.
2.
3.
4.
Audio Port Permission. Audio connected, tape starts.
First recorded message.
After 3 seconds of silence, the audio path is disconnected.
Cue word or tone. Indicates that start of next message is approaching.
The cue is not heard in the telephone.
5. Tape is stopped at end of cue, before beginning of next message, and
remains
stopped awaiting next access.
6. Next message on tape.
Figure 3 End of Message Tape Sequence
An “end of message” tape sequence is a method for automatically turning off a
tape recorder (connected to the audio port) at the end of a message, and
positioning the tape for the start of the next message. This allows a single
message to be played each time the audio port is accessed.
Refer to Figure 3. The sequence consists of a 3-second (minimum) silent period
followed by a single short word or tone. When the TLS-4A detects 3 seconds of
silence, it removes the audio path between the audio port and the telephone.
When it hears the cue tone or word, it opens the control contacts of the audio
port to turn the recorder off, leaving the tape at the beginning of the next
message.
If the telephone that has accessed the audio port hangs up before the end of
message sequence is found, the tape will continue to run and cue itself for the
next message. If no audio was heard from the tape (if the tape was blank or
not connected), the control will be turned off when the phone hangs up.
Multiple copies of the message may be consecutively recorded on a long tape
(which would need to be manually rewound at the end of the tape), or a single
message may be recorded on a continuous loop tape.
Page 16
Reference Manual
Chapter 5: Testing Equipment and Installations
Chapter 5: Testing Equipment and Installations
Note: Default options are assumed. If you have trouble with any of the
following procedures, a previous user’s programming may be the cause.
Refer to Programming.
Testing Key Systems or PBX Lines
To test key system and PBX lines, connect TLS-4A lines to Tip and Ring of PBX
or key system Central Office loop start trunks (E&M, DID, or ground start
trunks cannot be tested with the TLS-4A.) If a ground reference is required,
connect a 0.080-inch diameter pin tip probe to the chassis ground reference
jack on the unit back panel (Figure 1). Figure 4 shows the pin connections for
the alligator clip cables used to connect TLS-4A lines to a terminal block
(cables not supplied). Figure 5 gives a generalized diagram for key system test
connections.
Caution: When ringing is applied, the Ring lead of the modular jacks carries
up to 95 VAC referenced to ground (alternating polarity). Be sure the
TLS-4A power switch is off before handling any cord ends or alligator clip
cables.
Manual Continuous Ring Test
·
Connect a telephone to Line 1 of the TLS-4A.
·
With Line 1 on-hook, press and hold the front panel switch in the
MAN/RING position.
·
Verify that the telephone rings continuously while the button is depressed
and that the Line 1 indicator blinks.
Line Wiring/Basic Function Test
The following test is used with Tone or Rotary phones.
·
Connect at least two telephones (or other telecom devices) to the TLS-4A.
·
Go off-hook with one telephone and dial the first telephone number for the
other telephone. Default numbers are 101, 102, 103, and 104 for Lines 1
through 4, respectively. Up to 16 digits can be programmed for each line,
as described in Programming.
·
Verify that a standard ring (2 seconds on, 4 seconds off) occurs at the other
telephone.
·
Go off-hook at the other telephone and verify that a connection is
established.
40-400-00033, Rev. C
Page 17
Telephone Line Simulator 4A
·
Go on-hook with both telephones. Repeat with other telephones and lines
as necessary.
Nonstandard Ring Cadence Test
To test equipment that looks for particular ring cadences, proceed as follows:
Note: Line 1 is used to enter programming mode, but any line can be used for
test. Lines 1 and 2 are used as examples in the steps below.
·
Go off-hook on Line 1 and press and hold the MAN/RING switch position
until the Line 1 light blinks.
-or-
·
With Lines 2 - 4 on-hook, lift the handset on Line 1 and enter: **99##.
Verify that the Line 1 light blinks.
·
Select Line 2 with the command *02#, then program the desired ring
cadence as described in Chapter 6, command 23.
·
Enter a second phone number for Line 2. (The default for the second phone
number is 202, the cadence is 1 second on, 1 off, 1 on, and 3 off.)
·
Hang up.
·
Go off-hook on Line 1 and dial the second phone number for Line 2.
·
Verify that Line 2 rings with the programmed ring cadence.
Dial Pad Check
The following verifies that all seven frequencies generated by the tone pad are
operating and that the telephone can receive audio signals.
Page 18
·
Connect the telephone under test into TLS-4A Line 1.
·
Go off-hook on Line 1 and press and hold the MAN/RING switch position
until the Line 1 light blinks.
·
With a known working phone, select Line 2 for programming with the
command *02#. Verify that the Line 2 light begins blinking.
·
Enter the following command: *11#1234567890#. (This programs the first
phone number for Line 2.)
·
Make sure the number does not conflict with other telephone numbers that
may have been programmed into the unit.
·
Listen for a three-beep confirmation. Hang up.
·
Go off-hook on the phone to be tested, wait for dial tone. Enter:
1234567890.
Reference Manual
Chapter 5: Testing Equipment and Installations
·
Verify that dial tone stops, ringback tone is heard, and Line 2 rings after
the last digit is dialed.
·
Go on-hook.
Telephone Handset Check
·
Telephone mouthpiece operation can be checked using the TLS-4A by any
standard procedure (e.g., go off-hook, break dial tone, blow on the
mouthpiece, and verify that sound is heard in the earpiece).
Call Progress Tone Test
·
Go off-hook on Line 1 and dial any seven-digit number that is not assigned
to a TLS-4A line.
·
Listen for the programmed “Response to Invalid Number” (see command
31, in Chapter 6). If the number starts with “1”, there will be an
eight-second delay between the last digit and when you hear the
programmed response.
·
Hang up the telephone.
Test Numbers
The following numbers are used to demonstrate or to test how a device
responds to dial tone, busy tone, reorder tone, and silence. All of the numbers
listed below are default settings and can be changed. To change the defaults
for these commands, please see page 39 .
To test a device’s response to dial tone:
·
Lift a handset from a phone on any of the lines and dial: 83781
To test a device’s response to busy tone:
·
Lift a handset from a phone on any of the lines and dial: 83782
To test a device’s response to reorder tone:
·
Lift a handset from a phone on any of the lines and dial: 83783
To test a device’s response to ringback tone:
·
Lift a handset from a phone on any of the lines and dial: 83784
40-400-00033, Rev. C
Page 19
Telephone Line Simulator 4A
To test a device’s response to silence:
·
Lift a handset of a phone on any line and dial: 83785
Silent Off-hook Mode
If an indefinitely open, silent line (that is, a line that will not revert to dial tone
after a timeout period) is desired for test purposes, this can be set up by
selecting 2 (silent) when programming command 32. See Chapter 6 for more
information.
Page 20
Reference Manual
Chapter 5: Testing Equipment and Installations
Figure 4 Clip Cable Connectors (Used with Terminal Block)
Figure 5 Key System Test Connections
40-400-00033, Rev. C
Page 21
Telephone Line Simulator 4A
Chapter 6: Programming
Optional features for the TLS-4A, including telephone numbers, are
determined by programming the unit. This is done by accessing Program
mode and keying command codes using a tone (DTMF) telephone plugged
into the Line 1 jack.
Power Loss
Since the TLS-4A utilizes non-volatile memory, programming will not be lost
during a power outage.
Note: All command codes must consist of two digits. That is, codes 00
through 09 must be entered as shown; entering 0 through 8 will not work.
Types of Commands
There are two types of commands 05 through 09, and 60 through 64 are
effective systemwide; that is, they are set once for all four lines.
All others are “per-line commands”; that is, they must be set separately for
each line.
Note: If command 08 is set to 0 (disabled), you will not hear three
confirmation beeps nor the error tone.
To access Program mode
As explained below, there are two methods of accessing programming mode.
Generally, you can use either one. The second method (**99##) cannot be used
if the TLS-4A is programmed for “hot line” or direct audio port access on Line
1.
·
Lift the handset of the Line 1 phone. Press and hold the MAN/RING
switch position until you hear three beeps and the Line 1 light begins
blinking. Line 1 is automatically selected.
-or-
Page 22
·
With Lines 2 through 4 on-hook. Pick up Line 1 and when you hear
dial tone, dial: **99##
·
Listen for three beeps and watch for the Line 1 light to blink.
·
Enter any of the per-line programming commands (codes 11 through
90) for Line 1, or any of the systemwide programming codes.
Reference Manual
Chapter 6: Programming
·
To enter any of the per-line programming commands for Lines 2
through 4, you must first select the line using commands 02, 03, or 04.
While any of these lines is selected, you can also enter any
systemwide programming command.
Command Format
For each feature to be programmed, a command is entered at the telephone
keypad. All commands start with * and end with #. The # is also used to
separate data fields if the command has more than one field. That is:
*<two digit command code>#<data field>#
-orin the case of commands with multiple data fields:
*<two digit command code>#<data field>#<data field>#
For example, to program 123 as the audio port access number, enter: *06#123#
To program the audio port to immediate access, multiple user, and disconnect
at end of message, enter:
*05#1#1#1#
Commands having multiple data fields can be abbreviated if the latter fields
are to be set to zero. For example, *05#2## sets the audio access port to dial
access, single user, disconnect at off-hook.
If the TLS-4A accepts the code, you will hear a confirmation tone of three short
beeps. If the code is rejected, you will hear the error tone. If you hear error
tone, verify that the code and values you are trying to enter are valid, and try
again.
To correct command code mistakes:
If you made an error in entering the command code and have not yet entered a
#, key * to cancel the command. When you hear three beeps, enter the
command again.
To correct data field mistakes:
If you made an error in entering within a data field, (that is, after one or more
#s have been entered prior to the final #, key * to erase the current field back
to, but not including, the #, or ** to cancel the entire command. When you
hear three beeps, re-enter the command.
40-400-00033, Rev. C
Page 23
Telephone Line Simulator 4A
To exit Program mode
When you are finished programming, hang up.
The program codes and options are summarized for quick reference in
Appendix B.
Command Dictionary
With this table, you can look up a command by its number, name, or page
number. The Description provides information explaining the basic use of
each command. In-depth explanations are provided in the text on the
indicated page.
There are two types of commands: systemwide and per-line. Command codes
00 through 09 and 60 through 64 are systemwide and can be entered with any
line selected and with the unit in programming mode. All other commands are
per-line-programmable features (command codes 11 and above); all
commands entered are for Line 1 until another line (2 through 4) is selected.
Appendix B provides a quick reference list of commands.
Command
Number
Command
Description
Page
Systemwide Commands
**99##
00
Reset to defaults
Use this command to enter programming mode.
Use this command to erase programming and return to the
original settings.
28
28
There is no default for this command.
01
Program Line 1
Enter this command to program Line 1. After you enter this
command, you can enter others to change how Line 1
operates.
28
There is no default for this command.
02
Program Line 2
Use this command to program Line 2.
28
There is no default for this command.
03
Program Line 3
Enter this command to program Line 3.
28
There is no default for this command.
04
Program Line 4
This command programs Line 4.
There is no default for this command.
Page 24
28
Reference Manual
Chapter 6: Programming
Command
Number
05
Command
Audio Access Mode
Description
Page
This command sets which mode the audio port will be in
when you access it and when you disconnect from it. There
are three modes to choose from: monitor, immediate
access, and dial access.
29
The default is: dial access, one person can access the audio
port at a time, and disconnect at on-hook.
06
Audio Port Access
Number
Use this command to set the number you dial to access the
audio port when the Audio Access Mode (command 05) is
set to “dial access”.
30
The default number is 411.
07
Ring Type
Use this command to select the type of ringing that best fits
your application.
30
The default is x = 0, a 20 Hz synthesized sine wave
08
Confirmation and
Error Tones
Use this command to have the TLS send confirmation
tones or error tones after you enter a command. You turn
this option on by entering *08#1#. The TLS will send
confirmation tones after a command is entered correctly or
an error tone if the command is incorrect. If you do not
want to hear any tones, enter *08#0#.
31
The default is enabled, you will hear confirmation and
error tones.
09
Device Disconnect
Timer
Use this command to set the amount of time that the TLS
waits before sending a forced disconnect to the other
device.
31
The default is x=20 or 2 seconds.
Per-line commands
Note: A line must be selected before using the following commands. See commands 01 - 04.
11
First Phone Number
Use this command to program the first telephone number
for all four lines.
32
The default numbers are 101 - 104.
12
Second Phone
Number
Use this command to program the second telephone
number for all four lines.
32
The default numbers are 201 - 204.
13
Dial Tone/Hot Line
Number
This command has two functions. Use it to set a “hot line”
number so that whenever a phone on that line is picked up,
a programmed number is dialed. Or, use the command to
send dial tone when the “Revert to Dial Tone Number” is
dialed.
32
The default number is 711.
40-400-00033, Rev. C
Page 25
Telephone Line Simulator 4A
Command
Number
20
Command
Dial Tone Delay
Description
Page
Use this command to set the amount of time between when
you lift the receiver (i.e., when you go off-hook) and when
you hear dial tone.
33
The default is 0.1 second.
21
Network Response
Delay
Use this command to create a delay between the end of
dialing and when you hear ringing, busy, or reorder tone.
(This does not affect commands 60-64.)
33
The default time for this delay is 0.2 second.
22
Second Dial Tone
Delay
Use this command to set the time from the end of dialing
until dial tone is sent back to the line when you dial the
“Second Dial Tone Number”. This command works with
command 19.
33
The default is 0.5 second delay.
23
Ring Cadence Second Use this command to set a different ring for the second
Phone Number
numbers.
34
The default ring is: 1 second on, 1 second off, 1 second on,
3 seconds off.
30
Response to Busy
Signal
Use this command to set the response that calls from other
lines will get when calling this line: busy signal or reorder
tone.
34
The default is a busy signal.
31
Response to Invalid
Number
Use this command to set the tone heard if someone dials an
Invalid number from this line. The options are: busy,
reorder, ringback, silence, and connect to audio port.
34
The default is reorder tone.
32
Off-hook
(Hot
Line/Silent/Normal)
Use this command when you want to pick up one phone
and have another ring (“ringdown”) or to use the line
without hearing call progress tones and without hearing
dial tone.
35
The default is x=0 the TLS-4A operates normally.
33
Audio Port
Permission
Use this command to allow or prevent dial access to the
audio port. If you deny access and dial the number for the
audio port, you will hear reorder tone. (This does not affect
audio port access for invalid numbers.)
36
The default is enabled so that callers can access the audio
port.
34
Flash Detection
Use this command to turn flash detection on or off.
The default is enabled, the TLS will detect a switchhook
flash.
Page 26
36
Reference Manual
Chapter 6: Programming
Command
Number
35
Command
Hunt Mode
Description
Use this command to set how a “hunt group” or group of
phones sharing a single telephone number, responds when
the shared telephone number is dialed.
Page
37
The default is ring all or “hunt mode”.
36
Attenuation
This command can be turned on or off. If it is turned on,
the TLS will lower the volume (i.e., loudness) of a call.
38
The default is disabled or no attenuation.
38
Forced Disconnect
Use this command to determine whether a line gets a
forced disconnect when the other line hangs up.
38
The default is forced disconnect on.
60
Dialtone Number
Use this command to program a number that will respond
with continuous dial tone until you hang up.
39
The default number is 83781 (TEST1).
61
Busy Tone Number
Use this command to program a number that will respond
with busy tone until you hang up.
39
The default number is 83782 (TEST2).
62
Reorder Tone
Number
Use this command to program a number that will respond
with reorder tone until you hang up.
39
The default number is 83783 (TEST3).
63
Ringback Tone
Number
Use this command to program a number that will respond
with ringback tone until you hang up.
39
The default number is 83784 (TEST4).
64
Silence Number
Use this command to program a number that will respond
with silence until you hang up.
39
The default number is 83785 (TEST5).
90
Clone Line X
Use this command to copy the programming from one line
to the line you are calling from. For example, if you enter
*90#1# from Line 2, the programming from Line 1 is
copied to Line 2.
40
There is no default for this command.
99
Programming Query
Use this command to find out how a particular command is
set. This command does not work with commands 00-04.
40
There is no default for this command.
40-400-00033, Rev. C
Page 27
Telephone Line Simulator 4A
Systemwide Commands
**99##: Programming Mode
Use this command to enter programming mode from Line 1 with all other
lines on-hook.
00:
Reset to Defaults
This command resets the factory default operating conditions, either for the
entire unit, or for one or more lines. Each command must be entered twice, as
shown below.
·
To restore all defaults, enter:
*00#0#*00#0#
·
To restore defaults for Line 1, enter:
*00#1#*00#1#
·
To restore defaults for Line 2, enter:
*00#2#*00#2#
·
To restore defaults for Line 3, enter:
*00#3#*00#3#
·
To restore defaults for Line 4, enter:
*00#4#*00#4#
01 - 04: Select Line 1, 2, 3, or 4 for Programming
This command selects Line 1, 2, 3, or 4 so you can set any of the
per-line-programmable features (commands 11-52, and 90, 99) for Line 1.
Note: Use this command only if you have previously selected another line for
programming. On the first access to programming mode, Line 1 is
automatically selected.
*01#
The Line 1 light begins blinking. When you have finished programming Line
1, you can either (1) select another line, or (2) hang up to exit programming
mode.
To select Line 2, enter:
*02#
Page 28
Reference Manual
Chapter 6: Programming
To select Line 3, enter:
*03#
To select Line 4, enter:
*04#
05:
Audio Access Mode
Use this command to specify the methods of access to and disconnection from
the audio port. This command is effective systemwide. You can also enable or
disable each line’s access to the audio port. See command 33, Audio Port
Permission.
·
To program audio access mode, enter the command:
*05#x#y#z#
where: x = access mode
x = 0, monitor mode
x = 1, immediate access
x = 2, dial access (default)
y = connection mode
y = 0, single user (default)
y = 1, multiple user
z = disconnect mode
z = 0, disconnect at on-hook (default)
z = 1, disconnect at end-of-message
Monitor mode: The audio port is automatically connected to the first line on
which the handset is lifted (if permitted by the setting of command 33) and the
call, including dialing, will be recorded. To use this mode, the command must
be entered as shown below:
*05#0#0#0#
where: The command must be entered as shown above.
Immediate access: The audio port is connected directly to one or more lines
(if permitted by the setting of command 33). No dial tone is given and dialing
is ignored.
*05#1#y#z#
where: *05#1#0#0# - One user gets immediate access and remains
connected until on-hook
*05#1#0#1# - One user gets immediate access and remains
connected until end-of-tape message is heard
*05#1#1#0# - Multiple users get immediate access remain connected
until phones go on-hook
*05#1#1#1# - Multiple users get immediate access and remain
connected until end-of-tape message is heard.
40-400-00033, Rev. C
Page 29
Telephone Line Simulator 4A
Dial up access: Connects one or more users to the audio port (audio both to
and from the port) after the user dials the audio access number (command 06).
The default is x = 2.
*05#2#y#z#
where: *05#2#0#0# - One user can dial up the port and remain connected
until on-hook (default)
*05#2#0#0# -One user can dial up the port and remain connected
until the end-of-tape message.
*05#2#0#1# - Multiple users can dial up the port and remain
connected until on-hook.
*05#2#1#1# - Multiple users get immediate access and remain
connected until end-of-message is heard.
Note: See “End-of- Message Sequence” on page 16, for more information.
06:
Audio Port Access Number
This command sets the dial access number when the system is configured for
“dial access” (see command 05).
·
To set the dial access number, enter:
*06#x#
where: x is a 1 to 16 digit number (digits 0 through 9), default: 411
·
To delete the current audio port access number, enter:
*06##
07:
Ring Type
This command selects the ringing frequency. (The frequencies listed below are
within 5% of nominal.) The square wave options are intended for use use with
certain devices that may not detect the synthesized sinewave.
*07#x#
where: x=0, 20 Hz synthesized sinewave (default)
x=1, 25 Hz synthesized sinewave
x=2, 30 Hz synthesized sinewave
x=3, 60 Hz synthesized sinewave
x=4, 20 Hz squarewave
x=5, 25 Hz squarewave
x=6, 30 Hz squarewave
x=7, 60 Hz squarewave
Note: The 25-60 Hz frequencies are provided to simulate ringing frequencies
used outside the United States.
Page 30
Reference Manual
Chapter 6: Programming
08:
Confirmation and Error Tones
This command determines whether or not the TLS-4A will return confirmation
and error tones at the end of each programming command.
·
To disable the function so that no tones will be given.
*08#0#
·
To enable the function so that tones will be given (default), enter:
*08#1#
09:
Device Disconnect Timer
This command sets the time that the TLS-4A will wait before sending a
disconnect to a line remaining off-hook at the end of a conversation after other
line(s) are on-hook. (Default is 20 or 2 seconds.)
Please refer to command 38, Forced Disconnect on page 38.
*09#x#
where: x is a number between 10-200 representing tenths of seconds (For
example, x=199=19.9 seconds)
40-400-00033, Rev. C
Page 31
Telephone Line Simulator 4A
Per-line Commands
Before entering any of the following commands, you must select a line by
entering a 01, 02, 03, or 04 command. (See page 28.)
11:
First Telephone Number
Each of the four TLS-4A lines can be rung by other lines upon dialing one of
two numbers. The first number always rings the line with a standard single
ring having a ring cadence of two seconds on, four seconds off. Enter the
following to set the first number for the selected line:
*11#xx...x#
where xx...x is any number up to 16 digits long. Any combination of digits
0-9 may be used.
Default: 101 through 104 for Lines 1 through 4, respectively.
12:
Second Telephone Number
The second telephone number provides an alternate number that can be used
to dial the line. Ring cadence can be varied for this number (unlike the first
number); see command 23 on page 34. Enter the following to set the second
number for the selected line:
*12#xx...x#
where xx...x is any number up to 16 digits long. Any combination of
digits 0 through 9 may be used, default: 201 through 204 for Lines 1
through 4, respectively.
13:
Dial Tone/Hot Line Number Entry
This command can serve either of two purposes:
- If the dialing mode (see command 32 on page 35) has been set to “hot
line”, whenever a caller on THIS line (the line you have selected for
programming) picks up the handset, the TLS-4A will ring the number
you enter with this command.
For example (assuming default phone numbers are in effect), to set
Line 3 to ring Line 1 whenever the handset is lifted:
1. Enter programming mode.
2. Select Line 3 for programming: dial *03#.
3. Set dialing mode for Line 3 to hot line: *32#1#.
4. Set hot line number for Line 3 to 101 (first number) or 201 (second
number): Dial *13#101# or *13#201#.
5. Hang up.
Page 32
Reference Manual
Chapter 6: Programming
If the dialing mode, command 32, has been set to “normal”, a second dial tone
is given on this line when the revert number is dialed.
The command format is:
*13#xx...x#
where xx...x is any number up to 16 digits long. Any combination of
digits 0 through 9 may be used. Default: 711.
20:
Dial Tone Delay
This command establishes the interval from the time the receiver is lifted to
the time dial tone is heard on the line. The actual time may be longer than that
programmed if calls are also being set up on other lines.
·
To set the dial tone delay, enter:
*20#x#
where x is a number between 0-511 representing tenths of seconds (511 =
51.1 seconds). (Default: 0.1 second)
21:
Network Response Delay
This command determines the delay time from end of dialing until a “network
response” (ringback and ringing to the called line, busy, or reorder) for the
originating port. This does not apply to the test numbers programmed by
commands 60 - 64.
·
To set the network response delay, enter:
*21#x#
where x is a number between 0 and 511 representing tenths of seconds
(511 = 51.1 seconds). Default: 0.2 seconds.
22:
Second Dial Tone Delay
Sets the time from end of dialing until a second dial tone is returned to the line
when the caller dials the dial tone number set by command 13. (Not applicable
if the line is in hot line mode; see command 31 on page 36.)
The command is:
*22#x#
where: x is a number between 0 and 255 representing tenths of seconds
(255 = 25.5 seconds). Default: 0.5 second.
40-400-00033, Rev. C
Page 33
Telephone Line Simulator 4A
23:
Ring Cadence, Second Phone Number
This command sets second phone numbers which can be programmed to ring
a single, double, or triple ring, with on and off times as specified in this
command:
*23#a#b#c#d#e#f#
where: a is the “on” time of the first ring, b is the “off” time of the first
ring, c is the on time of the second ring, and so on.
a, c, and e can be any numbers from 0 through 30 representing
tenths of seconds (30 = 3.0 seconds).
b, d, and f can be any numbers from 0 through 63 representing
tenths of seconds (63 = 6.3 seconds).
Default: 1 second on, 1 second off, 1 second on, 3 seconds off.
·
To disable ringing, enter:
*23# #
·
To set the first on time and first off time to 30 and set the rest to 0 for
continuous 3 second off/3 second off ringing, enter:
*23#30# #
·
To set the on time to 30 and the first off time to 0 (i.e., continuous ringing),
enter:
*23#30#0# #
30:
Response to Busy
Determines the response that will be given to callers on other lines if this line is
busy when dialed.
·
To respond to callers with a busy signal (default), enter:
*30#0#
·
To respond to callers with a reorder tone, enter:
*30#1#
31:
Response to Invalid Number
This command determines the response that will be given to callers on this line
who dial a number that does not match any of phone numbers programmed
for the other lines.
Page 34
Reference Manual
Chapter 6: Programming
The fourth response, connecting a caller to the audio port, can be used to play
a recorded message or to simulate pre-recorded Special Information Tones
(SITs) used by the telephone network. If a second invalid number is dialed
while the first call is connected to the audio port, the second line will get busy
tone.
Regardless of the response you select, there will be a delay before the response
is activated. If an invalid number beginning with “1” is dialed, the TLS-4A will
simulate the telephone network’s delay by waiting until 11 digits have been
entered or 8 seconds have passed.
If an invalid number beginning with any number other than “1” is dialed, the
TLS-4A will respond after 7 digits have been entered or after 8 seconds have
passed.
There are four responses:
*31#x#
where x = 0, callers will hear busy tone
x = 1, callers will hear reorder tone (default)
x = 2, callers will hear ringback tone
x = 3, callers will hear silence
x = 4, callers will be connected to the audio port.
32:
Off-hook Modes
This command may be used for either of the following:
(1) To enable the line to ring another line without dialing (i.e., “ringdown
mode” or “hot line”). A ringdown number must also be programmed; see
(command 19).
(2) To provide a quiet battery feed source with no call progress tones and no
response to dialing (“silent mode”).
A 0 setting provides normal dial operation.
·
To disable ringdown and provide normal dial operation (default), enter:
*32#0#
Note: To ensure that the line stays silent and cannot dial out if held off-hook
at the end of a call, set the tone following disconnect command to silence:
*39#1#
·
To put this line in ringdown mode so that the TLS-4A automatically rings
the number programmed in command 13 whenever the receiver is lifted
on this line, enter:
*32#1#
40-400-00033, Rev. C
Page 35
Telephone Line Simulator 4A
Note: To ensure that the line stays silent and cannot dial out if held off-hook
at the end of a call, set the tone following disconnect command to silence:
*39#1#
·
To put this line in silent mode so that no dial tone is provided and the line
will not respond to dialing, enter:
*32#2#
33:
Audio Port Permission
This command permits or denies access to the audio port. (This command
does not affect the audio port access for command 31.)
·
To disable audio access from this line, enter:
*33#0#
Note: If command 05, Audio Port Access, is set to monitor for tone
(*05#3#y#z#), you will be unable to disable access.
·
To enable audio access from this line (default), enter:
*33#1#
34:
Flash Detection
This command determines whether or not the TLS-4A will recognize a “flash”
issued on this line.
A flash is used to signal for services such as calling an attendant, setting up a
conference call, or transferring a call. A flash can be executed either by using
the FLASH button (on phones that have one) or by momentarily pressing the
switch in the telephone handset cradle (don’t do both).
·
To disable switchhook flash detection; callers on this line will not be able
to transfer calls or exercise other PBX-like functions, enter:
*34#0#
Note: If you disable switchhook flash detection, the on-hook detect time will
be shorter. In this situation, a switchhook flash could result in a disconnect.
·
To enable switchhook flash detection (default), enter:
*34#1#
Page 36
Reference Manual
Chapter 6: Programming
35:
Hunt Mode
This command determines how the TLS-4A will respond when more than one
line is programmed with the same number, in effect setting up a “hunt
group”. In a hunt group, when a dialed line is busy, the system will attempt to
ring other lines in the group until it finds an available line. For more
information, see Chapter 2. There are four options:
This feature is activated from the line making the call and must be
programmed on each line that makes calls in hunt mode.
Program the lines between which you want to hunt with the same number,
either first or second.
Note: All numbers in a hunt group must be programmed in the same number
type: they must all be first or second numbers.
For example: To setup a hunt group consisting of Lines 3 and 4, enter *03# to
select Line 3.
*12# 789#, second number is 789
*04#, select Line 4
*12# 789#, second number is 789
Note: If you pick up one of the phones in the hunt group and place a call to
the hunt group number, the next higher line will ring. If you pick up the
phone on Line 3 from the hunt group in the above example and call 789,
Line 4 will ring.
·
To disable hunt mode so that the TLS-4A will only attempt to ring the first
line that has this number, enter:
*35#0#
·
To cause the TLS-4A to ring simultaneously all lines programmed with
this number. The first line to answer will be connected; all others will
revert to normal operation (default), enter:
*35#1#
·
To cause the TLS-4A to ring the first available line that has this number,
starting from Line 1, enter:
*35#2#
40-400-00033, Rev. C
Page 37
Telephone Line Simulator 4A
·
To cause the TLS-4A to ring the next available line that has this number; that
is, the next higher line number after the last one used (if Line 2 was the last
line rung, Line 3 will be rung), enter:
*35#3#
36:
Attenuation
This command turns down the volume of sound transmitted on this line.
When there are two active calls, the TLS-4A will apply attenuation to both
calls; however, attenuation will not be doubled if one attenuated line calls
another.
·
To disable attenuation (default), enter:
*36#0#
·
To enable attenuation, enter:
*36#1#
38:
Forced Disconnect
This feature determines whether this line gets a forced disconnect when the
other line goes back on-hook.
·
To enable (default) forced disconnect, enter:
*38#1#
Note: The TLS-4A cannot ring one line while sending a forced disconnect to
another. If these actions are attempted simultaneously, either the ringing
or the forced disconnect will be delayed until the other is finished.
·
To disable forced disconnect, enter:
*38#0#
39:
Tone Following Disconnect
This command sets the tone that will be heard after a forced disconnect or, if
forced disconnect is disabled, the tone will be heard after the delay before
disconnect.
If x=4, the caller will be connected to the audio port and will hear any
announcement you have recorded.
*39#x#
where: x=0, dialtone (default)
x=1, busy
x=2, reorder
Page 38
Reference Manual
Chapter 6: Programming
x=3, silence
x=4, audio port
60:
Dial Tone Number
This command programs a number that you can dial to hear continuous
dialtone. This is used to test or demonstrate how a device responds to
continuous dialtone.
*60#x#
where: x = 0-16 digits
83781 or “TEST1” (default)
61:
Busy Tone Number
This command programs a number that you can dial to hear busy tone. It is
used to test or demonstrate how a device responds to busy tone.
*61#x#
where: x = 0 -16 digits
83782 “TEST2” (default)
62:
Reorder Tone Number
This command programs a number that you can dial to hear reorder tone. It is
used to test or demonstrate how a device responds to reorder tone.
*62#x#
where: x = 0 - 16 digits
83783 or “TEST3” (default)
63:
Ringback Tone Number
This command programs a number that you can dial to hear ringback tone. It
is used to test or demonstrate how a device responds to ringback tone.
*63#x#
where: x = 0 - 16 digits
83784 or “TEST4”
64:
Silence Number
This command programs a number you can dial to hear silence. It is used to
test or to demonstrate how a device responds to silence on the line.
*64#x#
where: x = 0 - 16 digits
83785 or “TEST5”
40-400-00033, Rev. C
Page 39
Telephone Line Simulator 4A
90:
Clone Line X
This command copies the features programmed for another line to this line.
Note: When a line is cloned, the line’s telephone number are not cloned.
·
To copy Line 1 programming to this line, enter:
*90#1#
·
To copy Line 2 programming to this line, enter:
*90#2#
·
To copy Line 3 programming to this line, enter:
*90#3#
·
To copy Line 4 programming to this line, enter:
*90#4#
99:
Programming Query
This command is used to find out the current setting for any programmable
feature. The TLS-4A will give a voice response to query commands.
·
Enter the query command as:
*99#xx#
where: xx is any command code.
The following commands give special results:
*99#99#, A voice speaks digits 0 through 9.
*99#98#, A voice speaks the firmware version number.
*99#00#, 8 seconds of 1 kHz tone are returned.
Codes 01 through 04 are not applicable query commands.
Page 40
Reference Manual
Chapter 7: Warranty, Troubleshooting, and Return
Chapter 7: Warranty, Troubleshooting, and Return
Warranty Information
Teltone warrants this product to be free from defects in material and
workmanship for a period of one year, given proper installation and usage.
At its sole discretion, Teltone will repair or replace free of charge any unit
found to be defective during the warranty period. Units found defective
beyond the warranty period will be repaired or replaced at a flat rate.
Troubleshooting
Before you return a unit, check the fuse.
If the POWER light does not come on when the unit is plugged in and turned
on, try changing the fuse. The active fuse, and a spare, are both located in a
holder on the back panel of the unit, below the power plug, as shown in Figure
6.
1. To remove the fuse holder, insert the blade of a small screwdriver into the
groove at the bottom of the power plug and push outward.
2. The active fuse is the one farthest from the labeled panel; the other fuse is
the spare. Remove the active fuse by pushing on either end.
3. Remove the spare fuse and insert it into the active fuse holder.
AC POWER
RECEPTACLE
ACTIVE FUSE
SPARE FUSE
Figure 6 Fuse Holder Location
40-400-00033, Rev. C
Page 41
Telephone Line Simulator 4A
Note: If there is no spare fuse in the holder, obtain a replacement fuse of the
following type: 5 x 20 mm, 0.25 Ampere, slo blow. See Chapter 9 for recommended
replacement fuses.
4. Return the fuse holder to the opening in the TLS back panel.
5. If the POWER light still does not come on, return the unit for repair as instructed
below.
Return Procedures
If a unit is found to be defective, contact Teltone customer service to obtain a RMA
(Return Material Authorization) number and shipping instructions. When returning
units, provide the following information:
Page 42
•
Unit model number, unit part number, and serial number (obtained from the
Unit ID label on the bottom of the unit).
•
Teltone RMA number
•
All available fault information
•
Complete shipping and billing address
•
Repair purchase order
Reference Manual
Chapter 7: Warranty, Troubleshooting, and Return
Technical Support
For technical assistance on this product, call Teltone technical support
at 425-951-3390 or send an email to [email protected].
40-400-00033, Rev. C
Page 43
Telephone Line Simulator 4A
Chapter 8: Electrical Specifications
AC Power Input
Voltage
Frequency
Current
Fusing
Unit dissipation
TLS-4A: 115 VAC ±15%
49 to 61 Hz
TLS-4A: 0.2 A maximum (nominal line voltage)
0.25 A 5 x 20 mm slow blow
20 Watts maximum
Telephone Line Circuit (Loop Start)
On-hook voltage
Short circuit loop current
Minimum loop current
-48 ± 5 Volts (Tip positive referenced to Ring)
< 30 milliamps
18 milliamps with a 500-ohm loop
Transmission Specifications
Nominal impedance
Insertion loss
900 ohms
Switchable between 3.4 dB and 16 dB ± 2 dB @ 1 kHz
when two lines are connected
Ring Source
Ring voltage
Ring frequency
Drive capacity
Ring termination on answer
Ring waveform
78 VAC ± 10% AC @ 20 HZ sinewave
Selectable 20, 25, 30, 60 ± 5% Hz
Up to 5 ringer equivalents (5 REN) total @ 20 HZ
sinewave
Within 250 ms
Selectable step approximated sine or square wave
DTMF Detection
Frequency accept
Frequency reject
Tone-on time
Tone-off time
Amplitude
Twist
± (1.5% + 2 Hz)
± 3.5%
40 ms minimum
40 ms minimum
+4 to -18 dBm per frequency
6 dB or less
Rotary Dialing Detection
Rate
Percent break range
Break time
Make time
Interdigit time
End-of-digit detection
8 to 22 PPS
40% to 80% (LSSGR 6.3.4.6)
18 ms minimum, 100 ms maximum
9 ms minimum, 75 ms maximum
300 ms minimum
100 ms minimum
Loop Current Detect
Minimum off-hook current
Maximum on-hook current
Off-hook detect time
On-hook detect time
Hook flash detect time
Page 44
15 mA
10 mA
100 ms max
>Flash
300 - 1100 ms (must detect)
<280 ms > 1120 must not detect
Reference Manual
Chapter 8: Electrical Specifications
Ringing Cadence
Ring programming increment
100 ms
Rings per cycle
1 to 3 (programmable)
Ring “on” time
0 to 3 seconds
Ring “off” time
0 to 6.3 seconds
Call Progress Tone Characteristics (Tone levels referenced to 900 ohms)
Dial tone
350 Hz ± 0.5% and 440 Hz ± 0.5% at -19 dBm ±3 dB per tone
Busy and reorder tone
480 Hz ± 0.5% and 620 Hz ± 0.5% at -19 dBm ±3 dB per tone
Audible ringback tone
440 Hz ± 0.5% and 480 Hz ± 0.5% at -19 dBm ±3 dB per tone
Audio Input/Output Jack
Recorder tone
230 ms of 1050 - 1650Hz tone to activate
Audio In impedance
10 k ohms
Audio gain (jack to Tip/Ring)
~ -10.5 dB (-10 dBm out with 1 V in)
Audio Out impedance
600 ohms
Audio gain (Tip/Ring to jack)
~0 dB
Relay contact rating
1 Form A contact, 100 volt maximum, 1 mA maximum,
30 volt-amps maximum
Connector pinout
Pin 1: relay contact
Pin 2: ground
Pin 3: relay contact
Pin 4: audio in to TLS-4A
Pin 5: audio out from TLS-4A
Shell ground: ground
Mechanical Specifications
Dimensions
2.3" H x 8.5" W x 10.0" D (58 x 22 x 254 mm)
Weight
4 lb. 5 oz. (unit only)
Environmental Specifications
Storage temperature:
Short-term storage
-40 to +55 degrees C
Long-term storage
-20 to +50 degrees C
Operating temperature
0 to 45 degrees C
Humidity
85% noncondensing, maximum
Regulatory Compliance
Safety
United States
UL 1459
Canada
CSA C22.2 No. 225-M90
United States
FCC Part 15, Class A
EMC
40-400-00033, Rev. C
Page 45
Telephone Line Simulator 4A
Chapter 9: Ordering Information
TLS-5X-01
Telephone Line Simulator with power cord,
includes an AC power cord and reference
manual (this document). This unit accepts 115
VAC.
Optional Components
730-00039-03 (replacement)
AC power cord, three-pronged, power cord
(No. 18-3), type SVT rubber, with NEMA 5-15
P male/SPH-386 female connectors.
Replacement Fuses
Below are a list of fuses, with their part number and manufacturer’s name,
which you can purchase from an electronics distributor.
Bussman
GMD-250mA
SAN-O Industrial Corporation SD6-250
Page 46
Littlefuse
239.250
Bel
5TT-250MA
Reference Manual
Appendix A: Glossary
Appendix A: Glossary
Some terms in this glossary were defined with the assistance of Newton’s
Telecom Dictionary, by Harry Newton. To order a copy, call 1-800-LIBRARY or
write to: Telecom Library Inc., 12 West 21 Street, New York, New York 10010.
2500 set
The standard single-line touch-tone desk telephone.
Busy Tone
A signal generated by the Central Office indicating that the line you are calling is busy.
Call Progress Tone
A tone sent from the switch to tell the caller of the progress of the call. Examples are audible
ringing, re-order, busy, timing, etc.
Central Office
Telephone company facility where subscribers’ lines are joined to switching equipment for
connecting other subscribers to each other, locally and long distance. (Also called CO.)
DTMF
Also called touch-tone. Dual-tone multi-frequency. Push-button telephone signaling.
Forced disconnect
Method used by the telephone company to clear a line. When the called party goes on-hook, the
Central Office returns an open (that is, drops loop current) of at least 800 ms to the calling party.
This is also known as Calling Party Control (CPC), or Cutoff On Disconnect (COD), or
Disconnect Supervision.
Ground start
One of two types of switched telephone lines (outside lines) typically leased from telephone
companies, the other type being loop start. A ground start telephone line initiates an outgoing
telephone line seizure by applying a local resistance up to 550 ohms from ground to the tip
conductor.
Key telephone system
A telephone system in which the telephones have multiple buttons that permit a user to select
outgoing or incoming Central Office phone lines directly.
LED or light
Light-emitting diode. A semiconductor diode that emits light when a current is passed through
it. Used for status and information displays on electronic devices.
Loop start
One of two types of switched telephone lines (outside lines) typically leased from telephone
companies, the other type being ground start. A loop start telephone line is seized by connecting
a low resistance between the tip and ring (both wires) of the telephone line. This occurs
whenever a telephone or modem goes off-hook. If you need to find out if a line is loop start, call
the telephone company.
Off-hook
The telephone is in an off-hook state when the handset is removed from the cradle. A modem or
other device is off-hook when it answers a call or when it seizes a line to initiate a call.
Public Switched Telephone Network (PSTN)
Usually refers to the worldwide voice telephone network accessible to all those with telephones
and access privileges (In the U.S., it was formerly called the Bell System network or the AT&T
long distance network.)
Reorder Tone
A tone that sounds like the busy signal, but is twice as fast. It indicates that all switching paths
are busy. If you hear a reorder or fast busy, hang up and dial the number again.
40-400-00033, Rev. C
Page 47
Telephone Line Simulator 4A
Appendix B: Programming Quick Reference
Description
Command
Option
Default
Systemwide commands
Reset to Defaults
*00#x#*00#x#
x=0, reset entire unit
x=1, reset Line 1
x=2, reset Line 2
x=3, reset Line 3
x=4, reset Line 4
—
Select Line 1 for
programming
*01#
—
—
Select Line 2 for
programming
*02#
—
—
Select Line 3 for
programming
*03#
—
—
Select Line 4 for
programming
*04#
—
—
Audio Access Mode
*05#x#y#z
x = 0, monitor mode (y & z must be 0)
x = 1, immediate access
x = 2, dial access
dial access,
single user,
on-hook
y =0, single user
y =1, multiple user
*05#2#0#0#
z = 0, disconnect at on-hook
z = 1, disconnect at end-of-message
Audio Port Access
Number
*06#x#
x = 0-16 digits
411
Ring Type
*07#x#
x = 0, 20 Hz synthesized sinewave
(default)
x=1, 25 Hz synthesized sinewave
x=2, 30 Hz synthesized sinewave
x=3, 60 Hz synthesized sinewave
x=4, 20 Hz squarewave
x=5, 25 Hz squarewave
x=6, 30 Hz squarewave
x=7, 60 Hz squarewave
x = 0, 20 Hz
synthesized wave
Confirmation and Error
Signals
*08#0#
disable
enable *08#1#
*08#1#
enable
*09#x#
x=10 - 200 (1 to 20 seconds)
Disconnect Timer
*06#411#
(2 seconds) *09#20#
Per-line commands
First Phone Number
*11#xx...x#
x = 0 to 16 digits (0 through 9)
101-104
Second Phone Number
*12#xx...x#
x = 0 to 16 digits (0 through 9)
201-204
Page 48
Reference Manual
Appendix B: Programming Quick Reference
Description
Command
Option
Default
Dial tone/Hotline
Number
*13#xx..x.#
x = 0 to 16 digits (0 through 9)
711
Dial Tone Delay
*20#x#
x = 0 to 511 (51.1 seconds)
0.1 sec
Network Response Delay *21#x#
x = 0 to 511 (51.1 seconds)
0.2 sec
Second Dial Tone Delay
*22#x#
x = 0 to 255 (25.5 seconds)
0.5 sec
Ring Cadence,
Second Phone Number
*23#a#b#c#d#e# a, c, e = 0 to 30 (3 seconds)
f#
b, d, f = 0 to 63 (6.3 seconds)
Response to Busy
*30#0#
busy tone
*30#1#
reorder tone
Response to Invalid
Number
*31#x#
x = 0, busy
x = 1, reorder
x = 2, ringback
x = 3, silence
reorder *31#1#
Off-hook (hotline/silent/
normal)
*32#0#
normal
normal *32#0#
*32#1#
hotline (ringdown)
*32#2#
silent
*33#0#
disable
*33#1#
enable
*34#0#
disable
*34#1#
enable
Hunt Mode
*35#x#
x = 0, off
x = 1, ring all
x = 2, ring first available
x = 3, ring next
ring all *35#1#
Attenuation
*36#0#
disable
disable *36#0#
*36#1#
enable
*38#0#
disable
*38#1#
enable
Tone Following
Disconnect
*39#x#
x = 0, dial tone
x = 1, busy
x = 2, reorder
x = 3, silence
x = 4, audio port
dial tone *39#0#
Dial Tone Number
*60#x#
x = 0 - 16 digits
83781 or “TEST1”
Audio Port Permission
Flash Detect
Forced Disconnect
1 sec on,
1 sec off,
1 sec on,
3 sec off
busy *30#0#
enable *33#1#
enable *34#1#
enable *38#1#
40-400-00033, Rev. C
Page 49
Telephone Line Simulator 4A
Description
Command
Option
Default
Busy Tone Number
*61#x#
x = 0 - 16 digits
83782 or “TEST2”
Reorder Tone Number
*62#x#
x = 0 - 16 digits
83783 or “TEST3”
Ringback Tone Number
*63#x#
x = 0 - 16 digits
83784 or “TEST4”
Silence Number
*64#x#
x = 0 - 16 digits
83785 or “TEST5”
Clone Line x
*90#x#
x = 1, clone from Line 1
x = 2, clone from Line 2
x = 3, clone from Line 3
x = 4, clone from Line 4
—
Programming query
*99#x#
x = any valid command code (05 and
higher)
—
Page 50
Reference Manual
Index
Index
A
Access Numbers
Busy Tone
Accessing programming mode
Application examples
Attenuation of line volume
enable/disable
simultaneous calls
Audio port
invalid number
procedure for using
Audio port access
Enable/disable
Mode select
number entry
C
Call transfer procedure
Calling operations
Cancel command
Cassette tape
generating from telephone
generating on tape recorder
Clone line X
Copy programming
Command format
Conference call setup
Confirmation/error tone
Enable/disable
Copy programming
Correct programming mistakes
D
Demonstrating equipment
call transfer
conference call setup
enable flash detection
general
Dial tone delay
Set time
Dial tone/hot line number entry
E
End-of-message tape sequence
Equipment tests
dial pad check
nonstandard ring cadence
telephone handset
Exit from programming mode
F
Flash detection
Enable/disable
Flash detection
enable
Forced Disconnect
programming
Fuse
How to change
39
22
4, 5
38
38
35
12
36
29
30
10
2
23
13
12
40
23
10
31
40
23
10
10
11
7
33
32
16
18
18
19
24
36
11
38
41
H
Hunt Mode
ring first/ring all
ring next
Hunt mode programming
6
6
36
I
Illustrations
Fuse holder location
Indicators
Installation
Installation tests
call progress tone
Invalid Number
audio port
response delay
Simultaneous calls to audio port
K
Key system testing
L
LED indicators
Lights3
M
MAN/RING switch
N
Network response delay
Set time
O
Off-hook modes setting
Ringdown
Silent mode
On/off switch
Ordering information
optional
P
PBX line testing
Per-line programming commands
How to enter
Playing a message
From Audio Port
Power switch
Primary telephone number entry
Product support
Program/Select
Line 1
Line 2
Line 3
Programmable operations
Programming
Cancel command
Command format
correcting mistakes
query
41
3
7, 9
19
35
5, 35
5
8
3
3
33
35
36
3
46
8
33, 34, 35, 36, 40
32
14
3
32
43
28
28
28
2
23, 32
23
23
23
40
40-400-00033, Rev. C
Page 51
Telephone Line Simulator 4A
quick reference table
Programming
Programming mode
Accessing
exiting from
48, 49
28, 29, 33, 34, 35, 36, 40
Q
Quick reference
R
Recorder Tone
Regulatory compliance information
Response to busy
Response to invalid number
delay
Restore defaults
Return procedures
U.S. customers
Revert to dial tone delay
Set time
Ring Cadence
Second phone
Ring cadence, secondary phone number
S
Safety instructions
Secondary telephone number entry
Select
See also Program/Select
Silent line setup
Specifications
Static
protection from
Page 52
22
24
48, 49
45
iv
34
34
28
42
33
34
34
iii
32
20, 36
44, 45
1
Switches
Switchhook flash detection
Enable/disable
Systemwide programming commands
3
36
28, 29
T
Tape
generating from telephone
generating on tape recorder
Tape Recorders
compatibility
Technical Support
Telephone number entry
Test Numbers
busy tone
dialtone
reorder tone
ringback tone
silence
Testing
installation
TLS-4
Applications
Basic function
Calling operations
connecting equipment
Features
physical description
Tone Following Disconnect
Troubleshooting
W
Warranty information
13
12
12
43
32
19, 39
19, 39
19, 39
19, 39
20, 39
8
1
1
2
2
1
2
38
41
41