1
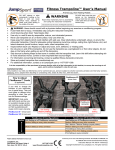
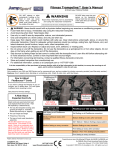
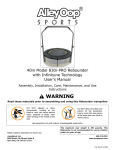
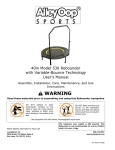
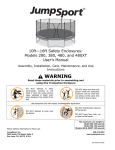
Installation Instructions for Exercise Handle Bar
JumpSport Customer Service phone #: 408-213-2551
Handle legs
6mm Allen wrench
LEG-A-20167-00
TOO-P-20334-00
6mm Hex drill bit
(not shown)
TOO-P-20320-00
Leg socket
Note: Leg hardware
may be inside of leg
socket and covered
by the leg plug.
Leg cap
Leg bushing
CAP-P-11678A
BUS-P-11683A
(may not be preinstalled)
Lock washer
WAS-P-11685A
Allen bolt
SCR-P-11684-01
Leg plug
PLU-P-11682A
1) Familiarize yourself with the leg pieces (leg and leg cap), leg hardware (leg bushing, lock washer, Allen bolt, and leg plug), and
the Allen wrench/drill bit.
IMPORTANT: Be sure leg caps are installed securely over bottom of legs, as shown above.
Notch in leg socket
WARNING: If you have handle
legs attached, do NOT attempt to
use the rebounder without the rest
of the handle pieces properly
installed first.
Pin on stud
Note: Keep Allen wrench to remove
or re-tighten legs, as needed.
WARNING: Periodically check all
leg mounting bolts and retighten
if necessary. All bolts should be
tight prior to using the rebounder
trampoline.
2) The 2 handle legs will be installed in place of the normal legs at the 2 locations shown above. Turn trampoline upside-down and fit
leg sockets over stud on trampoline frame. Notch in leg socket lines up with pin on stud. All leg hardware fits inside of leg socket, in
the order shown in Step 1. Securely tighten Allen bolts with supplied 6mm Allen wrench. Be sure the Fitness Trampoline logo is
centered between the 2 handle legs. When all legs are installed, turn your rebounder over.
Copyright © 2003-2011, by JumpSport, Inc. All rights reserved.
1
P/N: INS-P-11694-02C
Top handle
HAN-A-20164-00
CAUTION
Avoid Injury.
Small thumb screws
SCR-P-11706A
Exercise handle bar (when
attached to the rebounder) is
not designed to support your
entire weight. It is to aid
with balance and provide
exercise versatility.
Right side
handle
HAN-P-20169-00
2) Connect side handles to top handle, and secure with small
thumb screws to create a “top assembly”.
Left side
handle
HAN-P-20170-00
Large thumb
screws
SCR-P-11707A
3)
Lower top assembly into handle legs. You may have to
rotate entire top assembly 180 degrees for holes to line up. Adjust
height as necessary, before securing with large thumb screws.
Your exercise handle bar
is now installed!
To remove the handle, follow the installation
instructions in reverse order.
Limited Warranty
This warranty covers any defects in materials or workmanship for one (1) year from the original date of purchase. This warranty is
limited exclusively to original retail purchaser, and does not cover public or commercial use. For additional warranty details, please
visit http://www.jumpsport.com/assembly.htm and select the current JumpSport® Fitness Trampoline™ User’s Manual.
(Pictures are for illustration purposes only and may not match actual product.)
2
Model: HAN-S-20321-00