Download Digital Scribe
Transcript
Digital Scribe User Manual Rev 1.3 IOGEAR Digital Scribe User Manual This User Manual describes both hardware and software features. This user manual contains the following items: Page 1 Digital Pen instruction – How to install and use the digital pen Digital Scribe manual – How to install and use the Digital Scribe base unit NoteTaker Software Suite manual – How to use Software Suite Digital Scribe User Manual Rev 1.3 Digital PEN User Guide Page 2 Digital Scribe User Manual Rev 1.3 Overview Your Pen is a unique device that captures notes handwritten on plain paper, and transmits them to the base unit The Pen Uses patented technology combining Ultrasound and Infrared technologies with sophisticated algorithms to enable an accurate tracking and positioning system that tracks the movement of the tip of the pen on any surface and converts the movement into a vector image of the user‟s handwriting. Setting up Your Pen WARNING: Do not attempt to open the Digital Pen. This may cause the pen to malfunction When you pick up the pen, find a position that is comfortable for you, Be careful to hold the pen in a way that does not block the signals sent from the tip of the pen to the memory unit receivers Installing/Replacing an Ink Refill into the Pen The top of the pen cap also functions as an ink refill extractor. NOTE: Make sure you use a refill that is similar to the original (standard refill (67.2mm long X 2.33mm diameter). To replace the ink refill: 1. Detach the cap from the digital pen 2. Place the ink refill in the middle of the extractor. Hold the pen firmly, and apply pressure with the extractor against it Page 3 3. Pull the used Refill out Digital Scribe User Manual Rev 1.3 To insert a new refill 1. Slide the new refill into the tip of the pen 2. Gently press the new refill until it is lodged securely in place Installing/Replacing Pen Batteries 1. Please use the enclosed GP SR41 batteries with the positive polarity facing up 2. Batteries may be safely disposed of in normal household waste Contact your local government for disposal or recycling practices in your area 3. Caution: Risk of explosion if battery is replaced by an incorrect type Please use silver oxide button cells battery type only. When your Pen battery runs low, the following message appears on your screen: Page 4 Digital Scribe User Manual Rev 1.3 This warning is continuously displayed on each new note and the application tray icon in the system tray changes to reflect the current status until the batteries are replaced. Tray icon indiocation, for Pen low battery, in Note Mode Tray icon indiocation, for Pen low battery, in Mouse Mode Note: Lifetime of the batteries may vary and cannot be guaranteed. Supplied batteries are good for initial use only Page 5 Remove the battery compartment cover Install two SR41 batteries, with the positive poles facing up Replace battery compartment cover Digital Scribe User Manual Mounting your Base Unit to Paper Rev 1.3 Mounting your Base Unit to Paper Your base unit can be mounted in 3 positions on top of the paper. The following images illustrate the way you can mount your base unit, according to the recommended positioning. A. Mounting your base unit at the top center of the paper is recommended for a single paper usage: Page 6 Digital Scribe User Manual B. Mounting your base unit at the top left corner of a paper block is recommended for right hand Users Page 7 Rev 1.3 Digital Scribe User Manual C. Mounting your base unit at the top right corner of a paper block is recommended for left hand Users Page 8 Rev 1.3 Digital Scribe User Manual Base Unit Coverage area Rev 1.3 Base Unit Coverage area The following images illustrate the coverage area of your base unit. Note: The paper is an A4 size paper The striped line illustrates the covered area in each of the positions Base unit located at the left cornet Base unit located at the top center Page 9 Base unit located at the right cornet Digital Scribe User Manual Digital Scribe Base Unit Rev 1.3 Digital Scribe Base Unit Page 10 Digital Scribe User Manual Setting Up Your Hardware . Storing your NoteTaker Keep your PC Notes Taker away from liquids and direct sunlight at all times. Always store your unit in protected packaging or in the original box. Severe shock can cause degradation in performance. Take precautions not to drop the base Unit or Pen onto hard surfaces. Cleaning the NoteTaker Page 11 Clean your PC Notes Taker base unit using a soft cloth. Special care must be taken not to insert sharp pointed objects into the ultrasonic transmitting and receiving units. Digital Scribe Base Unit Rev 1.3 Digital Scribe User Manual Software Suite Manual Rev 1.3 Software Suite Manual System Requirements o o o o o o Microsoft ® Windows 2000 (SP4) or Microsoft ® Windows XP (SP2) or Microsoft ® Vista Minimum 50MB available hard disk space Minimum 128MB RAM 32 bit color quality Screen resolution of 1024x768 pixels Available USB port. Setting Up Your Desktop Software Your product is packaged with a CD that includes its companion desktop software Installing the Software After the installation process, when running the application for the 1st time, a new folder named “My Notes,” is created in your “My Documents” directory. All your notes will be saved into this directory. In the event that no “My Documents” directory is found, the installation process will create a new “My Documents” folder on your C hard drive. The „My Notes‟ folder will then be created under this directory. If you uninstall, upgrade or reinstall the software in a different location, the note files will remain in this directory, and will not be overwritten To install NoteTaker software Page 12 1. Insert the installation CD into your CD ROM drive. The setup 2. program should start automatically. If not, run the program by selecting „Run‟ from the Windows „Start‟ menu and type in D:\setup.exe. If your CD drive uses a different letter, type that letter instead of D. Follow the instructions on the screen. During installation, you will be prompted to choose whether you would like the application to auto-start when windows loads, and whether you would like an application icon on your desktop (in Custom Installation). Digital Scribe User Manual Rev 1.3 Setting your base unit orientation preferences Your base unit can be placed in 3 positions, on the top center of an A4 paper, or at the Left/Right corners Recommended for a single paper usage Recommended for usage on a paper block, for Right Handed Users Recommended for usage on a paper block, for Left Handed users Pen Modes Your product supports a Note mode and a Mouse Mode Selecting default mode can be done in 2 ways: a. At the first time you start your NoteTaker application OR b. Using the NoteTaker „Configuration‟ menu („Set Digital Pen Mode‟) Changing modes during operation can be done in 2 ways: a. Press the base unit top button („Mode‟ button) OR b. Right click the „NoteTaker‟ tray icon, and change mode OR c. Clicking on the virtual area using your pen Note: On each mode change, a Balloon will popup indicating the current mode and the corresponding LED will lit Page 13 Digital Scribe User Manual Using your Pen in Mouse Mode Rev 1.3 Using your Pen in Mouse Mode In Mouse mode, your Digital pen behaves as a mouse. Your pen will have the following functionality: To move your mouse cursor you can hover with the pen. To start Hovering you can press the side button or tip the pen on the paper. The pen will now hover even with no press for about 30 seconds. To Click an object, point your mouse cursor on that object. Now tip the pen on the paper or click the side button To Double-Click an object, point your mouse cursor on that object. Now tip the pen twice on the paper or click the side button twice To Right-Click an object, point your mouse cursor on that object. Now press the tip of the pen a bit longer on the paper. A special „Right Click‟ cursor will appear. Lift the pen from the paper, and the context menu (Right Click menu) appears Port Auto-Detection Once you launch the application, the NoteTaker software automatically detects your hardware. The application automatically searches all ports in order to detect the hardware. If it is unable to locate the connection, the Hardware Detection dialog box appears. USB Hot-Insertion USB Hot Insertion refers to connecting the USB cable while the application is running. The application will auto-detect your hardware if the USB cable is disconnected while the system is running and then re-connected. The application will also auto-detect the hardware if you first run the software and then connect the USB cable. Creating Notes The moment you begin to write or sketch with your digital pen, a Note Window appears on your screen that reflects everything that you write on the paper attached to the base unit. The Note Window toolbar allows you to perform various basic functions such as saving, editing, sending and copying your notes while writing, or once you have finished writing. NOTE: While writing, make sure not to block the line of sight between the pen and the base unit with your hand. When the line of sight is blocked, the NoteTaker will not function properly. Page 14 Digital Scribe User Manual Using your Pen in Mouse Mode Rev 1.3 The Notes Toolbar The following table contains all buttons available in the Notes toolbar together with a description of their functions. Button Description A4 VIEW – Switches the note view to A4 size Memo-size View – Switches the note view to memo size EDIT – Opens the Note Editor for editing the note COPY – Copies the note to the clipboard for pasting into other applications CLEAR – Clears the entire on-screen note UNDO – Clears the previous stroke made by the digital Pen in reverse chronological order. REDO – Replaces previously undone strokes in chronological order NOTE COLOR – Changes the current note color. PEN STYLES- Changes the Ink color and width. SAVE TO FOLDER – Saves the note to a specified folder and closes the note window. SEND BY NETWORK – Sends the current note by local network to selected recipients PRINT – Prints the current note EXPORT TO JPEG- Exports the selected note to a JPEG file SEND BY EMAIL - Sends the current note by email to selected recipients as a JPEG attachment Convert your note to Text using MyScript® Notes CLOSE WITHOUT SAVING – Closes the current note without saving Page 15 Digital Scribe User Manual Using your Pen in Mouse Mode Rev 1.3 SAVE AND CLOSE – Closes the current note and saves it into the Notes Manager under the default Miscellaneous folder (the note is named according to the creation date) Page 16 Digital Scribe User Manual Using your Pen in Mouse Mode Rev 1.3 Saving Notes Notes can be saved at any time during the note creation process. They are automatically saved to the default and named according to the date they were created. Notes can be renamed at any time once they have been saved. To save a note In the Note Window Toolbar, click the Save and Close icon to save the note to the default Miscellaneous folder click the Save the Folder icon note to any folder you select to save the NOTE: It is also possible to configure an 'Auto-Save' feature That will automatically save your note periodically while you are working Printing Notes A note can be printed from any of the 3 Note interfaces – The Note Window, The Note Editor or the Note Manager. Notes can be printed from a saved file in the Note Manager, or while they are open in the Notes Window or Notes Editor. To print a note from a file 1. 2. In the Note Manager, click the note name or thumbnail In the File menu, select Print Preview to first see how the note will look when printed. Note: You can preview multiple notes simultaneously. Select the first note, then on the keyboard press the <CTRL> key and select the other notes. 3. In the File menu, select Print or click the Print button 4. Select your desired print setting and properties (this can also be done through Print Setup from the File menu. Some default print preferences can also be set through the Configuration menu preferences) Page 17 Digital Scribe User Manual 5. Using your Pen in Mouse Mode Rev 1.3 Click OK. To print an open note 6. In the Notes Editor File menu, select Print or click the Print button –or– in the Note Window toolbar, simply click the Print button. 7. Repeat steps 4 and 5 in the previous procedure. Page 18 Digital Scribe User Manual Using your Pen in Mouse Mode Rev 1.3 Setting Your Preferences Set your default preferences such as note color, auto-save options, print preferences, etc. in the Preferences dialog box. The dialog box is divided into three tabs, each controlling a different Aspect of the system: General, Printing, and Ink. To access Preferences: In the Notes Manager Configuration menu, select Preferences. Set your General Preferences as follows: In the Auto-Save note in box, select the time interval (in minutes) after which the system automatically saves your note. This also activates an auto-recovery feature that recovers any unsaved information in case of system crash or power failure. The only input lost are changes made since the last auto-save Select the Load When Windows Starts checkbox to automatically load the NoteTaker each time you turn on your computer, so that a new note will pop up whenever you begin to using the Pen Select the Save Sticky Notes on Exit checkbox to automatically save all the new sticky notes you created. The saved sticky notes will then instantly appear the next time you either turn on your computer or restart the application Page 19 Digital Scribe User Manual Set your Mobile Preferences as follows: Select the Upload new notes automatically proper option Set your Print Preferences as follows: Select the Note Per Page checkbox to specify that when you print notes, only one note is printed per page Select the Center Note On Page checkbox to specify that notes always be centered on the page when printed Page 20 Using your Pen in Mouse Mode Rev 1.3 Digital Scribe User Manual Set your Paper Holder Preferences as follows: Under Paper Holder opacity, drag the slider to set the desired level of transparency Page 21 Using your Pen in Mouse Mode Rev 1.3 Digital Scribe User Manual Using your Pen in Mouse Mode Rev 1.3 The Note Manager The Note Manager can be used for storing, viewing, searching, copying and exporting notes. It is set up in Windows Explorer format, which allows you to browse through Your files in the left pane and view them in the right pane. Note Manager Menus Use these menus to select options and preferences and to perform all Software functions relating to storage and transfer of your notes. The following table contains a list of all menus and menu commands in the system together with a short description of their function. File Menu CONVERT TO TEXT MOVE TO SEND TO IMPORT EXPORT SET REMINDER Page 22 Convert your note to Text using MyScript® Notes Allows you to move the selected note to another folder Sends any note by email (Jpeg or Data file) or local network Import data file (.pegvf format) Exports the selected note/s to a JPEG file or a data file format Enables you to set an exact date and time that a selected note will be displayed as a reminder Digital Scribe User Manual SHOW AS STICKY NOTE SHOW AS PEPAR HOLDER PROPERTIES NEW FOLDER EMPTY DELETED ITEMS PRINT PRINT PREVIEW PRINT SETUP BACKUP/RESTORE EXIT Using your Pen in Mouse Mode Rev 1.3 Make this Note a Sticky Note Make this Note as Paper holder View Note Properties Create a new folder Performs a final irreversible deletion of all deleted notes Prints the selected note/notes Displays the selected note as it will look when printed Allows you to select print options Backup/Restore your Notes Database Exits the Note Manager interface Edit Menu EDIT NOTE CUT COPY PASTE DELETE RENAME COLOR FIND NOTE FIND NEXT SELECT ALL Allows you to edit a selected note Cuts the selected note and saves it to the clipboard Copies the selected note and saves it to the clipboard Pastes whatever was last copied or cut to the clipboard Deletes the selected note/notes Allows you to rename the selected note Set Note background color Lets you search through saved notes based on defined criteria Locates the next note that matches the search criteria Selects all notes View Menu SORT SMALL THUMB MEDIUM THUMB LARGE THUMB ZOOM IN ZOOM TO FIT ZOOM OUT Sort Notes by Date or Name Displays small thumbnails in the Note Manager view Displays medium sized thumbnails in the Note Manager view Displays large thumbnails in the Note Manager view Enlarges the thumbnail view by 50% (available only when viewing an individual note thumbnail) Returns the thumbnail view size to the original size (available only when viewing an individual note thumbnail) Reduces the thumbnail view by 50% (available only when viewing an individual note thumbnail) Configuration Menu DETECT HARDWARE PREFERENCES PEN STYLES Page 23 Allows you to detect your unit Allows you to select your personal preference for elements such as; note color, auto-save, windows options and printing options Lets you select the default ink color and stroke width of the pen Digital Scribe User Manual SET DEVICE ORIENTATION SET DIGITAL PEN MODE MOUSE PROPERTIES Using your Pen in Mouse Mode Rev 1.3 Set your device position on paper (Top center, Left or Right corners) Select default Pen mode (Mouse/Note) Mouse Resolution Help Menu READ USER MANUAL REGISTER ABOUT NOTETAKER Page 24 Opens the NoteTaker User Manual Opens a registration web page Displays NoteTaker version information Digital Scribe User Manual Using your Pen in Mouse Mode Rev 1.3 Note Manager Toolbox The Note Manager Toolbox contains buttons that give you access to the most commonly used menu commands. The following table contains a list of each button in the toolbox together with a description of its function Toolbox Button Description Convert your note to Text using MyScript® Notes CUT – Cuts the selected note and saves it to the clipboard COPY – Copies the selected note and saves it to the clipboard PASTE – Pastes whatever was last copied or cut to the clipboard DELETE – Deletes the selected note/notes EDIT NOTE – Allows you to edit a selected note PRINT -- Prints the selected note/notes SHOW AS STICKY NOTE – Make your Note as Sticky Note SHOW AS PAPER HOLDER – Make your Note as a paper holder SMALL THUMB – Displays small thumbnails in the Note Manager view MEDIUM THUMB - Displays medium sized of thumbnails in the Note Manager view LARGE THUMB - Displays large thumbnails in the Note Manager view NOTE MODE MOUSE MODE – TURNS YOUR PEN INTO A MOUSE ABOUT NOTETAKER – Provides you with your NoteTaker version information Page 25 Digital Scribe User Manual Using your Pen in Mouse Mode Rev 1.3 Managing Folders The Note Manager in installed with predefined folders, Miscellaneous, Deleted Items, Contacts, Follow Up, Received Notes and Mobile Notes. You can use these folders for storing your notes and can create additional custom folders, as needed. Creating a new folder To create a new folder: Creating a new folder can be done in few ways: You can use „File‟ menu to run the „New Folder„ option Choose the folder you want to create a sub folder for or choose the „My Notes‟ root folder Use „File‟ menu to run the „New Folder „ option. Fill the new folder name. You can right click any folder in the Folders Tree Choose the folder you want to create a sub folder for or choose the „My Notes‟ root folder Right click this folder Choose „New Folder‟ from the drop down menu A new folder will be created. To rename this folder please see „Renaming a folder‟ Renaming a folder All folders can be renamed except for the predefined Miscellaneous, Deleted Items, Received Notes and Mobile Notes To rename an existing folder: 1. 2. 3. Page 26 Right-click the folder you want to rename (Or press F2 key, when the folder is selected). In the short-cut menu, select Rename. The folder name is now highlighted. Type the new folder name. Digital Scribe User Manual Using your Pen in Mouse Mode Rev 1.3 Deleting a folder All folders can be deleted except for the predefined Miscellaneous, Deleted Items, Received Notes and Mobile Notes To delete a folder 1. 2. 3. Right-click the folder you want to delete (Or press the delete button, when the folder is selected). In the shortcut menu that appears, select Delete. Select „Yes’ to confirm that you would like to delete the folder, or „No’ to cancel the operation. Renaming Notes Each time you create and save a new note, it is automatically given a name that corresponds to the exact date and time the note was created. You can rename notes at any time to give them names that are more meaningful to you. To rename a note: 1. 2. 3. Right-click the note you want to rename (Or click F2 key, when the note is selected). In the shortcut menu that appears, select Rename. The note name is highlighted. Type the new note name. Moving Notes You can move a note from the folder it is currently in to any other folder. To move a note to another folder: 1. In the Note Manager, select the note file name or thumbnail. 2. 3. From the File menu, select Move to, –or– right-click the note name or thumbnail and in the shortcut menu, select Move to Select the folder name to which you would like to move the note NOTE: You can also use „Drag and Drop‟ to move a note. Finding Notes It is possible to search through your saved notes to locate any particular note. In order to perform a search: 1. 2. Page 27 In the Notes Manager Edit menu, select Find Note. Select the folder or folders where you would like to search. Digital Scribe User Manual 3. 4. 5. Page 28 Using your Pen in Mouse Mode Rev 1.3 If you would like to search by description or note name, select by description and then in the search for field, type in the name or description of the note you are looking for. To search by creation date parameters, select All notes created and then specify the date range according to which you would like to search. Click Find Digital Scribe User Manual Using your Pen in Mouse Mode Rev 1.3 Backup and Restore Notes Database You can use the Note Manager to backup your entire database, and restore it when needed. To backup your database: Select „File -->Backup/Restore --> Backup Database‟ from the Note Manager menu The following dialog will appear Choose the destination path to backup all your notes database (You can create a new folder by pressing „Make New Folder‟ button) Click the „Backup‟ button Upon a successful backup, the following message appears: Page 29 Digital Scribe User Manual To restore your database: Select „File -->Backup/Restore --> Restore Database‟ from the Note Manager menu The following dialog will appear Choose the location of your database backup Click the „Restore‟ button Upon a successful restore, your database will be restores to a new folder in the Note Manager. This new folder will be named „Restored database‟ and will also be according to the restoring date and time Page 30 Using your Pen in Mouse Mode Rev 1.3 Digital Scribe User Manual Using your Pen in Mouse Mode Rev 1.3 Selecting Pen Style You can change Ink color and width of on-screen pen strokes at any time (The default pen color is black and the default width is 1) To select the pen style: In the Notes Manager Configuration menu, select Pen Styles –or– Right-click the new note and in the shortcut menu that appears, select Pen Styles Click the arrow to the right of the current pen color to open the Pen Color list and select the color you want Use the arrows to the right of the current pen color width to select a pen stroke width between 1-10 (you can also type the desired width directly in the box) Click Default in order to restore the default settings at any time Click Cancel to return to the Note Manager or to the note without changing the current pen style settings NOTE: You can also change the color and width of any pen stroke in the Note Editor by selecting an individual pen stroke or group of strokes and then in the Tools Menu selecting Color or Line Width. Page 31 Digital Scribe User Manual Using your Pen in Mouse Mode Rev 1.3 Setting a Reminder You can use notes stored on your PC to be reminders by setting an exact date and time for a selected note to automatically pop up on your screen. To set a Reminder: In the Note Manager, select the note or note thumbnail In the File menu, select Set Reminder –or– Right-click the note and , in the shortcut menu, select Set Reminder Select the Enable Reminder checkbox In the Remind On list, click the arrow to the right of the list and select a date from the drop down calendar that appear If you would like to specify an exact time for the reminder, select the Exactly At checkbox and use the arrows to change the default time or type in the desired time NOTE: If you do not select an exact time, the reminder will appear when you turn on your computer on the specified day. Setting a Reminder to Snooze When a reminder appears, you can set it to snooze so that it disappears and then pops up again within 5, 10, 15 or 20 minutes (depending on your preference). To set a reminder to snooze Click Snooze In the drop-down list, select the number of minutes you want to “snooze” until you‟re reminded again Page 32 Digital Scribe User Manual Using your Pen in Mouse Mode Rev 1.3 Exporting to JPEG You can export any note to JPEG file format, turning the note into a graphic image. This is useful for example when you want to insert notes into documents created in other applications such as MS Word or PowerPoint. To export a note to jpeg format: In the Note Manager, select the note you want to export Right-click the note name, –or– in the File menu, select Export to JPEG. The Export dialog box appears In Save in, select the destination file path In the Save as type list, select JPEG. Under Resolution, select the resolution quality Click Save NOTE: You can export multiple notes simultaneously. On the keyboard, hold down the <CTRL> key and then in the Note Manager, select the notes you want to export. Page 33 Digital Scribe User Manual Using your Pen in Mouse Mode Rev 1.3 Exporting to a Data format file You can export any note to a vector format file, so that another NoteTaker user can import this file into the Note Manager database To export a note to a data file (.pegvf file): In the Note Manager, select the note you want to export Right-click the note name, –or– in the File menu, select „Export as a data file‟. The Export dialog box appears In Save in, select the destination file path Click Save Importing a Data format file You can import Data format file (.pegvf file) into the Note Manager database To import a data format file: In the File menu, select „Import a data file‟. The Import dialog box appears Select the file you would like to import Click Open Page 34 Digital Scribe User Manual Using your Pen in Mouse Mode Rev 1.3 Pasting Notes into Other Applications You can paste any saved note into another application (The note is automatically converted into a JPEG image). To paste a note into another application: 1. In the Note Manager, select the note or thumbnail. 2. 3. 4. In the Edit menu, select Copy or Cut (cutting will delete the note from its current location), –or– right-click the note name or thumbnail and, in the shortcut menu, select Copy or Cut. Open the application into which you would like to paste the note In the open application, locate and select the Paste option. Note: You can also copy a note that you are currently sketching by clicking on the Page 35 button in the Note Toolbar Digital Scribe User Manual Creating Sticky Notes You can create sticky notes by doing one of the following: Dragging notes from the Note Manager to your desktop. Select a note in the Note Manager, right click it and select „Show as Sticky Note‟ Select a note in the Note Manager, click the „Show as Sticky Note‟ toolbar button Page 36 Using your Pen in Mouse Mode Rev 1.3 Digital Scribe User Manual NOTES: To view additional sticky note options, right click on the sticky note Select „HIDE‟ to hide a sticky note into the application tray icon You can restore any hidden sticky note by right clicking the application tray icon, and selecting „My Sticky Notes‟. Then select the note you would like to restore A Sticky Note can automatically pop up after the application has been closed and re-opened, or after system reset. In the Note Manager, use the Configuration menu Page 37 Using your Pen in Mouse Mode Rev 1.3 Digital Scribe User Manual Using your Pen in Mouse Mode Rev 1.3 Creating Paper holder Notes Paper holder notes can help you in many ways. One common way is if you need to read your note and rewrite it in a text editor. A paper holder note will always be on top, and its transparency can be adjusted You can create paper holder note by doing one of the following: Select a note in the Note Manager, right click it and select „Show as Paper Holder‟ Select a note in the Note Manager, click the „Show as Paper Holder‟ toolbar button Page 38 Digital Scribe User Manual Using your Pen in Mouse Mode Rev 1.3 NOTES: You can hide and show paper holder notes the same way you hide and show sticky note To view additional options, right click on the sticky note You can set the transparency to a Paper Holder. In the Note Manager, use the Configuration menu Page 39 Digital Scribe User Manual Using your Pen in Mouse Mode Rev 1.3 The Note Editor Notes can be edited at any time, whether you are still writing one, or you want to edit a note you have already saved in the Note Manager. The Note Editor contains menus and a toolbar that give you access to a wide selection of editing functions Note Editor Menus The following table lists all menu commands available in the Note Editor, together with a description. Note menu PRINT Prints the selected note PRINT PREVIEW Displays the selected note as it will look when printed PRINT SETUP Allows you to select print options EXIT & SAVE/SEND Saves the edited note and closes the editing EXIT W/O SAVE/SEND Closes the editing application without saving any changes Edit Menu UNDO Page 40 Clears the last stroke made by the digital Pen. Clicking Undo again will clear the stroke made before that, and so forth. Digital Scribe User Manual Using your Pen in Mouse Mode Rev 1.3 REDO Replaces previously undone strokes in chronological order CUT Cuts the selected note and saves it to the clipboard COPY Copies the selected note and saves it to the clipboard PASTE Pastes whatever was last saved to the clipboard DELETE Deletes the selected note CLEAR PAGE Clears the entire on-screen note SELECT ALL Selects all the pen strokes in the note View menu ZOOM IN Increases the note view ZOOM TO FIT Restores the note view to the original size ZOOM OUT Reduces the note view TOOLBARS Allows you to select which editing toolbars you want to view (Standard, Tools, Manager) STATUS BAR Allows you to view or hide the status bar at the bottom of the Notes Editor FULL SCREEN Opens the Notes Editor into full screen view Configuration menu PEN/HIGHLIGHT PARAMS Lets you select the color and width of the Editor Pen and Highlighter Tools menu Page 41 SELECTOR Allows you to select any area by clicking and dragging with your mouse PEN Allows you to freestyle draw with your mouse HIGHLIGHT Allows you to highlight any area by freestyle drawing with your mouse LINE Allows you to insert a line of any length CIRCLE Allows you to insert a circle image of any size RECTANGLE Allows you to insert a rectangle of any size TEXT Allows you to insert type written text COLOR Allows you to pre-select or change the color of pen strokes or to highlight strokes or text LINE WIDTH 1 Allows you to pre-select or change the thickness of any stroke to width 1 Digital Scribe User Manual Using your Pen in Mouse Mode Rev 1.3 LINE WIDTH 2 Allows you to pre-select or change the thickness of any stroke to width 2 LINE WIDTH 4 Allows you to pre-select or change the thickness of any stroke to width 4 LINE WIDTH 8 Allows you to pre-select or change the thickness of any stroke to width 8 Help menu HELP TOPICS Opens the NoteTaker Online Help file ABOUT NOTETAKER Displays NoteTaker version information Note Editor Toolbars The Note Editor Toolbars provide you with quick access to the more common menu commands. The following table lists all toolbar buttons, together with a description of their functions. Standard Toolbar PRINT -- Prints the selected note CUT – Cuts the selected note and saves it to the clipboard COPY – Copies the selected note and saves it to the clipboard PASTE – Pastes whatever was last saved to the clipboard ABOUT NOTETAKER – Provides you with your NoteTaker version information HELP TOPICS – Provides you with your NoteTaker help FULL SCREEN – Brings the Notes Editor into full screen view Tools toolbar SELECT – Allows you to select any area by clicking and dragging with your mouse PEN – Allows you to freestyle draw using your mouse HIGHLIGHT – Allows you to highlight any area by freestyle drawing using your mouse Page 42 Digital Scribe User Manual Using your Pen in Mouse Mode Rev 1.3 LINE – Allows you to insert a line of any length CIRCLE – Allows you to insert a circle image of any size RECTANGLE – Allows you to insert a rectangle of any size TEXT – Allows you to insert type written text COLOR – Allows you to pre-select or change the color of pen strokes or to highlight strokes or text LINE WIDTH 1 – Allows you to pre-select or change the thickness of any stroke to width 1 LINE WIDTH 2 – Allows you to pre-select or change the thickness of any stroke to width 2 LINE WIDTH 4 – Allows you to pre-select or change the thickness of any stroke to width 4 LINE WIDTH 8 – Allows you to pre-select or change the thickness of any stroke to width 8 Manager toolbar CLEAR PAGE – Clears the entire on-screen note UNDO- Clears the previous action REDO- Replaces previously undone action ZOOM IN – Enlarges the note view ZOOM TO FIT - Returns the note view to the original size ZOOM OUT – Reduces the note view ROTATE RIGHT – Rotates the entire note image 180° to the right ROTATE LEFT – Rotates the entire note image 180° to the left Page 43 Digital Scribe User Manual Using your Pen in Mouse Mode Rev 1.3 Editing Notes Once a note is open in the Note Editor, you can only edit elements of the note (pen strokes, etc.) after they have been selected. Once you have selected the area you want to edit, you can delete it, change the color and/or width of the pen strokes, etc. You can also add figures and drawings into the note using the various drawing features (insert circle, line, highlight, text, etc). These new elements can also be edited after you insert them. To start editing a note 1. While working on a note, or in the Note Manager select the note and click the Edit Note button , –Or– right-click the note and, in the shortcut menu, click Edit Note. -OrDouble click a note in the note view mode The Note Editor window opens displaying the selected note. 2. Use the Select Area button in the Tools Toolbar or the Select option from the Tools Menu to select a particular stroke or group of strokes, –or– in the Edit menu, click Select All to select the entire note. NOTE: While editing, you can still use your pen to continue sketching on the note. Sending Notes You can send any note by email or over the local network. An emailed note appears as a JPEG attachment to the recipient. In order to send a note by local network, the recipient must have the NoteTaker software installed and running on his/her PC. Notes can be sent by email or network from both the Note window and the Note Manager. Sending notes by email The NoteTaker uses your default email client to send notes as email. To send a note immediately after you have completed it: 1. 2. 3. 4. Page 44 Click the Send Note by Email button A new email form opens with the note in the form of a JPEG attachment Type in the desired recipient‟s email address and any desired text in the subject and body of the email Send the email Digital Scribe User Manual Using your Pen in Mouse Mode Rev 1.3 To send a saved note: Any saved note can be send as a JPEG or vector format file o In the Note Manager, click the note name or thumbnail. o In the File menu, select Send TO --> Email, –or– right-click the note name or thumbnail and, in the shortcut menu that appears, select Send TO--> E-Mail . o A new email form opens with the note attached as a JPEG file. o Type the desired recipient‟s email address and any desired text in the subject and body of the email o Send the email Sending notes over the local network To send a note immediately after you have completed it 1. In the Note Window, click the Send Note to Network PC button . 2. In the Send Note dialog box, a list of all network users that have the NoteTaker application installed and running automatically appears. Select the Name/IP address of the person(s) to whom you would like to send the note –or– click Select All to send the note to everyone on the list. 3. Click Send. To send a saved note: o Page 45 In the Note Manager, click the note name or thumbnail. Digital Scribe User Manual Using your Pen in Mouse Mode Rev 1.3 o o o In the File menu, select Send To--> Network PC, –or– right-click the note name or thumbnail and, in the shortcut menu that appears, select Send To --> Network PC. In the Send Note dialog box, a list of all network users that have the NoteTaker application installed and running automatically appears. Select the Name/IP address of the person(s) to whom you would like to send the note –or– click Select All to send the note to everyone on the list. Click Send NOTE: You can select multiple recipients when sending a note via local network By selecting a name in the list, then pressing <CTRL> On the keyboard and selecting another name or names Page 46 Digital Scribe User Manual Using your Pen in Mouse Mode Rev 1.3 Receiving notes over the local network Users on a local area network (LAN) such as may exist in an office environment can receive notes over the LAN. When you receive a note, it automatically appears on your PC screen and a sound is heard Right click the received note to have the following options: o Replying to the sender (this includes an editing function so the user can add text and sketches) o Printing the note o Saving the note o Setting a reminder o Sending the note to other users on the network o Close the Note Notes received by LAN will be saved under „Received Notes‟ in the Note Manager Page 47 
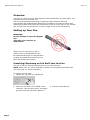
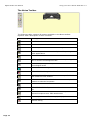
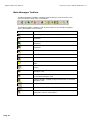
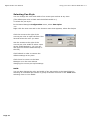
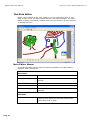
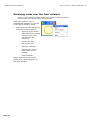
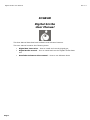
Digital Scribe User Manual Application Tray Icon Right clicking the application tray icon gives you the ability to perform the following actions: Browse Notes – Open the Note Manger Note Mode Or Mouse mode – Toggle between the 2 options of your Digital Pen. Tray icon changes accordingly Detect Hardware Detect your hardware. If your hardware is not detected, the tray icon changes to About NoteTaker See application details (About Dialog) Exit Exit the application Page 48 Using your Pen in Mouse Mode Rev 1.3 Digital Scribe User Manual Character Recognition Application Rev 1.3 Vision Objects MyScript® Notes Vision Objects MyScript® Notes Character Recognition Application General Overview NoteTaker Software Suite integrates with Vision Objects MyScript® Notes application. MyScript® Notes is a well known character recognition engine. You can use NoteTaker to export your notes into the MyScript® Notes recognition engine. Installing MyScript® Notes Please use „Vision Objects‟ CD within the product package. Follow „Vision Objects‟ installation instructions. Operating MyScript® Notes To use the MyScript® Notes recognition engine, please make sure you have installed Notetaker Software Suite Then, you can select a note, Notes, or a Sticky Note, and export them to the MyScript® Notes recognition engine. Exportable objects from NoteTaker to MyScript® Notes The following objects can be exported to MyScript® Notes: A New Note A single Note from „NoteTaker Manager‟ Multi pages Note from „NoteTaker Manager‟ Sticky Note from „NoteTaker Manager‟ Exporting objects Use the following methods for each type of object in order to export it to MyScript® Notes: A New Note Click the „Convert to Text‟ toolbar button A single/multi page Note from „NoteTaker Manager‟ Page 49 Digital Scribe User Manual Character Recognition Application Rev 1.3 Right clicking the Note in the thumbnails area Right clicking the Note in the tree area Page 50 Vision Objects MyScript® Notes Digital Scribe User Manual Character Recognition Application Rev 1.3 Selecting a note and selecting “File --> Convert to Text” menu Page 51 Vision Objects MyScript® Notes Digital Scribe User Manual Character Recognition Application Rev 1.3 Vision Objects MyScript® Notes Sticky Note from „NoteTaker Manager‟ Right clicking the „Sticky Note‟ and selecting “Convert to Text” menu Your Note will be exported to MyScript® Notes application. MyScript® Notes will be opened with your Note in the „Conversion‟ area Please refer to the MyScript® Notes user guide for more instructions of how to use the MyScript® Notes application Page 52 Digital Scribe User Manual Character Recognition Application Rev 1.3 Taking Care of Your Digital Scribe Storing your Device Keep your device away from liquids and direct sunlight at all times. Always store your unit in protected packaging or in the original box. Severe shock can cause degradation in performance. Take precautions not to drop the memory Unit or Pen onto hard surfaces. Cleaning your Digital Scribe Page 53 Clean your device using a soft cloth. Special care must be taken not to insert sharp pointed objects into the ultrasonic transmitting and receiving units. Vision Objects MyScript® Notes