1
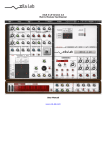
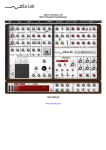
XILS 3
User Manual
www.xils-lab.com
-1-
Table of contents
1 Introduction......................................................................................................................................... 3
2 Features............................................................................................................................................... 5
3 Installation.......................................................................................................................................... 6
3.1 Windows (XP, VISTA)............................................................................................................... 6
3.2 Mac (OSX 10.3.9 and later)........................................................................................................ 6
4 Quick Start.......................................................................................................................................... 7
4.1 Launch....................................................................................................................................... 7
4.2 Toolbar....................................................................................................................................... 7
4.3 Adjusting the parameters............................................................................................................. 7
5 Preset Management............................................................................................................................. 8
5.1 Main Toolbar.............................................................................................................................. 8
5.2 Preset menu................................................................................................................................ 8
5.3 Bank menu............................................................................................................................... 10
5.4 A/B comparison........................................................................................................................ 11
6 XILS 3 modules description............................................................................................................. 12
6.1 Synthesis.................................................................................................................................. 12
6.1.1 Matrix.................................................................................................................................. 12
6.1.2 Oscillators........................................................................................................................... 13
6.1.3 Filter.................................................................................................................................... 14
6.1.4 Envelope shaper.................................................................................................................. 14
6.1.5 Noise generator................................................................................................................... 15
6.1.6 Ring modulator................................................................................................................... 15
6.1.7 Reverb................................................................................................................................. 15
6.1.8 Output filter......................................................................................................................... 16
6.1.9 Input Level.......................................................................................................................... 16
6.1.10 Joystick............................................................................................................................ 16
6.1.11 Output level and pan........................................................................................................ 17
6.1.12 Main level....................................................................................................................... 17
6.1.13 VU Meter........................................................................................................................ 17
6.2 Sequencer................................................................................................................................. 18
6.2.1 Main interface..................................................................................................................... 19
6.2.2 Display module................................................................................................................... 21
6.3 Virtual keyboard....................................................................................................................... 22
6.4 Advance settings panel.............................................................................................................. 23
6.4.1 Advanced keyboard settings panel...................................................................................... 23
6.4.2 Advanced input settings panel............................................................................................ 24
6.4.3 Advanced matrix settings panel.......................................................................................... 25
6.5 Option menu............................................................................................................................. 27
6.5.1 Main.................................................................................................................................... 27
6.5.2 Misc.................................................................................................................................... 27
-2-
1 Introduction
Thank you for choosing the XILS 3!
The XILS 3 is a virtual instrument based on the architecture of a classic matrix based modular
synthesizer. Matrix connection is one of the main features of this synthesizer.
Matrix connection brings modularity and sound
design to a new dimension. More than 450
connections (audio signals, control signals, trig
signals) are available, more than any other
modular synthesizers can do without being
unusable!
Easy to connect, easy to modify and easy to see, the matrix is far away the easiest way to
connect modules to each other.
But a connection matrix would be nothing
without modules to connect! XILS 3 boasts
alias free, warm sounding analog style
oscillators, analog curve matching, 2 pole and
self-oscillating 4 pole dynamic filters, fast
envelopes, a noise generator, a spring reverb,
and a ring modulator.
Last but not least, a 128 step sequencer is added to
this synthesizer. This easy to program sequencer can
create standard 8 or 16 step patterns, but also much
more complex rhythms for experimental music..
To bring an ergonomic approach to sound design, the XILS’s matrix and sequencer get their
own presets, providing the user with flexible sound management options.
Although the XILS 3 is an instrument, you can also use it as a powerful and versatile effects
processor. Two mono inputs can be modified, modulated, or used as modulator source or trig
source, thanks to four input modules: gate, envelope follower, pitch tracker and transient
tracker.
Famous sound designers and artists have already made hundreds of presets for the XILS 3, so you can
enjoy this instrument even if you do not have any knowledge of sound design!
2 Features
The XILS 3 offers:
•
•
•
•
•
•
•
•
•
•
•
•
•
•
•
•
•
•
•
Three aliasing-free oscillators: sine, ramp, square, triangle
One 2/4 pole low pass filter (a 3 pole self-oscillating mode is also planned)
Three envelopes, based on two different designs, trapezoid and ADSR
One MIDI synced LFO
One MIDI synced Sample and Hold
One voltage processor
One spring reverb
One ring modulator
One 128 step sequencer
Two output static filters
One joystick
Three connection matrix
One input gate
One input envelope follower
One pitch tracker
One transient tracker
Chorus and delay effects
Mono/Unison/Poly playing mode with up to 18 voices of polyphony
All parameters are MIDI controllable
The XILS 3 is available in the following formats:
•
•
Mac OSX 10.3.9 and later: VST, Audio Unit, RTAS (Pro Tools 7.0 and later)
Windows XP and Vista: VST, RTAS (Pro Tools 7.0 and later)
Minimum system requirements: 1 Gigabyte of RAM and a 2 GHz processor.
The XILS 3 is a plug-in and is not available in a stand alone application
3 Installation
3.1 Windows (XP, VISTA)
To install the XILS 3 on Windows XP or Windows 2000, launch the XILS 3 installer file
xils3_limited_win_setup.exe.
Once you have accepted the license agreement, you will be asked to select the installation directory
and provided with a default. Presets and various files used by the XILS 3 will be stored in this
directory.
Once the installation directory is chosen, you will be asked to select the VST plug-in directory, with a
suggested default. Keep this default directory if you do not use the VST version.
Next you must choose one of three versions of the plug-in. Your choice should depend on whether
your CPU recognizes SSE or SSE2 instructions. Generally, it is better to install the generic version,
which works with all computers, but in certain cases the other versions can provide improved CPU
efficiency.
The RTAS plug-in and its table control management ProTools, are directly copied into the following
directory: C:\Program Files\Common Files\Digidesign\DAE\Plug-Ins
On Windows 7, the XILS 3 LE may not display correctly the preset names. In that case, search the
software, on which you are starting for using our XILS-Lab vst plug-in. Right-click on that *.exe file
(for example cubase5.exe) a pop up window appears now. Now select "Open as administrator. The
XILS 3 will launch correctly.
3.2 Mac (OSX 10.3.9 and later)
To install the XILS 3 on an computer equipped with Mac OSX 10.3.9 or later, double-click the file
xils3_limited_osx_setup.dmg.
Then launch the install program, XILS 3 LIMITED.pkg, and follow the instructions.
Warning: the install program will ask you for your system password.
The various files of the XILS 3 will be copied into the following directories:
Library/Application Support/Digidesign/Plug-Ins
Library/Audio/Plug-Ins/Components
Library/Audio/Plug-Ins/VST
4 Quick Start
4.1 Launch
When you open the XILS 3 in your host sequencer application, the Init preset is loaded. You can
directly use this preset, which gives a simple mono standard sound.
4.2 Toolbar
The toolbar at the top of the interface allows you to load or save presets, make a comparison
between settings A and B, or modify the options.
Click on the Preset button to show the available presets in the current bank. Please note that
selecting a new preset without saving your current settings will erase any changes you have made
to those settings.
4.3 Adjusting the parameters
To adjust the parameters of the XILS 3, you have two axes: horizontal and vertical. So when you
change a parameter, you can vary the precision with the mouse movement angle.
Moreover, if you right-click on a parameter, or if you hold shift while clicking, you can adjust the
parameter with fine precision (the ? button of the toolbar display panel summarizes these
shortcuts).
Keyboard shortcut
Win:
CTRL+left click: reset parameter to its default value.
CTRL+right click or CTRL+Shift+left click: initialise the default value of the parameter.
OSX:
Apple+left click: reset parameter to its default value.
Apple+Shift+left click: initialise the default value of the parameter
5 Preset Management
5.1 Main Toolbar
In the toolbar you can find two buttons, Bank and Preset, with two associated text fields. The Bank
button opens the bank management menu and the Preset button opens the preset management
menu. The first text field shows the current bank and the second shows the current preset.
When a parameter is modified, the name of the preset is followed by a *, indicating that the current
settings of the XILS 3 no longer match the stored preset.
When you want to save a modified preset, click on the Save button. The settings of the XILS 3 are
then saved in the currently displayed preset, and the * disappears.
Some presets cannot be modified. They are called factory presets. In their case, the Save button is
replaced by a Dup. button. Clicking on this button will duplicate this preset into a new preset.
5.2 Preset menu
Click the Preset button to open the preset menu. Here you can choose and load another preset
from the current bank into the XILS 3.
In this menu, other actions are also available:
Delete Preset: use this to delete the current preset (a popup confirmation window appears). This
option is only available if the current preset is not a factory one.
New Preset: use this to create a new preset. A popup window with the following settings appears:
Init settings: a new preset will be created from initial settings values.
Current settings: a new preset will be created from the current preset settings. The new preset will
be created with a default name that can easily be modified by clicking in the preset name field.
Open preset Information: opens the following preset information window:
In this window you can modify the Name of the preset, its associated Bank, the preset Author, and
its associated Project. You can also see its creation date and the last update date.
To modify a preset name, click in the preset field and enter the new preset name. When modifying
a preset name (through the preset information window or directly in the toolbar), the following
window appears:
Rename: modifies the current preset name.
Duplicate: creates a new preset from the current settings with the new name. The previous preset
remains as it was.
5.3 Bank menu
Click on the Bank button to open the bank menu. Here you can directly select and load any preset
from any bank.
In this menu, other actions are also available:
New Bank: creates a new bank. As for the creation of a new preset, a choice is given concerning the
parameter initialisation: Current settings or Init Settings.
Delete Bank: deletes all of the presets of the current bank that are not factory ones. If the bank does
not contain any factory presets, it will completely disappear.
To modify a bank name, click in the bank field and enter the new name. When modifying a bank
name (through the bank information window or directly in the toolbar), the following windows
appear. The first appears if the bank name you entered doesn’t exist, while the second appears if it
already exists:
Bank rename: modifies the current bank name.
Preset to new bank: creates a new bank and moves the current preset into it.
Bank duplicate: creates a new bank and moves all of the presets of the current bank into it.
Move current preset: moves the current preset into the existing bank.
Merge the two banks: moves all the presets of the current bank into the existing bank, and deletes
the current bank.
Use Factory: enables or disables the display of factory presets.
Sort By…: sorts the presets according the bank, author, project, or shows all presets (Bank Name,
Author Name, Project Name, All Presets). The preset menu will show presets of the same category
(same author, same project or same bank).
Export Bank: exports a bank in the XILS 3’s proprietary format, Mac and PC cross-compatible. This
function is available only if presets are classified by bank name because only banks can be exported.
Import Bank: imports an XILS 3 bank.
5.4
A/B comparison
You can store two different settings at the same time and instantly switch from one to the other to
compare their settings. These two settings are stored in the A and B memories.
When you launch the XILS 3, the default activated memory is A. When you load or modify a preset,
this memory is also modified. You can switch to B memory by clicking on the B button.
To copy the current memory to the other one, press the button labelled -> or <-, according the
current active memory.
With this A/B comparison system, you can easily have two settings and compare them in a
convenient way.
6 XILS 3 modules description
The XILS 3 contains two cabinets: one is dedicated to the synthesis part, which brings the controls to
set oscillators, filters, envelopes and so on; the other used to set the sequencer controls and
additional panels.
6.1 Synthesis
In this part, you can control the main part of the synthesizer, the three oscillators, the filter, the
envelope shaper, the spring reverb, the ring modulator, the input signal level, the output signal level,
pan position and filter.
6.1.1 Matrix
The XILS 3 uses a matrix approach for connecting modules to each other. This contrasts greatly with
the cables used by most old modular synthesizers. The matrix has an output signal side on the left
and an input signal side at the top. So the signals go from the left to the top. When a mouse moves
over the matrix, corresponding rows and columns are lit up to help pinpoint the signal path. If you
click over a hole, you will initiate a connection. The signal will go from the selected output from the
left to the selected input at the top.
Output signals can be audio signals from oscillators, an output filter, a noise generator, external
signals and so on, or control signals such as an envelope or stick. An input destination can typically
be an input filter, an envelope shaper, a reverb, or modulation inputs or an output volume control.
Preset: The preset button shows a menu to recall a matrix preset that initialises the matrix
connection. To create matrix presets see the advanced matrix settings panel below.
6.1.2 Oscillators
Frequency: this knob has two parts, one for coarse tuning and the other for fine-tuning. The outside ring
sets the octave of the oscillator frequency: you can set it from -2 to +2 octaves, or it can be set to Low.
This Low setting gives a very low frequency oscillator, which can be used for effects. The inside part of
the knob fine-tunes the frequency. When tuning with the left mouse button, it sets the frequency by
semitone steps. When tuning with the right mouse button, it fine-tunes the frequency with more precision.
Shape: this knob sets the shape of the sine, square, ramp or triangle waveform. For the sine wave, it
adds odd harmonics, for the square, it modifies the impulse width, for the ramp it adds a second
front, and for the triangle, it modifies the raising front.
Shape
Ramp
Square
Triangle
0 or 50%
20%
Level: this knob modifies the output level of each waveform. This can be useful for blending the mix
of the waveforms and setting the amount of modulation created between them.
The oscillator’s frequency, shape and level can be modulated with control or audio signal thanks to
the matrix connection (for shape, see the advanced matrix setting panel below).
6.1.3 Filter
The XILS 3’s filter is an accurate dynamic low pass filter.
Frequency: This knob sets the cut-off frequency of the filter.
Response: This knob sets the resonance (or quality factor) of the filter.
Level: This knob sets the output level of the filter.
Poles: This three-position switch sets the number of poles and type of filter. In the top position, you
will get a four pole self-oscillating filter, in middle a three pole self-oscillating filter and in the
bottom position a two pole resonant filter. Self-oscillating means that when the response is at the
maximum, the filter outputs a sine wave signal even if there is no connection at its input.
6.1.4 Envelope shaper
The envelope shaper is another name for the standard VCA (Voltage Controlled Amplifier)
associated with an envelope. This envelope is not conventional though. Its original name was
“trapezoid” because it is like a mathematical trapezoid form, in contrast with a standard ADSR
envelope. But to keep in with the habits of most synthesizer users, you can select the type of
envelope you want by clicking on the Envelope Shaper label.
Trapezoid
ADSR
6.1.5 Noise generator
Most of the sounds you can hear have a noise component in the background or during the attack. To
reproduce this sound feature, the XILS 3 has a noise generator module.
Level: this knob sets the output level of the noise.
Colour: this knob sets the colour of the noise,
from a very coloured noise (less high frequency)
to a standard white noise, passing through a
standard pink noise.
The level of this module can be modulated through the connection matrix.
6.1.6 Ring modulator
The ring modulator module performs an
amplitude modulation between its two inputs.
Only the output level can be modified. This
module can create bell-like effects.
6.1.7 Reverb
The reverb module reproduces a spring reverb like that found on a VCS3/AKS synthesizer. It
produces a very typical spring reverb sound.
Level: this knob sets the output level on the
reverb.
Mix: this knob sets the mix between the dry and
the wet signal.
The mix setting can be modulated through the connection matrix.
6.1.8 Output filter
There is a static filter, low pass or high pass, for each of the two outputs, left and right. This filter
can be useful for limiting some high frequencies or removing rumble while keeping a full range for
the dynamic filter.
These knobs set the cut-off frequency of the filter
respectively for Channel 1 and Channel 2, while
the switches enable or disable the filter.
6.1.9 Input Level
The XILS 3 can also be a very powerful and versatile external effects processor. The external audio
signal you want to treat can be used for any purpose inside the XILS 3: modulation, an audio source
or a specific control signal such as pitch, envelope or trig generator. A gate is also provided (see
below).
These two knobs set the level of the external
inputs for Channel 1 and Channel 2 respectively.
6.1.10
Joystick
XILS 3 has a joystick. It is, of course, fully MIDI
controllable. The two Range knobs set
respectively the range of the horizontal and the
vertical movement.
6.1.11 Output level and pan
The level of the two channels can be set with the
Level knobs, while the two Pan Ext. knobs can
change the stereo field of each channel.
The output signal level can be modulated through the matrix connection.
6.1.12
Main level
The knob beneath the VU meter controls the general output level of the XILS 3, while the button
below enables or disables (by-passes) it.
6.1.13
VU Meter
The VU meter shows the level of the signal connected to its input through the connection matrix.
The signal can be either an audio signal or a control signal. The VU meter’s internal circuit
automatically adapts to your signal.
6.2 Sequencer
The XILS 3 has a powerful analogue style sequencer that can help you to create complex sequences
and incredible special effects. It is inspired by the old EMS 256 sequencer, which was, in its time, a
revolutionary machine!
As the output values of the XILS 3’s sequencer are hidden, it can perhaps be a little confusing at
first. But the power and versatility of this concept, in contrast to most other analogue sequencers of
the time, is a good reason to get to know it!
The sequencer has six output banks organised into three independent layers of
two linked banks. The right section of the sequencer panel shows the six banks
and how the three layers are used.
Each current output value is shown by the external ring of the corresponding
double-knob with a small triangle. You can set the current output value of a
sequencer step by clicking on the corresponding double-knob’s external ring.
The internal part of each double-knob sets the range of the corresponding output
bank, and thereafter the amount of modulation. Used as pitch modulator this
inner ring should be set to 12 o’clock to provide a normal scaled pitch
modulation.
You can connect your MIDI keyboard to the sequencer by switching on the Connect Kbd switch. In
this mode, when you hit a note, the pitch will be memorised in the steps of the first bank of the
corresponding layer and the velocity in steps of the second bank. The current layer on which the
keyboard acts is set with the three-position Layer knob on the left hand side of the panel.
You should also bear in mind that a seventh bank is used: the output trig. Each time a note is entered
on the keyboard, a trig is memorised for the current position.
Now when the clock runs, each time a trig occurs, the six memorised corresponding values are
outputs.
A series of MIDI controllable buttons controls the sequencer and a double-knob controls the
sequencer’s clock rate.
To help with your creative workflow, independent sequencer presets can be saved and recalled.
6.2.1 Main interface
Range A-F: The internal part of each double-knob sets the output level of the value, and the external
ring shows the current output value that can be modified by clicking on it.
Slew rate A-C-E: These knobs set glide times for the A-C-E bank output values. As they are
dedicated to pitch modulation, they give glide times for the pitch sequence. But of course, you can
use them for any other purpose as well.
Connect Kbd: This switch connects a virtual or MIDI keyboard to the sequencer (see the above
explanations).
Layer: A three-position knob that selects which layer will memorise the note values entered via your
keyboard (or the external rings of the Range double-knobs).
Clock rate/clock count: This double-knob sets the clock rate (internal knob) and the number of the
sequence steps (external ring). The clock rate can be set in Hz or in multiples or sub-multiples of
your host application’s tempo, depending on the MIDI Sync switch (see the Advanced Display
Module of the sequencer). The step number is the number of available trigs the sequencer can do
before looping. It can be set from 2 steps to 128, allowing for powerful and complex rhythms!
Max/Current display: The digital display beneath the Max current label shows the current number
of steps and the maximum number the sequencer will reach before looping. Click on the label to see
the sequencer’s preset name. In this mode you can click into the display to edit and change the name.
Preset: This button opens a menu that shows you the available sequencer presets for recall:
The menu also allows you to save or delete sequencer presets, or even create new ones. You can also
choose Random settings, which tunes all of the sequencer settings randomly (step number, clock
rate and the six bank output values).
Reset: Resets the sequencer clock to the first step or the last step of a sequence, depending on the
direction of the clock (see below). This action can also be done through the trig matrix connection.
Start: Starts the sequencer clock. This action can also be done through the trig matrix connection.
Stop: Stops the sequencer clock. This action can also be done through the trig matrix connection.
Next: Moves the sequencer position to the next step.
Fwrd/1Sht/Reverse: This three-position switch allows you to choose how the steps are played.
Forward is the ‘normal’ direction of a sequence (left to right) while Reverse changes the direction of
the pattern (right to left) and 1Sht plays the sequence only once.
Cont/Kbr/Step: This three-position switch allows you to choose how the clock runs; in continuous
mode, step by step (incremented each time a note is entered on your keyboard), or step by step but
incremented only with the step button. These modes are useful for programming or verifying your
sequences.
Erase All: Erases all of the events in the selected sequence.
Erase Evt: Erases the current step of the sequence (all of the six output values and the trig one).
6.2.2 Display module
The XILS 3’s sequencer display panel makes it easy to make, verify and modify your sequences.
Three zooms can be used to display the internal values, selected by the ‘+’ and ‘–’ buttons. Zoom 1
shows the entire range of the value, useful when using the sequencer to modulate parameters such as
filter frequency, oscillator level or shape. Zoom 2 and Zoom 3 show four and two octaves
respectively. The slider allows you to move the displayed part inside the whole range.
The current time slot is shown as a white cursor line at the bottom of the view.
Each of the current sequences is displayed in a different colour. The sequences can be highlighted or
hidden by checking or unchecking the corresponding coloured boxes to the left of the event display
area.
You can also modify the sequencer with the mouse : select the sequence you want to adjust. With the
left button, , click on the panel to add or modify a step. With the right button, click to erase a step.
Zoom 1
Zoom 2
Zoom 3
In the sequencer display panel you can see two switches:
Tempo Sync: Allows the sequencer to be synchronized to the tempo of your host application. In this
mode, the sequencer’s clock rate is set by multiples and sub-multiples of the host’s tempo.
Sequencer Monophonic/Triphonic: This switch selects how the sequencer triggers the different
voices of the XILS 3. In monophonic mode, the sequencer triggers only voice 0 and the sequences
are monophonic. This is independent of the keyboard playing mode. When the keyboard playing
mode is set to mono or uni, playing the keyboard will tune the sequence according to the keyboard’s
follow connections. When the keyboard playing mode is set in polyphonic, the sequence is tuned
according to the keyboard follow only when voice 0 is activated. This is always the case in reset
mode, but not in circular mode. This feature enhances the flexibility and versatility of the sequencer.
In triphonic mode each layer of the sequencer trigs respectively voices 0, 1 and 2. This allows you
to get sequences with three voices of polyphony. In the same way described above, depending on the
keyboard playing mode, the sequences will follow the keyboard in different manners accordingly
with voices 0, 1, and 2 activated.
Some thoughts on using the sequencer :
While the sequencer section gives you all the controls over the input of step values, speed, running
order, sequencer length etc., an important part of the usage of the sequencer lays in a different
section of the synth: the MATRIX section.
This is where you set what all those step values should do: modulate pitch? Modulate filter? Pulse
Wide? Trigger the envelope? The sky is really the limit.
In the MATRIX section you set the connection of the step value outputs to a destination in the lower
left matrix: the 6 rows labeled SEQ LAYER 1A, 1B, 2A, 2B, 3A and 3B.
In the right matrix (TRIG CONNECTION) you can set trigger modulations, i.e. you can set if the
sequencer layer triggers should trigger the Trapezoid envelope or turn on, reset of stop the sequencer
for instance.
Experiment with all these modulation possibilities to find out that there are virtual no limits to what
you can do with the sequencer!
6.3 Virtual keyboard
The XILS 3’s keyboard lets you play notes that are sent to oscillators. The keyboard also highlights
the MIDI note information that the XILS 3 receives. To the left of the keyboard are two dedicated
wheels, one for the modulation and the other for the pitch bend.
The output of the modulation wheel and details of which modules it modulates are set in the
advanced matrix settings panel.
The pitch bend wheel is directly connected to the keyboard follow circuits and modifies the pitch they
calculate when connected to the oscillators. The pitch bend range can be set from one semi-tone to
four octaves in the advanced keyboard settings panel.
6.4 Advance settings panel
By clicking on the following labels, different advanced settings panels will be displayed:
6.4.1 Advanced keyboard settings panel
Clicking the Keyboard tab shows the advanced keyboard settings window:
The Keyb Mode menu lets you choose the synthesizer’s playing mode:
Mono: monophonic mode, only one note playing at a time, with low note priority.
Circular Poly: a polyphonic mode with up to 18 active notes at a time. Each voice is chosen in a
circular manner, allowing a very long release but requiring a lot of CPU resources.
Reset Poly: a polyphonic mode with up to 18 active notes at a time. Each new note is played with
the first free voice, cutting the current release and reducing the CPU load.
Uni2: a monophonic mode with two active notes of the same pitch playing. Thanks to the detune
knob, a phasing effect can be created.
Uni4: a monophonic mode with four active notes of the same pitch playing.
Uni6: a monophonic mode with six active notes of the same pitch playing.
The portamento/glide parameters define how the note transitions behave. In monophonic mode,
only one note is played, so each transition glide occurs between two successive notes. When a
polyphonic mode is enabled, note transitions are cyclic. This means that note transitions are
undetermined, and the note from which the glide is calculated is one of the previously played notes.
The following parameters are available:
Portamento: activates or deactivates the portamento mode. When the portamento mode is
enabled, the note transitions are progressive in pitch.
Glide Time: This knob adjusts the transition time between the notes.
Glissando: This switch activates semitone transitions between notes. When deactivated, the glides
are continuous.
Legato: This switch determines if the notes have to be legato to activate the glide - i.e. if the
previous ‘note off’ has to occur after the current ‘note on’.
6.4.2 Advanced input settings panel
This panel allows the setting of modules dedicated to processing external input signals. First you will
find a noise gate that removes some of the external signal. Then a transient follower detects the
transient in a signal and transforms it with a modulator or trig source. There is also an envelope
follower that transforms the shape of the input signal, and a pitch tracker that transforms the pitch of
the signal.
Gate settings:
Attack: This knob sets the time the gate will open.
Release: This knob sets the time the gate will close.
Opening Threshold: This knob sets the threshold over the gate level. The external input signal must
at or over this level to open the gate.
Closing Threshold: This knob sets the threshold below the gate level. The external input signal must
below this level to close the gate.
Gate level: This knob sets the level for opening or closing the gate.
Envelope Follower:
Attack: This knob sets the smoothing of the raising part of the signal shape. The less it is, the more
the output will folow the external signal’s shape
Release: This knob sets the smoothing of the release part of the signal shape.
Lvl Out: This knob sets the level of the output signal of this module.
Transient Follower:
Sensitivity: This knob sets how the detection circuit will react on the transient of the external signal.
Time: This knob sets how the detection circuit will react for successive transients.
Release Time: This knob sets the release time of the output signal of the module
Lvl Out: This knob sets the level of the module’s output signal.
Pitch Tracker:
This module extracts the pitch of the input signal. The resulting pitch signal can be applied to the
oscillators, but it can also be used to modulate any other modules via the connection matrix.
Quality: This knob sets the smoothing of the pitch tracking. Turned left, the smoothing is minimal
and the modulation is almost unpredictable, whereas turned right, the smoothing is maximal and
the modulation is very slow: applied to oscillators, it gives a glide effect.
Snap: This switch activates the tune option of the pitch tracker: the pitch will be tuned to scale
notes.
Set Zero: This double-knob shifts the pitch. It allows you to change the pitch of all the modules that
use the pitch tracker signal. The internal part adjusts the shift in semi-tones while the external ring
adjusts in octaves.
Low Freq: This knob sets the minimal lowest frequency of the pitch tracker. It sets the lowest note
that the pitch tracker can handle.
High Freq: This knob sets the maximal or highest frequency of the pitch tracker. It sets the highest
note that the pitch tracker can handle.
The settings of the pitch tracker’s frequency range must be adjusted according the input signal. It
affects the pitch tracker’s tessitura (the range from lowest to highest note expected) and tracking
responsiveness. The broader the tessitura, the less precise the detection will be.
Adjust these two settings according to your input signal. As you adjust them, you can see the notes
corresponding to the minimal and maximal frequencies.
6.4.3 Advanced matrix settings panel
The get more modulation possibilities, the XILS 3 has three additional matrices on the advanced
matrix settings panel: one on the right hand side, for routing the trig signal; another towards the top
left, for extended synthesis modulation; and a third one beneath that, for routing the sequencer
outputs.
Mod Wheel: This knob sets the range of the modulation wheel.
Velocity: This knob sets the range of the velocity.
After Touch: This knob sets the range of the after touch.
Key Follow 1: This knob sets the range of the key follow 1.
Key Follow 2: This knob sets the range of the key follow 2.
To recall easily connections, a matrix preset
management is available:
Preset button: Opens the matrix preset menu,
while clicking on the up and down arrows will
recall the next or previous preset. The preset
name is displayed in the Preset field and can be
modified by clicking on it.
The matrix preset menu allows you to save,
create and delete presets.
6.5 Option menu
6.5.1 Main
In the toolbar, the Options button opens a menu for selecting various options for the XILS 3.
This menu shows the following options settings:
XILS 3 About: displays information about the XILS 3 (version, build date and credits).
Open MIDI settings panel: opens a popup where you can assign MIDI controllers for each of
the XILS 3’s parameters. Click on the parameter label to select the parameter you want assign,
then enter the MIDI controller number (from 0 to 127), or switch on the learning switch and send a
MIDI command with the correct MIDI controller number. It will be memorised by the XILS 3. This
settings popup can also be opened by CTRL+ALT+Apple+Left-click (Mac) or CTRL+Win+ALT+Leftclick (Win) on the desired XILS 3 parameter.
6.5.2 Misc
Init settings from current settings: initialises the default values of the XILS 3 from the current
settings. All the new presets will be created from these settings, when the init settings choice is
selected. These parameters will also be used when setting a control to its default value. (Win:
CTRL+click, OSX: ALT+Apple+Click).
Popup On: shows a popup window while modifying a value.
Popup Name On: the name of the current modified parameter is displayed.
Wheel Incr: 0.01: parameter increment of 0.01 when using of the mouse wheel.
Wheel Incr: 0.05: parameter increment of 0.05 when using of the mouse wheel.
Wheel Incr: 0.1: parameter increment of 0.1 when using of the mouse wheel.
VU Meter update: low: slow refresh rate for the VU meter. Useful when it is necessary to save
CPU power.
VU Meter update: middle: standard refresh rate for VU meter.
VU Meter update: fast: fast refresh rate for VU meter. Useful when it is necessary to precisely
follow the VU meter’s input signal.