1
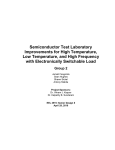
Chapter 2 Site Selection and Identification - Introduction to Volunteer Water Quality Monitoring Training Notebook - When you begin monitoring, the first thing you will need to do is select a site. As defined for our purposes, a “site” is a 300-foot-long segment of stream. Ideally, a site includes at least one riffle (when monitoring an Ozark stream), or a variety of habitats such as root mat, snags, and non-flow habitat in prairie or lowland streams. Volunteers may choose to monitor any stream in which they have an interest. An important factor in selecting a site is to choose a stream that is close to where you live so that monitoring is convenient for you. In order to receive your biological monitoring equipment, it will be necessary for you to choose a site, perform an initial survey of the site using the brightly colored Site Selection Data Sheet provided to you at your Introductory Workshop, calculate the stream discharge within your site using the Stream Discharge Data Sheet, and submit the data sheets to program staff, along with a map showing the location of your site. Once you have completed these steps, you will be mailed a set of biological monitoring equipment which will be on loan to you for as long as you are participating in the program. This equipment will include 3x3 kick net, hand magnifiers, forceps, and sample vials. If you choose to leave the program, we ask that you return your equipment to us so that it can be issued to another volunteer. Reasons for choosing a particular monitoring site vary widely. Past and present volunteers have chosen sites for the following reasons: 1.) Interest in a stream on their property, in their neighborhood, community, or on school property. 2.) A desire to protect a favorite fishing or float stream. Healthy streams are often not monitored regularly by state agencies. Limited numbers of staff must prioritize their efforts, often focusing on the worst situations first. Having volunteer data available from these streams can be very helpful when questions arise about their historical Site Selection & Identification 12/13 Introductory Level Notebook 1 condition. This baseline data is invaluable to agencies when disasters occur, such as a hazardous material spill, pipeline break, etc. 3.) Concern about impacts on water quality in their adopted streams from point source or nonpoint source pollution discharges. 4.) The site is of concern to state agencies. Personnel working on water-related issues in the regional offices of the Departments of Natural Resources and Conservation may have specific concerns about particular local streams. Volunteers have contacted them for any suggestions they might have regarding streams of concern or possible sampling sites. 5.) Wanting to fill gaps in monitoring efforts in their area. By researching where state agency staff or other volunteers were already monitoring, they chose a sampling site where baseline data was lacking or did not exist. You can determine the extent of volunteer effort in your area in the following ways: Talk to other monitors on your Stream Team about where they monitor. Contact Stream Team Associations in your area as listed in the Appendix of this notebook. Contact Stream Team Program staff for assistance. Using one of the Interactive maps on the DNR website: http://www.dnr.mo.gov/env/wpp/wpp-map-gallery.htm Depending on the GIS interactive map you choose you can do the following: Find points of interest such as watershed, county, city, or road by searching or zooming Locate conservation areas, state parks, or national forests Locate existing Stream Team VWQM sites (this does not include other activities such as trash pickups, tree planting, etc.) Locate impaired waters/water segments on the 303(d) list Locate wastewater and stormwater discharges See classified waters and their designated uses, such as whole body contact recreation, cool and cold-water aquatic life, drinking water, outstanding state and national resource waters Site Selection & Identification 12/13 Introductory Level Notebook 2 The GIS based map allows you to do more than the Google map such as: Create your own map using DNR data layers (similar to CARES) Pick a map extent such as a county Identify map items Add items to maps such as text boxes, etc. print or email maps query all data layers for information using tools and actions options Site Selection & Identification 12/13 Introductory Level Notebook 3 I. CRITERIA TO CONSIDER WHEN CHOOSING A MONITORING SITE A. HABITAT In order to perform biological monitoring, select a monitoring site with suitable habitat for macroinvertebrates. If you choose a site that does not contain places for macroinvertebrates to live, you will soon tire of monitoring due to a consistent lack of critters. Finding sites with suitable habitat is sometimes difficult in areas that are highly impacted by human activities. Habitat is destroyed by stream straightening (channelization) and the forced movement of streams into concrete ditches, which happens in many urban areas. The best sites contain at least one riffle. These are easy to find in Ozark streams. Ideally, the riffle should be large enough to collect three net sets of macroinvertebrates. The three individual net sets in a riffle should represent “microhabitats” within the riffle. If you cannot find a site within a riffle, you can sample a mix of alternative habitats including root mats, snags or woody debris, and non-flow areas. B. OTHER FACTORS 1. Permission to monitor Always gain permission from the landowner before you monitor. If you have selected a site on public land, like a Conservation Area or State Park, be sure to contact the area manager or park superintendent for permission before sampling. This will ensure that you don’t interfere with any ongoing studies or projects. Additionally, there may be endangered species concerns of which you are not aware. Another concern is the amount of monitoring in the area. Many volunteers want to use public land, but if too many people routinely sample at the same location, they can negatively impact the aquatic community through their sampling efforts alone. As a result, area managers need to gauge how much impact area users have on the aquatic resources. Site Selection & Identification 12/13 Introductory Level Notebook 4 2. What are your monitoring goals? Your purpose for monitoring will greatly influence your choice of a monitoring site. Decide in advance what you want to learn from the data. Some goals of monitoring include: Effects of wastewater or stormwater discharges Effects of non-point source pollution from noticeable sources such as a large parking lot or row crop field Overall health of your watershed 3. Where do tributaries enter the stream? To determine the overall health of an entire watershed, select a site near the mouth of a particular stream, below all tributaries. To determine the impact of a single tributary, select sites above and below the confluence of the tributary with the main stream. 4. Where are the point and nonpoint sources of pollution located? Knowing the sources of possible impacts to your stream will help you interpret the data. If your goal is to determine the impacts of a specific discharge, you need to select two sites, one above and one below any identified discharge. The upstream site can serve as a reference against which to compare downstream data. Be sure there are no tributaries or other inputs between the discharge site and your downstream sites. Any other source of possible contaminants entering the stream will complicate data interpretation. 5. Does the site maintain aquatic macroinvertebrates all year? Picking a site that has permanent flow is very important. Our sampling protocol is not designed to assess intermittent streams. An intermittent stream receives groundwater flow only part of the year, and the flow stops when the water table drops below the channel. You should be able to consistently sample three habitats at your site at least twice a year, in the spring and fall. If part of your site dries up in the driest time of year, as long as at least some portion of your 300-foot stretch of stream maintains pools that support aquatic life during the driest times of the year, you may still Site Selection & Identification 12/13 Introductory Level Notebook 5 sample in the spring and fall. This is acceptable. However, if your entire 300foot site dries up anytime during the year (meaning there aren’t even pools of water), you will need to abandon this site and find another one. Perhaps you can still monitor the same stream, but you will have to move a farther down in the watershed. In general, one site is often sufficient to determine overall stream health. However, multiple sites are necessary when documenting impacts of a specific pollution source. Below is an example of how a volunteer might choose monitoring sites and assign site numbers to those sites. SITE 1 Sample at the mouth of a stream to determine the health of the entire watershed. SITES 2 & 3 Sample above and below the confluence of a tributary to determine the impacts that activities in the tributary’s watershed have on water quality. SITES 4 & 5 Sample above and below point or nonpoint source discharges to determine their specific impacts on water quality. Site Selection & Identification 12/13 Introductory Level Notebook 6 Remember that each one of your sites is a 300-foot stream segment, and individual sites should not overlap. II. SITE NUMBERS Site numbers must be in consecutive and chronological order. Label each site you monitor with a number, beginning with #1. Continue to use that site number each time you submit data from that site. If you abandon a monitoring site, do not assign that number to a future monitoring site (i.e., do not reuse site numbers). Your second site should be given a number that is specific to that place (i.e., Site #2). If you routinely monitor only two sites, even if they are on different streams, one site should be labeled Site #1 and the other should be labeled Site #2. An Example of Site Numbering: Your site number will be tied to your Stream Team number and your name. If you have questions about the site number, write it on your data sheet and/or contact us by phone or email at the numbers/addresses provided in the Appendix (orange page) of this notebook. Example 1.) Bea A. Volunteer, after attending the Introductory workshop, joins Stream Team No. 68. Bea wants to monitor a site that Mac and Ron Vertebrate previously monitored for Stream Team No. 68. Mac and Ron are moving to Tasmania and can no longer monitor this site (it’s too far to commute). Although Bea’s site was originally adopted by Mac and Ron’s Stream Team (No. 68) and was their Site #3, it will now be labeled as Bea’s Site #1 because it is her first site. The only way it would remain Site #3 for Bea is if she had already adopted two other sites previously. Example 2.) Dewey Lovewater’s Stream Team used the following verbal description for their Site #1 for six consecutive data submissions: “50 yds. upstream from Greene County Farm Road 195.” The following year he submitted data with a verbal description: “200 yards upstream from Green County Farm Road 195.” Since a site is defined as 300 feet (100 yards) in length, his new verbal description insinuates that he has moved to a new site. In actuality, he simply forgot to use the same verbal description and Site Selection & Identification 12/13 Introductory Level Notebook 7 made up a new one. Unfortunately, the discrepancy held up his data from being entered in the Stream Team databases until program staff could contact him and determine whether it was really a new site or just the wrong description for his Site #1. III. SITE LOCATION A. How to describe your site Verbally describe on every data sheet where your site is on a stream. If this information is missing, we cannot process your data. Use a brief site description that will enable program staff to locate your site on a map or drive directly to the site. Often you can use these descriptions: 1. Street or highway names with direction 2. Upstream or downstream from bridges 3. Major intersections 4. The approximate distances from those landmarks (e.g., 100 feet upstream from Hwy P Bridge). For a particular site, always use the same verbal description on the data sheet. Changing verbal descriptions can be confusing to program staff when reviewing your data, so please be consistent. Changing the verbal description of your site may put your data on hold until staff can determine whether it is the same site or a new site. To help you remember a particular site number and description, consider filling out just these items listed at the top of your data sheets, including Stream Name, County, Site #, Site Description, and Stream Team Number, and then making copies of the data sheet to use when sampling that particular site in the future. That way you don’t have to remember what site number and description you used last time! Why is there so much attention on site location/description? If you think about it, if we don’t know where your site is located, your data will not be useful to the program and others. Site Selection & Identification 12/13 Introductory Level Notebook 8 B. Site Selection Data Sheet The site Selection Data Sheet was designed to help familiarize you with the features of your site and to guide you through the process of determining what kind of habitat exists there. As explained in the previous section, it is important to fill out the required information as completely as possible. SITE NUMBER. This is the site number you designate. It becomes very important if you choose to monitor more than one site. Number sites in the chronological order in which you adopt them, and ALWAYS use the same site number for a particular monitoring location. The first time you send in data on a site, BE SURE to check the box on the data sheet next to “Site #,” and send in a map illustrating the location of the site along with your data sheet. STREAM and COUNTY. List the name of the stream as it appears on your map and the county in which the monitoring site is located (not the county in which you live unless they happen to be the same). If your stream is not named on a map you may call it “Unnamed Tributary to…” and list the next named stream into which your stream flows. Please check to see that the name of the stream is correct. Do not use local names that are not on a map. This will cause confusion when staff processes your data. You can check your stream’s name at http://geonames.usgs.gov/. SITE LOCATION. This refers to a verbal description of the location. Consider it to be driving directions. Please use a brief description that is both easy for you to remember and easy for program staff to fit in our databases. Examples of descriptions would be “100 ft. downstream Hwy 63 Bridge,” or “Hwy J east on CRD328, 100 ft. upstream CRD-328 Bridge.” Always use the same verbal description each time you monitor the site. Although some people like to include GPS coordinates as part of the site description, it is not a substitute for the verbal Site Selection & Identification 12/13 Introductory Level Notebook 9 description. We use the keywords in your verbal description to match to your site in the database, so we must have a verbal description. DATE. Use the date the information on the data sheet is collected in the month/day/year format. TRAINED DATA SUBMITTER. This is the name of the person who attended the Introductory Level Volunteer Water Quality Monitoring workshop or higher level (i.e., Level 1, 2, or 3) course and to whom the data will be assigned. Data is assigned the Quality Assurance/Quality Control (QA/QC) level of the Trained Data Submitter and, as detailed in Chapter 1, the QA/QC level of the data determines how it can be used by agencies. If you have attended the Introductory workshop, you may only “submit” data (that is, be listed as the “Trained Data Submitter”) for Site Selection, Stream Discharge and Biological Monitoring. To maintain data integrity (and thus the use of VWQM data), the program can only accept submitted Visual Survey and/or Water Chemistry data from a volunteer after Level 1 training has been completed. TRAINED DATA SUBMITTER’S STREAM TEAM NUMBER. Please enter the number of the Stream Team under which this data is submitted. Reference definition of “Trained Data Submitter” above. TRAINED PARTICIPANTS. List names of others on your Team who have also attended at least an Introductory Level workshop who are assisting the Trained Data Submitter on that day of data collection. You may also include names of individuals who assisted in the monitoring but have not yet attended any workshops. In addition, be sure to mention on your Missouri Stream Team Activity Report the names of everyone (trained or otherwise) who helped with the monitoring so that they all get credit for the activity! You may need to attach a list of names to the Activity Report to ensure all get credit. Site Selection & Identification 12/13 Introductory Level Notebook 10 NOTE: The following observations are highly subjective. It is very important that you take your time and be as accurate as possible in describing the conditions at your stream site. WEATHER CONDITIONS. Is the weather clear, cloudy, partly cloudy, or is it raining? Describe the weather on the day you are collecting data. If none of these choices fit, please describe in the section marked “Other.” TEMPERATURE. Using the thermometer provided in class, record the air temperature then the temperature of the water. Temperature should be recorded in an area that is not exposed to direct sunlight. Please allow plenty of time for the thermometer to acclimate to the ambient temperature. WATER APPEARANCE. Use a clear plastic container to scoop up a small amount of water from the stream. Is the water clear, brown, milky, or oily? Check the box that most accurately describes the color of the water. If none of these choices fit, please describe in the section marked “Other.” WATER ODOR. Using the same container of water, raise it to your nose and smell it. Is there an odor? Does it smell rotten, musty, fishy, or is there a chlorine odor? Check the box that most accurately describes the odor of the water. As always, if you smell something different please describe in “Other.” HABITAT. Check all the choices that apply. Your 300 ft. site may contain a high percentage of these habitat choices. Most sites should contain at least one riffle, but you may also have pools, root wads, logs, and runs. If you have other habitat features not listed on the data sheet, feel free to list them under “Other.” RIPARIAN COVER. We would like to know how much riparian cover is available at your site. Is the area fully shaded, fully exposed, or somewhere in between? Check the box that most accurately describes the riparian conditions at your site. Site Selection & Identification 12/13 Introductory Level Notebook 11 VEGETATION. Describe the type of vegetation present (or lack thereof) by checking the appropriate boxes. Check all that apply. If you have other vegetative features not listed on the data sheet, feel free to list them under “Other.” ALGAE. Are there algae in your stream? Is it everywhere, or only in spots? If algae are present, is it close-growing or filamentous (strands over 2 inches long)? Check all that apply. If none of the choices describes the algal conditions at your site, feel free to elaborate under “Other.” STREAM BED. Take a close look at the stream bed at your site. What type of substrate do you see? We have listed the most common types of substrate and would like you to rank them from 0 -5 with 5 being the most prevalent substrate type. The 0 may be used more than once if some of these types of substrate do not exist at your site. It is quite possible, though that you may have all five types present in varying amounts within your site. Try to rank them from the most prevalent down to the least prevalent. AQUATIC ORGANISMS. Since you have not received your biological monitoring equipment yet, you cannot do an extensive survey of the organisms present. However, please mark the sheet if you happen to see fish at your site. If you choose to turn over a few rocks and find invertebrates, check that option, too. You do not need to identify them, but if you would like to do so enter that information in the area reserved for “Other.” LAND USE IN THE WATERSHED. Take a look around your stream site. How is the land within the watershed being put to use? Are there homes and factories? Are there woods and pastures? Check all the choices that apply to your site and if you have other land uses to list, do so in the section marked “Other.” C. Things to remember on all data sheets Site Selection & Identification 12/13 Introductory Level Notebook 12 In order to track your data, it is extremely important to list the following information on all data sheets. If any of these six pieces of information are missing from your data sheet, processing of your data will be delayed. A fully completed sheet ensures faster processing of your data. 1. Stream Name 2. Site Number: It is critical that site numbers are not duplicated to prevent program staff from assigning data to the wrong place on the stream or even to the wrong stream. 3. Site Location: Describe the site with a brief, yet thorough, verbal description. This description should equate to driving directions and should not be something like, “This is a well-wooded site just left of the fallen tree on private property” but rather, “Upstream of the Edgewood Dr. crossing, ¼ mile west of Highway 179.” 4. Date: Some data results naturally vary with the seasons, so this is critical. Please be sure to use the year in your date. We will accept data from any year, but we do need to know what year it was collected. 5. Stream Team Number: Use the number of the Stream Team you are representing when collecting the data. 6. Trained Data Submitter: This is the person responsible for the data. This information helps program staff to know what level of Quality Assurance/Quality Control to assign to the data since data of different levels can be used for different purposes. IV. SITE MAP When submitting data from a new site, please include a copy of a map on which you have clearly marked your monitoring site. This is only necessary the first time you send in data for a new site. After that, your map and location are on file and you can send in your data sheets without an accompanying map. Before you collect data at a new site, locate the site on the map you intend to send in with your data. You can photocopy a portion of an appropriate map (e.g., topo or county map), or print an electronic map (e.g. CARES, Google Map, etc.). Take the map Site Selection & Identification 12/13 Introductory Level Notebook 13 with you as this proves helpful in the field. You do not need to send an entire USGS topographic map. An 8 ½” x 11” photocopy is fine as long as you include the following information on the map itself. This information is extremely helpful, especially since it’s possible for the map to become separated from the data sheets, so each needs to be identified on its own. 1. Stream Team Number (e.g., Stream Team No. 1221) 2. Trained Data Submitter’s name 3. Topo quadrangle map name (if using a topo – e.g., Marble Hill) 4. County 5. Stream name 6. Site number 7. Site description 8. An “X” marking the sampling site You can write this information on the front or back of the map, but please do attach the map to your data and make sure it is identified with your name. We sometimes receive maps that are not labeled and then if they become detached from the data they were sent with, we do not know how to match the map with the data collector. Topographic and county maps work best for helping program staff accurately locate your site. Reference the Appendix for information on how to get copies of different types of maps, including locating them on the internet (e.g., http://geology.com/topo-maps/ OR http://www.cares.missouri.edu/). If you decide to order a topo map, your instructor has an Index Map for Topographic Sheets to help you determine which quadrangle map(s) you will need to order. Please reference examples of helpful maps at the end of this chapter. If you are not able to provide us with all the information listed above, please don’t let that keep you from sending a map in with your data! Simply mail in a map with your name on it and draw an “X” to mark your site. If needed, we will work with you to help us identify your site’s location. We appreciate your time and assistance. Site Selection & Identification 12/13 Introductory Level Notebook 14 We recommend making photocopies of your site map for your future use before you send a copy in with your first set of data from the site. When a map is submitted with the data sheets, the data processing is not delayed. Be aware that we cannot put your data into the Stream Team databases until we have the location of your sampling site accurately identified. Program staff needs this information to determine the GIS coordinates for your site(s) before they can enter the data into the program databases. Even if you report the necessary geographic information, please send the map too. V. Global Positioning System (GPS) Information Do you have a GPS unit and are anxious to use it to report site location information? Due to a variety of GPS formats and map data, if you wish to report map-related data in GPS format, please complete one of our GPS Site Location Data Sheets and send it in with your data. We’ve provided a blank data sheet at back of this chapter from which you can make copies. If you need additional copies, they can be downloaded and printed from the Stream Team website: http://www.mostreamteam.org/Documents/datasheets/GPSdatasheet.pdf. To get started, first check the settings on your unit. You may have to change your settings to match program needs. Depending on the type of unit you have, some of these settings may be unavailable. Settings should be as follows: Horizontal Datum – North American Datum 1983 (NAD83). This removes map distortion. Imagine a paper map being wrapped around Earth; this creates distortion of distances. Coordinates format – o UTM (Universal Transverse Mercator coordinates). EPA requires coordinates be reported in UTMs and thus data should be reported in UTMs when possible. Staff can convert from Latitude/Longitude if UTMs are not available. Site Selection & Identification 12/13 Introductory Level Notebook 15 o Latitude/Longitude. If using this format be sure to only record in Decimal Degrees. This is the most accurate latitude/longitude format. Enable Wide Angle Augmentation System (WAAS) if available. WAAS uses signals from base stations on the ground to refine the calculations used to improve accuracy. If your GPS unit has this feature, you may need to go into your settings and turn it on. Unit of measure – Meters. EPA requires accuracy measurements for location be reported in meters and thus data should be reported in meters when possible. Staff can convert the measurement if meters are not available. Second, it’s best to let your GPS unit sit undisturbed for a period of time. Best approach is to set the GPS unit down (somewhere safe) and let it “run” while you collect your data. There are several things you can do in order to allow a GPS unit to provide information that is as accurate as possible. One of the most important things you can do is allow the unit to stabilize. The longer the unit searches for satellites the greater its accuracy. It takes multiple readings from available satellites to obtain more measurements. The GPS unit will give you a position with an accuracy reading. Try to wait until your Horizontal Accuracy reading is ≥7 meters. Depending on your GPS unit, this may take several minutes. Higher end units (e.g., Trimble, etc.) will have Estimated Precision Error (EPE) and Point Dilution of Precision (PDOP) readings instead of an accuracy reading. This measures the position error (instead of accuracy) of coordinates. Provide the available position error information from your GPS unit; you may need to consult the user manual that came with your unit. You should also take your reading from a location which has the best exposure to the sky. Taking readings where signals bounce from reflective surfaces can add false distances and decrease the accuracy of the reading. There are also two coordinates types commonly used, Latitude/Longitude and Universal Transverse Mercator (UTM). These are the “grids” on which your position is displayed. Site Selection & Identification 12/13 Introductory Level Notebook 16 The UTM coordinate system was developed by the United States Army Corps of Engineers in the 1940s and was based on an ellipsoidal model of the Earth. There are ten “zones” for the United States. Most of Missouri is in zone 15 north, though sections of the southeast part of the state are in zone 16 north. However, any readings from zone 16 will still read as Zone 15 in Missouri. This is the preferred coordinate format. Please send us your GPS coordinates in UTMs. Decimal degrees, degrees/minutes/seconds, and decimal minutes are all forms of latitude and longitude. Many of you may be familiar with degrees/minutes/seconds. Decimal degrees are the Metric equivalent, and allow for greater accuracy. As mentioned, Latitude/Longitude should be recorded in decimal degrees for this purpose. This will be a great addition to the map you send in with any new site. Please feel free to send one in on any of your old sites, too. However, GPS data does not negate the need to send a map and include a verbal description. VI. ENDANGERED SPECIES Note that regardless of where you sample, you need to carry your Stream Team Identification card in order to sample macroinvertebrates. By carrying this card, you are exempt from having to obtain a Wildlife Collector’s Permit from the Missouri Department of Conservation. This is especially important when sampling within the home range of endangered species. Niangua darters and Topeka shiners are listed as endangered by the U.S. Fish and Wildlife Service and the Missouri Department of Conservation. Topeka shiners spawn in runs and pools over the nests of sunfish, so they should not be affected by volunteers’ monitoring efforts to collect macroinvertebrates. However, because the Niangua darter spawns in riffles, kicking up macroinvertebrate samples in riffles can be detrimental to spawning. In order to avoid disturbing Niangua darter habitat during spawning season, do not monitor macroinvertebrates between March 15 and June 15 in the following Ozark streams as they are within the known range of the Niangua darter: Site Selection & Identification 12/13 Introductory Level Notebook 17 Niangua River watershed: Niangua River and Greasy Creek Little Niangua River watershed: Little Niangua River, Mack’s Creek, Starks Creek, Thomas Creek, and Cahoochie Creek Sac River watershed: Sac River, Bear Creek, Brush, and Panther Creek Tavern Creek watershed: Tavern Creek, Barren Fork, Brushy Fork, Kenser Creek, and Little Tavern Creek Other waterways: o Maries River o Little Maries Creek o North Dry Sac River o Pomme de Terre River o South Fork of the Pomme de Terre River o Little Pomme de Terre River Please continue to conduct visual survey, water chemistry and stream discharge monitoring in this time period (March 15 - June 15). MORG AN HENR Y BEN TON Marie s River MILLER MA RIES rn C re River T a ve iangua Little N ek STCLAIR OSAGE Bru s CEDA R CAMDE N hC ree k HICKOR Y DALLAS Bea r ng N ia C re PULAS KI ek de e Ri ve r er iv R GREE NE rr Te Dr yS ac DADE Site Selection & Identification 12/13 LA CLED E e No rth m m Po POLK i ver ua R Stream reaches requiring special collection authorization W EB STER Range of the Niangua Darter in Missouri January, 2004 Introductory Level Notebook 18 Site Selection & Identification 12/13 Introductory Level Notebook 19 Site Selection & Identification 12/13 Introductory Level Notebook 20 Site Selection & Identification 12/13 Introductory Level Notebook 21 Site Selection & Identification 12/13 Introductory Level Notebook 22 Site Selection & Identification 12/13 Introductory Level Notebook 23 Site Selection & Identification 12/13 Introductory Level Notebook 24