1
Gigaset E310/E310A (Panther) / MEA EN / A31008-M2301-A601-1-UZ19 / Cover_front.fm / 09.05.2012
Congratulations
By purchasing a Gigaset, you have chosen a brand that is fully committed
to sustainability. This product’s packaging is eco-friendly!
To learn more, visit www.gigaset.com.
Gigaset E310/E310A (Panther) / MEA EN / A31008-M2301-A601-1-UZ19 / Cover_front.fm / 09.05.2012
Gigaset E310/E310A (Panther) / MEA EN / A31008-M2301-A601-1-UZ19 / overview.fm / 11.05.2012
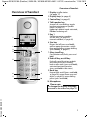
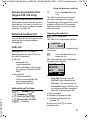
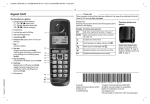
Overview of handset
Overview of handset
Ð
1
23.04.
‘
1 Display in idle status
(¢ page 17)
2 Display keys (¢ page 4)
3 Control key (¢ page 5)
4 Talk/speaker key
Accept call; start dialling; toggle
between earpiece and speaker
mode (¢ page 27);
Lights up: speaker mode activated;
Flashes: incoming call
Ã
INT 1
5 Key 1
U
Call the answering machine
(E310A only) (¢ page 35)/
network mailbox (¢ page 40)
10:53
Menu
6 Star key
2
3
4
8
Ringers on/off (press and hold);
with an open connection: switch
from pulse dialling to tone dialling
(press briefly, ¢ page 51)
7 0 key/recall key
Consultation call (flash): press and
hold
8 End call key, on/off key
5
End call; cancel function; go back
one menu level (press briefly);
back to idle status (press and hold);
activate/deactivate handset
(press and hold in idle status)
9 Hash key
6
9
7
10
Keypad lock on/off (press and hold,
¢ page 20); upper/lower case and
digits (¢ page 63); enter dialling
pause (press and hold)
10 Microphone
Version 5, 03.04.2011
Please note
To change the display language,
proceed as described on page 45.
1
Gigaset E310/E310A (Panther) / MEA EN / A31008-M2301-A601-1-UZ19 / overview.fm / 11.05.2012
Overview of handset
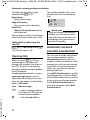
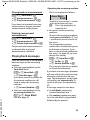
Overview of Gigaset E310A base
You can use the keys on the base to
operate the integrated answering
machine (Gigaset E310 A only),
search for handsets ("paging"
¢ page 44) and register handsets
to the base ¢ page 43.
2
7
3
5
6
4
1
1 Registration/paging key:
Search for handsets (press briefly, paging ¢ page 44).
Register handsets (press and
hold ¢ page 43).
2 On/off key: switch answering
machine on and off.
Lights up: answering machine
is activated.
Flashes: message is being played
back or recorded.
3 Volume keys:
(– = quieter; + = louder.)
During message playback: adjust
the speaking volume.
While phone is ringing: adjust
ringer melody volume.
4 Play/Stop key:
Play back new messages from answering machine (press briefly),
play back all messages (press
and hold), cancel playback.
Flashes: at least one new message is present.
Flashes very quickly: memory
is full.
During message playback:
5 Skip to the start of the current
message (press once) or go to the
previous message (press twice).
6 Go to the next message.
7 Delete current message.
Please note
If the answering machine is
being operated from a handset
or if it is recording a message, it
cannot be operated from the
base at the same time.
Version 5, 03.04.2011
Overview of Gigaset E310 base
Registration/paging key
Press briefly: search for handsets ("paging"
¢ page 44).
Press and hold: register handsets and DECT
devices (¢ page 43).
2
Gigaset E310/E310A (Panther) / MEA EN / A31008-M2301-A601-1-UZ19 / Symbols_Keys.fm /
Icons and keys
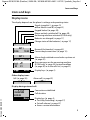
Icons and keys
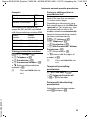
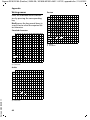
Display icons
The display depends on the phone's settings and operating status.
Ð
Ø ÚÃ
U
INT 1
23.04.
10:53
INT 1
é12:00
10:53
Ã
03
™
01
‘
Menu
Other display icons:
Call (¢ page 26)
Signal strength ¨ (¢ page 41)
or Eco Mode+ icon ½ (¢ page 41)
Keypad locked (¢ page 20)
Ringer melody switched off (¢ page 48)
Answering machine activated (E310A only)
Batteries are charged (¢ page 17)
Charge status of the batteries (¢ page 17)
Name of the handset (¢ page 43)
Current day/current time (¢ page 15)
Alarm clock switched on and wake-up time set
(¢ page 42)
New messages on the answering machine
(E310A only, ¢ page 35)/network mailbox
(¢ page 40) or in the calls list (¢ page 31)
Display keys (¢ page 4)
Alarm call (¢ page 42)
°
Display during external call:
Version 5, 03.04.2011
—
1234567890
00:00:53
Menu
Connection established
Call duration
Display key (¢ page 4)
u Two-Way Recording (¢ page 37)
u Set call volume (¢ page 47)
u Access service information
3
Gigaset E310/E310A (Panther) / MEA EN / A31008-M2301-A601-1-UZ19 / Symbols_Keys.fm /
Icons and keys
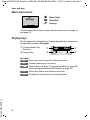
Main menu icons
ç
Settings
Back W
é
Alarm Clock
ç
Settings
ê Voice Mail
OK
For information on using the menu and the menu tree, see page 19
and page 23.
Display keys
The functions of the display keys change depending on the particular operating situation. Examples:
1 Current display key
function
2 Display keys
1
2
‘
Menu
1
2
Version 5, 03.04.2011
Examples:
Open main menu/menu for further functions.
Menu
Confirm selection or save entry.
OK
‘ Open calls list (¢ page 31), network mailbox (¢ page 40)
or answering machine list (E310A only, ¢ page 35).
Delete key: delete one character at a time.
Del.
Go back one menu level or cancel operation.
Back
4
Gigaset E310/E310A (Panther) / MEA EN / A31008-M2301-A601-1-UZ19 / Symbols_Keys.fm /
Icons and keys
Control key
In the description below, the side of the control key
(up, down, right, left) that you have to press in the
different operating situations is marked in black e.g.,
v for "press the right edge of the control key".
The control key has a number of different functions:
When the handset is in idle status
v
Open the main menu.
s
Open the directory.
u
Open the list of handsets.
t
Call up the menu for setting the handset's call volume.
In menus and in lists
q
Scroll up/down a line at a time.
In input fields
u / v Use the control key to move the cursor to the left u or
right v.
Version 5, 03.04.2011
During an external call
v
Mute the microphone.
s
Open the directory.
u
Initiate an internal consultation call.
t
Adjust the loudspeaker volume for earpiece and speaker
mode.
5
Gigaset E310/E310A (Panther) / MEA EN / A31008-M2301-A601-1-UZ19 / E310_E310AIVZ.fm /
Contents
Contents
Overview of handset . . . . . . . . . . . . . . . . . . . . . . . . . . . . . . . . . . . . . . . . 1
Overview of Gigaset E310A base . . . . . . . . . . . . . . . . . . . . . . . . . . . . 2
Overview of Gigaset E310 base . . . . . . . . . . . . . . . . . . . . . . . . . . . . . . 2
Icons and keys . . . . . . . . . . . . . . . . . . . . . . . . . . . . . . . . . . . . . . . . . . . . . .
Display icons . . . . . . . . . . . . . . . . . . . . . . . . . . . . . . . . . . . . . . . . . . . . . . . . . . .
Main menu icons . . . . . . . . . . . . . . . . . . . . . . . . . . . . . . . . . . . . . . . . . . . . . . .
Display keys . . . . . . . . . . . . . . . . . . . . . . . . . . . . . . . . . . . . . . . . . . . . . . . . . . .
Control key . . . . . . . . . . . . . . . . . . . . . . . . . . . . . . . . . . . . . . . . . . . . . . . . . . . .
3
3
4
4
5
Safety precautions . . . . . . . . . . . . . . . . . . . . . . . . . . . . . . . . . . . . . . . . . . 9
First steps . . . . . . . . . . . . . . . . . . . . . . . . . . . . . . . . . . . . . . . . . . . . . . . . .
Checking the package contents . . . . . . . . . . . . . . . . . . . . . . . . . . . . . . .
Setting up the base and charger (if included) . . . . . . . . . . . . . . . . . .
Connecting the base . . . . . . . . . . . . . . . . . . . . . . . . . . . . . . . . . . . . . . . . . .
Connecting the charger (if included) . . . . . . . . . . . . . . . . . . . . . . . . . . .
Setting up the handset for use . . . . . . . . . . . . . . . . . . . . . . . . . . . . . . . . .
Changing the display language . . . . . . . . . . . . . . . . . . . . . . . . . . . . . . . .
Setting the date/time . . . . . . . . . . . . . . . . . . . . . . . . . . . . . . . . . . . . . . . . .
10
10
10
11
11
12
14
15
What would you like to do next? . . . . . . . . . . . . . . . . . . . . . . . . . . . . 18
Using the phone . . . . . . . . . . . . . . . . . . . . . . . . . . . . . . . . . . . . . . . . . . .
Menu guidance . . . . . . . . . . . . . . . . . . . . . . . . . . . . . . . . . . . . . . . . . . . . . . .
Keys on the keypad . . . . . . . . . . . . . . . . . . . . . . . . . . . . . . . . . . . . . . . . . . .
Correcting incorrect entries . . . . . . . . . . . . . . . . . . . . . . . . . . . . . . . . . . .
Activating/deactivating the handset . . . . . . . . . . . . . . . . . . . . . . . . . . .
Activating/deactivating the keypad lock . . . . . . . . . . . . . . . . . . . . . . .
19
19
20
20
20
20
Understanding the operating steps . . . . . . . . . . . . . . . . . . . . . . . . . 21
Version 5, 03.04.2011
Menu tree . . . . . . . . . . . . . . . . . . . . . . . . . . . . . . . . . . . . . . . . . . . . . . . . . 23
Making calls . . . . . . . . . . . . . . . . . . . . . . . . . . . . . . . . . . . . . . . . . . . . . . .
Making external calls and ending calls . . . . . . . . . . . . . . . . . . . . . . . . .
Accepting a call . . . . . . . . . . . . . . . . . . . . . . . . . . . . . . . . . . . . . . . . . . . . . . .
Calling Line Identification . . . . . . . . . . . . . . . . . . . . . . . . . . . . . . . . . . . . .
Notes on phone number display (CLIP) . . . . . . . . . . . . . . . . . . . . . . . .
Speaker mode operation . . . . . . . . . . . . . . . . . . . . . . . . . . . . . . . . . . . . . .
Muting . . . . . . . . . . . . . . . . . . . . . . . . . . . . . . . . . . . . . . . . . . . . . . . . . . . . . . .
6
26
26
26
26
27
27
28
Gigaset E310/E310A (Panther) / MEA EN / A31008-M2301-A601-1-UZ19 / E310_E310AIVZ.fm /
Contents
Using the directory and lists . . . . . . . . . . . . . . . . . . . . . . . . . . . . . . . .
Directory . . . . . . . . . . . . . . . . . . . . . . . . . . . . . . . . . . . . . . . . . . . . . . . . . . . . .
Redial list . . . . . . . . . . . . . . . . . . . . . . . . . . . . . . . . . . . . . . . . . . . . . . . . . . . . .
Answering machine list (Gigaset E310A only) . . . . . . . . . . . . . . . . . .
Network mailbox list . . . . . . . . . . . . . . . . . . . . . . . . . . . . . . . . . . . . . . . . . .
Calls list . . . . . . . . . . . . . . . . . . . . . . . . . . . . . . . . . . . . . . . . . . . . . . . . . . . . . . .
Opening lists . . . . . . . . . . . . . . . . . . . . . . . . . . . . . . . . . . . . . . . . . . . . . . . . . .
28
28
30
31
31
31
32
Automatic network provider preselection . . . . . . . . . . . . . . . . . . . 32
Operating the answering machine . . . . . . . . . . . . . . . . . . . . . . . . . .
Switching the answering machine on/off . . . . . . . . . . . . . . . . . . . . . .
Recording a personal announcement . . . . . . . . . . . . . . . . . . . . . . . . . .
Playing back messages . . . . . . . . . . . . . . . . . . . . . . . . . . . . . . . . . . . . . . . .
Accepting a call from the answering machine . . . . . . . . . . . . . . . . . .
Activating/deactivating call screening . . . . . . . . . . . . . . . . . . . . . . . . .
Diverting an external call to the answering machine . . . . . . . . . . .
Activating/deactivating two-way record . . . . . . . . . . . . . . . . . . . . . . .
Setting up the answering machine . . . . . . . . . . . . . . . . . . . . . . . . . . . .
Operating when on the move (remote operation) . . . . . . . . . . . . . .
34
34
34
35
36
37
37
37
38
39
Using the network mailbox . . . . . . . . . . . . . . . . . . . . . . . . . . . . . . . . . 40
Accepting a new message from the network mailbox . . . . . . . . . . 40
Playing back messages . . . . . . . . . . . . . . . . . . . . . . . . . . . . . . . . . . . . . . . . 40
ECO DECT . . . . . . . . . . . . . . . . . . . . . . . . . . . . . . . . . . . . . . . . . . . . . . . . . 41
Version 5, 03.04.2011
Using the handset as an alarm clock . . . . . . . . . . . . . . . . . . . . . . . . 42
Using multiple handsets . . . . . . . . . . . . . . . . . . . . . . . . . . . . . . . . . . .
Registering handsets . . . . . . . . . . . . . . . . . . . . . . . . . . . . . . . . . . . . . . . . . .
De-registering handsets . . . . . . . . . . . . . . . . . . . . . . . . . . . . . . . . . . . . . . .
Locating a handset ("paging") . . . . . . . . . . . . . . . . . . . . . . . . . . . . . . . . .
Listening in to an external call (conference) . . . . . . . . . . . . . . . . . . . .
Making internal calls . . . . . . . . . . . . . . . . . . . . . . . . . . . . . . . . . . . . . . . . . .
43
43
43
44
44
44
Setting the handset . . . . . . . . . . . . . . . . . . . . . . . . . . . . . . . . . . . . . . . .
Changing the display language . . . . . . . . . . . . . . . . . . . . . . . . . . . . . . . .
Setting the calender type . . . . . . . . . . . . . . . . . . . . . . . . . . . . . . . . . . . . .
Setting the display . . . . . . . . . . . . . . . . . . . . . . . . . . . . . . . . . . . . . . . . . . . .
Auto answer . . . . . . . . . . . . . . . . . . . . . . . . . . . . . . . . . . . . . . . . . . . . . . . . . .
Changing the speaker/earpiece volume . . . . . . . . . . . . . . . . . . . . . . .
Changing ringers . . . . . . . . . . . . . . . . . . . . . . . . . . . . . . . . . . . . . . . . . . . . .
Advisory/warning tones . . . . . . . . . . . . . . . . . . . . . . . . . . . . . . . . . . . . . . .
Restoring the handset default settings . . . . . . . . . . . . . . . . . . . . . . . . .
45
45
46
46
46
47
47
48
49
7
Gigaset E310/E310A (Panther) / MEA EN / A31008-M2301-A601-1-UZ19 / E310_E310AIVZ.fm /
Contents
Setting the base . . . . . . . . . . . . . . . . . . . . . . . . . . . . . . . . . . . . . . . . . . .
Changing the ringers for the Gigaset E310A base . . . . . . . . . . . . . . .
Activating/deactivating music on hold . . . . . . . . . . . . . . . . . . . . . . . . .
Repeater support . . . . . . . . . . . . . . . . . . . . . . . . . . . . . . . . . . . . . . . . . . . . .
Protecting against unauthorised access . . . . . . . . . . . . . . . . . . . . . . . .
Resetting the base to the default settings . . . . . . . . . . . . . . . . . . . . . .
49
49
49
50
50
50
Operating the base on the PABX . . . . . . . . . . . . . . . . . . . . . . . . . . . . 51
Customer Service & Assistance . . . . . . . . . . . . . . . . . . . . . . . . . . . . . 53
Manufacturer warranty (Middle East) . . . . . . . . . . . . . . . . . . . . . . . 55
Service Centres (Midde East) . . . . . . . . . . . . . . . . . . . . . . . . . . . . . . . 57
Questions and answers . . . . . . . . . . . . . . . . . . . . . . . . . . . . . . . . . . . . . . . . 58
Authorisation . . . . . . . . . . . . . . . . . . . . . . . . . . . . . . . . . . . . . . . . . . . . . . . . . 60
Environment . . . . . . . . . . . . . . . . . . . . . . . . . . . . . . . . . . . . . . . . . . . . . . 60
Appendix . . . . . . . . . . . . . . . . . . . . . . . . . . . . . . . . . . . . . . . . . . . . . . . . .
Caring for your telephone . . . . . . . . . . . . . . . . . . . . . . . . . . . . . . . . . . . . .
Contact with liquid . . . . . . . . . . . . . . . . . . . . . . . . . . . . . . . . . . . . . . . . . . . .
Specifications . . . . . . . . . . . . . . . . . . . . . . . . . . . . . . . . . . . . . . . . . . . . . . . . .
Writing and editing names . . . . . . . . . . . . . . . . . . . . . . . . . . . . . . . . . . . .
61
61
61
62
63
Accessories . . . . . . . . . . . . . . . . . . . . . . . . . . . . . . . . . . . . . . . . . . . . . . . . 65
Mounting the E310 base on the wall . . . . . . . . . . . . . . . . . . . . . . . . 66
Mounting the charger on the wall . . . . . . . . . . . . . . . . . . . . . . . . . . 66
Version 5, 03.04.2011
Index . . . . . . . . . . . . . . . . . . . . . . . . . . . . . . . . . . . . . . . . . . . . . . . . . . . . . 67
8
Gigaset E310/E310A (Panther) / MEA EN / A31008-M2301-A601-1-UZ19 / security.fm / 02.05.2012
Safety precautions
Safety precautions
Warning
Read the safety precautions and the user manual before use. Explain their content and the
potential hazards associated with using the telephone to your children.
$
Use only the power adapter supplied, as indicated on the underside of the base.
Fit only the recommended, rechargeable batteries (¢ page 62), i.e., never use a conventional (non-rechargeable) battery or other battery type as this could result in significant health risks and personal injury.
Using your telephone may affect nearby medical equipment. Be aware of the technical conditions in your particular environment, for example doctor's surgery.
If you use a medical device (e.g., a pacemaker), please contact the device manufacturer. They will be able to advise you regarding the susceptibility of the device to
external sources of high frequency energy. Please refer to the "Appendix" chapter for
the specifications of this Gigaset product.
Do not hold the rear of the handset to your ear when it is ringing or when speaker
mode is activated. Otherwise you risk serious and permanent damage to your hearing.
Your Gigaset is compatible with the majority of digital hearing aids on the market.
However, perfect function with all hearing aids cannot be guaranteed.
The handset may cause interference in analogue hearing aids. If you require assistance, please contact your hearing aid supplier.
Do not install the base or charger in bathrooms or shower rooms. The base and
charger are not splashproof.
Do not use your phone in environments with a potential explosion hazard (e.g., paint
shops).
ƒ
If you give your phone to a third party, make sure you also give them the user manual.
Remove faulty bases from use or have them repaired by our Service team, as these
could interfere with other wireless services.
Please note
Version 5, 03.04.2011
u Not all of the functions described in this user guide are available in all countries.
u The device cannot be used in the event of a power failure. It is also not possible to transmit emergency calls.
9
Gigaset E310/E310A (Panther) / MEA EN / A31008-M2301-A601-1-UZ19 / starting.fm / 11.05.2012
First steps
First steps
Checking the package contents
u One Gigaset E310/E310A base
u One power adapter
u One Gigaset handset
u Two batteries
u One battery cover
u One phone cord
u One user guide
If you have purchased a model with multiple handsets, the package should contain two batteries, a battery cover and a charger with
power adapter for each additional handset.
Setting up the base and charger (if included)
The base and charger are designed for use in dry rooms in a temperature range of +5°C to +45°C.
¤ Set up the base at a central point in the building on a level, nonslip surface or mount the base (Gigaset E310 only) and charger on
the wall (¢ page 66).
Please note
Pay attention to the range of the base.
This is up to 300 m in unobstructed outdoor areas and up to 50 m
inside buildings. The range is reduced when Eco Mode is activated (¢ page 41).
Version 5, 03.04.2011
The phone's feet do not usually leave any marks on surfaces. However, due to the multitude of different varnishes and polishes used
on today's furnishings, the occurrence of marks on the surfaces cannot be completely ruled out.
Please note:
u Never expose the telephone to the effects of heat sources, direct
sunlight or other electrical devices.
u Protect your Gigaset from moisture, dust, corrosive liquids and
fumes.
10
Gigaset E310/E310A (Panther) / MEA EN / A31008-M2301-A601-1-UZ19 / starting.fm / 11.05.2012
First steps
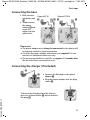
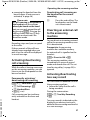
Connecting the base
¤ First, connect
telephone jack
1.
¤ Then connect
the power
adapter 2 and
insert the
cables into the
cable ducts.
Gigaset E310
2
1
Gigaset E310A
1
1 2
1
1
1
Please note:
u The power adapter must always be connected, as the phone will
not operate without a mains connection.
u Use only the power adapter and phone cord supplied. Pin connections on telephone cables can vary.
u The answering machine is ready for use approx. 15 seconds after
the base has been connected or reset.
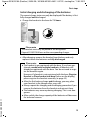
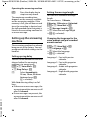
Connecting the charger (if included)
2
1
¤ Connect the flat plug on the power
adapter 1.
¤ Plug the power adapter into the plug
socket 2.
Version 5, 03.04.2011
To disconnect the plug from the charger,
press the release button 3 and disconnect
the plug 4.
4
3
11
Gigaset E310/E310A (Panther) / MEA EN / A31008-M2301-A601-1-UZ19 / starting.fm / 11.05.2012
First steps
Setting up the handset for use
The display is protected by a plastic film.
Please remove the protective film!
Inserting the batteries and closing the battery cover
Warning
Use only rechargeable batteries (¢ page 62) recommended by
Gigaset Communications GmbH i.e., never use a conventional
(non-rechargeable) battery, as this could result in significant
health risks and personal injury. For example, the outer casing of
the batteries could be damaged or the batteries could explode.
The phone could also malfunction or be damaged as a result of
using batteries that are not of the recommended type.
¤ Insert the batteries with the
polarity in the correct direction.
The polarity is indicated in/on the
battery compartment.
¤ Slide the battery
cover back into the
main casing until it
clicks into place.
Version 5, 03.04.2011
To reopen the battery
cover, for instance to
replace the batteries,
press the grooved area
at the top of the cover
and slide it downwards.
12
Gigaset E310/E310A (Panther) / MEA EN / A31008-M2301-A601-1-UZ19 / starting.fm / 11.05.2012
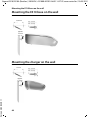
First steps
Initial charging and discharging of the batteries
The correct charge status can only be displayed if the battery is first
fully charged and discharged.
¤ Charge the handset in the base for 7.5 hours.
7.5
h
Please note
The handset must only be placed in the designated
Gigaset E310/E310A base or the corresponding charger.
¤ After charging, remove the handset from the base and only
replace it when the batteries are fully discharged.
Version 5, 03.04.2011
Please note
u The handset is pre-registered with the base. If you have purchased a model with multiple handsets, all handsets will
already be registered with the base. You do not need to register the handsets again.
However, if a handset is not registered with the base (Register
Handset or Place handset into base flashes on the display),
please register the handset manually (¢ page 43).
u After the first battery charge and discharge, you may place
your handset in the charger after every call.
u Always repeat the charging and discharging procedure if you
remove the batteries from the handset and reinsert them.
u The batteries may warm up during charging. This is not dangerous.
u After a while, the charge capacity of the batteries will decrease
for technical reasons.
13
Gigaset E310/E310A (Panther) / MEA EN / A31008-M2301-A601-1-UZ19 / starting.fm / 11.05.2012
First steps
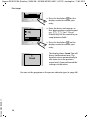
Changing the display language
Change the display language if you do not understand the language
currently set.
‘
Menu
¤ Press keys L4 slowly one
after the other.
L4
English
Back
U
¤ Press the right-hand display
key.
‰
The display for setting languages
appears and the current language
(e.g., English) is selected.
OK
¤ Press down on the control
key s ...
Francais
Back U
´
OK
... until the language you wish
to use is displayed e.g., French.
¤ Press the key below §OK to
select this language.
Francais
Version 5, 03.04.2011
Retour U
‰
The selection is marked with ‰ .
OK
¤ Press and hold the end call key
a to return to idle status.
14
Gigaset E310/E310A (Panther) / MEA EN / A31008-M2301-A601-1-UZ19 / starting.fm / 11.05.2012
First steps
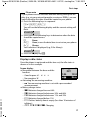
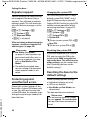
Setting the date/time
Set the date and time so that the correct date and time can be
assigned to incoming calls, and so that the alarm can be used.
Please note
Depending on your network provider, the date and time may be
displayed automatically.
‘
Time
¤ Press the key below §Time§ on the
display screen.
(If you have already set the
date/time, open the input field
via the menu ¢ page 23.)
Set Date/Time
Back V
Version 5, 03.04.2011
Enter Date:
[04.04.2012]
OK
¤ Press the key below §OK on the
display screen to open the submenu.
The input field opens. The active
position flashes.
¤ Enter the day, month and year
as a 8-digit number via the
keypad e.g.,
Q4Q42Q12
for 4 April 2012.
To correct errors: Press on
the left or right edge of the
control key to change the
position of the cursor.
15
Gigaset E310/E310A (Panther) / MEA EN / A31008-M2301-A601-1-UZ19 / starting.fm / 11.05.2012
First steps
Back
OK
¤ Press the key below §OK § on the
display screen to confirm your
entry.
Enter Time:
[07:15]
Back
OK
¤ Enter the hours and minutes as
four-digit numbers via the keypad
e.g., QM15 for 7.15 a.m.
If necessary, use the control key to
swap between fields.
¤ Press the key below §OK on the
display screen to confirm your
entry.
‰
Saved
The display shows Saved. You will
hear a confirmation tone. The
handset returns automatically to
idle status or to the previous
menu level, if you performed the
settings via the menu.
Version 5, 03.04.2011
You can set the gregorian or the persian calendar type (¢ page 46).
16
Gigaset E310/E310A (Panther) / MEA EN / A31008-M2301-A601-1-UZ19 / starting.fm / 11.05.2012
First steps
Please note
If your phone receives the date and time during calling line display (e.g., via your network provider, a router or PABXs), you can
specify whether this data should be copied to your phone:
¤ Press the following keys in sequence:
v ¤ P#Q5#MI
You will see the following display and the current setting will
flash:
973 SET: [0]
¤ Press one of the following keys to determine when the date
should be copied across:
Q
Never
Or 1
Once, in case the date/time is not set on your phone
Or 2
Always
Your selection is displayed (e.g., 2 for Always):
973 SET: [2]
¤ Press the display key §OK .
Display in idle status
Version 5, 03.04.2011
Once the phone is registered and the time set, the idle status is
shown as in this example.
Screen display
Ã
U
Ð
u Reception between the base and the
INT
1
handset:
23.04.
10:53
– Good to poor: Ð ¨ § ¦
‘
Menu
– No reception: ¥
u Activating the answering machine:
– ± Your answering machine is set with a pre-recorded
announcement
u Battery charge status:
– U Batteries charged to over 66%
– V Batteries charged to between 34% and 66%
– e Batteries charged to between 11% and 33%
– = Batteries charged below 11%
– = Flashes: battery almost empty (less than 10 minutes of
talktime)
– = e V U Charging
17
Gigaset E310/E310A (Panther) / MEA EN / A31008-M2301-A601-1-UZ19 / starting.fm / 11.05.2012
What would you like to do next?
If Eco Mode+ (¢ page 41) is activated, the ½ icon is displayed in the
top left corner of the display.
Your phone is now ready for use.
If you have any questions about using your phone, please read the
tips on troubleshooting ("Questions and answers" ¢ page 58) or
contact our Customer Care team (¢ page 53).
What would you like to do next?
Now that you have successfully set up your Gigaset, you can immediately start calling – or you can adapt it to your personal requirements. Use the following guide to quickly locate the most important
functions.
Operating the phone
Changing the ringers and volume on the handset
Changing the ringers and volume on the base
(Gigaset E310A only)
Changing the call volume on the handset
Activating Eco Mode / Eco Mode+
Transferring an old directory to a new handset
Registering other handsets
Recording an announcement for the answering
machine (Gigaset E310A only)
Version 5, 03.04.2011
Storing numbers in the directory
18
g page 19
g page 47
g page 49
g page 47
g page 41
g page 30
g page 43
g page 34
g page 28
Gigaset E310/E310A (Panther) / MEA EN / A31008-M2301-A601-1-UZ19 / starting.fm / 11.05.2012
Using the phone
Using the phone
Menu guidance
Your telephone's functions are accessed via a menu consisting of
several levels (menu overview ¢ page 23).
Main menu (first menu level)
¤ When the handset is in idle status, press the display key §Menu§ to
open the main menu.
The functions in the main menu are shown
ç
by means of an icon and the function's
Settings
name.
Selecting a function:
Back W
OK
¤ You can scroll between functions using
the control key q. The relevant function is shown in the display.
¤ Press the display key §OK to select the displayed function. This
opens the corresponding submenu and the first entry is displayed.
If you press the display key §Back , left on the control key u or
briefly press the end call key a, the display returns to idle status.
Submenus
Version 5, 03.04.2011
The functions in the submenu are indicated
by name.
Audio Settings
Selecting a function:
¤ You can scroll between functions using
Back U
OK
the control key q. The relevant function
is shown in the display.
¤ Press the display key §OK to select the displayed function. This
opens the corresponding submenu and the first entry is displayed.
If you press the display key §Back , left on the control key u or
briefly press the end call key a, the display will return to the previous menu level.
Any settings you have not confirmed by pressing §OK will be discarded.
19
Gigaset E310/E310A (Panther) / MEA EN / A31008-M2301-A601-1-UZ19 / starting.fm / 11.05.2012
Using the phone
Returning to idle status
From any point in the menu:
¤ Press and hold the end call key a or
¤ Do not press any key: after 2 minutes,
the display will automatically revert to
idle status.
Ð
Ã
INT 1
23.04.
‘
U
10:53
Menu
Keys on the keypad
c/Q/P etc.
Press the corresponding key on the handset.
~
Enter digits or letters.
Correcting incorrect entries
You can correct incorrect characters in the input fields by navigating
to the incorrect entry using the control key. You can then:
u Use the display key §Del. to delete the character before the cursor
u Insert characters at the cursor position
u Overwrite the highlighted (flashing) character e.g., when entering time and date
Activating/deactivating the handset
a
In idle status, press and hold the end call key (confirmation tone).
If you place a deactivated handset in the base or charger, it will automatically be activated after a specific period of time (approx. 30 seconds).
Version 5, 03.04.2011
Activating/deactivating the keypad lock
The keypad lock prevents any inadvertent use of the phone.
#
In idle status, press and hold the hash key (confirmation
tone). The keypad lock is activated or deactivated. If it is
activated, the Ø icon appears in the display.
If the keypad lock is activated, a corresponding message is displayed
when you press a key.
The keypad lock deactivates automatically when you receive a call.
It is reactivated when the call is finished.
20
Gigaset E310/E310A (Panther) / MEA EN / A31008-M2301-A601-1-UZ19 / explanation.fm / 02.05.2012
Understanding the operating steps
Understanding the operating steps
An example of a procedure is as follows:
§Menu§ ¤ q Settings ¤ §OK ¤ q Telephony ¤ §OK
¤ q Auto Answer ¤ §OK (‰ = on)
This means you should proceed as follows:
Please note
Scroll upwards if you wish to select one of the last entries in a
menu level with numerous entries.
‘
Menu
§Menu§ :
Press the key below §Menu§ on the
display screen to open the main
menu.
¤ q:
Press up or down on the control key
until ...
ç
Settings
Back W
Settings:
... the menu entry Settings appears
on the screen.
OK
Version 5, 03.04.2011
¤ §OK :
Press the key below §OK on the display screen to open the submenu.
¤ q:
Press up or down on the control
key until ...
21
Gigaset E310/E310A (Panther) / MEA EN / A31008-M2301-A601-1-UZ19 / explanation.fm / 02.05.2012
Understanding the operating steps
Telephony:
... the menu entry Telephony
appears on the screen.
Telephony
Back
U
OK
¤ §OK :
Press the key below §OK on the
display screen to open the submenu.
¤ q:
Press up or down on the control
key until ...
Auto
Answer ´
Back V
OK
Version 5, 03.04.2011
Auto
Answer ‰
Back V
OK
22
Auto Answer:
... the menu entry Auto Answer
appears on the screen.
¤ §OK :
Press the key below §OK on the
display screen to switch the
function on or off (‰ = on).
The change is effective immediately and does not need to be
confirmed.
Press the key below §Back§ on the
display screen to jump back to
the previous menu level
or
Press and hold the end call key
a to return to idle status.
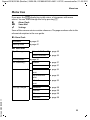
Gigaset E310/E310A (Panther) / MEA EN / A31008-M2301-A601-1-UZ19 / menuetree.fm / 11.05.2012
Menu tree
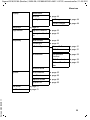
Menu tree
If you press the §Menu§ display key in idle status, a list appears with menu
entries. You can scroll through the list by pressing q.
é
ê
ç
Alarm Clock
Voice Mail
Settings
Some of these menu entries contain submenus. The page numbers refer to the
relevant description in the user guide.
é Alarm Clock
Activation
¢ page 42
Wake up time
¢ page 42
ê Voice Mail
Play Messages
Network Mailbox ** ¢ page 40
Answer Machine ** ¢ page 35
Answerphone *
¢ page 34
Call Screening *
Handset
¢ page 37
Base
¢ page 37
Announcements *
Record Announce- ¢ page 34
ment
Play Announcement
¢ page 35
Delete Announce- ¢ page 35
ment
Version 5, 03.04.2011
Message Length *
Unlimited
¢ page 38
1 Minute
¢ page 38
2 Minutes
¢ page 38
3 Minutes
¢ page 38
23
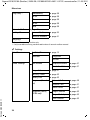
Gigaset E310/E310A (Panther) / MEA EN / A31008-M2301-A601-1-UZ19 / menuetree.fm / 11.05.2012
Menu tree
Ring Delay *
Network Mailbox
Set Key 1 *
Immediately
¢ page 38
10 sec
¢ page 38
18 sec
¢ page 38
30 sec
¢ page 38
Auto
¢ page 38
¢ page 40
Answer Machine
¢ page 35
Network Mailbox
¢ page 41
Language
* Base with answering machine only
** Only base with answering machine and number of network mailbox entered
ç Settings
Date/Time
Set Date/Time
Calendar
¢ page 15
Gregorian
Persian
Audio Settings
Call Volume
Earpiece Volume
¢ page 47
Handsfree Volume ¢ page 47
Ringer Volume
¢ page 47
Advisory Tones
¢ page 49
Battery Low
¢ page 49
Ringtones (Handset)
Version 5, 03.04.2011
Ringtones (Base),
E310A only
24
External Calls
¢ page 48
Internal Calls
¢ page 47
Alarm Clock
¢ page 47
Ringer Volume
¢ page 49
Ringer Melody
¢ page 49
Time Control
¢ page 49
Gigaset E310/E310A (Panther) / MEA EN / A31008-M2301-A601-1-UZ19 / menuetree.fm / 11.05.2012
Menu tree
Display
Screensaver
Contrast
Backlight
Language
Registration
Telephony
¢ page 46
In Charger
¢ page 46
Out of Charger
¢ page 46
¢ page 45
Register Handset
¢ page 43
De-register Handset
¢ page 43
Auto Answer
¢ page 46
Listening in
¢ page 44
Calls List Type
Preselection
Missed Calls
¢ page 31
All Calls
¢ page 31
Preselection
Number
¢ page 33
With Preselection ¢ page 33
Without Preselec- ¢ page 33
tion
Music on hold
Version 5, 03.04.2011
System
Reset Handset
¢ page 49
Base Reset
¢ page 50
Repeater Mode
¢ page 50
System PIN
¢ page 50
Eco Mode
¢ page 41
Eco Mode+
¢ page 41
25
Gigaset E310/E310A (Panther) / MEA EN / A31008-M2301-A601-1-UZ19 / telephony.fm / 11.05.2012
Making calls
Making calls
When the display backlight is
switched off, pressing any key will
activate the backlight. The relevant
key function is performed.
Making external calls and
ending calls
External calls are calls using the public telephone network.
Enter the phone number ~ and
press the talk key c. The number is
dialled.
You can also first press and hold the
talk key c (dial tone) and then
enter the number.
Press and hold the hash key # to
enter a dialling pause.
During the call, you can access the
menu for adjusting the earpiece volume with t and adjust the volume
using q.
Ending a call/cancelling dialling:
Press the end call key a or place
the handset in the base or charger.
Version 5, 03.04.2011
Accepting a call
The handset indicates an incoming
call in three ways: by ringing, by a
display on the screen and by the
flashing talk/speaker key d.
Press the talk/speaker key c to
accept the call.
If the handset is in the base and the
Auto Answer function is activated
(¢ page 46), the handset will accept
26
a call automatically when you lift it
out of the base.
If the ringer is intrusive, press
§Menu§ ¤ Silent ¤ §OK§
You can accept the call as long as it is
displayed on the screen.
Calling Line Identification
When you receive a call, the caller's
number is displayed on the screen if
the following prerequisites are met:
u Your network provider supports
CLIP, CLI
– CLI (Calling Line Identification):
the caller's number is
transmitted.
– CLIP (Calling Line Identification
Presentation): the caller's
number is displayed.
u You have requested CLIP from
your network provider.
u The caller has requested CLI from
the network provider.
Call display
When you receive a call, the phone
number is shown in the display.
If the number of the caller is stored
in your directory, the display is
replaced by the corresponding
directory entry.
123456789
Menu
The following is displayed instead of
the number:
Gigaset E310/E310A (Panther) / MEA EN / A31008-M2301-A601-1-UZ19 / telephony.fm / 11.05.2012
Making calls
u External Call, if no number is
transmitted.
u Withheld, if the caller has suppressed Calling Line Identification.
u Unavailable, if the caller has not
requested Calling Line Identification.
Notes on phone number
display (CLIP)
By default, the number of the caller
is shown in the display of your
Gigaset telephone. You do not have
to make any other settings on your
Gigaset telephone.
However, if the caller's number is
not displayed, this can be due to
the following:
u You have not requested CLIP from
your network provider
u Your telephone is connected via a
PABX or a router with an integrated PABX (gateway) that does
not transmit all information.
Version 5, 03.04.2011
Is your telephone connected via a
PABX/gateway?
You can establish this by checking
for an additional device connected
between your telephone and home
connection, e.g., a PABX, gateway
etc. In most cases, simply resetting
this device will remedy the situation:
¤ Briefly disconnect the PABX
power plug. Re-insert the plug
and wait for the device to restart.
If the caller number is still not
displayed:
¤ Check the CLIP (phone number
display) settings of your PABX and
activate this function if necessary.
In the user manual for the device,
search for the term "CLIP" (or an
alternative term such as "calling
line identification", "phone
number identification", "caller ID"
etc.). If necessary, contact the
device manufacturer.
If this does not resolve the problem,
it is possible that your network provider does not provide the CLIP service for this number.
Have you requested the phone
number display service from your
network provider?
¤ Check whether your provider
supports phone number display
(CLIP) and that the function has
been activated for you. If necessary, contact your provider.
Additional information on this subject can be found on the Gigaset
website at:
www.gigaset.com/service
Speaker mode operation
In speaker mode, you activate the
loudspeaker so that you can hear
the caller without having to hold the
handset to your ear. You therefore
have both hands free and other people can listen in on the conversation.
Please note
Inform your caller before you use
speaker mode so that they know
a third party may be listening.
27
Gigaset E310/E310A (Panther) / MEA EN / A31008-M2301-A601-1-UZ19 / telephony.fm / 11.05.2012
Using the directory and lists
Activating/deactivating
speaker mode
Switching between earpiece and
speaker mode
d
Press the speaker key.
During a call and when listening
to the answering machine
(Gigaset E310A only), activate or
deactivate speaker mode.
If you wish to place the handset in
the charger during a call:
¤ Press and hold the speaker key d
while placing the handset in the
charger and for a further 2 seconds. Otherwise, the call is cancelled.
For instructions on adjusting the
loudspeaker volume, see page 47.
Muting
You can deactivate your handset's
microphone during a call.
Press the right-hand control key v
during the call to activate/deactivate the function.
Version 5, 03.04.2011
Using the directory and
lists
The telephone offers a directory,
redial list, answering machine list,
network mailbox list and calls list.
You can save up to 150 entries in the
directory.
You can create a personalised directory for your own individual handset. You can copy all of the entries or
individual entries to other handsets
28
(¢ page 30). It is also possible to
copy entries from old handsets providing they are registered to your
(new) base.
Directory
You can store numbers and the associated names in the directory. With
the handset in idle status, open the
directory by pressing the s control
key.
Length of an entry
Number: max. 32 digits
Name: max. 16 characters
Saving the first number in the
directory
s ¤ Dir. empty New Entry? ¤ §OK
¤ ~ (Enter number) ¤ §OK
¤ ~ (Enter name) ¤ §OK
Storing further numbers in the
directory
s ¤ §Menu§ ¤ New Entry ¤ §OK
¤ ~ (Enter number) ¤ §OK
¤ ~ (Enter name) ¤ §OK
Please note
u Refer to the character set chart
to see how to enter names
(¢ page 63).
u Press and hold the hash key #
to enter a dialling pause.
Gigaset E310/E310A (Panther) / MEA EN / A31008-M2301-A601-1-UZ19 / telephony.fm / 11.05.2012
Using the directory and lists
Order of directory entries
The directory entries are sorted in
alphabetical order. Spaces and digits take first priority. The sort order is
as follows:
1 Space
2 Digits (0–9)
3 Letters (alphabetical)
4 Other characters
To get round the alphabetical order
of the entries, insert a space or a
digit in front of the name. These
entries will then move to the beginning of the directory.
Selecting a directory entry
s
Open the directory.
You have the following options:
u Use q to scroll through the
entries until the required name is
selected.
u Enter the first character of the
name, if necessary scroll to the
entry with the q key.
Dialling with the directory
Select an entry.
¤c
Managing directory entries
Version 5, 03.04.2011
Select an entry.
The following functions can be
selected with §Menu§ ¤ q:
New Entry
Save new phone number.
VIP Caller Melody
Mark a directory entry as a VIP Æ
(Very Important Person) by
assigning a specific ringtone to it.
You recognise VIP calls by the
ringtone.
Edit Entry
Edit selected entry.
Use Number
Edit or add to a stored number.
Then dial or select other functions
using §§Menu§§.
Delete Entry
Delete selected entry.
Send Entry
Send an individual entry to
another handset (¢ page 30).
Delete List
Delete all directory entries.
Send List
Send the complete directory to
another handset.
Shortcut
For creating shortcuts by assigning the current entry to a key, see
the following section.
Using shortcuts
You can assign directory entries to
the keys 2 to O:
s ¤ q (Select entry)
¤ §§Menu§§ ¤ Shortcut
¤ ~ (Press the key to which you
want to assign the entry)
To dial, press and hold the required
shortcut key.
29
Gigaset E310/E310A (Panther) / MEA EN / A31008-M2301-A601-1-UZ19 / telephony.fm / 11.05.2012
Using the directory and lists
Transferring the directory to
another handset
Redial list
You can transfer directory entries
from other handsets to your new
handset – even entries from old
handsets.
The redial list contains the ten numbers last dialled with the handset. If
one of the numbers is in the directory, the corresponding name will
be displayed.
Prerequisites:
u The sending and receiving handsets must both be registered to
the same base.
u The other handset and the base
can send and receive directory
entries.
s ¤ q (Select entry) ¤ §Menu§
¤ q Send Entry/Send List ¤ §OK
¤ q (Select the internal number
of the receiving handset) ¤ §OK
A message appears on the display to
confirm a successful transfer. You
will hear the confirmation tone.
Adding a displayed number to
the directory
Version 5, 03.04.2011
You can copy numbers displayed in
a list, e.g., the calls list or redial list, to
the directory.
A number is displayed.
§Menu§ ¤ q Copy to Directory ¤ §OK
¤ Complete the entry (¢ page 28).
The message playback is interrupted while numbers are copied
from the answering machine list
(Gigaset E310A only).
30
Dialling from the redial list
c
q
c
Press the talk key.
Select an entry.
Press the talk key. The
number is dialled.
Managing entries in the redial
list
c
q
Press the talk key.
Select an entry.
§Menu§
Press the display key.
The following functions can be
selected with q:
Use Number
Edit or add to the number. Then
dial or select other functions from
the §Menu§.
Copy to Directory
Copy an entry to the directory.
Delete Entry
Delete selected entry.
Delete List
Delete all entries.
Gigaset E310/E310A (Panther) / MEA EN / A31008-M2301-A601-1-UZ19 / telephony.fm / 11.05.2012
Using the directory and lists
Answering machine list
(Gigaset E310A only)
The answering machine list contains
all the calls recorded by the answering machine. You can use the list to
listen to messages on the answering
machine (¢ page 35).
Press and hold (idle status).
The calls list entries are retained
when you change the list type.
Depending on the type of list set, all
numbers of the last 25 incoming
calls are saved or just the missed
calls are saved.
Network mailbox list
Opening the calls list
You can use this list to listen to messages on the network mailbox
(¢ page 40).
The calls list is displayed as follows:
Calls list
Prerequisite: CLIP (¢ page 27)
Depending on the type of list set,
the calls list contains:
u All calls
– Accepted calls
– Unanswered calls
– Calls recorded by the answering machine (Gigaset E310A
only)
u Missed calls
– Unanswered calls
– Calls not recorded by the
answering machine
(Gigaset E310A only)
Setting the call list type
§Menu§ ¤ q Settings ¤ §OK§
¤ q Telephony ¤ §OK§
¤ q Calls List Type ¤ §OK§
Version 5, 03.04.2011
a
¤ q Missed Calls /All Calls
¤ §OK§ (‰ = selected)
’ ¤ q Calls List:
Calls List:
01+02
Number of new entries + number of old,
read entries.
§OK
Press the display key to
open the list.
The last incoming call is displayed.
Example of list entries:
New Call
02
123456789
28.06.
08:34
Back U Menu
u Status of entry
– New Call: New missed call.
– Old Call: Entry already read.
– Call recv.: Call was answered.
– Answer M (Gigaset A510A): the
answering machine accepted
the call. A message was left.
u Entry number
u Number or name of caller
u Call date and time (if set,
¢ page 15).
If necessary, use q to select
another entry.
31
Gigaset E310/E310A (Panther) / MEA EN / A31008-M2301-A601-1-UZ19 / telephony.fm / 11.05.2012
Automatic network provider preselection
The following functions can be
selected with §Menu§ ¤ q:
Delete Entry
Delete current entry.
Copy to Directory
Copy an entry to the directory.
Delete List
Caution! All old and new entries
will be deleted.
After exiting the calls lists, all viewed
entries are assigned the status "old".
Calling back a caller from the
calls list
à ™
03
01
Please note
If calls are saved in the network
mailbox, you will receive a message if the list type has been set
accordingly (see your network
provider user guide).
’ ¤ q Calls List 01+02 ¤ §OK
¤ q (Select entry) ¤ c
Automatic network
provider preselection
Opening lists
You can store a call-by-call number
(preselection number), which is
automatically placed in front of
numbers when you dial them. If, for
example, you wish to make international calls via special network providers, you can save the relevant
dialling code here.
In the With Preselection list, specify
the dialling codes or the first digits
of the dialling codes that you wish to
assign to the preselection number.
In the Without Preselection list,
enter the exceptions to the With
Preselection list.
When you press ’ , the list
selection opens. You can scroll
through the available lists by pressing q. Only the lists containing
messages and the network mailbox
list are displayed.
An advisory tone sounds as soon as
a new message appears in a list.
Depending on the type of the new
entry, an icon appears in the display
while in idle status:
Icon
Ã
™
Version 5, 03.04.2011
The number of new entries is displayed under the corresponding
icon.
32
New message ...
... in the answering machine
list (Gigaset A510A only) or
on the network mailbox
... in the missed calls list
Gigaset E310/E310A (Panther) / MEA EN / A31008-M2301-A601-1-UZ19 / telephony.fm / 11.05.2012
Automatic network provider preselection
Examples:
Preselection Number
0999
With Preselection
08
Without Preselection
081
084
All numbers that start with 08,
except for 081 and 084, are dialled
with the preselection number 0999.
Phone
number
Dialled
number
07112345678 ¤
07112345678
08912345678 ¤
0999 08912345678
08412345678 ¤
08412345678
Storing preselection numbers
§Menu§ ¤ q Settings ¤ §OK§
¤ q Telephony ¤ §OK§
¤ q Preselection ¤ §OK§
¤ q Preselection Number ¤ §OK§
¤ ~ (Enter or edit preselection
number) ¤ §OK§
a
Press and hold (idle status).
Saving or editing entries in
preselection lists
Each of the two lists can contain
11 entries with 4 digits.
Depending on the country, numbers may be preset in the With Preselection list. This means e.g., that
all national calls or calls to the
mobile network are automatically
linked to the preselection number
you have saved previously.
§Menu§ ¤ q Settings ¤ §OK§
¤ q Telephony ¤ §OK§
¤ q Preselection ¤ §OK§
¤ q With Preselection / Without
Preselection ¤ §OK§
¤ q (Select entry) ¤ §OK§
¤ ~ (Enter or edit first digits of
number) ¤ §OK§
a
Press and hold (idle status).
Temporarily cancelling
preselection
c (press and hold) ¤ §Menu§
¤ q Automatic Preselect off
¤ §OK§ ¤ ~ Dial number
Permanently deactivating
preselection
Version 5, 03.04.2011
Delete the preselection number
with §Del.§ and press §OK .
33
Gigaset E310/E310A (Panther) / MEA EN / A31008-M2301-A601-1-UZ19 / answering_m.fm /
Operating the answering machine
Operating the
answering machine
You can operate the (integrated)
answering machine
u Via the handset or
u Via the keys on the base or
u Via external phone (¢ page 39)
You will find information on operating the answering machine via the
keys on the base on page 2.
The following sections describe
operation via the handset.
Switching the answering
machine on/off
§Menu§ ¤ q Voice Mail ¤ §OK§
¤ q Answerphone ¤ §OK§ (‰ = on)
When the answering machine is
switched on, the remaining memory
time is announced. The ± icon
appears in the display. The on/off
key lights up on the base.
The answering machine uses a prerecorded announcement. However,
you can also record a personal
announcement of your own.
Version 5, 03.04.2011
Please note
If the memory is full the answering machine switches itself off
automatically. It switches itself
on again automatically when you
delete old messages.
34
Recording a personal
announcement
§Menu§ ¤ q Voice Mail ¤ §OK§
¤ q Announcements ¤ §OK§
¤ q Record Announcement ¤ §OK§
¤ Press OK, talk after tone ¤ §OK§
You will hear a short tone.
¤ Now say your announcement
(at least 3 seconds).
Just as if you were making a call
via the earpiece, place the telephone against your ear and speak
into the microphone at a normal
volume.
Cancel the recording with a or
§Back§. Restart the recording with
§OK .
§OK
Press the display key to
end the recording.
After recording, the announcement
is played back for you to check.
Please note
u Your recording is ended automatically:
– If the maximum message
length of 170 seconds is
reached or
– If there is a pause lasting for
longer than 2 seconds.
– If answering machine memory gets full.
u If you cancel the recording, the
pre-recorded announcement
is used.
u The recording is stopped and
seved if the answering
machine memory is full.
Gigaset E310/E310A (Panther) / MEA EN / A31008-M2301-A601-1-UZ19 / answering_m.fm /
Operating the answering machine
Playing back an announcement
§Menu§ ¤ q Voice Mail ¤ §OK§
¤ q Announcements ¤ §OK§
¤ q Play Announcement ¤ §OK§
If you have not recorded your own
announcement, the pre-recorded
announcement will be played.
Deleting your personal
announcement
§Menu§ ¤ q Voice Mail ¤ §OK§
¤ q Announcements ¤ §OK§
¤ q Delete Announcement ¤ §OK§
The pre-recorded announcement is
used again after a personal
announcement is deleted.
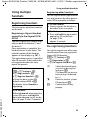
Playing back messages
Version 5, 03.04.2011
There are three ways to start playing
back messages on the answering
machine.
u Start message playback via the
Voice Mail menu:
§Menu§ ¤ q Voice Mail ¤ §OK§
¤ q Play Messages ¤ §OK§
If you have entered a number for
the network mailbox you still
need to select the answering
machine:
¤ q Answer Machine ¤ §OK§
u Start message playback via the
answering machine list:
’ ¤ q Answ. Mach.:
(see also page 32)
The list is displayed as follows:
Answ. Mach.:
01+02
Number of new messages + number
of old, played back messages.
§OK
Press the display key to
open the list.
u Fast access to the answering
machine:
To access the answering machine,
simply press and hold the 1 key
– you do not have to select it via
the menu.
The integrated answering
machine has already been preset
at the factory. However, if you
have set the network mailbox for
fast access (¢ page 40), you can
change this setting.
§Menu§ ¤ q Voice Mail ¤ §OK§
¤ q Set Key 1 ¤ §OK§
¤ q Answer Machine ¤ §OK§
The setting for fast access applies
to all registered handsets.
If you have new messages, playback
will start with the first new message,
otherwise with the first old message. The loudspeaker on the handset switches on automatically. To
switch it off, press the speaker key
d.
A message comprises two parts:
u An info block, comprising
number/date/time and
u The content (spoken message).
First, the info block is played back
followed by the content.
35
Gigaset E310/E310A (Panther) / MEA EN / A31008-M2301-A601-1-UZ19 / answering_m.fm /
Operating the answering machine
The status of the call, the callers
number or the callers name and the
date/time of the call is displayed.
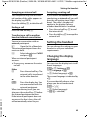
Stopping and controlling
playback
Controlling message playback
depends on when you press the
relevant key.
During message playback:
2
Stop playback. Press again to
resume.
t or During the info block
1 announcement: Skip to the
start of the previous message.
During playback of the content: Skip to the start of the
current message.
s or Go to the start of the next
I message.
L
During the info block
announcement: Skip info
block.
During playback of the content: Skip to the content of
the next message.
Version 5, 03.04.2011
Skipping back from the first message means you skip to the last message, skipping forward from the last
message means you skip to the first
message.
If playback is interrupted for over a
minute, the answering machine
returns to idle status.
36
Additional functions during
message playback
§Menu§
Press the display key. Playback stops.
Select the relevant function
using q:
Dial Number
Dial the number.
Continue
Continue message playback.
Volume
Set the speaker or earpiece volume.
Copy to Directory
Copy the caller's number to the
directory.
Delete all
Delete all old messages.
Deleting an individual message
During playback:
Press key Q or display key §Del.§.
Accepting a call from the
answering machine
You can still accept a call even when
the answering machine has
answered a call or is recording:
§Accept§ Press display key.
You can also accept the call by:
u pressing the talk key c
Gigaset E310/E310A (Panther) / MEA EN / A31008-M2301-A601-1-UZ19 / answering_m.fm /
Operating the answering machine
u removing the handset from the
base/charger (if auto answer is
activated, ¢ page 46)
Please note
If Call Screening is activated via
the handset and the call can
already be heard on the handset, you can only accept the call
by pressing §Accept§. Pressing the
talk key/hands free key conly
activates or deactivates the
handsfree mode.
Recording stops and you can speak
to the caller.
If three seconds of the call have
already been recorded when you
pick it up, the call will be displayed
as a new message.
Activating/deactivating
call screening
While the caller is leaving a message
on the answering machine, you can
listen in via the loudspeaker on the
base or handset.
Permanently activating/
deactivating call screening
§Menu§ ¤ q Voice Mail ¤ §OK§
¤ q Call Screening ¤ §OK§
Version 5, 03.04.2011
¤ q Handset/Base
¤ §OK§ (‰ = on)
Call screening can be simultaneously activated on the base and
handset.
Deactivating call screening on
the handset for the current
recording
a
Press the end call key. The
loudspeaker on the handset is deactivated.
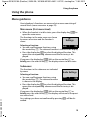
Diverting an external call
to the answering
machine
You can divert an incoming external
call to the answering machine, even
if it is deactivated.
Prerequisite: the answering
machine has available memory.
An external call is signalled on the
handset:
§Menu§ ¤ Divert to AM ¤ §OK§
The answering machine starts
immediately in answer & record
mode and records the call. The set
time for ring delay (¢ page 38) is
ignored.
Activating/deactivating
two-way record
You can record an external call with
the answering machine.
¤ Inform the caller that the call is
being recorded.
During the conversation:
§Menu§ ¤ q Two-Way Recording
¤ §OK§
Two-way record is indicated on the
display by an advisory text and is
added to the answering machine list
as a new message.
37
Gigaset E310/E310A (Panther) / MEA EN / A31008-M2301-A601-1-UZ19 / answering_m.fm /
Operating the answering machine
§End§
Press the display key to
stop two-way record.
The maximum recording time
depends on the memory available
on the answering machine. If the
memory is full, you will hear an end
tone, the recording is aborted, and
the call recorded up to that point is
listed in the answering machine list
as a new message.
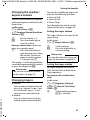
Setting the message length
Setting up the answering
machine
Changing the language for the
voice prompt and pre-recorded
announcement
The answering machine has already
been preset at the factory. You can
configure individual settings via the
handset.
§Menu§ ¤ q Voice Mail ¤ §OK§
¤ q Language ¤ §OK§
Setting up ring delay
Language 1: Farsi with persian
calendar
Language 2: Farsi with gregorian
calendar
Language 3: Arabic with gregorian
calendar
Language 4: English with gregorian
calendar
You can set the amount of time that
elapses before the answering
machine is to accept a call.
§Menu§ ¤ q Voice Mail ¤ §OK§
¤ q Ring Delay ¤ §OK§
q
Version 5, 03.04.2011
Select Immediately,
10 sec, 18 sec, 30 sec or
Auto and press §OK§
(‰ = selected).
With Auto the ring delay is as follows:
u If there are no new messages, the
answering machine answers a call
after 18 seconds.
u If new messages are present, the
answering machine answers a call
after 10 seconds.
38
You can set a maximum message
length.
You can choose: 1 Minute,
2 Minutes, 3 Minutes or Unlimited.
§Menu§ ¤ q Voice Mail ¤ §OK§
¤ q Message Length ¤ §OK§
¤ q Select the message length
¤ §OK (‰ =selected)
¤ q Select the language
¤ §OK§ (‰ = selected)
Gigaset E310/E310A (Panther) / MEA EN / A31008-M2301-A601-1-UZ19 / answering_m.fm /
Operating the answering machine
Operating when on the
move (remote operation)
You can check your answering
machine from any other telephone
(hotel, pay phone etc.).
Prerequisites:
u You have set a system PIN other
than 0000 (¢ page 50).
u The phone you are using for
remote operation has tone dialling (DTMF) i.e., you hear different
tones when you press the keys.
Alternatively, you can use a code
transmitter (available from retailers).
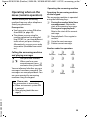
Calling the answering machine
and playing messages
~
9 ~
Dial your own number.
When you hear your
announcement, press 9
and enter the system PIN.
You are informed whether any new
messages have been recorded. The
messages are now played back. You
can now operate the answering
machine using the keypad.
Operating the answering machine
via the keypad
The answering machine is operated
using the following keys:
A During the number/date/time
announcement: Skip to the
start of the previous message.
During message playback:
Skip to the start of the current
message.
B Stop playback. Press again to
resume.
3 Go to the next message.
0 Delete current message.
Number codes for operation:
A
B
3
Previous
Stop/cont.
Next
D
E
F
G
H
:
0
Delete
9
Enter
;
Version 5, 03.04.2011
Please note
The connection is terminated:
u When an incorrect system PIN
is entered
u After playing back the message(s)
39
Gigaset E310/E310A (Panther) / MEA EN / A31008-M2301-A601-1-UZ19 / T-NetBox-registration.fm /
Using the network mailbox
Using the network
mailbox
The network mailbox is the answering machine in your provider's telephone network. More information is
available from your provider.
You cannot use the network mailbox
unless you have requested it from
your provider.
Entering the network mailbox
number
In order to use the network mailbox
quickly and easily via the network
mailbox list and to use fast access,
you will need to enter the number in
your phone.
§Menu§ ¤ q Voice Mail ¤ §OK§
¤ q Network Mailbox ¤ §OK§
~
Enter the network mailbox number and
press §OK.
Version 5, 03.04.2011
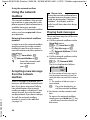
Accepting a new message
from the network
mailbox
When a message is recorded, you
receive a call from the network mailbox. If you have requested Calling
Line Identification, the network
mailbox number is displayed. If you
accept the call, the new messages
are played back. If you do not accept
the call, the network mailbox
number is saved in the calls list
(¢ page 31).
40
Please note
Enter the network mailbox phone
number into your directory along
with the designation "Network
mailbox"; the display and the
calls list will then show this designation.
Playing back messages
There are three ways to call the network mailbox.
u Call the network mailbox via the
Voice Mail menu:
§Menu§ ¤ q Voice Mail ¤ §OK§
¤ q Play Messages ¤ §OK§
¤ q Network Mailbox ( E310A
only) ¤ §OK§
u Call the network mailbox via the
network mailbox list:
’ ¤ q Network MBX:
The list is displayed as follows:
Network MBX:
00+**
00: The number of new messages is
only displayed correctly if your network provider transmits this information.
**: The number of old messages is
not available.
§OK
Press the display key to
call the network mailbox.
u Fast access to the network mailbox:
To access the network mailbox,
simply press and hold the 1 key
– you do not have to select it via
the menu.
Gigaset E310/E310A (Panther) / MEA EN / A31008-M2301-A601-1-UZ19 / T-NetBox-registration.fm /
ECO DECT
Gigaset E310: The network mailbox is preconfigured for fast
access.
Gigaset E310A: The integrated
answering machine is preconfigured for fast access. You can
switch to the network mailbox.
§Menu§ ¤ q Voice Mail ¤ §OK§
¤ q Set Key 1 ¤ §OK§
¤ q Network Mailbox
¤ §OK§ (‰ = selected)
The setting for fast access applies
to all handsets.
ECO DECT
You are helping to protect the environment with your Gigaset.
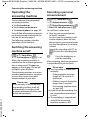
Reducing energy consumption
Your telephone has a power-saving
adapter plug and uses <0.4 W when
in idle status and when the batteries
are not being charged.
Reducing radiation
Version 5, 03.04.2011
The radiation from your telephone is
reduced automatically:
u Handset: The closer the handset
is to the base, the lower the radiation.
u Base: The radiation is reduced to
virtually zero when only one
handset is registered and the
handset is placed in the base.
You can reduce the radiation from
the handset and the base even more
by using Eco Mode:
Eco Mode
Reduces the radiation of the base
and handset by 80% – whether you
are making a call or not. Eco Mode
reduces the range of the base by
approx. 50%. It is always better to
use Eco Mode when a reduced
range is sufficient.
Switching off radiation
Eco Mode+
When you activate Eco Mode+, the
radiation (DECT transmission
power) of base and handset is
switched off automatically and only
turns on when calls are made.
This is also true when multiple handsets are used, provided the handsets
support Eco Mode+.
Eco Mode/Eco Mode+ can be activated/deactivated independently of
one another and can also be used
with multiple handsets. The handset
need not be placed in the base.
Activating/deactivating Eco Mode
/ Eco Mode+
§Menu§ ¤ q Settings ¤ §OK§
¤ q Eco Mode / Eco Mode+
¤ §OK§ (‰ = on)
41
Gigaset E310/E310A (Panther) / MEA EN / A31008-M2301-A601-1-UZ19 / T-NetBox-registration.fm /
Using the handset as an alarm clock
Status displays
Display icon
Ð ¨ § ¦
¥
½
Reception strength:
– Good to poor
– No reception
Eco Mode+ enabled
(displays instead of
the reception
strength icon when
in idle status)
Version 5, 03.04.2011
Please note
u When using Eco Mode+ you can
ensure that the range of the
base is sufficient by pressing
and holding the talk key c. You
hear the dialling tone if the base
can be reached.
u When Eco Mode+ is enabled:
– Call setup is delayed by
approx. 2 seconds.
– Handset standby time is
reduced by approx. 50%.
u Registering handsets that do
not support Eco Mode+ causes
the mode to be deactivated on
the base and all other handsets.
u Activating Eco Mode reduces
the range of the base.
u Eco Mode / Eco Mode+ and
repeater support (¢ page 50)
cancel each other out, i.e., if you
use a repeater, you cannot use
Eco Mode or Eco Mode+.
42
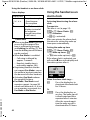
Using the handset as an
alarm clock
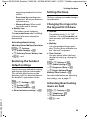
Activating/deactivating the alarm
clock
Prerequisite:
The time is set (¢ page 15).
§Menu§ ¤ q Alarm Clock ¤ §OK§
¤ q Activation
¤ §OK§ (‰ = activated)
After you activate the alarm clock,
the menu for setting the wake-up
time opens automatically.
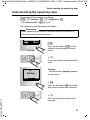
Setting the wake-up time
§Menu§ ¤ q Alarm Clock ¤ §OK§
¤ q Wake up time ¤ §OK§
¤ ~ (Enter wake-up time) ¤ §OK§
If the alarm clock is activated, you
will see the l icon in the display and
the wake-up time after it.
Ð
Ã
INT 1
l12:00
‘
U
10:53
Menu
When the alarm clock rings…
§Off§
Press the display key to
deactivate the alarm clock
for 24 hours.
Or
§Snooze§ Press the display key or
any key. The wake-up call
is deactivated and then
repeated after 5 minutes.
After the second repetition the wake-up call is
deactivated for 24 hours.
Gigaset E310/E310A (Panther) / MEA EN / A31008-M2301-A601-1-UZ19 / T-NetBox-registration.fm /
Using multiple handsets
Using multiple
handsets
Registering handsets
You can register up to four handsets
on the base.
Registering a Gigaset handset
manually to the Gigaset E310/
E310A
You must register the handset manually on both the handset (1) and
the base (2).
Once registration is complete, the
handset returns to idle status. The
internal number of the handset
appears in the display, e.g., INT 1.
The registration process is cancelled
after 60 seconds. If the handset has
not registered within this time,
repeat the process.
Version 5, 03.04.2011
1) On the handset
§Menu§ ¤ q Settings ¤ §OK§
¤ q Registration ¤ §OK§
¤ q Register Handset ¤ §OK§
¤ Enter the base system PIN
(default setting: 0000) ¤ §OK
The display shows Handset is
registering.
Registering other handsets
You can register other Gigaset handsets and handsets for other devices
with GAP functionality as follows.
1) On the handset
¤ Start to register the handset as
described in its user guide.
2) On the base
¤ Press and hold the registration/
paging key ù on the base
(¢ page 2) for
approx. 3 seconds.
De-registering handsets
You can de-register any other registered handset from any registered
Gigaset E310H handset.
§Menu§ ¤ q Settings ¤ §OK§
¤ q Registration ¤ §OK§
¤ q De-register Handset ¤ §OK§
q
~
§OK§
Select the internal party
you wish to de-register
and press §OK .
(The handset you are currently using is indicated
by <.)
Enter the current system
PIN and press §OK .
Confirm the security
prompt.
2) On the base
Within 60 seconds of entering the
system PIN, press and hold the
registration/paging key ù on the
base (¢ page 2) (min. 3 seconds).
43
Gigaset E310/E310A (Panther) / MEA EN / A31008-M2301-A601-1-UZ19 / T-NetBox-registration.fm /
Using multiple handsets
Locating a handset
("paging")
You can locate your handset using
the base.
¤ Briefly press the registration/paging key ù on the base
(¢ page 2).
¤ All handsets will ring at the same
time ("paging"), even if the ringer
melodies are switched off.
Ending paging
Briefly press the registration/paging
key ù on the base (¢ page 2) or
press the talk key c or end call key
a on the handset.
Listening in to an
external call (conference)
You want to listen in to an existing
external call.
Prerequisite: The Listening in function must be activated.
Version 5, 03.04.2011
Activating/deactivating the
function:
§Menu§ ¤ q Settings ¤ §OK§
¤ q Telephony ¤ §OK§
¤ q Listening in ¤ §OK§ (‰ = on)
Listening in to the call:
Press and hold the talk key c on
the handset. All participants hear a
signal tone. This handset displays
the Conference Call message and it
is not possible to dial another
number from this handset.
44
Ending listening in:
Press the end call key a on the
handset; all participants hear a
signal tone.
If the first internal participant
presses the end call key a, the
handset that has "listened in"
remains connected to the external
participant.
Making internal calls
Internal calls are free calls between
handsets that are registered with
the same base.
Calling a specific handset
u
~
Or:
u
s
c
Initiate internal call.
Enter the number of the
handset.
Initiate internal call.
Select handset.
Press the talk key.
Calling all handsets
("group call")
u
Or:
u
P
Or:
u
Call All
c
Press and hold.
Initiate internal call.
Press the star key.
Initiate internal call.
Select
Press the talk key.
Ending a call
a
Press the end call key.
Gigaset E310/E310A (Panther) / MEA EN / A31008-M2301-A601-1-UZ19 / T-NetBox-registration.fm /
Setting the handset
Accepting an internal call
Accepting a waiting call
Your telephone rings and the internal number of the caller appears in
the display (e.g. INT 2).
Press the talk key c, to take the call.
If you receive an external call while
conducting an internal call, you will
hear the call waiting tone (short
beep). The caller's number will
appear in the display if phone
number identification is enabled.
¤ Press the end call key a to end
the internal call.
¤ Press the talk key c to accept the
external call.
Ending a call
Press the end call key a.
Transferring a call to another
handset/internal consultation
You are in conversation with an
external participant.
u
Open the list of handsets.
The external participant hears the
music on hold.
s
Select a handset or Call All
and press §OK .
When an internal participant
answers:
¤ If necessary, announce the external call.
Either
a
Press the end call key. The
external call is transferred
to the other handset.
or
Version 5, 03.04.2011
§Back
Press the display key. You
are reconnected with the
external participant.
When transferring a call, you can
also press the end call key a before
the internal participant answers.
If the internal participant does not
answer or the line is busy, the call
will automatically return to you.
Setting the handset
You can change the settings on your
handset to suit your individual
requirements.
Changing the display
language
You can view the display texts in different languages.
§Menu§ ¤ q Settings ¤ §OK§
¤ q Language ¤ §OK§
¤ q (Select language) ¤ §OK§
The current language is indicated by
a‰.
If you accidentally choose a language you do not understand:
§Menu§ ¤ L4
¤ q (Select language)
¤ §OK (‰ = selected)
45
Gigaset E310/E310A (Panther) / MEA EN / A31008-M2301-A601-1-UZ19 / T-NetBox-registration.fm /
Setting the handset
Setting the calender type
You can use the gregorian or the
persian calendar type.
§Menu§ ¤ q Settings ¤ §OK§
¤ Date/Time ¤ §OK§ ¤ q Calendar
¤ §OK§ ¤ q Gregorian /Persian
¤ §OK§
The current setting is indicated by
a ‰.
Setting the display
You can set the display contrast, the
screensaver and the backlight.
§Menu§ ¤ q Settings ¤ §OK§
¤ q Display ¤ §OK§
Version 5, 03.04.2011
You have the following options:
Screensaver
In idle status a digital clock can be
displayed as a screensaver. This
replaces the idle status display.
You can choose between No
Screensaver and Digital Clock.
The screensaver is not displayed
in certain situations e.g., during a
call or if the handset is de-registered.
To show the display in idle status,
briefly press end call key a.
Contrast
Nine contrast settings are available.
46
Backlight
Depending on whether or not the
handset is in the charger, you can
activate or deactivate the backlight (‰ = on).
¤ q In Charger/Out of Charger
¤ §OK§ (‰ = on)
If the display backlight In Charger
is activated, the display is permanently dimmed, when the handset is in the charger.
If the display backlight Out of
Charger is activated, the handset
will switch the display brightness
in two stages to 10% of the maximum brightness when the handset is not in the charger.
When the display backlight is
switched off, pressing any key will
activate the backlight and perform the relevant key function.
Please note
If the backlight is turned on
outside the charger, the
standby time for the handset is
considerably reduced!
Auto answer
When this function is activated,
when a call arrives you can simply
lift the handset out of the base without having to press the talk key c.
§Menu§ ¤ q Settings ¤ §OK§
¤ q Telephony ¤ §OK§
¤ q Auto Answer ¤ §OK§ (‰ = on)
Gigaset E310/E310A (Panther) / MEA EN / A31008-M2301-A601-1-UZ19 / T-NetBox-registration.fm /
Setting the handset
Changing the speaker/
earpiece volume
You can set the volume for speaker
mode and earpiece mode to five different levels.
In idle status:
t ¤ Call Volume ¤ §OK§
¤ q Earpiece Volume/Handsfree
Volume ¤ §OK§
q
Set the volume 1–5.
Press the display key to
save the setting.
During a conversation via the earpiece or in speaker mode:
t
Press the control key to
open the menu for setting
the volume. Set the earpiece or speaker volume
1–5 by pressing q.
The setting 1–5 will automatically be
saved after approximately 3 seconds
or press the display key §OK .
Please note
You can also set the call volume
via the menu (¢ page 24).
§OK
Version 5, 03.04.2011
Changing ringers
u Volume:
You can choose between five volumes (e.g., volume 3 = ˆ) and
the "crescendo" ring (‡, volume increases with each ring).
u Melody:
You can select from a list of preloaded ringtones and melodies.
You can also set different ringer melodies for the following functions:
u External Calls
u Internal Calls
u Alarm Clock
For information on how to set the
ringers for the base, see page 49.
Setting the ringer volume
The ringer volume is the same for all
types of ring.
In idle status:
t ¤ q Ringer Volume ¤ §OK
q
§OK
Set the volume.
Press the display key to
save the setting.
Please note
You can also adjust the ringer volume via the menu (¢ page 24).
Setting the ringer melody
Set ringer melodies for External
Calls, Internal Calls and the Alarm
Clock separately.
For internal calls and the alarm
clock
In idle status:
t ¤ q Ringtones (Handset)
¤ §OK§ ¤ q Internal Calls/Alarm
Clock ¤ §OK§
q
Select melody and press
§OK§ (‰ = selected).
47
Gigaset E310/E310A (Panther) / MEA EN / A31008-M2301-A601-1-UZ19 / T-NetBox-registration.fm /
Setting the handset
For external calls:
In idle status:
t ¤ q Ringtones (Handset)
¤ §OK§ ¤ q External Calls ¤ §OK§
q can be used for the following:
Melodies
You can set the ringtone as
described above.
Time Control
You can specify a time period
when you do not want the telephone to signal external calls e.g.,
during the night.
Activation is switched on or off by
pressing §OK§ (‰ = activated).
Settings
Ringer off from: /Ringer off until:
Enter time in 4-digit format.
Please note
During this period, you will
continue to receive calls from
numbers to which you have
assigned a personalised melody in the directory (VIP).
Version 5, 03.04.2011
Anonymous Calls Silent
You can set your handset so that it
does not ring for calls where Calling Line Identification has been
withheld (not answering
machine). The call will only be signalled on the display.
Switch the Anonymous Calls
Silent function on or off by pressing §OK§ (‰ = activated).
Please note
You can also set the ringtones
via the menu (¢ page 24).
48
Activating/deactivating the
ringer
You can:
u Permanently deactivate the
ringer in idle status or when
receiving a call
u Deactivate the ringer for the current call only
The ringer cannot be re-activated
while a call is in progress.
Permanently deactivating the
ringer
P
Press and hold the star
key.
The Ú icon appears in the display.
Reactivating the ringer
P
Press and hold the star
key.
Deactivating the ringer for the
current call
§Menu ¤ Silent ¤ §OK§
Advisory/warning tones
Your handset uses advisory tones to
tell you about different activities
and statuses. The following tones
can be activated and deactivated
independently of each other:
u Advisory Tones
– Key click: Every key press is
confirmed.
– Confirmation tone (rising tone
sequence): At the end of an
entry/setting, when the handset is placed in the base and on
arrival of a new entry in the
Gigaset E310/E310A (Panther) / MEA EN / A31008-M2301-A601-1-UZ19 / T-NetBox-registration.fm /
Setting the base
answering machine list or the
call list.
– Error tone (descending tone
sequence): When you make an
incorrect entry.
– Menu end tone: When scrolling at the end of a menu.
u Battery Low
The battery needs charging.
The menu end tone when scrolling
at the end of a menu cannot be
deactivated.
Activating/deactivating
advisory tones/battery low tone
§§Menu§ ¤ q Settings
¤ q Audio Settings ¤ §OK§
¤ q Advisory Tones/ Battery Low
¤ §OK§ (‰ = on)
Restoring the handset
default settings
Version 5, 03.04.2011
You can reset any individual settings
and changes that you have made.
This will not affect entries in the
directory, calls list, date and time or
the handset's registration to the
base.
§Menu§ ¤ q Settings ¤ §OK§
¤ q System ¤ §OK§
¤ q Reset Handset ¤ §OK§
¤ Reset to factory settings? ¤ §OK§
Setting the base
The base settings are made via registered handset.
Changing the ringers for
the Gigaset E310A base
u Volume:
Five volume levels (1–5), "Off"
(volume = 0) and Crescendo (volume increases with each ring) can
be set.
u Melody:
List of pre-loaded ringer melodies. The first three melodies are
the "classical" ring tones.
u Time Control:
You can specify when the base
should not ring (e.g., during the
night).
§Menu§ ¤ q Settings ¤ §OK§
¤ q Audio Settings ¤ §OK§
¤ q Ringtones (Base) ¤ §OK§
¤ q Ringer Volume/Ringer
Melody/Time Control ¤ §OK§
For more information on adjusting
the settings, see ¢ page 47.
Activating/deactivating
music on hold
§Menu§ ¤ q Settings ¤ §OK§
¤ q Telephony ¤ §OK§
¤ q Music on hold
¤ §OK§ (‰ = on)
49
Gigaset E310/E310A (Panther) / MEA EN / A31008-M2301-A601-1-UZ19 / T-NetBox-registration.fm /
Setting the base
Repeater support
Changing the system PIN
You can increase the range and signal strength of the base using a
repeater. You will need to activate
repeater mode. This will terminate
any calls that are in progress at the
time.
§Menu§ ¤ q Settings ¤ §OK§
¤ q System ¤ §OK§
¤ q Repeater Mode
¤ §OK§ (‰ = activated)
You can change the base's 4-digit
default system PIN ("0000") to a 4digit PIN known only to yourself.
Gigaset E310A: Setting a system PIN
enables remote operation of the
answering machine (¢ page 39).
§Menu§ ¤ q Settings ¤ §OK§
¤ q System ¤ §OK§
¤ q System PIN ¤ §OK§
¤ System PIN:
~ (Enter current system PIN) ¤ §OK§
¤ New PIN:
~ (Enter new system PIN) ¤ §OK§
After activating or deactivating the
repeater, switch your handset off
and on again (¢ page 20).
Please note
u Eco Mode / Eco Mode+
(¢ page 41) and repeater support cancel each other out, i.e.,
if you use a repeater, you cannot use Eco Mode or Eco
Mode+.
u The default encrypted transmission setting is deactivated
when repeater mode is activated.
Protecting against
unauthorised access
Version 5, 03.04.2011
Protect the system settings of the
base with a system PIN known only
to you. You will need to enter the
system PIN when, for example, registering/de-registering a handset to/
from the base.
50
Resetting the system PIN
If you have forgotten your system
PIN, you can reset the PIN to the
original code 0000 using the button on the base. This will also reset
other settings; see the section entitled "Resetting the base to the
default settings".
Resetting the base to the
default settings
When restoring default settings:
u Individual settings are reset
u All lists are deleted
u Eco Mode and Eco Mode+ are
deactivated
The date and time are retained.
Please note
The answering machine is ready
for use approx. 15 seconds after
the base has been connected or
reset.
Gigaset E310/E310A (Panther) / MEA EN / A31008-M2301-A601-1-UZ19 / T-NetBox-registration.fm /
Operating the base on the PABX
Resetting the base via the menu
When resetting via the menu
u Handsets are still registered
u The system PIN is not reset.
§Menu§ ¤ q Settings ¤ §OK§
¤ q System ¤ §OK§
¤ q Base Reset ¤ §OK§
¤ Reset to factory settings? ¤ §OK§
Resetting the base using the
button on the base
When resetting the base using the
button on the base
u All handsets are de-registered
and
u The system PIN is reset to the original code 0000
Proceed as follows:
¤ Remove the mains cable from the
base.
¤ Hold down the registration/paging key ù on the base (¢ page 2)
while reconnecting the power
cable to the base. Hold the key
down for at least 5 seconds.
Version 5, 03.04.2011
Please note
All handsets are de-registered
and must be re-registered. All settings are reset to the default settings.
Operating the base on
the PABX
The following settings are only necessary if your PABX requires them;
see the PABX user manual.
Changing the dialling mode
§Menu§ ¤ P#Q5#11
¤ Enter the digit for the dialling
mode: Q = tone dialling (DTMF);
1 = pulse dialling (PD) ¤ §OK .
Temporarily switching to
tone dialling (DTMF)
If your PABX still operates with pulse
dialling (PD), but you need tone dialling for a connection (e.g., to listen
to the network mailbox), you must
switch to tone dialling for the call.
Prerequisite: You are conducting a
call or have already dialled an external number.
¤ Press the star key P.
Tone dialling is now activated for
this call only.
Setting recall
§Menu§ ¤ P#Q5#12
¤ Enter digits for recall:
Q = 80 ms; 1 = 100 ms;
2 = 120 ms; I = 400 ms;
4 = 250 ms; 5 = 300 ms;
L = 600 ms; M = 800 ms ¤ §OK .
51
Gigaset E310/E310A (Panther) / MEA EN / A31008-M2301-A601-1-UZ19 / T-NetBox-registration.fm /
Operating the base on the PABX
Changing the pause after line
seizure
You can set the length of the pause
inserted between pressing the talk
key c and transmitting the phone
number.
§Menu§ ¤ P#Q5#1O
¤ Enter digit for the current
pause length:
1 = 1 second
2 = 3 seconds
I = 7 seconds ¤ §OK .
Version 5, 03.04.2011
Changing the pause after recall key
§Menu§ ¤ P#Q5#14
¤ Enter digit for the current
pause length:
1 = 800 ms;
2 = 1600 ms;
I = 3200 ms ¤ §OK .
52
Gigaset E310/E310A (Panther) / MEA EN / A31008-M2301-A601-1-UZ19 / appendix.fm / 11.05.2012
Customer Service & Assistance
Customer Service & Assistance
Do you have any questions? As a Gigaset customer, you can find help quickly
in this User Manual and in the service section of our Gigaset online portal
www.gigaset.com/service.
In our constantly updated online service you can find:
u Extensive information about our products
u FAQ compilations
u Keyword search to help find topics quickly
u Compatibility database: Find out which base stations and handsets can be
combined.
u Product comparison: Compare the features of several products with each
other.
u Downloads for user manuals and current software updates
u E-mail contact form for customer service
Version 5, 03.04.2011
Please register your phone online right after purchase.
This enables us to provide you with even better service regarding questions or
an after sales query/issue/claim. In order to contact our customer service via
email, please use the email contact form from our Gigaset online portal after
selecting your home country.
Our representatives are also available on the telephone hotlines for consultation.
53
Gigaset E310/E310A (Panther) / MEA EN / A31008-M2301-A601-1-UZ19 / appendix.fm / 11.05.2012
Customer Service & Assistance
Customer Service & Assistance
Australia. . . . . . . . . . . . . . . . . . . . . . . 1300 780 878
Austria . . . . . . . . . . . . . . . . . . . . . 0043 1 311 3046
Bahrain. . . . . . . . . . . . . . . . . . . . . .97 31 73 11 173
Belgium . . . . . . . . . . . . . . . . . . . . . . . 0 78 15 66 79
Bosnia Herzegovina. . . . . . . . . . . . . 033 276 649
Brazil . . . . . . . . . . . . . . . . . . . . . . . . . . . . . 4003 3020
(grandes cidades e regiões metropolitanas Custo de uma ligao local)
. . . . . . . . . . . . . . . . . . . . . . . . . . . . . .0800 888 3020
(demais localidades - Gratuito)
Bulgaria . . . . . . . . . . . . . . . . . +359 2 9710666
(0.50 евро на минута от всички държави за
стационарни телефони. За обаждания от
мобилни телефони може да има други цени).
Canada. . . . . . . . . . . . . . . . . . . . . .1-866 247-8758
China . . . . . . . . . 0 21 400 670 6007 (RMB 0.11)
Croatia . . . . . . . . . . . . . . . 01 2456 555 (0,23 Kn)
Czech Republic . . . . . . . . . . . . . . . . . 233 032 727
Denmark . . . . . . . . . . . . . . . . +45 (0) 35 25 86 00
Finland . . . . . . . . . . . . . . . . . . . . . . . 09 231 134 25
France. . . . . . . . . . . . . . . . . . . +33 170 706 181
Coût d’un appel local depuis une ligne fixe
Orange.
Germany . . . . . . . . . . . . . . . . . . . . .01805 333 222
Der Anruf kostet Sie aus den deutschen Festnetzen 0,14 € pro Minute. Anrufe aus den deutschen Mobilfunknetzen kosten höchstens 0,42
€ pro Minute.
Greece . . . . . . . . . . . . . . . . . . . . . .801-100.0.500
(Χρέωση 0,0031 € το λεπτό για το σταθερό
δίκτυο της Ελλάδας. Για κλήσεις από κινητό
ίσως ισχύουν άλλες χρεώσεις)
Hong Kong . . . . . . . . . . . . . . . . . . . . . . . 2763 0203
. . . . . . . . . . . . . . . . . . . . . . . . . . . . . . . . . . 2389 7285
Hungary. . . . . . . . . . . . . . . . . 01 267 21 09 (27 Ft)
India . . . . . . . . . . . . . . . . . . . . Please refer to your
. . . . . . . . . . . . . . . . . . . . . . . . . local warranty card
Indonesia . . . . . . . . . . . . . . . . . . (62-21) 5673813
. . . . . . . . . . . . . . . . . . . . . . . . . .(62-21) 888856000
Ireland . . . . . . . . . . . . . . . . . . . . . . . 18 50 77 72 77
Italy. . . . . . . . . . . . . . . . . . . . . . . . 199.15.11.15
(€ cent 8,36 + IVA al minuto da telefono fisso
della rete Telecom Italia senza scatto alla risposta mentre per le chiamate effettuate attra-
verso la rete di altri operatori fissi o mobili consultate le tariffe del vostro operatore)
Jordan. . . . . . . . . . . . . . . . . 00962 6 5625460/1/2
Kuwait. . . . . . . . . . . +965 -22458737/22458738
Lebanon. . . . . . . . . . . . . . . . . . . . . +9611240259/
. . . . . . . . . . . . . . . . . . . . . . . . . . . . . . +9611236110
Luxembourg. . . . . . . . . . . . . . . +352 8002 3811
Malaysia . . . . . . . . . . . . . . . . . . . . +603-8076 9696
Malta . . . . . . . . . . . . . . +390 2360 46789 (0,10 €)
Mexico
. . . 01800 999 4442738 (01800 999 GIGASET)
Netherlands . . . . . . . . . . . . . . . 0900-3333102
(0,25 € per minuut (vast net). Voor oproepen uit
het mobiele netwerk kunnen andere prijzen
gelden.)
New Zealand . . . . . . . . . . . . . . . . . .0800 780 878
Norway . . . . . . . . . . . . . . . . . . . . . .22 70 84 00
(Oppstartskostnad 89 øre + 15 øre pr. minutt fra
fasttelefon. For samtaler fra mobiltelefon
gjelder egne priser.)
Oman . . . . . . . . . . . +968 709281 Ext. 49/21/75
Poland. . . . . . . . . . . . . . . . . . . . . . . . . . 801 140 160
Portugal . . . . . . . . . . . . . . . .(351) 808 781 223
(custo de uma chamada local)
Qatar . . . . . . .00974 4257777 / 00974 4257844
Romania. . . . . . . . . . . . . . . . . . +40 021 204 9130
Russia . . . . . . . . . . . . . . . . . . . . . . 8 (495) 2281312
Saudi Arabia . . . . . . 00966 2 6500282 Ext. 209
Serbia . . . . . . . . . . . . . . . . . . . . . . . . .0800 222 111
Singapore . . . . . . . . . . . . . . . . . . . . . . . .6735 9100
Slovak Republic . . . . . 02 59 68 22 66 (4,428 sk)
Slovenija . . . . . . . . . . . . . . . . . . . . . . . 01 5466511
South Africa . . . . . . . . . . . . . . . +2711 46 13 181
Spain . . . . . . . . . . . . . . . . . . . . . . . . . . . 902 103935
Sweden . . . . . . . . . . . . . . . . . . . . . . . . .87 50 99 11
Switzerland . . . . . . . . . . . . . . . . . . . .0848 212 000
Taiwan . . . . . . . . . . . . . . . . . . . . . . . .02 266 24343
Turkey . . . . . . . . . . . . . . . . . . . . . . . 0216 459 98 59
Ukraine . . . . . . . . . . . . . . . . . . +380-44-451-71-72
United Arab Emirates . . . . . . . +97144458255/
. . . . . . . . . . . . . . . . . . . . . . . . . . . . . +97144458254
United Kingdom . . . . . . . . . . . . 0 84 53 67 08 12
USA . . . . . . . . . . . . . . . . . . . . . . . . 1-866 247-8758
Vietnam . . . . . . . . . . . . . . . . . . . . . . .1900 545 416
Version 5, 03.04.2011
Please have your record of purchase ready when calling. After sales service is not offered in countries
where our product is not sold by authorised dealers.
54
Gigaset E310/E310A (Panther) / MEA EN / A31008-M2301-A601-1-UZ19 / appendix.fm / 11.05.2012
Manufacturer warranty (Middle East)
Manufacturer warranty (Middle East)
On the purchase of your new Gigaset product, we guarantee that this equipment is a genuie manufacturer’s product and extend the following warranty:
We guarantee this product against manufacturing defects for two full years
from the date of purchase, unless specified otherwise.
Adaptors and batteries for cordless phones carry 6 months warranty from the
date of purchase.
Version 5, 03.04.2011
Gigaset Communications authorized Service Centres will replace or repair, if
necessary, any defective part/parts free of charge by presenting this certificate
of warranty at the Service Centre mentioned overleaf.
This Certificate of warranty does not apply if the telephone has:
1. Been misused, mishandled, willfull damaged, neglected, damaged by lightning, improperly repaired, tested, altered improperly in any way.
2. A defect arising out of any failure to follow instructions either in the manual
or product specification.
3. In case repairs are carried out of by unauthorized personnel or unauthorized source warranty will be void.
4. A defect arising from using non-Gigaset approved accessories or ancillary
items attached to or in connection with the telephone.
5. If this certificate of warranty is not signed and stamped by the authorised
distributor.
6. Any other claim resulting out of or in connection with the device shall be excluded from this warranty.
For Southern Africa:
In the event of an after-sales issue/warranty claim please refer back to your
point of purchase.
Proof of purchase (receipt) has to be submitted.
55
Certificate of warranty (Middle East)
The warranty is not valid if it is not signed and stamped by the authorized distributor.
Please fill in the following details and stamp the card to validate the warranty.
All details must be filled in by the dealer and retained by the customer.
This warranty shall apply to products purchased in the Middle East only.
Customer’s Name: _______________________________________________
Product / Model: ________________________________________________
Dealer’s Name: __________________________________________________
Date of Purchase: ________________________________________________Invoice / Cash Memo Details:_______________________
______________________________________________
Dealer’s Stamp
56
Version 5, 03.04.2011
Gigaset E310/E310A (Panther) / MEA EN / A31008-M2301-A601-1-UZ19 / appendix.fm / 11.05.2012
Manufacturer warranty (Middle East)
Gigaset E310/E310A (Panther) / MEA EN / A31008-M2301-A601-1-UZ19 / appendix.fm / 11.05.2012
Service Centres (Midde East)
Service Centres (Midde
East)
UAE
Customer Service Hotline UAE
TEL: 00971-4-4458255 / 00971-4-4458254
Service Collection Point
www.technocare-prodigy.com
KARAMA
Sea Shell Electronics
Opp. Karama Centre
Dubai, UAE
Tel: 00971-4-3979228
Fax: 00971-4-3966205
Deira
Souvenier Mobiles,
Omar Bin Katab Road,
Oppst. Gulf Peral hotel (Tahir Hotel)
Al Baraha Street,
Tel: 00971-4-2731910 / 00971-4-2737377
Sharajah
Hotline Telecom
Sahara Centre
Sharjah, UAE
Tel: 00971-6-5312126
Al Ain
Phone Station
Al Ain Mall, Town Centre,
Tel: 00971-3-7515588
Fujairah
Al Manzil,
Al Gurfa Street,
Main market Road,
Tel: 00971-9-2233488
Version 5, 03.04.2011
Oman
National Telephone Services Co. LLC
P.O. Box 2786 PC:112, Sultanate of Oman
Tel: +968-709281 Ext. 45/21/75
Fax: +968-791013
E-mail: [email protected]
Qatar
Modern Home,
51-East - Salwa Road,
Al-Maha Complex, Doha
Tel: 00974-4257844 / 00974-4257777
Fax: 00974-4314700
Bahrain
Authorized Service Center,
Bldg: 211, Rd: 339, Block: 321,
Old Place Road, Manama,
Tel: 00973-17311173
E-mail: [email protected]
Saudi Arabian Service Centers:
Ahmed Abdulwahed Trading Co.
Jeddah Service Center
Al-Amal Plaza, Hail Street,
Jeddeh, Saudi Arabia,
Tel: 02-6500282 Ext. 209
Riyadh Service Center
Olaya Street
Riyadh, Saudi Arabia,
Tel: 01-4622470 / 4623850
Khobar Service Centre
Al-Khobar Street,
Al-Khobar, Saudi Arabia,
Tel: 03-8944193/03-8952359
Madina Munawara
Al-Ayon Street,
Tel: 00966-4-8387931
Khamis Mushyat
Al-Khalidiya St.,
Tel: 00966-7-2230772
Tabuk
Main Street,
Tel: 00966-4-4219232
57
Gigaset E310/E310A (Panther) / MEA EN / A31008-M2301-A601-1-UZ19 / appendix.fm / 11.05.2012
Service Centres (Midde East)
Kuwait
Customer Service Hotline Kuwait
Tel: 00965-22458737 / 00965-22458738
Al-Baptain Service Center
Shop #: 247
Qibla, Block 11,
Avenue 11,
Souk al Kabeer,
Fahad Al Salem Street,
Tel: 00965-2464993
Jordan
SEDR Home & office Electronics
Co - Tronicom
Wasfi Al-Tal St.,
Building No. 80,
2nd floor,
Tel: 00962-6-5625460/1/2
Lebanon
306, Jdeideh Sin el Fil Blvd,
Tel: 00961-1240259 / 00961-1236110
Questions and answers
Version 5, 03.04.2011
If you have any questions about the
use of your phone, you can contact
us at www.gigaset.com/service
for assistance 24/7.
In addition, the following table provides troubleshooting assistance.
The display is blank.
1. The handset is not activated.
¤ Press and hold the end call
key a.
2. The battery is empty.
¤ Charge or replace the battery
(¢ page 13).
58
"Base" flashes in the display.
1. The handset is outside the range
of the base.
¤ Move the handset closer to the
base.
2. The range of the base is reduced
because Eco Mode is activated.
¤ Deactivate Eco Mode
(¢ page 41) or reduce the distance between the handset
and base.
3. The base is not activated.
¤ Check the base power adapter
(¢ page 11).
"Place handset into base" or
"Register Handset" flashes in the
display.
The handset has not been registered with the base or has been deregistered.
¤ Place the handset in the base
(automatic registration, may take
up to 5 minutes) or register the
handset manually (¢ page 43).
The handset does not ring.
1. The ringer melody is deactivated.
¤ Activate the ringer melody
(¢ page 48).
2. The phone only rings if the phone
number has been transferred.
¤ Activate the ringtone for
unknown calls (¢ page 48).
Gigaset E310/E310A (Panther) / MEA EN / A31008-M2301-A601-1-UZ19 / appendix.fm / 11.05.2012
Service Centres (Midde East)
Version 5, 03.04.2011
You cannot hear a ringer/dialling
tone from the fixed line.
The phone cord supplied has not
been used or has been replaced by
a new cord with the wrong pin connections.
¤ Please always use the phone cord
supplied or ensure that the pin
connections are correct when
purchasing from a retailer
(¢ page 63).
Each incoming call resets the date/
time incorrectly.
The date and time are sent via e.g.,
your network provider, a router or
PABXs during calling line display.
This data may be incorrect.
¤ Set the date/time correctly e.g.,
on the router or PABX.
¤ Do not automatically copy the
date/time ¢ page 17.
The connection always terminates
after approx. 30 seconds.
Repeater activated/deactivated
(¢ page 50).
¤ Activate/deactivate the handset
(¢ page 20).
When you try to activate Eco Mode
/ Eco Mode+, "Not possible!"
appears in the display.
¤ A handset is registered to the
base that does not support Eco
Mode+.
¤ You use a repeater. Eco Mode /
Eco Mode+ and repeater support
cancel each other out.
Error tone sounds after system PIN
prompt.
You have entered the wrong system
PIN.
¤ Reset the system PIN to 0000
(¢ page 50).
Forgotten system PIN.
¤ Reset the system PIN to 0000
(¢ page 50).
The other party cannot hear you.
You pressed the mute key v during a call. The handset is "muted".
¤ Unmute the microphone
(¢ page 28).
The number of the caller is not displayed although CLIP has been
set.
Calling Line Identification is not
enabled.
¤ The caller should ask the network provider to enable Calling
Line Identification (CLI).
Refer to the notes on calling line display (¢ page 27).
You hear an error tone when keying an input.
Action has failed/invalid input.
¤ Repeat the process.
Read the display and refer to the
user guide if necessary.
You cannot listen to messages on
the network mailbox.
Your PABX is set to pulse dialling.
¤ Set your PABX to tone dialling
(¢ page 51).
59
Gigaset E310/E310A (Panther) / MEA EN / A31008-M2301-A601-1-UZ19 / appendix.fm / 11.05.2012
Environment
Gigaset E310A only:
No time is specified for a message
in the calls list.
Date/time have not been set.
¤ Set the date/time (¢ page 15).
During remote operation the
answering machine does not
respond to key 9.
The system PIN is still set to 0000.
¤ Set the system PIN to something
other than 0000 (¢ page 50).
The answering machine reports
"Incorrect PIN!" during remote
operation.
You have entered the wrong system
PIN. The connection is terminated.
¤ Call answering machine again.
The answering machine will not
record any messages/stopps the
recording of a personal announcement.
The memory is full.
¤ Delete old messages.
¤ Play back and delete new messages (¢ page 36).
Version 5, 03.04.2011
Exclusion of liability
Some displays may contain pixels
(picture elements) which remain
activated or deactivated. This is
completely normal and does not
indicate a fault.
60
Authorisation
This device is intended for analogue phone
lines outside the European Economic Area
(with the exception of Switzerland) depending on national type approval.
Country-specific requirements have been
taken into consideration.
We, Gigaset Communications GmbH,
declare that this device meets the essential
requirements and other relevant regulations
laid down in Directive 1999/5/EC.
A copy of the Declaration of Conformity is
available at this Internet address:
www.gigaset.com/docs
Environment
Our environmental mission
statement
We, Gigaset Communications
GmbH, bear social responsibility
and are actively committed to a better world. Our ideas, technologies
and actions serve people, society
and the environment. The aim of our
global activity is to secure sustainable life resources for humanity. We
are committed to a responsibility for
our products that comprises their
entire life cycle. The environmental
impact of products, including their
manufacture, procurement, distribution, utilisation, service and disposal, are already evaluated during
product and process design.
Gigaset E310/E310A (Panther) / MEA EN / A31008-M2301-A601-1-UZ19 / appendix.fm / 11.05.2012
Appendix
Further information on environmentally friendly products and processes is available on the Internet at
www.gigaset.com.
Environmental management
system
Version 5, 03.04.2011
Gigaset Communications GmbH is certified pursuant to the
international standards EN 14001 and
for the environment and human
health. They are a prerequisite for
the re-use and recycling of used
electrical and electronic equipment.
For further information on disposing of your used equipment, please
contact your local authority or your
refuse collection service.
Appendix
ISO 9001.
ISO 14001 (Environment): Certified
since September 2007 by TüV SÜD
Management Service GmbH.
ISO 9001 (Quality): Certified since
17/02/1994 by TüV SÜD Management Service GmbH.
Wipe the unit with a damp cloth or
an antistatic cloth. Do not use solvents or microfibre cloths.
Never use a dry cloth; this can cause
static.
Disposal
Contact with liquid
Batteries should not be disposed of
in general household waste.
Observe the local waste disposal
regulations, details of which can be
obtained from your local authority.
All electrical and electronic products
should be disposed of separately
from general household waste
using designated local authority
sites.
If a product displays
this symbol of a
crossed-out rubbish
bin, the product is
subject to European
Directive 2002/96/EC.
Correct disposal and
separate collection of
used equipment will help to prevent
potential negative consequences
Caring for your telephone
!
If the handset has come into contact
with liquid:
1. Deactivate the handset and remove the battery immediately.
2. Allow the liquid to drain from the
handset.
3. Pat all parts dry, then place the
handset with the battery compartment open and the keypad
facing down in a dry, warm place
for at least 72 hours (not in a microwave, oven etc.).
4. Do not switch on the handset
again until it is completely dry.
When it has fully dried out, you will
usually be able to use it again.
61
Gigaset E310/E310A (Panther) / MEA EN / A31008-M2301-A601-1-UZ19 / appendix.fm / 11.05.2012
Appendix
Specifications
Batteries
Technology: Nickel-metal-hydride
(NiMH)
Size:
AAA (Micro, HR03)
Voltage:
1.2 V
Capacity:
550 - 1000 mAh
The device is supplied with two
approved batteries.
Handset operating times/
charging times
Your handset can charge batteries
up to a capacity of 1000 mAh. Using
special high-performance batteries
or batteries with high capacities is
not recommended for cordless
phones.
The operating time of your Gigaset
depends on the capacity and age of
the batteries and the way it is used.
(Standby times/talktimes/operating
times are maximum possible times,
charging times are typical values.)
Version 5, 03.04.2011
Capacity (mAh)
approx.
550 700 800
Standby time
190/ 220/ 255/
(hours) *
153 176 203
Talktime (hours) 17 20 23
62
1000
310/
250
28
Operating time
for 1.5 hrs of calls
per day (hours) **
- Without
110 130 150 185
- With
85 95 110 135
Eco Mode+
Charging time in 6.5 7.5 8.5 11
base (hours)
Charging time in 6
7
8
9.5
charger (hours)
* Without/with display backlight
** Without display backlight
(Backlight ¢ page 46)
Due to the constant progression in
battery development, the list of recommended batteries in the FAQ section of the Gigaset Customer Care
pages is updated regularly:
www.gigaset.com/service
Base power consumption
E310
E310A
In standby
mode *
approx.
0.6 W
approx.
0.6 W
Base in standby
mode **
< 0.4 W
< 0.4 W
During a call
approx.
0.5 W
approx.
0.6 W
* Charged handset in base
** Handset not in base
Gigaset E310/E310A (Panther) / MEA EN / A31008-M2301-A601-1-UZ19 / appendix.fm / 11.05.2012
Appendix
General specifications
DECT standard
Supported
GAP standard
Supported
No. of channels
60 duplex channels
Radio frequency
range
1881MHz1897MHz
Duplex method
Time multiplex,
10 ms frame length
Repeat frequency 100 Hz
of the transmission
pulse
Length of the
370 μs
transmission pulse
Channel grid
1728 kHz
Bit rate
1152 kbit/s
Modulation
GFSK
Language code
32 kbit/s
Transmission
power
10 mW
average power
per channel,
250 mW pulse
power
Range
Up to 300 m outdoors, up to 50 m
indoors
Base power supply 230 V ~/50 Hz
Ambient condi+5°C to +45°C, 20%
tions for operation to 75% relative
humidity
Dialling mode
DTMF (tone dialling)/PD (pulse
dialling)
Pin connections on the
telephone jack
1
2
3
4
5
6
unused
unused
a
b
unused
unused
Writing and editing
names
The following rules apply when writing names:
u Each key between Q and O is
assigned several letters and characters.
u Control the cursor with u v.
u Characters are inserted at the cursor position.
u Press the display key §Del.§ to
delete the character before the
cursor.
u The first letter of the name is automatically capitalised and then followed by lower case letters.
Setting upper/lower case or
digits
Repeatedly press the hash key # to
change the text input mode.
123 Digits
Abc Upper case *
abc
Version 5, 03.04.2011
4
5
6
3
2
1
Lower case
* First letter in capitals, all others in
lower case
63
Gigaset E310/E310A (Panther) / MEA EN / A31008-M2301-A601-1-UZ19 / appendix.fm / 11.05.2012
Appendix
Writing names
Persian
Standard characters
1x 2x 3x 4x 5x 6x 7x 8x 9x 10x11x12x13x14x15x16x
€
b
e
h
k
n
q
u
x
.
/
£
c
f
i
l
o
r
v
y
,
(
#
$
2
3
4
5
6
s
8
z
?
)
@
¥
ä
ë
ï
¤
á à â ã ç
é è ê
í ì î
ö
7
ü
9
!
<
\
ñ ó ò ô õ
ß
ú ù û
ÿ ý æø å
2)
0 + - : ¿ ¡ “ ‘ ; _
= >%
& §
1) Space
2) Line break
1) Space
2) Line break
Arabic
1x 2x 3x 4x 5x 6x 7x 8x 9x 10x 11x 12x 13x 14x
Version 5, 03.04.2011
,
1) Space
2) Line break
64
a b c
d e f
i
k l
o
q r s
t u v
x y z
+ - : “ ‘
> %
h
j
n
p
,.
1
$
2
I
4
g
5
L
m
M
N
O
w
2)
Q 1) .
!
P * / ( ) < =
#
# @ \ &
1
$
2
I
4
g
5
L
m
M
N
O
w
2)
Q 1) .
!
P * / ( ) < =
#
# @ \ &
,
1 1
2 a
Id
4g
5 j
Lm
Mp
N t
Ow
Q 1)
P *
#
1x 2x 3x 4x 5x 6x 7x 8x 9x 10x 11x 12x 13x 14x
_
a b c
d e f
i
k l
o
q r s
t u v
x y z
+ - : “ ‘
> %
h
j
n
p
,.
Enter the individual letters/characters by pressing the corresponding
key.
Briefly press the key several times in
succession to select the required letter/character.
_
Gigaset E310/E310A (Panther) / MEA EN / A31008-M2301-A601-1-UZ19 / accessories.fm / 10.05.2012
Accessories
Accessories
Upgrade your Gigaset to a cordless PABX.
Gigaset E310H handset
u Hear whom the call is for with VIP ringtones
u Handsfree operation with brilliant voice quality
u Hearing aid compatible (HAC)
u High-contrast, large b/w display
u Battery charge status and reception signal indicator
u Large font for outstanding legibility
u Green illuminated handsfree key
u High-quality, large, illuminated and clear keypad
u Directory for 150 entries
u Automatic redialling of the last 10 numbers
u Talk/standby time of up to 20/240 hours
u Standard batteries
www.gigaset.com/gigasete310h
Gigaset repeater
The Gigaset repeater can be used to increase the reception range between your Gigaset handset and the base.
www.gigaset.com/gigasetrepeater
Version 5, 03.04.2011
Compatibility
You can find more information about the handset functions in connection
with the individual Gigaset bases at:
www.gigaset.com/compatibility
All accessories and batteries are available from your phone retailer.
Use only original accessories. This will avoid possible health risks
and personal injury, and also ensure that all the relevant regulations are complied with.
65
Gigaset E310/E310A (Panther) / MEA EN / A31008-M2301-A601-1-UZ19 / accessories.fm / 10.05.2012
Mounting the E310 base on the wall
Mounting the E310 base on the wall
29.6 mm
approx.
7.9 mm
Mounting the charger on the wall
21 mm
Version 5, 03.04.2011
approx.
3.5 mm
66
Gigaset E310/E310A (Panther) / MEA EN / A31008-M2301-A601-1-UZ19 / E310_E310ASIX.fm /
Index
Index
A
C
Accepting a call . . . . . . . . . . . . . . . . . . . . . 26
Access protection . . . . . . . . . . . . . . . . . . . 50
Accessories . . . . . . . . . . . . . . . . . . . . . . . . . . 65
Activating
advisory tones . . . . . . . . . . . . . . . . . . . . 48
answering machine . . . . . . . . . . . . . . . 34
auto answer . . . . . . . . . . . . . . . . . . . . . . . 46
handset . . . . . . . . . . . . . . . . . . . . . . . . . . . 20
key lock . . . . . . . . . . . . . . . . . . . . . . . . . . . 20
two-way recording . . . . . . . . . . . . . . . . 37
Adapter plug
power saving . . . . . . . . . . . . . . . . . . . . . . 41
Advisory tones . . . . . . . . . . . . . . . . . . . . . . 48
Alarm clock . . . . . . . . . . . . . . . . . . . . . . . . . . 42
Anonymous . . . . . . . . . . . . . . . . . . . . . . . . . 27
Answering machine . . . . . . . . . . . . . . . . . 34
remote operation . . . . . . . . . . . . . . . . . 39
Answering machine list . . . . . . . . . . . . . 32
Authorisation. . . . . . . . . . . . . . . . . . . . . . . . 60
Auto answer . . . . . . . . . . . . . . . . . . 26, 38, 46
Automatic network provider
preselection . . . . . . . . . . . . . . . . . . . . . 32
Calendar type . . . . . . . . . . . . . . . . . . . . . . . 46
Call
internal. . . . . . . . . . . . . . . . . . . . . . . . . . . . 44
participant listening in . . . . . . . . . . . . 44
picking up from
answering machine . . . . . . . . . . . 36
transferring (connecting). . . . . . . . . . 45
two-way recording . . . . . . . . . . . . . . . . 37
Call screening during recording . . . . . 37
Call waiting, internal call . . . . . . . . . . . . 45
Calling
externally . . . . . . . . . . . . . . . . . . . . . . . . . 26
internally . . . . . . . . . . . . . . . . . . . . . . . . . . 44
Calling Line Identification . . . . . . . . . . . 26
Calls list . . . . . . . . . . . . . . . . . . . . . . . . . . . . . 31
Changing
display language . . . . . . . . . . . . . . . . . . 14
earpiece volume . . . . . . . . . . . . . . . . . . 47
speaker volume . . . . . . . . . . . . . . . . . . . 47
system PIN . . . . . . . . . . . . . . . . . . . . . . . . 50
Character Sets . . . . . . . . . . . . . . . . . . . . . . . 64
Charge status indicator . . . . . . . . . . . . . . . 3
CLI, CLIP . . . . . . . . . . . . . . . . . . . . . . . . . . . . . 26
Confirmation tone. . . . . . . . . . . . . . . . . . . 48
Contrast . . . . . . . . . . . . . . . . . . . . . . . . . . . . . 46
Control key . . . . . . . . . . . . . . . . . . . . . . . . . 1, 5
Correcting incorrect entries . . . . . . . . . 20
Customer Care . . . . . . . . . . . . . . . . . . . . . . 53
Customer Service & Assistance . . . . . . 53
Version 5, 03.04.2011
B
Base
changing system PIN . . . . . . . . . . . . . . 50
connecting . . . . . . . . . . . . . . . . . . . . . . . . 11
operating on PABX . . . . . . . . . . . . . . . . 51
restoring default settings . . . . . . . . . 50
setting . . . . . . . . . . . . . . . . . . . . . . . . . . . . 49
setting up . . . . . . . . . . . . . . . . . . . . . . . . . 10
Battery
battery low tone . . . . . . . . . . . . . . . . . . 49
charging . . . . . . . . . . . . . . . . . . . . . . . . . . 13
display . . . . . . . . . . . . . . . . . . . . . . . . . . . . . 3
icon . . . . . . . . . . . . . . . . . . . . . . . . . . . . . . . . 3
inserting . . . . . . . . . . . . . . . . . . . . . . . . . . 12
Battery low tone. . . . . . . . . . . . . . . . . . . . . 49
D
Deactivating
advisory tones . . . . . . . . . . . . . . . . . . . . 48
answering machine . . . . . . . . . . . . . . . 34
auto answer . . . . . . . . . . . . . . . . . . . . . . . 46
handset . . . . . . . . . . . . . . . . . . . . . . . . . . . 20
key lock . . . . . . . . . . . . . . . . . . . . . . . . . . . 20
two-way recording . . . . . . . . . . . . . . . . 37
67
Gigaset E310/E310A (Panther) / MEA EN / A31008-M2301-A601-1-UZ19 / E310_E310ASIX.fm /
Index
Delete key . . . . . . . . . . . . . . . . . . . . . . . . . . . . 4
Deleting
announcement (ans. mach.) . . . . . . . 35
characters . . . . . . . . . . . . . . . . . . . . . . . . . 20
De-registering (handset) . . . . . . . . . . . . 43
Dialling
using shortcut . . . . . . . . . . . . . . . . . . . . . 29
with directory . . . . . . . . . . . . . . . . . . . . . 29
Dialling mode . . . . . . . . . . . . . . . . . . . . . . . 51
Dialling pause . . . . . . . . . . . . . . . . . 1, 26, 28
Digital clock . . . . . . . . . . . . . . . . . . . . . . . . . 46
Directory . . . . . . . . . . . . . . . . . . . . . . . . . . . . 28
opening . . . . . . . . . . . . . . . . . . . . . . . . . . . . 5
order of entries . . . . . . . . . . . . . . . . . . . . 29
saving entry . . . . . . . . . . . . . . . . . . . . . . . 28
saving first number . . . . . . . . . . . . . . . 28
selecting entry . . . . . . . . . . . . . . . . . . . . 29
sending entry/list to handset. . . . . . 30
Display
changing display language . . . .14, 45
Contrast . . . . . . . . . . . . . . . . . . . . . . . . . . . 46
in idle status. . . . . . . . . . . . . . . . . . . . . 1, 20
network mailbox message . . . . . . . . 40
number (CLI/CLIP) . . . . . . . . . . . . . . . . . 26
Screensaver . . . . . . . . . . . . . . . . . . . . . . . 46
Display keys . . . . . . . . . . . . . . . . . . . . . . . . 1, 4
Disposal . . . . . . . . . . . . . . . . . . . . . . . . . . . . . 61
Version 5, 03.04.2011
E
Earpiece
volume . . . . . . . . . . . . . . . . . . . . . . . . . . . . 47
Earpiece mode . . . . . . . . . . . . . . . . . . . . . . 28
ECO DECT . . . . . . . . . . . . . . . . . . . . . . . . . . . 41
Eco mode . . . . . . . . . . . . . . . . . . . . . . . . . . . 41
Eco mode+ . . . . . . . . . . . . . . . . . . . . . . . . . . 41
End call key. . . . . . . . . . . . . . . . . . . . . . . . 1, 26
Entering recall . . . . . . . . . . . . . . . . . . . . . . . . 1
Environment . . . . . . . . . . . . . . . . . . . . . . . . 60
Error tone . . . . . . . . . . . . . . . . . . . . . . . . . . . 49
External call . . . . . . . . . . . . . . . . . . . . . . . . . 27
divert to ans. machine. . . . . . . . . . . . . 37
68
F
Fast access
answering machine . . . . . . . . . . . .35, 40
G
General troubleshooting . . . . . . . . . . . . 58
Group call . . . . . . . . . . . . . . . . . . . . . . . . . . . 44
H
Handset
activating/deactivating . . . . . . . . . . . 20
advisory tones . . . . . . . . . . . . . . . . . . . . 48
contact with liquid . . . . . . . . . . . . . . . . 61
de-registering . . . . . . . . . . . . . . . . . .43, 50
display language . . . . . . . . . . . . . . .14, 45
earpiece volume . . . . . . . . . . . . . . . . . . 47
idle status . . . . . . . . . . . . . . . . . . . . . . . . . 20
list . . . . . . . . . . . . . . . . . . . . . . . . . . . . . . . . . . 5
locating . . . . . . . . . . . . . . . . . . . . . . . . . . . 44
muting . . . . . . . . . . . . . . . . . . . . . . . . . . . . 28
registering . . . . . . . . . . . . . . . . . . . . . . . . 43
restoring to default settings . . . . . . . 49
setting (individual) . . . . . . . . . . . . . . . . 45
setting up . . . . . . . . . . . . . . . . . . . . . . . . . 12
speaker volume . . . . . . . . . . . . . . . . . . . 47
transferring a call. . . . . . . . . . . . . . . . . . 45
using multiple. . . . . . . . . . . . . . . . . . . . . 43
Hash key . . . . . . . . . . . . . . . . . . . . . . . . . . 1, 20
Hearing aids . . . . . . . . . . . . . . . . . . . . . . . . . . 9
Help . . . . . . . . . . . . . . . . . . . . . . . . . . . . . . . . . 58
I
Icon
key lock . . . . . . . . . . . . . . . . . . . . . . . . . . . 20
ringer . . . . . . . . . . . . . . . . . . . . . . . . . . . . . 48
Idle status
display . . . . . . . . . . . . . . . . . . . . . . . . . . 1, 20
returning to . . . . . . . . . . . . . . . . . . . . . . . 20
Incorrect entries (correction) . . . . . . . . 20
Internal call . . . . . . . . . . . . . . . . . . . . . . . . . . 44
call waiting . . . . . . . . . . . . . . . . . . . . . . . . 45
Internal listening in. . . . . . . . . . . . . . . . . . 44
Gigaset E310/E310A (Panther) / MEA EN / A31008-M2301-A601-1-UZ19 / E310_E310ASIX.fm /
Index
K
Key click . . . . . . . . . . . . . . . . . . . . . . . . . . . . . 48
Key lock . . . . . . . . . . . . . . . . . . . . . . . . . . . . . 20
Keys
control key . . . . . . . . . . . . . . . . . . . . . . . 1, 5
delete key . . . . . . . . . . . . . . . . . . . . . . . . . . 4
display keys . . . . . . . . . . . . . . . . . . . . . . 1, 4
end call key . . . . . . . . . . . . . . . . . . . . . . . . 1
hash key. . . . . . . . . . . . . . . . . . . . . . . . . 1, 20
key 1 (fast access to
answering machine) . . . . 1, 35, 40
key 1 (fast access to
network mailbox) . . . . . . . . . . . . . . 1
on/off key . . . . . . . . . . . . . . . . . . . . . . . . . . 1
paging key . . . . . . . . . . . . . . . . . . . . . . . . . 2
recall key . . . . . . . . . . . . . . . . . . . . . . . . . . . 1
shortcut . . . . . . . . . . . . . . . . . . . . . . . . . . . 29
star key . . . . . . . . . . . . . . . . . . . . . . . . . . . . . 1
talk key . . . . . . . . . . . . . . . . . . . . . . . . . . . . . 1
L
Language, display . . . . . . . . . . . . . . . . . . . 14
List
answering machine list . . . . . . . . . . . . 32
calls list . . . . . . . . . . . . . . . . . . . . . . . . . . . . 31
handsets . . . . . . . . . . . . . . . . . . . . . . . . . . . 5
redial list . . . . . . . . . . . . . . . . . . . . . . . . . . 30
Listening in to a call . . . . . . . . . . . . . . . . . 44
Lock
activating/deactivating key lock . . 20
Version 5, 03.04.2011
M
Making calls
accepting a call. . . . . . . . . . . . . . . . . . . . 26
external . . . . . . . . . . . . . . . . . . . . . . . . . . . 26
internal . . . . . . . . . . . . . . . . . . . . . . . . . . . . 44
Manufacturer warranty (Middle East)55
Menu
end tone . . . . . . . . . . . . . . . . . . . . . . . . . . 49
tree. . . . . . . . . . . . . . . . . . . . . . . . . . . . . . . . 23
using . . . . . . . . . . . . . . . . . . . . . . . . . . . . . . 19
Message
copying number to the directory. . 36
playing back . . . . . . . . . . . . . . . . . . .35, 40
Message key
opening lists . . . . . . . . . . . . . . . . . . . . . . 32
Message length (ans. mach.) . . . . . . . . 38
Music on hold . . . . . . . . . . . . . . . . . . . . . . . 49
Muting the handset . . . . . . . . . . . . . . . . . 28
N
Network mailbox . . . . . . . . . . . . . . . . . . . . 40
Network provider preselection
automatic . . . . . . . . . . . . . . . . . . . . . . . . . 32
Number
displaying caller's number (CLIP) . . 26
saving in the directory . . . . . . . . .28, 30
O
On/off key . . . . . . . . . . . . . . . . . . . . . . . . . . . . 1
Operating remotely . . . . . . . . . . . . . . . . . 39
Operating steps (display) . . . . . . . . . . . . 21
Order in directory . . . . . . . . . . . . . . . . . . . 29
P
PABX
operating base on PABX . . . . . . . . . . . 51
setting dialling mode . . . . . . . . . . . . . 51
setting recall . . . . . . . . . . . . . . . . . . . . . . 51
switching to tone dialling . . . . . . . . . 51
Package contents . . . . . . . . . . . . . . . . . . . 10
Paging. . . . . . . . . . . . . . . . . . . . . . . . . . . . . 2, 44
Phone number display, notes . . . . . . . 27
PIN change
system PIN . . . . . . . . . . . . . . . . . . . . . . . . 50
Pin connections . . . . . . . . . . . . . . . . . . . . . 63
PIN, changing . . . . . . . . . . . . . . . . . . . . . . . 50
Playing back
announcement (ans. mach.) . . . . . . . 35
message (ans. mach.) . . . . . . . . . .35, 40
Power adapter. . . . . . . . . . . . . . . . . . . . . . . . 9
Power consumption . . . . . . . . . . . . . . . . . 62
Power saving adapter plug . . . . . . . . . . 41
Preselection . . . . . . . . . . . . . . . . . . . . . . . . . 32
saving, changing entry . . . . . . . . . . . . 33
Protecting phone against access . . . . 50
69
Gigaset E310/E310A (Panther) / MEA EN / A31008-M2301-A601-1-UZ19 / E310_E310ASIX.fm /
Index
Q
Questions and answers . . . . . . . . . . . . . . 58
R
Radiation
reducing . . . . . . . . . . . . . . . . . . . . . . . . . . 41
Range . . . . . . . . . . . . . . . . . . . . . . . . . . . . . . . 10
Recall key. . . . . . . . . . . . . . . . . . . . . . . . . . . . . 1
Reception booster, see Repeater
Recording
two-way recording . . . . . . . . . . . . . . . . 37
Redial list . . . . . . . . . . . . . . . . . . . . . . . . . . . . 30
Reducing energy consumption. . . . . . 41
Reducing radiation . . . . . . . . . . . . . . . . . . 41
Registering (handset) . . . . . . . . . . . . . . . 43
Repeater . . . . . . . . . . . . . . . . . . . . . . . . . . . . 50
Resetting the system PIN . . . . . . . . . . . . 50
Restoring to default settings
base . . . . . . . . . . . . . . . . . . . . . . . . . . . . . . . 50
handset . . . . . . . . . . . . . . . . . . . . . . . . . . . 49
Ringer
anonymous calls silent . . . . . . . . . . . . 48
changing . . . . . . . . . . . . . . . . . . . . . . . . . . 47
melody . . . . . . . . . . . . . . . . . . . . . . . . . . . . 47
time control . . . . . . . . . . . . . . . . . . . . . . . 48
volume . . . . . . . . . . . . . . . . . . . . . . . . . . . . 47
Ringer (Base)
changing . . . . . . . . . . . . . . . . . . . . . . . . . . 49
melody . . . . . . . . . . . . . . . . . . . . . . . . . . . . 49
time control . . . . . . . . . . . . . . . . . . . . . . . 49
volume . . . . . . . . . . . . . . . . . . . . . . . . . . . . 49
Setting . . . . . . . . . . . . . . . . . . . . . . . . . . . . . . 42
date . . . . . . . . . . . . . . . . . . . . . . . . . . . . . . . 15
recall . . . . . . . . . . . . . . . . . . . . . . . . . . . . . . 51
time . . . . . . . . . . . . . . . . . . . . . . . . . . . . . . . 15
Setting up
base . . . . . . . . . . . . . . . . . . . . . . . . . . . . . . . 10
handset . . . . . . . . . . . . . . . . . . . . . . . . . . . 12
Speaker mode . . . . . . . . . . . . . . . . . . . . . . . 27
Specifications . . . . . . . . . . . . . . . . . . . . . . . 62
Star key. . . . . . . . . . . . . . . . . . . . . . . . . . . . . . . 1
System . . . . . . . . . . . . . . . . . . . . . . . . . . . . . . 50
T
Talk key. . . . . . . . . . . . . . . . . . . . . . . . . . . . . . . 1
Telephone care . . . . . . . . . . . . . . . . . . . . . . 61
Telephone jack
pin connections . . . . . . . . . . . . . . . . . . . 63
Tone dialling . . . . . . . . . . . . . . . . . . . . . . . . 51
V
Viewing network mailbox message . 40
Volume
earpiece . . . . . . . . . . . . . . . . . . . . . . . . . . . 47
handset speaker volume . . . . . . . . . . 47
loudspeaker . . . . . . . . . . . . . . . . . . . . . . . 47
ringer . . . . . . . . . . . . . . . . . . . . . . . . . . . . . 47
W
Writing and editing names . . . . . . . . . . 63
S
Version 5, 03.04.2011
Screensaver . . . . . . . . . . . . . . . . . . . . . . . . . 46
Searching
handset . . . . . . . . . . . . . . . . . . . . . . . . . . . 44
in directory . . . . . . . . . . . . . . . . . . . . . . . . 29
Sending
directory entry to handset . . . . . . . . 30
Service Centres (Midde East) . . . . . . . . 57
70
All rights reserved. Rights of modification reserved.
Gigaset E310/E310A (Panther) / MEA EN / A31008-M2301-A601-1-UZ19 / Cover_back.fm / 02.05.2012