1
MIKAPACK 15
User Manual
Issue 1.1
Lighting Technologies
ME 3023
1106.03.023
MIKAPACK 15 USER MANUAL
CONTENT
CONTENT ............................................................................................................................................... 1 1. Generalities ................................................................................................................................... 3 1.1 Delivery - Unpacking .............................................................................................................. 3 1.2 Safety ..................................................................................................................................... 3 1.3 Description ............................................................................................................................. 4 1.3.1 Weight and dimensions ..................................................................................................... 4 1.3.2 Main Features .................................................................................................................... 4 1.3.3 Technical Specifications .................................................................................................... 4 1.3.4 Supplied with...................................................................................................................... 5 1.3.5 Options............................................................................................................................... 5 1.4 Precautions ............................................................................................................................ 6 2. FRONT PANNEL ............................................................................................................................ 7 3. Power Supply Connection and Outlet Panels ............................................................................ 8 3.1 Mains Supply .......................................................................................................................... 8 3.2 Power Supply ......................................................................................................................... 8 3.3 Outlet Panels .......................................................................................................................... 8 3.3.1 NF/CEBEC ......................................................................................................................... 8 3.3.2 Schuko ............................................................................................................................... 8 3.3.3 CEE 16 A (P17) ................................................................................................................. 8 3.3.4 Swiss.................................................................................................................................. 8 3.3.5 UK 15 A.............................................................................................................................. 8 3.4 Power Supply with screw-on terminal strip ............................................................................ 9 4. Menu Structure............................................................................................................................ 10 4.1 MENU Structure ................................................................................................................... 10 4.1.1 Top Menu items: .............................................................................................................. 10 4.1.2 Generalities ...................................................................................................................... 10 4.2 Timeout display .................................................................................................................... 10 4.2.1 Description ....................................................................................................................... 10 4.2.2 Appears............................................................................................................................ 11 4.3 Start Address ....................................................................................................................... 11 4.4 Test Dimmer ......................................................................................................................... 11 4.5 Chaser .................................................................................................................................. 12 4.6 Patch .................................................................................................................................... 12 4.7 Dimmer Law ......................................................................................................................... 13 4.8 Dimmer Preheat ................................................................................................................... 13 4.9 Dimmer Maximum Levels..................................................................................................... 14 4.10 Memories.............................................................................................................................. 14 4.10.1 PLAY ........................................................................................................................... 15 4.10.2 Edit .............................................................................................................................. 15 4.10.3 Record DMX Input ....................................................................................................... 15 4.10.4 PRIORITY.................................................................................................................... 16 4.11 If DMX Fails ......................................................................................................................... 16 4.11.1 Memory........................................................................................................................ 16 4.12 Factory Defaults ................................................................................................................... 17 4.12.1 Factory Defaults: ......................................................................................................... 17 4.13 Preferences .......................................................................................................................... 17 4.13.1 Custom Law................................................................................................................. 18 4.13.2 If DMX Fails time ......................................................................................................... 18 4.13.3 Display on / off ............................................................................................................. 19 4.13.4 Time fade memories .................................................................................................... 19 5. Maintenance ................................................................................................................................ 20 5.1 Warning ................................................................................................................................ 20 User Manual - page 1
Issue 1.1
www.adblighting.com
MIKAPACK 15 USER MANUAL
5.2 Fuses.................................................................................................................................... 20 5.3 List of Accessories and Spare Parts .................................................................................... 20 5.3.1 Spare Parts List ............................................................................................................... 20 6. Wiring digarams .......................................................................................................................... 21 6.1 6.2 7. High voltage wiring diagram ................................................................................................. 21 Low voltage wiring diagram.................................................................................................. 22 DATA CABLE............................................................................................................................... 23 7.1 7.2 7.3 Standard DMX interconnection or extension cable .............................................................. 23 Termination resistor ............................................................................................................. 23 DMX Data Connections........................................................................................................ 23 User Manual - page 2
Issue 1.1
www.adblighting.com
MIKAPACK 15 USER MANUAL
1. Generalities
1.1 Delivery - Unpacking
Upon delivery of your equipment, open the packaging carefully and examine the dimmer unit.
If you observe any damage, contact the shipping company immediately, and have your
complaint duly recorded. You may rest assured that your equipment left the factory in perfect
condition.
Check whether what you have received is in conformity with the delivery notice, and whether
the notice is in conformity with your order.
In the event of any error, contact your shipper immediately to clarify the situation and receive
full satisfaction. If you find nothing wrong, replace the material in the packing and store it in a
warm place, away from dust and humidity, while awaiting final installation. Never leave the
material on the worksite under any circumstance.
1.2 Safety
The MIKAPACK 15 is professional fully digital dimmers built in accordance with European
safety standards EN 60950 and EN 60204.
It is a Class I equipment designed and manufactured to EN 60950 and requires imperatively
a safety earth connection in compliance with local regulations.
To prevent any risk of electric shock, do not remove any cover or part of the enclosure.
Access to internal parts is not required for normal operation. Refer servicing to skilled and
trained service personnel exclusively. Disconnect from the power supply prior to opening for
inspection or service.
WARNING! LETHAL VOLTAGES ARE PRESENT INSIDE
Connection to an inappropriate power source may irreversibly damage the dimmer unit, it is
the user’s responsibility to use it for its intended purpose and to check the equipment
connected to it.
The MIKAPACK 15 is professional equipment developed with the simplicity of use in mind.
However, to obtain full benefits of the safety measures, the equipment shall be installed and
serviced by skilled and trained personnel exclusively.
Important Notice for Power Cables Power supply cables and connectors are an important
part of your equipment and contribute to its safety.
• Always use an isolator or main circuit-breaker or RCD (use the TEST button), or main
fuses to interrupt the link; never pull on the cable.
• Do not damage the cable nor the connectors in any way, check them at each installation
or at regular intervals in a permanent installation.
• Do not tie together power supply cables and signal cables.
User Manual - page 3
Issue 1.1
www.adblighting.com
MIKAPACK 15 USER MANUAL
1.3 Description
6 x 3 kW all-digital dimmer pack in 19" combining high quality with economic and above
average performance, for general purpose applications in stage and architectural lighting
whenever space, cost and reliability are the prime considerations.
1.3.1
Weight and dimensions
Dimensions (mm)
Net Weight (kg)
: 440 x 355 x 88 (19” 2U)
: 10.3
Packing
Dimensions (mm)
Gross weight (kg)
: 600 x 520 x 190
: 12.5
1.3.2
•
•
•
•
•
•
•
•
•
•
•
•
1.3.3
•
•
•
•
•
•
•
•
Main Features
4 control buttons, 2 x 8 character LCD display and user-friendly menu for easy
access to all dimmer functions.
First dimmer address selection.
Local test of a dimmer (steady or chaser).
6 pre-programmed chasers with 6 intensity levels.
Patch selectable per dimmer.
9 dimmer laws selectable per dimmer + 1 user programmable law.
Preheat selectable per dimmer.
Maximum dimmer levels selectable per dimmer.
Storage of 16 lighting cues.
Last lighting maintained in case of DMX signal interruption or loss. (cue, last DMX
values or fading out).
Return to factory defaults values.
User customization of menu items.
Technical Specifications
Power supply : 230 V / 400 V Star 3NPE, 50/60 Hz
Consumption : 27 A per phase
Power supply cable 1.5 m – 5 x 4 mm² (except for the MIKAPACK with screw-on
terminal strip)
Dimmer protection with MCB's, 1P+N
Suitable for continuous duty at 6 x 3 kW – 35 °C
TRIACS BTA41-600 - 40 Amps.
Professional filtering
Control protocol: DMX512A on XLR5, with galvanic isolation
User Manual - page 4
Issue 1.1
www.adblighting.com
MIKAPACK 15 USER MANUAL
1.3.4
•
•
•
•
1.3.5
Supplied with
instruction manual
2 brackets for 19’’ rack mounting
Kit for additional support of the MIKAPACK 15 in a 19’’ touring rack
4 rubber feet
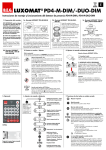
Options
1.3.5.1 Carrying handle
Carry handle to make the MIKAPACK easy portable
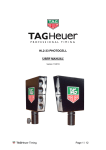
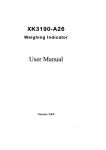
1.3.5.2 Truss clamping kit
The truss clamping kit consists out of:
a.
Plate to fix a clamp
b.
Plate to fix security cable
c.
All screws to fix both plates
b
User Manual - page 5
Issue 1.1
a
www.adblighting.com
MIKAPACK 15 USER MANUAL
1.4 Precautions
Your dimmer is equipped with a forced ventilation system, with a low-noise, high
performance fan. This allows continuous use at full rated load. For MIKAPACK, air intake
apertures are on the right side panel, and the exhaust aperture is on the left side panel. Do
never obstruct these apertures!
Keep side apertures clear for ventilation. Keep minimum 5 cm open space for ventilation.
User Manual - page 6
Issue 1.1
www.adblighting.com
MIKAPACK 15 USER MANUAL
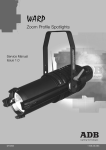
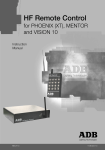
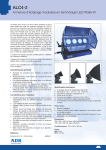
2. FRONT PANNEL
1
5
4
1.
2.
3.
4.
5.
6.
3 red LED indicators for the supply phases (L1 – L2 – L3)
2 green LED indicators for control signals ( Run and DMX)
6 green LED indicators for the dimmer channels
4 control buttons
2 x 8 character LCD display
DMX IN XLR 5 F and DMX OUT XRL 5 M connector
User Manual - page 7
Issue 1.1
www.adblighting.com
2
3
6
MIKAPACK 15 USER MANUAL
3. Power Supply Connection and Outlet Panels
3.1 Mains Supply
• Mains supply 3NPE (TN-S), 400 V, 50 / 60 Hz
• Single-phase operation possible (single-pole protected)
3.2 Power Supply
Power supply cable 1.5 m – 5 x 4 mm² except for the MIKAPACK with screw-on terminal strip
3.3 Outlet Panels
3.3.1
NF/CEBEC
3.3.2
Schuko
3.3.3
CEE 16 A (P17)
3.3.4
Swiss
Picture not available during writing manual
3.3.5
UK 15 A
Picture not available during writing manual
User Manual - page 8
Issue 1.1
www.adblighting.com
MIKAPACK 15 USER MANUAL
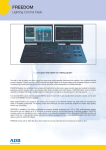
3.4 Power Supply with screw-on terminal strip
Terminal strip, 3-phase + N + PE
User Manual - page 9
Issue 1.1
www.adblighting.com
MIKAPACK 15 USER MANUAL
4. Menu Structure
4.1 MENU Structure
MIKAPACK dimmer has a rolling menu structure.
Navigation buttons:
[Enter]: allows to go inside a chosen menu item, and the confirm
the selections
[Escape]: goes always one level to the top menu
[Up] and [Down]: allows to page in the menus and to select the
data items in each menu.
4.1.1
Top Menu items:
1. Start Address
2. Test Dimmer
3. Chaser
4. Patch
5. Dimmer Law
6. Dimmer Preheat
7. Dimmer Maximum levels
8. Memories
9. If DMX Fails
10. Factory Defaults
11. Preferences
4.1.2
•
•
•
UP
Page direction for rolling Menu
DOWN
Generalities
To enter the Menu press Enter before navigating.
If a change is done inside the menus an asterix (*) will indicate that you are doing
modification(s); when pressed enter the asterix (*) will disappear and you change(s)
are saved.
By starting up the MIKAPACK the software version is shown for a short.
4.2 Timeout display
M
I
K
A
P
A
C
D
M
X
-
0
0
7
4.2.1
K
Description
First line ADB MIKAPACK
Second line text changing (1s)
• DMX 007 (PATCHED if Patched)
• PREH SET; LAW SET, MAX SET
Second line only change if a preheat or/ and a law is assigned to a dimmer.
If more than one from above, every second the texts are changing.
User Manual - page 10
Issue 1.1
www.adblighting.com
MIKAPACK 15 USER MANUAL
4.2.2
Appears
After a start up the MIKAPACK dimmer will display the timeout display.
Possibility that the display turn to black mode (off back-light) after 30 s – see Preference
Menu.
4.3 Start Address
Press [Enter]; press [Up] or [Down] until
S
T
A
D
M
X
R
T
0
A
0
T
1
Press [Enter]
S
T
A
D
M
X
R
T
0
A
0
T
1
Press [Up] or [Down] to change the DMX address {1 – 512}.
Press [Enter] to confirm the new address
Press at any moment [Escape] to undo the change.
If a patch was programmed previously START ADDRESS Menu will display:
P
A
T
C
H
E
R
A
S
E
E
D
?
Press [Enter] to erase and entering a global address.
Press at any moment [Escape] to undo the change.
Factory default - DMX address 1
4.4 Test Dimmer
Press [Enter]; press [Up] or [Down] until
T
E
S
T
Press [Enter]
B
L
I
N
K
I
N
G
Press [Up] or [Down] to select test mode
• Steady – dimmer will be steady on in test
• Blinking – dimmer will blink – 1s on / 1s off in test
Press [Enter]
D
I
M
1
V
A
L
7
0
%
Dimmer is at stage at chosen value
Press [Up] or [Down] to change the dimmer number {1 – 6}
User Manual - page 11
Issue 1.1
www.adblighting.com
MIKAPACK 15 USER MANUAL
Press [Enter] to confirm
Press [Up] or [Down] to change value {1 – FF} (default value 70%)
Press [Enter] to confirm
[Up] next dimmer on stage – same value
[Down] previous dimmer on stage – same value
Press at any moment [Escape] to exit the test function.
Re-entering Menu; values always at default value; 70%
Note: Test function includes the dimmer assignments; dimmer laws, dimmer preheats and
the dimmer maximum level.
4.5 Chaser
Press [Enter]; press [Up] or [Down] until
C
H
A
S
E
R
N
E
Press [Enter]
S
C
A
N
R
Press [Up] or [Down] to select chaser
• Fixed 30
• Fixed 50
• Fixed FF
• Scanner 1
• Scanner 2
• Scanner X
• Build-up 1
• Build-up 2
• KnightRider
Pressing the [ENTER] the selected chaser starts to play.
C
H
A
V
A
L
S
E
R
7
0
%
Press [Up] or [Down] to change level value {1 – FF} (default value 70%)
Press [Enter] to go back one level up to select different chaser.
Chaser will always disable the incoming DMX.
Press at any moment [Escape] to exit the chaser function.
4.6 Patch
Press [Enter]; press [Up] or [Down] until
P
A
T
C
H
User Manual - page 12
Issue 1.1
www.adblighting.com
MIKAPACK 15 USER MANUAL
Press [Enter]
D
I
M
1
D
M
X
0
0
1
Press [Up] or [Down] to change the dimmer number {1 – 6}
Press [Enter] to confirm
Press [Up] or [Down] to change the dimmer number {1 – 512}
Press [Enter] to confirm;
Press [Up] or [Down] to change the dimmer number ....
Press at any moment [Escape] the dimmer ask back, ENABLE the PATCH function.
Press [Enter] to enable, press [Escape] to disable. At both selections the edited parameters
are stored into the E²PROM.
Factory default - No patch – 1 to 1
4.7 Dimmer Law
Press [Enter]; press [Up] or [Down] until
D
I
M
L
A
W
I
N
Press [Enter]
D
I
M
1
L
A
W
L
Press [Up] or [Down] to change the dimmer number {1 – 6}
Press [Enter] to confirm
Press [Up] or [Down] to change the law {Lin}
1. linear rms voltage Lin
2. linear rms to 120V 120V
3. fluorescent lighting Fluo
4. square law Sqr.
5. TV TV
6. BBC BBC
7. non-dim (on at 15 %, off at 12 %) OnOf
8. Customer-defined law Cust
Press [Enter] to confirm;
Press [Up] or [Down] to change the dimmer number ....
Note: non-dim law is switching On and Off at the zero-crossing.
Press at any moment [Escape] to exit the dimmer law function.
To setup the custom law = see preference menu
Factory default - Lin
4.8 Dimmer Preheat
Press [Enter]; press [Up] or [Down] until
D
I
M
P
R
User Manual - page 13
Issue 1.1
E
H
www.adblighting.com
MIKAPACK 15 USER MANUAL
Press [Enter]
D
I
M
P
R
E
1
H
0
0
Press [Up] or [Down] to change the dimmer number {1 – 6}
Press [Enter] to confirm
Press [Up] or [Down] to change level value {00 - FF}
Press [Enter] to confirm
Press [Up] or [Down] to change the dimmer number ....
Press at any moment [Escape] to exit the dimmer preheat function.
Factory default 00% for all channels.
4.9 Dimmer Maximum Levels
Press [Enter]; press [Up] or [Down] until
D
I
M
M
A
X
Press [Enter]
D
I
M
M
A
X
1
F
F
%
Press [Up] or [Down] to change the dimmer number {1 – 6}
Press [Enter] to confirm
Press [Up] or [Down] to change level value {00 - FF}
Output = input x level (eg. Input 240V – level 90% - Maximum output = 216V)
Press [Enter] to confirm
Press [Up] or [Down] to change the dimmer number ....
Press at any moment [Escape] to exit the dimmer maximum levels function.
Factory default - FF
4.10 Memories
The MIKAPACK has 16 Memories with fade in and fade out time.
Press [Enter]; press [Up] or [Down] until
M
E
M
O
R
I
E
S
Press [Enter]
P
L
A
Y
User Manual - page 14
Issue 1.1
www.adblighting.com
MIKAPACK 15 USER MANUAL
Press [Up] or [Down] to change
1. PLAY – allows to play memory
2. EDIT – allows to create a memory
3. RECORD – allows to record the input for the 6 channels
4. PRIORITY
HTP (memory and DMX input)
No DMX (Play memory disconnect DMX input)
4.10.1 PLAY
Press [Enter]
P
L
A
Y
0
1
Press [Up] or [Down] to select the memory.
Press [Enter] to start playing the memory – fade in xx s (On the display FADE IN appears to
inform that the dimmer just fade to the selected memory).
[Escape] will stop the playing (or fading) memory and fade back to DMX in xx s till the
dimmer fade back to zero level, FADE OUT appears on the display.
(Time to fade in/out memories which marked now [xx s] see the preferences menu)
4.10.2 Edit
If memory exits; no warning to overwrite
Press [Enter]
E
D
I
T
0
1
Press [Up] or [Down] to select the memory
Press [Enter] to edit the memory
D
I
M
1
V
A
L
0
0
%
Press [Up] or [Down] to change the dimmer number {1 – 6}
Press [Enter] to confirm
Press [Up] or [Down] to change level value {00 - FF}
Press [Enter] to confirm;
Press [Up] or [Down] to change the dimmer number ....
Press at any moment [Escape] to go to edit function.
4.10.3 Record DMX Input
If memory exits; no warning to overwrite
Press [Enter]
R
E
C
0
1
Press [Up] or [Down] to select the memory
Press [Enter] to record the memory (On the display appears done ... text)
User Manual - page 15
Issue 1.1
www.adblighting.com
MIKAPACK 15 USER MANUAL
Press at any moment [Escape] to go to the record dmx input function.
4.10.4 PRIORITY
For all memories
Press [Enter]
P
R
I
H
T
P
O
R
I
T
Y
Press [Up] or [Down] to change
1. HTP
2. NO DMX
Press [Enter] to confirm selection.
Press at any moment [Escape] to go to priority function.
4.11 If DMX Fails
Press [Enter]; press [Up] or [Down] until
I
F
F
A
I
D
M
L
S
X
Press [Enter]
K
E
E
P
Press [Up] or [Down] to change
1. KEEP – last DMX values
2. FADE OUT – Wait 60s and fade out in 60s ( possibility to change in preferences
menu)
3. MEMORY – Play memory
Press [Enter] to confirm selection
Press at any moment [Escape] to go to if dmx fails function.
4.11.1 Memory
Memory will open submenu
M
E
M
0
1
Press [Up] or [Down] to select the memory
Press [Enter] to select the memory
Press at any moment [Escape] to go to the memory function .
Default value: KEEP
User Manual - page 16
Issue 1.1
www.adblighting.com
MIKAPACK 15 USER MANUAL
4.12 Factory Defaults
Press [Enter]; press [Up] or [Down] until
F
A
C
T
O
R
Y
D
E
F
A
U
L
T
S
Press [Enter]
C
L
E
A
R
Press [Up] or [Down] to change the dimmer number {CLEAR}
1. CLEAR – Factory default without deleting preferences and Memories
2. CLEAR MEM – Deleting All Memories
3. CLEAR ALL – Factory default with deleting preferences and Memories
Press [ENTER]
C
L
E
A
R
C
O
N
F
I
R
M
?
Press [ENTER] to confirm Clear operation
Press at any moment [Escape] to go to the clear function.
4.12.1 Factory Defaults:
Global Address
1
Test Dimmer
Value 70%
Chaser
Value 70%
Patch
1 to 1
Dimmer Law
LIN – custom LIN
Dimmer Preheat
No Preheat (00%)
Dimmer Maximum levels
FF
IF DMX FAILS
KEEP ( FADE wait 60s fade 60s)
Memories
Fade out 5s – Fade in 5s – No HTP
Display
Timeout 30s - ON
Custom LAW
LIN
4.13 Preferences
Press [Enter]; press [Up] or [Down] until
P
R
E
F
E
R
E
C
Press [Enter] [Enter] [Enter]
3 times enter within 2s will open de preferences Menu
User Manual - page 17
Issue 1.1
www.adblighting.com
MIKAPACK 15 USER MANUAL
The menu allows to setup
1. Custom law
2. If DMX Fails time
3. Display on / off
4. Time fade memories
Preferences are only deleted by resetting to factory defaults – Clear ALL option.
4.13.1 Custom Law
Press [Up] or [Down] until
C
U
S
L
A
W
Press [Enter]
D
M
X
0
0
L
A
W
0
0
Press [Up] or [Down] to change the DMX VALUE {00 – 255}
Press [Enter] to confirm
Press [Up] or [Down] to change LAW VALUE {00 - FF}
Press [Enter] to confirm;
Press at any moment [Escape] to exit the custom law function.
Factory default - LIN law
4.13.2 If DMX Fails time
Time if keep is set in the IF DMX FAILS menu
Press [Up] or [Down] until
D
E
F
I
F
D
M
X
F
A
I
L
Press [Enter]
F
A
D
E
0
0
S
W
A
I
T
0
0
S
Press [Up] or [Down] to change the fade time {00 – 99}
Press [Enter] to confirm
Press [Up] or [Down] to change the wait time {00 – 99}
Press [Enter] to confirm
Press at any moment [Escape] to go to the main Menu.
Factory Fade default – 60s
Factory Wait default – 60s
User Manual - page 18
Issue 1.1
www.adblighting.com
MIKAPACK 15 USER MANUAL
4.13.3 Display on / off
Press [Up] or [Down] until
D
I
S
P
L
A
Y
O
N
/
O
F
F
Press [Enter]
D
I
S
P
O
N
Press [Up] or [Down] to change
1. On
2. Off
If off, display will turn to black mode after time 30s (different time can be set inside this
menu)
Press [Enter] to confirm
D
I
S
P
O
F
T
I
M
E
3
0
F
Press [Up] or [Down] to change the wait time {00 – 99}
Press [Enter] to confirm
Press at any moment [Escape] to go to the main Menu.
Wait default – 30s
Display default ON
4.13.4 Time fade memories
•
•
For all memories
Also time if used in IF DMX FAILS MENU
Press [Up] or [Down] until
D
E
F
M
E
0
0
0
0
M
T
Press [Enter]
I
N
O
U
T
Press [Up] or [Down] to change the IN time {00 – 99}
Press [Enter] to confirm
Press [Up] or [Down] to change the OUT time {00 – 99}
Press [Enter] to confirm
Press at any moment [Escape] to go to the main Menu.
IN default – 5s
OUT default – 5s
User Manual - page 19
Issue 1.1
www.adblighting.com
MIKAPACK 15 USER MANUAL
5. Maintenance
5.1 Warning
Lethal voltages are used in this equipment. Refer servicing to trained personnel. Power must
be disconnected before the cover is removed.
5.2 Fuses
The internal fuses are accessible by opening the MIKAPACK. Always disconnect the power
before you open the dimmer unit or replace a fuse! Switch power off by means of the supply
isolator, supply MCB or supply RCD. Then disconnect the supply plug.
Always use fuses of the same type, size, current rating, fusing value and fault current rating
as the originals. Contact your supplier for spare parts.
5.3 List of Accessories and Spare Parts
Always use original spare parts, do not use substitutes. The original components were
selected to achieve the performance and reliability you expect of your equipment.
5.3.1
Spare Parts List
From serial number 0031 and above1
Code
Description
5021.04.010
Thyristor board
5021.04.020
Control board
5021.04.030
Interface board
5021.04.040
DMX connector board
5021.04.050
ATMEL driver board
5021.04.060
IC main software
5021.04.070
DC/DC converter
5021.04.080
Line driver
5021.04.090
Optocopler
5021.04.100
CEBEC socket
5021.04.110
SCHUKO socket
5021.04.120
SWISS socket
5021.04.130
UK socket
5021.04.140
CEE socket
5021.04.150
Circuit breaker
5021.04.160
Front handle
5021.04.170
Front plate
1
For MIKAPACK with serial number from 0001 to 0030 please contact your area sales manager.
User Manual - page 20
Issue 1.1
www.adblighting.com
MIKAPACK 15 USER MANUAL
6. Wiring digarams
6.1 High voltage wiring diagram
User Manual - page 21
Issue 1.1
www.adblighting.com
MIKAPACK 15 USER MANUAL
6.2 Low voltage wiring diagram
User Manual - page 22
Issue 1.1
www.adblighting.com
MIKAPACK 15 USER MANUAL
7. DATA CABLE
7.1 Standard DMX interconnection or extension cable
7.2 Termination resistor
The terminating resistor must be placed on the output connector of the last unit on the DMX
line.
7.3 DMX Data Connections
User Manual - page 23
Issue 1.1
www.adblighting.com
MIKAPACK 15 USER MANUAL
User Manual - page 24
Issue 1.1
www.adblighting.com
Belgium
N.V. ADB-TTV Technologies S.A.
(Group Headquarters) Leuvensesteenweg 585, B-1930 Zaventem
Tel : +32.2.709.32.11, Fax : +32.2.709.32.80, E-Mail : [email protected]
France
ADB S.A.S.
Sales Office: 92, Avenue Jean Jaurès F-92120 Montrouge
Tel : +33.1.41.17.48.50, Fax : +33.1.42.53.54.76, E-Mail : [email protected]
Factory & Group Logistics Centre: Zone industrielle Rouvroy F-02100 Saint-Quentin
Tel : +33.3.23.06.35.70, Fax : +33.3.23.67.66.56, E-Mail : [email protected]
www.adblighting.com
Lighting Technologies
M-3023-E-01r Subject to modifications
ADB - Your Partner for Light