1
Samsung Security Manager
User Manual
overview
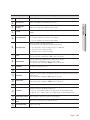
CONTENTS
OVERVIEW
2
Contents
2
5
Introduction on Samsung Security Manager
8
Main features Samsung Security Manager
9
Terms frequently used
10
Installation
GETTING STARTED
21
Checking installed installation
21
22
Getting Started with Samsung Security Manager
23
Using SSM License Manager
SSM CONFIGURATION MANAGER
28
Login/Logout
28
30
Registration
49
Assignment
51
Camera Management
55
Layout Setting
61
Schedule Setup
63
Scheduled backup
67
Event
72
Recording management
SSM CONSOLE
80
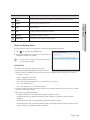
Log In / Out
80
82
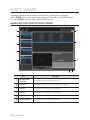
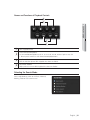
SSM Console Screen Composition
INSTALLATION
10
2_ overview
86
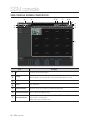
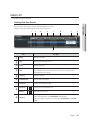
Names and Functions of Live Viewer
86
88
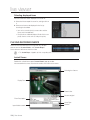
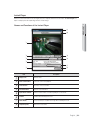
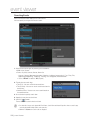
Names and Features of Screen Indicators
89
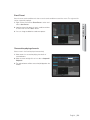
Device
92
Camera List
93
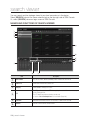
Alarm Out and Control
94
Selecting Tile Pattern
94
Layout
● OVERVIEW
LIVE VIEWER
100 Virtual Matrix Controller
103 Audio Broadcasting
104 PTZ Control
107 Event List
108 Playing Recorded Events
111 Live Video Screen
116 Digital Zoom
EVENT VIEWER
120
SEARCH VIEWER
126
120 Names and Functions of Event Viewer
121 Event Search
126 Names and Functions of Search Viewer
132 Advanced Search
136 Masking Backup
137 Folder Search
137 POS Search
138 Backup
SETTING CONSOLE
139 Setting SSM Console
139
English _3
overview
SSM SERVICE MANAGER
145 Service Manager
145
SSM RECORDING SERVER
149
SSM HA
149 SSM Recording Server ServiceManager
153 Recording Server Update Manager
155 Recording Server updates
157 HA Terminology and Installation
157
APPENDIX
164
4_ overview
164 Product Specification
167 Use Joystick
168 Open Source License Notification on the Product
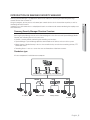
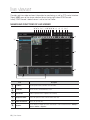
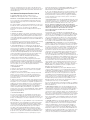
INTRODUCTION ON SAMSUNG SECURITY MANAGER
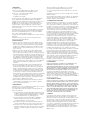
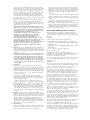
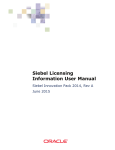
Samsung Security Manager Structure Overview
Samsung Security Manager consists of the Console program in the client area and System Manage, Media
Gateway and Recording Server in the server area.
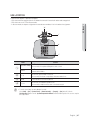
1 Console : Console provides monitoring and controlling user interface.
1 System Manager : System Manager provides administration on all devices and users of the system.
1 Media Gateway : Media Gateway's role is as the centralized relay server for the transmitting of video, PTZ
control and events.
1 Recording Server : It acts as a server that saves and broadcasts video from a camera.
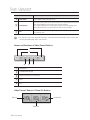
Standalone type
All server components Installed onto one computer.
Console (PC)
System Manager
Media Gateway
ENCODER
Recording Server
DVR
NVR
ALARM
HDD
NETWORK
BACKUP
REC
REC
CH1
CH2
CH3
2
3
4
6
7
8
9
0
ALARM
ALARM
ZOOM
CH2
TELE
WIDE
VIEW
MODE
AUDIO
ALARM
AUDIO OUT
VIDEO IN
IP cameras
NETWORK
NETWORK
BACKUP
BACKUP
REC
REC
PRESET
MENU
DIGTAL VIDEO RECORDER
RESET
AUDIO IN
HDD
HDD
FREEZE BACKUP SEARCH
CH4
CH1
CH1
1
5
CH3
CH4
NETWORK
Analog cameras
USB
RETURN
NETWORK
VIDEO RECORDER SRN-1670D
DVD
RECORDER
SRN - 1670D
USB
DVD RECORDER
USB
OPEN/CLOSE
OPEN/CLOSE
NETWORK VIDEO RECORDER
Analog cameras
IP cameras
English _5
● OVERVIEW
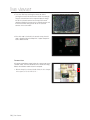
Samsung Security Manager is an application software that enables the accessing and controlling Samsung’s
network devices from a remote PC.
Using this program, you may access and control your network devices via the Internet from anywhere, as well as
monitoring connected camera.
It provides users with remote access and playback/search an environment for remote monitoring that employs ease
and effectiveness.
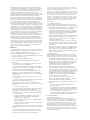
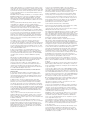
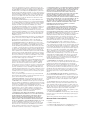
overview
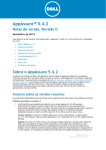
Multi type
In case of distributed installation of the System Manager, Media Gateway and Console on multiple
computers:
System Manager
IP cameras
CH1
CH2
CH3
Media Gateway
Recording Server
Media Gateway
Console (PC)
CH2
RESET
AUDIO IN
AUDIO OUT
VIDEO IN
Console (PC)
CH4
CH1
CH1
Recording Server
CH3
CH4
NETWORK
ENCODER
NVR
Console (PC)
Analog
cameras
6_ overview
DVR
Media Gateway
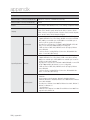
Supported Products
DVR
Network Camera
SNB-7000/5000/3000/2000/1000/1001/3002, SNZ-5200, SNO-7080R/5080R/1080R, SNC-B2335/B2331/
M300/1300/550/570, SNB-7002/7001/5001, SNO-7082RV, SNB-6004/6003, SNV-6084R, SNO-6084R,
SNB-5004 / SNB-5003, SNO-6011R, SNV-6012M, SNV-5084, SNB-7004, SNO-7084R, SNV-7084/7084R,
SNV-6013, SNB-6010
SND-7080/5080(F)/3080(F)/3080C(F)/1010/1080/1011/3082, SNV-7080/5080/3080/5010/3120/
5080R/3082/1080/1080R, SND-560/460V, SNC-B5368/B5399, SNV-7082V, SND-7082V/7082FV,
SND-6084/6083, SND-6084R, SND-7084/7084R
SNP-5200(H)/3430H/3370, 3371(TH)/3301(H)/3120(V/VH)/3302(H), SNC-C6225/C7225/C7478,
SNP-3300A/1000A/3750/3350, SNP-6200/H, SNP-5300/H, SNP-6201/H, SNP-6200RH, SNP-6320/ 6320H
SNF-7010, SNF-7010V, SNF-7010VM
NVR
SRN-6450/3250, SNR-6400/3200, SRN-1670D/470D, SRN-1671, SRN-1000, SRN-4000, SRN-472S
Encoder
SPE-400/100/101, SPE-1600R, SNS-400/100
Controller
SPC-2000
Panomorph Lens
IMV1-1/3 Panomorph CS mount (SNB-5000 compatible)
SW NVR
NET-i ware_SNS_SF064/SNS_SF032/SNS_SF016/SNS_SF008/SNS_SF004, SSMRS20/SSM-RS10/
SSM-RS00
English _7
● OVERVIEW
SRD-1670(D/DC)/1650(D/DC)/870(D/DC)/850(D/DC)/470(D)/440, SRD-1630(D)/1610(D)/830(D),
SRD-1652D/852D, SRD-480D, SVR-1670/3200/1680(C)/1660(C)/1645/960(C)/945/480, SHR-2000/
5000/6000/7000/8000 series, SVR-1650E/1640A/950E, SRD-1640/840/1641P/841P, SRD-442,
SRD-1653D/1673D, SRD-1654D/854D, SRD-473D, SRD-443, SRD-1676D/1656D, SRD-876D/476D,
SRD-1673DU, SRD-445, SRD-856/456, SRD-1680D/880D
overview
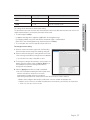
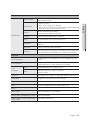
System Requirements
Item
Minimum
Recommended
CPU
Intel Core i5-4670 @ 3.40GHz
Intel Core i7-4770 @ 3.40GHz
RAM
4 GB or more
8 GB or more
HDD
More than 20 GB of free space for installation
- For operation, the system log database requires 10 GB or more free space.
OS
1. Console, Configuration Manager
- Windows 7 32bit/64bit
- Windows 8 32bit/64bit
- Windows 8.1 32bit/64bit
2. System Manager / MediaGateway
- Windows 7 32bit/64bit
- Windows 8 32bit/64bit
- Windows 8.1 32bit/64bit
- Windows Server 2008 R2 64bit
- Windows Server 2012 32bit/64bit
Configurable monitoring systems according to the system performance:
1 Minimum Specifications : Allows access to 16 channels, with monitoring 16 channels at CIF resolution.
1 Recommended Specifications : Allows access to 64 channels, with monitoring 64 channels at 4CIF
resolution.
MAIN FEATURES SAMSUNG SECURITY MANAGER
1 Live Viewer
- Supports simultaneous video display of up to 64 monitoring tiles per monitor, maximum 4 monitors for 100
monitoring tiles
- One footage file can save up to 1 hours worth of video
- Supports full-screen mode
- Place video feed at any desired tile using drag-n-drop
- A simple double-click adds a video feed to the video screen
- Supports sequenced automatic source switching
1 Event Viewer
- Provides search function for events and real-time logs
- Provides 1-channel playback for events
- Provides methods of acknowledging, recording, and search on an event
1 Search Viewer
- Up to 16 videos can be played simultaneously
- Supports periodic backup (self-executable footage)
- Search for and play the data for each event stored in the storage device
8_ overview
1 Configuration Manager
User login and restrictions according to privilege
Equipment registration and allocation
Layout setting and allocation
Scheduled backup setting
Schedule setting
Easy guide
Device configuration file
SSM configuration file
Recording Server Schedule Setting
● OVERVIEW
-
1 Console setting
- SSM console local setting
- Screen and event local setting
1 Updating
- Supports remote updating of software using update server
TERMS FREQUENTLY USED
1 Tree : Display area that shows a list of registered objects and their hierarchy.
1 Context Menu : Pop-up menus that appears when right mouse button is clicked.
1 Device : Includes DVR, NVR, Video Server, and Network Camera.
1 Tile : Unit screen cell that displays video.
1 Object : Object is an overall term for the device, camera, site, layout, sensor, etc.
1 SSM : Abbreviation of Samsung Security Manager.
English _9
installation
INSTALLATION
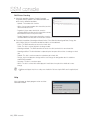
Before Starting
Setting SSM Password
The user inputs the password when installing SSM (recording Server) or registering the recording server in SSM.
The password is used for authentication to register the recording server in SSM and can be changed.
[Mandatory]
- The ID and password should not be the same.
- The password should be at least 8 digits and at most 32 digits.
- If the password is smaller than 10 digits but at least 8 digits, it should be a combination of letters, numbers and
special characters (no limitation on special characters).
- If the password is 10 digits or more, it should be combination of letters and number at the minimum.
[Optional]
- 3 or more contiguous characters cannot be used. (ex. abc or cba).
- 4 or more contiguous keyboard keys cannot be used. (ex. asdf or 4321).
- 3 or more repeated characters cannot be used (ex. 111, qqqq)
A password that violates the mandatory criteria cannot be set.
A password that violates the optional criteria may be used, but a warning message will be displayed.
The user inputs the password twice, and the password is set only when two inputs are identical.
The password is used for authentication to register the recording server in SSM and can be changed in Service Manager after the
installation.
Installing the SSM
Run the Samsung Security Manager installer program on a local PC to install the Samsung Security Manager.
Software installation requires about 20 minutes, depending on installation conditions.
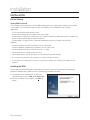
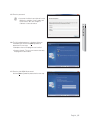
1. Use provided CD or download and run Samsung
Security Manager installer, "SSM_vx.xx_xxxxxx.exe".
2. When the installation screen appears, click [Next >]
button.
10_ installation
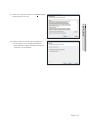
3. Check license agreement and then click [Next >] button
to proceed to the next step.
● INSTALLATION
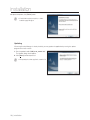
4. Choose whether to install all or partial components.
1 Install all features in this computer (Standalone) :
System Manager, Console and Media Gateway are
installed on a single computer.
English _11
installation
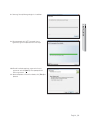
1 Install in multiple computer : Installs only selected
components of System Manager / Console / Media
Gateway onto the PC.
M
For information on complete structure according to the
installation type, refer to "Samsung Security
Manager Structure Overview". (Page 5)
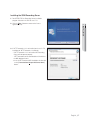
5. Specify the folder path to save the installation program.
By default, it is set to "C:₩Program Files₩Samsung".
- To change the path, click [Change...] button and enter
the desired path directly or browse to select one.
6. To proceed to the next step, click [Next >] button.
7. Click [Install] button to begin installation.
12_ installation
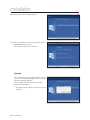
8. Samsung Security Manager begins its installation.
● INSTALLATION
9. When prompted with .NET Framework license
agreement, agree and proceed to the next step.
10. DirectX installation package, agree to the license
agreement and click [Next >] when prompted with
license agreement.
11. Upon completion of DirectX installation, click [Finish] to
proceed.
English _13
installation
12. Install PostgreSQL.
13. Enter the initial password for PostgreSQL.
M
A password should be at least 8 digits and less than
10 digits in a combination of letters, numbers and
special characters. Or it can be 10 digits in
combination of letters and numbers.
14. Continue the PostgreSQL installation.
When installation is complete, the SSM administrator
password input window is displayed.
14_ installation
15. Enter the password.
M
A password should be at least 8 digits and less than
● INSTALLATION
10 digits in a combination of letters, numbers and
special characters. Or it can be 10 digits in
combination of letters and numbers.
16. The HA installation process is displayed. Select an
installation type and click the [Next >] button to
proceed to the next step.
1 Complete selected : All programs are installed.
1 Custom selected : The user can custom select only
the programs to be installed.
17. Enter the initial SSM-HA password.
Click the [Next >] button to proceed to the next step.
English _15
installation
18. Upon completion, click [Finish] button.
M
If installed with required prerequisites, no further
installation popup will appear.
Updating
If Samsung Security Manager is already installed, you may update the application by running the update
program to the latest version.
1. Run the update installer "SSM_vx.xx_xxxxxx.exe".
The Update dialog should appear.
2. Click [Next >] button to proceed.
M
After updating the software application, restart the PC.
16_ installation
Installing the SSM Recording Server
1. Run SETUP.EXE the Recording Server installation
program included in the DVD or user's PC.
● INSTALLATION
2. Click the [Next >] button to move to the license
agreement step.
3. If .NET Framework 4.0 is not installed on the user’s PC,
installation of .NET Framework 4.0 will begin.
- If NET Framework 4.0 is not installed the Recording
Server will not operate properly.
- .NET Framework can be downloaded and installed at
the MS download center.
A In the A NET Framework S/W installation window click
on the [I have read and accept the license terms.]
button.
English _17
installation
B The installation indicator will be displayed in the
window while NET Framework is being installed.
- After finishing installing - .NET Framework 4.0, you
can restart the system depending on the PC
conditions.
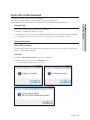
4. Installation of Sentinel Runtime begins when the dongle key driver is not installed in the user PC.
- The recording server does not run properly if Sentinel Runtime is not installed.
- The Sentinel Runtime Installation program can be downloaded from http://www.safenet-inc.com for
installation.
A Click the [Next >] button in Sentinel Runtime Installation.
5. Select a SSM-RS configuration type and click the
[Next >] button to proceed to the next step.
You can decide whether to install HA by selecting 'Custom'
installation.
6. Input the initial SSM-RS password.
Click the [Next >] button to proceed to the next step.
18_ installation
7. Click the <OK> button in the "Install HA program" dialog
box to install the HA program.
HA Server and Client can be selectively installed during the HA
installation step.
● INSTALLATION
8. The HA program installation begins.
9. The completion confirmation dialog box is displayed
after the HA program is successfully installed.
Click the <OK> button.
English _19
installation
10. Preparing to install the Recording Server.
11. When the installation has finished successfully, click on
the [Finish] button to terminate.
After installation is finished, the PC will restart.
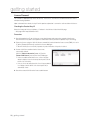
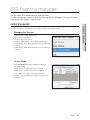
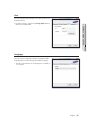
Upgrade
If the Recording Server is already installed on the PC.
You can run the upgraded program file or use Update
Manager to perform upgrades.
Click the <Yes> button to maintain the existing
database during updating.
After updating software applications, restart the PC to prevent
malfunctions.
20_ installation
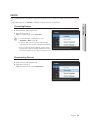
getting started
CHECKING INSTALLED INSTALLATION
SSM
● GETTING STARTED
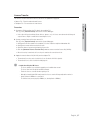
Check whether the Samsung Security Manager installation has been successfully installed.
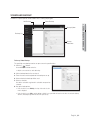
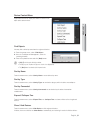
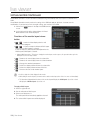
1. Click <Start> Windows menu.
2. If Samsung Security Manager has been successfully installed,
SSM submenu should show 4 items of <LicenseManager>,
<SSM Configuration Manager>, <SSM Console> and <SSM
Service Manager>.
M
For distributed installation, only those menu items selected in
installation will appear. Refer to the "Installation" section. (Page 10)
Recording Server
After finishing the installation, check if the Recording Server is installed properly.
1. Click <Start> Windows menu.
2. If the Recording Server is installed properly, you will see the
3 items, <LicenseManager>, <ServiceManager> and
<Uninstall> below the Recording Server.
When you run the program for the first time, the language for the
Recording Server is automatically set to the OS language.
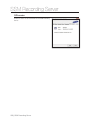
HA
Check if HA Manager was successfully installed after the installation is completed.
1. Move to the <Start> menu.
2. If HA is successfully installed, <HA Manager> sub folder is
displayed under the 'HA' folder.
English _21
getting started
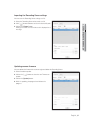
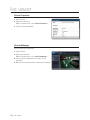
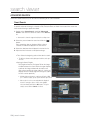
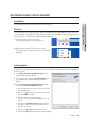
GETTING STARTED WITH SAMSUNG SECURITY MANAGER
In case of Standalone installation
1. Click <SSM Service Manager> shortcut icon or expand
and click "Start > Samsung > SSM > SSM Service
Manager".
1 SSM Service Manager : A software program that
manages server software products. To use SSM
Console, the server should be ready.
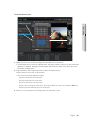
2. Double click <SSM Service Manager> icon on the task tray or click right mouse button on it to open
context menu and click <View Service Status>.
3. Click <Start Service> button.
If successfully installed, each installed program
component should show its <Service Status> as
<Started>.
4. Run the SSM Configuration Manager to utilize the SSM
Console program after the initial installation.
M
If the program is already set, Start SSM Console right away.
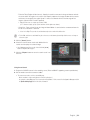
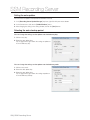
In case of multi installation
A Media Gateway server computer can connect to only 1 System Manager. A System Manager accepts
connections from multiple Media Gateway servers. A System Manager accepts connections from multiple
Console clients.
1. Run the Service Manager on the computer installed with
the System Manager. (Page 145)
2. Click <Start Service> button.
If successfully installed, the System Manager should show its
<Status> as <Started>.
3. Run the Service Manager on the computer installed with
the Media Gateway. (Page 145)
4. Run the Service Manager on the computer installed with
the Media Gateway and click <Start Service> button.
If successfully installed, the Media Gateway should show its
<Status> as <Started>.
5. Run the SSM Configuration Manager to utilize the SSM Console program after the initial installation.
M
If the program is already set, Start SSM Console right away.
22_ getting started
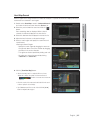
USING SSM LICENSE MANAGER
The program manages the licenses of all SSM products.
SSM License Manager supports activation, deletion and transfer of SW licenses.
It also supports the license activation of the HW dongle key used by SSM-RS and SSM-VM v1.0.
The SW license and HW dongle key license are supported.
1 SW license : Supported by SSM v1.3 or higher
1 HW dongle key license : License used by SSM-RS and SSM-VM v1.0 to maintain backward compatibility
If the SSM-RS v1.0 promotion (16ch) is used, the license activation is not needed when the update is installed.
License Activation
Online SW Activation
The online SW activation menu allows the user to activate the license if the use can access the EMS server
(license server) through a Web page.
Procedure
1. Select the [Online SW Activation] menu of License Manager.
2. Input the product key and click the [Activation] button.
3 messages are displayed when the license is activated.
English _23
● GETTING STARTED
License Type
getting started
License Server Data
https://ems.samsungsecurity.com/ems/customerLogin.html
Cases of Failed License Activation
1. When a 'Trust Failure' pops up while a user is verifying a license online: Please check the time and the
system will synchronize the Internet time. (Server : time.windows.com)
2. Failed login to the license server online: Check if Internet is connected.
3. Attempt to authenticate the license of already authenticated product key: Check if the license key was
already authenticated. An authenticated license key cannot be authenticated again.
4. Terminated license module service: Check if the ACC page can be accessed.
If not, check if the Sentinel LDK License Manager service in the service menus is stopped and start the
service.
- ACC page : http://localhost:1947
Offline SW Activation
Offline SW activation allows the user to activate the license when the user cannot access the EMS server
(license server) through the Web page.
Create a C2V file in the PC to authenticate the license and create a V2C file in the PC that has access to the
license server then authenticate the license.
Procedure
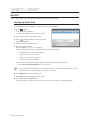
1. Select [Offline SW Activation] in the License Manager.
2. Click the [Collect information] button in the Collect Status Information menu to collect the PC data to
activate the license.
Create a C2V file with the [Collect Information] button (to collect the PC data to authenticate the license).
3. Connect to the license server Web page (EMS) from a PC that has online access to the license server.
Address : https://ems.samsungsecurity.com/ems/customerLogin.html
4. Log in with the product key provided.
5. Click the [Register Later] button in the upper right corner.
6. Click the [Offline Activation] button in the upper right
corner.
24_ getting started
7. In the Generate License popup dialog box, upload the
C2V file run in Step 1 and click the [Generate] button.
Download the generated V2C file.
Create a V2C file (license file) using the C2V file containing the
collected PC data.
● GETTING STARTED
8. Retrieve the downloaded V2C file from [Apply License
File] of the [Offline SW Activation] menu of the License
Manager. Then click 'Apply Update' to register the license
in the PC.
HW Dongle Activation
This section describes the activation of HW dongle key license.
HW dongle key : A license key supported by SSM-RS and SSM-VM v1.0
Run [HW Dongle Activation] menu of the License Manager.
To activate a HW license, the current service must be stopped before the license is activated.
After the HW license is activated, the use must restart the service manually.
Procedure
1. Stop service of the product to activate the license.
2. Select the [HW Dongle Activation] menu in the License Manager.
3. Click the [Check Hardware license information] button to check the dongle key information.
4. After checking the HW dongle key information, click the [Activation] button to activate the license.
5. Restart the stopped service.
The HW dongle key license cannot be activated remotely.
English _25
getting started
License Removal
This function is applicable only to the SW license. The menu is used when a customer demands a refund
after purchasing a product.
Upon a demand for a refund, the key ID of the purchased product is sent to the seller to delete the license.
Checking the Product Key ID
Select the feature of the key in Options > Products in the left hand side of the ACC page.
- ACC page URL: http://localhost:1947/
Procedure
1. Send the product key ID to the licenser server administrator and request the removal of the license.
Send the license key data issued upon the demand for refund. (Refer to the product key ID checking.)
2. Delete the license using the V2C file (license removal file) received from the license server (EMS). It is run in
[1] of the [Remove SW license] menu of the License Manager.
When the V2C file (license removal file) is updated, the product information of the product is deleted.
3. Create a C2V file to confirm that the license was
successfully deleted.
Click the [Collect information] button in [2] of the
[Remove SW license] menu of the License Manager.
If there are multiple authenticated licenses, a license list popup
window is displayed. Select the deleted product key and create the
C2V file of the selected key.
If only one license was authenticated, the license list popup window
is not displayed, and the C2V file of the deleted product key is
automatically created.
4. Send the created C2V file to the license administrator.
26_ getting started
License Transfer
This menu is used to transfer the license due to the PC problem or upgrade.
1 Source PC : PC of the authenticated license
Procedure
1. Create the ID file to collect the PC data in the recipient PC.
Run [1] in the [Transfer license] menu of the License Manager.
If the recipient PC has the multi byte (Korean, Chinese, Japanese, etc.), the license cannot be transferred. Change the
computer name to English or number before transferring the license.
2. Create a transfer license file in the source PC.
Run [2] in the [Transfer license] menu of the License Manager.
1. Configure the ID file created in the recipient PC in the 'Read the recipient information file'.
2. Configure the name of the transfer license file.
3. Select the license key to transfer from the license list.
4. Click the [Generate License Transfer File] button to create a transfer license file (H2H file).
When a license key is transferred, the license key to be transferred is removed from the list.
3. Apply the transfer license file (H2H file) to the recipient PC.
The transferred license key can be checked in the license list after the H2H file is uploaded.
The transferred license can be checked in the ACC page also.
J
Caution when Using the SW License
- The license activation is not needed after upgrading or re-installation after removal.
The license exists in the PC until the hard disk is formatted.
- Transfer the license to a new PC first when replacing a PC.
- When OS is reinstalled (after HDD format), transfer the license to another PC temporarily and then retrieve it.
- Actual PC instead of VMWare is recommended.
The SW license may not run properly in VMWare (ex., after duplication of VMWare).
English _27
● GETTING STARTED
1 Recipient PC : PC to receive the new license
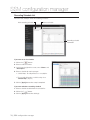
SSM configuration manager
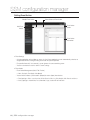
This function is used to register the SSM console users and devices, configure the screen
layout, and set up the schedule and backups.
Use <Standard Setup> to set up the whole system, or <Easy Guide> to setup only the basic
guide for monitoring.
LOGIN/LOGOUT
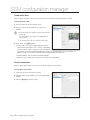
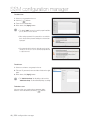
Login
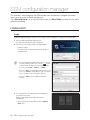
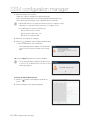
SSM Configuration Manager requires the user to log in after the program is started for normal operation.
1. Click the SSM Configuration Manager icon.
The login authentication window is displayed.
2. Enter the user ID and password in the login window.
- Default ID: admin
- Password: Enter the password registered during the
installation step.
M
If the SSM is installed in distributed mode and you need to start
] button
a program installed in another server, click the [
located below the login button in the login window to register
the server to either <Auto>, <Manual> or <DDNS>.
If it is set to <Auto>, SystemManager is automatically selected.
If it is set to <Manual>, System Manager can be selected from
the list, or IP address and Port information can be set.
If it is set to <DDNS>, then the DDNS input field will be
activated.
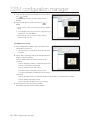
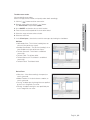
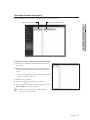
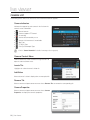
3. The selection menu is displayed when the program is
started for the first time.
Select a menu option according to the desired
configuration.
After the initial run, the program will be started in <Standard
Setup> mode.
28_ SSM configuration manager
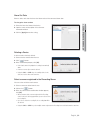
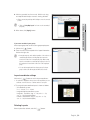
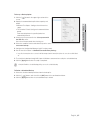
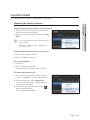
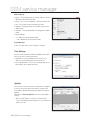
Easy Guide
This only shows the minimum menu options needed for
monitoring, such as device registration and allocation.
● SSM CONFIGURATION MANAGER
Only device, user group, user, and site registration and
allocation are enabled in this mode.
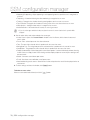
Standard Setup
All functions of Configuration Manager can be set up.
English _29
SSM configuration manager
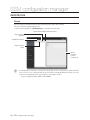
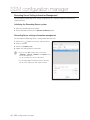
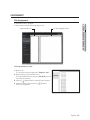
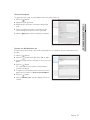
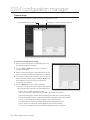
REGISTRATION
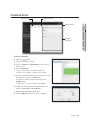
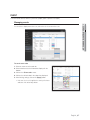
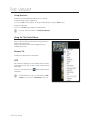
Device
You can register the Media Gateway and the Recording Server and a device below it.
This lists the devices registered by the user.
A device can be added when <MediaGateway> is selected in the tree menu.
Delete Selected Media Gateway/device
Register Device
(Manual)
Add Media Gateway
Register Device
(Auto)
Media
Gateway/
Device/
Camera Info
M
A media gateway is a server which is connected to the camera, DVR, encoder or recording server to manage and relay the
devices. Since the console communicates with the devices through the media gateway without being directly connected to
the device, the media gateway must be selected first before the registration of devices.
- The protocol supported in SSM are SUNAPI, SVNP and ONVIF.
30_ SSM configuration manager
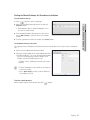
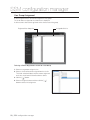
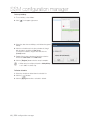
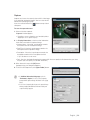
Setting the Media Gateway for Standalone Installation
To add a Media Gateway :
1. Click [
] button in device setup page.
If Media Gateway IP address is displayed as 0.0.0.0, be sure to
check your PC's network settings.
3. If the information of MG to be registered is not in the list,
check <Manual Input>, and then enter the IP and port
number.
4. To finish registration and close the window, click [Close] button.
To edit Media Gateway information:
The right pane shows information on the Media Gateway selected from the tree menu, which is available to
edit.
1. Click on a desired Media Gateway to be edited.
2. Edit name and description of the selected Media Gateway.
1 DDNS Use/Not Use : This is the setting used to remotely
access the media gateway. Input the DDNS ID if the
DDNS is used and IP (WAN) address if not.
- IP (WAN) : Enter IP (WAN) generated for each media
gateway.
M
IP address, MAC Address, and port number are for display only
and cannot be modified.
Refer to 'Option Setting' for details of setting the DDNS of the
System Manager. (Page 78)
To delete a Media Gateway:
Select a Media Gateway to be deleted, and click [
] button.
English _31
● SSM CONFIGURATION MANAGER
2. Select a desired Media Gateway from the list and click
[Register] button.
SSM configuration manager
Setting the Media Gateway for Distributed Installation
1. Run the Service Manager on the computer installed with the System Manager. (Page 145)
2. Run the Service Manager on the computer installed with the Media Gateway. (Page 145)
3. On the Media Gateway server, set the IP address and port number of computer installed with the System
Manager.
To add a Media Gateway
1. Click the [
] button in the device setup window.
2. The list of media gateways that can be registered in
System Manager that the console accesses will be
displayed.
3. Select a desired Media Gateway from the list and click
[Register] button.
If Media Gateway IP address is displayed as 0.0.0.0, be sure to
check your PC's network settings.
4. If the information of MG to be registered is not in the list, check <Manual Input>, and then enter the IP
and port number.
5. To finish registration and close the window, click [Close] button.
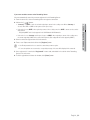
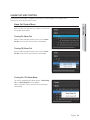
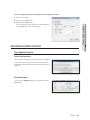
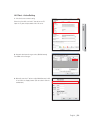
Adding Devices
To add a device automatically:
You can search add a device connected to your local network automatically.
] button.
1. Click [
All discovered devices or Recording Servers from the local
network are shown in the “Register Device (Auto)” list.
2. Select a device or Recording Server to register from the list.
SVNP or SUNAPI can be registered as the protocol type. If SUNAPI
is selected as the protocol type, the cameras supporting SUNAPI
can be searched and registered. (Refer to Appendix for models
supporting SUNAPI.)
3. Enter the ID and password, and click [Register] button.
M
The User ID and password should be the account registered to the corresponding device.
If connection encounters error, corresponding message of cause is displayed in the status tab.
Refer to "Installation of SSM Recording Server" for details of password setting.
4. Once registered, it is marked as "Registered" in status tab, and added under the Media Gateway list.
5. To finish registration and close the window, click [Close] button.
1 IP Install : The device network can be configured.
Input the network data to change. If the device password
matches, the network data of the device can be changed.
Information
Applied the device IP settings.
MAC Address : 00:16:6c:f0:05:42
OK
32_ SSM configuration manager
If you want to add a camera to the Recording Server
You can automatically search for a camera registered in the Recording Server.
1. From the device list, select a Recording Server to register a camera for.
2. Click on the [
] button.
selected, either SVNP or SUNAPI can be registered as the protocol type.
If the vendor is set to <ONVIF> when registering a camera of the recording server, the <ONVIF> cameras can be searched
and registered.
- Resigstering ONVIF model is only supported in the SSM-RS10 and SSM-RS20 models.
If the vendor is set to <Samsung> and the protocol type to <SUNAPI> when registering a camera of the recording server,
the cameras supporting SUNAPI can be searched and registered. (Refer to Appendix for models supporting SUNAPI.)
3. Select a camera to register from the list of cameras.
4. Enter a user ID/password and click on the [Register] button.
M
User ID and password are the ones saved in a camera that you want to register.
If connection problems are encountered, a corresponding message of the cause will be displayed in the status tab.
5. Once registered, it is marked as “Registered” in status tab, and added in the sub list of the Recording
Server in the tree menu.
6. To finish registration and close the window, click [Close] button.
English _33
● SSM CONFIGURATION MANAGER
<Samsung> or <ONVIF> can be selected when registering a camera in the recording server. When <Samsung> is
SSM configuration manager
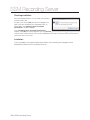
To add device manually:
Device can be registered manually by a user, by directly entering required information.
] button.
1. Click [
"Register Device (Manual)" window should appear.
2. Select the model name for a device or Recording Server
that you want to access.
3. Select the address type.
Available types are static IP, URL, Samsung DDNS, S1 DDNS, and
iPOLiS DDNS.
Available address type can be different depending on the device.
If a model type that SUNAPI can be registered with is selected in the manual device registration, a protocol type combo box is
output. (Refer to Appendix for models supporting SUNAPI.)
4. Provide required information for connection to the device.
Required information is dependant to the set address type.
5. Enter the ID and password.
The User ID and password should be the account registered to the corresponding device.
6. Click [Register].
If connection encounters error, corresponding message of cause is displayed.
M
When a device is registered in Easy Guide mode, the site and administrator group are automatically assigned.
In Standard Setup mode, the administrator group is automatically assigned after the device is registered and the site is
assigned.
34_ SSM configuration manager
If you want to manually add a camera to the Recording Server
You can directly enter the information of a camera registered in the Recording Server.
1. From the device list, select a Recording Server to register a camera for.
2. Click on the [
] button.
<Samsung> or <ONVIF> can be selected when registering a camera in the recording server. When <Samsung> is
selected, either SVNP or SUNAPI can be registered as the protocol type.
If the vendor is set to <ONVIF> when registering a camera of the recording server, the <ONVIF> cameras can be searched
and registered.
- Resigstering ONVIF model is only supported in the SSM-RS10 and SSM-RS20 models.
If the vendor is set to <Samsung> and the protocol type to <SUNAPI> when registering a camera of the recording server,
the cameras supporting SUNAPI can be searched and registered. (Refer to Appendix for models supporting SUNAPI.)
4. Select the address type.
The available address types are: IP Address, URL, websamsung.net, samsungipolis.com.
The available address types may vary depending on the camera model.
If a model type that SUNAPI can be registered with is selected in the manual camera registration, a protocol type combo box
is output.
5. Set the necessary information for connecting a camera.
Different information is required for each address type.
6. Enter user ID and password.
User ID and password are the ones saved in the camera that you want to register.
7. Click on the [Register] button.
If connection issues are encountered, the corresponding cause messaged is displayed.
1 Appendix : SUNAPI will run properly with the following models and firmware versions.
- SUNAPI supporting models : SNB-6004, SNB-6003, SND-6084, SND-6083, SNV-6084R, SNO-6084R,
SND-6084R
- F/W version : snb6004_Series_2.22_131218 or higher
English _35
● SSM CONFIGURATION MANAGER
3. Select the desired camera's model name.
SSM configuration manager
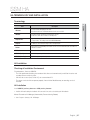
Editing Device Information
You can edit information of a device registered.
To edit device information:
1. Select a desired device to be edited.
2. In the right information pane, edit the device information.
3. When finished, click [Apply] button.
1 System Restart setting : You can set the period and the
execution time to restart the system (PC) periodically.
1 Device Connect : Connects to the selected device.
1 Device Disconnect : Ends the connection to the selected
device.
M
The feedback of the change of device connection data is
displayed in a popup window.
- Connection successful, Already registered device, IP address
crash, MAC address crash, Network error, ID error, PW error,
Privilege error, Connection failed, Concurrent users exceeded, No response, S/W version mismatch, DDNS error, Number
of allowable registered cameras has been exceeded, 5 times or more password errors with the ID, You can login only
after 30 seconds. / Another user is already connected. Do you want to disconnect and login again?
You can move the registered media gateway by dragging the device in the device tree with a mouse.
You can select only one device to move when moving the media gateway.
36_ SSM configuration manager
If you want to modify the camera access information registered in the Recording Server
1. Select a camera registered in the Recording Server.
2. Click on the [Access Info Setings] button in the device
information menu on the right hand side of the screen.
4. When finished, click [Apply] button.
1 Connecting/Releasing connection : It connects/
disconnects the connection to the selected camera.
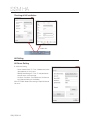
Viewing the Device Settings
You can see the device related settings information on the Settings Page provided by each device.
To edit device settings:
1. In the right information pane, click [Device setup page]
button.
The selected device’s settings page should appear.
2. Edit settings as required.
3. When finished with device settings, click [Apply] button of
the device settings page.
4. To close the device’s settings page, click [
the top right corner.
] button on
Device settings page differs from devices connected. For further
details, refer to the user manual of each device.
English _37
● SSM CONFIGURATION MANAGER
3. Modify the camera information displayed in the bottom
right of the screen.
SSM configuration manager
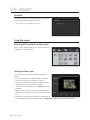
Camera Info View
Select a device and then a camera under it to check the connected camera information and video.
To Change Camera Info
1. Select a camera under the selected device.
2. Enter the name and description in the camera info
window.
M
If the Panomorph lens is installed, specify the camera position
and lens type.
Check to ensure the camera model is compatible with the
Panomorph lens.
The camera position can be selected for the Fish-Eye type.
3. When done, click [Apply] button.
1 Camera type : The type of camera registered can be
selected from "Box, Dome, PTZ, PT Driver, Panomorph,
Fish-Eye". When a type is selected, its icon is displayed
in the device tree of the Configuration Manager. In the case of Panomorph or Fish-Eye camera, the
option must be set in advance to activate the dewarping function in the console.
1 Camera position : Set the camera installation position.
1 Shortcut : Only numbers are accepted for the shortcut to image output.
Sensor Information
Select a device and the lower level sensor to check the connected sensor data.
To change the sensor data
1. Select the lower level sensor of the device.
2. Input the name and description in the sensor information
window.
3. Click the [Apply] button after setting.
38_ SSM configuration manager
Alarm Out Data
Select a device and select the lower level alarm to check the connected alarm data.
To change the alarm out data
● SSM CONFIGURATION MANAGER
1. Select the lower level alarm of the device.
2. Input the name and description in the alarm out
information window.
3. Click the [Apply] button after setting.
Deleting a Device
A device can be selectively deleted.
1. Select a device to delete from the tree.
2. Click [
] button.
3. When confirmation prompts, click [OK].
If the related camera is in playback or recording, it automatically
aborts.
A camera or sensor object cannot be deleted.
Using the <Ctrl> or <Shift> key, select multiple devices in the
device tree to delete them at the same time.
Select a camera registered in the Recording Server
You can select and delete each camera.
1. Select a camera to delete from the tree.
2. Click on the [
] button.
3. When the camera delete confirmation window appears,
click [OK].
When you want to delete a camera registered in the Recording
Server, in the device delete popup window, you can select to delete
the recording file.
If you chose to delete the recording file, the recording data will be
also deleted.
Using the <Ctrl>or <Shift> key, select multiple cameras registered in the Recording Server to delete them at the same time.
English _39
SSM configuration manager
Recording Server Setting Information Management
You can import the Recording Server settings or export them as a. cab file or update the firmware for a
registered camera.
Initializing the Recording Server system
1. Select the Recording Server to initialize.
2. Select initialization and click on the [Restore the Default] button.
Recording Server settings information management
You can import the Recording Server’s settings information from a file.
1. Click on the [
] button to select the setting to retrieve.
2. Select a saved file.
3. Click on the [Import] button.
4. Imports the settings from the selected file.
M
If you select the <All> checkbox, then you can retrieve
<Hardware>, <Record>, <Network> and <System> items
from the Recording Server.
You can check and select each set of information.
You can import multiple Recording Servers at the same time,
but only one Recording Server can be exported at a time.
40_ SSM configuration manager
Importing the Recording Server settings
You can save the Recording Server settings as a file.
1. Select the Recording Server to be saved as a file.
] button to browse and set the desired file path.
● SSM CONFIGURATION MANAGER
2. Click [
3. Click on the [Export] button.
Settings are saved as a file and the result is displayed as a
message.
Updating camera firmware
You can update the firmware for a camera registered below the Recording Server.
1. Select a model to update.
2. Click on the [
update.
] button to select the new Firmware to
3. Click on the [Update] button.
4. While it is updating, the progress bar indicates the
progress.
English _41
SSM configuration manager
Managing Device Settings
You can import device settings from a file, or export it in *.dat format.
Importing Device Settings
You can import device’s settings information from a file.
1. Click [
] button to browse and set the desired file path.
2. Select a settings file.
3. Click [Import] button.
4. Imports the settings from the selected file.
M
If checked <Including Network Settings>, imports network
environment settings too.
Importing for multiple devices is allowed, where exporting limits
to one device at a time.
Exporting Device Settings
You can save your device’s settings information as a file.
1. Select desired device to export its settings.
2. Click [
] button to browse and set the desired file path.
3. Click [Export] button.
The settings are exported into a file, and its result is
displayed as a message.
42_ SSM configuration manager
Updating the Device Firmware
1. Select a device to update.
2. Click [
version.
] button to select update software of newer
● SSM CONFIGURATION MANAGER
3. Click [Update] button.
4. During the updating, the progress bar shows the
progress.
M
Devices of the same model can be selected together from the
list and updated at the same time.
English _43
SSM configuration manager
User
This function is used to generate the user group, set up the privilege of each user group, and add users to
the group.
Delete
Add User
Add User Group
Registered Group/
User List
User Group/
User
Information
Setting a User Group
To add a User Group:
1. Click the [
] button.
2. After a user group is generated, enter the name and
description in the info field on the right hand side and
configure the privilege.
3. When done, click [Apply] button.
J
The default "Administrator Group" is created in program
installation process, which is not to be deleted.
44_ SSM configuration manager
To edit User Group privilege:
1. Select a user group under a site from the tree.
2. Edit the user group’s information on the right pane.
● SSM CONFIGURATION MANAGER
3. Select allowed privileges by checking checkboxes.
1 Live Viewer : Privileges can be set for each item selected
to the Live page.
1 Search Viewer : Privileges can be set for each time
selected to the Search page.
1 Event Viewer : Privileges can be set to the generated
event.
1 Schedule Backup : Schedule backup privileges can be
set.
1 Access Privilege : Accessible setting menu can be
selected and set. The users in a group can access only
the set menu.
1 Video Wall : Video wall privileges can be set.
J
For "Administrator Group", changing privilege is not allowed.
Setting privilege is only available in user group information.
Live Viewer is allowed by default, and cannot be disallowed.
4. When done, click [Apply] button.
To delete a User Group:
Select a user group to be deleted, and click [
] button.
English _45
SSM configuration manager
To add a User:
1. Select a user group from the tree.
2. Click the [
] button.
3. Enter the user information.
4. When done, click [Apply] button.
J
The default "admin" account is created in program installation
process, which is not to be deleted.
When setting a password, if the password does not satisfy the
basic criteria, another password satisfying the criteria must be
input again.
If the password satisfies the basic criteria but not the optional
criteria, you can choose to use the currently input password as
is or input a new one.
To edit user:
1. Select a user from a user group in the tree.
2. Edit user ID, password, name and other fields on the right
pane.
3. When done, click [Apply] button.
J
The "Administrator Group" has all privileges, and users in the
"Administrator Group" are allowed with all privileges accordingly.
To delete a user:
You can select users registered to a group to delete.
Select a user to be deleted, and click [
] button.
46_ SSM configuration manager
Site
In SSM, user accounts are administered for each Site where a site is considered to be a physical
administrative unit.
1 Administration by locations grouped by Sites
1 Permission management for viewer functions
1 Site Management (Add / Edit / Delete)
- Name, Description
Managing Sites
In the logical tree, a site can group camera and alarm out by location and it can help easier locating desired
camera if there are many camera devices.
Delete Selected Site
Add Site
Site
Information
J
The default topmost site is created in program installation process, which is not to be deleted.
English _47
● SSM CONFIGURATION MANAGER
Using Site
SSM configuration manager
Using Site/User Group
You can configure a site and user groups at your preference.
Ex.) Below sample construction shows sites of "HQ", "Factory" and "Storage", where each site includes user
groups of "Disaster Prevention" and "Security Dept", and added with users of "Chief Disaster Officer", "Front
Gate Security" and "Rear Gate Security".
1 Site
Administrator Group
HQ
Factory
Storage
Disaster Prevention Center
Chief Disaster Officer
Security Dept
Front Gate Security
Rear Gate Security
Parking Tower
Lobby
Secretary
CEO Room
Disaster Prevention
Disaster_Monitor1
Disaster_Monitor2
Security Dept
Factory_Front_Security
Security Dept
Storage_Front_Security
Setting a Site
To add a site:
1. Click [
] button.
2. Enter the site name and description in the right pane.
To edit a site:
1. Select a site from the tree.
2. Edit site name and information on the right.
3. When finished, click [Apply] button.
To delete a site:
1. Select a site from the tree.
2. Click [
] button.
48_ SSM configuration manager
ASSIGNMENT
Site Assignment
Registered Site List
● SSM CONFIGURATION MANAGER
A device for the site is assigned.
A device can be selected and assigned to the site.
List of Assignable Devices
To Assign Cameras to a Site
1. Select a site.
The site must have been registered in “Register > Site”.
2. Select a device and camera for the site.
To select multiple cameras, press the [Ctrl]/[Shift] key and
then select the cameras.
3. Click the [
] button after the camera(s) is(are) selected.
4. Select the device and then click the [
release the assignment.
] button to
English _49
SSM configuration manager
User Group Assignment
A device registered in the site can be assigned to a user group.
The list of devices assigned to the selected site is displayed.
A device can be selected and registered to the selected user of the group.
Registered User Group List
Assignable Site List
To Assign a Device Registered in the Site to a User Group
1. Select a user group to assign the site.
2. Select a site or camera to be assigned from the site list.
The list for selection displays only the cameras registered
to the site, not all cameras connected to the device.
3. Click the [
] button.
4. Select an assigned camera and then click the [
button to release the assignment.
50_ SSM configuration manager
]
CAMERA MANAGEMENT
Profile
List of registered devices
● SSM CONFIGURATION MANAGER
The profile of a camera assigned to the site can be checked and modified.
Camera Profile List
Camera
Video
1. Click on the <Video> menu of a camera to change video settings.
2. Select either <Used> or <Not Used>.
If you set the camera’s video to <Not Used>, you cannot listen to the live voice.
If you set the camera's video to <Off>, audio will be turned off automatically.
Audio
1. Select the <Audio> menu of a camera to change audio settings.
2. Select either <Used> or <Not Used>.
If you set the camera’s Audio to <Off>, you cannot listen to the live voice.
You can set audio recording in [Recording Management] > [Camera Setup] > [Camera] tab.
English _51
SSM configuration manager
Covert
1. Click on the <Covert> menu of a camera to change covert settings.
2. Check it.
<Covert> will be turned <On>.
If you check <Covert> of a camera, you cannot view live/searched video or listen to voice, but you can still record video or
voice.
If you want to change the camera profile, high resolution, low resolution, and the recording profile
1. Select the camera whose profile is to be modified from the
list of cameras registered to the site.
The profile of the camera under the device can be set up,
or the camera can be selected individually.
2. Select a camera to change the settings of from the list and
select a changed value from the change item at the
bottom.
3. To change the profile of the cameras in the list across the
board, select the cameras using the [Ctrl] or [Shift] key in
the keyboard and select the change value from the
change item at the bottom.
4. Click the [Apply] button after the setup is complete.
M
You can only set the recording profile for a camera registered in
the Recording Server.
You can set the Live (High), Live (Low) and Recording properties for each camera.
- In Video Properties, there are Resolution, Tx Quality, Frame Rate, Compression, Bitrate Control, Bitrate and GOP size.
A camera registered in DVR and NVR cannot be changed.
52_ SSM configuration manager
Setting Presets
For PTZ control supporting cameras, you can add or delete preset positions for direct camera framing.
The PTZ preset screen becomes available for settings, only when a PTZ supporting camera is selected.
You can distinguish PTZ controllable cameras by icon appeared on the device list.
According to the device, 20~255 presets are supported. Check the device specification for the maximum number of
presets.
A preset name can be set to a combination of letters and numbers up to 12 characters.
Camera Video
Registered
Site List
PTZ Adjustment
Menu
Preset List
If you want to add or delete a preset
1. Select a desired camera from the Device List to define a
preset.
2. Use PTZ controller to set the camera framing to a desired
point, and enter the preset name.
3. Click [
] button.
In the preset list, added one appears.
4. To delete a preset, select the preset to be deleted, and
click [
] button.
In the case of cameras that support Homeposition, Fish Eye or
Panomorph, the Homeposition item is automatically added to the
preset list, and the preset position moves to the set home position
when Homeposition is set.
M
For further information on PTZ controller, refer to "PTZ
Control". (Page 104)
English _53
● SSM CONFIGURATION MANAGER
M
SSM configuration manager
Setting
This section describes the camera image compensation. This
setting is enabled only for the cameras registered with the
SUNAPI protocol.
1 Backlight compensation : the backlight compensation
mode supports the level setting only when the WDR mode
is set.
1 Daytime/nighttime mode : Color, BW, auto, external BW
and schedule can be selected.
1 Simple focus : The auto focus is activated whenever the
button is clicked.
1 Focus : The focus is adjusted by setting the speed with the
combo box. It can be set to 1, 10 or 100.
1 Zoom in/out : A ratio is set from a combo box to enlarge or
reduce the display by the set ratio. It can be set to 1, 10 or
100.
1 P-Iris : The iris is opened by the set value to adjust the light
exposure in the box or dome camera.
The level can be set by adjusting the slide or inputting a specific value.
The amount of light increases and the screen becomes lighter as the level increases.
To set the Masking
1. Move to SSM Configuration Manager > Camera Management > Preset.
2. Click the Masking setting button and set the masking on the screen.
Click the beginning point and end point of the masking rectangle to set the mask rectangle.
Up to 8 masking settings are allowed.
3. Move to SSM Configuration Manager > Registration > User.
4. Set the privilege of mask output in Live and Search.
5. The mask set to Live or Search is output according to the privilege.
54_ SSM configuration manager
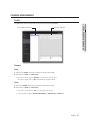
LAYOUT SETTING
Users can select the camera videos to be displayed on one screen.
A layout is generated, and the camera and site configuration included in the layout can be checked.
User can configure the screen specifically for a region, and select it for viewing whenever needed.
When the layout is created, the ownership of the group with which the logged user is affiliated is created in the
Configuration Manager.
Layouts can be edited only when the user that has ownership logs in.
Add Map
Add layout groups
Add Layout
Delete Layout/Map
Layout List
Layout
Information
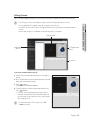
Registration
Camera Layout
Create a Camera Layout, and place the cameras in the
desired tile of split screen to compose various layouts.
The device list only shows devices available for adding to the
layout currently being edited, in a tree format.
English _55
● SSM CONFIGURATION MANAGER
M
SSM configuration manager
To add a camera layout:
1. Click the [
] button to generate the camera layout.
2. Click [Split Screen] button and select a desired layout
split mode.
3. Drag a desired device from the device list, and drop in
onto a tile.
Double-click a camera to add it to the layout. Double-click
a system to add all cameras in the system to the layout.
4. When done, click [Apply] button.
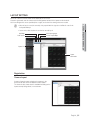
Map Layout
Place the camera and sensor icon in the position on the
image of the registered map to complete the layout.
56_ SSM configuration manager
To add a map and place links:
1. Select a user group to be added with a map layout, and
click [
] button to create one.
2. Select a newly-generated map.
● SSM CONFIGURATION MANAGER
3. Click [Split Screen] button and select a desired layout
split mode.
In the split screen selection pane, the tile marked with sky blue is
the destination tile of added map image.
4. Click [
image file.
] button to browse and set the desired map
5. Select a layout in <Add Link> and click the [
button.
]
6. The link icon is registered in the map. Click the icon in the
map layout of live viewer to move to the selected map link.
M
Place mouse cursor on the top right corner of the map layout to
display screen adjustment dialog.
For further details screen adjustment on map layout, refer to
"Layout". (Page 94)
English _57
SSM configuration manager
7. If you want to change the size/location of an icon, click on
] button.
the [
You can change the icon size and the font size and
location.
8. If you want to add a user icon, click on the [
button.
]
You can set the icon name. (32 Korean letters, 64 Roman alphabet
letters)
You can designate the file to be used for the icon. (jpg, bmp or png
format and size of less than 50Kbytes.)
Click the right side of the icon and select "Image change" to
change the image of the icon.
To add devices to a map:
1. Once completed with adding a map, click devices to be
added from the device list.
In the device list, devices included in the group to where the layout
is registered.
2. Click a device and drag it onto the desired position on the
map, and release the mouse.
You can add any device of camera, alarm or sensor.
1 Camera
- You can distinguish cameras, and identify whether the
camera is connected to the network.
- You can identify cameras with events.
- The camera name is identified in the live viewer.
- The camera information is displayed in the live viewer.
1 Alarm Out
- You can distinguish alarms, and identify whether the alarm device is connected to the network.
- You can identify alarm device names.
- You can turn on or off Alarm Out in the live viewer.
3. Click device icon with your left mouse button.
Green ball that controls camera framing appears.
58_ SSM configuration manager
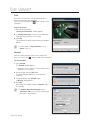
4. Click the green ball, and it turns red. While in red, drag
and drop the ball to adjust camera’s viewing direction.
Click a camera, drag and drop while holding to move the camera’s
position.
● SSM CONFIGURATION MANAGER
M
"Refer to "Using Map Layout" on how to use the arrow keys."
(Page 96)
5. When done, click [Apply] button.
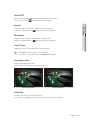
If you want to add a layout group
Add a layout group that can be used to group map layouts.
1. Click on the [
] button.
2. Enter the name and description in the layout information
filled on the right side.
M
A map layout group can be added regardless of the existence of
camera/map layout, but an existing map layout cannot be
moved to the lower level of a map layout group. When a map
layout is created after a created map layout group is selected,
the map layout is located at the lower level of the map layout
group.
You can add a map layout below a layout group. If a layout
group is deleted, its sub map layouts will be also deleted.
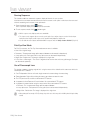
Layout coordinate settings
Click on the [
] button to set the layout coordinates.
A coordinate is displayed as three points on the map. When you set a
coordinate, enter the reference coordinate value for each point.
1 The range of layout coordinate input is shown as follows.
- X/Y coordinate system
X : 0 ~ 10000, Y : 0 ~ 10000
- Longitude/latitude coordinate system
Longitude - East/West, deg: 0 ~ 180, min : 0 ~ 59,
sec : 0 ~ 59 (first decimal point)
Latitude - North/South, deg: 0 ~ 90, min : 0 ~ 59,
sec : 0 ~ 59 (first decimal point)
Deleting Layouts
Select layout to be deleted, and click [
] button.
English _59
SSM configuration manager
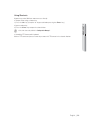
Layout Assignment
A layout is assigned to the user group.
A list of layouts available to the selected user group is displayed.
Select a layout and register it to the user group.
Registered User
Group List
Assignable Map/
Layout List
To Assign Cameras
1. Select a user group to assign the layout.
2. Click to select a layout to assign from the layout list.
3. Click the [
] button.
4. Click the [
] button to release the assignment.
M
After a layout assigned to the user group has been selected,
another layout under it can be assigned.
The layout can be allocated only when a user who has
ownership logs in.
60_ SSM configuration manager
SCHEDULE SETUP
Add Schedule
Delete Schedule
Schedule
Information
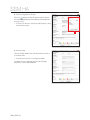
To Set up a Schedule
1. Click the [
] button.
2. Select the generated schedule.
3. Enter the <Name> and <Description> in the list on the
right hand side.
4. Select <Frequency>.
1 Daily : The schedule is set up in one-day units.
1 Weekly : The schedule is set up in one-week units.
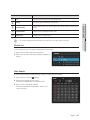
5. Select a schedule area from the time selection cell, drag it
with the mouse, and click the [Set] button.
To cancel the schedule, drag the area and click the
[Cancel] button.
Multiple time cells can be selected by using the [Ctrl] key.
6. Double-click the time selection cell and then select the
minutes of <Start Time> and <End Time>.
7. Select whether the holidays will be used.
8. Click the [Apply] button after the setup is complete.
English _61
● SSM CONFIGURATION MANAGER
Setting Holiday
SSM configuration manager
To Set up Holidays
1. To use holidays, select <Use>.
2. Click [
] in the upper-right corner.
3. Select the dates that are holidays, and indicate the type of
holiday.
4. Click the schedule area in the time selection cell, drag it
with the mouse, and click the [Set] button.
To cancel the schedule, drag the area and click the
[Cancel] button.
5. Double-click the time selection cell and then select the
minutes of <Start Time> and <End Time>.
6. Click the [Register] button after the setup is complete.
M
Holiday setting is set at higher priority when <Setting Holiday>
is set to <Use> in schedule setup.
To Delete Schedule
1. Select the schedule to delete from the schedule list.
2. Click the [
] button.
3. Click the [Apply] button after a schedule is deleted.
62_ SSM configuration manager
SCHEDULED BACKUP
The data of a specific period can be saved in the PC running the program.
Add Backup
Delete Backup
Backup List
Backup
Information
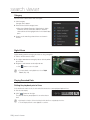
To Set up Video Backup
The specified event backup can be set up to run at the specified time.
] button.
1. Click the [
A new backup is added to the list.
Only the connected devices can be backed up.
2. Click a backup from the list to select it.
3. Enter the name and description of the backup to set up.
4. Select whether the backup will be used.
5. Select a schedule.
One of the schedules registered in schedule setup can be
selected.
6. Set up the backup time.
If the schedule is set to <Weekly>, the day of the week selection
menu is displayed.
If the schedule is set to <Daily> and the backup schedule is set up for within 24 hours from the time selected as the backup
start time, the backup begins with the data of the previous day.
English _63
● SSM CONFIGURATION MANAGER
Backup Option
SSM configuration manager
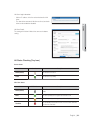
7. Select the format of the saved file.
“*.sec” and “*.avi” are available as the backup file format.
1 AVI : General purpose format. This can be played by Window Media Player.
1 SEC : Samsung’s own format. Player is provided with the video data.
M
Window Media Player does not support avi files with a resolution of 3 megapixels or higher.
SEC backup is recommended for high-resolution videos of 3 megapixels or more.
A new AVI backup file is created in the following cases.
- When you change the video’s resolution
- When you change the audio or video codec
- When the file size is greater than 2GB
8. Select the event type to run a backup.
9. Click the [
] button to select the path of the backup file.
Input the ID and password to login to the NAS drive.
- If the following popup window is displayed, check the input NAS
account or disconnect the previous network connection and try
again.
Information
Cannot set NAS. Check the following.
1. Check if your NAS ID/password is correct.
2. Disconnect all the previous connections to the server or shared
resource and try again.
OK
10. Click the [Apply] button after the setup is complete.
M
The following popup window is displayed if the Windows login
account is not set. The Windows login account can be set in the
backup option (page 65).
Information
Set your Windows Logon Account.
OK
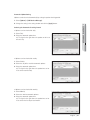
To Check Scheduled Backup Status
1. Click the [
screen.
] button in the upper-left section of the
2. Check the progress of the registered backup.
64_ SSM configuration manager
To Set up a Backup Option
1. Click the [
screen.
] button in the upper-right section of the
1 File Retention Period : Configure the automatic delete
period.
Data recorded prior to the specified period are
automatically deleted.
3. Check to use the password in the <Use a password in
the SEC file> menu.
Set or check the password after checking use.
4. Select the number of devices to be backed up at the same time in <Maximum number of devices for
concurrent backup>.
5. Configure the Configuration Manager login ID and password.
6. Set the interval and count in <Network Connection Retry Setting>.
It specifies how many times the reconnection will be attempted and the interval (min.) when the connection to a NAS drive is
cut.
7. To schedule the backup through NAS, input the Windows account to be used by the schedule backup.
8. Click the [Apply] button after the setup is completed.
M
Only the ID with the scheduled backup privilege can use the scheduled backup.
To Delete a Scheduled Backup
1. Select the scheduled backup to delete from the backup list.
2. Click the [
] button, and then click the [OK] button in the confirmation window.
3. Click the [Apply] button after the scheduled backup is deleted.
English _65
● SSM CONFIGURATION MANAGER
2. Specify the automatic backup file delete capacity and
period.
1 Minimum Free Space : Configure the minimum free
space.
SSM configuration manager
Device Assignment
A device is selected and assigned to the scheduled backup.
A device can be selected to be assigned to a scheduled backup.
Backup List
Assignable
Site List
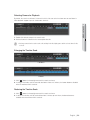
To Assign a Device
1. Select the backup schedule to assign to the camera.
2. Click to select a device to be assigned from the device list.
Cameras connected to the device can also be individually assigned.
3. Click the [
] button.
4. Click the [
] button to cancel the assignment.
M
Only the devices assigned to the account set up in the
scheduled backup option can be backed up.
66_ SSM configuration manager
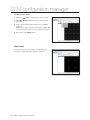
EVENT
The event action defines how the system acts (output) upon a specific event (input).
Managing events
● SSM CONFIGURATION MANAGER
You can select to display events that occur, and set the color for an event that occurs.
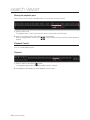
To set the event color
1. Select an event to set the color for.
2. Select whether to use the information displayed in the
bottom.
3. Click on the <Event color> menu.
4. Click on the desired color in the color chart displayed.
5. After finishing settings, click on the [Apply] button.
If the event color is set, it is applied to the event log of the viewer
and border of the camera image window.
English _67
SSM configuration manager
Setting Event Action
Modify Event Action
Delete Selected Event Action
Add Event
Action
Event Action
Option
Event Action
Information
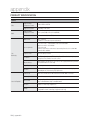
1 Event Settings
- A single monitoring setting. Upon an event, the Live Viewer monitoring screen automatically switches to
Single mode with the event-generating channel for the specified period.
- For specified interval (5~60 seconds), system ignores the same continuing event.
- You can set whether to use the device’s event settings.
1 Event Action
- Event Action Management (Add / Edit / Delete)
Name, Description, Event (Input), Action (Output)
- You can define various system actions (output) for events (input) from devices.
Event (input) types: Device connection release, Motion Detection, Video Loss, Video Analysis, Audio Detection and Sensor
Action (output) types: Instant Viewer, Preset, Alarm Out, Pop-up, Sound and E-mail notification
68_ SSM configuration manager
To add an event action:
You can add/edit event actions.
Select event type, device of action, and specify action details accordingly.
1. Click the [
] button to add an event action.
● SSM CONFIGURATION MANAGER
2. Select an event action and click the [
] button.
The "Event Action" setup window appears.
3. Use <ON/OFF> to determine the use of this function.
4. Enter the name and description of the event action added.
5. Select the usage and event action schedule.
6. Select the return time.
7. In the <Event Input>, select devices and their event types by checking the checkboxes.
HA Event
1 No Standby Client : The HA client (standby) does not
exist at the time of fail-over request.
1 Standby Client Broken : The HA client (standby) is in an
error condition at the time of fail-over request.
1 Fail-over Successful : The fail-over is established
successfully.
1 Fail-over Failed : The fail-over failed.
1 Fail-back Successful : The fail-back is established
successfully.
1 Fail-back Failed : The fail-back failed.
Device Event
1 Video Loss : If the video recording is interrupted, an
event is generated.
1 Motion Detection : If the device detects a motion, an
event is generated.
1 Passing : An object passing through the area specified
by the user is recognized as an event.
1 Entering : An object entering the area specified by the
user is recognized as an event.
English _69
SSM configuration manager
1 Appearing/Disappearing : Object appearing in or disappearing from the specified area is recognized as
an event.
1 Tampering : A situation hindering the video monitoring is recognized as an event.
1 Tracking : Recognize the situation of tracing moving objects on the screen as an event.
1 Face Detection : Recognize the situation of sensing a face in the user selected area as an event.
1 Video Analysis : Intelligent video analysis is recognized as an event.
1 Audio Detection : If the device detects sound, an event is generated.
M
If you selected an upper ranked device that you registered a camera for, events related to device operation will be
displayed.
8. Set the action device and action method of an event type.
1 Instant Viewer : Opens the "Instant Viewer" window in the Live Viewer, which shows the occurred
event’s video.
1 Preset : Runs selected preset on the selected camera.
1 Tour : The tour of the selected device is performed in the case of an event.
1 Swing/Auto Pan : The swing/auto pan of the selected device is performed in the case of an event.
1 Group/Scan : The group/scan of the selected device is performed in the case of an event.
1 Popup : Automatically selected along with Instant Viewer option. If selected individually without selecting
Instant Viewer, an empty Instant Viewer having no video displayed upon an event only for reacting to the
occurred event.
1 Sound : Generates sound alarm upon events.
1 E-mail : Sends out event notification e-mail upon events.
1 Auto broadcasting music source : Search for and select and preview the music file to be played when an
event occurs.
9. To finish settings and close the window, click [Apply] button.
To delete an event action:
Select an event action to be deleted, and click [
70_ SSM configuration manager
] button.
To Set up Event Option
The ignore time and e-mail send time options of the event action can be set.
1. Click the [
] button.
2. Specify the event ignore time.
● SSM CONFIGURATION MANAGER
3. Specify whether the device event action setting will be
used.
4. Enter the recipient and sender e-mail addresses and
e-mail sending interval when an event is generated.
5. Click the [Apply] button after the date input is complete.
To Select an e-Mail Recipient or CC
Recipient and CC of the event e-mail can be selected from the user group list, or their e-mail addresses can
be input.
1. Click the [
] button.
2. Click the [
] button to the right of the <To> or <CC>.
3. Select the recipient of the e-mail from the users in the user
group.
4. Click the [
] button.
The e-mail address of the recipient selected from the
e-mail list is displayed.
5. To register the e-mail address of the user not in the user
group, enter the address in <Enter an e-mail address>.
6. Click the [
] button.
7. Click the [Confirm] button after the recipient and CC are
selected.
English _71
SSM configuration manager
RECORDING MANAGEMENT
Recording Server list
To set the Recording Server information
1. Overwrite : If there is no extra disk space, select whether
or not to overwrite the recording file.
2. Auto recovery : If you record it in network external storage
(iSCSI), select whether to auto recover the recording when
a storage connection is cut off and stored again.
3. Recording Server disk information settings : Shows the
disk information of the selected Recording Server.
- Record : When the disk status is set to [Record], you
can search for and play the recording.
- Restore : If the disk status is [restore], the recording
data can be restored in the case of HA fail-back.
- Released : When the disk status is set to [Released],
you can search or play only but cannot record. Any
ongoing recording will be stopped.
You cannot allocate a [System] disk where the OS is installed.
You cannot record if there is no [Record] disk as well as the [System] disk.
4. Refresh : Click on the [Refresh] button to update the local disk information with the latest information.
72_ SSM configuration manager
Camera Assignment
You can distribute camera to each [Record] disk of the Recording Server.
List of registered recording disks
List of allocatable cameras
● SSM CONFIGURATION MANAGER
If you want to assign a camera to the [Record] disk
1. Select the Recording Server to initialize.
2. Select the [Record] disk to assign a camera to.
3. In the list of cameras registered in the Recording Server
on the right, select a camera to be assigned to the disk.
4. Click on the [
] button.
The selected camera will be copied below the [Record]
disk.
You can assign the same camera to multiple disks.
You cannot record with a camera not distributed to the disk.
If you want to cancel assigning a camera to the [Record]
disk
1. Select the Recording Server from the list on the left..
2. Select an item to cancel from the list of cameras registered within the [Record] disk.
3. Click on the [
] button.
The selected disk will be deleted from the [Record] disk.
English _73
SSM configuration manager
Recording Schedule List
You can create, modify or delete the recording schedules.
Add a recording schedule
Delete a schedule
Recording schedule
information
If you want to set the schedule
1. Click on the [
] button.
2. Select a created schedule.
3. In the list on the right of the screen, enter <Name> and
<Description>.
4. Select a schedule for each event type.
Schedule Always : Recording will be done on every day/time.
For more detailed information on schedule setting, refer to
"Schedule Setup". (Page 61)
5. Click the [Apply] button after setup is completed.
If you want to delete a recording schedule
1. Select a schedule to delete from the schedule list.
2. Click on the [
] button.
3. Click the [Apply] button after deleting it.
74_ SSM configuration manager
Recording Schedule Assignment
You can distribute a camera for each Record disk of the Recording Server.
Recording schedule list
List of allocatable cameras
● SSM CONFIGURATION MANAGER
If you want to assign a camera to the recording schedule
1. Select a user recording schedule to which a camera will
be assigned.
2. Select the Recording Server or camera to assign from the
list of camera/Recording Servers on the right side of the
screen.
If you select a Recording Server, the list of cameras below it will be
shown on the right side of the screen.
3. Click on the [
] button.
4. Click on the [
] button to cancel assignments.
5. If you want to set all cameras in the list at once, press the
[Ctrl] or [Shift] key to select cameras.
M
Only the cameras assigned to the recording disk can be
assigned to a recording schedule.
English _75
SSM configuration manager
Camera Setup
You can check or change the settings of cameras assigned to the server.
List of available camera settings
Displaying the camera settings information
If you want to change camera settings
1. Select a camera registered in the Recording Server that
you want to change the setting for.
2. Press the [Ctrl] or [Shift] key to select the camera to
change the setting for.
3. Select a camera to change the setting of from the list and
select a change value from the change item at the bottom.
4. To change the setting of the cameras in the list across the
board, select the cameras using the [Ctrl] or [Shift] key in
the keyboard and select the change value from the
change item at the bottom.
5. Click the [Apply] button after setup is completed.
1 You can set the fps used for each camera and recording
type (general/event) registered in the Recording Server.
- You can turn the audio recording on or off.
If you set the camera’s Audio Recording to <Off>, you cannot record voices.
- General recording types includes manual recording and continuous schedule recording.
- Event recording type includes : motion/alarm/video loss/intelligent video analysis/audio.
You can set the recording file storage period for each camera activated.
- A recording file that exceeds the storage period will be automatically deleted.
You can check the recording file storage period for each camera activated.
- Press the Refresh button to renew the available storage period that is displayed.
76_ SSM configuration manager
Video settings
Options
Descriptions
ALL FRAMES
Saving all frames received.
KEY FRAMES
Only saves the I-frame received.
1 ~ 30
Uses the selected fps to save.
MPEG
This setting will not overwrite the device video setting.
The actual frame rate used to receive and save data from a device may differ from the frame rate set here. If a
smaller amount of data is received, only that much will be saved.
The max throughput is 400Mbps.
- It supports recording with a resolution of 3MB within the throughput range.
- For recording stability, using HDD with SATA2 7200rpm or higher is recommended.
(Each HDD's max recording processing should not exceed 100Mbps.)
The recording data can be searched or played by using the SSM console.
To change an event setting
1. Select an event item camera registered in the Recording
Server that you want to change the recording setting for.
2. Select a camera to change the setting of from the list and
select a change value from the change item at the bottom.
If you turn off the time setting, nothing will be recorded.
3. To change the setting of the cameras in the list across the
board, select the cameras using the [Ctrl] or [Shift] key in
the keyboard and select the change value from the
change item at the bottom.
4. Click the [Apply] button after the setup is completed.
1 You can set pre/post recording time with respect to the
time the event occurs so that users can easily
understand the situation when an event occurs.
Video during the pre/post time set based on the time the event occurs will be recorded.
- Motion, alarm, intelligent video analysis, audio event : You can set both the pre/post time.
- Video loss event : As there is no video to record after an event occurs, you can only set the pre time.
A video loss event only occurs in an encoder.
English _77
● SSM CONFIGURATION MANAGER
MJPEG
SSM configuration manager
Option Setup
To Set up Option
1. Click the [
] button at the upper-right section of the SSM Configuration Manager screen.
2. Configure each option item.
1 Log
You can set the log retention period, which sets to delete expired log files automatically.
1 Backup/Restore
You can back up the current settings or restore the SSM Configuration Manager setups from a saved
file.
- Backup : Selecting this item disables the button. Set the backup file path and click [Backup] button to
start backup into the specified file path.
- Restore : Selecting this item disables the button. Set the restoration file path and click [Restore]
button to load setup from the specified backup file.
1 Restore the Default
Initializes SSM Configuration Manager program’s setup to the default settings.
1 Language
Display language can be specified.
1 Use Device’s Default Name
When it is checked, the name of the camera registered to the device is displayed in the list or the screen.
78_ SSM configuration manager
1 Login Restrictions
Login restrictions can be specified.
- Number of Failures : Login is restricted when the specified number of login attempts is exceeded.
1 Server Information
- SM DDNS Use/Not Use : This option specifies whether the DDNS login function will be used by the
system manager in Mobile Viewer and Web Studio.
- DDNS ID : Enter the ID to be used for DDNS login.
3. When done, click [Apply] button.
English _79
● SSM CONFIGURATION MANAGER
- Time Limit : Login is restricted for a specified time after a login failure.
1 Password Change Notification
Password change notification can be sent.
After it is turned <Use>, the notice is sent at the interval specified in <Frequency>.
SSM console
This is a program to monitor the camera images registered and assigned to Configuration
Manager, check the event, and search the data stored in the device.
LOG IN / OUT
Logging In
Once the program is started, a user must log in for correct use of the SSM Console.
1. Click SSM Console icon.
The Login dialog should appear.
2. <LIVE>, <EVENT> and <SEARCH> viewer types are
shown when viewer selection tab is clicked. Select one
and log in to start the selected viewer.
3. Enter the user ID and password in the login window.
- Default ID : admin
- Password : Enter the password registered during the
installation step.
J
If SSM is installed in distributed mode and you need to start the
] button
program install in another server, click the [
located below the login button in the login window to register
the server to either <Auto> or <Manual>.
If it is set to <Auto>, SystemManager is automatically selected.
If it is set to <Manual>, SystemManager can be selected from
the list, or IP and Port information can be set.
80_ SSM console
M
Select <Save Login ID> to avoid account input from the next login.
Set <Auto Login> in Settings to log in automatically upon starting the program.
In the cases below, login will fail and the user will be prompted with login information.
< If entered password does not match >
Logging Out
For safer use of SSM Console, please log out when the work period is finished.
Logging out saves the last screen composition and then closes all windows, and returns to the login prompt.
] button.
1. On the main window, click [
The Logout dialog should appear.
2. On the dialog, click [Yes] button.
It logs out.
Terminating SSM Console automatically logs out the user.
English _81
● SSM CONSOLE
< If entered unregistered user ID >
SSM console
SSM CONSOLE SCREEN COMPOSITION
c
b
m
Item
Description
ID
Shows the User ID currently logged in.
b
UI LOCK
Locks the user interface.
When attempted to use the program while locked, password dialog appears to unlock.
c
S/W Title
Shows the software title.
Logout
Logs out and exits.
Audio Broadcasting
Registered cameras can be grouped for simultaneous broadcasting.
Virtual matrix Controller
Run or terminate Virtual Matrix Controller.
Selecting the Viewer
You may select and run a desired viewer from <LIVE>, <EVENT> and <SEARCH>, or you can add
a shortcut link to external program.
Added external shortcut is shown in a list.
82_ SSM console
Item
Description
Check the System
Status
You may check the system status of computers installed with each program component.
Settings
Opens the system settings menu screen.
Close
Exits the program.
Help
Shows the SSM Console application’s information.
Menu Bar
Loaded with executable menu buttons.
m
Display Pane
Shows the screen according to the selected viewer.
● SSM CONSOLE
Check the System Status
You may check the status of the computers installed with each program component.
1. Click [
] on the top side of SSM Console.
2. Check each component’s IP address and its status from
the popped Health Check window.
M
The device status in the health check window is displayed only
for systems supporting SNMP.
Health Check
The health check shows the summary of each item.
1 Console/Configuration Manager/Media Gateway/System
Manager shows the number of connected devices and the number of disconnected devices of all items.
- IP address : IP data
- Status : Connection status data
- Memory : Memory utilization rate
- BPS : Total network utilization of the PC in which the item is installed
- CPU : CPU occupation rate
- HDD : HDD capacity in use / Total HDD capacity
1 The device shows the number of connected devices, the number of disconnected devices and the number
of devices without SNMP setting.
1 RAID shows the following information.
- Number of virtual disks in normal condition (Optimal condition = normal.)
- Number of virtual disks in abnormal condition (Partially Degraded, Degraded or Offline condition =
abnormal.)
- Number of physical disks in normal condition (Optimal condition = normal.)
- Number of physical disks in abnormal condition (Offline, Unconfigured Good, Unconfigured Bad, Failed,
Rebuild, Foreign, or Hot Spare condition = abnormal.)
English _83
SSM console
RAID Status Checking
1. Virtual disk condition: {Optimal, Partially Degraded,
Degraded, Offline}. Optimal is the normal condition and
others are the abnormal conditions.
- Optimal : The member disk is online.
- Offline : One or more member disks have failed, and the
data cannot be accessed.
- Degraded : One or more virtual disks set to the
redundant RAID level failed, and the virtual disks cannot
be maintained if there are any more errors.
- Partially Degraded : One or more virtual disks set to the
redundant RAID level failed, but the virtual disks can be maintained even if there are any more errors.
2. Physical disk condition: {Unconfigured Good, Online, Failed, Rebuild, Unconfigured Bad, Foreign, Hot
spare, Offline}. Online is the normal condition and others are the abnormal.
- Online : The RAID controller can access the virtual disks.
- Failed : The disk is a virtual disk but is no longer usable.
- Unconfigured Good : The RAID controller can access the disk, but the disk is not a virtual disk.
- Unconfigured Bad : The disk failed but is replaced by the hot-spare disk and thus is no longer a virtual
disk.
- Rebuild : This disk is used to restore the redundancy of a virtual disk.
- Foreign : A disk is displayed as foreign until the user changes its configuration after it is added to
another RAID controller.
- Hot spare : The disk is set to hot-spare.
- Offline : The disk is a virtual disk and displayed in invalid data. It may be in the middle of a status
change.
M
RAID data are displayed only for the recording servers installed in a PC/server using the RAID controller supplied by Intel/
LSI.
Help
Click Help button to display program version and date
information window.
84_ SSM console
Checking up Console Configurations
The Console consists of Live, Search and Event Viewer.
Understand the role of each component and run the appropriate one as required.
1 Live Viewer : Provides real-time video and event information for monitoring, as well as PTZ control interface.
1 Event Viewer : Provides viewing of real-time events and the searching / playing of device’s events.
< Live Viewer >
< Event Viewer >
1 Search Viewer : You can search and play video footage stored in your local computer or in the device.
< Search Viewer >
English _85
● SSM CONSOLE
Console Structure
live viewer
Provides real-time video and event information for monitoring, as well as PTZ control interface.
Select [LIVE] menu of the viewer selection tab on the top right side of SSM Console.
Initially, SSM Console’s default viewer is set to the Live Viewer.
NAMES AND FUNCTIONS OF LIVE VIEWER
bc
m n q
r
B
t
A
Item
Description
List Menu
Shows registered devices and their connection status.
b
Full Screen
Fills the monitor’s full area with video screen.
c
Multi Monitor
Enables expanded monitor configuration for monitoring.
Change Tile Pattern
Selects the split screen mode of the live viewer’s video area.
Deletes the video tile.
Deletes all open video tiles.
Sequence
Screen switches its display layout mode automatically in order and interval defined in "Settings >
Screen > Monitor > Sequence".
86_ live viewer
Item
Description
OSD On/Off
Show or hide displayed indicators.
Initialize Events
Clears out all event indicators from all video tiles.
Capture
Captures the selected video tile’s current screen as an image file.
Print
Prints out the selected video tile’s current screen.
Record
Starts or stops recording of the selected video tile.
Device REC
Starts or stops recording with connected device remotely.
Speaker
Turns on or off the speaker.
Volume
Adjusts audio volume.
n
Talk
If supported by the connected device, activates microphone to talk.
Zoom In/Out
Enlarges or reduces video size using digital zoom.
Original Size
Resizes zoomed screen to its original 100% size.
q
Brightness
Adjusts the current video tile’s brightness.
r
Contrast
Adjusts the current video tile’s contrast.
Display Pane
Shows the Live Viewer screen.
t
Event List
Shows events occurred on connected devices.
A
Event Filter
You can select event types to be displayed on the event list.
B
Show/Hide Tools
Use these buttons to show or hide menu pane and control buttons.
m
● LIVE VIEWER
Camera status indicator
Indicators shown on the video tile tells the connected camera’s input status.
< Video Loss >
< Disconnected >
< Exceeded max
user >
< Camera Off or
Covert >
English _87
live viewer
NAMES AND FEATURES OF SCREEN INDICATORS
b
Camera01(192.168.0.128:4520)
2014-05-10 06:30:27
c
Item
Description
Camera Name
Shows the name and IP address of camera connected to the corresponding video tile.
If <Use Device’s Default Name> is set, the name registered to the device is shown as the camera
name.
b
Date & Time
Shows the video’s date and time information.
Shows the device supports PTZ control.
Display the status of audio output.
Display the status of using the microphone.
Appears when a sensor event is generated.
c
Icon
Appears if motion event is detected by the corresponding camera.
Appears if a video analysis event has occurred on the corresponding camera.
Appears if audio event is detected by the corresponding camera.
Shows that recording is in progress on the computer running SSM Console.
Shows that recording is in progress on a remotely connected device.
88_ live viewer
DEVICE
Add a networked device and allocate a registered camera to the user’s device list. Select the device to view the in a
tile.
In registration step, set to <Connect> to display the device in the list as connected.
● LIVE VIEWER
Connecting Devices
1. Select a device to be connected to.
2. Right mouse click on it.
Upon the context menu, select <Connect>.
M
For further information on adding devices, refer to
"Registration > Device". (Page 30)
If logged out while connected to a device, logging in again
revives previously connected devices and groups automatically.
If you select a list and enter text (keyword), only those groups
and devices that contain the text will be displayed in the search
result. This is useful if you do the search for a long list of devices or groups.
Disconnecting Devices
1. Select a device to be disconnected.
2. Right mouse click on it.
Upon the context menu, select <Disconnect>.
English _89
live viewer
Device Properties
1. Select a device.
2. Right mouse click on it.
Upon the context menu, select <Device Properties>.
3. Check the device information.
Device Webpage
Runs the device on a web viewer.
1. Select a device.
2. Right mouse click on it.
Upon the context menu, select <Device Webpage>.
3. Enter the access information to the device, ID and
password.
4. Moves to the connected device’s web viewer starter page.
90_ live viewer
Device Context Menu
Right mouse click on an empty area within the device list to
open device context menu.
● LIVE VIEWER
Find Objects
You may find a device by name from the registered devices.
1. From the context menu, select <Find Object>.
2. Once the Find Object window appears, select the
searching direction.
3. Enter the keyword for name and click [Next] button.
M
[Ctrl]+[F] also brings the find object window.
Find object opens only when the object tree has the focus (highlighted).
The [Next] button is activated only if a keyword exists.
Sort by Name
From the context menu, select <Sort by Name> to sort devices by name.
Sort by Type
From the context menu, select <Sort by Type> to sort devices by type, while the device tree collapses.
Sort by Connected
From the context menu, select <Sort by Connected> to sort devices by the order of connection
establishment.
Expand / Collapse Tree
From the context menu, select <Expand Tree> or <Collapse Tree> to show or hide tree list of registered
devices.
Show / Hide Devices
From the context menu, select <Hide Device> to hide registered devices.
If hidden, the menu switches to <Show Device> automatically, and selecting it reveals the hidden devices.
English _91
live viewer
CAMERA LIST
If connecting to the device was successful, a list of connected cameras appears.
Camera Indicators
Indicators that appear by each camera in the list show the
camera’s status information.
1
: General camera
1
: Camera supports PTZ control
1
: In recording
1
: Camera disconnected by a user
1
: Camera is disconnected / unreachable
1
: Box Type
1
: PT Driver Type
1
: Fish-Eye/Panomorph Type
M
Refer to "Camera Information" for details of camera type selection. (page 38)
Camera Context Menu
From the device list, select a camera and right click on it to
open the camera context menu.
Locate Tile
Highlights the selected camera’s video tile.
Add Video
Selected camera’s video is displayed on an unoccupied tile.
Remove Tile
Select a camera and open context menu to select <Remove Tile> to remove the corresponding tile.
Camera Properties
Select a camera and open context menu to select <Camera
Properties> to display the camera’s properties.
92_ live viewer
ALARM OUT AND CONTROL
Once a device’s connection is established successfully, the device appears in the Alarm Out list.
You may turn on or off each device’s alarm.
● LIVE VIEWER
Alarm Out Context Menu
Select an alarm and right click on it to open its context menu
that enables alarm control.
Turning On Alarm Out
Select an alarm and open context menu to select <Alarm
Out On> to turn on the selected alarm’s alarm output.
Turning Off Alarm Out
Select an alarm and open context menu to select <Alarm
Out Off> to turn off the selected alarm’s alarm output.
Turning On / Off Alarm Beep
For devices supporting Alarm beep speaker, <Alarm Beep
On> or <Alarm Beep Off> menu appears.
Upon such device’s alarms, you can turn on or off beep
sound output.
English _93
live viewer
SELECTING TILE PATTERN
You can set the video pane’s split-screen mode.
1 4:3 screen modes : 1/4/6/8/9/10/12/13/16/17/21/25/36/49
/64
1 16:9 screen modes : 6/12/20/30
M
While in multi-monitor environment, layouts and split modes for
less than 100 channels will be available.
Other modes will be disabled.
Modes having more splits than the number defined in <Split Screen> will be disabled. (Page 141)
LAYOUT
You can configure SSM software to display in multiple monitoring devices with defined layout.
] button then select a desired multi monitor type, and configure the layout as
From the top side menu, select [
preferred on the expanded monitor.
Apply a layout for the multi monitors
Selecting the multi monitors
1. From the top side menu, click [
] button.
2. Select the number of monitors.
As many monitors as specified are displayed on the
screen.
3. Select a monitor to be applied with the layout settings by
clicking arrows beside the monitor name.
M
Monitor #1 is the default monitor, and Monitor #2 and others
are expanded monitors.
You can set expanded monitor in "Screen > Monitor".
(Page 141)
The extended monitor (subsidiary Live Viewer) is applied to the monitor specified in "Screen > Monitor". Full screen is
also applied to the specified monitor.
Since the monitor 1 is set to the extended monitor by default, the monitor setting must be changed to change the location
of the extended monitor execution.
94_ live viewer
Setting the Tile Pattern for the expansion monitor
1. Click a tile of an expansion monitor to activate the corresponding monitor.
2. From the top side menu, click [
] button.
● LIVE VIEWER
3. Select a desired tile pattern to apply it.
Applying Layout
Select a monitor and then double click the desired layout.
The selected monitor is applied with the layout.
To add a layout
You can add multiple layouts to a desired monitor.
The layout can be registered in “Layout > Register” of SSM Configuration Manager.
For further information on adding layouts, refer to "Layout Setting". (Page 55)
< Camera Layout >
< Map Layout >
English _95
live viewer
Favorites
The camera layout of the selected monitor can be added to
Favorite (32 Korean characters or 64 letters).
The Favorites are stored separately for each user.
Using Map Layout
Selecting Split View Mode for Map Layout
When selecting a Map Layout, up to 10 split view modes are
available for the corresponding.
Utilizing the Map Layout
In the split view mode, a desired layout can be applied
quickly.
1 The Free mode places the video right upon the camera
icon when the icon on the map layout is clicked.
1 The other 9 modes place the camera’s video on the first
unoccupied tile when clicked the camera icon.
1 To delete the selected video, press the [Delete] key on the
keyboard.
1 Map tile link line : When a camera icon or image window is
clicked, the image window and camera are connected by a
line.
1 Icon tool tip : Place the mouse pointer on a camera icon on
the map layout to display the description input in "Registration > Device" of Configuration Manager.
96_ live viewer
1 Mini map : Double click the Map Link button or layout group link to display the mini map page.
1 To exit Map Layout mode, click [
] button.
● LIVE VIEWER
1 If you select a layout group in the layout tree, the first map
that belongs to it will be displayed. Also, the screen will
display the button you can press to move to the map that
belongs to the group.
1 Camera
- Tile search : It finds the tile showing the camera image.
- Tile delete : It deletes the tile showing the camera image.
- Attribute : It shows the information of the connected
camera.
- Instant Player : It runs the Instant Player.
1 Alarm Out
- Alarm Out On : It turns on the alarm output setting.
- Alarm Out Off : It turns off the alarm output setting.
To initialize the angle
Click on the [
M
] button and then the Move to Map button to initialize the angle.
Refer to "Layout Setting" for more details of layout. (Page 55)
Refer to "OSD Display" for further information on setting the mini map. (Page 142)
To move around the map
1 While holding down the mouse’s right click, move your
mouse to change the map angle.
While holding down the mouse’s left click, move your
mouse to change the map location.
English _97
live viewer
1 Press the 'Shift' key and drag the mouse to draw a
rectangle and select all camera icons within the rectangle.
Drag the selected icons to the map to display the image
tiles of the selected cameras on the map, to the multimonitor to display the images of the selected camera, and
to the view matrix setting screen to set the selected
cameras in the view matrix.
1 If the mini map is checked in the console setup, the mini
map is displayed when the Map Link / Layout Group Link
icon is double clicked.
To zoom in/out
Use zoom control bar to zoom in/out the current map screen.
To zoom in/out, click the control bar in the middle and drag.
Mouse wheel button zooms in/out the map too.
When the image tile on the map is double clicked, the size is changed
in the sequence of 1X, 2X, 3X 1X, 2X ….
98_ live viewer
Instant Viewer
The camera icon on the map layout blinks if an event occurs.
Double click the camera icon to display "Instant Viewer".
M
● LIVE VIEWER
It enables checking the event and digital zooming on the
video screen.
For further information on using the Instant Viewer, refer to
"Instant Viewer". (Page 108)
Viewing Instant Player
Point the mouse to a camera icon flickering because of an
event, click the right mouse button and select the instant
player to display the recorded video images.
English _99
live viewer
VIRTUAL MATRIX CONTROLLER
Virtual Matrix Controller is used to control the SVM (Samsung Virtual Matrix) S/W and it requires installation of the
SVM.
Virtual Matrix Controller can only retrieve the settings in the SVM and apply or edit them. It cannot save the
modifications. If you want to save the changed settings, you need to use the SVM.
1. Click on the [
screen.
] button in the top of the SSM Console
2. In the right hand side of the video window, the Virtual
Matrix control screen will be displayed.
Functions of the monitor layout viewer
button
1
/
: Loads the video displayed on the wall
monitor into the program.
1
/
: It starts or stops the Advanced Wall Layout
mode when the Wall Layout is selected.
It starts or stops the Wall Sequence/Wall Spot when the
Wall Sequence/Wall Spot is selected.
Advanced Wall Layout mode : This refers to changing the monitor layout, monitor sequence, tile spot and monitor spot in the
wall layout to be in a run ready condition.
1
: Removes the event displays from the selected tile.
1
: Removes the event displays from the selected monitor.
1
: Changes the monitor layout pattern.
1
: Deletes the displayed content from the selected tile.
1
: Deletes the displayed content from all the tiles.
1
: Reverts to the last saved monitor layout.
M
A tile is a single unit of video displayed in the monitor.
While editing the monitor layout, if you want to work on another monitor layout, then click on it to move to it immediately.
The information display window in the bottom of the monitor layout will display the <Wall Layout> if you click on it and
will display the <Monitor Layout> if you click on it.
To apply a Wall Layout
1. Select a registered wall.
2. Set the wall mode to Wall Layout.
3. Select a wall layout to use.
The wall layout will be immediately applied to the wall.
4. The selected Wall Layout name will be displayed.
100_ live viewer
To edit the Monitor Layout
● LIVE VIEWER
1. Double click a tile in the wall layout to display the information of the selected tile.
1 The information of the selected tile : Monitor layout, map layout, monitor sequence, tile spot and monitor
spot data are displayed. Although the monitor layout data include the details of the layout, other items
only display the object name.
2. Drag and drop the device/layout/map icon/live video to the monitor layout.
It will be reflected in the wall on a real time basis.
Video that can be assigned by dragging and dropping
- Drag a device and assign it to the monitor layout
- Drag a layout and assign it to the monitor layout
- Drag an event and assign it to the monitor layout
- Drag the icons in the map layout to allocate them to monitor layout. (Multiple icons can be selected using the <Shift> key.)
- Drag video played in the SSM and assign it to the monitor layout
3. However, it is not reflected on the wall right away if the wall mode is active.
English _101
live viewer
To run a wall sequence
A wall sequence is a function to shift multiple wall layouts in order to view multiple layouts on a single wall.
1. Select the wall mode to Wall Sequence.
2. Select a specific wall sequence from the wall sequence list.
3. If you press it once, a wall sequence will appear. Press it
one more time to terminate it.
To Run Wall Spot
The wall spot is a function to change the wall image when an event is generated in a device.
A spot is a function to change the wall video when an event occurs on a specific device.
1. Select the wall mode to Wall Spot.
The wall spot added in SVM is displayed.
2. Select a wall spot from the wall spot list.
3. Click once to start the wall spot and click again to stop the
wall spot.
If you want to set the OSD on the wall
Set the OSD to be displayed on the video wall.
1. Click on the [OSD] button.
The OSD settings screen will be displayed.
2. Select an OSD item to be displayed in the video.
3. Click on the [OK] button after settings are completed.
Click on the [Cancel] button to return to the previous
screen.
102_ live viewer
AUDIO BROADCASTING
To Add/Delete an Audio Broadcasting Group
A broadcasting group can be added and a camera can be registered for audio broadcasting.
● LIVE VIEWER
1. Click the right mouse button on an audio broadcasting
group and select <Add Broadcasting Group>.
2. Enter the name in the name input box and click the <OK>
button.
The name can be changed after the broadcasting group is added.
3. Register a camera by dragging and dropping under the
added broadcasting group.
There is no limitation on the number of broadcasting groups to be
added, but up to 16 cameras can be registered.
4. To delete an added item, select the item and right click the
mouse and select <Delete Item>.
To Add/Delete the Source of Audio Broadcasting
The sound files in the PC can be selected for broadcasting.
1. Select 'Audio Broadcasting', right click the mouse and
then select <Add Sound Source>.
2. Select a sound file to add.
Only mp3 and wav format sound files are supported.
3. Right click the mouse to preview or stop preview of the
added sound file.
4. To delete an added sound file, select the file and click the
right mouse button then select <Delete Sound Source>.
1 The registered cameras can be grouped for simultaneous
broadcasting.
M
User's voice can be transmitted using [
].
Up to 16 cameras can be selected at once for broadcasting.
English _103
live viewer
PTZ CONTROL
If the connected device supports PTZ functions, you can control PTZ camera remotely.
M
Even the box cameras without the PTZ function can use some function of <Panomorph Lens> or <Fish-Eye>.
Depending on camera model used, PTZ control may not be supported. For further information, refer to the camera’s user
manual.
If the camera supports Fish-Eye or SUNAPI, the home position can be set.
Select the PTZ camera and click the arrow key to move the PTZ camera in the selected direction.
Names and Functions of PTZ Control Window
q
b
c
n
m
104_ live viewer
Item
Description
Area Zoom
Controls PTZ to fill in tile with the dragged area on the video.
b
Go to 1x Zoom
Restores the original 1x zoom from Area Zoom screen.
c
PTZ Sensitivity
Controler
Adjusts the PTZ ball control sensitivity to faster or slower.
PTZ Ball
While operating PTZ, click and hold the ball and drag to desired direction to adjust the camera’s
framing.
Adjusts the camera’s focus manually.
Focus Adjustment
Focus Near : Adjusts the focus range to closer distance.
Focus Far : Adjusts the focus range to farther distance.
Zooms in / out with controllable zooming speed.
Zooming activates only if clicked at the speed set by speed slider.
Zoom Adjustment
Patrol
This is to call a group and its presets in order for monitoring.
You can only activate or deactivate the <Tour> option of the camera.
Swing/Autopan
Sets the camera to repeat swinging from a certain position to another.
According to the configuration, you can set to rotate or swing.
You can only activate or deactivate <Autopan> option of the camera.
DIS On/Off
DIS function can be turned on or off.
Auto Tracking On/Off
The auto tracking function can be turned on or off.
Group/Scan
Controls the camera according to the added preset groups in order, where a preset group can be of
multiple presets.
You can only activate or deactivate <Scan> option of the camera.
Trace/Pattern
Moves and zooms the camera with a predefined settings automatically.
You can only activate or deactivate <Pattern> option of the camera.
m
Preset
You can save specific camera’s view as a preset, or recall a preset to set camera framing.
Zoom Speed Slider : Sets the zooming speed out of 1 – 100 range.
Zoom In : Zooms in to enlarge the image.
Zoom Out : Zooms out to reduce the image.
Controls the amount of light travels through the lens.
n
Iris Control
Close Iris : Sets to bigger F number for less light exposure, resulting in darker image.
Open Iris : Sets to smaller F number for more light exposure, resulting in brighter image.
Camera Menu Traversal
While opening the camera menu, adjust the selected position.
Switch to the Menu
Mode
Moves to the connected camera’s settings menu screen.
q
Exit the Menu Mode
Exits the menu setup.
English _105
● LIVE VIEWER
live viewer
Auto Tracking
1. Click [
] to run auto tracking.
2. Press <Alt> key to select the object to auto track in the image.
When the movement of the selected image is detected, the camera moves in the detected direction.
[
/
] is enabled only for models that support Auto Tracking.
Using the Camera Menu
Click Camera Menu button to toggle display of the connected camera’s menu on the screen.
1. Using the PTZ Ball up/down/left/right control button, move to a desired menu.
2. To select the menu, click PTZ ball control.
3. To exit camera menu mode, click [
] button.
Preset Control
Click [
] button to display saved list of presets.
Select one from the list to set the camera’s view to the
saved location.
M
Presets can be saved in Settings menu.
For further information on preset, refer to "Setting Presets".
(Page 53)
106_ live viewer
EVENT LIST
Lists up device events in real-time.
Viewing Real-time Events
b
c
Item
Description
Status
Shows the event status.
b
Type
Shows occurred event’s type as icon.
c
Device
Shows the device type.
User
In SSM system, it shows the current SSM user’s account information.
For general device-related events (motion detection, sensor, etc.), the user ID who
acknowledged the event is shown.
Time (PC)
Shows the event time.
Confirmed Time
Shows the time acknowledged.
Description
Describes the meaning of the event.
Scroll Lock
Locks the list not to automatically scroll.
Clear List
Fully clears out the event list.
Event List
Shows real-time events of the device selected in the left pane.
Double click a listed item to open "Instant Viewer" pop-up window.
Right mouse clicking on an item opens context menu of "Instant Viewer" and "Instant
Player".
English _107
● LIVE VIEWER
You can check device events from all connected devices in the list.
Filter the events by selecting type of events for the Event List.
live viewer
Selecting displayed items
You can select items to be displayed in the event list.
1. Select the title on top of the event list, and right click on
it.
2. Select event items to be displayed in the list, by
checking the checkbox.
Items such as event time (device), measures taken and alert
history can be listed additionally.
Event priorities are additionally displayed. Double click the event
priority column to sort the events according to the priority.
PLAYING RECORDED EVENTS
Select an event item from the list and right click on it to open
context menu of <Instant Viewer> and <Instant Player>.
Select either one of them to check the video.
M
The <Instant Player> is playable only if the corresponding device contains saved data.
Instant Viewer
Double click a listed item to open "Instant Viewer" pop-up window.
You can confirm the event, record event remarks and end the event status.
Selecting the Camera
Display Pane
Zoom In/Out
Reset to original
Event Descriptions
Alarm Type
Input field for remarks
108_ live viewer
Confirm
Instant Player
Select an event item from the list and right click on it to open context menu and click <Instant Player> to
open it and play the corresponding camera’s video image.
● LIVE VIEWER
Names and Functions of the Instant Player
b
c
Item
Description
Display Pane
Shows the video.
b
Video control buttons
Controls the current event playback.
c
Time Selection
Plays video of the selected time.
Event Information
Shows the event information.
Input field for remarks
Enter the measures taken or remarks regarding the occurred event.
Confirm
Confirms and acknowledges the event.
Alarm Details
You can selectively record alarm event’s type when confirming the event.
Playback by time
Moves to the selected time.
English _109
live viewer
Item
Description
Video Control
Controls digital zooming of the player screen.
Linked Camera
For a sensor event, the video of the camera connected to the camera video/sensor specified
as the action (output) type in event action can be selected for viewing.
For a camera related event, the camera image specified as the action (output) type in the
camera video/event action of the generated event can be selected for viewing.
Exit
Closes and exits the Instant Player. If [Confirm] button is not clicked, exiting the player does
not confirm the event.
J
Recorded video footage can be played with Event Viewer, Search Viewer and Instant Player. Note that one saved footage
cannot be played with multiple viewers at the same time.
Names and Functions of Video Control Buttons
b
c
Step by frames
b
Forward/backward fast play
c
Play from event time (reset to event time)
Pause
Play
Video Control / Zoom In / Zoom Out Buttons
Zoom In
Original Size
Zoom Out
110_ live viewer
LIVE VIDEO SCREEN
Live feed from the connected device is displayed in the selected tile.
● LIVE VIEWER
Monitoring by Selecting Cameras
To display video feed from a camera on an unoccupied tile:
1 Double click a camera from the device tree to display its
video feed on the first unoccupied tile.
1 Select a tile, and open the context menu to select <Add
Video>.
M
In case of using multiple monitors, it is added to the monitor
which is activated.
When there’s no empty tile, the video is displayed on the
focused (selected) tile.
To display video feed from a camera on a specific tile:
1. Select a camera from the device tree.
2. Drag it and drop on a desired tile.
To change the video tile:
1. Select a tile.
2. Drag it and drop on a desired tile.
Selected two tile’s video display swaps each other.
To remove video feed from a tile:
1. Select a tile or camera to delete and right click on it.
Or, press the [Delete] key of the keyboard to promptly delete.
2. From the context menu, select <Remove Tile>.
The selected camera’s video is removed from the tile
and it becomes unoccupied.
3. To remove all video feeds from every tile, click [
button on top of video pane.
Entire tiles become unoccupied.
]
English _111
live viewer
Using Shortcuts
Shortcut keys make SSM even more more user-friendly.
1 To open videos using a shortcut key
1) Press the <Alt> key. (Keep the 'alt' key pressed before pressing the <Enter> key.)
2) Input a number key.
3) Press the <Enter> key to open the selected video.
M
Check the shortcut key definition in "Configuration Manager".
Using the Tile Context Menu
Select a video tile from the video pane and right click on it
to open the context menu.
Click to select desired ones from the appeared list of
available menu items.
Remove Tile
Removes the video from the selected tile.
OSD
Sets whether to display on-screen display menu and icons
on the video screen, such as date, camera name and other
information.
It acts the same to that of the [
video pane.
M
] button on top side of
For OSD information selection, check the item in the <OSD
Display> selection menu of <Environment>. (Page 142)
112_ live viewer
Capture
● LIVE VIEWER
Captures and saves the currently selected tile’s video image
in the specified destination file path. You can select the file
format when specifying the path.
] button on top side of
It acts the same to that of the [
video pane.
To save the captured screen:
1. Select a tile to be captured.
"Capture" window appears.
Depending on system configuration, saves immediately without
displaying the screen capture setup step.
2. In <Display Information>, check to select information
items to be saved with the captured image.
1 Camera Name : If checked, saved capture contains
the camera name at the top of the image.
1 Date/Time : If checked, saved capture contains the
time captured at the top of the image.
1 Description : If checked, saved capture contains the
description recorded in the Description text field.
Up to 50 characters can be entered.
1 Path : Sets the destination file path of the captured file. You can specify the file format when you select
the path. (You can specify JPG or BMP file format.)
3. When done with setup, click [OK] button.
A popup saying save completed appears.
4. To check saved capture file, click [Open Folder] button.
M
If <Additional information dialog popup> option in
"Environment > Capture" is selected, every capturing
prompts with file path and image information on the popup
dialog.
If not selected, capturing directly saves the captured image
without prompting with additional information dialog and
completion dialogs appears.
English _113
live viewer
Print
Prints out the selected tile’s current video image to the
printer connected with your computer.
] button on top side of
It acts the same to that of the [
video pane.
To print the screen:
1. Select a tile to be printed.
"Screen Print Information" window appears.
2. In <Display Information>, check to select information
items to be printed with the screen image.
3. Click [OK].
Print window of the printer connected to your computer
appears.
M
For further details on <Display Information>, refer to
"Capture". (Page 113)
Record
Starts and stops recording of the currently selected tile.
] button on top side of video pane.
It acts the same as the [
To start recording:
1. Click <Record>.
The "Record" window appears.
Depending on system configuration, records immediately without
displaying the record setup step.
2. Set the file path and click [OK] button.
The record indicator appears on the tile and starts
recording.
3. To stop recording, click <Record> again.
A "Warning" dialog appears.
4. Click [OK].
Unchecking the checkbox in front of <Record> stops
the recording.
M
If <Additional information dialog popup> option in
"Environment > REC" is selected, every recording prompts
with file path on the popup dialog.
114_ live viewer
Device REC
Starts or stops recording onto the device connected to the tile’s camera.
] button on top side of video pane.
It acts the same as the [
● LIVE VIEWER
Speaker
Transmits or stops Transmiting sound from the selected camera.
] button on top side of video pane.
It acts the same to that of the [
Microphone
Produces sound through the microphone at a remote device.
] button on top side of video pane.
It acts the same to that of the [
Instant Player
Displays the Instant Player window for the selected channel.
M
Only playable if the device contains recorded footage data.
For further use of the Instant Player, refer to "Instant Player". (Page 109)
Keep Aspect Ratio
Keeps original video’s aspect ratio.
If not selected, the video is filled into the video pane.
< Variable Aspect Ratio >
< Keep Aspect Ratio >
Actual Size
If selected, the video is reset to the original size.
If the video's size is bigger than the screen, you can move it with mouse dragging.
English _115
live viewer
Deinterlacing
Sets or cancels deinterlacing of the tile’s video.
Flip
Flips the video vertically.
Fog Removal
The fog removal menu is displayed for cameras supporting the fog removal function.
You can select Off / Auto / 1~10.
Device Alarm Reset
Initialize the alarm settings.
Properties
Shows the selected camera’s property information in a
pop-up window.
DIGITAL ZOOM
Digital zooming allows the enlarging of the video as if using a magnifier.
It works on the displayed image by enlarging it digitally, which is different than optical zooming of lens.
Digital zooming provides magnification up to 16 times of the original.
Setting Digital Zoom Area
1. From the top side menu, click [
] button.
It switches to digital zooming mode, and every clicking
magnifies the image by 50%.
2. Click a desired video and then drag it or click Zoom In
button for further zooming.
Enlarged image is centered by the point you clicked.
When an area is selected by dragging, the selection fills the screen.
116_ live viewer
Digital Zooming Out
1. From the top side menu, click [
] button.
● LIVE VIEWER
2. Click a video.
Reduced image is centered by the point you clicked.
Every clicking of Zoom Out button reduces the image by
50%.
Exiting Digital Zoom
1. From the top side menu, click [
] button.
2. Digital zooming ends, and the video is reset to the original.
Moving Video Area with Pan Cursor
1. While in digital zooming, click on the zoomed area marker shown near the bottom of digital zoom screen.
2. While holding mouse button, drag to move it to a desired area.
< In Digital Zooming >
M
< Released Digital Zooming >
If clicked Zoom In/Out button, it resizes by 50%.
Restoring to the Original Size exits digital zooming.
Switching to Full Screen Mode
1. From the top side menu, click [
] button.
Only the video pane fills the screen.
2. To exit the full screen mode, press [Esc] on the keyboard.
English _117
live viewer
Running Sequence
This function enables an automatic sequence display of channels in a pre set time.
Used when there are more connected channels than the current screen splits. It switches to the next set of
channels according to the current screen split mode.
] button.
1. From the top side menu, click [
Runs sequenced display in the current split screen mode.
2. To exit sequence mode, click [
M
] button again.
While in sequence mode, Map Layout becomes unavailable.
The Sequence mode supports split screen mode up to 16-splits. If you configure Sequence mode to include a layout
having more than 16 splits, actual Sequence mode operation limits playback to 16-split mode.
You can define the order of layouts and their dwell time for sequence mode in "Setup > Screen > Monitor". (Page 141)
Fish-Eye View Mode
For Fish-Eye cameras, the Fish-Eye View mode context menu is available.
1 Over View : Original image
1 Panorama : The panorama image split to top and bottom can be moved independently.
1 4-way split screen : Each part of the 4-way split screen can be moved independently.
1 Single View : Default view. The image is displayed in a single view.
1 1 Over View + 3Rectangles : The screen is organized into an over view and 3 way split images. Each part
can be moved separately.
Use of Panomorph Lens
The function supports a viewing angle of 360° using the mouse in the video tile of the camera on which the
Panomorph lens is enabled.
1. Pan/Tilt Operation: Click on a tile and drag it to move the camera along the mouse drag.
2. Zoom Operation: Right-click and drag the mouse up or down to zoom in or out.
3. The PTZ panel can be used like a conventional PTZ camera.
4. It supports the Area Zoom and Preset functions like a conventional PTZ camera.
5. It supports the zoom function using the mouse wheel like a conventional PTZ camera.
1 Perimeter : This is a panorama image split into top and bottom.
1 4-way split screen : Each part of the 4-way split screen can be moved independently.
1 Single View : Default view. The image is displayed in a single view.
M
When printing the Panomorph or Fish Eye image, the position set as the home position in CM is printed in single view by
default.
118_ live viewer
Using Shortcuts
Shortcut keys make SSM even more more user-friendly.
1 To open videos using a shortcut key
1) Press the <Alt> key. (Keep the 'alt' key pressed before pressing the <Enter> key.)
● LIVE VIEWER
2) Input a number key.
3) Press the <Enter> key to open the selected video.
M
Check the shortcut key definition in "Configuration Manager".
1 Controlling PTZ Camera with Keyboard
Select a PTZ camera and press an arrow key to move the PTZ camera in the selected direction.
English _119
event viewer
It provides viewing of real-time events and searching / playing events of devices.
Select [EVENT] menu of the viewer selection tab on the top right side of SSM Console.
Or, select [EVENT] viewer on login screen of SSM Console.
NAMES AND FUNCTIONS OF EVENT VIEWER
b
c
Item
Description
Live Event / Event
Search Tabs
Select either one of real-time event and event search.
b
Device List
Select a device to display events of the selected device in the event list.
c
Sensor list
Select a sensor to be displayed in the event list window.
Alarm list
Select an alarm to be displayed in the event list window.
Event Type
Shows selected type of events only in the event list.
Scroll Lock, Clear List
Locks the list not to scroll, and clears all events listed.
120_ event viewer
Item
Description
Event List
Event Details
Confirm
When clicked after confirming the event searched, acknowledges the event.
All events other than log, SSM (User, System) and Device (System, Alarm Out) can be
confirmed as cleared event.
History
Shows the event history of the selected.
It displays the detailed information and video of the selected event.
It displays the information of all events.
The event viewer maintains the tree selection setting and applies it to the tree.
EVENT SEARCH
Viewing Live Events
You can check real-time events in the event list.
M
For further details on checking events, refer to "Searching Events". (Page 122)
English _121
● EVENT VIEWER
M
Shows events, click column header to sort events by the selected one.
event viewer
Searching Events
Click Event Search tab to display event search menu.
You can specify event type and time for search.
1. Select desired event types by checking the checkboxes.
1 SSM : User, System
1 Device : System, Camera, Sensor, Alarm Out
- Camera : System, Movement detection, Video loss, Intelligent image analysis, Pass, Entry, Exit,
Appearing/Disappearing, Tempering, Tracking, Face recognition, Audio detection
Refer to "HA Event" for details of "HA". (Page 69)
2. Filter by time to search logs.
1 Time (PC) : You can search for occurred time.
1 Time (Device) : You can run event search based on the
device time.
1 Confirmed Time : You can run event search based on
the confirmed time.
3. Use calendar to specify search date.
4. Specify the start time and end time.
5. Click the [
] button.
Events match the search criteria are listed.
M
Recorded video footage can be played with Event Viewer, Search Viewer and Instant Player. Note that one saved footage
cannot be played with multiple viewers at the same time.
Maximum of 10,000 event search results are displayed.
122_ event viewer
Event Preset
Save the event search condition and select a saved search condition to search the events. The registered list
can be sequentially replayed.
● EVENT VIEWER
1. Right click the mouse in the <Event Preset> section and
select <Save Preset>.
2. Input the name of the preset of search condition and time
of search then click the <Save> button.
3. You can change or delete the saved event presets.
Consecutive playing of events
Select events in the list to be played consecutively.
1. Select events for consecutive playing from the list of
searched events.
2. Select an event and right click on it to select <Sequential
Playback>.
3. The selected events will be consecutively displayed on the
window.
English _123
event viewer
Backing up event logs
You can backup all the events searched in the list.
1. Press the [
] button.
2. When the <Backup Event Log> window appears, press
] button to set the backup path and then press
the [
] button.
the [
3. When the backup is finished, press the [
to check the full event details and a stat report.
] button
4. As needed, use shortcut buttons on the top side of the
report to print, or save the report as an Excel, PDF or Word
file.
124_ event viewer
Confirming Events
You can check details of event searched in the list, and confirm it to end the event situation.
● EVENT VIEWER
1. Double click an event to see its details from the list.
In the event details pane, the event video is played as well
as its details.
Or, select an event and right click on it to open <Instant Viewer>.
For further information on playback control, refer to "Instant
Player". (Page 109)
2. Check event details and set <Alarm Details> to either
one of <Normal>, <Abnormal> and <Etc>.
3. Describe the measures taken.
4. Click [Confirm] button.
Once confirmed, it is marked in the list.
History
For confirmed events, you can see the confirmed details of the selected event from the list.
1. Select an event to see its history from the list.
2. Click [History] button.
3. Check event confirmation details.
M
If user A described intrusion path in the Alarm Measures for an event, and user B added notes on further details of taken
measure and confirmed that event, such process of alarm measure can be checked afterwards with History function.
English _125
search viewer
You can search and play footages stored in your local computer or in the device.
Select [SEARCH] menu of the viewer selection tab on the top right side of SSM Console.
Or, select [SEARCH] viewer on login screen of SSM Console.
NAMES AND FUNCTIONS OF SEARCH VIEWER
b
c
Item
Description
Search mode
You can select Basic, Advanced, Masking, Folder or POS as the search mode.
b
Device List
Shows devices that can be searched over.
c
Category
Shows available event types for search.
PTZ
The PTZ panel is enabled to use PTZ when replaying the recorded file on a camera set up to
use the Panomorph lens.
The PTZ, AreaZoom, and preset functions can be used.
Refer to "Use of Panomorph Lens" for more details. (Page 118)
Date/Time
Dates with found matches from the selected device is marked on the calendar.
Timeline
Sets the search result list to timeline format.
126_ search viewer
Item
Description
List
Sets the search result to a list of events sorted by events.
Backup
Sets the time period for backing up searched data.
Detailed Timeline
Use this timeline slider to move selected search result’s specific moment, or zoom in/out the
timeline.
Playback Control
Playback controls for playing back search result.
Display Pane
Shows the video of searched result.
M
The context menu appeared when right clicked on each menu item is the same to that of Live Viewer.
Device List
From the device list, you can select desired device for your search.
1. Search desired device from registered devices.
2. Refine your search by checking checkboxes of groups or
devices.
Date Search
If selected device contains recorded data on a date, it is marked on the calendar.
1. Select a device and click [
] button.
2. Select year and month for your search.
If a date has recorded data, it is marked in color.
3. Click to select a date to be searched.
Detailed time period of recorded data is shown in the
search result area.
English _127
● SEARCH VIEWER
search viewer
Category
You can set the search criteria with event types.
1. Click Category.
Category items appear.
2. Select desired search category items.
1 Video Loss, Motion Detection, Video Analysis, Audio
Detection, Sensor, Continuous, Manual : Searches
selected items for the highlighted tile in the video display
pane.
3. Search results matching selected items are shown in
timeline.
Digital Zoom
Digital zooming provides enlarging the video as using a magnifier.
1. Click a desired camera’s video.
2. Use digital zoom button to magnify/reduce desired portion
of the video.
3. Brightness and contrast can be adjusted too.
Click [
M
] button to reset to the original.
For further details on using digital zoom, refer to "Digital
Zoom". (Page 116)
Playing Searched Data
Setting the playback point of time
In the timeline of search result, the red vertical line means the current playback point of time.
1. Set the time to play.
2. Click [
] button on the right.
The point of time for your playback is set to the chosen
time.
M
Or, drag the red strip or click on a desired point in the timeline to set playback point of time.
The time display shows the current playback’s record time.
128_ search viewer
Selecting Camera for Playback
By default, the search result shows 5 channels in the list. You can resize it to show more or scroll down it.
Video playback supports up to 16 simultaneous channels.
● SEARCH VIEWER
1. Double click desired camera in the search result.
2. Selected camera’s video fills the first unoccupied video tile.
M
Or, drag a camera from the search result to a tile and drop in the video display pane to add the selected channel’s video
to the tile.
Enlarging the Timeline Scale
< 24 Hours >
< 1 Hour >
1. Click [
] button in the top right corner of the search result area.
2. It enlarges the timeline scale of searched data from 24 hours to 5 minutes, the button becomes disabled
when the maximum limit is reached.
Reducing the Timeline Scale
1. Click [
] button in the top right corner of the search result area.
2. It reduces the timeline scale of searched data from 5 minutes up to 24 hours, the button becomes
disabled when the minimum limit is reached.
English _129
search viewer
Moving the playback point
When a search result is found, the playback point is set to the time currently selected.
1. Select a search result.
The playback point is set to the time currently selected, marked with a red vertical line.
2. Drag the red vertical line to a desired point of time in the timeline.
When in enlarged timeline, you can use < , > arrows on both ends of the timeline to move backward/
forward.
Playback Control
Pause or control playback speed.
Playback
1. Select a search result and click [
] button.
In the playback progress bar, the current playback speed is indicated.
2. Use playback control buttons to control playback faster or slower.
130_ search viewer
Names and Functions of Playback Controls
b
● SEARCH VIEWER
c
b
Start / stop playback, Pause
Faster forward / backward playback
Sets the forward/backward playback speed to x1, x2, x4, x8, x16, x32, x64, and then x1 again on every click.
When in paused, it switches to slower forward / backward playback button.
c
Step Forward / Backward
Moves the video frame by frame. While in playback, these buttons are disabled.
Skip Forward / Backward
Skips to previous or next event. While in playback, these buttons are disabled.
Selecting the Search Mode
Click a radio button to switch to the Basic, Advanced,
Masking, Folder or POS search screen.
English _131
search viewer
ADVANCED SEARCH
If there are recorded data, they can be searched according to the search condition.
Smart Search
A specific section of the image is selected as ROI, Exclusive Zone, or Virtual Line to search the events that
have occurred during a specific time band.
1. Switch to the <Smart Search> model of <Advanced
Search> and select the device to search in the <Device>
list.
Smart search is a function supported only by the recording server.
2. Select the year and month to search and click the [
button.
Dates containing data are displayed. When a date is
selected, the data are displayed in the time-line list.
]
3. Select the data from those displayed in the time-line list.
4. Adjust the time-line bar to set the preview image.
1 Time : Select the beginning and end time for the search.
The difference between the beginning and end time can be up to
24 hours.
Camera01(55.101.56.53:4505)
2014-05-12 12:01:40
1 Setting the Search Region
- ROI (Region of Interest): Designate ROI on the image
window to detect the events within the region. Specify
a point on the image window with the mouse and
draw a line to specify the region. Up to 11 vertices are
allowed within an interior angle of 180 degrees. (Up to
32 ROI's can be specified.)
2014-05-12 MON 11:48:33
Click the right mouse button to complete specification of ROI.
h mouse))
(ex.: To draw a rectangle, specify 4 points and then right click the
After a region is set, the event setting window is displayed.
Select the event type to detect of three events (multiple
selections allowed) and click the <OK> button. The region
setting is canceled when <Cancel> is clicked.
Camera01(55.101.56.53:4505)
2014-05-12 12:01:40
Event
Entering
Exiting
Motion Detection
2014-05-12 MON 11:48:33
OK
132_ search viewer
Cancel
- Exclusive Zone (Region of Non-interest) : Specify the exclusive zone on the image window to exclude
the events within the region in the search result. Specify a point on the image window with the mouse
and draw a line to specify the region. Up to 11 vertices are allowed within an interior angle of 180
degrees. (Up to 32 ROI's can be specified.)
Right click the mouse to complete specification of ROI.
- Virtual Line : Draw a virtual line on the image window. Motion is searched when a movement from the
line to the set direction is detected.
Select Left or Right. They can be selected simultaneously to detect motion in both directions.
M
For the ROI, exclusive zone and virtual line, place the mouse on the drawn region and right click the mouse to change or
delete the region.
5. Click the [Search] button.
6. Check the result of smart search and double click the
search result to replay the selected image.
Up to 500 smart search lists can be checked. Click the [◄/►]
Camera01(55.101.56.53:4505)
2014-05-12 12:01:40
button to navigate between pages.
7. Click the <Export> button to save the search results in an
excel file.
2014-05-12 MON 11:48:33
Using Smart Search
1. Register the SUNAPI camera in the recording server. (Refer to SUNAPI supporting camera specification.)
2. Set the motion event of the camera to <On>.
The camera event can be set in the camera Web page.
- Motion event On, no region setting (detection of motion in all regions.)
- Accessing the camera Web page: Select a camera in the Registration > Device menu of the Configuration Manager and click
the [Device Setting Page] button of the device information.
English _133
● SEARCH VIEWER
(ex.: To draw a rectangle, specify 4 points and then click the right mouse button.)
search viewer
Motion Search
1. Switch to the <Motion Search> mode of <Advanced
Search> and select the device to search in the <Device>
list.
2. Set search year and month, and click [
] button.
Dates with recorded data are marked in the calendar.
Select one to display data in timeline list.
3. In the timeline list, select a desired data item.
4. Use timeline bar to control preview display.
5. Specify the start time and end time for thumbnail view.
Up to 60 minutes can be assigned with start and end times.
6. Set the time interval.
1 Search Region Setting
- Specify the search region by dragging the mouse
to the right and down. Cancel the selection by
dragging the mouse in the reverse direction.
- The region can also be specified by clicking each
cell.
- All regions are selected or canceled by clicking
<Select All> or <Cancel All>.
In case the selected device supports motion detection, check
<Motion Search> checkbox for motion search. For other devices
not supporting motion search, the button is disabled.
7. Click [Search] button.
8. Select a searched thumbnail to start playback in preview
screen automatically.
134_ search viewer
Heat Map Search
Select a region on the image to detect the motion of an object in a specific time band and display how many
movements were detected in each region.
2. Select the year and month to search and click the [
button.
Dates containing data are displayed. When a date is
selected, the data are displayed in the time-line list.
● SEARCH VIEWER
1. Switch to the <Heat Map> mode in <Advanced Search>
and select the device to search from the <Device> list.
]
3. Select the data from those displayed in the time-line list.
4. Adjust the time-line bar to set the preview image.
5. Select a search region and specify the search time and
search format.
1 Setting the Search Region
- Specify the search region by dragging the mouse to
the right and down. Cancel the selection by dragging
the mouse in the reverse direction.
- The region can also be specified by clicking each cell.
- All regions are selected or canceled by clicking
<Select All> or <Cancel All>.
6. Click the [View Heat Map] button.
After the heat map search is completed, different colors are
displayed according to the number of movements detected.
-
: Redder colors means more movements
detected.
Check the results of the smart search and double click the search
results to replay the selected image.
Up to 500 smart search lists can be checked. Click the [◄/►]
button to navigate between pages.
English _135
search viewer
MASKING BACKUP
The mask operating for a specific period is added to the image to back up the image and audio.
Masking Backup
1. Select <Masking Backup> mode in the search mode.
2. Set the search condition.
1 Time: Enter the time for backup.
1 Region: Set the mask region to back up.
1 Path: Specify the backup path.
1 Password: Select whether the password will be used
and set the password.
If password is to be used, set the password and confirm
it.
3. Click the [Backup] button.
To Set the Mask Region
1. Click [
].
2. To set the mask region, click the position of the upper left
vertex of the rectangle on the image window, move the
mouse then click the point of lower right vertex of the
rectangle.
3. Set the mask operating time and click the <OK> button.
When the mask region and mask operating time are set, the
recording of the selected region for the selected time is not saved.
Up to 32 masks can be set.
136_ search viewer
FOLDER SEARCH
Search for the data in the folder which contains the data that were saved as SEC files in the PC used for SSM
Console execution.
● SEARCH VIEWER
Searching Folders
1. Set to Folder Search mode and select a folder from
<Folder> list.
Resulting footages are automatically listed in the timeline
list.
2. Select a desired data from the timeline list.
3. Use playback control to play selected data.
M
If the selected folder has more than 64 SEC files, then the
popup window will ask you to select the files to be played.
But if you double click on the timeline, you can play a maximum
of 16 sets of video at a time.
If the SEC file you want to play video for has a password, then
the popup will prompt you to enter the password. You must enter the correct password before you can play the video.
POS SEARCH
You can search POS records based on time and text keyword.
M
The Search function is available only for the device supporting the POS function.
Searching POS data
1. Set to POS Search mode and select date and time for
your search.
2. Enter a search <Keyword>.
3. Set the search condition.
1 Find whole words : If not selected, blanks between
keywords act as AND operator.
Ex) If entered "Cash 2500", finds data contains both
"Cash" and "2500" from the database.
1 Match case : If selected, the search becomes case
sensitive, distinguishing upper and lowercase letters.
4. Click [
] button.
English _137
search viewer
BACKUP
You can back up the search data onto the computer that is running the program.
Backing Up Search Data
You can back up searched footage of selected period into a desired folder.
] button.
1. Click [
The backup pop-up appears.
Backup is only available for devices currently connected.
2. Select a channel from the backup window.
3. Click [
] button to browse and set the desired
backup storage path.
4. Specify the start time and end time.
5. Set the backup file format.
Backup supports "*.sec" and "*.avi" formats.
1 AVI : A general video format. Can be played with Windows Media Player.
A new AVI backup file is created in the following cases.
- When you change the video’s resolution
- When you change the audio or video codec
- When the file size is greater than 2GB
1 SEC : Samsung’s proprietary format. Embeds self-executable video player with data.
Check <Use a Password in the SEC file> to set the password.
M
The Microsoft Windows Media Player does not support AVI files having resolutions higher than 3Mega pixels. For highresolution videos of more than 3 Mega pixels, SEC backup is recommended.
6. Click [Backup] button to start backing up.
7. Click [Stop] button to stop backup in the middle.
8. To end backup, click [Close] button.
The backup stops and saves the file backed up at the moment, and closes the backup window.
138_ search viewer
setting console
SETTING SSM CONSOLE
Environment
● SETTING CONSOLE
Language
Sets the language used for Samsung Security Manager’s user interface.
Use Device’s Default Name
When it is checked, the name of the camera registered to the device is displayed in the list or the screen.
Date/Time
Set the date and time format displayed on OSD.
Date / Time indication is based on the time of running the pop-up window.
1 Date formats
2010-04-19 (yyyy-mm-dd)
04-19-2010 (mm-dd-yyyy)
19-04-2010 (dd-mm-yyyy)
1 Time formats
08:06:04 (hh:mm:ss)
08:06 (hh:mm)
English _139
setting console
Capture
You can set the captured image file’s path.
1 Path : Shows the current file path, click [
] button to set to another file location.
Click <Additional information dialog popup> to display saved path and additional capturing information on a popup window
separately when capturing a monitoring window.
REC
Set the selected recording data’s file path and recording interval.
1 Path : Shows the current file path, click [
] button to set to another file location.
1 Recording Interval : Sets how long the recording will continue.
1 Format : Sets the file format for recording.
Click <Additional information dialog popup> to display saved path and additional recording information on a popup window
separately when recording a monitoring window.
If you check <Use the login Password as a password for recording>, you can use the login password for recording.
Startup
Configures the screen display and its settings when the program is started.
1 Display full screen : On the program’s startup, it fills the entire screen automatically.
1 Load Last Settings : When restarting, it loads the last displayed camera’s video layout.
UI Auto Lock / Logout
1 UI Auto Lock : If there is no keyboard or mouse action for the specified period, it locks user interface
automatically which prevents unintended access.
1 Logout : If there’s no keyboard or mouse action for the specified period, it logs out automatically to prevent
unintended access.
140_ setting console
Screen
● SETTING CONSOLE
Monitor
The monitor layout can display up to 100 channels on a maximum of 4 monitors.
Execution location
Select the number of monitors to connect. Up to 4 monitors can be connected.
Split Screen
Sets the split screen mode for each viewer / monitor.
The available split screen modes differ by maximum number of channels and connected monitors.
J
The default settings may not be appropriate to your configurations; user must configure the system appropriately for
proper operations.
English _141
setting console
Sequence
Distributes camera feeds to fit the selected split screen mode
in sequenced order automatically, at the specified duration.
M
Sequenced mode is available only for a camera layout.
To define sequence:
1. Click [
monitor.
] button on the top right corner of the target
2. To add a layout, click [
] button.
click [
] button. To delete a layout,
3. Click <Dwell Time>’s [
of each layout added.
] button and set the dwell time
4. When done with setup, click [OK] button.
5. To apply the sequence mode, check the checkbox in front
of the sequence setup button.
OSD Display
You can select the information (OSD) displayed on the monitor.
Check the checkbox of <Use mini map> to specify the use of mini map.
- Adjust the value between 0.3~1.0 to set the size of the mini map.
- Select upper right/lower right/upper left/lower left to set the position of the mini map.
Video Quality
Use I-Frame
Set the number of channels, the I-Frame mode will be applied for more than the specified channels.
It is applied to each monitor of each viewer.
It is used to avoid system overload of multi-channel video monitoring.
M
What is I-Frame?
Video compression methods hiring H.264 and MPEG4 codecs produces compressed video of one base frame (Intra-frame)
and multiple predictions (predicted frames) only containing differences between each frame’s previous one.
142_ setting console
Resolution
Set the number of channels, low-resolution will be applied for more than the specified channels for better
communication.
It is applied to each monitor of each viewer.
This specifies the channel number to begin deblocking.
It is applied to the monitor of each viewer separately.
It is used to prevent overloading of the system during multi-channel video monitoring.
M
What is deblocking?
Video compression using the H.264 codec compresses the screen image into multiple blocks.
When this is applied, the boundary between the blocks may become visible, degrading the image quality.
Deblocking eliminates this boundary between blocks to improve the image quality.
1 Show Intelligent Video Analysis Rules : Sets whether to display Intelligent Video Analysis Rule applied for the
video.
1 Stop video being receiving of other channels in [Expand Tile] mode. : Sets whether to receive video from
channels other than the expanded when viewing one channel in [Expand Tile] mode of Live Viewer.
English _143
● SETTING CONSOLE
Deblocking
setting console
Event
Event Single Monitoring
Upon an event, the Live Viewer monitoring screen automatically switches to Single mode with the eventgenerating channel for the specified period, which returns to previous mode afterwards.
Sequential playback time for event
You can set the consecutive event playing time as the pre/post event time.
Map Layout
If this option is set and an event occurs while viewing a map layout, the view automatically switches to the
corresponding map which contains the event-generating device’s icon on it.
Sound
Set the sound device for the event, and how the sound repeats.
Instant Viewer
If selected <Instant Viewer>, set the maximum number of simultaneous instant viewers allowed and
minimum dwell time of event pop-up dialog.
144_ setting console
SSM service manager
You can check SSM related services, and stop them.
The Service Manager should run while the Samsung Security Manager is running at the same
time, and an icon appears in the task tray.
● SSM SERVICE MANAGER
SERVICE MANAGER
Resides in the task tray, and provides access to Samsung Security Manager services.
Managing the Services
Select the icon and right mouse click.
Service menu should appear.
You can start or stop services.
1 Start the SSM Console : Runs SSM Console program.
1 Start Service : Starts Media Gateway and System Manager
services.
1 Stop Service : Stops Media Gateway and System Manager
services.
Service Status
Click [Service Status] to open SSM Service Manager
information dialog.
1 Start Service : Disabled if the service is running.
1 Stop Service : Disabled if the service is stopped.
1 OK : Applies the changes, and closes the window.
1 Cancel : Does not applies the changes, and closes the
window.
English _145
SSM service manager
Media Gateway
1 NIC #1 : The media gateway IP, console, CM, etc. saved in
SM DB are connected to this NIC.
1 NIC #2 : If it is set, the equipment is connected to the NIC.
1 Port : It is the port used for connecting the client.
1 Http port : This port provides the CGI Web service to the
mobile viewer.
1 Rtsp port : The rtsp port provides the image to the mobile
viewer.
1 System Manger
- IP : SM IP for the connection to MG.
- Port : SM port for the connection to MG.
SystemManager
1 Port : The port of the system manager is changed.
Time Settings
You can set the computer installed with SSM to be the NTP
time server, and its checking frequency.
1 Operation as a synchronization server : Other PCs or
devices are synchronized with the time of this PC.
1 Use synchronization : This PC tries synchronization to the
input address at the specified interval.
Updater
If the server has the latest version, the update list will appear.
A user can check the release note and the content of the
latest updates before deciding whether to proceed with the
updates.
Click on the <Use Auto Update> and set the auto update
settings.
When "Automatic Updates" is selected or the 'Update' button is
clicked, e automatically performed and patches are executed when the
updates are needed.
146_ SSM service manager
Automatic Update Setting
Updates can be checked automatically by setting the update checking period.
1. Select [Update] in [SSM Service Manager].
● SSM SERVICE MANAGER
2. Change the setting in the setting window and click the [Apply] button.
Selecting the Automatic Checking Interval
1 Updates can be checked for daily.
1. Select Daily.
2. Select the automatic update time.
ex.) The figure in the right shows the update set for 10:00
am each day.
1 Updates can be checked for weekly.
1. Select Weekly.
2. Select the day of the week for automatic updates.
3. Select the automatic update time.
ex.) The figure in the right shows the update time set for
10:00 am on each Sunday.
1 Updates can be checked for monthly.
1. Select Monthly.
2. Select the date for automatic updates.
3. Select the automatic update time.
ex.) The figure in the right shows the update time set for
10:00 am on the first day of each month.
English _147
SSM service manager
Language
You can set the program language.
About
Shows the Service Manager’s version information.
148_ SSM service manager
SSM Recording Server
SSM RECORDING SERVER SERVICEMANAGER
Service manager
It is in the task bar and manages the SSM Recording Server service.
Service management
Select an icon and right click with your mouse button on it.
Service menu will appear.
You can start or stop the service.
1 Start the Recording Server service : Starts the service.
1 Stop the Recording Server service : Stops the service.
Service starts
Click on the [View the Service Properties] to launch the
Recording Server Service Properties window.
You can check the current status of the Recording Server
service.
1 Start the Recording Server service : Starts the service.
1 Stop the Recording Server service : Stops the service.
1 Unregister MediaGateway : Cancel registration of the Media
Gateway and initialize the Media Gateway information box.
Recording Server can be registered and accessed in a single Media
Gateway.
If the Recording Server is already registered and connected to the
Media Gateway, and if you want to register in another Media
Gateway, you need to delete (cancel registration) the Recording
Server in the SSM.
When registration is cancelled, the Media Gateway information is
initialized. So, you can register in another Media Gateway.
If the registered Recording Server is not connected to the Media Gateway, you need to delete the Recording Server from the
SSM and click on the [Unregister MediaGateway] button in the Recording Server Service Manager to initialize the registered
information.
English _149
● SSM RECORDING SERVER
You can check the execution status of the SSM Recording Server related service and terminate it if you want to.
You can change the SSM Recording Server related settings.
As soon as the SSM Recording Server runs, the service manager program will run. The task bar will automatically
show the icon.
SSM Recording Server
NTP Client
You can set the NTP server to synchronize the time of the PC
where the Recording Server is installed.
You can change the setting to make sure time
synchronization is performed periodically.
Network
You can retrieve the Recording Server setting information from a file.
Setting the number of networks used
You can set the number of networks used.
1. Check the network to be used.
1 1 used : Uncheck network 1 used.
If one network is used, it means that a single network
will communicate with the SSM and the device.
1 2 used : Check network 2 used.
If two networks are used, it means that network 1 will
communicate with the SSM and network 2 will
communicate with the device to evenly distribute the
communication load.
2. Click on the [Apply] button to save changed settings.
Network selection
Select network 1/2 from the list of available networks on the
PC.
If you want to change the network setting, the Recording Server
service will resume.
Port setting
You can set the system port range that the Recording Server will use.
150_ SSM Recording Server
User
You can change the password for a user who will access the
Recording Server.
● SSM RECORDING SERVER
1 Password changes : Click on the [Change pwd] button to
switch to a new password.
Language
You can select the language to display the program (SSM
Recording Server service manager and update manager).
Basically, it is automatically set to the OS language. If not available, it
is set to English.
English _151
SSM Recording Server
S/W version
Shows the latest version information for the SSM Recording
Server.
152_ SSM Recording Server
RECORDING SERVER UPDATE MANAGER
Installation
Execute
In the Recording Server Service Manager, click on the Recording Server Update Manager <Start menu> to
run the program. If the program is already running, as shown in the figure below, in the task bar you can see
the tray icon of the “Recording Server Updater Manager” program.
1. Place your mouse cursor over the icon.
The tool tip will appear on the right hand side.
2. Right click with your mouse button on the tray icon.
The context menu as shown on the right hand side will be
displayed.
Latest updates
Regardless of the auto check function, you can access the update server anytime to check the availability of
the latest version.
1. In the [Recording Server Update Manager] tray icon,
right click with your mouse button.
2. In the Context menu, select the [Unhide Window] menu.
The Recording Server Update Manager window will
appear.
3. In the “Recording Server Updater Manager” window,
click on the [Check Latest Update] button.
1) In this window, you can check the current version and
the installation date.
2) Press the [
] button to check the release note for
the current version installed.
3) You can check the communication log.
Using this log, a user can find out about the cause of
failures.
4) Click on the [Check New Version] button to check if
the there is a more recent version released than the
currently used version.
5) Click on the [Log Clear] button to delete the log.
6) Click on the [Hide] button to make the window disappear.
English _153
● SSM RECORDING SERVER
Run the SSM Recording Server installation file to install them all.
SSM Recording Server
Setting the auto updates
You can check the update check period for automatic checkup.
1. In the [Recording Server Update Manager] tray icon, right click with your mouse button.
2. In the Context menu, click on the [Unhide Windows] menu.
3. After changing the setting in the setting window, click on the [Save] button.
Selecting the auto checkup period
You can change the settings so that updates are checked every day.
1. Click on every day.
2. Select the auto update time.
Ex) The figure on the right shows the settings to update at
16:44:21 AM every day.
You can change the settings so that updates are checked every week.
1. Click on every week.
2. Select the auto update day.
3. Select the auto update time.
Ex) The figure on the right shows the setting to update at
16:44:36 AM every Sunday.
154_ SSM Recording Server
You can change the setting so that updates are checked every month.
1. Click on every month.
2. Select the auto update day.
● SSM RECORDING SERVER
3. Select the auto update time.
Ex) The figure on the right shows the setting to update at
16:45:06 AM on the 1st of every month.
RECORDING SERVER UPDATES
Auto Update Scenario
Latest version alerts
If the server has the latest version, the update list will appear.
A user can check the release note and the content of the
latest updates before deciding whether to proceed with the
updates.
Download steps
If you select the [Update] button, the installation file will be
downloaded.
English _155
SSM Recording Server
Checking installation
When the download finishes, the user will be asked whether
or not to install it now.
Assume a user selected [No], then when the program runs
again, if the latest installation file is downloaded, then as
shown above, the “Recording Server Installation
Confirmation” window will appear.
In the “Recording Server Installation Confirmation”
window, select [No] and run the program. Then, the [Recording Server Update Manager] program will
check the latest version from the server and it will download the new one in case that a later version than the
current one exists in the server.
Installation
If you select [Yes] in the Installation Confirmation window, all the Recording Server programs will be
automatically terminated and the installation file will run.
156_ SSM Recording Server
SSM HA
HA TERMINOLOGY AND INSTALLATION
Terminology
● SSM HA
Term
Description
HA Server
A server module managing the HA client.
It decides the fail-over or fail-back and transfers the event to SSM.
HA Client
A module actually executing the HA function in each PC.
A HA client can be either in Active or Standby mode.
Target Service
A service managed by the HA active client.
* Target Service : Recording Server and SSM MediaGateway
Target IP
IP address to be used by the target service managed by HA
Failover
A procedure for a HA standby client to take over the role of the failed HA active client when a
HA active client fails
Failback
A procedure for a failed HA active client to be recovered and resume normal operation
HA Client(Active)
A HA client operating in Active mode
HA Client(Standby)
A HA client operating in Standby mode
HA Installation
Checking of Installation Environment
PC performance : Same as SSM-RS.
- The HW specification (including the number of disk drives and network cards) and OS of the active and
standby clients must be the same.
- HW must be a server (Intel, Dell or HP), not a conventional PC.
- The target service for HA can operate properly if one of either MediaGateway or recording service is
installed.
HA Installation
Install SSM-RS_version_date.exe or SSM_version_date.exe.
Install the HA installer during the installation. HA server and client can be selected during the HA installation.
Manual Execution of HA Manager (Automatically Executed during Reboot)
Start - Program - Samsung - HA - HA Manager
English _157
SSM HA
Checking of HA Installation
Double Click
HA Setting
HA Server Setting
1. HA Server Setting
- Server Network Card / IP / Port : Network connection
data to operate as a HA server
- SSM System Manager IP / Port : IP and port data to
connect to the system manager
- HA Server Password : Password for the HA clients to
log in (inputted during the installation)
Click the 'Enable' button after entering all input field data of
HA server.
158_ SSM HA
HA Client - Active Setting
1. HA client/server network setting
Select the client NIC card and IP data of current PC.
● SSM HA
Input the IP, port and password of the HA server.
2. Network data input of target service (MediaGateway)
Run SSM service manager.
3. Manually enter the IP to be used by MediaGateway in NIC
#1 and click the 'Apply' button. (Do not select it from the
combo box.)
English _159
SSM HA
4. HA Client Target Service IP Input
] button to select or add the target IP data to
Click the [
be used by MediaGateway and recording server operated in
the client server.
The HA client IP, HA server IP, target IP (#1 and #2) input in the setting
must all be different values.
5. HA Client Login
Click the 'Enable' button, wait, and confirm that the client is
in the Active state.
The password of the HA server is set during the installation.
The above screen is displayed when the HA client login
procedure is successfully completed.
160_ SSM HA
HA Client - Standby Setting
The HA client (standby) can be configured in the same or different PC as the HA server.
HA Client Setting
● SSM HA
1. Input the HA client data.
Select up to the target network card in the same way as the
HA client (active).
After the input is completed, click the 'Enable' button and set
it to the Standby state.
Recording File Recovery
Recovery UI
1. In the case of successful fail-back, if a recording file exists
in the standby client, the standby client sends the
recording file to the active client.
2. The user can cancel or retry the file transfer.
3. The transfer result can be checked through Log View.
For the recovery to begin, the restore disk (at least 2GB available
space needed) for recovery must have been allocated in the SSM
Configuration Manager.
English _161
SSM HA
HA Web Viewer
1. Accessing HA Web
Desktop Icon in the Local PC
- Double click the HA Web Viewer icon on the desktop.
Input the URL (http://(HAServerIP):8888/ha/loginpage) in the address box of the browser in a remote PC.
2. HA Web Server Login
- Select a language.
- Enter the password set during the HA installation and click
the 'Login' button.
3. HA Web Server Setting
HA Server Setting and staus informaton
- The setting of HA server in Web is the same as the above
setting.
162_ SSM HA
HA Client Login Information
- Click an IP address in the list to view the details of HA
client.
● SSM HA
- The data of the connected HA client are listed, and each
client can be enabled or disabled.
HA Client Details
The setting of HA client in Web is the same as the above
setting.
HA Status Checking (Tray Icon)
Server Status
Status
Server Icon
Description
Disable(default)
The HA server is not used.
Enable
The HA server is operating.
HA Client Status
Status
HA Client Icon
Description
Disable(default)
The HA function is not used. It can be set to use the HA function. Error
status.
Active
The HA is operating as it is logged in as a HA active client.
Standby
The HA is operating as it is logged in as a HA standby client.
FakeActive
The HA standby client has taken over the role of the active client after
the HA active client failed.
English _163
appendix
PRODUCT SPECIFICATION
Features
Video
Audio
Live
Monitoring
Search & Playback
164_ appendix
Supported Video
Compression Format
H.264, MPEG-4, MJPEG
Supported resolution
Depending on the device
Supported Audio
Compression Format
G.711 μ-law (PCM), G.723, G.726 (ADPCM)
Functions
Bi-directional audio (Listen/Talk)
Multi-monitor
Up to 4 monitors
(Follow the recommended system requirement)
Screen-split mode
4:3 screen modes : 1/4/6/8/9/10/13/16/17/21/25/36/49/64
16:9 screen modes : 6/12/20/30
Full screen mode
* While in multi-monitor environment, layouts and split modes for less than 100
channels will be available.
Sequence mode
up to 16-splits per monitor
PTZ Control
Area Zoom, Go to 1x zoom, PTZ Sensitivity, Focus, Zoom, Patrol, Swing/Autopan,
Group/Scan, Trace/Pattern, Preset, Iris control
Map monitoring
Split View Mode for Map Layout, Zoom in/out, video popup(Instant viewer), Camera/
Sensor/Alarm Out icons on the map
Simple Recording
Recording of the selected video tile during 1hour
Functions
OSD On/Off, Snapshot / Prints Image, Brightness/Contrast control, Keep Aspect
Ratio/Original size, Deinterlacing, Flip, Digital zoom
Search mode
Date, Event, Smart Search, POS Search based on DVR, NVR, Local folder
Screen-split mode
Up to 16 footages can be played simultaneously
Video Control
Start/stop, Pause, Faster/Slower forward/backward,
Step Forward/Backward, Skip Forward/Backward
Functions
Snapshot / Prints Image, Digital zoom
Backup
Local storage, back up format(AVI, SEC)
Configurable schedule for backup (*supported model only)
Features
Shows real-time event list of the device(event status, type, device, user, time(PC)),
Viewing instant video image
Searching events
- SSM : User, System
- Device : System, Camera, Sensor, Alarm Out
- Camera : Video Loss, Motion, Passing, Entering, Exiting, Disappearing (Appearing),
Tampering, Tracking, Face Detection, Audio Detection
Reporting
Manual report (show events and statistics)
print & Save function, format(excel, PDF, word)
Confirming
set alarm details Normal/Abnormal/Etc, confirm action
History
the confirmed details of the selected event from the list
Instant Viewer
Display the selecting camera. Confirm the event, record event remarks and end the
event status.
Instant Player
Plays the corresponding camera’s video image
Event Action
Define various system actions (output) for events (input) from devices, action (output)
types: Instant Viewer, Preset, Alarm Out, Pop-up, Sound and E-mail notification
Configuration
Site/User management
Site/User group/User account management, Permission management for viewer
functions
Device management
Automatic device IP scanning, Viewing the device settings(Device webpage),
Exporting/Importing devices settings, Updating the device firmware
Screen
management
Layouts
Setting/Adding/Deleting Layouts, Map/Video Layout
Monitor
Multi Monitor, Split Screen, Sequence, Using I-Frame,
Using low-resolution
Environment
OSD display, Date/Time, Capture, Recording, Sartup, Language, UI auto lock, Log
System settings
Backup/Restore SSM setups, Restore the devault settings
Time synchronization
NTP Server, Client
Update
Automatic self upgrade(Connection to Samsung upgrade server)
General
Supported devices
Samsung's N/W Camera, Encoder, DVR/NVR
Maximum number of Media Gateways per system
Default 4 Media Gateway
Maximum number of Free NET-i ware/Recording
Server per system
1 NET-i ware/Recording Server
English _165
● APPENDIX
Event Monitoring
Real-time event list
appendix
Configuration
Maximum number of cameras per Media Gateway
N/W Camera 72channels or DVR/NVR 288channels(36)
Maximum number of clients per Media Gateway
5 Clients
Modules
System Manager, Media Gateway, Console, Service Manager, Configuration Manager
Language
Total 23 languages support
English, French, German, Spanish, Italian, Russian, Chinese, Japanese, Korean,
Turkish, Polish, Czech, Serbian, Romanian, Portuguese, Dutch, Croatian, Hungarian,
Greek , Swedish, Danish, Finnish, Norwegian, Bulgarian
System Requirement
166_ appendix
Recommended
- System manger, media gateway and console : CPU Intel Core i7-4770 @
3.40GHz, RAM 8GB or more, Video Memory 1024MB or more (Geforce GTX560
GPU), 20GB or more available space in HDD (10GB or more available space to
save the log DB for operation after installation)
- Recording Server : CPU Intel Core i7-4770 @ 3.40GHz, RAM 8GB, SSD (for OS
disk), 4 or more HDD SATA 7200rpm 64MB (for recording disk)
* RAID specification : RAID5, 8Bay, HW RAID controller (AF support), Windows
Server 2012 64bit
* iSCSI specification : Including RAID specification above, NIC bandwidth 2G or
higher, 2 or more NIC's (NIC Teaming)
Minimum
- System manger, media gateway and console : CPU Intel Core i5-4670 @
3.40GHz, RAM 4GB or more, Video Memory 512MB or more (Geforce GT240),
20GB or more available space in HDD (10GB or more available space to save the
log DB for operation after installation)
- Recording Server : CPU Intel Core i5-4670 @ 3.40GHz, RAM 8GB, 2 or more HDD
SATA2 7200rpm 64MB (1 OS disk and 1 or more recording disks)
* RAID specification : RAID5, 8Bay, HW RAID controller (AF support), Windows
Server 2012 64bit
* iSCSI specification : Including RAID specification above, NIC bandwidth 2G or
higher, 2 or more NIC's (NIC Teaming)
Operating System
- Console : Windows7 32bit/64bit, Windows8 32bit/64bit or Windows8.1
32bit/64bit
- System manager and media gateway : Windows7 32bit/64bit, Windows8
32bit/64bit, Windows8.1 32bit/64bit, Windows Server 2008 R2 64bit or Windows
Server 2012 32bit/64bit
- Recording Server : Windows Server 2008 R2, Windows Server 2012, Windows 7,
Windows 8 or Windows 8.1
* 32, 64bit support
* Windows XP SP2, Windows Server 2003 SP2 and Windows Server 2008 R1 are
supported only by SSM-RS 1.0.
USE JOYSTICK
b
c
Name
Function
Up/Down/Left/Right
In PTZ mode, the camera can be panned, tilted, and controlled in 8 directions.
In Screen mode, the top/bottom/left/right tile can be selected.
Rotation
In PTZ mode, the screen is zoomed in when it is rotated clockwise and zoomed out when it is
rotated counterclockwise.
b
1~8
In PTZ mode, presets number 1~9 are run.
In Screen mode, the layout corresponding to the button number is run.
c
9~10
PTZ mode and Screen mode are switched.
11, 12
In PTZ mode, Focus Near/Far operation is run.
In Screen mode, multiple monitors can be selected and changed.
M
To set the correct image, the axis calibration is needed.
Select [Start] [Set] [Control Panel] [Game Controller] [Property] [Set] via the PC, click the
[Compensation] button to run the “System Compensation Wizard” and then follow the guide on the screen to complete
axis compensation.
English _167
● APPENDIX
The SPC-2000 joystick is operated as follows:
- SPC-2000 must be connected to the PC before the console is launched in order to be recognized.
- SPC-2000 can run in PTZ or Screen mode.
- In Screen mode, the layouts assigned to the console are numbered 1~8 in the order of assignment.
OPEN SOURCE LICENSE NOTIFICATION ON THE PRODUCT
The software included in this product contains copyrighted software that is licensed under the BSD 2.0/MIT License/Apache License 1.1/Apache
License 2.0/EPL 1.0/CDDL 1.1/Code Project Open 1.02 License/LGPL2.1/LGPL3.0/OpenSSL License/XFree86 License 1.0/Intel Software
Development Products License/Microsoft Public License(Ms-PL)/BSD 3-clause License/Oracle Binary Code JRE and JDK 7 License/BSD 2-clause
License/Creative Commons Attribution 2.0 UK License/Sun Java Message Service 1.0.2 License.
You may obtain the complete Corresponding Source code from us for a period of three years after our last shipment of this product by sending email
to [email protected]
o BSD 2.0 : Cygwin - flex
o MIT License : dotNetInstaller: setup bootstrapper for Windows, Rapidxml-1.13, MicroPlanet Gravity, Newtonsoft.Json, WPF Composites, jQuery
UI, jquery-i18n-properties, Newtonsoft.Json, cellcloud, gsoapwinhttp, jQuery JavaScript Library, AngularJS, datejs-rails, django-frontend-skeleton,
farserver, flashcanvas, flot, Flotr2, Font-Awesome, gibberish-aes, jasmine.js, javascriptRRD, jGenUI, jQuery JavaScript Library, jQuery UI - jquery/
jquery-ui on GitHub, jqueryui.com, magixcms, moment, ng-grid, require-expose-plugin
o Apache License 1.1 : Apache Jakarta Commons Collections
o Apache License 2.0 : Apache.NMS, Apache.NMS.ActiveMQ, MassTransit, spring-net, AAL-WPF-ServiceStack, Apache-Logging log4net, Quartz
Enterprise Scheduler .NET, Apache Jakarta Commons IO, Apache Jakarta Lang, Apache Shiro, Apache-Jakarta BeanUtils, Apache-Jakarta
Collections, Apache-Jakarta Pool, Condor, EZMorph, Jakarta Commons-Logging, json-lib, jackson-databind, ActiveMQ :: Assembly, ActiveMQ ::
KahaDB, angularjs-nvd3-directives, Apache Commons Javaflow, Apache Commons Lang, Apache Directory Studio, Apache Felix Configuration
Admin Service, Apache Felix File Install, Apache Felix Remote Shell, Apache Felix Shell Service, Apache Felix Web Management Console, Apache
Geronimo, Apache ServiceMix :: Bundles :: antlr-runtime, Apache ServiceMix :: Bundles :: cglib, Apache ServiceMix :: Bundles :: commons-lang,
Apache ServiceMix :: Bundles :: mybatis, Apache ServiceMix :: Bundles :: quartz, Apache ServiceMix Transaction, Apache-Jakarta Digester,
bamboo BSC, Bootstrap, Data Mapper for Jackson, Eclipse Gemini Blueprint, GetAggregatedSubjectOfCareSchedule, Groovy, J2EE Management
1.1, Jackson, Jackson - org.codehaus.jackson:jackson-core-asl, jedis, jettison, kairosdb, m2engine, mobile-system, mybatis, osgiwiki, restletframework-java, sigar, tomcat-jdbc, Umbraco-CMS, JmDNS, WSO2 Governance Registry
o EPL 1.0 : Eclipse Project, Eclipse Equinox, org.eclipse.osgi, osgi-vaadin-demo, groovy-eclipse, rhf-competitions
o CDDL 1.1 : GlassFish, JSR-311 - JAX-RS - The Java API for RESTful Web Services (Jersey), jersey-bundle, browser-detect
o Code Project Open 1.02 License : Code Project – AlphaBlendTextBox – A transparent/translucent textbox for .NET, Code Project – Animating
Windows Forms, Code Project – BarTender – Group your contents, Code Project – Cabinet File (*.CAB) Compression and Extraction, Code Project
– Data Encryption/Decryption using RijndaelManaged and PasswordDeriveByt, Code Project – How to skin scrollbars for Panels, in C#, Code
Project – Simple Movie Database in C# using Microsoft Access, Code Project – Windows Management Instrumentation (WMI) Implementation,
Code Project - WPF TreeListView Control, Code Project - Creating an XML file based on XSD, Code Project - A reusable, high performance,
socket server class - Part 1, Code Project - Install Windows Service using Custom Action
o LGPL 2.1 : Live555, javastruct, JFreeChart - 1. JFreeChart, JFreeChart - 3. Jcommon, jna
o LGPL 3.0 : JasperReports Library - jasperreports, m-surveys
o OpenSSL License : OpenSSL 1.0.1g
o XFree86 License v 1.0 : XFree86
o Intel Software Development Products License : Intel Integrated Performance Primitives - Intel IPP
o Microsoft Public License(Ms-PL) : cfx, netsqlazman, mooncodecs, Extended WPF Toolkit, Altairis Web UI Toolkit, NumericalDataApplication, WPF
Wizard Control, Latence, EasyTweet
o BSD 3-clause License : Open Computer Vision Library - opencv-win, ASM Core, d3, DataTables, DataTablesSrc, jQuery::DataTables,
MvcDataTables.NET, Paul Johnson's JavaScript Message Digest Hash Function Library
o Oracle Binary Code JRE and JDK 7 License : Java Cryptography Extension (JCE) Unlimited Strength Jurisdiction Policy
o BSD 2-clause License : morris.js, Leaflet
o Creative Commons Attribution 2.0 UK License : Webtoolkit Javascript base64
o Sun Java Message Service 1.0.2 License : Java Message Service (JMS)
BSD 2.0
MIT License
Copyright (c) 1990, The Regents of the University of California.
All rights reserved.
Redistribution and use in source and binary forms, with or without
modification, are permitted provided that the following conditions are
met:
o Redistributions of source code must retain the above copyright
notice, this list of conditions and the following disclaimer.
o Redistributions in binary form must reproduce the above copyright
notice, this list of conditions and the following disclaimer in the
documentation and/or other materials provided with the distribution.
o Neither the name of Google Inc. nor the names of its contributors
may be used to endorse or promote products derived from this
software without specific prior written permission.
THIS SOFTWARE IS PROVIDED BY THE COPYRIGHT HOLDERS AND
CONTRIBUTORS "AS IS" AND ANY EXPRESS OR IMPLIED
WARRANTIES, INCLUDING, BUT NOT LIMITED TO, THE IMPLIED
WARRANTIES OF MERCHANTABILITY AND FITNESS FOR A
PARTICULAR PURPOSE ARE DISCLAIMED. IN NO EVENT SHALL
THE COPYRIGHT OWNER OR CONTRIBUTORS BE LIABLE FOR ANY
DIRECT, INDIRECT, INCIDENTAL, SPECIAL, EXEMPLARY, OR
CONSEQUENTIAL DAMAGES (INCLUDING, BUT NOT LIMITED TO,
PROCUREMENT OF SUBSTITUTE GOODS OR SERVICES; LOSS OF
USE, DATA, OR PROFITS; OR BUSINESS INTERRUPTION) HOWEVER
CAUSED AND ON ANY THEORY OF LIABILITY, WHETHER IN
CONTRACT, STRICT LIABILITY, OR TORT (INCLUDING NEGLIGENCE
OR OTHERWISE) ARISING IN ANY WAY OUT OF THE USE OF THIS
SOFTWARE, EVEN IF ADVISED OF THE POSSIBILITY OF SUCH
DAMAGE.
Copyright (c)
o dotNetInstaller: setup bootstrapper for Windows (2009, Davide Icardi,
Vestris Inc. and Contributors)
o Rapidxml-1.13 (2006-2009, Marcin Kalicinski)
o Newtonsoft.Json (2007, James Newton-King)
o AngularJS (2010-2012 Google, Inc. http://angularjs.org)
o crypto-js (2009-2013, by Jeff Mott. All rights reserved. code.google.
com/p/crypto-js/wiki/License)
o datejs-rails (2006-2007, Coolite Inc. (http://www.coolite.com/). All
rights reserved.)
o django-frontend-skeleton (2005, 2013 jQuery Foundation, Inc.
jquery.org/license)
o farserver (2012 AUTHORS.txt; Licensed MIT, GPL)
o flashcanvas (2009, Tim Cameron Ryan / 2009-2011, FlashCanvas
Project)
o flot (2007, IOLA)
o Flotr2 (2011, Jacob Thornton)
o Font-Awesome (Dave Gandy)
o gibberish-aes (2008, Mark Percival - http://mpercival.com)
o jasmine.js (2008-2014 Pivotal Labs)
o javascriptRRD (2012, Krzysztof Urbas @krzysu [myviews.pl])
o jGenUI (2008 Paul Bakaus (ui.jquery.com))
o cellcloud (2009-2012, Cell Cloud Team - [email protected])
o gsoapwinhttp (2011, Daniel Rozsar)
o jQuery v1.10.2 (2005, 2013 jQuery Foundation, Inc. | jquery.org/
license)
o jQuery v1.7.1 (jquery.com | jquery.org/license)
o jQuery JavaScript Library v2.0.3 (2005, 2013 jQuery Foundation, Inc.
and other contributors)
o jQuery UI (2013 jQuery Foundation)
o jQuery JavaScript Library v1.9.1 (2005, 2012 jQuery Foundation, Inc)
o magixcms (HTML5 Shiv v3.7.0 | @afarkas @jdalton @jon_neal @rem)
o ng-grid (2012 the AngularUI Team, http://angular-ui.github.com)
o RequireJS (2010-2012, The Dojo Foundation All Rights Reserved)
Permission is hereby granted, free of charge, to any person obtaining a
copy of this software and associated documentation files (the
"Software"), to deal in the Software without restriction, including without
limitation the rights to use, copy, modify, merge, publish, distribute,
sublicense, and/or sell copies of the Software, and to permit persons to
whom the Software is furnished to do so, subject to the following
conditions:
The above copyright notice and this permission notice shall be included
in all copies or substantial portions of the Software.
THE SOFTWARE IS PROVIDED "AS IS", WITHOUT WARRANTY OF
ANY KIND, EXPRESS OR IMPLIED, INCLUDING BUT NOT LIMITED TO
THE WARRANTIES OF MERCHANTABILITY, FITNESS FOR A
PARTICULAR PURPOSE AND NONINFRINGEMENT. IN NO EVENT
SHALL THE AUTHORS OR COPYRIGHT HOLDERS BE LIABLE FOR
ANY CLAIM, DAMAGES OR OTHER LIABILITY, WHETHER IN AN
ACTION OF CONTRACT, TORT OR OTHERWISE, ARISING FROM,
OUT OF OR IN CONNECTION WITH THE SOFTWARE OR THE USE
OR OTHER DEALINGS IN THE SOFTWARE.
The Apache Software License, Version 1.1
Copyright (c) 2000 The Apache Software Foundation. All rights
reserved.
Redistribution and use in source and binary forms, with or without
modification, are permitted provided that the following conditions are
met:
1. Redistributions of source code must retain the above copyright
notice, this list of conditions and the following disclaimer.
2. Redistributions in binary form must reproduce the above copyright
notice, this list of conditions and the following disclaimer in the
documentation and/or other materials provided with the distribution.
3. The end-user documentation included with the redistribution, if any,
must include the following acknowledgment:
"This product includes software developed by the Apache Software
Foundation (http://www.apache.org/)."
Alternately, this acknowledgment may appear in the software itself, if
and wherever such third-party acknowledgments normally appear.
4. The names "Apache" and "Apache Software Foundation" must not
be used to endorse or promote products derived from this software
without prior written permission. For written permission, please contact
[email protected].
5. Products derived from this software may not be called "Apache", nor
may "Apache" appear in their name, without prior written permission of
the Apache Software Foundation.
THIS SOFTWARE IS PROVIDED ``AS IS'' AND ANY EXPRESSED OR
IMPLIED WARRANTIES, INCLUDING, BUT NOT LIMITED TO, THE
IMPLIED WARRANTIES OF MERCHANTABILITY AND FITNESS FOR A
PARTICULAR PURPOSE ARE DISCLAIMED. IN NO EVENT SHALL
THE APACHE SOFTWARE FOUNDATION OR ITS CONTRIBUTORS BE
LIABLE FOR ANY DIRECT, INDIRECT, INCIDENTAL, SPECIAL,
EXEMPLARY, OR CONSEQUENTIAL DAMAGES (INCLUDING, BUT
NOT LIMITED TO, PROCUREMENT OF SUBSTITUTE GOODS OR
SERVICES; LOSS OF USE, DATA, OR PROFITS; OR BUSINESS
INTERRUPTION) HOWEVER CAUSED AND ON ANY THEORY OF
LIABILITY, WHETHER IN CONTRACT, STRICT LIABILITY, OR TORT
(INCLUDING NEGLIGENCE OR OTHERWISE) ARISING IN ANY WAY
OUT OF THE USE OF THIS SOFTWARE, EVEN IF ADVISED OF THE
POSSIBILITY OF SUCH DAMAGE.
This software consists of voluntary contributions made by many
individuals on behalf of the Apache Software Foundation. For more
information on the Apache Software Foundation, please see <http://
www.apache.org/>.
Portions of this software are based upon public domain software
originally written at the National Center for Supercomputing
Applications, University of Illinois, Urbana-Champaign.
Apache License 2.0
We used the Apache ActiveMQ in our application and we did not modify
the source code.
Copyright (c)
o Apache.NMS (2005-2006, The Apache Software Foundation)
o Apache ActiveMQ (2005-2008, The Apache Software Foundation)
o MassTransit (2007-2008, The Apache Software Foundation)
o spring-net (2002-2011, the original author or authors)
o AAL-WPF-ServiceStack ()
o Apache-Logging log4net (2004-2013, The Apache Software
Foundation)
o Quartz Enterprise Scheduler .NET (2001-2013, Terracotta Inc. and
Marko Lahma)
o Apache Jakarta Commons IO (2001-2014, The Apache Software
Foundation)
o Apache Jakarta Lang (2001-2014, The Apache Software Foundation)
o Apache Shiro (2008-2014, The Apache Software Foundation)
o Apache-Jakarta BeanUtils (2001-2014, The Apache Software
Foundation)
o Apache-Jakarta Collections (2001-2014, The Apache Software
Foundation)
o Apache-Jakarta Pool (2001-2014, The Apache Software Foundation)
o Condor (2001-2014, The Apache Software Foundation)
o EZMorph (2006-2007, the original author or authors)
o Jakarta Commons-Logging (2001-2013, The Apache Software
Foundation)
o json-lib (2002, JSON.org)
o jackson-databind (2012-2013, FasterXML)
o angularjs-nvd3-directives (2014, Christian Maurer; Licensed Apache
License, v2.0)
o Apache Commons Javaflow (2004-2008, The Apache Software
Foundation)
o Apache Commons Lang (2012, The Apache Software Foundation)
o Apache Geronimo (2003-2013, The Apache Software Foundation)
o Apache-Jakarta Digester (2001-2013, The Apache Software
Foundation)
o bamboo BSC (2014, Dice)
o Bootstrap (2012, Twitter)
o Data Mapper for Jackson (2009, FasterXML, LLC)
o Eclipse Gemini Blueprint (2014, The Eclipse Foundation)
o J2EE Management 1.1 (2013, Oracle and/or its affiliates)
o jedis (2010, Jonathan Leibiusky)
o jettison (2006, Envoi Solutions LLC)
o sigar (2004-2009, Doug MacEachern)
o tomcat-jdbc (1999-2014, The Apache Software Foundation)
o Umbraco-CMS (2011, Abdulla Abdurakhmanov)
o JmDNS (2002-2011, JmDNS)
o WSO2 Governance Registry (2014, WSO2)
1. Definitions.
"License" shall mean the terms and conditions for use, reproduction,
and distribution as defined by Sections 1 through 9 of this document.
"Licensor" shall mean the copyright owner or entity authorized by the
copyright owner that is granting the License.
"Legal Entity" shall mean the union of the acting entity and all other
entities that control, are controlled by, or are under common control with
that entity. For the purposes of this definition, "control" means (i) the
power, direct or indirect, to cause the direction or management of such
entity, whether by contract or otherwise, or (ii) ownership of fifty percent
(50%) or more of the outstanding shares, or (iii) beneficial ownership of
such entity.
"You" (or "Your") shall mean an individual or Legal Entity exercising
permissions granted by this License.
"Source" form shall mean the preferred form for making modifications,
including but not limited to software source code, documentation
source, and configuration files.
"Object" form shall mean any form resulting from mechanical
transformation or translation of a Source form, including but not limited
to compiled object code, generated documentation, and conversions to
other media types.
"Work" shall mean the work of authorship, whether in Source or Object
form, made available under the License, as indicated by a copyright
notice that is included in or attached to the work (an example is
provided in the Appendix below).
"Derivative Works" shall mean any work, whether in Source or Object
form, that is based on (or derived from) the Work and for which the
editorial revisions, annotations, elaborations, or other modifications
represent, as a whole, an original work of authorship. For the purposes
of this License, Derivative Works shall not include works that remain
separable from, or merely link (or bind by name) to the interfaces of, the
Work and Derivative Works thereof.
"Contribution" shall mean any work of authorship, including the original
version of the Work and any modifications or additions to that Work or
Derivative Works thereof, that is intentionally submitted to Licensor for
inclusion in the Work by the copyright owner or by an individual or Legal
Entity authorized to submit on behalf of the copyright owner. For the
purposes of this definition, "submitted" means any form of electronic,
verbal, or written communication sent to the Licensor or its
representatives, including but not limited to communication on
electronic mailing lists, source code control systems, and issue tracking
systems that are managed by, or on behalf of, the Licensor for the
purpose of discussing and improving the Work, but excluding
communication that is conspicuously marked or otherwise designated
in writing by the copyright owner as "Not a Contribution."
"Contributor" shall mean Licensor and any individual or Legal Entity on
behalf of whom a Contribution has been received by Licensor and
subsequently incorporated within the Work.
2. Grant of Copyright License. Subject to the terms and conditions of
this License, each Contributor hereby grants to You a perpetual,
worldwide, non-exclusive, no-charge, royalty-free, irrevocable copyright
license to reproduce, prepare Derivative Works of, publicly display,
publicly perform, sublicense, and distribute the Work and such
Derivative Works in Source or Object form.
3. Grant of Patent License. Subject to the terms and conditions of this
License, each Contributor hereby grants to You a perpetual, worldwide,
non-exclusive, no-charge, royalty-free, irrevocable (except as stated in
this section) patent license to make, have made, use, offer to sell, sell,
import, and otherwise transfer the Work, where such license applies
only to those patent claims licensable by such Contributor that are
necessarily infringed by their Contribution(s) alone or by combination of
their Contribution(s) with the Work to which such Contribution(s) was
submitted. If You institute patent litigation against any entity (including a
cross-claim or counterclaim in a lawsuit) alleging that the Work or a
Contribution incorporated within the Work constitutes direct or
contributory patent infringement, then any patent licenses granted to
You under this License for that Work shall terminate as of the date such
litigation is filed.
4. Redistribution. You may reproduce and distribute copies of the
Work or Derivative Works thereof in any medium, with or without
modifications, and in Source or Object form, provided that you meet the
following conditions:
1. You must give any other recipients of the Work or Derivative Works
a copy of this License; and
2. You must cause any modified files to carry prominent notices stating
that You changed the files; and
3. You must retain, in the Source form of any Derivative Works that You
distribute, all copyright, patent, trademark, and attribution notices
from the Source form of the Work, excluding those notices that do
not pertain to any part of the Derivative Works; and
4. If the Work includes a "NOTICE" text file as part of its distribution,
then any Derivative Works that You distribute must include a
readable copy of the attribution notices contained within such
NOTICE file, excluding those notices that do not pertain to any part
of the Derivative Works, in at least one of the following places: within
a NOTICE text file distributed as part of the Derivative Works; within
the Source form or documentation, if provided along with the
Derivative Works; or, within a display generated by the Derivative
Works, if and wherever such third-party notices normally appear.
The contents of the NOTICE file are for informational purposes only
and do not modify the License. You may add Your own attribution
notices within Derivative Works that You distribute, alongside or as
an addendum to the NOTICE text from the Work, provided that
such additional attribution notices cannot be construed as modifying
the License. You may add Your own copyright statement to Your
modifications and may provide additional or different license terms
and conditions for use, reproduction, or distribution of Your
modifications, or for any such Derivative Works as a whole, provided
Your use, reproduction, and distribution of the Work otherwise
complies with the conditions stated in this License.
5. Submission of Contributions. Unless You explicitly state otherwise,
any Contribution intentionally submitted for inclusion in the Work by You
to the Licensor shall be under the terms and conditions of this License,
without any additional terms or conditions. Notwithstanding the above,
nothing herein shall supersede or modify the terms of any separate
license agreement you may have executed with Licensor regarding such
Contributions.
6. Trademarks. This License does not grant permission to use the
trade names, trademarks, service marks, or product names of the
Licensor, except as required for reasonable and customary use in
describing the origin of the Work and reproducing the content of the
NOTICE file.
7. Disclaimer of Warranty. Unless required by applicable law or agreed
to in writing, Licensor provides the Work (and each Contributor provides
its Contributions) on an "AS IS" BASIS, WITHOUT WARRANTIES OR
CONDITIONS OF ANY KIND, either express or implied, including,
without limitation, any warranties or conditions of TITLE, NONINFRINGEMENT, MERCHANTABILITY, or FITNESS FOR A
PARTICULAR PURPOSE. You are solely responsible for determining the
appropriateness of using or redistributing the Work and assume any
risks associated with Your exercise of permissions under this License.
8. Limitation of Liability. In no event and under no legal theory,
whether in tort (including negligence), contract, or otherwise, unless
required by applicable law (such as deliberate and grossly negligent
acts) or agreed to in writing, shall any Contributor be liable to You for
damages, including any direct, indirect, special, incidental, or
consequential damages of any character arising as a result of this
License or out of the use or inability to use the Work (including but not
limited to damages for loss of goodwill, work stoppage, computer failure
or malfunction, or any and all other commercial damages or losses),
even if such Contributor has been advised of the possibility of such
damages.
9. Accepting Warranty or Additional Liability. While redistributing the
Work or Derivative Works thereof, You may choose to offer, and charge
a fee for, acceptance of support, warranty, indemnity, or other liability
obligations and/or rights consistent with this License. However, in
accepting such obligations, You may act only on Your own behalf and
on Your sole responsibility, not on behalf of any other Contributor, and
only if You agree to indemnify, defend, and hold each Contributor
harmless for any liability incurred by, or claims asserted against, such
Contributor by reason of your accepting any such warranty or additional
liability.
END OF TERMS AND CONDITIONS
APPENDIX: How to apply the Apache License to your work
To apply the Apache License to your work, attach the following
boilerplate notice, with the fields enclosed by brackets "[]" replaced with
your own identifying information. (Don't include the brackets!) The text
should be enclosed in the appropriate comment syntax for the file
format. We also recommend that a file or class name and description of
purpose be included on the same "printed page" as the copyright
notice for easier identification within third-party archives.
Copyright [yyyy] [name of copyright owner]
Licensed under the Apache License, Version 2.0 (the "License");
you may not use this file except in compliance with the License.
You may obtain a copy of the License at
http://www.apache.org/licenses/LICENSE-2.0
Unless required by applicable law or agreed to in writing, software
distributed under the License is distributed on an "AS IS" BASIS,
WITHOUT WARRANTIES OR CONDITIONS OF ANY KIND, either
express or implied.
See the License for the specific language governing permissions
and limitations under the License.
EPL 1.0
As we did not modify the Eclipse Project, Eclipse Equinox, org.eclipse.
osgi, osgi-vaadin-demo, groovy-eclipse, org.apache.commons.
codec_1.3.0.v201101211617.jar and rhf-competitions, we have no
obligation to distribute the source code.
Copyright (c)
o Eclipse Equinox (2007, IBM Corporation, Cognos Incorporated and
others. All Rights Reserved.)
THE ACCOMPANYING PROGRAM IS PROVIDED UNDER THE TERMS
OF THIS ECLIPSE PUBLIC LICENSE ("AGREEMENT"). ANY USE,
REPRODUCTION OR DISTRIBUTION OF THE PROGRAM
CONSTITUTES RECIPIENT'S ACCEPTANCE OF THIS AGREEMENT.
1. DEFINITIONS
"Contribution" means:
a) in the case of the initial Contributor, the initial code and
documentation distributed under this Agreement, and
b) in the case of each subsequent Contributor:
i) changes to the Program, and
ii) additions to the Program;
where such changes and/or additions to the Program originate from
and are distributed by that particular Contributor. A Contribution
'originates' from a Contributor if it was added to the Program by such
Contributor itself or anyone acting on such Contributor's behalf.
Contributions do not include additions to the Program which: (i) are
separate modules of software distributed in conjunction with the
Program under their own license agreement, and (ii) are not derivative
works of the Program.
"Contributor" means any person or entity that distributes the Program.
"Licensed Patents" mean patent claims licensable by a Contributor
which are necessarily infringed by the use or sale of its Contribution
alone or when combined with the Program.
"Program" means the Contributions distributed in accordance with this
Agreement.
"Recipient" means anyone who receives the Program under this
Agreement, including all Contributors.
2. GRANT OF RIGHTS
a) Subject to the terms of this Agreement, each Contributor hereby
grants Recipient a non-exclusive, worldwide, royalty-free copyright
license to reproduce, prepare derivative works of, publicly display,
publicly perform, distribute and sublicense the Contribution of such
Contributor, if any, and such derivative works, in source code and
object code form.
b) Subject to the terms of this Agreement, each Contributor hereby
grants Recipient a non-exclusive, worldwide, royalty-free patent
license under Licensed Patents to make, use, sell, offer to sell, import
and otherwise transfer the Contribution of such Contributor, if any, in
source code and object code form. This patent license shall apply to
the combination of the Contribution and the Program if, at the time
the Contribution is added by the Contributor, such addition of the
Contribution causes such combination to be covered by the Licensed
Patents. The patent license shall not apply to any other combinations
which include the Contribution. No hardware per se is licensed
hereunder.
c) Recipient understands that although each Contributor grants the
licenses to its Contributions set forth herein, no assurances are
provided by any Contributor that the Program does not infringe the
patent or other intellectual property rights of any other entity. Each
Contributor disclaims any liability to Recipient for claims brought by
any other entity based on infringement of intellectual property rights
or otherwise. As a condition to exercising the rights and licenses
granted hereunder, each Recipient hereby assumes sole responsibility
to secure any other intellectual property rights needed, if any. For
example, if a third party patent license is required to allow Recipient
to distribute the Program, it is Recipient's responsibility to acquire
that license before distributing the Program.
d) Each Contributor represents that to its knowledge it has sufficient
copyright rights in its Contribution, if any, to grant the copyright
license set forth in this Agreement.
3. REQUIREMENTS
A Contributor may choose to distribute the Program in object code form
under its own license agreement, provided that:
a) it complies with the terms and conditions of this Agreement; and
b) its license agreement:
i) effectively disclaims on behalf of all Contributors all warranties and
conditions, express and implied, including warranties or conditions
of title and non-infringement, and implied warranties or conditions
of merchantability and fitness for a particular purpose;
ii) effectively excludes on behalf of all Contributors all liability for
damages, including direct, indirect, special, incidental and
consequential damages, such as lost profits;
iii) states that any provisions which differ from this Agreement are
offered by that Contributor alone and not by any other party; and
iv) states that source code for the Program is available from such
Contributor, and informs licensees how to obtain it in a reasonable
manner on or through a medium customarily used for software
exchange.
When the Program is made available in source code form:
a) it must be made available under this Agreement; and
b) a copy of this Agreement must be included with each copy of the
Program.
Contributors may not remove or alter any copyright notices contained
within the Program.
Each Contributor must identify itself as the originator of its Contribution,
if any, in a manner that reasonably allows subsequent Recipients to
identify the originator of the Contribution.
4. COMMERCIAL DISTRIBUTION
Commercial distributors of software may accept certain responsibilities
with respect to end users, business partners and the like. While this
license is intended to facilitate the commercial use of the Program, the
Contributor who includes the Program in a commercial product offering
should do so in a manner which does not create potential liability for
other Contributors. Therefore, if a Contributor includes the Program in a
commercial product offering, such Contributor ("Commercial
Contributor") hereby agrees to defend and indemnify every other
Contributor ("Indemnified Contributor") against any losses, damages
and costs (collectively "Losses") arising from claims, lawsuits and other
legal actions brought by a third party against the Indemnified
Contributor to the extent caused by the acts or omissions of such
Commercial Contributor in connection with its distribution of the
Program in a commercial product offering. The obligations in this
section do not apply to any claims or Losses relating to any actual or
alleged intellectual property infringement. In order to qualify, an
Indemnified Contributor must: a) promptly notify the Commercial
Contributor in writing of such claim, and b) allow the Commercial
Contributor to control, and cooperate with the Commercial Contributor
in, the defense and any related settlement negotiations. The Indemnified
Contributor may participate in any such claim at its own expense.
For example, a Contributor might include the Program in a commercial
product offering, Product X. That Contributor is then a Commercial
Contributor. If that Commercial Contributor then makes performance
claims, or offers warranties related to Product X, those performance
claims and warranties are such Commercial Contributor's responsibility
alone. Under this section, the Commercial Contributor would have to
defend claims against the other Contributors related to those
performance claims and warranties, and if a court requires any other
Contributor to pay any damages as a result, the Commercial
Contributor must pay those damages.
5. NO WARRANTY
EXCEPT AS EXPRESSLY SET FORTH IN THIS AGREEMENT, THE
PROGRAM IS PROVIDED ON AN "AS IS" BASIS, WITHOUT
WARRANTIES OR CONDITIONS OF ANY KIND, EITHER EXPRESS OR
IMPLIED INCLUDING, WITHOUT LIMITATION, ANY WARRANTIES OR
CONDITIONS OF TITLE, NON-INFRINGEMENT, MERCHANTABILITY
OR FITNESS FOR A PARTICULAR PURPOSE. Each Recipient is solely
responsible for determining the appropriateness of using and
distributing the Program and assumes all risks associated with its
exercise of rights under this Agreement , including but not limited to the
risks and costs of program errors, compliance with applicable laws,
damage to or loss of data, programs or equipment, and unavailability or
interruption of operations.
6. DISCLAIMER OF LIABILITY
EXCEPT AS EXPRESSLY SET FORTH IN THIS AGREEMENT, NEITHER
RECIPIENT NOR ANY CONTRIBUTORS SHALL HAVE ANY LIABILITY
FOR ANY DIRECT, INDIRECT, INCIDENTAL, SPECIAL, EXEMPLARY,
OR CONSEQUENTIAL DAMAGES (INCLUDING WITHOUT LIMITATION
LOST PROFITS), HOWEVER CAUSED AND ON ANY THEORY OF
LIABILITY, WHETHER IN CONTRACT, STRICT LIABILITY, OR TORT
(INCLUDING NEGLIGENCE OR OTHERWISE) ARISING IN ANY WAY
OUT OF THE USE OR DISTRIBUTION OF THE PROGRAM OR THE
EXERCISE OF ANY RIGHTS GRANTED HEREUNDER, EVEN IF
ADVISED OF THE POSSIBILITY OF SUCH DAMAGES.
7. GENERAL
If any provision of this Agreement is invalid or unenforceable under
applicable law, it shall not affect the validity or enforceability of the
remainder of the terms of this Agreement, and without further action by
the parties hereto, such provision shall be reformed to the minimum
extent necessary to make such provision valid and enforceable.
If Recipient institutes patent litigation against any entity (including a
cross-claim or counterclaim in a lawsuit) alleging that the Program itself
(excluding combinations of the Program with other software or
hardware) infringes such Recipient's patent(s), then such Recipient's
rights granted under Section 2(b) shall terminate as of the date such
litigation is filed.
All Recipient's rights under this Agreement shall terminate if it fails to
comply with any of the material terms or conditions of this Agreement
and does not cure such failure in a reasonable period of time after
becoming aware of such noncompliance. If all Recipient's rights under
this Agreement terminate, Recipient agrees to cease use and
distribution of the Program as soon as reasonably practicable. However,
Recipient's obligations under this Agreement and any licenses granted
by Recipient relating to the Program shall continue and survive.
Everyone is permitted to copy and distribute copies of this Agreement,
but in order to avoid inconsistency the Agreement is copyrighted and
may only be modified in the following manner. The Agreement Steward
reserves the right to publish new versions (including revisions) of this
Agreement from time to time. No one other than the Agreement
Steward has the right to modify this Agreement. The Eclipse Foundation
is the initial Agreement Steward. The Eclipse Foundation may assign the
responsibility to serve as the Agreement Steward to a suitable separate
entity. Each new version of the Agreement will be given a distinguishing
version number. The Program (including Contributions) may always be
distributed subject to the version of the Agreement under which it was
received. In addition, after a new version of the Agreement is published,
Contributor may elect to distribute the Program (including its
Contributions) under the new version. Except as expressly stated in
Sections 2(a) and 2(b) above, Recipient receives no rights or licenses to
the intellectual property of any Contributor under this Agreement,
whether expressly, by implication, estoppel or otherwise. All rights in the
Program not expressly granted under this Agreement are reserved.
This Agreement is governed by the laws of the State of New York and
the intellectual property laws of the United States of America. No party
to this Agreement will bring a legal action under this Agreement more
than one year after the cause of action arose. Each party waives its
rights to a jury trial in any resulting litigation.
CDDL 1.1
As we did not modify the GlassFish, JSR-311 - JAX-RS - The Java API
for RESTful Web Services (Jersey), jersey-bundle and browser-detect,
we have no obligation to distribute the source code.
o Glassfish (2010, Oracle and/or its affiliates. All rights reserved.)
o JSR-311 - JAX-RS - The Java API for RESTful Web Services (Jersey)
(2010-2014, Oracle Corporation)
o jersey-bundle (2010-2014, Oracle Corporation)
o browser-detect (2003, by Stephen Chapman, Felgall Pty Ltd)
1. Definitions.
1.1. “Contributor” means each individual or entity that creates or
contributes to the creation of Modifications.
1.2. “Contributor Version” means the combination of the Original
Software, prior Modifications used by a Contributor (if any), and the
Modifications made by that particular Contributor.
1.3. “Covered Software” means (a) the Original Software, or (b)
Modifications, or (c) the combination of files containing Original
Software with files containing Modifications, in each case including
portions thereof.
1.4. “Executable” means the Covered Software in any form other
than Source Code.
1.5. “Initial Developer” means the individual or entity that first makes
Original Software available under this License.
1.6. “Larger Work” means a work which combines Covered
Software or portions thereof with code not governed by the terms of
this License.
1.7. “License” means this document.
1.8. “Licensable” means having the right to grant, to the maximum
extent possible, whether at the time of the initial grant or
subsequently acquired, any and all of the rights conveyed herein.
1.9. “Modifications” means the Source Code and Executable form
of any of the following:
A. Any file that results from an addition to, deletion from or
modification of the contents of a file containing Original
Software or previous Modifications;
B. Any new file that contains any part of the Original Software or
previous Modification; or
C. Any new file that is contributed or otherwise made available
under the terms of this License.
1.10. “Original Software” means the Source Code and Executable
form of computer software code that is originally released under this
License.
1.11. “Patent Claims” means any patent claim(s), now owned or
hereafter acquired, including without limitation, method, process,
and apparatus claims, in any patent Licensable by grantor.
1.12. “Source Code” means (a) the common form of computer
software code in which modifications are made and (b) associated
documentation included in or with such code.
1.13. “You” (or “Your”) means an individual or a legal entity exercising
rights under, and complying with all of the terms of, this License. For
legal entities, “You” includes any entity which controls, is controlled
by, or is under common control with You. For purposes of this
definition, “control” means (a) the power, direct or indirect, to cause
the direction or management of such entity, whether by contract or
otherwise, or (b) ownership of more than fifty percent (50%) of the
outstanding shares or beneficial ownership of such entity.
2. License Grants.
2.1. The Initial Developer Grant.
Conditioned upon Your compliance with Section 3.1 below and
subject to third party intellectual property claims, the Initial Developer
hereby grants You a world-wide, royalty-free, non-exclusive license:
(a) under intellectual property rights (other than patent or
trademark) Licensable by Initial Developer, to use, reproduce,
modify, display, perform, sublicense and distribute the Original
Software (or portions thereof), with or without Modifications,
and/or as part of a Larger Work; and
(b) under Patent Claims infringed by the making, using or selling
of Original Software, to make, have made, use, practice, sell,
and offer for sale, and/or otherwise dispose of the Original
Software (or portions thereof).
(c) The licenses granted in Sections 2.1(a) and (b) are effective
on the date Initial Developer first distributes or otherwise makes
the Original Software available to a third party under the terms
of this License.
(d) Notwithstanding Section 2.1(b) above, no patent license is
granted: (1) for code that You delete from the Original Software,
or (2) for infringements caused by: (i) the modification of the
Original Software, or (ii) the combination of the Original Software
with other software or devices.
2.2. Contributor Grant.
Conditioned upon Your compliance with Section 3.1 below and
subject to third party intellectual property claims, each Contributor
hereby grants You a world-wide, royalty-free, non-exclusive license:
(a) under intellectual property rights (other than patent or
trademark) Licensable by Contributor to use, reproduce, modify,
display, perform, sublicense and distribute the Modifications
created by such Contributor (or portions thereof), either on an
unmodified basis, with other Modifications, as Covered
Software and/or as part of a Larger Work; and
(b) under Patent Claims infringed by the making, using, or
selling of Modifications made by that Contributor either alone
and/or in combination with its Contributor Version (or portions of
such combination), to make, use, sell, offer for sale, have made,
and/or otherwise dispose of: (1) Modifications made by that
Contributor (or portions thereof); and (2) the combination of
Modifications made by that Contributor with its Contributor
Version (or portions of such combination).
(c) The licenses granted in Sections 2.2(a) and 2.2(b) are
effective on the date Contributor first distributes or otherwise
makes the Modifications available to a third party.
(d) Notwithstanding Section 2.2(b) above, no patent license is
granted:
(1) for any code that Contributor has deleted from the
Contributor Version;
(2) for infringements caused by: (i) third party modifications of
Contributor Version, or (ii) the combination of Modifications
made by that Contributor with other software (except as part
of the Contributor Version) or other devices; or
(3) under Patent Claims infringed by Covered Software in the
absence of Modifications made by that Contributor.
3. Distribution Obligations.
3.1. Availability of Source Code.
Any Covered Software that You distribute or otherwise make
available in Executable form must also be made available in Source
Code form and that Source Code form must be distributed only
under the terms of this License. You must include a copy of this
License with every copy of the Source Code form of the Covered
Software You distribute or otherwise make available. You must
inform recipients of any such Covered Software in Executable form
as to how they can obtain such Covered Software in Source Code
form in a reasonable manner on or through a medium customarily
used for software exchange.
3.2. Modifications.
The Modifications that You create or to which You contribute are
governed by the terms of this License. You represent that You
believe Your Modifications are Your original creation(s) and/or You
have sufficient rights to grant the rights conveyed by this License.
3.3. Required Notices.
You must include a notice in each of Your Modifications that
identifies You as the Contributor of the Modification. You may not
remove or alter any copyright, patent or trademark notices
contained within the Covered Software, or any notices of licensing
or any descriptive text giving attribution to any Contributor or the
Initial Developer.
3.4. Application of Additional Terms.
You may not offer or impose any terms on any Covered Software in
Source Code form that alters or restricts the applicable version of
this License or the recipients' rights hereunder. You may choose to
offer, and to charge a fee for, warranty, support, indemnity or liability
obligations to one or more recipients of Covered Software. However,
you may do so only on Your own behalf, and not on behalf of the
Initial Developer or any Contributor. You must make it absolutely
clear that any such warranty, support, indemnity or liability obligation
is offered by You alone, and You hereby agree to indemnify the Initial
Developer and every Contributor for any liability incurred by the Initial
Developer or such Contributor as a result of warranty, support,
indemnity or liability terms You offer.
3.5. Distribution of Executable Versions.
You may distribute the Executable form of the Covered Software
under the terms of this License or under the terms of a license of
Your choice, which may contain terms different from this License,
provided that You are in compliance with the terms of this License
and that the license for the Executable form does not attempt to
limit or alter the recipient's rights in the Source Code form from the
rights set forth in this License. If You distribute the Covered Software
in Executable form under a different license, You must make it
absolutely clear that any terms which differ from this License are
offered by You alone, not by the Initial Developer or Contributor. You
hereby agree to indemnify the Initial Developer and every Contributor
for any liability incurred by the Initial Developer or such Contributor
as a result of any such terms You offer.
3.6. Larger Works.
You may create a Larger Work by combining Covered Software with
other code not governed by the terms of this License and distribute
the Larger Work as a single product. In such a case, You must
make sure the requirements of this License are fulfilled for the
Covered Software.
4. Versions of the License.
4.1. New Versions.
Oracle is the initial license steward and may publish revised and/or
new versions of this License from time to time. Each version will be
given a distinguishing version number. Except as provided in Section
4.3, no one other than the license steward has the right to modify
this License.
4.2. Effect of New Versions.
You may always continue to use, distribute or otherwise make the
Covered Software available under the terms of the version of the
License under which You originally received the Covered Software. If
the Initial Developer includes a notice in the Original Software
prohibiting it from being distributed or otherwise made available
under any subsequent version of the License, You must distribute
and make the Covered Software available under the terms of the
version of the License under which You originally received the
Covered Software. Otherwise, You may also choose to use,
distribute or otherwise make the Covered Software available under
the terms of any subsequent version of the License published by the
license steward.
4.3. Modified Versions.
When You are an Initial Developer and You want to create a new
license for Your Original Software, You may create and use a
modified version of this License if You: (a) rename the license and
remove any references to the name of the license steward (except
to note that the license differs from this License); and (b) otherwise
make it clear that the license contains terms which differ from this
License.
5. DISCLAIMER OF WARRANTY.
COVERED SOFTWARE IS PROVIDED UNDER THIS LICENSE ON
AN “AS IS” BASIS, WITHOUT WARRANTY OF ANY KIND, EITHER
EXPRESSED OR IMPLIED, INCLUDING, WITHOUT LIMITATION,
WARRANTIES THAT THE COVERED SOFTWARE IS FREE OF
DEFECTS, MERCHANTABLE, FIT FOR A PARTICULAR PURPOSE
OR NON-INFRINGING. THE ENTIRE RISK AS TO THE QUALITY
AND PERFORMANCE OF THE COVERED SOFTWARE IS WITH
YOU. SHOULD ANY COVERED SOFTWARE PROVE DEFECTIVE
6.
7.
8.
9.
IN ANY RESPECT, YOU (NOT THE INITIAL DEVELOPER OR ANY
OTHER CONTRIBUTOR) ASSUME THE COST OF ANY
NECESSARY SERVICING, REPAIR OR CORRECTION. THIS
DISCLAIMER OF WARRANTY CONSTITUTES AN ESSENTIAL
PART OF THIS LICENSE. NO USE OF ANY COVERED SOFTWARE
IS AUTHORIZED HEREUNDER EXCEPT UNDER THIS
DISCLAIMER.
TERMINATION.
6.1. This License and the rights granted hereunder will terminate
automatically if You fail to comply with terms herein and fail to cure
such breach within 30 days of becoming aware of the breach.
Provisions which, by their nature, must remain in effect beyond the
termination of this License shall survive.
6.2. If You assert a patent infringement claim (excluding declaratory
judgment actions) against Initial Developer or a Contributor (the Initial
Developer or Contributor against whom You assert such claim is
referred to as “Participant”) alleging that the Participant Software
(meaning the Contributor Version where the Participant is a
Contributor or the Original Software where the Participant is the
Initial Developer) directly or indirectly infringes any patent, then any
and all rights granted directly or indirectly to You by such Participant,
the Initial Developer (if the Initial Developer is not the Participant) and
all Contributors under Sections 2.1 and/or 2.2 of this License shall,
upon 60 days notice from Participant terminate prospectively and
automatically at the expiration of such 60 day notice period, unless if
within such 60 day period You withdraw Your claim with respect to
the Participant Software against such Participant either unilaterally or
pursuant to a written agreement with Participant.
6.3. If You assert a patent infringement claim against Participant
alleging that the Participant Software directly or indirectly infringes
any patent where such claim is resolved (such as by license or
settlement) prior to the initiation of patent infringement litigation, then
the reasonable value of the licenses granted by such Participant
under Sections 2.1 or 2.2 shall be taken into account in determining
the amount or value of any payment or license.
6.4. In the event of termination under Sections 6.1 or 6.2 above, all
end user licenses that have been validly granted by You or any
distributor hereunder prior to termination (excluding licenses granted
to You by any distributor) shall survive termination.
LIMITATION OF LIABILITY.
UNDER NO CIRCUMSTANCES AND UNDER NO LEGAL THEORY,
WHETHER TORT (INCLUDING NEGLIGENCE), CONTRACT, OR
OTHERWISE, SHALL YOU, THE INITIAL DEVELOPER, ANY
OTHER CONTRIBUTOR, OR ANY DISTRIBUTOR OF COVERED
SOFTWARE, OR ANY SUPPLIER OF ANY OF SUCH PARTIES, BE
LIABLE TO ANY PERSON FOR ANY INDIRECT, SPECIAL,
INCIDENTAL, OR CONSEQUENTIAL DAMAGES OF ANY
CHARACTER INCLUDING, WITHOUT LIMITATION, DAMAGES FOR
LOSS OF GOODWILL, WORK STOPPAGE, COMPUTER FAILURE
OR MALFUNCTION, OR ANY AND ALL OTHER COMMERCIAL
DAMAGES OR LOSSES, EVEN IF SUCH PARTY SHALL HAVE
BEEN INFORMED OF THE POSSIBILITY OF SUCH DAMAGES.
THIS LIMITATION OF LIABILITY SHALL NOT APPLY TO LIABILITY
FOR DEATH OR PERSONAL INJURY RESULTING FROM SUCH
PARTY'S NEGLIGENCE TO THE EXTENT APPLICABLE LAW
PROHIBITS SUCH LIMITATION. SOME JURISDICTIONS DO NOT
ALLOW THE EXCLUSION OR LIMITATION OF INCIDENTAL OR
CONSEQUENTIAL DAMAGES, SO THIS EXCLUSION AND
LIMITATION MAY NOT APPLY TO YOU.
U.S. GOVERNMENT END USERS.
The Covered Software is a “commercial item,” as that term is
defined in 48 C.F.R. 2.101 (Oct. 1995), consisting of “commercial
computer software” (as that term is defined at 48 C.F.R. § 252.2277014(a)(1)) and “commercial computer software documentation” as
such terms are used in 48 C.F.R. 12.212 (Sept. 1995). Consistent
with 48 C.F.R. 12.212 and 48 C.F.R. 227.7202-1 through 227.72024 (June 1995), all U.S. Government End Users acquire Covered
Software with only those rights set forth herein. This U.S.
Government Rights clause is in lieu of, and supersedes, any other
FAR, DFAR, or other clause or provision that addresses Government
rights in computer software under this License.
MISCELLANEOUS.
This License represents the complete agreement concerning
subject matter hereof. If any provision of this License is held to be
unenforceable, such provision shall be reformed only to the extent
necessary to make it enforceable. This License shall be governed by
the law of the jurisdiction specified in a notice contained within the
Original Software (except to the extent applicable law, if any,
provides otherwise), excluding such jurisdiction's conflict-of-law
provisions. Any litigation relating to this License shall be subject to
the jurisdiction of the courts located in the jurisdiction and venue
specified in a notice contained within the Original Software, with the
losing party responsible for costs, including, without limitation, court
costs and reasonable attorneys' fees and expenses. The application
of the United Nations Convention on Contracts for the International
Sale of Goods is expressly excluded. Any law or regulation which
provides that the language of a contract shall be construed against
the drafter shall not apply to this License. You agree that You alone
are responsible for compliance with the United States export
administration regulations (and the export control laws and
regulation of any other countries) when You use, distribute or
otherwise make available any Covered Software.
10. RESPONSIBILITY FOR CLAIMS.
As between Initial Developer and the Contributors, each party is
responsible for claims and damages arising, directly or indirectly, out
of its utilization of rights under this License and You agree to work
with Initial Developer and Contributors to distribute such
responsibility on an equitable basis. Nothing herein is intended or
shall be deemed to constitute any admission of liability.
NOTICE PURSUANT TO SECTION 9 OF THE COMMON
DEVELOPMENT AND DISTRIBUTION LICENSE (CDDL)
The code released under the CDDL shall be governed by the laws of
the State of California (excluding conflict-of-law provisions). Any litigation
relating to this License shall be subject to the jurisdiction of the Federal
Courts of the Northern District of California and the state courts of the
State of California, with venue lying in Santa Clara County, California.
Code Project Open 1.02 License
Copyright (c)
o Code Project – AlphaBlendTextBox – A transparent/translucent
textbox for .NET (2003, Bob Bradley)
o Code Project – Animating Windows Forms (2006, Robert Rohde)
o Code Project – BarTender – Group your contents (2006, Robert
Rohde)
o Code Project – Cabinet File (*.CAB) Compression and Extraction
(2012, Elmue)
o Code Project – Data Encryption/Decryption using RijndaelManaged
and PasswordDeriveByt (2006, Nidheesh T Mani)
o Code Project – How to skin scrollbars for Panels, in C# (2006, Greg
Ellis)
o Code Project – Windows Management Instrumentation (WMI)
Implementation (2002, Paul Li)
o Code Project - WPF TreeListView Control (2012, Andrey Gliznetsov)
o Code Project - Creating an XML file based on XSD (2006, jebarson)
o Code Project - A reusable, high performance, socket server class Part 1 (2002, Len Holgate)
o Code Project - Install Windows Service using Custom Action (2010,
lata07mahi)
Preamble
This License governs Your use of the Work. This License is intended to
allow developers to use the Source Code and Executable Files provided
as part of the Work in any application in any form.
The main points subject to the terms of the License are:
o Source Code and Executable Files can be used in commercial
applications;
o Source Code and Executable Files can be redistributed; and
o Source Code can be modified to create derivative works.
o No claim of suitability, guarantee, or any warranty whatsoever is
provided. The software is provided "as-is".
o The Article accompanying the Work may not be distributed or
republished without the Author's consent
This License is entered between You, the individual or other entity
reading or otherwise making use of the Work licensed pursuant to this
License and the individual or other entity which offers the Work under
the terms of this License ("Author").
License
THE WORK (AS DEFINED BELOW) IS PROVIDED UNDER THE TERMS
OF THIS CODE PROJECT OPEN LICENSE ("LICENSE"). THE WORK IS
PROTECTED BY COPYRIGHT AND/OR OTHER APPLICABLE LAW.
ANY USE OF THE WORK OTHER THAN AS AUTHORIZED UNDER
THIS LICENSE OR COPYRIGHT LAW IS PROHIBITED.
BY EXERCISING ANY RIGHTS TO THE WORK PROVIDED HEREIN,
YOU ACCEPT AND AGREE TO BE BOUND BY THE TERMS OF THIS
LICENSE. THE AUTHOR GRANTS YOU THE RIGHTS CONTAINED
HEREIN IN CONSIDERATION OF YOUR ACCEPTANCE OF SUCH
TERMS AND CONDITIONS. IF YOU DO NOT AGREE TO ACCEPT
AND BE BOUND BY THE TERMS OF THIS LICENSE, YOU CANNOT
MAKE ANY USE OF THE WORK.
1. Definitions.
a. "Articles" means, collectively, all articles written by Author which
describes how the Source Code and Executable Files for the Work
may be used by a user.
b. "Author" means the individual or entity that offers the Work under
the terms of this License.
c. "Derivative Work" means a work based upon the Work or upon
the Work and other pre-existing works.
d. "Executable Files" refer to the executables, binary files,
configuration and any required data files included in the Work.
e. "Publisher" means the provider of the website, magazine,
CD-ROM, DVD or other medium from or by which the Work is
obtained by You.
f. "Source Code" refers to the collection of source code and
configuration files used to create the Executable Files.
g. "Standard Version" refers to such a Work if it has not been
modified, or has been modified in accordance with the consent of
the Author, such consent being in the full discretion of the Author.
h. "Work" refers to the collection of files distributed by the Publisher,
including the Source Code, Executable Files, binaries, data files,
documentation, whitepapers and the Articles.
i. "You" is you, an individual or entity wishing to use the Work and
exercise your rights under this License.
2. Fair Use/Fair Use Rights. Nothing in this License is intended to
reduce, limit, or restrict any rights arising from fair use, fair dealing,
first sale or other limitations on the exclusive rights of the copyright
owner under copyright law or other applicable laws.
3. License Grant. Subject to the terms and conditions of this License,
the Author hereby grants You a worldwide, royalty-free, nonexclusive, perpetual (for the duration of the applicable copyright)
license to exercise the rights in the Work as stated below:
a. You may use the standard version of the Source Code or
Executable Files in Your own applications.
b. You may apply bug fixes, portability fixes and other modifications
obtained from the Public Domain or from the Author. A Work
modified in such a way shall still be considered the standard version
and will be subject to this License.
c. You may otherwise modify Your copy of this Work (excluding the
Articles) in any way to create a Derivative Work, provided that You
insert a prominent notice in each changed file stating how, when
and where You changed that file.
d. You may distribute the standard version of the Executable Files
and Source Code or Derivative Work in aggregate with other
(possibly commercial) programs as part of a larger (possibly
commercial) software distribution.
e. The Articles discussing the Work published in any form by the
author may not be distributed or republished without the Author's
consent. The author retains copyright to any such Articles. You may
use the Executable Files and Source Code pursuant to this License
but you may not repost or republish or otherwise distribute or make
available the Articles, without the prior written consent of the Author.
Any subroutines or modules supplied by You and linked into the
Source Code or Executable Files of this Work shall not be
considered part of this Work and will not be subject to the terms of
this License.
4. Patent License. Subject to the terms and conditions of this
License, each Author hereby grants to You a perpetual, worldwide,
non-exclusive, no-charge, royalty-free, irrevocable (except as stated
in this section) patent license to make, have made, use, import, and
otherwise transfer the Work.
5. Restrictions. The license granted in Section 3 above is expressly
made subject to and limited by the following restrictions:
a. You agree not to remove any of the original copyright, patent,
trademark, and attribution notices and associated disclaimers that
may appear in the Source Code or Executable Files.
b. You agree not to advertise or in any way imply that this Work is a
product of Your own.
c. The name of the Author may not be used to endorse or promote
products derived from the Work without the prior written consent of
the Author.
d. You agree not to sell, lease, or rent any part of the Work. This
does not restrict you from including the Work or any part of the
Work inside a larger software distribution that itself is being sold. The
Work by itself, though, cannot be sold, leased or rented.
e. You may distribute the Executable Files and Source Code only
under the terms of this License, and You must include a copy of, or
the Uniform Resource Identifier for, this License with every copy of
the Executable Files or Source Code You distribute and ensure that
anyone receiving such Executable Files and Source Code agrees
that the terms of this License apply to such Executable Files and/or
Source Code. You may not offer or impose any terms on the Work
that alter or restrict the terms of this License or the recipients'
exercise of the rights granted hereunder. You may not sublicense
the Work. You must keep intact all notices that refer to this License
and to the disclaimer of warranties. You may not distribute the
Executable Files or Source Code with any technological measures
that control access or use of the Work in a manner inconsistent with
the terms of this License.
f. You agree not to use the Work for illegal, immoral or improper
purposes, or on pages containing illegal, immoral or improper
material. The Work is subject to applicable export laws. You agree
to comply with all such laws and regulations that may apply to the
Work after Your receipt of the Work.
6. Representations, Warranties and Disclaimer. THIS WORK IS
PROVIDED "AS IS", "WHERE IS" AND "AS AVAILABLE", WITHOUT
ANY EXPRESS OR IMPLIED WARRANTIES OR CONDITIONS OR
GUARANTEES. YOU, THE USER, ASSUME ALL RISK IN ITS USE,
INCLUDING COPYRIGHT INFRINGEMENT, PATENT
INFRINGEMENT, SUITABILITY, ETC. AUTHOR EXPRESSLY
DISCLAIMS ALL EXPRESS, IMPLIED OR STATUTORY
WARRANTIES OR CONDITIONS, INCLUDING WITHOUT
LIMITATION, WARRANTIES OR CONDITIONS OF
MERCHANTABILITY, MERCHANTABLE QUALITY OR FITNESS
FOR A PARTICULAR PURPOSE, OR ANY WARRANTY OF TITLE
OR NON-INFRINGEMENT, OR THAT THE WORK (OR ANY
PORTION THEREOF) IS CORRECT, USEFUL, BUG-FREE OR FREE
OF VIRUSES. YOU MUST PASS THIS DISCLAIMER ON
WHENEVER YOU DISTRIBUTE THE WORK OR DERIVATIVE
WORKS.
7. Indemnity. You agree to defend, indemnify and hold harmless the
Author and the Publisher from and against any claims, suits, losses,
damages, liabilities, costs, and expenses (including reasonable legal
or attorneys’ fees) resulting from or relating to any use of the Work
by You.
8. Limitation on Liability. EXCEPT TO THE EXTENT REQUIRED BY
APPLICABLE LAW, IN NO EVENT WILL THE AUTHOR OR THE
PUBLISHER BE LIABLE TO YOU ON ANY LEGAL THEORY FOR
ANY SPECIAL, INCIDENTAL, CONSEQUENTIAL, PUNITIVE OR
EXEMPLARY DAMAGES ARISING OUT OF THIS LICENSE OR THE
USE OF THE WORK OR OTHERWISE, EVEN IF THE AUTHOR OR
THE PUBLISHER HAS BEEN ADVISED OF THE POSSIBILITY OF
SUCH DAMAGES.
9. Termination.
a. This License and the rights granted hereunder will terminate
automatically upon any breach by You of any term of this License.
Individuals or entities who have received Derivative Works from You
under this License, however, will not have their licenses terminated
provided such individuals or entities remain in full compliance with
those licenses. Sections 1, 2, 6, 7, 8, 9, 10 and 11 will survive any
termination of this License.
b. If You bring a copyright, trademark, patent or any other
infringement claim against any contributor over infringements You
claim are made by the Work, your License from such contributor to
the Work ends automatically.
c. Subject to the above terms and conditions, this License is
perpetual (for the duration of the applicable copyright in the Work).
Notwithstanding the above, the Author reserves the right to release
the Work under different license terms or to stop distributing the
Work at any time; provided, however that any such election will not
serve to withdraw this License (or any other license that has been,
or is required to be, granted under the terms of this License), and
this License will continue in full force and effect unless terminated as
stated above.
10. Publisher. The parties hereby confirm that the Publisher shall not,
under any circumstances, be responsible for and shall not have any
liability in respect of the subject matter of this License. The Publisher
makes no warranty whatsoever in connection with the Work and
shall not be liable to You or any party on any legal theory for any
damages whatsoever, including without limitation any general,
special, incidental or consequential damages arising in connection
to this license. The Publisher reserves the right to cease making the
Work available to You at any time without notice
11. Miscellaneous
a. This License shall be governed by the laws of the location of the
head office of the Author or if the Author is an individual, the laws of
location of the principal place of residence of the Author.
b. If any provision of this License is invalid or unenforceable under
applicable law, it shall not affect the validity or enforceability of the
remainder of the terms of this License, and without further action by
the parties to this License, such provision shall be reformed to the
minimum extent necessary to make such provision valid and
enforceable.
c. No term or provision of this License shall be deemed waived and
no breach consented to unless such waiver or consent shall be in
writing and signed by the party to be charged with such waiver or
consent.
d. This License constitutes the entire agreement between the parties
with respect to the Work licensed herein. There are no
understandings, agreements or representations with respect to the
Work not specified herein. The Author shall not be bound by any
additional provisions that may appear in any communication from
You. This License may not be modified without the mutual written
agreement of the Author and You.
GNU LESSER GENERAL PUBLIC LICENSE 2.1
We used the javastruct, JFreeChart - 1. JFreeChart, JFreeChart - 3.
Jcommon and jna in our application and we did not modify the source
code. We modified the Live555 in the source code and used it in our
application.
Copyright(C)
o Live555 (1991, 1999 Free Software Foundation, Inc.)
o javastruct (2007 Free Software Foundation, Inc. <http://fsf.org/>)
o JFreeChart - 1. JFreeChart (2000-2004, by Object Refinery Limited
and Contributors)
o JFreeChart - 3. Jcommon (2000-2004, by Object Refinery Limited
and Contributors)
o jna (1991, 1999 Free Software Foundation, Inc.)
Version 2.1, February 1999
Copyright (C) 1991, 1999 Free Software Foundation, Inc.
51 Franklin Street, Fifth Floor, Boston, MA 02110-1301 USA Everyone
is permitted to copy and distribute verbatim copies of this license
document, but changing it is not allowed.
[This is the first released version of the Lesser GPL. It also counts as the
successor of the GNU Library Public License, version 2, hence the
version number 2.1.]
Preamble
The licenses for most software are designed to take away your freedom
to share and change it. By contrast, the GNU General Public Licenses
are intended to guarantee your freedom to share and change free
software--to make sure the software is free for all its users.
This license, the Lesser General Public License, applies to some
specially designated software packages--typically libraries--of the Free
Software Foundation and other authors who decide to use it. You can
use it too, but we suggest you first think carefully about whether this
license or the ordinary General Public License is the better strategy to
use in any particular case, based on the explanations below.
When we speak of free software, we are referring to freedom of use, not
price. Our General Public Licenses are designed to make sure that you
have the freedom to distribute copies of free software (and charge for
this service if you wish); that you receive source code or can get it if you
want it; that you can change the software and use pieces of it in new
free programs; and that you are informed that you can do these things.
To protect your rights, we need to make restrictions that forbid
distributors to deny you these rights or to ask you to surrender these
rights. These restrictions translate to certain responsibilities for you if you
distribute copies of the library or if you modify it.
For example, if you distribute copies of the library, whether gratis or for a
fee, you must give the recipients all the rights that we gave you. You
must make sure that they, too, receive or can get the source code. If
you link other code with the library, you must provide complete object
files to the recipients, so that they can relink them with the library after
making changes to the library and recompiling it. And you must show
them these terms so they know their rights.
We protect your rights with a two-step method: (1) we copyright the
library, and (2) we offer you this license, which gives you legal
permission to copy, distribute and/or modify the library.
To protect each distributor, we want to make it very clear that there is no
warranty for the free library. Also, if the library is modified by someone
else and passed on, the recipients should know that what they have is
not the original version, so that the original author's reputation will not
be affected by problems that might be introduced by others.
Finally, software patents pose a constant threat to the existence of any
free program. We wish to make sure that a company cannot effectively
restrict the users of a free program by obtaining a restrictive license from
a patent holder. Therefore, we insist that any patent license obtained for
a version of the library must be consistent with the full freedom of use
specified in this license.
Most GNU software, including some libraries, is covered by the ordinary
GNU General Public License. This license, the GNU Lesser General
Public License, applies to certain designated libraries, and is quite
different from the ordinary General Public License. We use this license
for certain libraries in order to permit linking those libraries into non-free
programs.
When a program is linked with a library, whether statically or using a
shared library, the combination of the two is legally speaking a
combined work, a derivative of the original library. The ordinary General
Public License therefore permits such linking only if the entire
combination fits its criteria of freedom. The Lesser General Public
License permits more lax criteria for linking other code with the library.
We call this license the "Lesser" General Public License because it does
Less to protect the user's freedom than the ordinary General Public
License. It also provides other free software developers Less of an
advantage over competing non-free programs. These disadvantages
are the reason we use the ordinary General Public License for many
libraries. However, the Lesser license provides advantages in certain
special circumstances.
For example, on rare occasions, there may be a special need to
encourage the widest possible use of a certain library, so that it
becomes a de-facto standard. To achieve this, non-free programs must
be allowed to use the library. A more frequent case is that a free library
does the same job as widely used non-free libraries. In this case, there
is little to gain by limiting the free library to free software only, so we use
the Lesser General Public License.
In other cases, permission to use a particular library in non-free
programs enables a greater number of people to use a large body of
free software. For example, permission to use the GNU C Library in
non-free programs enables many more people to use the whole GNU
operating system, as well as its variant, the GNU/Linux operating
system.
Although the Lesser General Public License is Less protective of the
users' freedom, it does ensure that the user of a program that is linked
with the Library has the freedom and the wherewithal to run that
program using a modified version of the Library.
The precise terms and conditions for copying, distribution and
modification follow. Pay close attention to the difference between a
"work based on the library" and a "work that uses the library". The
former contains code derived from the library, whereas the latter must
be combined with the library in order to run.
TERMS AND CONDITIONS FOR COPYING, DISTRIBUTION AND
MODIFICATION
0. This License Agreement applies to any software library or other
program which contains a notice placed by the copyright holder or
other authorized party saying it may be distributed under the terms of
this Lesser General Public License (also called "this License"). Each
licensee is addressed as "you".
A "library" means a collection of software functions and/or data
prepared so as to be conveniently linked with application programs
(which use some of those functions and data) to form executables.
The "Library", below, refers to any such software library or work which
has been distributed under these terms. A "work based on the Library"
means either the Library or any derivative work under copyright law: that
is to say, a work containing the Library or a portion of it, either verbatim
or with modifications and/or translated straightforwardly into another
language. (Hereinafter, translation is included without limitation in the
term "modification".)
"Source code" for a work means the preferred form of the work for
making modifications to it. For a library, complete source code means
all the source code for all modules it contains, plus any associated
interface definition files, plus the scripts used to control compilation and
installation of the library.
Activities other than copying, distribution and modification are not
covered by this License; they are outside its scope. The act of running a
program using the Library is not restricted, and output from such a
program is covered only if its contents constitute a work based on the
Library (independent of the use of the Library in a tool for writing it).
Whether that is true depends on what the Library does and what the
program that uses the Library does.
1. You may copy and distribute verbatim copies of the Library's
complete source code as you receive it, in any medium, provided that
you conspicuously and appropriately publish on each copy an
appropriate copyright notice and disclaimer of warranty; keep intact all
the notices that refer to this License and to the absence of any
warranty; and distribute a copy of this License along with the Library.
You may charge a fee for the physical act of transferring a copy, and
you may at your option offer warranty protection in exchange for a fee.
2. You may modify your copy or copies of the Library or any portion of
it, thus forming a work based on the Library, and copy and distribute
such modifications or work under the terms of Section 1 above,
provided that you also meet all of these conditions:
a) The modified work must itself be a software library.
b) You must cause the files modified to carry prominent notices stating
that you changed the files and the date of any change.
c) You must cause the whole of the work to be licensed at no charge to
all third parties under the terms of this License.
d) If a facility in the modified Library refers to a function or a table of data
to be supplied by an application program that uses the facility, other
than as an argument passed when the facility is invoked, then you must
make a good faith effort to ensure that, in the event an application does
not supply such function or table, the facility still operates, and performs
whatever part of its purpose remains meaningful.
(For example, a function in a library to compute square roots has a
purpose that is entirely well-defined independent of the application.
Therefore, Subsection 2d requires that any application-supplied function
or table used by this function must be optional: if the application does
not supply it, the square root function must still compute square roots.)
These requirements apply to the modified work as a whole. If identifiable
sections of that work are not derived from the Library, and can be
reasonably considered independent and separate works in themselves,
then this License, and its terms, do not apply to those sections when
you distribute them as separate works. But when you distribute the
same sections as part of a whole which is a work based on the Library,
the distribution of the whole must be on the terms of this License,
whose permissions for other licensees extend to the entire whole, and
thus to each and every part regardless of who wrote it.
Thus, it is not the intent of this section to claim rights or contest your
rights to work written entirely by you; rather, the intent is to exercise the
right to control the distribution of derivative or collective works based on
the Library.
In addition, mere aggregation of another work not based on the Library
with the Library (or with a work based on the Library) on a volume of a
storage or distribution medium does not bring the other work under the
scope of this License.
3. You may opt to apply the terms of the ordinary GNU General Public
License instead of this License to a given copy of the Library. To do this,
you must alter all the notices that refer to this License, so that they refer
to the ordinary GNU General Public License, version 2, instead of to this
License. (If a newer version than version 2 of the ordinary GNU General
Public License has appeared, then you can specify that version instead
if you wish.) Do not make any other change in these notices.
Once this change is made in a given copy, it is irreversible for that copy,
so the ordinary GNU General Public License applies to all subsequent
copies and derivative works made from that copy.
This option is useful when you wish to copy part of the code of the
Library into a program that is not a library.
4. You may copy and distribute the Library (or a portion or derivative of
it, under Section 2) in object code or executable form under the terms
of Sections 1 and 2 above provided that you accompany it with the
complete corresponding machine-readable source code, which must
be distributed under the terms of Sections 1 and 2 above on a medium
customarily used for software interchange.
If distribution of object code is made by offering access to copy from a
designated place, then offering equivalent access to copy the source
code from the same place satisfies the requirement to distribute the
source code, even though third parties are not compelled to copy the
source along with the object code.
5. A program that contains no derivative of any portion of the Library,
but is designed to work with the Library by being compiled or linked
with it, is called a "work that uses the Library". Such a work, in isolation,
is not a derivative work of the Library, and therefore falls outside the
scope of this License.
However, linking a "work that uses the Library" with the Library creates
an executable that is a derivative of the Library (because it contains
portions of the Library), rather than a "work that uses the library". The
executable is therefore covered by this License. Section 6 states terms
for distribution of such executables.
When a "work that uses the Library" uses material from a header file
that is part of the Library, the object code for the work may be a
derivative work of the Library even though the source code is not.
Whether this is true is especially significant if the work can be linked
without the Library, or if the work is itself a library. The threshold for this
to be true is not precisely defined by law.
If such an object file uses only numerical parameters, data structure
layouts and accessors, and small macros and small inline functions (ten
lines or less in length), then the use of the object file is unrestricted,
regardless of whether it is legally a derivative work. (Executables
containing this object code plus portions of the Library will still fall under
Section 6.)
Otherwise, if the work is a derivative of the Library, you may distribute
the object code for the work under the terms of Section 6. Any
executables containing that work also fall under Section 6, whether or
not they are linked directly with the Library itself.
6. As an exception to the Sections above, you may also combine or link
a "work that uses the Library" with the Library to produce a work
containing portions of the Library, and distribute that work under terms
of your choice, provided that the terms permit modification of the work
for the customer's own use and reverse engineering for debugging such
modifications.
You must give prominent notice with each copy of the work that the
Library is used in it and that the Library and its use are covered by this
License. You must supply a copy of this License. If the work during
execution displays copyright notices, you must include the copyright
notice for the Library among them, as well as a reference directing the
user to the copy of this License. Also, you must do one of these things:
a) Accompany the work with the complete corresponding machinereadable source code for the Library including whatever changes were
used in the work (which must be distributed under Sections 1 and 2
above); and, if the work is an executable linked with the Library, with the
complete machine-readable "work that uses the Library", as object
code and/or source code, so that the user can modify the Library and
then relink to produce a modified executable containing the modified
Library. (It is understood that the user who changes the contents of
definitions files in the Library will not necessarily be able to recompile the
application to use the modified definitions.)
b) Use a suitable shared library mechanism for linking with the Library. A
suitable mechanism is one that (1) uses at run time a copy of the library
already present on the user's computer system, rather than copying
library functions into the executable, and (2) will operate properly with a
modified version of the library, if the user installs one, as long as the
modified version is interface-compatible with the version that the work
was made with.
c) Accompany the work with a written offer, valid for at least three years,
to give the same user the materials specified in Subsection 6a, above,
for a charge no more than the cost of performing this distribution.
d) If distribution of the work is made by offering access to copy from a
designated place, offer equivalent access to copy the above specified
materials from the same place.
e) Verify that the user has already received a copy of these materials or
that you have already sent this user a copy.
For an executable, the required form of the "work that uses the Library"
must include any data and utility programs needed for reproducing the
executable from it. However, as a special exception, the materials to be
distributed need not include anything that is normally distributed (in
either source or binary form) with the major components (compiler,
kernel, and so on) of the operating system on which the executable
runs, unless that component itself accompanies the executable.
It may happen that this requirement contradicts the license restrictions
of other proprietary libraries that do not normally accompany the
operating system. Such a contradiction means you cannot use both
them and the Library together in an executable that you distribute.
7. You may place library facilities that are a work based on the Library
side-by-side in a single library together with other library facilities not
covered by this License, and distribute such a combined library,
provided that the separate distribution of the work based on the Library
and of the other library facilities is otherwise permitted, and provided
that you do these two things:
a) Accompany the combined library with a copy of the same work
based on the Library, uncombined with any other library facilities. This
must be distributed under the terms of the Sections above.
b) Give prominent notice with the combined library of the fact that part
of it is a work based on the Library, and explaining where to find the
accompanying uncombined form of the same work.
8. You may not copy, modify, sublicense, link with, or distribute the
Library except as expressly provided under this License. Any attempt
otherwise to copy, modify, sublicense, link with, or distribute the Library
is void, and will automatically terminate your rights under this License.
However, parties who have received copies, or rights, from you under
this License will not have their licenses terminated so long as such
parties remain in full compliance.
9. You are not required to accept this License, since you have not
signed it. However, nothing else grants you permission to modify or
distribute the Library or its derivative works. These actions are
prohibited by law if you do not accept this License. Therefore, by
modifying or distributing the Library (or any work based on the Library),
you indicate your acceptance of this License to do so, and all its terms
and conditions for copying, distributing or modifying the Library or
works based on it.
10. Each time you redistribute the Library (or any work based on the
Library), the recipient automatically receives a license from the original
licensor to copy, distribute, link with or modify the Library subject to
these terms and conditions. You may not impose any further restrictions
on the recipients' exercise of the rights granted herein. You are not
responsible for enforcing compliance by third parties with this License.
11. If, as a consequence of a court judgment or allegation of patent
infringement or for any other reason (not limited to patent issues),
conditions are imposed on you (whether by court order, agreement or
otherwise) that contradict the conditions of this License, they do not
excuse you from the conditions of this License. If you cannot distribute
so as to satisfy simultaneously your obligations under this License and
any other pertinent obligations, then as a consequence you may not
distribute the Library at all. For example, if a patent license would not
permit royalty-free redistribution of the Library by all those who receive
copies directly or indirectly through you, then the only way you could
satisfy both it and this License would be to refrain entirely from
distribution of the Library.
If any portion of this section is held invalid or unenforceable under any
particular circumstance, the balance of the section is intended to apply,
and the section as a whole is intended to apply in other circumstances.
It is not the purpose of this section to induce you to infringe any patents
or other property right claims or to contest validity of any such claims;
this section has the sole purpose of protecting the integrity of the free
software distribution system which is implemented by public license
practices. Many people have made generous contributions to the wide
range of software distributed through that system in reliance on
consistent application of that system; it is up to the author/donor to
decide if he or she is willing to distribute software through any other
system and a licensee cannot impose that choice.
This section is intended to make thoroughly clear what is believed to be
a consequence of the rest of this License.
12. If the distribution and/or use of the Library is restricted in certain
countries either by patents or by copyrighted interfaces, the original
copyright holder who places the Library under this License may add an
explicit geographical distribution limitation excluding those countries, so
that distribution is permitted only in or among countries not thus
excluded. In such case, this License incorporates the limitation as if
written in the body of this License.
13. The Free Software Foundation may publish revised and/or new
versions of the Lesser General Public License from time to time. Such
new versions will be similar in spirit to the present version, but may differ
in detail to address new problems or concerns.
Each version is given a distinguishing version number. If the Library
specifies a version number of this License which applies to it and "any
later version", you have the option of following the terms and conditions
either of that version or of any later version published by the Free
Software Foundation. If the Library does not specify a license version
number, you may choose any version ever published by the Free
Software Foundation.
14. If you wish to incorporate parts of the Library into other free
programs whose distribution conditions are incompatible with these,
write to the author to ask for permission. For software which is
copyrighted by the Free Software Foundation, write to the Free
Software Foundation; we sometimes make exceptions for this. Our
decision will be guided by the two goals of preserving the free status of
all derivatives of our free software and of promoting the sharing and
reuse of software generally.
NO WARRANTY
15. BECAUSE THE LIBRARY IS LICENSED FREE OF CHARGE, THERE
IS NO WARRANTY FOR THE LIBRARY, TO THE EXTENT PERMITTED
BY APPLICABLE LAW. EXCEPT WHEN OTHERWISE STATED IN
WRITING THE COPYRIGHT HOLDERS AND/OR OTHER PARTIES
PROVIDE THE LIBRARY "AS IS" WITHOUT WARRANTY OF ANY KIND,
EITHER EXPRESSED OR IMPLIED, INCLUDING, BUT NOT LIMITED
TO, THE IMPLIED WARRANTIES OF MERCHANTABILITY AND
FITNESS FOR A PARTICULAR PURPOSE. THE ENTIRE RISK AS TO
THE QUALITY AND PERFORMANCE OF THE LIBRARY IS WITH YOU.
SHOULD THE LIBRARY PROVE DEFECTIVE, YOU ASSUME THE
COST OF ALL NECESSARY SERVICING, REPAIR OR CORRECTION.
16. IN NO EVENT UNLESS REQUIRED BY APPLICABLE LAW OR
AGREED TO IN WRITING WILL ANY COPYRIGHT HOLDER, OR ANY
OTHER PARTY WHO MAY MODIFY AND/OR REDISTRIBUTE THE
LIBRARY AS PERMITTED ABOVE, BE LIABLE TO YOU FOR
DAMAGES, INCLUDING ANY GENERAL, SPECIAL, INCIDENTAL OR
CONSEQUENTIAL DAMAGES ARISING OUT OF THE USE OR
INABILITY TO USE THE LIBRARY (INCLUDING BUT NOT LIMITED TO
LOSS OF DATA OR DATA BEING RENDERED INACCURATE OR
LOSSES SUSTAINED BY YOU OR THIRD PARTIES OR A FAILURE OF
THE LIBRARY TO OPERATE WITH ANY OTHER SOFTWARE), EVEN IF
SUCH HOLDER OR OTHER PARTY HAS BEEN ADVISED OF THE
POSSIBILITY OF SUCH DAMAGES.
END OF TERMS AND CONDITIONS
How to Apply These Terms to Your New Libraries
If you develop a new library, and you want it to be of the greatest
possible use to the public, we recommend making it free software that
everyone can redistribute and change. You can do so by permitting
redistribution under these terms (or, alternatively, under the terms of the
ordinary General Public License).
To apply these terms, attach the following notices to the library. It is
safest to attach them to the start of each source file to most effectively
convey the exclusion of warranty; and each file should have at least the
"copyright" line and a pointer to where the full notice is found.
one line to give the library's name and an idea of what it does.
Copyright (C) year name of author
This library is free software; you can redistribute it and/or
modify it under the terms of the GNU Lesser General Public
License as published by the Free Software Foundation; either
version 2.1 of the License, or (at your option) any later version.
This library is distributed in the hope that it will be useful, but WITHOUT
ANY WARRANTY; without even the implied warranty of
MERCHANTABILITY or FITNESS FOR A PARTICULAR PURPOSE. See
the GNU Lesser General Public License for more details.
You should have received a copy of the GNU Lesser General Public
License along with this library; if not, write to the Free Software
Foundation, Inc., 51 Franklin Street, Fifth Floor, Boston, MA 021101301 USA
Also add information on how to contact you by electronic and paper
mail.
You should also get your employer (if you work as a programmer) or
your school, if any, to sign a "copyright disclaimer" for the library, if
necessary. Here is a sample; alter the names:
Yoyodyne, Inc., hereby disclaims all copyright interest in the library `Frob'
(a library for tweaking knobs) written by James Random Hacker.
signature of Ty Coon, 1 April 1990
Ty Coon, President of Vice
That's all there is to it!
GNU LESSER GENERAL PUBLIC LICENSE 3.0
o JasperReports Library - jasperreports (2000 - 2014, Jaspersoft
Corporation)
o m-surveys (2013, Eklektix, Inc)
Version 3, 29 June 2007
Copyright (C) 2007 Free Software Foundation, Inc. <http://fsf.org/>
Everyone is permitted to copy and distribute verbatim copies of this
license document, but changing it is not allowed.
This version of the GNU Lesser General Public License incorporates the
terms and conditions of version 3 of the GNU General Public License,
supplemented by the additional permissions listed below.
0. Additional Definitions.
As used herein, “this License” refers to version 3 of the GNU Lesser
General Public License, and the “GNU GPL” refers to version 3 of the
GNU General Public License.
“The Library” refers to a covered work governed by this License, other
than an Application or a Combined Work as defined below.
An “Application” is any work that makes use of an interface provided by
the Library, but which is not otherwise based on the Library. Defining a
subclass of a class defined by the Library is deemed a mode of using
an interface provided by the Library.
A “Combined Work” is a work produced by combining or linking an
Application with the Library. The particular version of the Library with
which the Combined Work was made is also called the “Linked
Version”.
The “Minimal Corresponding Source” for a Combined Work means the
Corresponding Source for the Combined Work, excluding any source
code for portions of the Combined Work that, considered in isolation,
are based on the Application, and not on the Linked Version.
The “Corresponding Application Code” for a Combined Work means
the object code and/or source code for the Application, including any
data and utility programs needed for reproducing the Combined Work
from the Application, but excluding the System Libraries of the
Combined Work.
1. Exception to Section 3 of the GNU GPL.
You may convey a covered work under sections 3 and 4 of this License
without being bound by section 3 of the GNU GPL.
2. Conveying Modified Versions.
If you modify a copy of the Library, and, in your modifications, a facility
refers to a function or data to be supplied by an Application that uses
the facility (other than as an argument passed when the facility is
invoked), then you may convey a copy of the modified version:
a) under this License, provided that you make a good faith effort to
ensure that, in the event an Application does not supply the function or
data, the facility still operates, and performs whatever part of its purpose
remains meaningful, or
b) under the GNU GPL, with none of the additional permissions of this
License applicable to that copy.
3. Object Code Incorporating Material from Library Header Files.
The object code form of an Application may incorporate material from a
header file that is part of the Library. You may convey such object code
under terms of your choice, provided that, if the incorporated material is
not limited to numerical parameters, data structure layouts and
accessors, or small macros, inline functions and templates (ten or fewer
lines in length), you do both of the following:
a) Give prominent notice with each copy of the object code that the
Library is used in it and that the Library and its use are covered by this
License.
b) Accompany the object code with a copy of the GNU GPL and this
license document.
4. Combined Works.
You may convey a Combined Work under terms of your choice that,
taken together, effectively do not restrict modification of the portions of
the Library contained in the Combined Work and reverse engineering for
debugging such modifications, if you also do each of the following:
a) Give prominent notice with each copy of the Combined Work that the
Library is used in it and that the Library and its use are covered by this
License.
b) Accompany the Combined Work with a copy of the GNU GPL and
this license document.
c) For a Combined Work that displays copyright notices during
execution, include the copyright notice for the Library among these
notices, as well as a reference directing the user to the copies of the
GNU GPL and this license document.
d) Do one of the following:
0) Convey the Minimal Corresponding Source under the terms of this
License, and the Corresponding Application Code in a form suitable for,
and under terms that permit, the user to recombine or relink the
Application with a modified version of the Linked Version to produce a
modified Combined Work, in the manner specified by section 6 of the
GNU GPL for conveying Corresponding Source.
1) Use a suitable shared library mechanism for linking with the Library. A
suitable mechanism is one that (a) uses at run time a copy of the Library
already present on the user's computer system, and (b) will operate
properly with a modified version of the Library that is interfacecompatible with the Linked Version.
e) Provide Installation Information, but only if you would otherwise be
required to provide such information under section 6 of the GNU GPL,
and only to the extent that such information is necessary to install and
execute a modified version of the Combined Work produced by
recombining or relinking the Application with a modified version of the
Linked Version. (If you use option 4d0, the Installation Information must
accompany the Minimal Corresponding Source and Corresponding
Application Code. If you use option 4d1, you must provide the
Installation Information in the manner specified by section 6 of the GNU
GPL for conveying Corresponding Source.)
5. Combined Libraries.
You may place library facilities that are a work based on the Library side
by side in a single library together with other library facilities that are not
Applications and are not covered by this License, and convey such a
combined library under terms of your choice, if you do both of the
following:
a) Accompany the combined library with a copy of the same work
based on the Library, uncombined with any other library facilities,
conveyed under the terms of this License.
b) Give prominent notice with the combined library that part of it is a
work based on the Library, and explaining where to find the
accompanying uncombined form of the same work.
6. Revised Versions of the GNU Lesser General Public License.
The Free Software Foundation may publish revised and/or new versions
of the GNU Lesser General Public License from time to time. Such new
versions will be similar in spirit to the present version, but may differ in
detail to address new problems or concerns.
Each version is given a distinguishing version number. If the Library as
you received it specifies that a certain numbered version of the GNU
Lesser General Public License “or any later version” applies to it, you
have the option of following the terms and conditions either of that
published version or of any later version published by the Free Software
Foundation. If the Library as you received it does not specify a version
number of the GNU Lesser General Public License, you may choose
any version of the GNU Lesser General Public License ever published
by the Free Software Foundation.
If the Library as you received it specifies that a proxy can decide
whether future versions of the GNU Lesser General Public License shall
apply, that proxy's public statement of acceptance of any version is
permanent authorization for you to choose that version for the Library.
LICENSE ISSUES
The OpenSSL toolkit stays under a dual license, i.e. both the conditions
of the OpenSSL License and the original SSLeay license apply to the
toolkit. See below for the actual license texts. Actually both licenses are
BSD-style Open Source licenses. In case of any license issues related
to OpenSSL please contact [email protected].
OpenSSL License
Copyright (c) 1998-2008 The OpenSSL Project. All rights reserved.
Redistribution and use in source and binary forms, with or without
modification, are permitted provided that the following conditions are
met:
1. Redistributions of source code must retain the above copyright
notice, this list of conditions and the following disclaimer.
2. Redistributions in binary form must reproduce the above copyright
notice, this list of conditions and the following disclaimer in the
documentation and/or other materials provided with the distribution.
3. All advertising materials mentioning features or use of this software
must display the following acknowledgment: "This product includes
software developed by the OpenSSL Project for use in the OpenSSL
Toolkit. (http://www.openssl.org/)"
4. The names "OpenSSL Toolkit" and "OpenSSL Project" must not be
used to endorse or promote products derived from this software
without prior written permission. For written permission, please contact
[email protected].
5. Products derived from this software may not be called "OpenSSL"
nor may "OpenSSL" appear in their names without prior written
permission of the OpenSSL Project.
6. Redistributions of any form whatsoever must retain the following
acknowledgment: "This product includes software developed by the
OpenSSL Project for use in the OpenSSL Toolkit (http://www.openssl.
org/)"
THIS SOFTWARE IS PROVIDED BY THE OpenSSL PROJECT "AS IS"
AND ANY EXPRESSED OR IMPLIED WARRANTIES, INCLUDING, BUT
NOT LIMITED TO, THE IMPLIED WARRANTIES OF
MERCHANTABILITY AND FITNESS FOR A PARTICULAR PURPOSE
ARE DISCLAIMED. IN NO EVENT SHALL THE OpenSSL PROJECT OR
ITS CONTRIBUTORS BE LIABLE FOR ANY DIRECT, INDIRECT,
INCIDENTAL, SPECIAL, EXEMPLARY, OR CONSEQUENTIAL
DAMAGES (INCLUDING, BUT NOT LIMITED TO, PROCUREMENT OF
SUBSTITUTE GOODS OR SERVICES; LOSS OF USE, DATA, OR
PROFITS; OR BUSINESS INTERRUPTION) HOWEVER CAUSED AND
ON ANY THEORY OF LIABILITY, WHETHER IN CONTRACT, STRICT
LIABILITY, OR TORT (INCLUDING NEGLIGENCE OR OTHERWISE)
ARISING IN ANY WAY OUT OF THE USE OF THIS SOFTWARE, EVEN
IF ADVISED OF THE POSSIBILITY OF SUCH DAMAGE.
This product includes cryptographic software written by Eric Young
([email protected]). This product includes software written by Tim
Hudson ([email protected]).
Original SSLeay License
Copyright (C) 1995-1998 Eric Young ([email protected])
All rights reserved.
This package is an SSL implementation written by Eric Young (eay@
cryptsoft.com).
The implementation was written so as to conform with Netscapes SSL.
This library is free for commercial and non-commercial use as long as
the following conditions are aheared to. The following conditions apply
to all code found in this distribution, be it the RC4, RSA, lhash, DES,
etc., code; not just the SSL code. The SSL documentation included
with this distribution is covered by the same copyright terms except that
the holder is Tim Hudson ([email protected]). Copyright remains Eric
Young's, and as such any Copyright notices in the code are not to be
removed.
If this package is used in a product, Eric Young should be given
attribution as the author of the parts of the library used.
This can be in the form of a textual message at program startup or in
documentation (online or textual) provided with the package.
Redistribution and use in source and binary forms, with or without
modification, are permitted provided that the following conditions are
met:
1. Redistributions of source code must retain the copyright notice, this
list of conditions and the following disclaimer.
2. Redistributions in binary form must reproduce the above copyright
notice, this list of conditions and the following disclaimer in the
documentation and/or other materials provided with the distribution.
3. All advertising materials mentioning features or use of this software
must display the following acknowledgement: "This product includes
cryptographic software written by Eric Young ([email protected])"The
word 'cryptographic' can be left out if the rouines from the library being
used are not cryptographic related :-).
4. If you include any Windows specific code (or a derivative thereof) from
the apps directory (application code) you must include an
acknowledgement: "This product includes software written by Tim
Hudson ([email protected])"
THIS SOFTWARE IS PROVIDED BY ERIC YOUNG "AS IS" AND ANY
EXPRESS OR IMPLIED WARRANTIES, INCLUDING, BUT NOT
LIMITED TO, THE IMPLIED WARRANTIES OF MERCHANTABILITY
AND FITNESS FOR A PARTICULAR PURPOSE ARE DISCLAIMED. IN
NO EVENT SHALL THE AUTHOR OR CONTRIBUTORS BE LIABLE
FOR ANY DIRECT, INDIRECT, INCIDENTAL, SPECIAL, EXEMPLARY,
OR CONSEQUENTIAL DAMAGES (INCLUDING, BUT NOT LIMITED
TO, PROCUREMENT OF SUBSTITUTE GOODS OR SERVICES; LOSS
OF USE, DATA, OR PROFITS; OR BUSINESS INTERRUPTION)
HOWEVER CAUSED AND ON ANY THEORY OF LIABILITY, WHETHER
IN CONTRACT, STRICT LIABILITY, OR TORT (INCLUDING
NEGLIGENCE OR OTHERWISE) ARISING IN ANY WAY OUT OF THE
USE OF THIS SOFTWARE, EVEN IF ADVISED OF THE POSSIBILITY
OF SUCH DAMAGE.
The licence and distribution terms for any publically available version or
derivative of this code cannot be changed. i.e. this code cannot simply
be copied and put under another distribution licence [including the GNU
Public Licence.]
XFree86 License 1.0
Version 1.0 of XFree86® Project License.
Copyright (C) 1994-2003 The XFree86® Project, Inc.
All Rights Reserved.
Permission is hereby granted, free of charge, to any person obtaining a
copy of this software and associated documentation files (the
"Software"), to deal in the Software without restriction, including without
limitation the rights to use, copy, modify, merge, publish, distribute,
sublicence, and/or sell copies of the Software, and to permit persons to
whom the Software is furnished to do so, subject to the following
conditions:
The above copyright notice and this permission notice shall be included
in all copies or substantial portions of the Software.
THE SOFTWARE IS PROVIDED "AS IS", WITHOUT WARRANTY OF
ANY KIND, EXPRESS OR IMPLIED, INCLUDING BUT NOT LIMITED TO
THE WARRANTIES OF MERCHANTABILITY, FITNESS FOR A
PARTICULAR PURPOSE AND NONINFRINGEMENT. IN NO EVENT
SHALL THE XFREE86 PROJECT BE LIABLE FOR ANY CLAIM,
DAMAGES OR OTHER LIABILITY, WHETHER IN AN ACTION OF
CONTRACT, TORT OR OTHERWISE, ARISING FROM, OUT OF OR IN
CONNECTION WITH THE SOFTWARE OR THE USE OR OTHER
DEALINGS IN THE SOFTWARE.
Except as contained in this notice, the name of the XFree86 Project
shall not be used in advertising or otherwise to promote the sale, use or
other dealings in this Software without prior written authorization from
the XFree86 Project.
Intel Software Development Products License
Copyright(C) 2000, Intel Corporation, all rights reserved.
Intel® Software Development Products – License Agreement
IMPORTANT - READ BEFORE COPYING, INSTALLING OR USING.
Do not copy, install, or use the Materials provided under this license
agreement ("Agreement"), until you have carefully read the following
terms and conditions.
By copying, installing, or otherwise using the Materials, you agree to be
bound by the terms of this Agreement. If you do not agree to the terms
of this Agreement, do not copy, install, or use the Materials.
End User License Agreement for the Intel(R) Software Development
Products
1. LICENSE DEFINITIONS:
A. "Materials" are defined as the software, documentation, license key
codes and other materials, including any updates and upgrade thereto,
for the applicable Intel Software Development Product (which may be
found at http://www.intel.com/software/products/), that are provided to
you under this Agreement. Materials also include the Redistributables as
defined below.
B. "Redistributables" are the files listed in the following text files that may
be included in the Materials for the applicable Intel Software
Development Product: clredist.txt, credist.txt, fredist.txt, redist.txt..
C. “Cluster OpenMP Library”, is comprised of the files listed in the
“clredist.txt” file specified above, is the Intel(R) Cluster OpenMP* Library
add-on option to the Intel(R) C++ Compiler for Linux* and Intel(R)
Fortran Compiler for Linux* products (“Intel Compiler for Linux”). The use
of the Cluster OpenMP Library is conditioned on having a valid license
from Intel for the Cluster OpenMP Library and for either Intel Compiler
for Linux, and further is governed by the terms and conditions of the
license agreement for applicable the Intel Compiler for Linux.
D. “Source Code” is defined as the Materials provided in human
readable format, whether unmodified or modified by you.
E. "Sample Source" is the Source Code file(s) that: (i) demonstrate
certain limited functions included in the binary libraries of the Intel(R)
Integrated Performance Primitives (“Intel(R) IPPs”); (ii) are identified as
Intel IPP sample source code; and (iii) are obtained separately from Intel
after you register your copy of the Intel Integrated Performance
Primitives product with Intel.
2. LICENSE GRANT:
A. Subject to all of the terms and conditions of this Agreement, Intel
Corporation ("Intel") grants to you a non-exclusive, non-assignable,
copyright license to use the Materials.
B. Subject to all of the terms and conditions of this Agreement, Intel
grants to you a non-exclusive, non-assignable copyright license to
modify the Materials, or any portions thereof, that are (i) provided in
Source Code form or, (ii) are defined as Redistributables and are
provided in text form.
C. Subject to all of the terms and conditions of this Agreement and any
specific restrictions which may appear in the Redistributables text files,
Intel grants to you a non-exclusive, non-assignable copyright license to
distribute (except under an Evaluation License as specified below) the
Redistributables, or any portions thereof, as part of the product or
application you developed using the Materials. If such application is a
software development library, then attribution, as specified in the
product release notes of the corresponding Materials, shall be displayed
prominently in that application’s product documentation and on the
application’s product web site.
3. LICENSE RESTRICTIONS:
A. If you receive your first copy of the Materials electronically, and a
second copy on media, then you may use the second copy only in
accordance with your applicable license stated in this Agreement, or for
backup or archival purposes. You may not provide the second copy to
another user.
B. You may NOT: (i) use or copy the Materials except as provided in this
Agreement; (ii) rent or lease the Materials to any third party; (iii) assign
this Agreement or transfer the Materials without the express written
consent of Intel; (iv) modify, adapt, or translate the Materials in whole or
in part except as provided in this Agreement; (v) reverse engineer,
decompile, or disassemble the Materials; (vi) attempt to modify or
tamper with the normal function of a license manager that regulates
usage of the Materials; (vii) distribute, sublicense or transfer the Source
Code form of any components of the Materials, Redistributables and
Sample Source and derivatives thereof to any third party except as
provided in this Agreement; or (viii) distribute Redistributables except as
part of a larger program that adds significant primary functionality
different from that of the Redistributables.
C. The scope and duration (time period) of your license depends on the
type of license you obtained from Intel. The variety of license types are
set forth below, which may not be available for all "Intel(R) Software
Development Products" and therefore may not apply to the Materials.
For more information on the types of licenses, please contact Intel or
your sales representative.
i. EVALUATION LICENSE If you are using the Materials under the control
of an Evaluation license, you as an individual may use the Materials only
for internal evaluation purposes and only for the term of the evaluation
time period, which is controlled by the license key code for the
Materials. NOTWITHSTANDING ANYTHING TO THE CONTRARY
ELSEWHERE IN THIS AGREEMENT, YOU MAY NOT DISTRIBUTE ANY
PORTION OF THE MATERIALS, AND THE APPLICATION AND/OR
PRODUCT DEVELOPED BY YOU MAY ONLY BE USED FOR
EVALUATION PURPOSES AND ONLY FOR THE TERM OF THE
EVALUATION PERIOD.
You may install copies of the Materials on an unlimited number of
computers provided that you are the only individual using the Materials
and only one copy of the Materials is in use at any one time. A separate
license is required for each additional use and/or individual user in all
other cases. Intel will provide you with a license code key that enables
the Materials for an Evaluation license. If you are an entity, Intel grants
you the right to designate one individual within your organization to have
the sole right to use the Materials in the manner provided above.
ii. NONCOMMERCIAL-USE LICENSE: If you are using the Materials
under the control of a Noncommercial-Use license, you as an individual
may use the Materials only for non-business use where you receive no
fee, salary or any other form of compensation. The Materials may not be
used for any other purpose, whether "for profit" or "not for profit." Any
work performed or produced as a result of use of the Materials cannot
be performed or produced for the benefit of other parties for a fee,
compensation or any other reimbursement or remuneration. You may
install copies of the Materials on an unlimited number of computers
provided that you are the only individual using the Materials and only
one copy of the Materials is in use at any one time. A separate license is
required for each additional use and/or individual user in all other cases.
Intel will provide you with a license code key that enables the Materials
for a Noncommercial-Use license. If you obtained a time-limited
Noncommercial-Use license, the duration (time period) of your license
and your ability to use the Materials is limited to the time period of the
obtained license, which is controlled by the license key code for the
Materials. If you are an entity, Intel grants you the right to designate one
individual within your organization to have the sole right to use the
Materials in the manner provided above.
iii. SINGLE-USER LICENSE: If you are using the Materials under the
control of a Single-User license, you as an individual may install and use
the Materials on an unlimited number of computers provided that you
are the only individual using the Materials and only one copy of the
Materials is in use at any one time. A separate license is required for
each additional use and/or individual user in all other cases. Intel will
provide you with a license code key that enables the Materials for a
Single-User license. If you obtained a time-limited Single-User license,
the duration (time period) of your license and your ability to use the
Materials is limited to the time period of the obtained license, which is
controlled by the license key code for the Materials.
If you are an entity, Intel grants you the right to designate one individual
within your organization to have the sole right to use the Materials in the
manner provided above.
iv. NODE-LOCKED LICENSE: If you are using the Materials under the
control of a Node-Locked license, you may use the Materials only on a
single designated computer by no more than the authorized number of
concurrent users. A separate license is required for each additional
concurrent user and/or computer in all other cases. Intel will provide you
with a license code key that enables the Materials for a Node-Locked
license up to the authorized number of concurrent users. If you obtained
a time-limited Node-Locked license, the duration (time period) of your
license and your ability to use the Materials is limited to the time period
of the obtained license, which is controlled by the license key code for
the Materials.
v. FLOATING LICENSE: If you are using the Materials under the control
of a Floating license, you may (a) install the Materials on an unlimited
number of computers that are connected to the designated network
and (b) use the Material by no more than the authorized number of
concurrent users. A separate license is required for each additional
concurrent user and/or network on which the Materials are used. Intel
will provide you with a license code key that enables the Materials for a
Floating license up to the authorized number of concurrent users. If you
obtained a time-limited Floating license, the duration (time period) of
your license and your ability to use the Materials is limited to the time
period of the obtained license, which is controlled by the license key
code for the Materials. Intel Library Floating License: If the Materials are
the Intel(R) Math Kernel Library or the Intel(R) Integrated Performance
Primitives Library or the Intel(R) Threading Building Blocks (either "Intel
Library"), then the Intel Library is provided to you as an add-on option to
either the Intel(R) C++ Compiler product or the Intel(R) Fortran Compiler
product (either "Intel Compiler") for which you have a Floating license,
and as such, in addition to the terms and conditions above, the Intel
Library may only be used by the authorized concurrent users of that
Intel Compiler Floating license.
vi. CLUSTER SYSTEM LICENSE: If you are using the Materials under
the control of a Cluster System license, (a) you may install the Materials
on an unlimited number of computers provided that all such computers
are part of a single cluster system and (b) if you are an entity you must
designate from within your organization individuals, up to and not
exceeding the authorized number of users, to have the sole right to use
the Materials, and you must limit the use of the Materials to only those
designated individuals. A separate license is required for (c) each
additional cluster system on which the Materials are used, and (d) each
additional designated individual user exceeding the authorized number
of users. Intel will provide you with a license code key that enables the
Materials for a Cluster System license up to the authorized number of
individual uses/users.
If you obtained a time-limited Cluster System license, the duration (time
period) of your license and your ability to use the Materials is limited to
the time period of the obtained license, which is specified in the
Materials and/or controlled by the license key code for the Materials.
D. DISTRIBUTION: Distribution of the Materials is also subject to the
following limitations: You (i) shall be solely responsible to your customers
for any update or support obligation or other liability which may arise
from the distribution, (ii) shall not make any statement that your product
is "certified", or that its performance is guaranteed, by Intel, (iii) shall not
use Intel's name or trademarks to market your product without written
permission, (iv) shall prohibit disassembly and reverse engineering, (v)
shall not publish reviews of Materials designated as beta without written
permission by Intel, and (vi) shall indemnify, hold harmless, and defend
Intel and its suppliers from and against any claims or lawsuits, including
attorney's fees, that arise or result from your distribution of any product.
E. Intel(R) Integrated Performance Primitives (Intel IPP). The following
terms and conditions apply only to the Intel IPP.
i. Licensee’s use or implementation of the Intel IPP Materials may require
additional licenses, including but not limited to copyright and patent
licenses from various entities. Should any such additional copyright,
patent or other licenses be required, Licensee agrees to obtain any
such licenses at Licensee's own expense. Licensee is solely responsible
for obtaining any such licenses and the copyright licenses granted in
herein are conditioned on Licensee obtaining such additional licenses.
ii. Notwithstanding anything herein to the contrary, a valid license to Intel
IPP is a prerequisite to any license for Sample Source, and possession
of Sample Source does not grant any license to Intel IPP (or any portion
thereof). To access Sample
Source, you must first register your licensed copy of the Intel IPP with
Intel. By downloading, installing or copying any Sample Source file, you
agree to be bound by terms of this Agreement.
F. SOFTWARE TRANSFER: You may permanently transfer all of your
rights under this Agreement only with Intel's prior written permission.
4. COPYRIGHT: Title to the Materials and all copies thereof remain with
Intel or its suppliers. The Materials are copyrighted and are protected by
United States copyright laws and international treaty provisions. You will
not remove any copyright notice from the Materials. You agree to
prevent any unauthorized copying of the Materials. Except as expressly
provided herein, no license or right is granted to you directly or by
implication, inducement, estoppel or otherwise, specifically Intel does
not grant any express or implied right to you under Intel patents,
copyrights, trademarks, or trade secret information.
5. NO WARRANTY AND LIMITED REPLACEMENT: THE MATERIALS
AND INFORMATION ARE PROVIDED "AS IS" WITH NO WARRANTIES,
EXPRESS OR IMPLIED, INCLUDING BUT NOT LIMITED TO ANY
IMPLIED WARRANTY OF MERCHANTABILITY, FITNESS FOR A
PARTICULAR PURPOSE, NON-INFRINGEMENT OF INTELLECTUAL
PROPERTY RIGHTS, OR ANY WARRANTY OTHERWISE ARISING
OUT OF ANY PROPOSAL, SPECIFICATION, OR SAMPLE. If the media
on which the Materials are furnished are found to be defective in
material or workmanship under normal use for a period of ninety (90)
days from the date of receipt, Intel's entire liability and your exclusive
remedy shall be the replacement of the media. This offer is void if the
media defect results from accident, abuse, or misapplication.
6. LIMITATION OF LIABILITY: THE ABOVE REPLACEMENT PROVISION
IS THE ONLY WARRANTY OF ANY KIND. INTEL OFFERS NO OTHER
WARRANTY EITHER EXPRESS OR IMPLIED INCLUDING THOSE OF
MERCHANTABILITY, NONINFRINGEMENT OF THIRD- PARTY
INTELLECTUAL PROPERTY OR FITNESS FOR A PARTICULAR
PURPOSE. NEITHER INTEL NOR ITS SUPPLIERS SHALL BE LIABLE
FOR ANY DAMAGES WHATSOEVER (INCLUDING, WITHOUT
LIMITATION, DAMAGES FOR LOSS OF BUSINESS PROFITS,
BUSINESS INTERRUPTION, LOSS OF BUSINESS INFORMATION, OR
OTHER LOSS) ARISING OUT OF THE USE OF OR INABILITY TO USE
THE SOFTWARE, EVEN IF INTEL HAS BEEN ADVISED OF THE
POSSIBILITY OF SUCH DAMAGES. BECAUSE SOME JURISDICTIONS
PROHIBIT THE EXCLUSION OR LIMITATION OF LIABILITY FOR
CONSEQUENTIAL OR INCIDENTAL DAMAGES, THE ABOVE
LIMITATION MAY NOT APPLY TO YOU.
7. UNAUTHORIZED USE: THE MATERIALS ARE NOT DESIGNED,
INTENDED, OR AUTHORIZED FOR USE IN ANY TYPE OF SYSTEM
OR APPLICATION IN WHICH THE FAILURE OF THE MATERIALS
COULD CREATE A SITUATION WHERE PERSONAL INJURY OR
DEATH MAY OCCUR (E.G MEDICAL SYSTEMS, LIFE SUSTAINING OR
LIFE SAVING SYSTEMS). Should the buyer purchase or use the
Materials for any such unintended or unauthorized use, the buyer shall
indemnify and hold Intel and its officers, subsidiaries and affiliates
harmless against all claims, costs, damages, and expenses, and
reasonable attorney fees arising out of, directly or indirectly, any claim of
product liability, personal injury or death associated with such
unintended or unauthorized use, even if such claim alleges that Intel
was negligent regarding the design or manufacture of the part.
8. USER SUBMISSIONS: You agree that any material, information or
other communication you transmit or post to an Intel website or provide
to Intel under this Agreement will be considered non-confidential and
non-proprietary ("Communications"). Intel will have no obligations with
respect to the Communications. You agree that Intel and its designees
will be free to copy, modify, create derivative works, publicly display,
disclose, distribute, license and sublicense through multiple tiers of
distribution and licensees, incorporate and otherwise use the
Communications and all data, images, sounds, text, and other things
embodied therein, including derivative works thereto, for any and all
commercial or non-commercial purposes. You are prohibited from
posting or transmitting to or from an Intel website or provide to Intel any
unlawful, threatening, libelous, defamatory, obscene, pornographic, or
other material that would violate any law.
9. TERMINATION OF THIS LICENSE: This Agreement becomes
effective on the date you accept this Agreement and will continue until
terminated as provided for in this Agreement. If you are using the
Materials under the control of a time-limited license, for example an
Evaluation License, this Agreement terminates without notice on the last
day of the time period, which is controlled by the license key code for
the Materials. Intel may terminate this license at any time if you are in
breach of any of its terms and conditions. Upon termination, you will
immediately return to Intel or destroy the Materials and all copies
thereof.
10. U.S. GOVERNMENT RESTRICTED RIGHTS: The Materials are
provided with "RESTRICTED RIGHTS". Use, duplication or disclosure
by the Government is subject to restrictions set forth in FAR52.227-14
and DFAR252.227-7013 et seq. or its successor. Use of the Materials
by the Government constitutes acknowledgment of Intel's rights in
them.
11. APPLICABLE LAWS: Any claim arising under or relating to this
Agreement shall be governed by the internal substantive laws of the
State of Delaware, without regard to principles of conflict of laws. You
agree that the terms of the United Nations Convention on Contracts for
the Sale of Goods do not apply to this Agreement. You agree that your
distribution and export/re-export of the Software and permitted
modifications shall be in compliance with the laws, regulations, orders
or other restrictions of applicable export laws.
12. THIRD PARTY PROGRAMS. The Materials may contain third party
programs. The license terms with those third party programs apply to
your use of them.
* Other names and brands may be claimed as the property of others
Microsoft Public License(Ms-PL)
Copyright(C)
o cfx (Microsoft Corporation)
o netsqlazman (2004, Armand du Plessis <[email protected]>)
o mooncodecs ( 2002, Mark Crichton <[email protected]>)
o Extended WPF Toolkit (2007-2013, Xceed Software Inc.)
o Altairis Web UI Toolkit (2006-2014, Microsoft)
o NumericalDataApplication (2006-2014, Microsoft)
o WPF Wizard Control (2006-2014, Microsoft)
o Latence (2006-2014, Microsoft)
o EasyTweet (2006-2014, Microsoft)
This license governs use of the accompanying software. If you use the
software, you accept this license. If you do not accept the license, do
not use the software.
1. Definitions
The terms "reproduce," "reproduction," "derivative works," and
"distribution" have the same meaning here as under U.S. copyright law.
A "contribution" is the original software, or any additions or changes to
the software.
A "contributor" is any person that distributes its contribution under this
license.
"Licensed patents" are a contributor's patent claims that read directly
on its contribution.
2. Grant of Rights
(A) Copyright Grant- Subject to the terms of this license, including the
license conditions and limitations in section 3, each contributor grants
you a non-exclusive, worldwide, royalty-free copyright license to
reproduce its contribution, prepare derivative works of its contribution,
and distribute its contribution or any derivative works that you create.
(B) Patent Grant- Subject to the terms of this license, including the
license conditions and limitations in section 3, each contributor grants
you a non-exclusive, worldwide, royalty-free license under its licensed
patents to make, have made, use, sell, offer for sale, import, and/or
otherwise dispose of its contribution in the software or derivative works
of the contribution in the software.
3. Conditions and Limitations
(A) No Trademark License- This license does not grant you rights to use
any contributors' name, logo, or trademarks.
(B) If you bring a patent claim against any contributor over patents that
you claim are infringed by the software, your patent license from such
contributor to the software ends automatically.
(C) If you distribute any portion of the software, you must retain all
copyright, patent, trademark, and attribution notices that are present in
the software.
(D) If you distribute any portion of the software in source code form, you
may do so only under this license by including a complete copy of this
license with your distribution. If you distribute any portion of the software
in compiled or object code form, you may only do so under a license
that complies with this license.
(E) The software is licensed "as-is." You bear the risk of using it. The
contributors give no express warranties, guarantees or conditions. You
may have additional consumer rights under your local laws which this
license cannot change. To the extent permitted under your local laws,
the contributors exclude the implied warranties of merchantability,
fitness for a particular purpose and non-infringement.
BSD 3-Clause License
o Open Computer Vision Library - opencv-win (2000-2008, Intel
Corporation, all rights reserved. 2009, Willow Garage Inc., all rights
reserved.)
o ASM Core (2000-2007, INRIA, France Telecom)
o d3 (2010-2014, Michael Bostock, All rights reserved.)
o DataTables (2008-2013 SpryMedia Ltd.)
o DataTablesSrc (2008-2013 SpryMedia Ltd.)
o jQuery::DataTables (2008-2012, Allan Jardine, all rights reserved.)
o MvcDataTables.NET (2009-2012, Allan Jardine, all rights reserved.)
o Paul Johnson's JavaScript Message Digest Hash Function Library
(2000 - 2002, Paul Johnston)
The following is a BSD 3-Clause ("BSD New" or "BSD Simplified")
license template. To generate your own license, change the values of
OWNER, ORGANIZATION and YEAR from their original values as given
here, and substitute your own.
Note: You may omit clause 3 and still be OSD-conformant. Despite its
colloquial name "BSD New", this is not the newest version of the BSD
license; it was followed by the even newer BSD-2-Clause version,
sometimes known as the "Simplified BSD License". On January 9th,
2008 the OSI Board approved BSD-2-Clause, which is used by
FreeBSD and others. It omits the final "no-endorsement" clause and is
thus roughly equivalent to the MIT License.
Historical Background: The original license used on BSD Unix had four
clauses. The advertising clause (the third of four clauses) required you to
acknowledge use of U.C. Berkeley code in your advertising of any
product using that code. It was officially rescinded by the Director of the
Office of Technology Licensing of the University of California on July
22nd, 1999. He states that clause 3 is "hereby deleted in its entirety."
The four clause license has not been approved by OSI. The license
below does not contain the advertising clause.
This prelude is not part of the license.
<OWNER> = Regents of the University of California
<ORGANIZATION> = University of California, Berkeley
<YEAR> = 1998
In the original BSD license, the occurrence of "copyright holder" in the
3rd clause read "ORGANIZATION", placeholder for "University of
California". In the original BSD license, both occurrences of the phrase
"COPYRIGHT HOLDERS AND CONTRIBUTORS" in the disclaimer read
"REGENTS AND CONTRIBUTORS".
Here is the license template:
Copyright (c) <YEAR>, <OWNER>
All rights reserved.
Redistribution and use in source and binary forms, with or without
modification, are permitted provided that the following conditions are
met:
1. Redistributions of source code must retain the above copyright
notice, this list of conditions and the following disclaimer.
2. Redistributions in binary form must reproduce the above copyright
notice, this list of conditions and the following disclaimer in the
documentation and/or other materials provided with the distribution.
3. Neither the name of the copyright holder nor the names of its
contributors may be used to endorse or promote products derived from
this software without specific prior written permission.
THIS SOFTWARE IS PROVIDED BY THE COPYRIGHT HOLDERS AND
CONTRIBUTORS "AS IS" AND ANY EXPRESS OR IMPLIED
WARRANTIES, INCLUDING, BUT NOT LIMITED TO, THE IMPLIED
WARRANTIES OF MERCHANTABILITY AND FITNESS FOR A
PARTICULAR PURPOSE ARE DISCLAIMED. IN NO EVENT SHALL
THE COPYRIGHT HOLDER OR CONTRIBUTORS BE LIABLE FOR
ANY DIRECT, INDIRECT, INCIDENTAL, SPECIAL, EXEMPLARY, OR
CONSEQUENTIAL DAMAGES (INCLUDING, BUT NOT LIMITED TO,
PROCUREMENT OF SUBSTITUTE GOODS OR SERVICES; LOSS OF
USE, DATA, OR PROFITS; OR BUSINESS INTERRUPTION) HOWEVER
CAUSED AND ON ANY THEORY OF LIABILITY, WHETHER IN
CONTRACT, STRICT LIABILITY, OR TORT (INCLUDING NEGLIGENCE
OR OTHERWISE) ARISING IN ANY WAY OUT OF THE USE OF THIS
SOFTWARE, EVEN IF ADVISED OF THE POSSIBILITY OF SUCH
DAMAGE.
Oracle Binary Code JRE and JDK 7 License
Copyright (C) IBM Corporation 2005, 2010. All Rights Reserved.
Oracle Binary Code License Agreement for the Java SE Platform
Products
ORACLE AMERICA, INC. ("ORACLE"), FOR AND ON BEHALF OF
ITSELF AND ITS SUBSIDIARIES AND AFFILIATES UNDER COMMON
CONTROL, IS WILLING TO LICENSE THE SOFTWARE TO YOU ONLY
UPON THE CONDITION THAT YOU ACCEPT ALL OF THE TERMS
CONTAINED IN THIS BINARY CODE LICENSE AGREEMENT AND
SUPPLEMENTAL LICENSE TERMS (COLLECTIVELY "AGREEMENT").
PLEASE READ THE AGREEMENT CAREFULLY. BY SELECTING THE
"ACCEPT LICENSE AGREEMENT" (OR THE EQUIVALENT) BUTTON
AND/OR BY USING THE SOFTWARE YOU ACKNOWLEDGE THAT
YOU HAVE READ THE TERMS AND AGREE TO THEM. IF YOU ARE
AGREEING TO THESE TERMS ON BEHALF OF A COMPANY OR
OTHER LEGAL ENTITY, YOU REPRESENT THAT YOU HAVE THE
LEGAL AUTHORITY TO BIND THE LEGAL ENTITY TO THESE TERMS.
IF YOU DO NOT HAVE SUCH AUTHORITY, OR IF YOU DO NOT WISH
TO BE BOUND BY THE TERMS, THEN SELECT THE "DECLINE
LICENSE AGREEMENT" (OR THE EQUIVALENT) BUTTON AND YOU
MUST NOT USE THE SOFTWARE ON THIS SITE OR ANY OTHER
MEDIA ON WHICH THE SOFTWARE IS CONTAINED.
1. DEFINITIONS.
"Software" means the Java SE Platform Products in binary form that
you selected for download, install or use from Oracle or its authorized
licensees, any other machine readable materials (including, but not
limited to, libraries, source files, header files, and data files), any updates
or error corrections provided by Oracle, and any user manuals,
programming guides and other documentation provided to you by
Oracle under this Agreement.
"General Purpose Desktop Computers and Servers" means computers,
including desktop and laptop computers, or servers, used for general
computing functions under end user control (such as but not specifically
limited to email, general purpose Internet browsing, and office suite
productivity tools). The use of Software in systems and solutions that
provide dedicated functionality (other than as mentioned above) or
designed for use in embedded or function-specific software
applications, for example but not limited to: Software embedded in or
bundled with industrial control systems, wireless mobile telephones,
wireless handheld devices, netbooks, kiosks, TV/STB, Blu-ray Disc
devices, telematics and network control switching equipment, printers
and storage management systems, and other related systems are
excluded from this definition and not licensed under this Agreement.
"Programs" means Java technology applets and applications intended
to run on the Java Platform, Standard Edition platform on Java-enabled
General Purpose Desktop Computers and Servers.
“Commercial Features” means those features identified in Table 1-1
(Commercial Features In Java SE Product Editions) of the Software
documentation accessible at http://www.oracle.com/technetwork/java/
javase/documentation/index.html.
“README File” means the README file for the Software accessible at
http://www.oracle.com/technetwork/java/javase/terms/readme/index.
html.
2. LICENSE TO USE. Subject to the terms and conditions of this
Agreement including, but not limited to, the Java Technology
Restrictions of the Supplemental License Terms, Oracle grants you a
non-exclusive, non-transferable, limited license without license fees to
reproduce and use internally the Software complete and unmodified for
the sole purpose of running Programs. THE LICENSE SET FORTH IN
THIS SECTION 2 DOES NOT EXTEND TO THE COMMERCIAL
FEATURES. YOUR RIGHTS AND OBLIGATIONS RELATED TO THE
COMMERCIAL FEATURES ARE AS SET FORTH IN THE
SUPPLEMENTAL TERMS ALONG WITH ADDITIONAL LICENSES FOR
DEVELOPERS AND PUBLISHERS.
3. RESTRICTIONS. Software is copyrighted. Title to Software and all
associated intellectual property rights is retained by Oracle and/or its
licensors. Unless enforcement is prohibited by applicable law, you may
not modify, decompile, or reverse engineer Software. You acknowledge
that the Software is developed for general use in a variety of information
management applications; it is not developed or intended for use in any
inherently dangerous applications, including applications that may
create a risk of personal injury. If you use the Software in dangerous
applications, then you shall be responsible to take all appropriate
fail-safe, backup, redundancy, and other measures to ensure its safe
use. Oracle disclaims any express or implied warranty of fitness for such
uses. No right, title or interest in or to any trademark, service mark, logo
or trade name of Oracle or its licensors is granted under this Agreement.
Additional restrictions for developers and/or publishers licenses are set
forth in the Supplemental License Terms.
4. DISCLAIMER OF WARRANTY. THE SOFTWARE IS PROVIDED "AS
IS" WITHOUT WARRANTY OF ANY KIND. ORACLE FURTHER
DISCLAIMS ALL WARRANTIES, EXPRESS AND IMPLIED, INCLUDING
WITHOUT LIMITATION, ANY IMPLIED WARRANTIES OF
MERCHANTABILITY, FITNESS FOR A PARTICULAR PURPOSE OR
NONINFRINGEMENT.
5. LIMITATION OF LIABILITY. IN NO EVENT SHALL ORACLE BE
LIABLE FOR ANY INDIRECT, INCIDENTAL, SPECIAL, PUNITIVE OR
CONSEQUENTIAL DAMAGES, OR DAMAGES FOR LOSS OF
PROFITS, REVENUE, DATA OR DATA USE, INCURRED BY YOU OR
ANY THIRD PARTY, WHETHER IN AN ACTION IN CONTRACT OR
TORT, EVEN IF ORACLE HAS BEEN ADVISED OF THE POSSIBILITY
OF SUCH DAMAGES. ORACLE'S ENTIRE LIABILITY FOR DAMAGES
HEREUNDER SHALL IN NO EVENT EXCEED ONE THOUSAND
DOLLARS (U.S. $1,000).
6. TERMINATION. This Agreement is effective until terminated. You may
terminate this Agreement at any time by destroying all copies of
Software. This Agreement will terminate immediately without notice from
Oracle if you fail to comply with any provision of this Agreement. Either
party may terminate this Agreement immediately should any Software
become, or in either party's opinion be likely to become, the subject of
a claim of infringement of any intellectual property right. Upon
termination, you must destroy all copies of Software.
7. EXPORT REGULATIONS. You agree that U.S. export control laws
and other applicable export and import laws govern your use of the
Software, including technical data; additional information can be found
on Oracle's Global Trade Compliance web site (http://www.oracle.com/
products/export). You agree that neither the Software nor any direct
product thereof will be exported, directly, or indirectly, in violation of
these laws, or will be used for any purpose prohibited by these laws
including, without limitation, nuclear, chemical, or biological weapons
proliferation.
8. TRADEMARKS AND LOGOS. You acknowledge and agree as
between you and Oracle that Oracle owns the ORACLE and JAVA
trademarks and all ORACLE- and JAVA-related trademarks, service
marks, logos and other brand designations ("Oracle Marks"), and you
agree to comply with the Third Party Usage Guidelines for Oracle
Trademarks currently located at http://www.oracle.com/us/legal/
third-party-trademarks/index.html. Any use you make of the Oracle
Marks inures to Oracle's benefit.
9. U.S. GOVERNMENT LICENSE RIGHTS. If Software is being
acquired by or on behalf of the U.S. Government or by a U.S.
Government prime contractor or subcontractor (at any tier), then the
Government's rights in Software and accompanying documentation
shall be only those set forth in this Agreement.
10. GOVERNING LAW. This agreement is governed by the substantive
and procedural laws of California. You and Oracle agree to submit to the
exclusive jurisdiction of, and venue in, the courts of San Francisco, or
Santa Clara counties in California in any dispute arising out of or relating
to this agreement.
11. SEVERABILITY. If any provision of this Agreement is held to be
unenforceable, this Agreement will remain in effect with the provision
omitted, unless omission would frustrate the intent of the parties, in
which case this Agreement will immediately terminate.
12. INTEGRATION. This Agreement is the entire agreement between
you and Oracle relating to its subject matter. It supersedes all prior or
contemporaneous oral or written communications, proposals,
representations and warranties and prevails over any conflicting or
additional terms of any quote, order, acknowledgment, or other
communication between the parties relating to its subject matter during
the term of this Agreement. No modification of this Agreement will be
binding, unless in writing and signed by an authorized representative of
each party.
SUPPLEMENTAL LICENSE TERMS
These Supplemental License Terms add to or modify the terms of the
Binary Code License Agreement. Capitalized terms not defined in these
Supplemental Terms shall have the same meanings ascribed to them in
the Binary Code License Agreement. These Supplemental Terms shall
supersede any inconsistent or conflicting terms in the Binary Code
License Agreement, or in any license contained within the Software.
A. COMMERCIAL FEATURES. You may not use the Commercial
Features for running Programs, Java applets or applications in your
internal business operations or for any commercial or production
purpose, or for any purpose other than as set forth in Sections B, C, D
and E of these Supplemental Terms. If You want to use the Commercial
Features for any purpose other than as permitted in this Agreement,
You must obtain a separate license from Oracle.
B. SOFTWARE INTERNAL USE FOR DEVELOPMENT LICENSE
GRANT. Subject to the terms and conditions of this Agreement and
restrictions and exceptions set forth in the README File incorporated
herein by reference, including, but not limited to the Java Technology
Restrictions of these Supplemental Terms, Oracle grants you a
non-exclusive, non-transferable, limited license without fees to
reproduce internally and use internally the Software complete and
unmodified for the purpose of designing, developing, and testing your
Programs.
C. LICENSE TO DISTRIBUTE SOFTWARE. Subject to the terms and
conditions of this Agreement and restrictions and exceptions set forth in
the README File, including, but not limited to the Java Technology
Restrictions of these Supplemental Terms, Oracle grants you a
non-exclusive, non-transferable, limited license without fees to
reproduce and distribute the Software, provided that
i. you distribute the Software complete and unmodified and only
bundled as part of, and for the sole purpose of running, your Programs,
ii. the Programs add significant and primary functionality to the
Software,
iii. you do not distribute additional software intended to replace any
component(s) of the Software,
iv. you do not remove or alter any proprietary legends or notices
contained in the Software,
v. you only distribute the Software subject to a license agreement that:
a. is a complete, unmodified reproduction of this Agreement; or
b. protects Oracle's interests consistent with the terms contained in this
Agreement and that includes the notice set forth in Section G, and
vi. you agree to defend and indemnify Oracle and its licensors from and
against any damages, costs, liabilities, settlement amounts and/or
expenses (including attorneys' fees) incurred in connection with any
claim, lawsuit or action by any third party that arises or results from the
use or distribution of any and all Programs and/or Software.
D. LICENSE TO DISTRIBUTE REDISTRIBUTABLES. Subject to the
terms and conditions of this Agreement and restrictions and exceptions
set forth in the README File, including but not limited to the Java
Technology Restrictions of these Supplemental Terms, Oracle grants
you a non-exclusive, non-transferable, limited license without fees to
reproduce and distribute those files specifically identified as
redistributable in the README File ("Redistributables") provided that:
i. you distribute the Redistributables complete and unmodified, and only
bundled as part of Programs,
ii. the Programs add significant and primary functionality to the
Redistributables,
iii. you do not distribute additional software intended to supersede any
component(s) of the Redistributables (unless otherwise specified in the
applicable README File),
iv. you do not remove or alter any proprietary legends or notices
contained in or on the Redistributables,
v. you only distribute the Redistributables pursuant to a license
agreement that: a. is a complete, unmodified reproduction of this
Agreement; or
b. protects Oracle's interests consistent with the terms contained in the
Agreement and includes the notice set forth in Section G,
vi. you agree to defend and indemnify Oracle and its licensors from and
against any damages, costs, liabilities, settlement amounts and/or
expenses (including attorneys' fees) incurred in connection with any
claim, lawsuit or action by any third party that arises or results from the
use or distribution of any and all Programs and/or Software.
E. DISTRIBUTION BY PUBLISHERS. This section pertains to your
distribution of the JavaTM SE Development Kit Software with your
printed book or magazine (as those terms are commonly used in the
industry) relating to Java technology ("Publication"). Subject to and
conditioned upon your compliance with the restrictions and obligations
contained in the Agreement, Oracle hereby grants to you a nonexclusive, nontransferable limited right to reproduce complete and
unmodified copies of the Software on electronic media (the "Media") for
the sole purpose of inclusion and distribution with your Publication(s),
subject to the following terms:
i. You may not distribute the Software on a stand-alone basis; it must be
distributed with your Publication(s);
ii. You are responsible for downloading the Software from the applicable
Oracle web site;
iii. You must refer to the Software as JavaTM SE Development Kit;
iv. The Software must be reproduced in its entirety and without any
modification whatsoever (including with respect to all proprietary
notices) and distributed with your Publication subject to a license
agreement that is a complete, unmodified reproduction of this
Agreement;
v. The Media label shall include the following information: Copyright
2011, Oracle America, Inc. All rights reserved. Use is subject to license
terms. ORACLE and JAVA trademarks and all ORACLE- and JAVArelated trademarks, service marks, logos and other brand designations
are trademarks or registered trademarks of Oracle in the U.S. and other
countries. This information must be placed on the Media label in such a
manner as to only apply to the Oracle Software;
vi. You must clearly identify the Software as Oracle's product on the
Media holder or Media label, and you may not state or imply that Oracle
is responsible for any third-party software contained on the Media;
vii. You may not include any third party software on the Media which is
intended to be a replacement or substitute for the Software;
viii. You agree to defend and indemnify Oracle and its licensors from and
against any damages, costs, liabilities, settlement amounts and/or
expenses (including attorneys' fees) incurred in connection with any
claim, lawsuit or action by any third party that arises or results from the
use or distribution of the Software and/or the Publication; ; and
ix. You shall provide Oracle with a written notice for each Publication;
such notice shall include the following information: (1) title of Publication,
(2) author(s), (3) date of Publication, and (4) ISBN or ISSN numbers.
Such notice shall be sent to Oracle America, Inc., 500 Oracle Parkway,
Redwood Shores, California 94065 U.S.A , Attention: General Counsel.
F. JAVA TECHNOLOGY RESTRICTIONS. You may not create, modify,
or change the behavior of, or authorize your licensees to create, modify,
or change the behavior of, classes, interfaces, or subpackages that are
in any way identified as "java", "javax", "sun", “oracle” or similar
convention as specified by Oracle in any naming convention
designation.
G. COMMERCIAL FEATURES NOTICE. For purpose of complying with
Supplemental Term Section C.(v)(b) and D.(v)(b), your license agreement
shall include the following notice, where the notice is displayed in a
manner that anyone using the Software will see the notice:
Use of the Commercial Features for any commercial or production
purpose requires a separate license from Oracle. “Commercial
Features” means those features identified Table 1-1 (Commercial
Features In Java SE Product Editions) of the Software documentation
accessible at http://www.oracle.com/technetwork/java/javase/
documentation/index.html
H. SOURCE CODE. Software may contain source code that, unless
expressly licensed for other purposes, is provided solely for reference
purposes pursuant to the terms of this Agreement. Source code may
not be redistributed unless expressly provided for in this Agreement.
I. THIRD PARTY CODE. Additional copyright notices and license terms
applicable to portions of the Software are set forth in the
THIRDPARTYLICENSEREADME file accessible at http://www.oracle.
com/technetwork/java/javase/documentation/index.html. In addition to
any terms and conditions of any third party opensource/freeware license
identified in the THIRDPARTYLICENSEREADME file, the disclaimer of
warranty and limitation of liability provisions in paragraphs 4 and 5 of the
Binary Code License Agreement shall apply to all Software in this
distribution.
J. TERMINATION FOR INFRINGEMENT. Either party may terminate this
Agreement immediately should any Software become, or in either
party's opinion be likely to become, the subject of a claim of
infringement of any intellectual property right.
K. INSTALLATION AND AUTO-UPDATE. The Software's installation
and auto-update processes transmit a limited amount of data to Oracle
(or its service provider) about those specific processes to help Oracle
understand and optimize them. Oracle does not associate the data with
personally identifiable information. You can find more information about
the data Oracle collects as a result of your Software download at http://
www.oracle.com/technetwork/java/javase/documentation/index.html.
For inquiries please contact: Oracle America, Inc., 500 Oracle Parkway,
Redwood Shores, California 94065, USA.
Last updated May 17, 2011
BSD 2-Clause License
Copyright (C)
o morris.js (2012-2014, Olly Smith All rights reserved.)
o Leaflet (2010-2013, Vladimir Agafonkin, CloudMade)
Redistribution and use in source and binary forms, with or without
modification, are permitted provided that the following conditions are
met:
1. Redistributions of source code must retain the above copyright
notice, this list of conditions and the following disclaimer.
2. Redistributions in binary form must reproduce the above copyright
notice, this list of conditions and the following disclaimer in the
documentation and/or other materials provided with the distribution.
THIS SOFTWARE IS PROVIDED BY THE AUTHOR "AS IS" AND ANY
EXPRESS OR IMPLIED WARRANTIES, INCLUDING, BUT NOT
LIMITED TO, THE IMPLIED WARRANTIES OF MERCHANTABILITY
AND FITNESS FOR A PARTICULAR PURPOSE ARE DISCLAIMED. IN
NO EVENT SHALL THE AUTHOR BE LIABLE FOR ANY DIRECT,
INDIRECT, INCIDENTAL, SPECIAL, EXEMPLARY, OR
CONSEQUENTIAL DAMAGES (INCLUDING, BUT NOT LIMITED TO,
PROCUREMENT OF SUBSTITUTE GOODS OR SERVICES; LOSS OF
USE, DATA, OR PROFITS; OR BUSINESS INTERRUPTION) HOWEVER
CAUSED AND ON ANY THEORY OF LIABILITY, WHETHER IN
CONTRACT, STRICT LIABILITY, OR TORT (INCLUDING NEGLIGENCE
OR OTHERWISE) ARISING IN ANY WAY OUT OF THE USE OF THIS
SOFTWARE, EVEN IF ADVISED OF THE POSSIBILITY OF SUCH
DAMAGE.
Creative Commons Attribution 2.0 UK License
Creative Commons Attribution 2.0 England and Wales
CREATIVE COMMONS CORPORATION IS NOT A LAW FIRM AND
DOES NOT PROVIDE LEGAL SERVICES. DISTRIBUTION OF THIS
LICENCE DOES NOT CREATE AN ATTORNEY-CLIENT RELATIONSHIP.
CREATIVE COMMONS PROVIDES THIS INFORMATION ON AN
"AS-IS" BASIS. CREATIVE COMMONS MAKES NO WARRANTIES
REGARDING THE INFORMATION PROVIDED, AND DISCLAIMS
LIABILITY FOR DAMAGES RESULTING FROM ITS USE.
Licence
THE WORK (AS DEFINED BELOW) IS PROVIDED UNDER THE TERMS
OF THIS CREATIVE COMMONS PUBLIC LICENCE ("CCPL" OR
"LICENCE"). THE WORK IS PROTECTED BY COPYRIGHT AND/OR
OTHER APPLICABLE LAW. ANY USE OF THE WORK OTHER THAN
AS AUTHORIZED UNDER THIS LICENCE OR COPYRIGHT LAW IS
PROHIBITED. BY EXERCISING ANY RIGHTS TO THE WORK
PROVIDED HERE, YOU ACCEPT AND AGREE TO BE BOUND BY THE
TERMS OF THIS LICENCE. THE LICENSOR GRANTS YOU THE
RIGHTS CONTAINED HERE IN CONSIDERATION OF YOUR
ACCEPTANCE OF SUCH TERMS AND CONDITIONS.
This Creative Commons England and Wales Public Licence enables You
(all capitalised terms defined below) to view, edit, modify, translate and
distribute Works worldwide, provided that You credit the Original Author.
'The Licensor' [one or more legally recognised persons or entities
offering the Work under the terms and conditions of this Licence]
and
'You'
agree as follows:
1. Definitions
a."Attribution" means acknowledging all the parties who have
contributed to and have rights in the Work, Derivative Work or Collective
Work under this Licence.
b."Collective Work" means the Work in its entirety in unmodified form
along with a number of other separate and independent works,
assembled into a collective whole.
c."Derivative Work" means any work created by the editing,
modification, adaptation or translation of the Work in any media
(however a work that constitutes a Collective Work will not be
considered a Derivative Work for the purpose of this Licence). For the
avoidance of doubt, where the Work is a musical composition or sound
recording, the synchronization of the Work in timed-relation with a
moving image ("synching") will be considered a Derivative Work for the
purpose of this Licence.
d."Licence" means this Creative Commons England and Wales Public
Licence agreement.
e."Original Author" means the individual (or entity) who created the
Work.
f."Work" means the work protected by copyright which is offered under
the terms of this Licence.
g.For the purpose of this Licence, when not inconsistent with the
context, words in the singular number include the plural number.
2. Licence Terms
2.1 The Licensor hereby grants to You a worldwide, royalty-free,
non-exclusive, Licence for use and for the duration of copyright in the
Work.
You may:
o copy the Work;
o create one or more Derivative Works;
o incorporate the Work into one or more Collective Works;
o copy Derivative Works or the Work as incorporated in any Collective
Work; and
o publish, distribute, archive, perform or otherwise disseminate the
Work, Derivative Works or the Work as incorporated in any Collective
Work, to the public in any material form in any media whether now
known or hereafter created.
HOWEVER,
You must not:
o impose any terms on the use to be made of the Work, the Derivative
Work or the Work as incorporated in a Collective Work that alter or
restrict the terms of this Licence or any rights granted under it or has
the effect or intent of restricting the ability to exercise those rights;
o impose any digital rights management technology on the Work, the
Derivative Work or the Work as incorporated in a Collective Work that
alters or restricts the terms of this Licence or any rights granted under
it or has the effect or intent of restricting the ability to exercise those
rights;
o sublicense the Work;
o subject the Work to any derogatory treatment as defined in the
Copyright, Designs and Patents Act 1988.
FINALLY,
You must:
o make reference to this Licence (by Uniform Resource Identifier (URI),
spoken word or as appropriate to the media used) on all copies of
the Work and Derivative Works and Collective Works published,
distributed, performed or otherwise disseminated or made available
to the public by You;
o recognise the Licensor's / Original Author's right of attribution in any
Work, Derivative Work and Collective Work that You publish,
distribute, perform or otherwise disseminate to the public and ensure
that You credit the Licensor / Original Author as appropriate to the
media used; and
o to the extent reasonably practicable, keep intact all notices that refer
to this Licence, in particular the URI, if any, that the Licensor specifies
to be associated with the Work, unless such URI does not refer to the
copyright notice or licensing information for the Work.
Additional Provisions for third parties making use of the Work
2.2. Further licence from the Licensor
Each time You publish, distribute, perform or otherwise disseminate
o the Work; or
o any Derivative Work; or
o the Work as incorporated in a Collective Work
the Licensor agrees to offer to the relevant third party making use of the
Work (in any of the alternatives set out above) a licence to use the Work
on the same terms and conditions as granted to You hereunder.
2.3. This Licence does not affect any rights that the User may have
under any applicable law, including fair use, fair dealing or any other
legally recognised limitation or exception to copyright infringement.
2.4. All rights not expressly granted by the Licensor are hereby
reserved, including but not limited to, the exclusive right to collect,
whether individually or via a licensing body, such as a collecting society,
royalties for any use of the Work.
3. Warranties and Disclaimer
Except as required by law, the Work or any Derivative Work is licensed
by the Licensor on an "as is" and "as available" basis and without any
warranty of any kind, either express or implied.
4. Limit of Liability
Subject to any liability which may not be excluded or limited by law the
Licensor shall not be liable and hereby expressly excludes all liability for
loss or damage howsoever and whenever caused to You.
5. Termination
The rights granted to You under this Licence shall terminate
automatically upon any breach by You of the terms of this Licence.
Individuals or entities who have received Derivative Works or Collective
Works from You under this Licence, however, will not have their
Licences terminated provided such individuals or entities remain in full
compliance with those Licences.
6. General
6.1. The validity or enforceability of the remaining terms of this
agreement is not affected by the holding of any provision of it to be
invalid or unenforceable.
6.2. This Licence constitutes the entire Licence Agreement between the
parties with respect to the Work licensed here. There are no
understandings, agreements or representations with respect to the
Work not specified here. The Licensor shall not be bound by any
additional provisions that may appear in any communication in any
form.
6.3. A person who is not a party to this Licence shall have no rights
under the Contracts (Rights of Third Parties) Act 1999 to enforce any of
its terms.
6.4. This Licence shall be governed by the law of England and Wales
and the parties irrevocably submit to the exclusive jurisdiction of the
Courts of England and Wales.
7. On the role of Creative Commons
7.1. Neither the Licensor nor the User may use the Creative Commons
logo except to indicate that the Work is licensed under a Creative
Commons Licence. Any permitted use has to be in compliance with the
Creative Commons trade mark usage guidelines at the time of use of
the Creative Commons trade mark. These guidelines may be found on
the Creative Commons website or be otherwise available upon request
from time to time.
7.2. Creative Commons Corporation does not profit financially from its
role in providing this Licence and will not investigate the claims of any
Licensor or user of the Licence.
7.3. One of the conditions that Creative Commons Corporation requires
of the Licensor and You is an acknowledgement of its limited role and
agreement by all who use the Licence that the Corporation is not
responsible to anyone for the statements and actions of You or the
Licensor or anyone else attempting to use or using this Licence.
7.4. Creative Commons Corporation is not a party to this Licence, and
makes no warranty whatsoever in connection to the Work or in
connection to the Licence, and in all events is not liable for any loss or
damage resulting from the Licensor's or Your reliance on this Licence or
on its enforceability.
7.5. USE OF THIS LICENCE MEANS THAT YOU AND THE LICENSOR
EACH ACCEPTS THESE CONDITIONS IN SECTION 7.1, 7.2, 7.3, 7.4
AND EACH ACKNOWLEDGES CREATIVE COMMONS
CORPORATION'S VERY LIMITED ROLE AS A FACILITATOR OF THE
LICENCE FROM THE LICENSOR TO YOU.
Creative Commons is not a party to this Licence, and makes no
warranty whatsoever in connection with the Work. Creative Commons
will not be liable to You or any party on any legal theory for any
damages whatsoever, including without limitation any general, special,
incidental or consequential damages arising in connection to this
licence. Notwithstanding the foregoing two (2) sentences, if Creative
Commons has expressly identified itself as the Licensor hereunder, it
shall have all rights and obligations of Licensor.
Except for the limited purpose of indicating to the public that the Work
is licensed under the CCPL, neither party will use the trademark
"Creative Commons" or any related trademark or logo of Creative
Commons without the prior written consent of Creative Commons. Any
permitted use will be in compliance with Creative Commons' thencurrent trademark usage guidelines, as may be published on its website
or otherwise made available upon request from time to time.
Creative Commons may be contacted at http://creativecommons.org/.
Sun Java Message Service 1.0.2 License
License Agreement for Java(TM) Message Service (JMS) 1.0.2b
Sun Microsystems, Inc.
Binary Code License Agreement
READ THE TERMS OF THIS AGREEMENT AND ANY PROVIDED
SUPPLEMENTAL LICENSE TERMS (COLLECTIVELY "AGREEMENT")
CAREFULLY BEFORE OPENING THE SOFTWARE MEDIA PACKAGE.
BY OPENING THE SOFTWARE MEDIA PACKAGE, YOU AGREE TO
THE TERMS OF THIS AGREEMENT. IF YOU ARE ACCESSING THE
SOFTWARE ELECTRONICALLY, INDICATE YOUR ACCEPTANCE OF
THESE TERMS BY SELECTING THE "ACCEPT" BUTTON AT THE END
OF THIS AGREEMENT. IF YOU DO NOT AGREE TO ALL THESE
TERMS, PROMPTLY RETURN THE UNUSED SOFTWARE TO YOUR
PLACE OF PURCHASE FOR A REFUND OR, IF THE SOFTWARE IS
ACCESSED ELECTRONICALLY, SELECT THE "DECLINE" BUTTON AT
THE END OF THIS AGREEMENT. 1. LICENSE TO USE. Sun grants you
a non-exclusive and non-transferable license for the internal use only of
the accompanying software and documentation and any error
corrections provided by Sun (collectively "Software"), by the number of
users and the class of computer hardware for which the corresponding
fee has been paid.
2. RESTRICTIONS. Software is confidential and copyrighted. Title to
Software and all associated intellectual property rights is retained by
Sun and/or its licensors. Except as specifically authorized in any
Supplemental License Terms, you may not make copies of Software,
other than a single copy of Software for archival purposes. Unless
enforcement is prohibited by applicable law, you may not modify,
decompile, or reverse engineer Software. You acknowledge that
Software is not designed, licensed or intended for use in the design,
construction, operation or maintenance of any nuclear facility. Sun
disclaims any express or implied warranty of fitness for such uses. No
right, title or interest in or to any trademark, service mark, logo or trade
name of Sun or its licensors is granted under this Agreement.
3. LIMITED WARRANTY. Sun warrants to you that for a period of ninety
(90) days from the date of purchase, as evidenced by a copy of the
receipt, the media on which Software is furnished (if any) will be free of
defects in materials and workmanship under normal use. Except for the
foregoing, Software is provided "AS IS". Your exclusive remedy and
Sun's entire liability under this limited warranty will be at Sun's option to
replace Software media or refund the fee paid for Software.
4. DISCLAIMER OF WARRANTY. UNLESS SPECIFIED IN THIS
AGREEMENT, ALL EXPRESS OR IMPLIED CONDITIONS,
REPRESENTATIONS AND WARRANTIES, INCLUDING ANY IMPLIED
WARRANTY OF MERCHANTABILITY, FITNESS FOR A PARTICULAR
PURPOSE OR NON-INFRINGEMENT ARE DISCLAIMED, EXCEPT TO
THE EXTENT THAT THESE DISCLAIMERS ARE HELD TO BE LEGALLY
INVALID.
5. LIMITATION OF LIABILITY. TO THE EXTENT NOT PROHIBITED BY
LAW, IN NO EVENT WILL SUN OR ITS LICENSORS BE LIABLE FOR
ANY LOST REVENUE, PROFIT OR DATA, OR FOR SPECIAL,
INDIRECT, CONSEQUENTIAL, INCIDENTAL OR PUNITIVE DAMAGES,
HOWEVER CAUSED REGARDLESS OF THE THEORY OF LIABILITY,
ARISING OUT OF OR RELATED TO THE USE OF OR INABILITY TO
USE SOFTWARE, EVEN IF SUN HAS BEEN ADVISED OF THE
POSSIBILITY OF SUCH DAMAGES. In no event will Sun's liability to
you, whether in contract, tort (including negligence), or otherwise,
exceed the amount paid by you for Software under this Agreement. The
foregoing limitations will apply even if the above stated warranty fails of
its essential purpose.
6. Termination. This Agreement is effective until terminated. You may
terminate this Agreement at any time by destroying all copies of
Software. This Agreement will terminate immediately without notice from
Sun if you fail to comply with any provision of this Agreement. Upon
Termination, you must destroy all copies of Software.
7. Export Regulations. All Software and technical data delivered under
this Agreement are subject to US export control laws and may be
subject to export or import regulations in other countries. You agree to
comply strictly with all such laws and regulations and acknowledge that
you have the responsibility to obtain such licenses to export, re-export,
or import as may be required after delivery to you.
8. U.S. Government Restricted Rights. If Software is being acquired by
or on behalf of the U.S. Government or by a U.S. Government prime
contractor or subcontractor (at any tier), then the Government's rights in
Software and accompanying documentation will be only as set forth in
this Agreement; this is in accordance with 48 CFR 227.7201 through
227.7202-4 (for Department of Defense (DOD) acquisitions) and with 48
CFR 2.101 and 12.212 (for non-DOD acquisitions).
9. Governing Law. Any action related to this Agreement will be governed
by California law and controlling U.S. federal law. No choice of law rules
of any jurisdiction will apply.
10. Severability. If any provision of this Agreement is held to be
unenforceable, this Agreement will remain in effect with the provision
omitted, unless omission would frustrate the intent of the parties, in
which case this Agreement will immediately terminate.
11. Integration. This Agreement is the entire agreement between you
and Sun relating to its subject matter. It supersedes all prior or
contemporaneous oral or written communications, proposals,
representations and warranties and prevails over any conflicting or
additional terms of any quote, order, acknowledgment, or other
communication between the parties relating to its subject matter during
the term of this Agreement. No modification of this Agreement will be
binding, unless in writing and signed by an authorized representative of
each party.
JAVA(TM) INTERFACE CLASSES
JAVA MESSAGE SERVICE (JMS), VERSION 1.0.2
SUPPLEMENTAL LICENSE TERMS
These supplemental license terms ("Supplemental Terms") add to or
modify the terms of the Binary Code License Agreement (collectively,
the "Agreement"). Capitalized terms not defined in these Supplemental
Terms shall have the same meanings ascribed to them in the
Agreement. These Supplemental Terms shall supersede any
inconsistent or conflicting terms in the Agreement, or in any license
contained within the Software. 1. Software Internal Use and
Development License Grant. Subject to the terms and conditions of this
Agreement, including, but not limited to Section 3 (Java(TM) Technology
Restrictions) of these Supplemental Terms, Sun grants you a nonexclusive, non-transferable, limited license to reproduce internally and
use internally the binary form of the Software, complete and unmodified,
for the sole purpose of designing, developing and testing your Java
applets and applications ("Programs").
2. License to Distribute Software. In addition to the license granted in
Section 1 (Software Internal Use and Development License Grant) of
these Supplemental Terms, subject to the terms and conditions of this
Agreement, including but not limited to Section 3 (Java Technology
Restrictions), Sun grants you a non-exclusive, non-transferable, limited
license to reproduce and distribute the Software in binary form only,
provided that you
i. distribute the Software complete and unmodified and only bundled as
part of your Programs,
ii. do not distribute additional software intended to replace any
component(s) of the Software,
iii. do not remove or alter any proprietary legends or notices contained in
the Software,
iv. only distribute the Software subject to a license agreement that
protects Sun's interests consistent with the terms contained in this
Agreement, and
v. agree to defend and indemnify Sun and its licensors from and against
any damages, costs, liabilities, settlement amounts and/or expenses
(including attorneys' fees) incurred in connection with any claim, lawsuit
or action by any third party that arises or results from the use or
distribution of any and all Programs and/or Software.
3. Java Technology Restrictions. You may not modify the Java Platform
Interface ("JPI", identified as classes contained within the "java" package
or any subpackages of the "java" package), by creating additional
classes within the JPI or otherwise causing the addition to or
modification of the classes in the JPI. In the event that you create an
additional class and associated API(s) whichi. extends the functionality
of the Java Platform, and
ii. is exposed to third party software developers for the purpose of
developing additional software which invokes such additional API,
you must promptly publish broadly an accurate specification for such
API for free use by all developers. You may not create, or authorize your
licensees to create additional classes, interfaces, or subpackages that
are in any way identified as "java", "javax", "sun" or similar convention as
specified by Sun in any naming convention designation.
4. Trademarks and Logos. You acknowledge and agree as between you
and Sun that Sun owns the SUN, SOLARIS, JAVA, JINI, FORTE,
STAROFFICE, STARPORTAL and iPLANET trademarks and all SUN,
SOLARIS, JAVA, JINI, FORTE, STAROFFICE, STARPORTAL and
iPLANET-related trademarks, service marks, logos and other brand
designations ("Sun Marks"), and you agree to comply with the Sun
Trademark and Logo Usage Requirements currently located at http://
www.sun.com/policies/trademarks. Any use you make of the Sun
Marks inures to Sun's benefit.
5. Source Code. Software may contain source code that is provided
solely for reference purposes pursuant to the terms of this Agreement.
Source code may not be redistributed unless expressly provided for in
this Agreement.
6. Termination for Infringement. Either party may terminate this
Agreement immediately should any Software become, or in either
party's opinion be likely to become, the subject of a claim of
infringement of any intellectual property right.
For inquiries please contact: Sun Microsystems, Inc. 901 San Antonio
Road, Palo Alto, California 94303
(Form ID#011801)
SALES NETWORK
SAMSUNG TECHWIN CO., LTD.
Samsung Techwin R&D Center, 6, Pangyo-ro 319beon-gil, Bundang-gu, Songnam-si, Gyeonggi-do 463-400, Korea
TEL : +82-70-7147-8740~60 FAX : +82-31-8018-3745
SAMSUNG TECHWIN AMERICA Inc.
100 Challenger Rd. Suite 700 Ridgefield Park, NJ 07660
Toll Free : +1-877-213-1222 Direct : +1-201-325-6920
Fax : +1-201-373-0124
www.samsungcctvusa.com
www.samsungtechwin.com
www.samsungsecurity.com
www.samsungipolis.com
SAMSUNG TECHWIN EUROPE LTD.
Samsung House, 1000 Hillswood Drive, Hillswood Business
Park Chertsey, Surrey, UNITED KINGDOM KT16 OPS
TEL : +44-1932-45-5300 FAX : +44-1932-45-5325