1
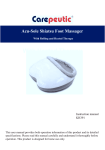
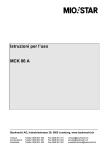
Night Vision Wristwatch HD Camcorder
1080P IR
USER MANUAL
KC314N
1. Overview
1. Indicator light
2. Operation button: power On/Off, Video Recording, Photo Taking, Voice Recording
3. Time adjustment
4. Microphone outlet for voice recording
5. Camera lens
6. Mode Switching button
7. USB port
8. Reset: press the button 2 and button 6 together for resetting
NOTE:
--most of time, you only need to use button 2 and button 6.
--Only press it, do NOT try to pull or rotate Button 2 and 6.
Important statement:
This watch is made with waterproof feature with 30 meters deep in accordance to the technology and
structure of the 3 degrees waterproof standard for timepiece. The waterproof design is to avoid very small
amount of water or liquid being sprayed over the watch. Because of the camera function, it does not
mean that you can wear this watch while you are diving or trying to use camera under water. If you are
working in the very humid environment, it is recommended that you replace the microphone knob (MIC1)
(4) with the extra knob (MIC2) included in the package.
Please refer to the picture of the knob instructions before you use them.
1. MIC1 and MIC2 are microphone knobs. The height of USB knob is a little bit higher than MIC1
and MIC2. Please make sure you do not switch microphone knobs with USB knob by mistake.
2. MIC1 is preset on watch as default. It has a small hole in the center of knob. Please use this knob
when you are doing recording with sound.
3. MIC2 is the extra knob included in the package. It does not have the small hole in the center but it
has a rubber ring inside the knob. It is recommended to use this knob when you are working in
very humid environment. But it will not have sound when you are doing video recording.
2. Operation Guideline
A. On/Off & Record Video: Press and Hold the Button (2) for about 2 seconds to turn on the power, the
blue and red indicator light will be on at the same time, the device is initiating. In about 1 second, red light
is off and the blue light flashes several times and off, the watch is now doing video recording
automatically. (Note: both red and blue light are off during recording). To get better video quality, please
do not move and shake the watch or hand during recording.
During recording, you can press the Button (6) once to check the mode status. After you press the Button
(6) once, if the blue light flashes, it means that the camera is recording normally.
To stop recording, simply press the Button (2) 2 times, the blue light is on solid, it is now in standby
status. Note: do not press the button (2) 2 times too quickly, you need to press it once and (after seeing
the blue light is on) then press second time.
To do recording again, simply press the Button (2) once again, the blue light is off and it is doing
recording. (Note: in standby mode, if you do not use the camera for 2 minutes, the power will shut off
automatically).
To completely turn off the camera function, press and hold the Button (2) for about 2 seconds, red light
flashes several times and off.
Note: Make sure there is enough light and good sound effect in the area where you do recording, do not
block the microphone hole.
B. (IR) Infrared LED On/Off: you can turn on the IR light when you are doing recording in darker area.
When the camera is in recording or in standby status, press and hold the Button (6) for about 2 seconds
until the red light flashes 3 times, the IR LED light is on now. To turn off the IR light, press and hold the
Button (6) for about 2 seconds, and the IR light is off, the camera is now doing recording without IR light.
NOTE:
--For IR function, the distance between lens and subject must be within 0.5 meter but no more
than 1 meter. If not, the image or video will be dark.
--IR light is not the indicator light. You cannot see the IR light from watch face.
C. Taking photos: when the camera is in the standby status (blue light is on solid), press Button (6) once,
the red light will be on solid, it is now in photo taking mode. Press the Button (2) once to take one photo
(red light flashes once), press Button (2) second time to take second photo and so on. To go back to
standby status, press the Button (6) twice, blue light is on solid. (Note: in standby mode, if you do not use
the camera for 2 minutes, it’ll shut off automatically).
D. Voice Recording: In standby mode (blue light is on solid), press Button (6) 2 times, both red and blue
light are on solid at the same time, it is in voice recording mode. Press the Button (2) once, the blue and
red light will flash at the same time, it is now doing voice recording. To stop voice recording, simply press
Button (2) once again (both red and blue light is on solid). Press Button (6) once again to go back to
standby mode (blue light is on solid).
E. Play Video: Turn off the camera. Connect the USB cable to the watch first and then connect it to your
PC through the USB cable and open the watch video folder in your computer. Right click on the video file
to choose media player or simply click on the video file to play video directly. You can play video with
Windows media player or VLC media player (if you have that software in your computer). Note: due to the
high resolution video, in order to play the video faster and have better video quality, you can copy video
files to your PC first and then click on video file in your PC to play.
Note: if your PC does not pop up with the removable folder, you can find it from your “My Computer”
folder in your PC.
F. Web Camera: The package includes a CD (software—camera driver). Please install the PC camera
diver in your computer first. When the camera is in standby mode or working mode, connect the watch to
computer with USB cable. You will find the “Standard Camera” icon in your PC’s “My Computer” folder.
You are now ready to use this camera as your web camera. (Note: please ask your computer
administrator if you need help for installing the CD).
•
Step 1: install the camera driver to your computer (Note: driver software comes with CD. You can
find the driver installation instruction inside the CD).
•
•
•
Step 2: turn on the camera function on watch. Wait for couple seconds for the device to be
initiated. The camera should be under either recording mode or standby mode. Note: you must
turn on the camera function first. If not, it'll go to U-Disk mode instead of web camera mode.
Step 3: connect the watch to computer through the USB cable. After couple seconds, your PC will
show up a frame with "Image Download Utility". Just click on EXIT icon, no need to do anything.
NOTE: If your USB device cannot be recognized by your PC, your PC will not show up the frame
with "Image Download Utility", in this case, please unplug the USB cable from both watch and
PC, and start it all over again from step 1.
Step 4: click on "My Computer" icon on your PC, click on the "Standard Camera" icon to use web
camera function.
G. Charging the Battery: You can do charging with your PC through the USB cable; you can also do
charging by using the AC charger connected to the USB cable. During charging, both red and blue light
on watch will be on solid. When the battery is fully charged, red light will be off, only blue light stays on
solid. NOTE: please always connect the cable to watch first before you connect it to PC or power outlet.
Note: The rechargeable battery is only for the camera. The timepiece itself is using an individual cell
battery (model #: SR626) (like other quartz watches). The cell battery is located inside the movement
under the rechargeable battery. When the cell battery is out of power, please bring your watch to local
watch stores to replace the cell battery.
H. Setting Time: This camera watch can do recording with real time and date.
1. Connect the watch to your computer through the USB cable.
2. Open WordPad program in your computer (Usually under Programs—Accessories).
3. Create a txt file named “time.txt” and save it in the root of the removable disk (the watch folder). In
the txt file, enter year.month.day hour:minute:second with the following format:
2013.12.30 12:09:25
Note: follow the time from your watch. There is one space between 30 and 12.
Note: save the time.txt file in the root (line up with the –REC folder. Do NOT save it inside the
–REC folder).
4. Save the above date and time in the “time.txt” file.
5. Disconnect the watch from your computer and wait for about 5 seconds and then turn on your
watch camera. It is now ready to do recording with real time and date.
I. Reset: If there is malfunction on the camera, press the Button (2) and Button (6) together for resetting.
J. U-Disk Mode
•
Step 1: Do NOT turn on the camera on watch. Simply connecting the watch to computer through the
USB cable. Wait for a while for the device to be initiated.
•
Step 2: If the USB device cannot be recognized by your computer, try to unplug the USB cable from
both watch and PC, and start it all over again from step 1.
•
Step 3: When your computer shows up with message box for you to open the U-disk folder, click on it
to open the folder. If your computer does not show up the message box, you can click on "My
Computer" icon on your PC and click on the "Removable Drive" icon to open the watch camera folder.
K. Troubleshooting:
1. When the memory is full, the red light and blue light flashes alternately for about 5 seconds, and
then it shut off automatically after saving existing file. If you want to continue recording, you need
to delete some files in order to leave enough memory for continuous recording.
2. When the battery power is too low, the red light flashes quickly and then shut off automatically
after saving the existing file. You need to do recharging.
3. If the video recorder stops responding due to improper operation or other reasons, press the
Button (2) and Button (6) together for resetting.
3. Specifications
Item
Specifications
Video format
AVI
Video encoding
M-JPEG
Video resolution
1920*1080
Continuous recording time
About 50 minutes after fully charged (80 minutes w/o using IR)
1GB capacity
10-15 minutes
Media playing software
Enclosed software of the operating system or Mainstream audio
and video media player, recommend KMPlayer
Picture resolution / format
4032*3024 / JPG
USB type
USB2.0
Supporting system
Windows me/2000/xp/2003/vista/Win 7;Mac os 10.4;Linux;
charge pressure
DC-5V
Interface type
Mini 4 Pin USB
Storage support
Built-in flash memory
Battery type
high-capacity lithium battery, model: 337/SR416SW
4. Maintenance:
Battery: If the watch is not in use for a long time, please have it fully charged before using. For safety, do
not put this watch too close to fireplace or overheated spot.
Operating temperature: 0—40°C. For the extension of battery life, it is better to use it in room
temperature.
Operating humidity: 20% -80%. This product does not have water resistance function (only waterproof
when MIC2 is used). So it can not work in the very humid environment or under water.
Lens: Do not expose the camera lens directly to strong light such as sun light so as to avoid damage to
optical devices.
Cleaning: Always use dry cloth to clean up the glass before doing recording. The watch has a
transparent cover on the glass for protection, please remove it before using the camera.
NOTE: Please follow the State’s law. Do not use this product illegally.
Limited Warranty
Please contact seller for warranty. Limited warranty from manufacturer only for original purchaser against manufacturing or workmanship
defect under normal use. Due to the hygiene or rehabilitation nature of this product, it is non-returnable.
Lenzburg™ is a trademark of QLM, © all rights reserved.
www.ideatomorrow.com