1
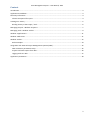
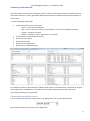
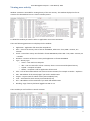
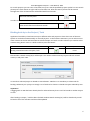
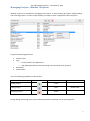
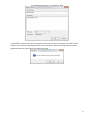
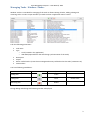
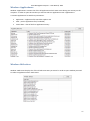
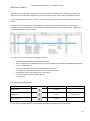
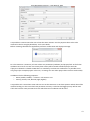
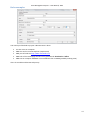
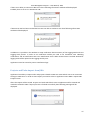
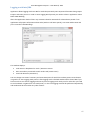
Time Management Expert – User Manual, 2015 Time Management Expert User Manual 1 Time Management Expert – User Manual, 2015 Content Introduction........................................................................................................................................................3 Application Possibilities ......................................................................................................................................3 Summary information ........................................................................................................................................4 Choose time period for report .......................................................................................................................4 Viewing user activity ..........................................................................................................................................5 Binding Activity to the Project / Task .............................................................................................................6 Managing Projects - Window «Projects» ...........................................................................................................7 Managing Tasks - Window «Tasks» ....................................................................................................................9 Window «Applications» ...................................................................................................................................11 Window «Web sites» .......................................................................................................................................11 Window «Rules»...............................................................................................................................................12 Rules examples .............................................................................................................................................14 Integration with External Project Management Systems (PMS) ......................................................................15 JIRA connection parameters setup...............................................................................................................15 Projects and Tasks import from JIRA ............................................................................................................16 Logging work into JIRA .................................................................................................................................17 Application parameters ....................................................................................................................................18 2 Time Management Expert – User Manual, 2015 Introduction We live in the time when word «Efficiency» becomes more and more popular and frequently used in everyday life. The economic crisis, high competition, company profit reduction lead to the need to take into account and monitor how and what we do, how effective we are and find out our unnecessary spends. One of the most important parts of our life is time, in any of its manifestations. Time is precious in our lives and nothing can stop it, turn it back and we can’t buy it. But time is money. Not efficient use of time can lead to unforeseen expenditure in the business, missed projects deadlines and failed contracts. And if you do not supervise under your time and do not take action project will be out of control and the risks will be increased dramatically. Therefore, it is time to start to control the time and work efficiently. Let’s do it. Application Possibilities Application Time Management Expert (TME) intended for automation of the time management and project management processes. It is used for audit and analysis of the spent time, save your time and makes work easier, especially if you work with project management systems (Atlassian JIRA). And as result it improves job efficiency, decrease unreasonable time spends and increase company income. It is used for following functions: Inspection of the user activity on the computer, based on information: o Activity type (Active, Out of desk, Locked PC, PC is off) o Active application o Activity start time, finish time and its duration o Window title of the active application for the moment o URL addresses of the visited by user site and pages if application is web browser (Internet Explorer, Firefox) Storing user activities chronology on PC Projects and Tasks support Classification of the user activity related to task and project o Automatically (based on special rules which are ready for use and can be customized) o Manually by user Provides time usage reports by different types o By activity types o By projects o By tasks o By applications o By visited web sites Integration with external Project Management Systems (PMS), Atlassian JIRA. o Projects and Tasks synchronization from the Atlassian JIRA o Perform logging of the work per tasks into the Atlassian JIRA o Logging work notification in specified time 3 Time Management Expert – User Manual, 2015 Summary information The main and first window that is displayed to user is summary information window. It displays summary information about user activity grouped by different parameters for selected time period (by default it is current day). It contains following information: Total information by user activity type o Active – User works on computer o Idle – User is inactive for at least 1 minute (there is no mouse and keyboard activity) o Locked – Computer is locked o Offline – Computer is Off or application is not started Last Activities for selected period of time Spent time per Projects Spent time per Tasks Spent time per Applications Spent time per visited Web sites This window contains 6 square blocks for different total reports: Total Information, Last Activities, Projects, Tasks, Applications and Web sites. Each block has information about spent time per item and its percentage comparing to all spent time. Choose time period for report You can choose time period for reports which are displayed for user in below date element. Selected date is global for all reports in the application. 4 Time Management Expert – User Manual, 2015 Viewing user activity Window «Activities» intended for viewing history of the user activity. This window displays list of user activities for selected date how it is shown in below picture. To show this window you need to select in application menu item «Activities». There are following parameters are displayed in the window: Application - Application file name like notepad.exe Start – Time of the activity start in format HH:MM:SS, where HH – hour, MM – minutes, SS – seconds Finish – Time when activity was finished in format HH:MM:SS, where HH – hour, MM – minutes, SS – seconds Duration – Duration of the user activity with application in format HH:MM:SS Type – Activity type: o Active – User works on computer o Idle – User is inactive for at least 1 minute, there is no mouse and keyboard activity o Locked – Computer is locked o Offline – Computer is Off or application did not work Title – Title of the window which was active at certain moment, for example «Youtube – Explorer» URL - URL address of the visited page if you work in web browser Project – Project name for which activity was intended (if set) Task – Task name for which activity was intended (if set) Site – URL address of the visited site if you work with web browser Worklog – Sign if activity has been logged into JIRA or not There is ability to use fast filter to search activities: 5 Time Management Expert – User Manual, 2015 For search purpose you can enter in fast filter line up to 5 words separated by space symbol. To start search please press search button at right side from fast filter line. After that search process will be started through text of the all data and list will be filled with found records. Start fast search by filter In order to clear search filter line and display all activities in the list you need to press button: Clear search filter line and search results Binding Activity to the Project / Task Application has ability to bind user activity to different tasks and projects to have clear view of the time spends. It can be done automatically or manually by User. In the window «Activities» you can select one or more activities in the list and bind them to selected Project and Task. In order to do this you need to select activities using button «Ctrl» or «Shift» and then press the button: Button Binding selected activities to Project / Task Keyboard Insert New window «Attach activity(ies)» will be open. You need to select necessary Project and Task to bind activity to and press «OK». In case when selected project is related to external PMS – JIRA then it is mandatory to select Task for binding. Otherwise just a project is enough. List of Tasks to be chosen is related to Project selected by User. Important! If logging work to JIRA has been already done for selected activity than it can’t be bound to another Project or Task. After binding to Project / Task has been finished window «Attach activity(ies)» will be closed and you will be back to list of the activities and list will be updated. 6 Time Management Expert – User Manual, 2015 Managing Projects - Window «Projects» Window «Projects» is intended for managing of the projects. It allows viewing all projects, adding, editing and removing projects. In order to open window you need to select in application menu «Projects». Project has following parameters: Projects name Type o Local (created in the application) o JIRA PMS (imported from the JIRA during synchronization of the projects) Description Creation date You have following possibilities in the window: Button Keyboard Adding project Insert Editing project Enter Removing project Delete Mouse Double Click During adding and editing of the project following window is displayed with project properties: 7 Time Management Expert – User Manual, 2015 It is possible to remove more than one project at the same time. For this purpose you need to select projects to be removed using keyboard keys «Ctrl» and «Shift». Before removing selected projects application perform confirmation and displays message: 8 Time Management Expert – User Manual, 2015 Managing Tasks - Window «Tasks» Window «Tasks» is intended for managing of the tasks. It allows viewing all tasks, adding, editing and removing tasks. In order to open window you need to select in application menu «Tasks». Task has following parameters: Task name Type o Local (created in the application) o JIRA PMS (imported from the JIRA during synchronization of the tasks) Description Project Status «Default task» (means that uncategorized activity will be bind to this task if parameter set) Creation date You have following possibilities: Button Keyboard Adding task Insert Editing task Enter Removing task Delete Mouse Double Click During adding and editing task following window is displayed 9 Time Management Expert – User Manual, 2015 It is possible to remove more than one task at the same time. For this purpose you need to select tasks in the list to be removed using keyboard keys «Ctrl» and «Shift». Before removing selected tasks application performs confirmation and displays message: Parameter «Default Task» means that uncategorized activity will be bind to this task if parameter set. It is possible to mark as default only one task at the same moment. 10 Time Management Expert – User Manual, 2015 Window «Applications» Window «Applications» contains list of the all applications which were active during user activity on the computer. In order to open this window you need to select in application menu «Applications». It contains applications list with their parameters: Application – application file name like explorer.exe Path – path to application file (if available) Create date – date of the first application activity Window «Web sites» Window «Web sites» displays list of the all web sites URLs you visited. In order to open window you need to select in application menu «Web sites». 11 Time Management Expert – User Manual, 2015 Window «Rules» Application has unique ability to classify user activity and automatically bind it to different Projects and Tasks. As result you will have opportunity to have information about spent time per projects and tasks. For this purpose special entities are used – Rules. Rule it is a group of the conditions how to classify user activity. Window «Rules» is intended for managing Rules. In order to open this window you need to select in application menu item «Rules». Window displays list of all Rules with their statuses (Enable, Disable) and priorities how shown in below picture. User activity can be classified by following parameters: o o o o o o o Application (application file name like word.exe) Path to application on the disk full or its part (for example, C:\Windows\SysWOW64\Notepad.exe or just «SysWOW64») Title of the window of the active application for the moment URL address of the visited web site if you work in web browser URL address of the visited page (Full or some part) Activity type (Active, Idle, Locked, Offline) Time period You have following possibilities: Button Keyboard Adding rule Insert Editing rule Enter Removing rule Delete Mouse Double Click During adding and editing of the rule following window is displayed with rule properties 12 Time Management Expert – User Manual, 2015 It is possible to remove more than one rule at the same moment. For this purpose select rules to be removed in the list using keyboard keys «Ctrl» and «Shift». Before removing selected rules application performs confirmation and displays message: For rule creation it is necessary to have at least one parameter (condition) and project/task. So if all rules conditions are true for current user activity than activity will be bound to defined project and task. If project in the Rule is related to JIRA then it is mandatory to select Task. Otherwise it is possible to use only project (For example project «The rest», «Training» for case when project does not have tasks inside). In addition rule has following properties: o Status (Enable, Disable) – It shows is rule active or not o Priority (Lowest, Low, Normal, High, Highest) It is possible such a case when some rules are true at the same time so we have question which rule will be used for binding. For this case rules have parameter «Priority». Rule that has bigger priority will be used. If all rules have the same priorities then rule which has more conditions will be used. 13 Time Management Expert – User Manual, 2015 Rules examples User activity will be bind to project «Administration» when: You are active on computer AND You work in Internet Explorer (iexplore.exe) AND you serf web site http://www.microsoft.com AND Title of the visited page contains in any place words download and office AND time on computer 09:00:00 or more AND less than 17:00:00 (probably working time) Also rule is enable and has Normal priority. 14 Time Management Expert – User Manual, 2015 Integration with External Project Management Systems (PMS) Application has ability to work together with project management system Atlassian JIRA. Application can import projects and tasks from JIRA Register work (Logging work) into JIRA. Start time and duration are got automatically. You can write description for logging work and change start time if necessary There is a notification possibility for Logging work at the certain time that can be set up by user JIRA connection parameters setup In order to set up JIRA connection parameters you need to select in application menu PMS > PMS Settings. Window «PMS Settings» will be opened if license for user is related to JIRA. In this window there are following parameters JIRA Server URL JIRA User name Password for JIRA User JIRA Username is taken from the license There is a possibility to perform test connection to JIRA according connection parameters from this window. For this purpose is intended button «Test Connection». If test connection was successful then information window will be displayed 15 Time Management Expert – User Manual, 2015 If there is no ability to connect to JIRA server then following information window will be displayed. Probably there is an error in JIRA Server URL If JIRA server URL has been reached but host was not able to authorize user then following information window will be displayed. In addition it is possible in the window to setup notification about necessity of the Logging Work and start Logging work process. In order to set notification enable you need to set checkmark near «Worklog notification» and set notification time near «Notification time». When entered time is reached window for logging work will be opened to do Logging work by user. Application must be started to process notification logic. Projects and Tasks import from JIRA Application has ability to import tasks and projects related to JIRA User name which was set in connection settings to JIRA server. In order to start import you need to select in application menu PMS > Import PMS Projects Issues. After that import will be started. Projects and Tasks which don’t exist in application will be created and marked as related to JIRA. If import process is finished successfully then following message will be displayed. 16 Time Management Expert – User Manual, 2015 Logging work into JIRA Application allows logging work into JIRA for tasks that previously were imported from JIRA during import Projects and Tasks process. In order to start Logging Work process you need to select in application menu PMS > PMS Worklog. After that application checks if there any activities related to JIRA tasks for selected time period. If Yes application will prepare information about tasks (with not null time spends), start time and duration and put it in window «JIRA Worklog» This window displays: Task names in dropdown list «Task / JIRA Issue name» Start time when you started to work under task («Start Time») Total task duration («Duration») You can change start time if necessary and write Description for work like in above picture. Press button «Log work» to start Logging work process. After logging work is finished window will be closed. But if you have more than one task for logging and want to process logging work one by one for tasks then you need to set checkmark «Log Work for next Task (Issue)». In this case logging work will be performed sequentially and window will be close when any tasks remains. 17 Time Management Expert – User Manual, 2015 Application parameters In order to display application parameters window you need to select in application menu «Settings». Window «Settings» contains settings for logging level for TME Collector which collects activity and TME UI (user interface application). 18