1
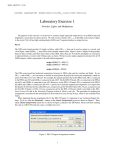
EASYPRO1GEVB EasyPro 3.2 Evaluation Board User's Manual http://onsemi.com EVAL BOARD USER’S MANUAL Programming and Evaluation Tool for Serial EEPROMs What is EasyPRO? EasyPRO is an easy-to-use, software-driven device programmer that is controlled and powered from the standard USB port of a PC. Designed as an extremely portable module (no bigger than a cell phone), the programmer provides a user-friendly tool for designers, service professionals and dealers. How easy is it to use? The new EasyPRO user interface provides a much easier way to find buttons and options required to run the test. © Semiconductor Components Industries, LLC, 2011 August, 2011 − Rev. 3 1 Publication Order Number: EVBUM2027/D EASYPRO1GEVB How can EasyPRO help me? EasyPRO allows you to write and read the content of the memory device (IIC, SPI and uWIRE) with either predefined patterns or your custom patterns. IIC, SPI Position mWIRE Position What devices can EasyPRO support? EasyPRO supports ON Semiconductor serial EEPROM devices, as well as competitor-equivalent products. The programmer is designed to support 8-pin devices in PDIP package. Other packages are supported using the appropriate test socket adapter. ADAPTER pin1 SOCKET pin1 What features are available? EasyPRO programs and reads the content of the memory device for ON Semiconductor serial EEPROMs. Choose and open the device file from the list available in “Devices” folder. To write or verify the data to or from the memory, an internal data Buffer is available. The buffer size is equal to the memory size of the selected device. The buffer content is shown in hexadecimal format in the left panel and as ASCII characters in the right panel, under DUT / Buffer tab. The buffer content is user editable or can be loaded with a specific data file (predefined or custom pattern). To program data into the memory or to verify memory content, the “Write”, “Read” and “Verify” functions are available under Device Functions menu. By clicking the “Write” button, the data previously loaded in the buffer will be written into the memory device under test. By clicking the “Read” button, the data read from the memory under test will be loaded into the data buffer. The “Verify” function is used to verify that programming has been correctly performed and that the memory content is identical to the data buffer. The total number of errors will be displayed in the “Output” messages window and the failed locations are marked in red in the buffer window. If the data read from the memory is identical to the data buffer, the message “Done with no differences” will be displayed. http://onsemi.com 2 EASYPRO1GEVB TABLE OF CONTENTS Installation . . . . . . . . . . . . . . . . . . . . . . . . . . . . . . . . . 4 Program Installation . . . . . . . . . . . . . . . . . . . . . . . . 4 Driver Installation . . . . . . . . . . . . . . . . . . . . . . . . . . 4 Firmware . . . . . . . . . . . . . . . . . . . . . . . . . . . . . . . . . . 5 Overview . . . . . . . . . . . . . . . . . . . . . . . . . . . . . . . . . . . 6 Panels . . . . . . . . . . . . . . . . . . . . . . . . . . . . . . . . . . . . . 7 Properties Panel . . . . . . . . . . . . . . . . . . . . . . . . . . . . 7 Output Panel . . . . . . . . . . . . . . . . . . . . . . . . . . . . . . 7 Caption Panel . . . . . . . . . . . . . . . . . . . . . . . . . . . . . 7 Tabs . . . . . . . . . . . . . . . . . . . . . . . . . . . . . . . . . . . . . . . 7 DUT Tab . . . . . . . . . . . . . . . . . . . . . . . . . . . . . . . . . 7 File Tab . . . . . . . . . . . . . . . . . . . . . . . . . . . . . . . . . . 7 Ribbons . . . . . . . . . . . . . . . . . . . . . . . . . . . . . . . . . . . . 8 Home . . . . . . . . . . . . . . . . . . . . . . . . . . . . . . . . . . . . 8 Open Device . . . . . . . . . . . . . . . . . . . . . . . . . . . . 8 Open Hex . . . . . . . . . . . . . . . . . . . . . . . . . . . . . . 8 Open Bin . . . . . . . . . . . . . . . . . . . . . . . . . . . . . . 9 Save DUT as HEX0 . . . . . . . . . . . . . . . . . . . . . 9 Save Hex . . . . . . . . . . . . . . . . . . . . . . . . . . . . . . 9 Save Hex as0 . . . . . . . . . . . . . . . . . . . . . . . . . . 9 Save Bin . . . . . . . . . . . . . . . . . . . . . . . . . . . . . . 10 Save Bin as0 . . . . . . . . . . . . . . . . . . . . . . . . . . 10 Property Window Button . . . . . . . . . . . . . . . . . 10 Caption Bar Button . . . . . . . . . . . . . . . . . . . . . . 11 Output Window Button . . . . . . . . . . . . . . . . . . 11 Buffer . . . . . . . . . . . . . . . . . . . . . . . . . . . . . . . . . . 11 Erase All . . . . . . . . . . . . . . . . . . . . . . . . . . . . . . 12 Fill . . . . . . . . . . . . . . . . . . . . . . . . . . . . . . . . . . 12 Start Address . . . . . . . . . . . . . . . . . . . . . . . . . . 12 Size . . . . . . . . . . . . . . . . . . . . . . . . . . . . . . . . . . Value . . . . . . . . . . . . . . . . . . . . . . . . . . . . . . . . . Checksum . . . . . . . . . . . . . . . . . . . . . . . . . . . . . Copy from Pattern . . . . . . . . . . . . . . . . . . . . . . Copy to Pattern . . . . . . . . . . . . . . . . . . . . . . . . . Save DUT as HEX0 . . . . . . . . . . . . . . . . . . . . Pattern . . . . . . . . . . . . . . . . . . . . . . . . . . . . . . . . . . Open Hex . . . . . . . . . . . . . . . . . . . . . . . . . . . . . Open Bin . . . . . . . . . . . . . . . . . . . . . . . . . . . . . Erase All . . . . . . . . . . . . . . . . . . . . . . . . . . . . . . Copy from Buffer . . . . . . . . . . . . . . . . . . . . . . . Copy to Buffer . . . . . . . . . . . . . . . . . . . . . . . . . Checksum . . . . . . . . . . . . . . . . . . . . . . . . . . . . . Save Hex . . . . . . . . . . . . . . . . . . . . . . . . . . . . . Save Hex as0 . . . . . . . . . . . . . . . . . . . . . . . . . Save Bin . . . . . . . . . . . . . . . . . . . . . . . . . . . . . . Save Bin as0 . . . . . . . . . . . . . . . . . . . . . . . . . . Device Functions . . . . . . . . . . . . . . . . . . . . . . . . . . Read . . . . . . . . . . . . . . . . . . . . . . . . . . . . . . . . . Write . . . . . . . . . . . . . . . . . . . . . . . . . . . . . . . . . Verify . . . . . . . . . . . . . . . . . . . . . . . . . . . . . . . . Device Start . . . . . . . . . . . . . . . . . . . . . . . . . . . Block Size . . . . . . . . . . . . . . . . . . . . . . . . . . . . Buffer Start . . . . . . . . . . . . . . . . . . . . . . . . . . . . Supply VCC . . . . . . . . . . . . . . . . . . . . . . . . . . . Sequential Read . . . . . . . . . . . . . . . . . . . . . . . . Page Mode . . . . . . . . . . . . . . . . . . . . . . . . . . . . Write Protect . . . . . . . . . . . . . . . . . . . . . . . . . . . Opens Shorts . . . . . . . . . . . . . . . . . . . . . . . . . . http://onsemi.com 3 12 13 13 13 13 14 14 14 14 15 15 15 15 16 16 16 16 17 17 17 17 18 18 18 18 19 19 19 19 EASYPRO1GEVB INSTALLATION Program Installation Do not connect the EasyPRO tester to the computer prior to installing the application software. EasyPRO 3.2 software requires the following system configuration: • Microsoft Windows XP or above • 20 MB of available hard disk space to install and run EasyPRO software • USB 1.1 or USB 2.0 port interface In order to install the program, click on the Install Software button from the EasyPRO Quick-Start Kit CD-ROM or double click on the Setup file found in the installation kit. It is possible that you will be asked if it is safe to run this program. Choose Run and the setup process begins. If you change your mind and you want to cancel the setup process, choose Cancel (this can also be done in any screen) and the installation will be terminated after your choice. If you want to continue, choose Next. In the next screen you can edit some of the installation parameters, such as the location for the program. You can browse for a new location or type it in the corresponding field. By default the program will be installed and available only for the current user of the computer. It is possible to change this setting if desired. Also you can see the disk requirements to install this program. Choose Next. The next screen asks you if you want to start the installation. If you want to change some parameters, hit Back and change them. If everything was setup ok, choose Next and the installation process begins. If during this process you are prompted to accept the installation (because the driver is not digitally signed) choose Continue Anyway. The installation is now complete and you may attach the tester to the computer. The program is also running without the device attached to the computer. Driver Installation The EasyPRO tester may be plugged directly into the USB port or connected by USB cable. Once the EasyPRO tester is connected to the computer, the Found New Hardware wizard will appear on the computer. Choose the automatic installation or install from a list or a specific location. If you wish to use this option, you can find the driver in the location where your program is installed, in the Driver folder. http://onsemi.com 4 EASYPRO1GEVB If you choose the automatic installation, hit Next and the wizard begins searching for available drivers. A screen may appear telling you that the driver is not digitally signed. Choose Continue Anyway. The driver will be installed. In the last screen just hit Finish. The EasyPRO tester and the computer are now ready to be used. FIRMWARE In order to start the EasyPRO program, you can either double click the desktop icon, or go to the Start menu > Programs > ON Semiconductor > EasyPRO 3.2 > EasyPRO. If this is the first time you use the EasyPRO, it is very possible that the firmware needs to be updated. Whenever a new version of the software kit comes out, the tester firmware is updated. When launched, the program automatically searches if new firmware is on the computer, and, if there is, prompts you to agree with the update. Hit YES and the program automatically updates the firmware. In the output window you can follow the update progress. If you do not update the firmware, the EasyPRO may not work correctly. http://onsemi.com 5 EASYPRO1GEVB OVERVIEW EasyPRO 1. 2. 4. 3. 5. 6. Legend: 1. Ribbons 2. Caption Bar 3. Tabs 4. Properties Panel 5. Output Window 6. Progress Bar http://onsemi.com 6 EASYPRO1GEVB PANELS Properties Panel DUT Details These fields show you some memory characteristics as defined in .dev file, such as minimum and maximum VCC that can be used with this part, memory size etc. They are not user editable. Working Conditions These fields show you the operating conditions with the tested device. They are a copy of operating conditions as set in the Device Functions ribbon. Only Specific details may be edited here. Output Panel Shows you different messages. All output messages, also ERROR messages, are displayed here. Caption Panel Shows you different useful tips after executing a function. TABS DUT Tab It is the interface between the program and the DUT (memory). Any write command takes the data from this tab and any read command outputs the data into this tab. It can be edited in the hex mode (left panel) or by entering the ASCII characters (right panel). The content of this tab can be written, exported to a HEX file or copied into the File tab. File Tab Allows you to work with pattern files. You can load, modify and/or save the pattern files, or transfer them into the DUT tab. It can be edited in the hex mode (left panel) or by entering the ASCII characters (right panel). http://onsemi.com 7 EASYPRO1GEVB RIBBONS Home Contains the most commonly used functions Open Device Open Device - prompts you to open a dev file. It will be opened in the DUT tab, filled by default with “0”. If another .dev file was already opened, the previous will be closed and the new one will be opened instead. Also, if there was a File tab opened, it is closed prior to opening the new device. This function is automatically run when the EasyPRO program is launched. Open Hex Open hex - prompts you to open a hex file, which will be opened in the File tab, where it can be edited if desired. If there was no file opened until using this function, the File tab is opened with the content of the file. If a file is already opened, it is closed and the new one is opened instead. http://onsemi.com 8 EASYPRO1GEVB Open Bin Open Bin - prompts you to open a bin file, which will be opened in the File tab, where it can be edited if desired. If there was no file opened until using this function, the File tab is opened with the content of the file. If a file is already opened, it is closed and the new one is opened instead. Save DUT as HEX0 Save DUT as Hex allows you to save the content of the DUT tab (the DUT memory mirror) into a hex file The default location when saving this file is the Patterns directory under the EasyPRO location on your disk. Save Hex Save Hex - saves the hex file you edited in the File tab. Remember that this function overwrites the current file. If you want to save the file under a different name, use Save hex as function Save Hex as0 Save Hex as - allows you to save the opened hex file with another name, without modifying the original one. You are prompted to enter the location for saving, also the new name of the file. http://onsemi.com 9 EASYPRO1GEVB Save Bin Save Bin - saves the bin file you edited in the File tab Remember that this function overwrites the current file. If you want to save the file under a different name, use Save bin as function Save Bin as0 Save bin as - allows you to save the opened bin file with another name, without modifying the original one. You are prompted to enter the location for saving, also the new name of the file. Property Window Button Property Window - This button opens and/or closes the properties window. In this window you will find a brief description of the part you selected. This fields are non editable. The working conditions are also shown here. You can edit the specific details, i.e. Page Mode and Write Protect. You can expand or collapse the categories using the + or − signs. http://onsemi.com 10 EASYPRO1GEVB Caption Bar Button Caption Bar - This button opens and/or closes the caption bar. This bar shows you different useful tips after executing a function. Output Window Button Output Window - In this window are displayed all messages, including error messages. Buffer Allows you to manage the data in the DUT tab http://onsemi.com 11 EASYPRO1GEVB Erase All Erase All - clears the entire tab (filling with 0xFF), regardless of the Fill options. Fill Fill - you can fill the entire DUT tab, or just a section of it with a desired value. Start Address - the address from where to begin the fill operation. Size - number of bytes to fill beginning with the start address. Value - the desired value to fill the buffer. Start Address Start Address - the address from where to begin the fill operation. Size Size - number of bytes to fill beginning with the start address. http://onsemi.com 12 EASYPRO1GEVB Value Value - the desired value to fill the buffer. Checksum Checksum - makes the sum of all words in the DUT tab and displays it in the output window. This information may be useful for faster comparison of the data inside the DUT. For a more rigorous check, use Verify, but it needs more time to complete. Copy from Pattern Copy from Pattern - copies the content of the File tab to DUT tab. This is useful for writing a given pattern into the device. Once the data is in the DUT tab, it can be written into the device. Copy to Pattern Copy to Pattern - copies the content of the DUT tab to File tab. This operation is useful to keep a backup copy of the DUT tab. http://onsemi.com 13 EASYPRO1GEVB Save DUT as HEX0 Save DUT as Hex - allows you to save the content of the DUT tab (the DUT memory mirror) into a hex file. The default location when saving this file is the Patterns directory under the EasyPRO location on your disk. Pattern With the functions found here you can manage the data in the File tab Open Hex Open Hex - prompts you to open a hex file, which will be opened in the File tab, where it can be edited if desired. If there was no file opened until using this function, the File tab is opened with the content of the file. If a file is already opened, it is closed and the new one is opened instead. Open Bin Open bin - prompts you to open a bin file, which will be opened in the File tab, where it can be edited if desired. If there was no file opened until using this function, the File tab is opened with the content of the file. If a file is already opened, it is closed and the new one is opened instead. http://onsemi.com 14 EASYPRO1GEVB Erase All Erase All - clears the entire tab (filling with 0xFF) Copy from Buffer Copy from Buffer - copies the content of the DUT tab to File tab. This operation is useful to keep a backup copy of the DUT tab. Copy to Buffer Copy to Buffer - copies the content of the File tab to DUT tab. This is useful for writing a given pattern into the device. Once the data is in the DUT tab, it can be written into the device. Checksum Checksum - makes the sum of all words in the File tab and displays it in the output window. This information may be useful for faster comparison of the data inside the DUT. For a more rigorous check, use Verify, but it needs more time to complete. http://onsemi.com 15 EASYPRO1GEVB Save Hex Save Hex - saves the hex file you edited in the File tab Remember that this function overwrites the current file. If you want to save the file under a different name, use Save hex as function. Save Hex as0 Save Hex as - allows you to save the opened hex file with another name, without modifying the original one. You are prompted to enter the location for saving, also the new name of the file. Save Bin Save Bin - saves the bin file you edited in the File tab Remember that this function overwrites the current file. If you want to save the file under a different name, use Save bin as function Save Bin as0 Save Bin as - allows you to save the opened bin file with another name, without modifying the original one. You are prompted to enter the location for saving, also the new name of the file. http://onsemi.com 16 EASYPRO1GEVB Device Functions Here there are some functions that helps you in order to make operations with the tested device Read Read - reads the memory and displays the content in the DUT tab. This operation is done under the operation details, details that can be edited in the corresponding menu. Write Write - writes into the DUT memory the content of the DUT tab. This operation is done under the operation details, details that can be edited in the corresponding menu. Verify Verify - compares the DUT tab content with the DUT. The differences between memory and DUT tab are displayed in red in the DUT tab. This operation is done under the operation details, details that can be edited in the corresponding menu. http://onsemi.com 17 EASYPRO1GEVB Device Start Device Start - Allows you to edit the start address of the device. Used in Read, Write, or Verify Block Size Block Size - Allows you to edit the number of bytes to be read or written. Used in Read, Write, or Verify Buffer Start Buffer Start - The buffer start address to begin the operations. Used in Read, Write, or Verify Supply VCC Supply VCC - Allows you to edit the value of the VCC supply. Used in Read, Write, or Verify http://onsemi.com 18 EASYPRO1GEVB Sequential Read Sequential Read - This mode allows a faster response time for reading large blocks of the memory. Used in Read or Verify Page Mode Page Mode - With this control you can set the write mode (page mode/byte mode) and the read mode (sequential/byte mode). For writing mode the default is page mode and for the read mode the default is sequential mode. Used in Read, Write, or Verify Write Protect Write Protect - Allows you to activate the write protect mode (WP pin) or not during Read, Write, or Verify Opens Shorts Opens Shorts - Verify the contact of the device in the ZIF socket. This function helps you to detect if the device is present in the socket, or, all the pins are in contact with the ZIF socket. Please verify the status of the operation in the output panel. http://onsemi.com 19 EASYPRO1GEVB ON Semiconductor and are registered trademarks of Semiconductor Components Industries, LLC (SCILLC). SCILLC reserves the right to make changes without further notice to any products herein. SCILLC makes no warranty, representation or guarantee regarding the suitability of its products for any particular purpose, nor does SCILLC assume any liability arising out of the application or use of any product or circuit, and specifically disclaims any and all liability, including without limitation special, consequential or incidental damages. “Typical” parameters which may be provided in SCILLC data sheets and/or specifications can and do vary in different applications and actual performance may vary over time. All operating parameters, including “Typicals” must be validated for each customer application by customer’s technical experts. SCILLC does not convey any license under its patent rights nor the rights of others. SCILLC products are not designed, intended, or authorized for use as components in systems intended for surgical implant into the body, or other applications intended to support or sustain life, or for any other application in which the failure of the SCILLC product could create a situation where personal injury or death may occur. Should Buyer purchase or use SCILLC products for any such unintended or unauthorized application, Buyer shall indemnify and hold SCILLC and its officers, employees, subsidiaries, affiliates, and distributors harmless against all claims, costs, damages, and expenses, and reasonable attorney fees arising out of, directly or indirectly, any claim of personal injury or death associated with such unintended or unauthorized use, even if such claim alleges that SCILLC was negligent regarding the design or manufacture of the part. SCILLC is an Equal Opportunity/Affirmative Action Employer. This literature is subject to all applicable copyright laws and is not for resale in any manner. PUBLICATION ORDERING INFORMATION LITERATURE FULFILLMENT: Literature Distribution Center for ON Semiconductor P.O. Box 5163, Denver, Colorado 80217 USA Phone: 303−675−2175 or 800−344−3860 Toll Free USA/Canada Fax: 303−675−2176 or 800−344−3867 Toll Free USA/Canada Email: [email protected] N. American Technical Support: 800−282−9855 Toll Free USA/Canada Europe, Middle East and Africa Technical Support: Phone: 421 33 790 2910 Japan Customer Focus Center Phone: 81−3−5773−3850 http://onsemi.com 20 ON Semiconductor Website: www.onsemi.com Order Literature: http://www.onsemi.com/orderlit For additional information, please contact your local Sales Representative EVBUM2027/D Mouser Electronics Authorized Distributor Click to View Pricing, Inventory, Delivery & Lifecycle Information: ON Semiconductor: EASYPRO1GEVB