1
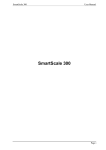
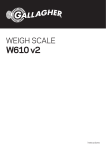
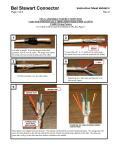
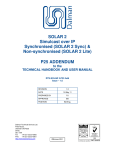
Bracket.
Pipe (maximum 62 mm diameter).
Trim u-bolts if mounting pipe
smaller than 40 mm diameter.
USER GUIDE
BRACKET INSTALLATION
Install on a horizontal pipe as shown, or attach to the wall
using screws supplied.
Congratulations on your purchase of this Tru-Test Series 2000 scale Indicator. To ensure you receive the service you are entitled to,
please complete and post the warranty card without delay.
SPECIFICATIONS
Note: product specifications may change without prior notice.
Total Capacity
2000 kg or 3000 kg (4400 lb or 6600 lb) depending on loadbars/EziFeet used.
Resolution
Set to 0.5 kg (selectable 0.1 kg to 5 kg) or 1 lb (0.2 lb to 10 lb).
Accuracy
±1% or 2 resolutions (whichever is greater) with Tru-Test loadbars/EziFeet connected.
Power supply
12 V DC (power adaptor or vehicle battery).
Operating temperature
-10 °C to +40 °C (+14 °F to +104 °F).
Storage temperature
-20 °C to +35 °C (-4 °F to +95 °F).
Memory
10,000 records.
Internal battery run time
12 hours with 2 loadbars connected (10 hours with backlight on).
Communications
2 RS-232 connectors or RS-232 plus RS-485 connector.
Environmental
IP67 (immersion in 1 m of water).
WITH THE SR2000 YOU CAN . . .
• Access the built-in manual where and when you need it.
• Display several items on the Weigh screen at once (eg. weight, tag/ID & gain).
• Move animals quickly from one file to another.
• See how much weighing time is left when running on the internal battery.
• Enter alpha-numeric tags/IDs, condition codes and file names (eg. for tag colour and easily recognisable file names).
• See weight gains (total, daily, monthly, total %, daily %, monthly %) to allow individual and group performance to be evaluated.
• See carcass weight.
• See dollar value (carcass or live weight) across 3 payout schedules.
• Perform 3-way drafting/sorting by weight, weight gain, carcass weight or value.
• Use automatic weight recording for hands free weighing and recording.
FOR SERVICE
• Interface with EID and auto drafting/sorting equipment.
www.tru-test.com
New Zealand
Phone (09) 978 8888
Facsimile (09) 978 8889
Toll Free 0800 878 837
USA
Phone (210) 495 9130
Facsimile (210) 495 9129
Toll Free 1 800 874 8494
Australia Vic. S.A. Tas.
Phone (03) 5820 1800
Facsimile (03) 5831 5524
Toll Free 1 800 682 880
Qld. N.S.W. N.T.
Phone (07) 3274 7800
Facsimile (07) 3255 6454
Toll Free 1 800 682 880
W.A.
Phone (08) 9274 1122
Facsimile (08) 9274 4824
Toll Free 1 800 682 880
Phone (01765) 689 541
Facsimile (01765) 689 851
UK
Ireland
Phone (021) 334 066
Facsimile (021) 334 520
Denmark
Phone 45 800 922
Facsimile 45 800 999
Hungary
Phone (5) 4721 5729
Poland
Phone (22) 645 1247
Latvia
Phone 2945 796
• Print reports that include carcass weights, weight gains and values.
• Span calibrate, allowing the SR2000 to be used with any loadcells.
• Perform group weighing.
Dust caps screw together
• Perform reverse weighing.
to keep out dirt and
moisture when cables
INSTALLATION
6
convenient place where animals can't
Lithuania
Phone 2790 034
E-mail [email protected]
knock the Indicator off or chew the
Estonia
Phone 7362 716
E-mail [email protected]
cables. The bracket mounts onto flat
surfaces (timber rails, concrete) or
ON
SE TU P
E
ESCAP
SPA C E
SH IF T
N
D
C
B
A
O
Q
P
CO N 1
CO N 2
G
F
E
R
S
T
U
V
LO AD CE
W
M
L
K
J
I
H
when cables removed.
ENTER
BACK
IN FO
O FF
on Indicator/cables
-
.
0
Indicator. Screw back
3
2
1
(see Loadbar User Manual).
2 Mount the Indicator bracket in a
are connected to
5
4
platform on a firm, level surface
E-mail [email protected]
9
8
7
1 Install loadbars/EziFeet under the
Phone (23) 414 100
Czech Republic
• Enter 2 condition codes for detailed information on individual animal performance.
X
Y
Z
LL S
R
PO WE
horizontal pipe-work with the
FCC NOTICE
The Tru-Test Model SR2000 Indicator has been tested and found to comply with the limits for a Class A digital device, pursuant to Part 15 of the
FCC rules. These limits are designed to provide reasonable protection against harmful interference when the equipment is used in a commercial
environment. This equipment generates, uses and can radiate radio frequency energy and, if not installed and used in accordance with the
instruction leaflet, may cause harmful interference to radio communications. Operation of this equipment in a residential area is likely to cause
harmful interference, in which case users will be required to correct the interference at their own expense.
supplied U-bolts.
3 Connect loadbar/EziFeet cable(s) to
the Indicator. Connect dust caps as
shown. The Indicator automatically
calibrates itself to Tru-Test loadbars or
EziFeet.
Communications connectors
Loadcell connectors,
for connecting to computer,
2 for loadbars, use
printer, EID reader etc.
either 1 for EziFeet.
4 Connect power cable (if needed).
© Tru-Test Limited, 2000
®
Auckland, New Zealand, www.tru-test.com
Power connector for connecting 12 V vehicle battery (red clip to positive terminal) or Tru-Test power adaptor.
An ISO 9001 Quality Registered Company
To connect power adaptor, pull battery clips off Indicator lead and plug lead into power adaptor lead (red to red).
WID80001 English rev 3 11.00
• S I M P L E • R U G G E D • V E R S AT I L E • P O W E R F U L •
®
TRICKS AND TIPS
FOR STARTERS
When first turned on the SR2000 takes you through an interactive tutorial to help familiarise you with the basic operation of the Indicator.
For full instructions on use of the Indicator, press
To add an item to the Weigh screen
to view the built-in manual.
INFO
• Place
• Press
shows part of screen that is
active and can be changed or actioned.
Stable light
Weigh screen.
shows weight
is stable and can be recorded.
For easy changing of files while weighing,
• Place
put file number/name on Weigh screen.
• Press
Short cut to File screen from
on an item in any screen.
INFO
Data/Statistics screens
.
• Place
on Put item on Weigh screen.
ENTER
• Press
to accept.
here.
ENTER
to accept.
Live weight.
®
Soft key labels.
Press soft key
7
8
9
4
5
6
ON
1
2
3
OFF
0
.
-
to
perform operation shown
on soft key label above.
ESCAPE
SETUP
tags/IDs and other data.
SPACE
A
B
C
D
E
F
G
H
I
J
K
L
M
Alpha (letter) characters for
from any other screen
SHIFT
N
O
P
Q
R
S
T
U
V
W
X
Y
Z
tags/IDs, file names and
CON 1
CON 2
POWER
To remove an item from the Weigh screen
For some markets this can be changed.
• Place
To change
• Press
on item to remove.
INFO
.
on kg/lb on Weigh screen.
• Place
Returns to Weigh screen
with just a few presses.
The Indicator is set to kg or lb in the factory.
• Place
ENTER
BACK
INFO
Records weights, enters
• Press
ENTER
.
• Use arrow keys to select option.
• Press
on Remove from Weigh screen.
ENTER
to accept.
condition codes.
LOADCELLS
• Press
Accesses Indicator setups for different functions, eg.
ENTER
to accept.
To get back the Welcome screen/Tutorial
Backs out of key presses one at a time.
• Weight gain.
Useful to remove last digit typed, or get
• Drafting.
Arrow keys move
• Carcass %.
to a previous screen.
around
• Auto weight recording.
the screen.
• Condition codes.
• Press
soft key.
• Place
on Tutorial.
• Press
ENTER
to accept.
Accesses appropriate parts
of the built-in manual.
• Schedules.
OPERATING NOTES
• Printer, computer & EID interfaces.
• Group weighing.
During weighing, check that animals are fully on the platform.
• Time and date.
Ensure that the underside of the platform or crate is kept clear of dirt and stones.
and accesses information about the Indicator, eg.
Do not leave the Indicator or loadbars/EziFeet in water. Store the Indicator in a cool dry place.
• Battery status.
The Indicator automatically turns off after 15 minutes of no activity, to limit discharge of the internal/external battery. See
WEIGH SCREEN SOFT KEYS
SETUP
to disable.
INTERNAL BATTERY OPTION
The internal battery charger operates from either the recommended Tru-Test power adaptor or a 12 volt vehicle battery. Damage to the Indicator
Zeroes the scale after build up of dirt on the platform. Normally automatic.
Displays average, total, minimum and maximum weights, gains etc.
Displays animal records - Tag/ID, weight, condition codes, gain, carcass etc.
Displays a list of files - for selecting new files or reviewing old ones.
Takes you to the contents page of the built-in manual.
caused by other charging supplies, including automotive battery chargers, is not covered by the warranty.
Charge the Indicator for 12 hours before using it for the first time.
The sophisticated battery modelling displays hours to run before flat (press
SETUP
,
,
), and also displays warning messages
at 1 hour, 15 minutes and 1 minute before flat.
To maximise battery life, observe the following simple guidelines:
QUICK START (to record tag/ID and weight)
1 Press
ON
and wait for zero weight (if you see the Welcome screen, press
• Preferably recharge the battery overnight.
ENTER
• Never charge the Indicator in direct sunlight.
).
2 Move animal onto platform.
Y
3 Type in Tag/ID eg.
4 Press
ENTER
2
The internal battery charger ensures maximum life of the battery, while giving the fastest charging rate possible. The battery is protected from
9
1
.
overcharging. Charging a flat battery takes 6 hours at temperatures of 10 °C to 35 °C (50 °F to 95 °F).
The 'Charge %' is displayed during charging to indicate charging progress.
.
5 Wait for stable light
• Store the Indicator in a cool dry place.
You can safely leave the Indicator on charge all the time. The scale can be used while charging. You do not need to charge before storage.
and press
ENTER
.
You have recorded Tag/ID and Weight. Move animal off platform and repeat from step 2.
• S I M P L E • R U G G E D • V E R S AT I L E • P O W E R F U L •
Charging at low or high temperatures could extend the charging time to 12 hours. At extreme temperatures the Indicator will not charge.
Fully charge the Indicator after storage.
Bracket.
Pipe (maximum 62 mm diameter).
Trim u-bolts if mounting pipe
smaller than 40 mm diameter.
USER GUIDE
BRACKET INSTALLATION
Install on a horizontal pipe as shown, or attach to the wall
using screws supplied.
Congratulations on your purchase of this Tru-Test Series 2000 scale Indicator. To ensure you receive the service you are entitled to,
please complete and post the warranty card without delay.
SPECIFICATIONS
Note: product specifications may change without prior notice.
Total Capacity
2000 kg or 3000 kg (4400 lb or 6600 lb) depending on loadbars/EziFeet used.
Resolution
Set to 0.5 kg (selectable 0.1 kg to 5 kg) or 1 lb (0.2 lb to 10 lb).
Accuracy
±1% or 2 resolutions (whichever is greater) with Tru-Test loadbars/EziFeet connected.
Power supply
12 V DC (power adaptor or vehicle battery).
Operating temperature
-10 °C to +40 °C (+14 °F to +104 °F).
Storage temperature
-20 °C to +35 °C (-4 °F to +95 °F).
Memory
10,000 records.
Internal battery run time
12 hours with 2 loadbars connected (10 hours with backlight on).
Communications
2 RS-232 connectors or RS-232 plus RS-485 connector.
Environmental
IP67 (immersion in 1 m of water).
WITH THE SR2000 YOU CAN . . .
• Access the built-in manual where and when you need it.
• Display several items on the Weigh screen at once (eg. weight, tag/ID & gain).
• Move animals quickly from one file to another.
• See how much weighing time is left when running on the internal battery.
• Enter alpha-numeric tags/IDs, condition codes and file names (eg. for tag colour and easily recognisable file names).
• See weight gains (total, daily, monthly, total %, daily %, monthly %) to allow individual and group performance to be evaluated.
• See carcass weight.
• See dollar value (carcass or live weight) across 3 payout schedules.
• Perform 3-way drafting/sorting by weight, weight gain, carcass weight or value.
• Use automatic weight recording for hands free weighing and recording.
FOR SERVICE
• Interface with EID and auto drafting/sorting equipment.
www.tru-test.com
New Zealand
Phone (09) 978 8888
Facsimile (09) 978 8889
Toll Free 0800 878 837
USA
Phone (210) 495 9130
Facsimile (210) 495 9129
Toll Free 1 800 874 8494
Australia Vic. S.A. Tas.
Phone (03) 5820 1800
Facsimile (03) 5831 5524
Toll Free 1 800 682 880
Qld. N.S.W. N.T.
Phone (07) 3274 7800
Facsimile (07) 3255 6454
Toll Free 1 800 682 880
W.A.
Phone (08) 9274 1122
Facsimile (08) 9274 4824
Toll Free 1 800 682 880
Phone (01765) 689 541
Facsimile (01765) 689 851
UK
Ireland
Phone (021) 334 066
Facsimile (021) 334 520
Denmark
Phone 45 800 922
Facsimile 45 800 999
Hungary
Phone (5) 4721 5729
Poland
Phone (22) 645 1247
Latvia
Phone 2945 796
• Print reports that include carcass weights, weight gains and values.
• Span calibrate, allowing the SR2000 to be used with any loadcells.
• Perform group weighing.
Dust caps screw together
• Perform reverse weighing.
to keep out dirt and
moisture when cables
INSTALLATION
6
convenient place where animals can't
Lithuania
Phone 2790 034
E-mail [email protected]
knock the Indicator off or chew the
Estonia
Phone 7362 716
E-mail [email protected]
cables. The bracket mounts onto flat
surfaces (timber rails, concrete) or
ON
SE TU P
E
ESCAP
SPA C E
SH IF T
N
D
C
B
A
O
Q
P
CO N 1
CO N 2
G
F
E
R
S
T
U
V
LO AD CE
W
M
L
K
J
I
H
when cables removed.
ENTER
BACK
IN FO
O FF
on Indicator/cables
-
.
0
Indicator. Screw back
3
2
1
(see Loadbar User Manual).
2 Mount the Indicator bracket in a
are connected to
5
4
platform on a firm, level surface
E-mail [email protected]
9
8
7
1 Install loadbars/EziFeet under the
Phone (23) 414 100
Czech Republic
• Enter 2 condition codes for detailed information on individual animal performance.
X
Y
Z
LL S
R
PO WE
horizontal pipe-work with the
FCC NOTICE
The Tru-Test Model SR2000 Indicator has been tested and found to comply with the limits for a Class A digital device, pursuant to Part 15 of the
FCC rules. These limits are designed to provide reasonable protection against harmful interference when the equipment is used in a commercial
environment. This equipment generates, uses and can radiate radio frequency energy and, if not installed and used in accordance with the
instruction leaflet, may cause harmful interference to radio communications. Operation of this equipment in a residential area is likely to cause
harmful interference, in which case users will be required to correct the interference at their own expense.
supplied U-bolts.
3 Connect loadbar/EziFeet cable(s) to
the Indicator. Connect dust caps as
shown. The Indicator automatically
calibrates itself to Tru-Test loadbars or
EziFeet.
Communications connectors
Loadcell connectors,
for connecting to computer,
2 for loadbars, use
printer, EID reader etc.
either 1 for EziFeet.
4 Connect power cable (if needed).
© Tru-Test Limited, 2000
®
Auckland, New Zealand, www.tru-test.com
Power connector for connecting 12 V vehicle battery (red clip to positive terminal) or Tru-Test power adaptor.
An ISO 9001 Quality Registered Company
To connect power adaptor, pull battery clips off Indicator lead and plug lead into power adaptor lead (red to red).
WID80001 English rev 3 11.00
• S I M P L E • R U G G E D • V E R S AT I L E • P O W E R F U L •
®