
1
Clarity Enterprise Project Tool User Manual For The Project Manager Emerson Doc Number Revision A8 – 2015-Mar-16 – Page 1 of 136 Project Name Project ID Clarity Enterprise Project Tool User Manual For The Project Manager Internal - Global Project Management End Customer: End Customer Reference Number: Document File Name: Document Status: Global Clarity Users Clarity Clarity Enterprise Project Tool User Manual for the Project Manager Approved Authorizations Name Function Developed By: Terry Redmond EMA Enterprise Planning Manager, PMO Reviewed By: Reinier Noppers Director Project Management Office EMA Released By: Roger Freeman VP Global Project Management Office Signature Distribution Name Company Emerson Process Management – Confidential and Proprietary Document based on PMO Template: GEN-WORD, Revision 0 Name Company Clarity Enterprise Project Tool User Manual For The Project Manager Emerson Doc Number Revision A8 – 2015-Mar-16 – Page 2 of 136 Project Name Project ID Revision History Rev Status Description Date Developed By Reviewed By P1 Initial Issue Working version 19-Nov-02 RN RF A1 First Release For Roll-out 21-Mar-03 RN RF A2 Updated Upgrade to Clarity 01-Apr-05 RN JA A3 Updated For Oracle Interface 16-Apr-07 TR RN A4 Updated For Issue to PMO Site 20-Jun-07 TR RN A5 Updated For Clarity Upgrade to V8.1 23-May-08 TR RN A6 Updated MSP conversion tool added 11-Aug-08 TR RN A7 Updated Updates for functions added. 12-Feb-10 PB RN A8 Updated Updates for functions added and new PMO template used 16-Mar-15 AD SY © Emerson Process Management. All rights reserved. Unauthorized duplication, in whole or in part, is prohibited. Trademarks identified in this document are owned by one of the Emerson Process Management group of companies. Unless otherwise agreed to in writing by the parties, any information provided in this document is confidential or proprietary and may not be used or disclosed without the expressed written permission of Emerson Process Management. Emerson Process Management Process Systems and Solutions 1100 W Louis Henna Blvd.–Building 1 Round Rock, TX 78681-7430 USA T +1 (512) 832-3020 F +1 (512) 908-4177 www.EmersonProcess.com Emerson Process Management - Confidential and Proprietary Document based on PMO Template: GEN-WORD, Revision 0 Clarity Enterprise Project Tool User Manual For The Project Manager Emerson Doc Number Revision A8 – 2015-Mar-16 – Page 3 of 136 Project Name Project ID Contents 1 INTRODUCTION ___________________________________________________ 6 1.1 1.2 1.3 1.4 1.5 1.6 1.7 2 About Clarity .............................................................................................................. 6 Purpose of this Manual .............................................................................................. 6 Clarity Infrastructure .................................................................................................. 6 System Setup ............................................................................................................ 7 Revision History ......................................................................................................... 8 Reference Documents ............................................................................................... 8 Support ...................................................................................................................... 8 OVERVIEW ______________________________________________________ 10 2.1 Data Sets................................................................................................................. 10 2.1.1 2.1.2 2.1.3 2.1.4 2.1.5 2.1.6 2.1.7 2.2 2.3 Clarity and Open Workbench ................................................................................... 13 Resource Planning .................................................................................................. 14 2.3.1 2.3.2 2.3.3 2.3.4 2.3.5 2.3.6 2.4 3 Cost Transfer to JD Edwards.................................................................................................. 18 Cost Transfer to Oracle .......................................................................................................... 19 Reports .................................................................................................................... 19 CREATE AND CLOSE A PROJECT IN CLARITY _________________________ 20 3.1 3.2 3.3 3.4 4 Allocations and Assignments .................................................................................................. 14 Role Based Scheduling .......................................................................................................... 15 Multiple Roles on Projects ...................................................................................................... 15 Assignment Based Scheduling ............................................................................................... 16 Some Notes about Resources and Users............................................................................... 17 BCEC Hour Bookings ............................................................................................................. 17 Interface to Emerson accounting Systems (JDE & Oracle) ...................................... 18 2.4.1 2.4.2 2.5 Global Data............................................................................................................................. 10 Activity Codes (Charge Codes) .............................................................................................. 10 Product Group Codes (Applied in JD Edwards Only) ............................................................. 10 Mandatory Milestones ............................................................................................................ 11 Project Class (JD Edwards) .................................................................................................... 12 Project Class (Oracle) ............................................................................................................ 12 Special Notes about User Diversity ........................................................................................ 13 Create a New Project ............................................................................................... 20 View Properties ....................................................................................................... 23 Set Financial Properties ........................................................................................... 25 Close a Project in Clarity.......................................................................................... 27 WORK WITH A PROJECT IN CLARITY _________________________________ 35 4.1 Properties Tab ......................................................................................................... 35 4.1.1 4.1.2 4.1.3 4.2 Financial ................................................................................................................................. 36 Status Reporting ..................................................................................................................... 36 Lessons Learned / GP Tracking Page .................................................................................... 39 The Team Tab ......................................................................................................... 41 Emerson Process Management – Confidential and Proprietary Document based on PMO Template: GEN-WORD, Revision 0 Clarity Enterprise Project Tool User Manual For The Project Manager Emerson Doc Number Revision A8 – 2015-Mar-16 – Page 4 of 136 4.2.1 4.2.2 4.2.3 4.2.4 4.2.5 4.3 Main Dashboard Page ............................................................................................................ 65 Financials Dashboard Page.................................................................................................... 66 Labour Overview Dashboard Page ......................................................................................... 72 Project Performance Dashboard Page ................................................................................... 73 Project Satisfaction Survey Page ........................................................................................... 74 Stoplights ................................................................................................................................ 76 Terminology ............................................................................................................................ 80 Other Options on the Project Properties Screen ...................................................... 81 4.6.1 4.6.2 4.6.3 5 Task List ................................................................................................................................. 50 Gantt (Work Breakdown Structure as per Previous Version) .................................................. 52 Resource Utilisation ................................................................................................................ 54 Assignments ........................................................................................................................... 54 Risks / Issues / Changes Tab .................................................................................. 55 Dashboard Tab ........................................................................................................ 63 4.5.1 4.5.2 4.5.3 4.5.4 4.5.5 4.5.6 4.5.7 4.6 Staff ........................................................................................................................................ 42 Detail ...................................................................................................................................... 46 Role Capacity ......................................................................................................................... 47 Participants ............................................................................................................................. 48 Participants Groups ................................................................................................................ 48 Tasks Tab ................................................................................................................ 50 4.3.1 4.3.2 4.3.3 4.3.4 4.4 4.5 Project Name Project ID Subprojects............................................................................................................................. 81 Dependencies......................................................................................................................... 81 Baseline .................................................................................................................................. 82 WORK WITH A PROJECT IN OPEN WORKBENCH _______________________ 83 5.1 5.2 5.3 5.4 5.5 5.6 5.7 5.8 5.9 Views, Highlights and Filters .................................................................................... 83 Project Data Fields .................................................................................................. 85 Task Codes ............................................................................................................. 87 Update of Actual Bookings....................................................................................... 88 The ‘Autoschedule’ Function .................................................................................... 88 The ‘Baseline’ Function ........................................................................................... 89 Work locally with Open Workbench Schedules ........................................................ 93 Assigning ETC’s To Resources ............................................................................... 94 Transfer Resource Assignments .............................................................................. 97 6 EET TO CLARITY INTERFACE ______________________________________ 106 7 ‘TWO TIER’ SCHEDULING TECHNIQUE IN OPEN WORKBENCH __________ 116 8 OPEN WORKBENCH TO MICROSOFT PROJECT CONVERSION TOOL _____ 127 8.1 8.2 8.3 8.4 8.5 8.6 Purpose ................................................................................................................. 127 Schedule Conversion ............................................................................................. 127 Access to Clarity Toolbox Functionality.................................................................. 127 Using the Conversion Tool..................................................................................... 128 Setting Up Microsoft Project Application ................................................................ 132 The Microsoft Project Schedule Output.................................................................. 132 Emerson Process Management – Confidential and Proprietary Document based on PMO Template: GEN-WORD, Revision 0 Clarity Enterprise Project Tool User Manual For The Project Manager Emerson Doc Number Revision A8 – 2015-Mar-16 – Page 5 of 136 8.7 Project Name Project ID What Data Converts From OWB To MSP? ............................................................ 133 Emerson Process Management – Confidential and Proprietary Document based on PMO Template: GEN-WORD, Revision 0 Clarity Enterprise Project Tool User Manual For The Project Manager Emerson Doc Number Revision A8 – 2015-Mar-16 – Page 6 of 136 1 INTRODUCTION 1.1 About Clarity Project Name Project ID Clarity is the Enterprise Projects Tool, implemented by Emerson Process Management to manage the projects and engineering business in an efficient and consistent way. Key functions in the Clarity Enterprise Projects Tool are Labour management, project planning (Work Breakdown Structure), Electronic timesheets, resource management, and scope management. The tool provides an enterprise infrastructure with a single, global database that supports harmonization of processes and structures, global resource sharing and a comprehensive view on all labour data. 1.2 Purpose of this Manual The purpose of this document is to provide a work instruction to Project Managers, Lead Engineers and Planners for the operation of the Clarity Enterprise Projects Tool. Most of the basic functionality that is available in Clarity is described in the EPT User Manual for the Project User. This functionality is not repeated here in this document. This document does not include all functions and possible options from all of the menus. This manual focuses around the Emerson processes, and therefore it only describes the most commonly used functions and those functions that are required to work with Clarity as it is implemented for Emerson. Furthermore, since the appearance of the screens can be customised and probably will be tuned and optimised regularly, the screenshots and details provided in this manual might be subject to changes. As the tool is pretty intuitive, users are expected to familiarise themselves with the general functionality and minor enhancements. If more support is required, questions can be logged through the formal support helpdesk lines. 1.3 Clarity Infrastructure Clarity V13.3 tool is an enterprise tool, installed on a number of central servers located in the St. Louis Data Centre in the USA. User can connect to these servers via the Emerson Wide Area Network. Emerson Process Management – Confidential and Proprietary Document based on PMO Template: GEN-WORD, Revision 0 Clarity Enterprise Project Tool User Manual For The Project Manager Emerson Doc Number Revision A8 – 2015-Mar-16 – Page 7 of 136 Project Name Project ID Clarity is a web-based tool, and therefore requires no client software installations on the local computer for normal project users. Ensure that the right version of Internet Explorer is installed. Minimum requirement is IE 8.0 and above. The URL for the Production system is: http://clarity.emersonprocess.com/niku/app There is also a test & training system available, so please ensure that you login to the correct system. To easily recognize the two systems, the menu bars in the test & training system have been given a different colour. Test system is Light Red, Training is GREEN and Production is BLUE The URL for the Training system is: http://claritytrn.emersonprocess.com/niku/nu The Training system can be used to check certain functionality before using it on the Production system. System administrators test new functionality or new software releases on Training system, therefore, occasionally, it might occur that the Training system is loaded with a different software version compared to the Production system. The Production server shall only be used according the documented procedures, as this is a mandatory Emerson Process Management business tool that interfaces with the Emerson JD Edwards / ORACLE business systems. 1.4 System Setup The following system set-up is only required for users that do not use a Citrix MetaFrame System: Emerson Process Management – Confidential and Proprietary Document based on PMO Template: GEN-WORD, Revision 0 Clarity Enterprise Project Tool User Manual For The Project Manager Emerson Doc Number Revision A8 – 2015-Mar-16 – Page 8 of 136 Project Name Project ID For project scheduling, the Open Workbench client software is required. For local users this needs to be installed on the local computer. The installation of Open Workbench is described in the Clarity User Set-Up - Client Software Installation document. The latest version 2.1.1 of Open Workbench can always be downloaded from the 'Account Settings' / 'Software downloads' menu in user’s Clarity login. Ask your local Clarity Champion or your local IT for assistance. 1.5 Revision History Removed from this document: PMO documentation no longer stored in the Knowledge Store. Document Manager Details removed due to release of Electronic Document Management System (EDMS) on SharePoint. Added in this document: New Side Pane Hide Feature. New Tab Layouts on Project Properties Screen. New Method of Financial Enablement. Multiple Resource Role Allocation & Assignment Enhancement. Transfer Resource Assignments Dashboard Enhancements. Risk Page Enhancements. New EET to Clarity Interface. ‘Two Tier’ Scheduling Technique in Open Workbench. 1.6 Reference Documents Clarity User Guides: This is online help content available in the Clarity Help menu. These user guides provide help user assistance to operate the various functions in Clarity. This is a context-sensitive help providing help for the situation that is associated with that state. Retrieve the latest versions of the following documents from the ‘Project Management Office’ website in the ‘ProcessWorld’ site: Clarity Enterprise Projects Tool User Manual for the Project User: This document contains the basic functions for all Clarity users. Open Workbench User Manual: This document is used in the Workbench training. Clarity User Setup - Client Software Installation: This document describes the set-up of the local computer for the correct operation of Clarity. EPT Data Dictionary: This is the definitive copy that is continually updated. The document contains all data definitions and codes that are used in the tool. 1.7 Support For access issues (e.g., password reset) or need any further help, raise issues by communicating - Emerson Process Management – Confidential and Proprietary Document based on PMO Template: GEN-WORD, Revision 0 Clarity Enterprise Project Tool User Manual For The Project Manager Emerson Doc Number Revision A8 – 2015-Mar-16 – Page 9 of 136 Project Name Project ID 1. PMO Support, by sending e-mail to [email protected] 2. ITSS Service Desk, via the web portal at http://itservicedesk.emrsn.org/webtier9.30/ess.do?lang=en or by email: [email protected] Emerson Process Management – Confidential and Proprietary Document based on PMO Template: GEN-WORD, Revision 0 Clarity Enterprise Project Tool User Manual For The Project Manager Emerson Doc Number Revision A8 – 2015-Mar-16 – Page 10 of 136 2 OVERVIEW 2.1 Data Sets 2.1.1 Global Data Project Name Project ID All common data sets in the tool are system wide data sets and used throughout the system, as well as in other systems (e.g. the Enterprise Estimating Tool). Data sets are maintained centrally and cannot be adjusted or extended by local users. All global data sets are documented in detail in the Data Dictionary. Refer to the latest version of this document available at the ProcessWorld website under the PMO PlantWeb Solutions Site under Project Management section. 2.1.2 Activity Codes (Charge Codes) Activity codes (in Clarity called 'charge codes') are used to identify the type of work performed. Refer to the Data Dictionary for the latest set of codes. It is extremely important that the activity codes are correctly used on projects, as these codes are the basis for most historical analysis of the data. These activity codes close the loop between the Estimating rules, the budgeting & planning of activities, and the actual time booked to these activities. Projects shall be populated with activity codes by the Project Manager or Planner, either by doing this manually during the development of the project schedule, or by using templates. If this is done correctly, then the individual resources can book their time to activities with predefined codes. Activities that are not populated with activity codes cannot be used for time booking. Timesheet gets automatically rejected if time is booked to such activities. The rules for these activity codes are: Each task in a plan must have an activity code if you can book hours against it (so an activity code is not required for e.g. material lead time tasks). A single task can only have one single activity code assigned. Multiple tasks can have the same activity code. 2.1.3 Product Group Codes (Applied in JD Edwards Only) In the JD Edwards financial systems each time a booking that results in a financial transaction needs to have a Product Group Code assigned. This is a financial rule within Emerson that all costs need to be associated with a Product Group Code (in Clarity called ‘WIP Class’). Therefore, all Product Group Codes from our accounting system (JDE) are mirrored to Clarity. The rules for these Product Group Codes are: Select a default Product Group Code at the project level – in the project financial properties; in Clarity this is called the 'WIP Class'. This will cause – by default – that all bookings are charged to that Product Group Code. Emerson Process Management – Confidential and Proprietary Document based on PMO Template: GEN-WORD, Revision 0 Clarity Enterprise Project Tool User Manual For The Project Manager Emerson Doc Number Revision A8 – 2015-Mar-16 – Page 11 of 136 Project Name Project ID You can overwrite this project level Product Group Code at the task level – in the project 'Tasks' tab, search for the specific task and define the specific Product Group Code for this task. Any booking to this task is now charged to this specific Product Group Code. An example of this method is a DeltaV project with some AMS related activities: the project can now be defined as a DeltaV project (project level Product Group Code) and only the AMS related tasks are configured with the AMS Product Group Code at the task level. 2.1.4 Mandatory Milestones Mandatory milestones are used to analyse project performance, which is a worldwide quality initiative (equivalent to delivery performance for products). The measurement principle is to include a series of key milestones in the project plan, then baseline the project at the start of the project and monitor the performance of the project by reviewing the variances between baseline and actual dates. The following key milestones are defined: D - Specification Approved F - FAT Start (or F1 for HW FAT start and F2 for SW FAT start) G - Delivery to Site (or G1 and G2 if HW Delivery and SW Delivery are separate) H – Site Acceptance I - Handover to IB ServiceS - Project Satisfaction Surveys S1 – Post FEED Project Satisfaction Survey S2 – Post Detailed Engineering & Design Project Satisfaction Survey S3 – Post FAT Project Satisfaction Survey S4 – Post Project Project Satisfaction Survey Functionality of F1/2 and G1/2 milestones is: If there is one FAT (combined for application software and hardware) then a single milestone with tag F shall be used. If the FAT is split into two activities, separated for software and hardware, then these shall be tagged as F1 and F2 respectively. If there are multiple, separate activities for software FAT (e.g. by area), then the first software FAT activity shall be tagged with code F1. Same rules apply for delivery milestone G. Functionality of S1, S2, S3, S4 milestones are: All projects with a Revised Order Value of $1M USD or greater should apply all of the appropriate S series mandatory milestones to ensure Satisfaction Survey compliance is achieved. All projects should have S4 applied to the schedule regardless of order value size. Project Satisfaction survey milestones can be overviewed in GPR9 report. Emerson Process Management – Confidential and Proprietary Document based on PMO Template: GEN-WORD, Revision 0 Clarity Enterprise Project Tool User Manual For The Project Manager Emerson Doc Number Revision A8 – 2015-Mar-16 – Page 12 of 136 2.1.5 Project Name Project ID Project Class (JD Edwards) The Project Class is a financial property that defines the way this project is financially processes in the system; each project class is processed differently: CUST_*PRJ: These customer projects correspond to a (box) project in our accounting system (JDE). Cost will automatically be transferred from the Clarity project to the JDE project on a weekly basis: debit to the project, credit to the home cost centre of the resource. CUST_*MRO: These projects are customer projects but do not have a corresponding (box) project in our accounting system. Cost will stay in Clarity, but can be manually transferred to JDE by local finance. NO_AVAIL This is an internal project class and is used for JDE accounting system locations. Cost will transferred from the Clarity project to the JDE project on a weekly basis. This project class will only be set up by the PMO support office COST_TX: Cost TX is used for 'projects' or 'departments' where hours booked to this type of project should result in a cost transfer between two cost centres. This cost transfer needs to be done manually by local finance. This project class shall normally only be set up by the Cost Centre owners. INTERNAL: These are internal Emerson projects. Hours booked to an internal project will create internal transactions in Clarity, but these will not cause financial transactions in JDE. These projects do not have any corresponding references in JDE. SALES: A special class to exclusively identify Sales (support) work that has to be recovered to SG&A. Financial processing is same as for COST_TX projects. NOTE: * indicates A for Asia Pacific JDE or E for EMA JDE 2.1.6 Project Class (Oracle) The Project Class is a financial property that defines the way this project is financially processes in the system; each project class is processed differently: CUS_OPRJ: These customer projects correspond to a project in the Oracle accounting system. Cost will automatically be transferred from the Clarity project to the Oracle project on a weekly basis: debit to the project, credit to the home cost centre of the resource. NO_AV_O: This is an internal project and has a corresponding project in the Oracle accounting system. Cost will automatically be transferred from the Clarity project to the Oracle project on a weekly basis. This project class will only be set up by the PMO support office. COST_OTX: Is a Cost Centre Project and is used for 'projects' or 'departments' where hours booked to this project will result in a cost transfer between two cost centres. This cost transfer needs to be done manually by local finance. This project class will only be set up by the PMO support office. INT_OOHP: This is an internal Emerson Overhead project. Work done for the resource’s home department or no work done at all. Cost will automatically be transferred from the Clarity project to the Oracle project on a weekly basis. This project class will only be set up by the PMO support office. Emerson Process Management – Confidential and Proprietary Document based on PMO Template: GEN-WORD, Revision 0 Clarity Enterprise Project Tool User Manual For The Project Manager Emerson Doc Number Revision A8 – 2015-Mar-16 – Page 13 of 136 2.1.7 Project Name Project ID SALES_O: A special class to exclusively identify Sales/Business Development work that has to be recovered to SG&A. Financial processing is same as for COST_OTX projects. This project class will only be set up by the PMO support office. Special Notes about User Diversity The Clarity tool is today used by a large user community from different areas (geographical areas, functional areas, multiple business units) within the Emerson organisation. This impacts the data structures that are in use: some series of codes are very specific for a particular user community. Note the following specific codes: Project Classes: Asia Pacific has specific project classes; CUS_APRJ and CUS_AMRO (where Europe uses classes CUS_EPRJ and CUS_EMRO). So, A = for AP and E = for EMA. Product Group Codes: The Asia Pacific JDE system uses a different set of product group codes. Therefore, the EMA or AP short code is used in the description of each code. Activity Codes: For the several user groups, separate activity codes (charge codes) are available. These codes are specifically for these groups, and not to be used by any other user groups. 2.2 Clarity and Open Workbench Project Management activities in Clarity are split over two areas: Clarity: the Clarity web-based tool controls the top-level project properties. Open Workbench: The task level properties and all scheduling aspects of a project are controlled by the Open Workbench client application. The following activities can (and should) be controlled via the Clarity web tool: Create new projects. Set all the general project properties. This includes the financial properties. Allocate resources to the project. Set financial properties on the task level (e.g. Product Group Code and Oracle Task Code). The following activities can now be done both in Open Workbench as well as through the web interface – it is up to the user preference where to do this: Assign codes at the task level Assign Mandatory Milestones at the task level Set financial properties on the task level (e.g. Oracle Task Code). The Open Workbench 2.1.1 tool is a client application that runs locally on the computer (not via the Web). The following activities are controlled via the Open Workbench tool: Assign resources to tasks Assign budgets and estimates to these resources Scheduling Emerson Process Management – Confidential and Proprietary Document based on PMO Template: GEN-WORD, Revision 0 Clarity Enterprise Project Tool User Manual For The Project Manager Emerson Doc Number Revision A8 – 2015-Mar-16 – Page 14 of 136 Project Name Project ID Define budgets over assignments in a specific timeframe. You can also access a number of general project properties from Open Workbench. However, it is recommended not to do this from Open Workbench and only change these properties using the Clarity tool. Please note that Clarity and Open Workbench sometimes use different terminology for identical parameters in the system. Refer to the vendor manuals. 2.3 Resource Planning 2.3.1 Allocations and Assignments The planning of resources to a project in Clarity can be split up in two levels: Level 1 is the allocation (booking) of resources to the project. This allocation is at the top level, it determines the duration (start and finish date), the % of the available time and the role this resource has to fulfil on the project. It also permits capture of the ‘sourced from’ location information as well as the ‘work location’ for the role / resource. This helps determine whether the resource is deputised or not. Example: Deputised System Engineer from Calgary X works on Project Y from 01-Mar-08 till 15-Jul-08 for 50% of their available time. Level 2 is the assignment of resources to particular tasks. This includes detail information per task, e.g. budgets, codes, duration's, etc. Example: System Engineer X works the first two weeks on the FDS development task, has 35 hours budget for this activity and activity code for this task is 0221. The following rules apply to these levels of planning: Level 2 Assignment cannot be done without level 1 Allocation. Allocations of named resources are set in Clarity, normally by the Resource Manager. Allocations of Generic Roles are set in Clarity by the Project Manager/Project Controls team Assignments are set in Open Workbench, normally by the Project Manager or the Planner. Once a resource has been allocated to a project (level 1) he will be able to book hours to that project. However, he has to scroll through the project list and manually add the tasks that he has worked on into his timesheet. In this case, he has no budget and no ETC information available. Provided prevent Unassigned Timesheet tasks is unchecked on the project properties. Emerson Process Management – Confidential and Proprietary Document based on PMO Template: GEN-WORD, Revision 0 Clarity Enterprise Project Tool User Manual For The Project Manager Emerson Doc Number Revision A8 – 2015-Mar-16 – Page 15 of 136 Project Name Project ID Once a resource has been assigned to a task (level 2) these tasks automatically appear on his timesheet. Budget and ETC values associated with these tasks will be shown on the timesheet. The defined allocation does not stop the Project Manager to assign this resource for more than the allocation amount of hours, although Open Workbench will highlight this as a conflict. If the project will be re-scheduled with the 'Resource Constraints' option selected, the assignment (level 2) will be limited to maximum the number of allocated (level 1) hours. In general, the variation between the allocation and the assignment is visible in both Clarity (in parameters like 'Remaining Allocation') and in Open Workbench (in parameters like 'Unused Availability'). 2.3.2 Role Based Scheduling In Clarity, you can plan resources based on named resources or based on roles, or any combination of these two resources. Named resources are individuals configured in the resource database. These have an availability based on their calendar and depending on their work on other projects. Roles are unnamed, generic resources, not linked to an individual, and with a default availability of 8 hours per day. Both named resources and roles provide the same functionality: you can allocate roles to a project, assign roles to a task and assign budgets to a role. This is specifically helpful if a project needs to be scheduled when all named resources are not yet nominated, but the schedule still has to be made. Typically, a project starts with all resources being roles (this is also the starting point from the Enterprise Estimating Tool, EET), whilst during the project execution phases all roles get replaced by named resources. This can be done by adding named resources and using the ’Transfer of Assignments’ feature in Open Workbench to reassign tasks and budgets. 2.3.3 Multiple Roles on Projects You can add the same resource role twice, and Clarity will add to each next role a sequential number between brackets to identify the unique instance of this role. So the first instance will not be numbered, and the 2nd instance will have the designator ‘(2)’ to it. See screenshot below. Emerson Process Management – Confidential and Proprietary Document based on PMO Template: GEN-WORD, Revision 0 Clarity Enterprise Project Tool User Manual For The Project Manager Emerson Doc Number Revision A8 – 2015-Mar-16 – Page 16 of 136 Project Name Project ID Each unique instance if this role can then be configured separately, e.g. the project can start with one SIS Engineer, with the 2nd SIS engineer phasing in later by giving this role a later start date; or one role can be 100% allocated to the project and the 2nd role for e.g. 50%. Also in Workbench these unique instances of these roles are available, with their individual allocations and availability: These roles can now be assigned to work packs, where it is now possible to assign a specific role to a specific activity; e.g. SIS Engineer has to work on Task 1.3.2.5.1, and will then continue on Task 1.3.2.5.3: There is no limitation to how many of the same roles can be added to a project. So this functionality will deliver great scheduling benefits, especially for the larger projects. 2.3.4 Assignment Based Scheduling Open Workbench is a scheduling tool that is fully resource driven. This has the following implications: Budgets, ETC values, etc. are always assigned to a resource (an individual or to a role). You cannot assign budgets to a task. A task that has no resource assigned cannot hold a budget. Emerson Process Management – Confidential and Proprietary Document based on PMO Template: GEN-WORD, Revision 0 Clarity Enterprise Project Tool User Manual For The Project Manager Emerson Doc Number Revision A8 – 2015-Mar-16 – Page 17 of 136 Project Name Project ID If multiple resources are assigned to a task, the budget is to be split over the two resources. Both resources have an individual budget and report individual ETC figures. In Open Workbench, this combination of a resource on a task is called an 'assignment'. Engineers book time to an assignment, and only see their own 'personal' budget on their timesheet, and not the other resources budgets on that task (if any). Important If you remove an assignment (a resource from a task), you will also remove the budget and ETC values that are associated with this assignment. You will not be able to remove assignments from a task when the resource has booked actual hours to that task. 2.3.5 Some Notes about Resources and Users In Clarity, there is a difference between a Resource and a User: A Resource (also called Staff in Clarity) is a body to plan work for. This resource is known in Open Workbench, has a set of skills, has an availability profile, a Manager and can book time to a project. A User (also called participant) is a resource that can login to the system, has a security profile (what this person is allowed to do in the system), is not known in Open Workbench, but can work on a project under the collaboration functions. Resources and Users are linked in the database: most people in Clarity are both a resource as well as a user. Exceptions are for example, Administrators, Finance and IT people who are users (that can use the system to configure data or run reports), but they are not resources. 2.3.6 BCEC Hour Bookings The Enterprise Projects Tool enables the way we work with our Best Cost Engineering Centres (BCEC's). The BCEC's participate and book time to the same project as the local organisation in a way that delivers our 'single truth' vision of project management. This has the following effects on the project: The budget is agreed based on quantity of hours calculated by the EET. If additional hours are booked on the project, this is visible, since BCEC will book all actual hours. The Project Manager has to manage this variance. Since the hourly cost is directly charged to the project, there will be no invoicing between the local project and the BCEC. The local Project Manager determines the tasks that are to be executed by the BCEC. These are identified in Clarity, at the task level. The BCEC Project Manager (and/or back office Planner) allocate their engineers to the project and assign them to the appropriate tasks using the ‘Transfer of Assignments’ feature- in Open Workbench. Emerson Process Management – Confidential and Proprietary Document based on PMO Template: GEN-WORD, Revision 0 Clarity Enterprise Project Tool User Manual For The Project Manager Emerson Doc Number Revision A8 – 2015-Mar-16 – Page 18 of 136 Project Name Project ID During project execution, the BCEC books actual hours to these tasks and report ETC values based on real progress made. The timing of the hour bookings reflects the real progress made by the BCEC enabling the local Project Manager to monitor the progress of the work. When the Project Manager approves the time booked to the project (through the pending hours report), they automatically accept the cost and approves the invoice for this work. If BCEC Engineers work in the local Contracts Engineers office or on a client site, hours will be booked to the project against the appropriate BCEC Deputation rate: there are special Input Type Codes available on the timesheet to be used for these bookings. Consequently, there will be additional expense costs per hour booked to the project for in-country work. This enables the Project Manager to forecast the total in country costs easily (based on the number of days present) and also drives towards minimising the in country content. All BCEC roles / resources should have the role sourced from and work location parameters populated on all projects as this will greatly enhance the Project Manager’s ability to effectively categorise BCEC resourcing impacts. 2.4 Interface to Emerson accounting Systems (JDE & Oracle) 2.4.1 Cost Transfer to JD Edwards Hours that are booked into Clarity are translated to cost using the following information: The hourly rate of a resource is determined by: The project role The home location The type code that was used on the timesheet for that particular booking So, the hourly rate is not linked to the individual but to the role that this resource fulfils in the project and where they are located. E.g. a German System Engineer has a different cost rate and a different currency than a Swedish System Engineer, and a Project Manager normally has a different rate than a System Engineer. If the projects where the resource books hours have a different currency than the cost rate of the resource, the cost is converted to the project currency, using the exchange rates available in the system (these are automatically updated with the exchange rates in JDE). Cost of actual hours booked to customer projects, are transferred to JDE on a weekly basis. This is an automatic process, running each Tuesday, Wednesday, and Thursday. Budgets, Estimates to Completes and Estimates at Completion do not get transferred to JDE. All cost is booked to JDE charge code J525 (level 8) to the appropriate Product Group Code. Note that there are no level 9 details available in JDE, and that JDE only holds cost information and no information related to hours. Emerson Process Management – Confidential and Proprietary Document based on PMO Template: GEN-WORD, Revision 0 Clarity Enterprise Project Tool User Manual For The Project Manager Emerson Doc Number Revision A8 – 2015-Mar-16 – Page 19 of 136 Project Name Project ID Hours booked to internal projects or to other cost centres do not get automatically transferred to JDE. Manual journals are required for cost centre recharges. Note that Asia Pacific has a different JDE system than Europe. Therefore, there are specific codes defined in the system to ensure a correct transfer of cost between Clarity and the various JDE systems. 2.4.2 Cost Transfer to Oracle Hours that are booked into Clarity are translated to cost using the following information: The hourly rate of a resource is determined by: The project role The home location The type code that was used on the timesheet for that particular booking So, the hourly rate is not linked to the individual but to the role that this resource fulfils in the project and where he is located, for example, an American System Engineer has a different cost rate and a different currency than a Canadian System Engineer, and a Project Manager normally has a different rate than a System Engineer. If the projects where the resource books hours have a different currency than the cost rate of the resource, the cost is converted to the project currency, using the exchange rates available in the system (these are automatically updated with the exchange rates in Oracle). Cost of actual hours booked to customer projects, are transferred to Oracle on a weekly basis. This is an automatic process, running weekly each Tuesday, Wednesday, and Thursday. Budgets, Estimates to Completes and Estimates at Completion do not get transferred to Oracle. All cost is booked to the appropriate Oracle Task Number. Note that there are times when the client issues new purchase orders that require independent invoicing for the additional work. In these cases the Oracle Task Number will be different than the default 01. Any tasks added to Clarity must be identified by exception in the Open Workbench or Microsoft Project tool using the ‘Oracle Task Code’ field. Hours booked in Clarity for ‘Not Available Time’, ‘General Overhead’, ‘Internal’ and ‘Sales’ projects will transact automatically to Oracle. Hours booked to other cost centre projects do not get automatically transferred to Oracle. Manual journals are required for cost centre recharges. Note that World areas that use Oracle are different than the JDE system in Europe and Asia Pacific. Therefore, there are specific codes defined in the Oracle system to ensure a correct transfer of cost between Clarity and the Oracle system. 2.5 Reports For a description of the functionality of the Clarity reports, refer to the ‘Reports Functional Documentation’ from the ‘ProcessWorld’ – ‘PPMO PlantWeb Solutions Site’- Project Management Section and navigate to the ‘Clarity User Manual for Reports’. Emerson Process Management – Confidential and Proprietary Document based on PMO Template: GEN-WORD, Revision 0 Clarity Enterprise Project Tool User Manual For The Project Manager Emerson Doc Number Revision A8 – 2015-Mar-16 – Page 20 of 136 3 Project Name Project ID CREATE AND CLOSE A PROJECT IN CLARITY Note that the property screens in Clarity can be customised to fulfil Emerson's specific needs. The screenshots in this chapter represent the system directly after the Clarity migration, but screen layout might be subject to changes. 3.1 Create a New Project Select the 'Projects' menu, and then – when the project list appears – click 'New'. Click 'Save' when all properties are correctly entered to create the project. The following information needs to be entered: % Complete Calculation Method: This field decides the method to calculate the % complete of each task and for complete project in turn. Manual - % Complete for each task has to be calculated manually and updated. Always needs to be Manual. Effort - % Complete for task is calculated automatically based on budgeted efforts and actual efforts consumed. Duration - % Complete for task is calculated automatically based on Baseline duration and actual duration since start of the task. Assignment Pool: This field decides the resource assignment rights i.e. either from Team members or from Resource Pool. It should be always Team Only Project Name: This name appears on all the project pages and project reports as the project title. It is recommended to build this name from a combination of the End user / Customer / Site / Project title. Emerson Process Management – Confidential and Proprietary Document based on PMO Template: GEN-WORD, Revision 0 Clarity Enterprise Project Tool User Manual For The Project Manager Emerson Doc Number Revision A8 – 2015-Mar-16 – Page 21 of 136 Project ID: This is the unique identifier for this project. Project Name Project ID For customer projects, this shall be the same ID as is used in the Emerson project accounting systems (JDE/Oracle). If the JDE/Oracle project number is not known yet, another reference (e.g. the PATT and/or quotation number) can be used temporarily, but the project ID needs to be set to the JDE/Oracle project number before the project financial properties are set. Internal projects do not have a corresponding project in JDE. The project ID’s for these projects are therefore free format, but the following guideline shall be used: xxiyyyyy - With xx the country code, ‘i’ for internal project and yyyyy a sequential number (e.g. 455i00001). For world areas that do not use Oracle overhead and cost centre projects will have an ID set by the PMO support office. Those areas that use the Oracle business system will have numbers generated from the Oracle business system before the PMO support office generate these projects. After project is financially enabled, Project ID cannot be modified in any condition. Project Contract Type: Select the appropriate type from the drop-down which describes the contract type for the project. This field is used to determine the proper Sales Forecasting Methodology in Clarity’s Financial Forecasting tool. Use the table from data dictionary provides good information in that table. Project Phases: This field indicate which phases are included in the project to determine the Project Satisfaction Survey requirements Industry Code: Select the appropriate Standard Industry Code from the drop-down for the project. This field helps categorise projects for overall reporting purposes. Description: Free format text field to enter some project characteristics. Project Manager: The Project Manager for this project. This is by default the person that creates this project. This person will automatically get authorisation to edit this project and also be set up as the ‘Collaboration Manager’. This project uses the PMO Configuration Standard for DeltaV (PCSD/PBL): Select from the dropdown box if this is using PCSD/PBL. This project includes SIS: Select from the dropdown box if the project contains SIS work. Start Date and Finish Date: Enter the tentative project duration. This duration is used to set the initial allocation when resources are added to the project. As soon as the project is scheduled in Open Workbench/Microsoft Project, these dates will be overwritten by the start and finish date that Open Workbench/Microsoft Project has calculated. The finish date determines periods available in Financial Forecasting Tool. Open for Time Entry: Indicate if hours can be booked to this project. You can leave this (temporary) unchecked if you do not want resource to book hours to this project (yet) and enable this function later. Prevent Unassigned Timesheet Tasks: This field if checked will not allow resources to book time on tasks which are not assigned to them. If this field is unchecked resources that are allocated to the respective project can assign any task by adding the task in to timesheet and book hours on them. Emerson Process Management – Confidential and Proprietary Document based on PMO Template: GEN-WORD, Revision 0 Clarity Enterprise Project Tool User Manual For The Project Manager Emerson Doc Number Revision A8 – 2015-Mar-16 – Page 22 of 136 Project Name Project ID ETC decrement: ETC Decrement job will reduce ETC on the same booked task only if the assignment role/role group of the Resource matches with Generic Role & if the location of the Resource matches with the Generic Role. For more information please refer Automatic ETC Decrement on Generic Role – Job Aid link available on Process world->Project Management-> Help On Time Delivery Milestone: Select which ‘event’ on the project will be measured. A selection has to be made at the start of the project. Requested Delivery Date: Enter the date that was originally requested by the customer. This date should be entered at the start of the project. Promised Delivery Date: Enter the agreed contractual delivery date. At the start of the project this is e.g. the date that is on the purchase order acknowledgement; during the project life cycle this date might have to be updated when change orders get approved. Actual Delivery Date: The true delivery date, after delivery has taken place. Different delivery dates has impact on RDSL & PDSL portlets Status: This field indicates the Capacity Planning Status for the project. By default the status is ‘Approved’, after we save the initial properties this field is editable. Change this to 'unapproved' if the project is still in the pursuit phase. Probability of Success: This field indicates the % probability of winning the project as per the sales forecast. The Probability of Success is considered for Resource Forecasting for projects having Capacity Planning Status as ‘Unapproved’. This value is used in capacity planning reports to calculate a weighted resource loading. Enterprise OBS: Browse to select the Enterprise OBS for the location from where this project is managed (who 'operationally' owns the project). This OBS parameter affects security aspects as well as operational reporting. It is not related to financial aspects. ! Important The Enterprise OBS is used in the system for reporting purpose (to e.g. define a specific group of projects that need to be included) and for security purpose (to define to what group of projects a Project Manager has write access). Not assigning or assigning incorrect/inappropriate Enterprise OBS to the project will result in not having access to the respective project. After this information is submitted, the project is created in the database. The following functionality is now available: Additional main properties can be setup for your project. Additional financial properties can be set to enable the project financials. Resources can be allocated to the project. Tasks can be created, budgets and ETC can be set and the project plan can be edited in Open Workbench. Resources can start booking hours to the project. However, these hours are not translated to cost and do not get transferred to JDE/Oracle until the project has been financially approved. New project can also be created by using ‘New from Template’ button. Only thing has to looked for is project which we are using as template must be a ‘template project’. Emerson Process Management – Confidential and Proprietary Document based on PMO Template: GEN-WORD, Revision 0 Clarity Enterprise Project Tool User Manual For The Project Manager Emerson Doc Number Revision A8 – 2015-Mar-16 – Page 23 of 136 3.2 Project Name Project ID View Properties The above entered properties can be viewed and edited later: To edit the project properties, go to the project list, search for the project (using the filter) and click on the project. The project will now open. We can filter the projects by using different field as per requirement. We can customise the columns on the Projects page in order to view the project properties in single screen without opening the project. To configure the columns click on the gear icon on the right hand top corner as highlighted in the above screenshot. The project properties page will now open – these can be viewed or modified from here if required. Emerson Process Management – Confidential and Proprietary Document based on PMO Template: GEN-WORD, Revision 0 Clarity Enterprise Project Tool User Manual For The Project Manager Emerson Doc Number Revision A8 – 2015-Mar-16 – Page 24 of 136 Project Name Project ID Additional Main properties are now available for completion. Save all edited details by clicking ‘Save’ or ‘Save & Return’. Lead/Project Engineer: Browse for the user that acts as the lead or project engineer on this project. SIS Lead Engineer: Browse for the user that acts as the SIS lead or project engineer on this project. Project should have SIS flag checked. Emerson Process Management – Confidential and Proprietary Document based on PMO Template: GEN-WORD, Revision 0 Clarity Enterprise Project Tool User Manual For The Project Manager Emerson Doc Number Revision A8 – 2015-Mar-16 – Page 25 of 136 3.3 Project Name Project ID Project Administrator: Browse for the user that does the administration for this project. Planner: Browse for the user that serves as the main front or back office planner for the project. Sales Representative: Type the name of the person that is responsible for this project from Sales prospective (this is not a browse function, as not all of the sales people are included in the Clarity user database). Safety Verification Plan Review Status: Select the appropriate status of the Safety verification plan from the drop down list. EDMS URL: A link for Project SharePoint site can be updated in this field which acts as ready reference & short cut for navigation to the site. Active: Checkbox for designating the project status. Only Active projects are considered for reports and other portlets and tool boxes. This check box can be checked/unchecked only when the project financial status is set to ‘Closed’. Earned Value Reporting – Check this box in case you need to calculate Earned Value using standard clarity reports and performance protlets. Status: This field is editable now and can be set to ‘Unapproved’ if the project is for pursuit project. Set Financial Properties The financial properties of a project include all the information that is required to convert hour bookings to cost. This cost is then moved to the Clarity transaction database and available on cost reports, and – if applicable – these costs will be transferred to the project accounting system (JDE/Oracle). ! Important The financial module contains important settings that are mandatory for the correct operation of the enterprise business tool. It is therefore essential that the financial properties be correctly configured according the guidelines in this paragraph. ! Important Before financially enabling a customer project in Clarity, first, you have to create a project in JDE/Oracle (not applicable for internal projects or countries not using JDE/Oracle job costing), since the financial module is the link between the project in Clarity and in JDE/Oracle. Make sure that the Project ID has been made identical to the JDE/Oracle project number. Once you save the changes, you can no longer change the project ID. Without a correct project ID, the data cannot be transferred to JDE/Oracle. The financial properties screen contains mandatory fields that have to be populated. Follow the guidelines as described below: Emerson Process Management – Confidential and Proprietary Document based on PMO Template: GEN-WORD, Revision 0 Clarity Enterprise Project Tool User Manual For The Project Manager Emerson Doc Number Revision A8 – 2015-Mar-16 – Page 26 of 136 Project Name Project ID Navigate to the financial properties tab. ! Note that the Project ID is not editable here! Ensure that you have the correct ID before you save the data. Press 'Save' when all properties are correctly entered. The 'Project Properties: Main - Financial' page contains a set of mandatory properties that need to be correctly set: Project ID: This shall be the JDE or Oracle project reference (or local reference if not client project). Emerson Process Management – Confidential and Proprietary Document based on PMO Template: GEN-WORD, Revision 0 Clarity Enterprise Project Tool User Manual For The Project Manager Emerson Doc Number Revision A8 – 2015-Mar-16 – Page 27 of 136 Project Name Project ID Financial Status: First enter all financial properties, only then set status to ‘Open’ to financially enable the project. If we save at this instance the Project ID is locked and cannot be edited in any case. Department: Browse for your local entity. Location: Browse for your local entity. Product Group Code: The code that is selected here is the default Product Group Code that is used if no Product Group Code has been defined at the task level. Refer to paragraph 2.1.3 for an explanation of Product Group Code functionality (JDE system Only) !Important In Clarity, each hour booking requires a product group code to create a successful transaction to JDE. Therefore, do not leave this field empty but always give a default value. ! Important In world areas that use Oracle, ensure this field has N.A. entered as a default. 3.4 Project Class: The project class determines how the financial transactions will be handled in the system. There are multiple different project classes, refer to paragraph 2.1.5 and 2.1.6 for a detailed description. Financial recovery analysis & Operational Effectiveness calculations are based on project class. Default Oracle Task Number: This is the default task number in Oracle where the labour cost gets booked to. Can be overwritten at Clarity task level or in Open Workbench. (Oracle System Only) Default Charge Code: Accept the default ‘9999: Non-Coded Activity’. There are different Charge Codes for different tasks, refer to paragraph 2.1.2 for a detailed description. Charge code can be set at task level in Clarity or in Open Workbench. Close a Project in Clarity Before a project is closed select the ‘Project Closure Check’ portlet and choose [Expand Filter]. Note – if you don’t have this tab available, you may have to personalise your page. Use the Manage My Tabs feature to create a new Tab; then configure it to apply the Project Closure Check portlet shown below. Emerson Process Management – Confidential and Proprietary Document based on PMO Template: GEN-WORD, Revision 0 Clarity Enterprise Project Tool User Manual For The Project Manager Emerson Doc Number Revision A8 – 2015-Mar-16 – Page 28 of 136 Click here to configure new tab Click ‘New’ for a new window where you can enter customised name for new tab. Click ‘Save & Continue’. Emerson Process Management – Confidential and Proprietary Document based on PMO Template: GEN-WORD, Revision 0 Project Name Project ID Clarity Enterprise Project Tool User Manual For The Project Manager Emerson Doc Number Revision A8 – 2015-Mar-16 – Page 29 of 136 Project Name Project ID Click ‘Add’ to view the available options. Enter the content you need. For example, *Project Closure * & click on filter Emerson Process Management – Confidential and Proprietary Document based on PMO Template: GEN-WORD, Revision 0 Clarity Enterprise Project Tool User Manual For The Project Manager Emerson Doc Number Revision A8 – 2015-Mar-16 – Page 30 of 136 Project Name Project ID Select the content and click ‘Add’. This will add new tab to your overview page. Click here to configure new tab You can select the project from list of projects or directly type the Project ID in the field. Click the ‘binoculars’ to launch the project selection box. The response/explanation will indicate if any project properties need to be addressed before closure is possible. Emerson Process Management – Confidential and Proprietary Document based on PMO Template: GEN-WORD, Revision 0 Clarity Enterprise Project Tool User Manual For The Project Manager Emerson Doc Number Revision A8 – 2015-Mar-16 – Page 31 of 136 Project Name Project ID Type the Project ID or Project Name Click on ‘Filter’ select the correct project by clicking on the radio button and then click on ‘Add’. On the ‘Project Closure Check’ tab click on ‘Filter’ The response will indicate if any project properties need to be addressed before closure is possible. When the explanation says ‘Project can be closed’ following steps have to be followed. Stop time entry: this is an option on the general properties page where time entry can be disabled. When the flag 'Open for Time Entry' is reset, resources are not able to book hours to the project, but the project is still available for review and scheduling. Disable the financial module: the financial module need to be disabled before the project can be made inactive. Make the project inactive: a project in Clarity cannot be deleted. If a project needs to be closed, it will be made inactive, so it will no longer appear in the overview screens and is not accessible for participants. Emerson Process Management – Confidential and Proprietary Document based on PMO Template: GEN-WORD, Revision 0 Clarity Enterprise Project Tool User Manual For The Project Manager Emerson Doc Number Revision A8 – 2015-Mar-16 – Page 32 of 136 Disable time entry for this project by unchecking this box. Emerson Process Management – Confidential and Proprietary Document based on PMO Template: GEN-WORD, Revision 0 Project Name Project ID Clarity Enterprise Project Tool User Manual For The Project Manager Emerson Doc Number Revision A8 – 2015-Mar-16 – Page 33 of 136 Project Name Project ID De-activate the financial module by changing the status to 'Closed'. To be able to close the financial module on a project, the following project conditions must be true: The project ETC must be 0 (no remaining work on the project) There are no pending timesheets with bookings for this project All transactions have been successfully posted If all these conditions are met, then the project can be closed the following day as the system runs a service to validate these conditions over night. These conditions can be checked in project closure tab. Then deactivate the project by unchecking this box. A closed project can always be reopened: An inactive project can be made active again and a closed financial module can be reopened. Emerson Process Management – Confidential and Proprietary Document based on PMO Template: GEN-WORD, Revision 0 Clarity Enterprise Project Tool User Manual For The Project Manager Emerson Doc Number Revision A8 – 2015-Mar-16 – Page 34 of 136 Project Name Project ID In the projects list filter, include the non-active projects in your search. Emerson Process Management – Confidential and Proprietary Document based on PMO Template: GEN-WORD, Revision 0 Clarity Enterprise Project Tool User Manual For The Project Manager Emerson Doc Number Revision A8 – 2015-Mar-16 – Page 35 of 136 4 WORK WITH A PROJECT IN CLARITY 4.1 Properties Tab Project Name Project ID Launch the Open Workbench client application. Add this project to the list of projects that can be directly accessed from the user's personal page (if you have added the 'My Projects' portlet on the personal page). Different tool boxes and Reports can be launched for this project from ‘Actions’ menu. Launching the project in Open Workbench will lock the project in Clarity, since current project data is 'checked out' from the database and locally used in the Open Workbench client application. On the ‘Project Properties: Main – Main Properties’ page, apart from the ‘Main Properties’ option, four more functions are available: Emerson Process Management – Confidential and Proprietary Document based on PMO Template: GEN-WORD, Revision 0 Clarity Enterprise Project Tool User Manual For The Project Manager Emerson Doc Number Revision A8 – 2015-Mar-16 – Page 36 of 136 4.1.1 Project Name Project ID Financial Refer section 3.3 Set Financial Properties. 4.1.2 Status Reporting The status page is a sub-page of the project Properties tab. It enables the Project Manager to enter status information with regards to several areas of the project. This status information is then used on the Project Status Report. Emerson Process Management – Confidential and Proprietary Document based on PMO Template: GEN-WORD, Revision 0 Clarity Enterprise Project Tool User Manual For The Project Manager Emerson Doc Number Revision A8 – 2015-Mar-16 – Page 37 of 136 Project Name Project ID General: Status Report Name: Short Name – this is displayed on list pages and reports as the Status Report identification. Enter the relevant name to the status report. ID: Enter the ID for the status report. ID is unique field and can be entered only once. After saving the status report ID gets locked and cannot be modified later. Emerson Process Management – Confidential and Proprietary Document based on PMO Template: GEN-WORD, Revision 0 Clarity Enterprise Project Tool User Manual For The Project Manager Emerson Doc Number Revision A8 – 2015-Mar-16 – Page 38 of 136 Project Name Project ID Report Date: Enter the date on which we are reporting the status of the project. Risk Ranking: A drop-down menu to select the overall project status. Choose between Hi, Medium and Low to indicate Overall Status: Depending upon the Risk Ranking, Schedule Status, Scope Status and Cost & Effort Status the Overall Project Status is decided. Overall Status is presented with Green, Yellow and Red colour to indicate Good, Average and Bad status respectively. Status Comment: Status Comment: Describe the overall project status. Schedule: Schedule Status: Select from the drop-down menu schedule status as On Track/Minor Variance/Significant Variance. Next Milestone on Track: Mark the check box if the next milestone is expected to be achieved on time. Variance Explanation: Describe the reason for variance. Scope: Scope Status: Select from the drop-down menu scope status as On Track/Minor Variance/Significant Variance. Scope Change Required: Mark the check box if scope change is required. Deliverable Scope Changed: Mark the check box if deliverable scope is changed. Project Objective Changed: Mark the check box if project objective is changed. Change Explanation: Describe the reason for change. Cost and Effort: Cost and Effort Status: Select from the drop-down menu Cost and Effort Status as On Track/Minor Variance/Significant Variance. Review Approval Problems: Mark the check box if cause of deviation in Cost and Effort is Review/Approval Problems from Customer. Staffing/Availability Issues: Mark the check box if cause of deviation in Cost and Effort is Staffing/Availability Issues from Customer. Project Affected by External Factors: Mark the check box if cause of deviation in Cost and Effort are external factors. Cost and Effort Explanation: Describe the reason for Cost and Effort Status. After filling the relevant information click ‘Save’ or ‘Save and Return’. The status indicator is converted to a coloured icon that is displayed in your projects list. Emerson Process Management – Confidential and Proprietary Document based on PMO Template: GEN-WORD, Revision 0 Clarity Enterprise Project Tool User Manual For The Project Manager Emerson Doc Number Revision A8 – 2015-Mar-16 – Page 39 of 136 4.1.3 Project Name Project ID Lessons Learned / GP Tracking Page In Lessons Learned / GP Tracking section, the Project Manager can capture and document specific events. These events may have impacted the Gross Profit of the project, either positive or negative. Select 'New' to create a new GP tracking variance. Emerson Process Management – Confidential and Proprietary Document based on PMO Template: GEN-WORD, Revision 0 Clarity Enterprise Project Tool User Manual For The Project Manager Emerson Doc Number Revision A8 – 2015-Mar-16 – Page 40 of 136 Project Name Project ID Fill in the fields as appropriate. Then ‘Save & Return’ The following information can be entered: Name: Short Name – this is displayed on list pages and reports as the GP tracking variance identification. Lessons Learned ID: The unique ID for this GP variance. ID can be entered only once. After saving the ID gets locked and cannot be modified later. Created Date: This will be default to the computer date when entered or can be edited to the desired date. Lessons Learned Category: Select the category (technology, Subcontract Content, Commercial, Project Services, Project Rework, Management/Control, External and Other) from drop-down list that caused this event. Lessons Learned Type: There are two types of lessons learned/GP tracking variance: Cause of a Variance: This lesson learned documents an event that happened on the project and that caused a GP variance to the project. Reason for Corrective Action: This lesson learned documents an action that was taken to prevent a GP variance from happening. GP tracking Cause Category: Select the appropriate category from the drop down list. Emerson Process Management – Confidential and Proprietary Document based on PMO Template: GEN-WORD, Revision 0 Clarity Enterprise Project Tool User Manual For The Project Manager Emerson Doc Number Revision A8 – 2015-Mar-16 – Page 41 of 136 Project Name Project ID GP Tracking – Cause Type: Select the appropriate cause from the drop down list. GP Variance: Type in the value of the variance (use hyphen ‘–’ if it is negative amount). Select the appropriate currency for your project. Issue or Cause Description: Enter a narrative of the description for the variance. Corrective Action: Enter a narrative of the corrective action that will be taken to mitigate further variances. Document: A file can be attached with further detail information. Here is an example of a GP tracking list: Total Value of GP Variance explained is reflected on financial dashboard of the project and it should match with the Total Estimated GP Change from Financial system (which is difference between As Sold margin and EAC margin). 4.2 The Team Tab The Team tab is used to view and add persons to the project in five different subtabs: Staff: Add Resources (either named resources or roles) to the project. This enables a named resource to book time to this project. Detail: View the resources on this project in a detailed (graphical) allocation view. Emerson Process Management – Confidential and Proprietary Document based on PMO Template: GEN-WORD, Revision 0 Clarity Enterprise Project Tool User Manual For The Project Manager Emerson Doc Number Revision A8 – 2015-Mar-16 – Page 42 of 136 4.2.1 Project Name Project ID Role Capacity: View the individual role capacity for each resource on the project. Participants: Add Users to the project to enable the user to collaborate on this project (share documents, participate in discussions, etc.). Participants Groups: A group is a sub-set from the list of project participants that you can use to easily select a number of participants by group, e.g. to give a group of people access to documents (design team, implementation team, etc.). Requisitions: This has been disabled for Emerson Staff Click on this icon to replace this person or role by another resource. Click on this icon to see all projects where this resource is working on. The following actions can be performed from this screen: Save: Remember to save the changes before going for next set of changes. Add: Add new resources to this project. A new window will open where you can search or browse for resources or roles. Resources where you have resource manager’s right can be added to the project. If you do not have Emerson Process Management – Confidential and Proprietary Document based on PMO Template: GEN-WORD, Revision 0 Clarity Enterprise Project Tool User Manual For The Project Manager Emerson Doc Number Revision A8 – 2015-Mar-16 – Page 43 of 136 Project Name Project ID sufficient access rights to the resource, you have to ask the Resource Manager to allocate the resource to the project. Notes: If you add a resource to the project, the default allocation for resource is from project start date to project finish date for 100% time. It is recommended to go into the resource properties and adjust this default to 0.01% and then set the segments for the duration resource is required on this project (see Staff Member Properties section below for more details). If the resource is already – partially – allocated to other projects, then the system will ask if all their time or only their remaining available time needs to be allocating. Selecting all of their time will cause this resource to become over-allocated. IMPORTANT: If you select ‘Remaining Time’ this will cause ‘segmentation’ for the remaining availability of this resource and can cause schedule anomalies. Add/Update by OBS: In case we want to allocate all the resources from specific resource OBS we can do so at a time rather than adding each resource separately. While adding large number of resources at a time we can also set properties like, Allocation Start and Finish Date, Default Allocation % and create allocation segments. Remove: Remove the resource from the project. If you remove the resource, you will also remove any budget associated with this resource. You cannot remove resources those have booked actual hours to the project; however, if you do try to remove such resource; the resource remains in the staff list and is no longer able to book time to this project. We have additional Actions on the right hand top corner. Allocate from Estimates: While creating schedule the estimated hours are distributed depending upon availability of the resource, start and finish date of the task and loading pattern. This utility will help to create segments as per the Estimates for particular period. Where there is no ETC for the period the segment with default allocation is created. Allocations are rounded to nearest 10% Set Allocation: This utility helps to modify different properties for single or multiple resources at a time. Emerson Process Management – Confidential and Proprietary Document based on PMO Template: GEN-WORD, Revision 0 Clarity Enterprise Project Tool User Manual For The Project Manager Emerson Doc Number Revision A8 – 2015-Mar-16 – Page 44 of 136 Project Name Project ID Shift Allocations: With this function, the allocated hours – or a part of the allocated hours – can be shifted to a later date, e.g. because the project is delayed Assignment Roles: With this function we can shift the task assignments from generic roles to the name resources. Replace (the monocular icon): This function is especially helpful when an unnamed resource (Role) has to be replaced by a named resource. The resource finder function will be launched, that allows the user to search for a specific resource based on name, role, availability, skill, location, etc. When a resource or role is replaced by another resource, all the assignments (level 2) with the associated budgets, ETC's etc. (not the actuals!) will also be relocated to this new resource. Click on the name of the resource to modify properties. You can change or tune the allocation of a resource on this project by clicking on the resource's name. The following screen will then appear: Emerson Process Management – Confidential and Proprietary Document based on PMO Template: GEN-WORD, Revision 0 Clarity Enterprise Project Tool User Manual For The Project Manager Emerson Doc Number Revision A8 – 2015-Mar-16 – Page 45 of 136 Project Name Project ID The following allocation details can be defined: Project Role: A resource can have a specific project role, other than primary role. By default this field is same as primary role of the resource. Please note that if the project role is other than the primary role the rate for this resource will be as per the project role for this project. Default % Allocation: This is the default allocation for each segment. It will be set at 100% by default. If there is only one segment, this field can be updated accordingly. When you specify a date range you will be prompted to enter a % allocation for that period and for periods other than this range % allocation will be set at the default % allocation. (In the above example you will see that this resource has been allocated to two specific dated periods other than 100%. The remaining time is at 100% indicating this resource can be available for other projects during these periods. IMPORTANT: While allocating a resource to any project, be aware that the default allocation will be 100% for the WHOLE Project duration unless specified. Open for Time Entry: Un-checking this field will restrict the resource from time booking on the project. Allocation Start and Finish Dates: When you add a resource, the resource is by default allocated for the full project duration. You can overwrite these here by realistic start and finish dates. Role Sourced From: Browse and select the appropriate location for where the role or resource will be sourced for the project. If the role is sourced locally (i.e. same as Financial Location) keep this field blank. Work Location: This field should be used to indicate if the role or resource will work from home location (Normal) or travel to the project or customer location (on Deputation). Allocation: This is the average allocation percentage over all segments, calculated for the full duration of the allocation. This field only displays if there are multiple segments configured. Emerson Process Management – Confidential and Proprietary Document based on PMO Template: GEN-WORD, Revision 0 Clarity Enterprise Project Tool User Manual For The Project Manager Emerson Doc Number Revision A8 – 2015-Mar-16 – Page 46 of 136 Project Name Project ID Since the allocation of a resource is not necessarily equally spread over the duration of a project, allocation segments can be created. A segment is a time period with a specific allocation percentage for that time period. See the example below: Another example of segmented allocation. To create a segment, enter the start date, the end date and the % allocation of that new segment in the lower line, and then press 'Save'. A new segment is created, and also a new empty line is added at the bottom to be able create the next segment. ! Important Remember to save the changes before going for next set of changes or simply use ‘Save & Return’. 4.2.2 Detail On the detail sub-tab you can view the weekly allocation of the resources on the project in a stacked bar chart. This view can also be edited to show tabular information. For more details contact the Project Office. Emerson Process Management – Confidential and Proprietary Document based on PMO Template: GEN-WORD, Revision 0 Clarity Enterprise Project Tool User Manual For The Project Manager Emerson Doc Number Revision A8 – 2015-Mar-16 – Page 47 of 136 4.2.3 Project Name Project ID Role Capacity On the role capacity sub-tab you can view the monthly allocation of the resource roles being used on the project. This view can also be edited to show tabular information. For more details contact the Project Office. Emerson Process Management – Confidential and Proprietary Document based on PMO Template: GEN-WORD, Revision 0 Clarity Enterprise Project Tool User Manual For The Project Manager Emerson Doc Number Revision A8 – 2015-Mar-16 – Page 48 of 136 4.2.4 Project Name Project ID Participants On the participants sub-tab you can add the Users that can collaborate on the project. These are the people that have access to documents, discussions and workflows, etc. This icon indicates that this person is the collaboration manager. The collaboration manager can add new participants to the team, and has more rights in the collaboration functions. The following actions can be performed from this screen: Add: Add new participants (users) to this project. Remove: Delete the selected participants. These users will lose their rights to access the collaboration functions on this project. Make Collaboration Manager: Make the selected participant a collaboration manager. There can be more than 1 collaboration manager on each project. Make Participant: Make the selected collaboration manager a 'normal' participant: this user will lose the specific rights associated with a collaboration manager. Add Staff: With the 'Add Staff' option, you can easily select all resources that have been allocated to the project as staff members (see previous paragraph) and add these as participants. 4.2.5 Participants Groups A group is a sub-set from the list of project participants that you can use to easily select a number of participants by group, e.g. to give a group of people access to documents (design team, implementation team, etc.). Emerson Process Management – Confidential and Proprietary Document based on PMO Template: GEN-WORD, Revision 0 Clarity Enterprise Project Tool User Manual For The Project Manager Emerson Doc Number Revision A8 – 2015-Mar-16 – Page 49 of 136 Emerson Process Management – Confidential and Proprietary Document based on PMO Template: GEN-WORD, Revision 0 Project Name Project ID Clarity Enterprise Project Tool User Manual For The Project Manager Emerson Doc Number Revision A8 – 2015-Mar-16 – Page 50 of 136 4.3 Project Name Project ID Tasks Tab In the Clarity web environment, all detailed project tasks, milestones and assignments can be viewed and properties can be configured. New tasks can also be created from here, but it is not recommended since there is only a limited set of data fields available for configuration. Configuration of tasks and milestones can best be done using Open Workbench. 4.3.1 Task List 4.3.1.1 Creating Tasks New task can be created by clicking on ‘New’ button. Another window will open, where in we have to maintain the different properties of the task. Likewise all tasks can be created one by one. Other option to copy tasks from template or some other project. To copy task option is under the ‘Action’ button on left hand side top section. Emerson Process Management – Confidential and Proprietary Document based on PMO Template: GEN-WORD, Revision 0 Clarity Enterprise Project Tool User Manual For The Project Manager Emerson Doc Number Revision A8 – 2015-Mar-16 – Page 51 of 136 4.3.1.2 Project Name Project ID Viewing Tasks Tasks can be viewed either in a flat list and can be filtered on different parameters. Click on the task name to edit the properties. Task properties can be edited on this page itself without entering in details of each task Emerson Process Management – Confidential and Proprietary Document based on PMO Template: GEN-WORD, Revision 0 Clarity Enterprise Project Tool User Manual For The Project Manager Emerson Doc Number Revision A8 – 2015-Mar-16 – Page 52 of 136 Project Name Project ID The JDE Product Group Code has to be edited from this page. The Oracle Task Code can be entered either here or in Open Workbench if different than the default of 01 name to edit Click resource the assignment properties (ETC). 4.3.2 Gantt (Work Breakdown Structure as per Previous Version) In the sub - option ‘Gantt’ a new window opens with the scheduling facility within the Clarity. We can perform most of the activities we do in any other scheduling tool. Emerson Process Management – Confidential and Proprietary Document based on PMO Template: GEN-WORD, Revision 0 Clarity Enterprise Project Tool User Manual For The Project Manager Emerson Doc Number Revision A8 – 2015-Mar-16 – Page 53 of 136 Similarly, Gantt can be opened using scheduler option: Emerson Process Management – Confidential and Proprietary Document based on PMO Template: GEN-WORD, Revision 0 Project Name Project ID Clarity Enterprise Project Tool User Manual For The Project Manager Emerson Doc Number Revision A8 – 2015-Mar-16 – Page 54 of 136 4.3.3 Project Name Project ID Resource Utilisation On the Resource Utilisation sub-tab you can view all activities and the total effort expended once the project is underway and baseline has been set. 4.3.4 Assignments On the Assignments sub-tab you can view all activities and the assigned resources to the tasks. By using the filter at the top of the screen you can drill down into finer resource assignment detail. Emerson Process Management – Confidential and Proprietary Document based on PMO Template: GEN-WORD, Revision 0 Clarity Enterprise Project Tool User Manual For The Project Manager Emerson Doc Number Revision A8 – 2015-Mar-16 – Page 55 of 136 4.4 Project Name Project ID Risks / Issues / Changes Tab Clarity supports PMI compliant risk management menus. The process of risk management is depicted below: Emerson Process Management – Confidential and Proprietary Document based on PMO Template: GEN-WORD, Revision 0 Clarity Enterprise Project Tool User Manual For The Project Manager Emerson Doc Number Revision A8 – 2015-Mar-16 – Page 56 of 136 Project Name Project ID If a risk is identified, then this risk can either be accepted (no action) or be mitigated. Mitigation will require actions to be taken, and therefore normally causes a change to the project (new or changed project tasks). If an accepted risk becomes true (mathematically as the probability raised to 100%), then this will also result in a project change. In Clarity, you can define risks; these risks can be converted into issues if it turned out that the risks became true, and issues can be converted to project changes. Clarity retains all the references and links between the issue and the originating risk, and between original risks and any residual risks. Multiple responses / actions can be defined for each individual risk. Refer to the PMI PMBoK® Guide for the explanations of risk response strategies and other definitions. We have simplified the pages by removing some of the risk attributes that were seldom used. Risks have now also been implemented in the Enterprise Estimating Tool (EET version 5.3.1 to support the risk assessment in the proposal phase. With the release of the interface between EET and Clarity we are now able to download a project from EET directly into Clarity, the risk data is aligned in Clarity with the risk data from the EET. Both the EET and Clarity risk pages are now fully aligned with the risk management process as defined in the PMO PlantWeb Solutions Site. You are therefore encouraged to visit the PMO PlantWeb Solutions Site to review the risk management process in conjunction with the new Clarity risk pages. Especially the Qualitative Risk Analysis page with PxI table will help to understand the concept (see screenshot below: go to Project Management / Project Planning / Risk Planning / Quantitative Risk Analysis). Emerson Process Management – Confidential and Proprietary Document based on PMO Template: GEN-WORD, Revision 0 Clarity Enterprise Project Tool User Manual For The Project Manager Emerson Doc Number Revision A8 – 2015-Mar-16 – Page 57 of 136 Project Name Project ID The layout of the pages is aligned with the PMI risk management steps. The results of the risk response planning are now included in that same risk. The earlier format required the user to create a new (associated) risk; or to overwrite the original probability and impact ratings with the new probability and impact that are the result of the response planning. Additional risk attributes have been added to capture this information, and some attributes are renamed: In the section Qualitative Analysis the user has to enter the Probability and Impact for this risk. These attributes are now renamed to ‘Initial Probability’ and ‘Initial Impact’ – as these are the values before a risk response plan is defined. Emerson Process Management – Confidential and Proprietary Document based on PMO Template: GEN-WORD, Revision 0 Clarity Enterprise Project Tool User Manual For The Project Manager Emerson Doc Number Revision A8 – 2015-Mar-16 – Page 58 of 136 Project Name Project ID The same is applicable for the Quantitative Analysis section, where the Cost Impact has been renamed to ‘Initial Cost Impact’. In the section Risk Response Planning the strategy can be defined, and as a result of that strategy the Probability or Cost Impact of the risk can change. So you can now enter the new, ‘Residual Probability’ and ‘Residual Cost Impact’; and calculate the resulting residual weighted cost. With all that information available, you can now decide if the response plan will be implemented, and – as a result of this – add the cost for the implementation of this plan (mitigation cost) and determine a final value for the Risk Allowance that you want to add to the project EAC costs. Risk Probability and Impact Levels: We have introduced a scale for the probability and impact levels; there are 5 levels. Furthermore, quantitative percentage values are added to the qualitative classification to give more guidance with the selection. Note that these quantitative levels follow a non-linear scale as historical analysis has proven that most of our risks are in the lower scale (which is good!) so we provide more points in this low end of the scale. Again: these are now fully in line with the PMO risk management process. The qualitative analysis is an activity to prioritise the risks, and to determine which of these risks will need further analysis and response planning. Each risk that is found applicable to this project in the risk identification activity shall therefore be qualified with regards to probability and impact. The result of the qualitative risk analysis step will be a score (calculated as Probability x Impact) for each risk. Probability and Impact scales run from Very Low to Very High, resulting in a risk score between 0-49; according to the PxI matrix below: Using pre-defined thresholds, the risks can then be divided into three categories: Low score: These risks needs to be included on a ‘watch list’ but do not require further analysis. Medium score: These risks need to be brought forward to the next steps of the risk management process. High score: These risks also need to be brought forward to the next steps of the risk management process, but these do require a response plan such that the result will be that the risk score of this risks is reduced to either medium or low. So at the end of the risk planning process, there should not be any risks left in the high category Emerson Process Management – Confidential and Proprietary Document based on PMO Template: GEN-WORD, Revision 0 Clarity Enterprise Project Tool User Manual For The Project Manager Emerson Doc Number Revision A8 – 2015-Mar-16 – Page 59 of 136 Project Name Project ID Summary of Risk Attribute Changes: The table below shows an overview of all the risk attributes where changes have been implemented for the new pages since the last upgrade: Risk Attribute Old Risk Pages New Risk Pages Risk Priority In risk definition section Deleted – as it had no functional purpose Associated Risks In risk identification section Deleted Associated Issues In risk identification section Deleted Probability In qualitative analysis section Renamed to ‘Initial Probability’ Impact In qualitative analysis section Renamed to ‘Initial Impact’ Cost Impact In quantitative analysis section Renamed to ‘Initial Cost Impact’ Residual Probability - New Residual Cost Impact - New Residual Weighted Cost - New Residual Risks In risk response planning section Deleted Mitigation Cost In quantitative analysis section Risk Allowance In quantitative analysis section Moved to response planning section, but value still available after migration Table 1 Summary of Risk Attribute changes Impact on Existing Risks As a result of these enhancements we will have to make some changes to the risk data and we have to ‘migrate’ the existing risks to the new structure. The most important data is transferred and still available, but some of the supporting data might have moved to other fields or might not be in use anymore. However, the most important field, the field ‘Risk Allowance’ that is used on the Project Dashboard to show the total project risk allowance (and that drives the risk stoplight) is not changed. The main page with the list of identified risks. Click 'New' to create a new risk, or click the name to edit an existing risk. When a new risk is created, the properties are grouped according to the processes in the PMBoK® Guide. The following properties are available: Emerson Process Management – Confidential and Proprietary Document based on PMO Template: GEN-WORD, Revision 0 Clarity Enterprise Project Tool User Manual For The Project Manager Emerson Doc Number Revision A8 – 2015-Mar-16 – Page 60 of 136 Project Name Project ID Risk Identification: Risk Name: Short Name – this is displayed on list pages and reports as the short risk identification. Risk ID: Unique ID for this risk. After saving ID gets locked and cannot be edited. Risk Description: Free format text field to describe the risk. Impact Description: Describe what will happen if the risk becomes an issue. Impact Date: When will the risk have an impact on the project? Risk Class: Select the appropriate risk class from the list; Business, Project, Commercial or Technical. Emerson Process Management – Confidential and Proprietary Document based on PMO Template: GEN-WORD, Revision 0 Clarity Enterprise Project Tool User Manual For The Project Manager Emerson Doc Number Revision A8 – 2015-Mar-16 – Page 61 of 136 Project Name Project ID Priority: Select the appropriate priority level from the list; Low, Medium or High. Assumptions: Document what assumptions have been taken when this risk was defined. Qualitative Risk Analysis: Initial Probability: The likelihood that this risk will occur. Available values are; 1 – Very Low (10%) 2 – Low (20%) 3 – Medium (30%) 5 – High (50%) 7 – Very High (70%) Initial Impact: The impact of this risk on the project when it becomes an issue. Available values are: 1 – Very Low (10%) 2 – Low (20%) 3 – Medium (30%) 5 – High (50%) 7 – Very High (70%) Calculated Risk: This is calculated as Probability x Impact, and therefore this attribute will always have a value between 1 and 49. Is Above Threshold: The risk threshold is defined at company level and has been set to 6, meaning that if the calculated risk > 6, this requires a quantitative analysis and response plan. Quantitative Risk Analysis: Initial Cost Impact: What is the impact to the project costs if this risk becomes an issue. Initial Weighted Cost: What is the weighted cost (is cost impact multiplied with the probability of the risk, where the above probability has to be converted to a detailed % value). Risk Response Planning: Response Strategy: What will be done with this risk? Select from the drop down list; Watch, Avoid, Transfer, Mitigate or Accept. Risk Response: Free format text field to describe the risk response strategy. Response (Mitigation) Cost: What would be the cost if this risk would be mitigated? Residual Probability: If this risk is mitigated, what is the probability of the risk remaining? Available values are: 1 – Very Low (10%) 2 – Low (20%) 3 – Medium (30%) 5 – High (50%) 7 – Very High (70%) Emerson Process Management – Confidential and Proprietary Document based on PMO Template: GEN-WORD, Revision 0 Clarity Enterprise Project Tool User Manual For The Project Manager Emerson Doc Number Revision A8 – 2015-Mar-16 – Page 62 of 136 Project Name Project ID Residual Cost Impact: What is the impact to the project costs if this residual risk becomes an issue. Owner: Who owns the risk and is responsible for monitoring the symptoms. This is by default the user that creates this risk, normally the Project Manager. Risk Symptoms: Describe how the risk can be 'detected'. Target Response Date: The date that a resolution for this risk needs to be defined. This date has to be prior to the Impact Date (take action before the risk becomes an issue on the project). Status: Define the status in the 'life cycle' of the risk. Select from; Open, Work In Progress, Resolved or Closed. Residual Weighted Cost: What is the weighted cost (is cost impact multiplied with the probability of the risk, where the residual cost impact probability has to be converted to a detailed % value). Risk Allowance: The cost to be presented on the project dashboard (this will be added to other risk allowances and the total will be visible on the project dashboard as the ‘Risk Allowance from Clarity’) Risk Allowance Category: Select from; Hourly Service, Emerson, Buyouts and Subcontractors or Expenses. Attachments: Document: a document can be attached to this risk for further documentation. There is a separate Response Strategy page – for this specific risk – where multiple actions can be defined – as part of the response plan – and be assigned to individuals. This stoplight is also shown on the project main dashboard page. Emerson Process Management – Confidential and Proprietary Document based on PMO Template: GEN-WORD, Revision 0 Clarity Enterprise Project Tool User Manual For The Project Manager Emerson Doc Number Revision A8 – 2015-Mar-16 – Page 63 of 136 4.5 Project Name Project ID Dashboard Tab In Clarity, each and every project is provided with a standard project dashboard page. This dashboard page shows a number of portlets with a mix of labour and performance information, and financial project data. Although the Oracle portlets and the JDE portlets are almost identical, there are some minor differences in availability of data, and the data has to be sourced from a different business system. Therefore, separate portlets are available for these. Oracle and JDE data is available on individual dashboard pages of each project. Dashboard information is split over multiple pages. The current dashboard page only shows Clarity related data that is identical to all projects. From this main dashboard page, the user can navigate to additional dashboard pages with business system specific information. These pages are provided with the logic to ensure that the correct financial data for that project is shown. More information is included in the dashboard that is currently spread over various areas in the tool (e.g. risk information, lessons learned, project status, bank account, S-Curve). Asia Pacific JDE Users: We do not have a financial interface to the JDE system in Asia Pacific, so unfortunately our users in AP do not have financial data on their dashboards – and also the stoplights that are based on financial data do not work. See the schematic overview of the main dashboard page and the four additional pages available through the links. Emerson Process Management – Confidential and Proprietary Document based on PMO Template: GEN-WORD, Revision 0 Clarity Enterprise Project Tool User Manual For The Project Manager Emerson Doc Number Revision A8 – 2015-Mar-16 – Page 64 of 136 Financials Page(s) Labour Overview Page Main Dashboard Page Program Performance Page Project Satisfaction Survey Page Financial Task Details Change order Emerson Process Management – Confidential and Proprietary Document based on PMO Template: GEN-WORD, Revision 0 Project Name Project ID Clarity Enterprise Project Tool User Manual For The Project Manager Emerson Doc Number Revision A8 – 2015-Mar-16 – Page 65 of 136 4.5.1 Main Dashboard Page The following portlets are available on the Main Dashboard page: Emerson Process Management – Confidential and Proprietary Document based on PMO Template: GEN-WORD, Revision 0 Project Name Project ID Clarity Enterprise Project Tool User Manual For The Project Manager Emerson Doc Number Revision A8 – 2015-Mar-16 – Page 66 of 136 4.5.2 Project Name Project ID Navigation Links: at the top of each dashboard page a small banner is shown with links to the additional dashboard pages. Use these links to navigate between the different dashboard pages. Note: Project Key Information: a general information window showing e.g. project name and ID at the left, and a number of project stoplights at the right. Project Status: a ‘copy’ of the project status information as it is entered on the project properties page. Only last 3 status reports are displayed on the dashboard Project Schedule Performance: the performance on a number of mandatory milestones that can be defined in the project schedule. Financials Dashboard Page The financial dashboard page shows all key financial data from the project. This data is sourced daily from the Oracle or JDE business system – Clarity is only used as a portal to display this information to the user. Note that – although Clarity is a labour Emerson Process Management – Confidential and Proprietary Document based on PMO Template: GEN-WORD, Revision 0 Clarity Enterprise Project Tool User Manual For The Project Manager Emerson Doc Number Revision A8 – 2015-Mar-16 – Page 67 of 136 Project Name Project ID management tool – the data on these pages represent the total project financials and include labour as well as materials and expenses etc. The following portlets are available on the Financials dashboard page: Navigation Links: at the top of each dashboard page a small banner is shown with links to the other dashboard pages. Project Information: a general information window showing e.g. project name and ID at the left, and a number of financial stoplights at the right. Project Financial Graph: a historical trend that shows order, cost and profit data per financial period. The budgeted amounts reflect the baselined value at the end of the fiscal period while the actual cost is the cumulative amount at the end of the fiscal period. The information in the graph can be validated using the ‘Financial’ tab in Oracle (Revised Cost Budget, EAC Cost, Revised Order Value, and EAC GP). Actual Cost information can be validated using the Oracle Expenditure Inquiry. Order Status: This portlet displays Order Value, Cost Budget, and Budgeted GP information summarized by the project’s financial plan type. The majority of information contained on this portlet can be validated using the Oracle Financial Tab. Both Change Order Value and Forecasted Total Value are calculated fields. Emerson Process Management – Confidential and Proprietary Document based on PMO Template: GEN-WORD, Revision 0 Clarity Enterprise Project Tool User Manual For The Project Manager Emerson Doc Number Revision A8 – 2015-Mar-16 – Page 68 of 136 Project Name Project ID Change Order Value = Revised Order Value – As Sold Value in Oracle o Forecasted Total Value = Revised Order Value + Forecasted Change Order Value The ‘As Sold from EET’ budgets are captured when the EET to Clarity interface is run. These fields are populated with the final sell and cost values from the EET proposal. A stoplight ‘As Sold Values out of sync’ shows red if the As Sold values from EET are different than the As Sold values entered in Oracle or JDE. For Oracle, the ‘Approved Order Value’ is a field that is unique to Oracle and does not have an equivalent in JDE. A stoplight ‘Approved/Revised Order Value out of sync’ has been added to show red if the Approved Order Value differs from the Revised Order Value. The Approved & Revised order value will always be out of sync for a project that has revalued the order value for fluctuations in currency. This occurs on projects that are run in a project currency different from the functional currency of the location. The values displayed in this portlet are based on the functional currency of the location. o Revenue Status: This portlet summarizes sales, invoicing, and profitability information about your project. The EAC GP is based on the Revised Order Value (not including forecasted change orders) and the EAC Cost. So the EAC cost should not include costs for forecasted change orders! The Sales Status information can be validated using Oracle Project Status Inquiry The Invoice Status information can be validated using Oracle Invoice Review Emerson Process Management – Confidential and Proprietary Document based on PMO Template: GEN-WORD, Revision 0 Clarity Enterprise Project Tool User Manual For The Project Manager Emerson Doc Number Revision A8 – 2015-Mar-16 – Page 69 of 136 Project Name Project ID Cost Status: This portlet summarizes the cost measures for the project. Information in this portlet can be validated using the combination of Oracle Project Status Inquiry, Invoice Review, and Financial Tab. ‘EAC Cost Index’ is shown a cost performance index for the project. It is calculated as EAC Cost / Revised Cost Budget. Emerson Process Management – Confidential and Proprietary Document based on PMO Template: GEN-WORD, Revision 0 Clarity Enterprise Project Tool User Manual For The Project Manager Emerson Doc Number Revision A8 – 2015-Mar-16 – Page 70 of 136 Project Name Project ID Adding the Product Business Unit filter (JDE Portlets only) On request of many users, we have implemented a Product Business Unit filter on the JDE Financial Status portlet and the JDE Cost Detail portlet. By selecting a Product Business Unit, the portlet will show all Product Group Codes for that Business Unit only: Also the sum at the bottom of the portlet does show the Business Unit total only – so this information can nicely be used for the financial reporting to the individual Business Units. Project Cost Detail (JDE EMA only – this information is not yet available for Oracle projects): This portlet shows the project cost information broken down at the lowest level. For JDE this is broken down by Product Group Code and Cost Code (J-Code): Emerson Process Management – Confidential and Proprietary Document based on PMO Template: GEN-WORD, Revision 0 Clarity Enterprise Project Tool User Manual For The Project Manager Emerson Doc Number Revision A8 – 2015-Mar-16 – Page 71 of 136 Project Name Project ID Project Cash Flow: an historical trend that shows the receipts, customer payments and cash flow on the project. Cost is based on the cost paid for the items. Information can be validated using Oracle Expenditure Inquiry and linkages to AP inside the form. Hourly Service is assumed to be paid in the month it occurs. Emerson product from inventory (including items ordered using PR Order Type) is assumed to be paid in the month the parts are fulfilled and shipped. Items paid through Accounts Payable (Supplier Invoices and Expense Reports) are assumed to be paid based on AP check date. Customer Payments is based on the paid date applied by CFS. Information can be validated using EMR Project Invoicing Report. Balance is calculation of cash flow balance expressed as the Customer Payments less Cost. Project Invoicing: This portlet shows all invoices to the customer that are raised on the project, with their status (CL=Closed, OP=Open). Invoice type can be INV (Invoice) or CM (Credit Note) for Oracle; or SI (Invoice) for JDE. Emerson Process Management – Confidential and Proprietary Document based on PMO Template: GEN-WORD, Revision 0 Clarity Enterprise Project Tool User Manual For The Project Manager Emerson Doc Number Revision A8 – 2015-Mar-16 – Page 72 of 136 4.5.3 Project Name Project ID Labour Overview Dashboard Page The following portlets are available on the Labour Overview dashboard page: Navigation Links: at the top of each dashboard page a small banner is shown with links to the other dashboard pages. Project Information: a general information window showing e.g. project name and ID. Labour Hours Analysis: A categorised labour overview for all project hours. This portlet displays labour broken down by the type of resource that executed the work (e.g. where the resource was sourced from). This can be the local centre, other engineering centres or any of our BCEC locations. These are all broken down per location, and also the number of deputation hours are shown separately. Emerson Process Management – Confidential and Proprietary Document based on PMO Template: GEN-WORD, Revision 0 Clarity Enterprise Project Tool User Manual For The Project Manager Emerson Doc Number Revision A8 – 2015-Mar-16 – Page 73 of 136 4.5.4 Project Name Project ID Labour Cost Analysis (including BCEC deputation charges): A labour cost summary of all project hours in terms of cost. This information helps the project manager to easily calculate the EAC costs based on the planned hours. Project Activity Overview: An overview of all hours broken down by activity code (type of work). The break down is at level 3; that is grouped by e.g. Project Control activities, PAS Software Engineering or Hardware Engineering activities, Site activities, etc. Project Performance Dashboard Page The following portlets are available on the Project Performance dashboard page: Navigation Links: at the top of each dashboard page a small banner is shown with links to the other dashboard pages. Project Information: a general information window showing e.g. project name and ID. Lessons Learned / GP Tracking: a ‘copy’ of the project Lessons Learned / GP Tracking information as it is entered on the project properties page. Project Risks: a ‘copy’ of the project Risk summary information as it is entered on the project risk pages. Emerson Process Management – Confidential and Proprietary Document based on PMO Template: GEN-WORD, Revision 0 Clarity Enterprise Project Tool User Manual For The Project Manager Emerson Doc Number Revision A8 – 2015-Mar-16 – Page 74 of 136 4.5.5 Project Name Project ID S-Curve: an historical view that shows planned work (budget) versus actual work. Project Hour Overview Graph: a historical hour summary that shows project actuals vs planned hours in compare graphical format. In addition, the portlet plots % cumulative lines for the respective work amounts. Project Satisfaction Survey Page The following portlets are available on the Project Satisfaction Survey dashboard page: Emerson Process Management – Confidential and Proprietary Document based on PMO Template: GEN-WORD, Revision 0 Clarity Enterprise Project Tool User Manual For The Project Manager Emerson Doc Number Revision A8 – 2015-Mar-16 – Page 75 of 136 Project Name Project ID Navigation Links: at the top of each dashboard page a small banner is shown with links to the other dashboard pages. The Project Satisfaction Survey link is adjacent to the “Product Performance Page”. Simply click on the link below the “Project Satisfaction Survey” tab to reveal survey results. Project Satisfaction Survey Filter: a drop down filter with the filter criteria related to the survey phase. The filter criteria are; Post FEED, Post DE&D, Post FAT and Post Project. By applying these filters the relevant customer feedback will be displayed. If we do not have any feedback related to a phase the portlets below the filter drop down will be empty. Project Satisfaction Survey – Project Details: This gives details of Project and it is applicable surveys. Project Satisfaction Survey: displays the numerical scores and some statistical information for each respondent of the project phase selected via the filter. A paraphrase of the question is listed and up to five columns of scores are displayed (one for each respondent). The row average and standard deviation are listed with a red indicator displaying for standard deviations >1.5 (indicating a wider range of opinions, possibly needing further investigation). The column Average and standard deviation provides a comparison among respondents. The Target score is the “goal” and is dynamically created for each location based on their respective scoring history for the previous fiscal year. Verbal Feedback: displays the verbal comments provided by each respondent for each question. The first row highlighted in yellow contains the question id number and question text. Below the yellow highlighted row are the corresponding responses to that question. You can tie the scores for a given respondent and their verbal responses together with the “response #” label. If we are not given permission by the customer to release their name, the name will be omitted but the text provided will be displayed. Emerson Process Management – Confidential and Proprietary Document based on PMO Template: GEN-WORD, Revision 0 Clarity Enterprise Project Tool User Manual For The Project Manager Emerson Doc Number Revision A8 – 2015-Mar-16 – Page 76 of 136 4.5.6 Project Name Project ID Project Common Survey: for trending purposes, a graphical bar chart displays the common question average scores by phase for each project. (First half of common questions is displayed). Some questions are asked in several phases of the project and the bar chart calculates the average score for each common question for a given project. All customer responses for each common question are included and the results displayed in a bar chart. The bar charts are coloured differently for each phase. Place the mouse pointer over a bar to see the score as a value displayed below the chart. Project Common Survey II: for trending purposes, a graphical bar chart displays the common question average scores by phase for each project. (Second half of common questions is displayed). Stoplights Many of the Dashboard pages and portlets contain what Clarity calls a ‘stoplight’ indicator. It is really a colour coded icon to help assess various project conditions for quick review. There are several Show Stoplight Help portlets available on the various Emerson Process Management – Confidential and Proprietary Document based on PMO Template: GEN-WORD, Revision 0 Clarity Enterprise Project Tool User Manual For The Project Manager Emerson Doc Number Revision A8 – 2015-Mar-16 – Page 77 of 136 Project Name Project ID Clarity pages which provide additional details and explain the rules and colours governing them. Use help to know meaning of different colour codes by clicking on Actions-> Learn more about this page Overall Project Status: This is a user entered stoplight that is taken from the Project Status properties page. Emerson Process Management – Confidential and Proprietary Document based on PMO Template: GEN-WORD, Revision 0 Clarity Enterprise Project Tool User Manual For The Project Manager Emerson Doc Number Revision A8 – 2015-Mar-16 – Page 78 of 136 Project Name Project ID Risk Ranking: This is a user entered stoplight that is taken from the Project Status properties page. The value has to be set based on the risk management process that is documented in the PMO Processes. Schedule Performance: This is a calculated stoplight, based on the average delay on a set of standard milestones (the mandatory milestones). Green: Average delay on mandatory milestones less than 5 days Yellow: Average delay on mandatory milestones between 5 and 20 days Red: Average delay on mandatory milestones more than 20 days Estimated Hours Budget Overrun: This is a calculated stoplight, which compares the budgeted (baseline) number of hours on the project with the estimated number of hours at completion. Green: EAC is equal or less than 100% of Baseline (budgeted) hours Yellow: EAC is between 100% and 105% of Baseline (budgeted) hours Red: EAC is more than 105% of Baseline (budgeted) hours Resource Assignment: This is a calculated stoplight, which compares determines the quality of the resource planning at task level (assignments) for a customer project. Green: Less than 25% of all assignments in next 6 weeks are still on roles Yellow: More than 25% of all assignments in next 6 weeks are still on roles Red: More than 50% of all assignments in next 6 weeks are still on roles WBS Quality: This is a calculated stoplight, which determines the quality of the project Work Breakdown Structure by calculating the average work (ETC) on assignments within the next 8 weeks; based on the assumption that the project shall be broken down in work packs of manageable size (between 150 and 200 hours). Green: Average work pack ETC is less than 150 hours Yellow: Average work pack ETC is size is between 150 and 200 hours Red: Average work pack ETC is more than 200 hours FFT Initialised- This stoplight indicates whether the project has been initialised in the Financial Forecasting Tool (FFT). Stoplight will be Red until the project has been initialised Green: project has been initialised Yellow: N.A. Red : project has not been initialised Cost Budget Overrun: This is a calculated stoplight, which compares the total budgeted project costs with the total estimated cost at completion. Green: No cost overrun (EAC <=Budget) Yellow: Less than 5% cost overrun Red: More than 5% cost overrun Cash Position (JDE EMA only – this information is not yet available for Oracle projects): This is calculated stoplight that gives an indication of the cash position of the project. Green: project has a positive cash flow (more than +5% of order value) Emerson Process Management – Confidential and Proprietary Document based on PMO Template: GEN-WORD, Revision 0 Clarity Enterprise Project Tool User Manual For The Project Manager Emerson Doc Number Revision A8 – 2015-Mar-16 – Page 79 of 136 Project Name Project ID Yellow: project has neutral cash flow (between -5% and +5% of order value) Red: Project has negative cash flow (less than -5% of order value). Project Satisfaction Survey: This is a calculated stoplight, which validates if the Project Revised Order Value is more than USD 1M and Customer Satisfaction Survey milestones have been correctly setup, and if surveys are completed in time. Clarity uses data from the business systems to determine project size which determines what surveys are mandatory. Green: Milestones are setup, and less than 25 days overdue Yellow: Milestones are setup, but overdue between 25 and 44 days Red: Milestones have not been correctly setup, or are overdue for more than 45 days Forecasted Invoices Imbalance: This stoplight determines if all project invoices have been forecasted. (Definition of Invoice Imbalance = Order Value - Issued Invoices - Forecast Invoices) Green: Forecasted Invoices Imbalance absolute value is <= 1 Yellow: Forecasted Invoices Imbalance absolute value is > 1 and < 100 US (or equivalent in local currency) Red: Forecasted Invoices Imbalance absolute value is >= 100 US (or equivalent in local currency) Project Accounts EAC and Toolbox EAC out of Balance: This stoplight compares the current Project Accounts EAC value and forecasted EAC value of each cost category. All Values are in US or equivalent in local currency Green: Absolute difference between these two values on all lines is <= 100 or equivalent in local currency Yellow: Absolute difference between these two values on any of the lines is > 100 and < 1000 or equivalent in local currency, and all other differences on any other line is <=100 Red: Absolute difference between these two values on any of the lines is >= 1000 or equivalent in local currency GP Tracking Balance: This is a calculated stoplight, which compares the project GP variance from the project accounting system with the GP variances explained by the project manager in the Clarity Lessons Learned / GP Tracking tool. Green: delta between Project GP variance and GP Tracking is less than $1000 Yellow: delta between Project GP variance and GP Tracking is between $1000 and $10,000 Red: delta between Project GP variance and GP Tracking is more than $10,000 Risk Allowance Balance: This is a calculated stoplight, which compares the risk allowance defined in Clarity with the risk allowance defined in the project accounting system. Green: delta between risk allowance in project accounting system and risk allowance defined in Clarity is less than $1000 Emerson Process Management – Confidential and Proprietary Document based on PMO Template: GEN-WORD, Revision 0 Clarity Enterprise Project Tool User Manual For The Project Manager Emerson Doc Number Revision A8 – 2015-Mar-16 – Page 80 of 136 Project Name Project ID 4.5.7 Yellow: delta between risk allowance in project accounting system and risk allowance defined in Clarity is between $1000 and $10.000 Red: delta between risk allowance in project accounting system and risk allowance defined in Clarity is more than $10,000 Project Accounts/EET As-Sold Values out of Sync: This stoplight compares the initial order value (As Sold status) in Clarity that is received from EET with the values in the business system. Grey: when Project Accounts/EET As-Sold Value = 0. Green: Absolute difference between order value in Oracle and EET is <= 100 (or equivalent local currency) Red: Absolute difference between the order value in Oracle and EET is > 100 US (or equivalent in local currency) Terminology An effort has been made to harmonise the terminology between Clarity, JDE and Oracle. The table below is a cross reference between the systems and lists the most important financial terms that are used in the portlets: ‘Life cycle’: ‘Type’: New Clarity Portlets As Sold Change Order Revised Forecast Change Order Expected Oracle Term Initial CO Baseline or Base Forecast CO Expected JDE Term Original Variation Revised or Current Forecasted Total Expected Order Value Cost Budget GP Revenue Cost Budget GP Order Value Cost Budget GP The above table is organised in a matrix format: combine the ‘life cycle’ prefix with the ‘type’ element to get the full term, e.g. the ‘As Sold Order Value’ or the ‘Revised Cost Budget’. Cost Terms Other Terms New Clarity Portlets Actual Cost Committed Cost ETC Cost EAC Cost Estimated Cost Variance Oracle Term Actual Cost Committed Cost JDE Term Actual Committed Estimate to Complete Cost Estimate at Completion Cost Estimated Cost to Complete Estimated Cost at Completion - Estimated Cost Variance Actual Sales Actual GP Actual Billing Total Actual Payments Received Project Cash Balance Risk Allowance Project Accounts Category Category Code Actual Revenue Actual Billing Oracle Expenditure Type Task Code Reported Sales Reported GP Total Invoiced Received Payments Project Balance Contingency JDE Product Group J-Code Emerson Process Management – Confidential and Proprietary Document based on PMO Template: GEN-WORD, Revision 0 Clarity Enterprise Project Tool User Manual For The Project Manager Emerson Doc Number Revision A8 – 2015-Mar-16 – Page 81 of 136 4.6 Other Options on the Project Properties Screen 4.6.1 Subprojects Project Name Project ID This screen allows you to create subprojects of the project you are in. This feature is not supported by the Project Office for individual projects. However, the feature is being utilised and introduced as part of the creation and maintenance procedures of Programs. 4.6.2 Dependencies This screen allows you to create links to other projects and to determine if this project is dependent of or on by another project in Clarity. This feature is not (yet) supported by the Project Office. Emerson Process Management – Confidential and Proprietary Document based on PMO Template: GEN-WORD, Revision 0 Clarity Enterprise Project Tool User Manual For The Project Manager Emerson Doc Number Revision A8 – 2015-Mar-16 – Page 82 of 136 4.6.3 Project Name Project ID Baseline You can also create a new baseline from this page, however, since you do not have task information here it is recommended that you baseline your project in Open Workbench. Refer to the Open Workbench (electronic) manuals for the functional description of the baseline function. Note that Emerson has implemented a 'patch' in Open Workbench with modified baseline functionality: this is described in section 5.6 The ‘Baseline’ Function. At the baseline sub-tab, you can view the list of baselines that have been created for this project (if they exist). Emerson Process Management – Confidential and Proprietary Document based on PMO Template: GEN-WORD, Revision 0 Clarity Enterprise Project Tool User Manual For The Project Manager Emerson Doc Number Revision A8 – 2015-Mar-16 – Page 83 of 136 Project Name Project ID 5 WORK WITH A PROJECT IN OPEN WORKBENCH 5.1 Views, Highlights and Filters In Open Workbench, all schedule data is displayed on the screen using Views, Highlights and Filters: Views: a view determines what data fields will be displayed on the screen, and what the format of that data will be. Example is a Gantt view or a tabulated data field. Filters: Filters can be defined to select a set of tasks or resources in a view. Filters are part of the view library. Highlights: a set of formatting conditions that causes data fields in any view to change the format (shape, colour), either based on the type of data field or based on certain conditions of that data. Example is to colour the critical path or tasks with a negative variance. A company library has been created with a predetermined set of Views, Highlights and Filters. This library is maintained by the Project Management Office and contains all views that a Project Manager normally requires. However, you can create new views and add these to your local library as you require. Although you can create your own set of views, we recommend that you - especially for the highlights - use the company library to avoid confusion. The settings of these libraries are defined in the menu: Click the File Icon on top left hand corner. Select Preferences from Options wizard. Then go to Locations tab. Emerson Process Management – Confidential and Proprietary Document based on PMO Template: GEN-WORD, Revision 0 Clarity Enterprise Project Tool User Manual For The Project Manager Emerson Doc Number Revision A8 – 2015-Mar-16 – Page 84 of 136 Project Name Project ID The latest company views can be found at the ‘ProcessWorld’ Website in the Project Management section. In the Emerson Corporate View Library, the following specific View, Highlights and Filters settings have been configured: View: Codes overview to list all the task codes that are used by Emerson (activity code, product group code, mandatory milestone) View: Hours overview to list all the relevant task and assignment related hours (budgets, actual hours, estimates to complete, etc.). View: Budget Entry view to be able to enter the budget in a tabulated format. Highlight: Resource (assignment) related data is green, task related data is blue. Highlight: Negative variance figures will be shown in red. Filter: Remove internal tasks (for customer print-outs) Filter: Remove completed tasks Filter: In views related to budgets and codes, all milestones have been hidden. If you print a schedule from Open Workbench, the current view, highlight and filter will also be used for the print output. The ‘Corporate Views’ can be accessed through the ‘Process World’ website and are found in the ‘PMO Project Management Processes’ screen, Go to quick views, click Project Management then on right hand side you will find templates column then select the PM-OWB, PMO corporate views. Download the Zip file. Emerson Process Management – Confidential and Proprietary Document based on PMO Template: GEN-WORD, Revision 0 Clarity Enterprise Project Tool User Manual For The Project Manager Emerson Doc Number Revision A8 – 2015-Mar-16 – Page 85 of 136 5.2 Project Name Project ID Project Data Fields ! Important Although a series of data fields are available from Open Workbench as well as from Clarity; you have to be aware that Open Workbench is a client application, and that project rights are only applied when you save the project back into the repository. If you have made changes to data fields that you were not allowed to do (e.g. changes to resource data), you might not be able to save the project and you will lose all the changes that have been made in Open Workbench. There are a large number of data fields available in Open Workbench that can be added to a view. To find the explanation of each field, go to the Open Workbench help function or press F1, below window will pop up. Help includes descriptions on all available data fields in Open Workbench. Apart from the data fields that are by default available in Open Workbench, Emerson has added some data fields to include Emerson specific data. We have also changed Emerson Process Management – Confidential and Proprietary Document based on PMO Template: GEN-WORD, Revision 0 Clarity Enterprise Project Tool User Manual For The Project Manager Emerson Doc Number Revision A8 – 2015-Mar-16 – Page 86 of 136 Project Name Project ID the naming of some Open Workbench data fields in the views and reports, to align the naming with the Emerson conventions. The headers that are defined in the company library views will use the description of the Emerson data. However, if you create your own views, the system will display the Clarity naming as default and you should replace these with the correct conventions to avoid any confusion. Refer to the cross-reference table below: Emerson data Used data fields in Clarity Remarks Activity Codes Charge Codes Mandatory Milestones Key Tasks/Milestones Flag at task level Revised Order Value (ROV) Baseline Usage We use the baseline to store budgeted hours. (Current) Actuals Actual Usage Posted hours Pending Actuals Pending Actuals Hours entered on a timesheet but not jet posted. Once posted, these will be removed from the Pending Actuals. (Current) Estimate to Complete (ETC) Estimate to Complete Calculated ETC value, where the ETC each week is reduced with the actual hours booked. Proposed ETC The ETC that is updated by the resource on the timesheet (if any) or otherwise equal to the ETC. Estimate at Completion (EAC) Total Usage = Actuals + ETC Pending Estimate at Completion New Total Usage = Actuals + Pending Actuals + Proposed ETC. (Current) Variance Usage Variance = Budget - Actuals - ETC Note that the Clarity data fields that relate to hours (Actuals, ETC's, EAC's, variation) are available both at task level and at assignment (resource) level. These are then called e.g. 'Assignment Total Usage' respectively 'Task Total Usage'. ! Important In Open Workbench and on the Clarity reports, a negative variance does mean an overrun, while in JDE/Oracle and ERS a negative variance means an under run. The rule in Project Management world is: negative = red = bad news, the finance people look at everything from a cost’s prospective where a negative cost is something positive. ! Important Open Workbench also has a series of data fields available that contain cost information. However, do not use cost information in Open Workbench: you will lose multi-currency information and get incorrect data. If you want to see cost, use the reports that are available in Clarity. Example: We use EAC in reports, but the 'EAC' field available in Open Workbench is a cost field. The EAC data field in Clarity is multiplied by a ‘billing rate’ (different value than the cost rate), so the value is incorrect. Emerson Process Management – Confidential and Proprietary Document based on PMO Template: GEN-WORD, Revision 0 Clarity Enterprise Project Tool User Manual For The Project Manager Emerson Doc Number Revision A8 – 2015-Mar-16 – Page 87 of 136 5.3 Project Name Project ID Task Codes Product Group Code (JDE Projects Only) The default Product Group Code for a project is set in the financial properties page of the project in Clarity. Refer to paragraph 3.3. However, you can overwrite this default setting on the task level, by entering an alternative Product Group Code in the Open Workbench field 'Task User Text 1' of that task. This will cause the cost of all hours booked to that particular task to be charged to the alternative product group code in JDE. This will provide the following functionality. If for a specific task an alternative, valid Product Group Code is entered, the cost booked to this task will be transferred to the corresponding Product Group Code in JDE. If an invalid alternative code is entered, the field will be cleared by the system when the project is saved back to the repository. All tasks that do not have an alternative Product Group Code entered at the task level will use the project default Product Group Code. ! Important Each hour booking in Clarity requires a valid Product Group Code. So ensure as a minimum that the 'Product Group Code' field in the financial project properties page is set. Default Oracle Task Number (Oracle Projects Only) The Default Oracle Task Number for a project is set in the ‘Project Properties’ page of the project in Clarity and will be populated by default as ‘01’. However, you can overwrite this default setting on the task level, by entering an alternative Oracle Task Number in the Open Workbench field ‘Oracle Task Number’ of that task. This will cause the cost of all hours booked to that particular task to be charged to the appropriate task number in the Oracle financial system. This will provide the following functionality. If for a specific task an alternative, valid Oracle Task Number is entered, the cost booked to this task will be transferred to the corresponding Oracle Task Number in Oracle. If an invalid alternative Oracle Task Number is entered, the field will be cleared by the system when the project is saved back to the repository. All tasks that do not have an alternative Oracle Task Number entered at the task level will use the project default Oracle Task Number. Activity Code If a schedule is created from transfer from the EET tool it will populate all the tasks in the schedule with a valid activity code. This activity code is stored in the Open Workbench field 'Charge Code'. If you add tasks in the schedule, you have to assign an activity code to this task by yourself. You can also change the activity code of existing tasks. If you do not specify an activity code, the default activity code 9999 is used. Emerson Process Management – Confidential and Proprietary Document based on PMO Template: GEN-WORD, Revision 0 Clarity Enterprise Project Tool User Manual For The Project Manager Emerson Doc Number Revision A8 – 2015-Mar-16 – Page 88 of 136 5.4 Project Name Project ID Update of Actual Bookings When hours get booked to a project by the resources via their timesheets in Clarity, the following sequence is followed: Step 1: When a resource ‘Saves’ their timesheet to the repository (even without submitting it): The field 'Pending Actuals' is updated with the hours as entered by the resource. The field 'Pending ETC' is updated either by overwriting the value on the timesheet or calculate from the 'Pending Actuals'. When timesheets are submitted or approved, this has no effect on 'Pending Actuals' or 'Current Actuals'. Step 2: When the timesheets are ‘Posted’: The 'Actual Usage' (Current Actuals) is updated with the hours as entered on the timesheet. The 'Pending Actuals' is reset to zero. The field 'Estimate to Complete' is automatically updated: the actual hours booked are subtracted from the current ‘Estimate to Complete’ (note: this step will not happen if the ETC is set to a 'fixed' loading pattern'). The field 'Proposed Estimate' is updated if the engineer had entered an alternative ETC value in their timesheet (otherwise this field is equal to the 'Estimate to Complete' field). If the ETC is manually updated on the timesheet, the flag 'Pending Estimate Override?' is set. The actual cost in JDE/Oracle is updated. Step 3: Manual update by the Project Manager: The 'Proposed Estimate' - as entered by the resource - can be accepted as the new ETC value for this task. This is not an automatic action but needs to be confirmed by the Project Manager (in Open Workbench, go to ‘Tools/Pending Estimates’…). There is a filter available that lists all the tasks where the Pending ETC is not equal to the new calculated ‘Estimate to Complete’. As long as the Project Manager has not accepted the 'Pending Estimate' as the new ETC value, the calculated ETC will show up on the resource's next timesheet. 5.5 The ‘Autoschedule’ Function Changes made to the project schedule in Open Workbench do not get automatically updated and recalculated. These changes do only take effect when you make use of the 'Autoschedule' function in Open Workbench. Emerson Process Management – Confidential and Proprietary Document based on PMO Template: GEN-WORD, Revision 0 Clarity Enterprise Project Tool User Manual For The Project Manager Emerson Doc Number Revision A8 – 2015-Mar-16 – Page 89 of 136 Project Name Project ID Icon The Autoschedule function has the following behaviour: Calculates the duration of each task, based on the estimate and the resource availability (only if resource constraints option is selected). Calculates the Critical Path Date constraints (Must Start On and Must Finish On) will override dependencies. Schedule critical path tasks Schedule started tasks Schedule tasks with higher priority (0-36, with 0 is highest priority) Schedule tasks in ascending order of float Schedule remaining tasks in WBS order (top-down) Resolve any constraints at a daily level. The Autoschedule function does not: Reassign resources Change the total usage of a task Move the start date of started tasks Change the duration of a fixed duration task Move the end date of started tasks with Fixed Duration Move completed tasks Move tasks that are locked for scheduling Move tasks with a Fixed loading pattern 5.6 The ‘Baseline’ Function ! Important Emerson has made a modification to the standard behaviour of the baseline function in Open Workbench. The baseline function will therefore work differently than described in the Open Workbench manuals. You do need a special setting on your local computer for this change to take effect. Refer to the ‘EPT User Set-up Manual’ or contact your local champion. Standard Clarity / Open Workbench functionality Emerson Process Management – Confidential and Proprietary Document based on PMO Template: GEN-WORD, Revision 0 Clarity Enterprise Project Tool User Manual For The Project Manager Emerson Doc Number Revision A8 – 2015-Mar-16 – Page 90 of 136 Project Name Project ID In Clarity and Open Workbench, there is no field to store the hour’s budget for each task. The way Clarity normally works is that the initial budget is stored as the ETC. To capture this value you have to baseline the project, which causes the ETC (= EAC) value to be stored in the baseline usage field. Initially this is OK, as the ETC at the start of the project is equal to the budget. However, if the project progresses, this data becomes dynamic: actuals are booked to the project and the ETC is reducing. The sum of the ETC and the Actuals is the EAC, and the EAC might start deviating from the original budget if there are variances on the project. If the project is now re-baselined, then this will cause the EAC to be stored as the new budget (baseline usage), and any variance on the project will be reset to zero, and therefore performance information on the project will get lost. This is in conflict with the Emerson way of looking at budgets: budgets can normally only change if additional funding is received from the customer. The set baseline function appears like this. You can see that the ‘Clear’ function is not selectable. This is due to the ‘Emerson patch’ being installed. Current functionality (if the patch is enabled by creating the registry setting) The very first time that the baselining function is used in Open Workbench, the behaviour is according the standard tool functionality. Select Define Baseline’ when baselining for the first time. Emerson Process Management – Confidential and Proprietary Document based on PMO Template: GEN-WORD, Revision 0 Clarity Enterprise Project Tool User Manual For The Project Manager Emerson Doc Number Revision A8 – 2015-Mar-16 – Page 91 of 136 Project Name Project ID If you introduce variances into your schedule you will need to rebaseline. However, as soon as the project has been baselined once, the baseline function in Open Workbench is partly disabled: any further base-lining will not cause the budget (baseline usage) field to be overwritten by the current EAC. Enter data into ETC column. The Budget data is not overwritten by the ETC Data, even after rebaselining. If you then change any budgets and proceed to re-baseline you will be prompted to confirm continuing to replace existing baseline. When the Baseline function is then used, only all timing related fields (task start date, finish date, duration) are copied to the baseline. The budget field is left unchanged. Emerson Process Management – Confidential and Proprietary Document based on PMO Template: GEN-WORD, Revision 0 Clarity Enterprise Project Tool User Manual For The Project Manager Emerson Doc Number Revision A8 – 2015-Mar-16 – Page 92 of 136 Project Name Project ID However, if you select ‘Tools’ ‘Multiple Baselines’ and ‘New Baseline’ when re-baselining you will maintain the original baseline data and will create a new baseline that will automatically number itself accordingly i.e. ‘Baseline2’ . By using this ‘Multiple Baselines’ feature you will in effect create a new budget that would include variances that may not be acceptable to the client so a facility exists to copy the original budget from the ‘Baseline 1’ to the new ‘Budget 2’ and then to manually enter the variances in the ‘Budget’ field. Emerson Process Management – Confidential and Proprietary Document based on PMO Template: GEN-WORD, Revision 0 Clarity Enterprise Project Tool User Manual For The Project Manager Emerson Doc Number Revision A8 – 2015-Mar-16 – Page 93 of 136 Project Name Project ID Instead of this functionality, the user is able to directly, manually modify the budget by editing the ‘Assignment Baseline Usage’ field. For this manual entering of the ‘Assignment Baseline Usage’ data, the following rules will apply: ‘Assignment Baseline Usage’ data can be entered as time-varying loading patterns (in a tabulated view) or as a lump sum. Enter the data in tabulated form may cause the task's ‘Baseline Start’ and ‘Baseline Finish’ to change, if the tabulated data is modified outside of the range of the previous ‘Baseline Start’ and ‘Baseline Finish’ dates. Editing it as a lump sum will create tabulated data spread evenly over the workdays between the task's ‘Baseline Start’ date and the task's ‘Baseline Finish’ date if the task has a baseline. Otherwise – if no baseline dates are available – it will be spread evenly over the workdays between the task's ‘Start Date’ and its ‘Finish Date’. This will cause (per the above logic) the task's baseline schedule dates to be implicitly set to these values. Note that the ‘Clear Baseline’ option in Open Workbench has been disabled, to prevent the baseline (budgeted values) to be cleared. 5.7 Work locally with Open Workbench Schedules If you want to work locally on your PC with an Open Workbench schedule, you can 'Check-out' the project to your local hard disk. Emerson Process Management – Confidential and Proprietary Document based on PMO Template: GEN-WORD, Revision 0 Clarity Enterprise Project Tool User Manual For The Project Manager Emerson Doc Number Revision A8 – 2015-Mar-16 – Page 94 of 136 Project Name Project ID In Open Workbench, go to 'File/Save As', and in the window that appears, select in the 'Save as type' box that you want to save as Workbench Files (*.rmp). Save the file to a directory on the local PC. The project is now locked in Clarity. From home, do the following: Start Open Workbench locally (select the windows start menu, go to Programs / Clarity / Open Workbench). At start-up, a login screen will appear. Ignore this screen by pressing the 'cancel' button. In Open Workbench, go to 'File / Open' and select your *.rmp file as saved to your local computer. You can press the folder icon at the top of the window to indicate that you want to load from the local computer. When back in the office, you can do these actions in the reversed order: Start Open Workbench Load the *.rmp file from your local computer. Save the project back into the Clarity repository. You can press the database icon at the top of the window to indicate that you want to load from the local computer. ! Important Make sure that you have selected the same project number and do not change the ID of this project when you save it to disk, otherwise a new project will be created in the depository. 5.8 Assigning ETC’s To Resources When resources or generic roles are allocated to projects, they are required to be assigned to designated task/s and populated with agreed ‘Estimate to Complete’ Emerson Process Management – Confidential and Proprietary Document based on PMO Template: GEN-WORD, Revision 0 Clarity Enterprise Project Tool User Manual For The Project Manager Emerson Doc Number Revision A8 – 2015-Mar-16 – Page 95 of 136 Project Name Project ID (ETC). Assigning resources to the tasks MUST ONLY be carried out in Open Workbench. ETC’s can be assigned to resource /generic roles either by entering hours in the task properties window or directly into the ETC column in the ‘Resource Assignment’ corporate view. 1. Assigning ETC’s through Task properties: 1.1 Double click on task header on the task where you want to assign the ETC. Task header 1.2 In Task Properties dialog, click on resource tab 1.3 Select the resource from Project Resources and click ‘Assign’. Note: You will be able to assign only those resources that have been allocated to the project. Emerson Process Management – Confidential and Proprietary Document based on PMO Template: GEN-WORD, Revision 0 Clarity Enterprise Project Tool User Manual For The Project Manager Emerson Doc Number Revision A8 – 2015-Mar-16 – Page 96 of 136 Project Name Project ID Type the ETC in ‘Estimate’ Column of the appropriate resource/generic role. Example: Project Manager assigned 32hours on task “Project Management”. 1.4 2. Assigning ETC’s using corporate View ‘Resource Assignment’: 2.1 Use ‘Resource Assignment’ View from the ‘Planning Group’ library. 2.2 You can directly type the ETC value into ETC column. Note: If you want to assign ETC’s to multiple resources, method 2 can be used to save time. Emerson Process Management – Confidential and Proprietary Document based on PMO Template: GEN-WORD, Revision 0 Clarity Enterprise Project Tool User Manual For The Project Manager Emerson Doc Number Revision A8 – 2015-Mar-16 – Page 97 of 136 5.9 Project Name Project ID Transfer Resource Assignments Transfer Assignments can be used to transfer ‘Estimate to Complete’ (ETC) or Budget from Generic Roles to named resources or from one named resource to other named resource. Transfer assignments copies the Budget, ETC Values but does not copy any actuals. There are many scenarios; 1. From resource role to named resource i. Before baseline ii. After baseline 2. From one named resource to other named resource i. Before actual booking ii. After actual booking 3. From one named resource to resource role i. Before actual booking ii. After actual booking But if someone wants to transfer the assignment from one resource to multiple resources then it has to be done manually. Case 1- a: How to transfer the assignment from resource role to named resource before baseline the projects follow the steps below. For example to transfer the assignment from resource role ‘Project Manager’ to named resource ‘Vidish Soman’. Below is the screen shot before transfer assignment Emerson Process Management – Confidential and Proprietary Document based on PMO Template: GEN-WORD, Revision 0 Clarity Enterprise Project Tool User Manual For The Project Manager Emerson Doc Number Revision A8 – 2015-Mar-16 – Page 98 of 136 Project Name Project ID Step 1: Click ‘Project Tab’ from bar and select “Transfer Assignments”. Step 2 The Transfer Assignment window will pop up. Select resource from drop down list whose assignment is to be transferred. After selecting the resource role it will show the entire list of tasks assigned to that resource role. For example ‘Project Manager’ is assigned to tasks ‘Project travel’ & ‘Project Management’ in this screenshot. Emerson Process Management – Confidential and Proprietary Document based on PMO Template: GEN-WORD, Revision 0 Step 3 Select the resource from the drop down list to transfer the assignment as shown Clarity Enterprise Project Tool User Manual For The Project Manager Emerson Doc Number Revision A8 – 2015-Mar-16 – Page 99 of 136 Project Name Project ID Step 4 Select the task to transfer to the named resource and click on the command button ‘>’ as shown This transfers the ETC, loading pattern and Max % load. See the below screenshot after ‘Transfer Assignment’ completed. Case 1- b: How to transfer the assignment from resource role to named resource after baseline the project follows the steps below. Emerson Process Management – Confidential and Proprietary Document based on PMO Template: GEN-WORD, Revision 0 Clarity Enterprise Project Tool User Manual For The Project Manager Emerson Doc Number Revision A8 – 2015-Mar-16 – Page 100 of 136 Project Name Project ID For example to transfer the assignment from resource role ‘Project Manager’ to named resource ‘Vidish Soman’. The screen shot below indicates position before ‘Transfer Assignment’; Follow steps 1 to 3 from case 1-a before baselining the project. Then follow step 4 below. Step 1: Click on the Tool from menu bar and select ‘Transfer Assignments’. Step 2: A ‘Transfer Assignment’ window will pop up. Select the appropriate resource from the drop down list whose assignment is to be transferred. Step 3 Select the appropriate resource from the drop down list to transfer the assignment to. Step 4- Select the task to transfer to the named resource , check ‘Keep Baseline’, click command button ‘>’. This transfers the Budget, ETC, loading pattern and Max % load. Emerson Process Management – Confidential and Proprietary Document based on PMO Template: GEN-WORD, Revision 0 Clarity Enterprise Project Tool User Manual For The Project Manager Emerson Doc Number Revision A8 – 2015-Mar-16 – Page 101 of 136 Project Name Project ID Check the budget for the transferred resource in ‘Status Update’ view from the ‘Controlling’ group library. Case 2 – a: How to transfer assignments from one named resource to another named resource after actual booking with no baseline. In this case follow steps 1 to 3 from case 1- a. Step 4 Select the task to be assigned to the new resource & click on the ‘>’ button. Emerson Process Management – Confidential and Proprietary Document based on PMO Template: GEN-WORD, Revision 0 Clarity Enterprise Project Tool User Manual For The Project Manager Emerson Doc Number Revision A8 – 2015-Mar-16 – Page 102 of 136 Project Name Project ID This transfers the remaining 24 hours ETC to the new named resource “Amit Honap” whilst current actual hours (16) remain with the original resource “Sarika Bhowte”. Case 2 – b: How to transfer the assignment from one named resource to another named resource after actual booking & project is baseline. In this example resource ‘Sarika Bhowte’ has booked hours on task ‘Project Management’ after baseline has been set on the project. However, we need to transfer the assignment to another named resource, ‘Amit Honap’. Follow the steps below; Actual 16 hrs. booked by resource Sarika Bhowte to task 1.1.1.1 with 24 hrs. ETC remaining. Step 1: Click on the Tool from menu bar & select ‘Transfer Assignments’. Emerson Process Management – Confidential and Proprietary Document based on PMO Template: GEN-WORD, Revision 0 Clarity Enterprise Project Tool User Manual For The Project Manager Emerson Doc Number Revision A8 – 2015-Mar-16 – Page 103 of 136 Project Name Project ID Step 2 The ‘Transfer Assignment’ window will pop up. Select the appropriate resource from the drop down list whose assignment is to be transferred. Step 3 Select the appropriate resource from the drop down list to transfer the assignment. Step 4 Don’t forget to check the check box ‘Keep Baseline’ and click on the ‘>’ button. This will transfer the baseline budget (40 hours) and remaining ETC (24 hours) of resource ‘Sarika Bhowte’ to selected task and new resource ‘Amit Honap’. NOTE: Budget adjustment has to be done manually. Current Actuals column will indicate the 16 hours booked by resource ‘Sarika Bhowte’, these will remain. However, the Current ETC (24 hours) to new assigned resource “Amit Honap” needs to be entered as 24 hours in the Current Budget column, whilst 16 hours must be entered in the Current Budget column against ‘Sarika Bhowte’. Emerson Process Management – Confidential and Proprietary Document based on PMO Template: GEN-WORD, Revision 0 Clarity Enterprise Project Tool User Manual For The Project Manager Emerson Doc Number Revision A8 – 2015-Mar-16 – Page 104 of 136 Project Name Project ID NOTE: Transfer the assignment to multiple resources has to be done manually. For example, if an assignment requires transferring on task ‘Project Management’ from ‘Project Manager’ having 60 hours ETC to multiple resources, ”Sarika Bhowte and Sourabh” splitting the time as 40 & 20 hours ETC respectively. Step 1- Double click on the task header, a Task Properties window will pop up. Select the ‘Resource’ tab. From the Project Resource list, select the resources to which assignments need to be transferred and click ‘Assign’. Emerson Process Management – Confidential and Proprietary Document based on PMO Template: GEN-WORD, Revision 0 Clarity Enterprise Project Tool User Manual For The Project Manager Emerson Doc Number Revision A8 – 2015-Mar-16 – Page 105 of 136 Step 2 Type in the ‘Estimate’ amount next to the newly assigned resource name and reduce the estimate from the original resource. NOTE: Budget adjustment has to be done manually. Emerson Process Management – Confidential and Proprietary Document based on PMO Template: GEN-WORD, Revision 0 Project Name Project ID Clarity Enterprise Project Tool User Manual For The Project Manager Emerson Doc Number Revision A8 – 2015-Mar-16 – Page 106 of 136 6 Project Name Project ID EET TO CLARITY INTERFACE The EET to Clarity interface is now available for all Project Managers who want to spend fewer efforts in creating new projects! This functionality allows you to create a project in Clarity directly from EET with all the data that is already configured in EET during the proposal phase. With this interface: You don’t have to retype lots of data in Clarity that is already available in EET. We get full transparency during the whole life cycle of the project: from proposals up to project execution. This will improve the project handover process. It is the objective that this interface is used as much as possible for all our new projects; however it will still be possible to create new projects directly in Clarity. At the end of this document it is described how to get access to this functionality. What is transferred? The following project data is transferred from EET to Clarity: Project Header Information: This includes: Project Name, preliminary Project ID, project description, Project Manager, preliminary project start and end date. Resource Allocations: all roles which are required according to the estimate. WBS: The Work Breakdown Structure as defined in EET will be used to structure the tasks in Clarity. Project Tasks: Including: task ID (WBS code), task name, activity code, role, and estimated hours (ETC). Each unique activity in EET is converted to a unique task in Clarity. Split of Work: Between front office and the BCEC. Project Risks: The project risk ranking (stoplight) and all individual risks that are identified in EET and listed in the EET risk register are transferred to the Risks tab in Clarity. As Sold Financials: As Sold order value and As Sold cost budget – with associated As Sold GP. Current limitations: The current released interface is the first version and more enhancements will follow in the future. The objective for this first release is to be able to create a project in Clarity from data that is already available in EET, without the need to retype it all. This version does not allow you to download a project multiple times – e.g. to update an existing project in Clarity with revised EET data. You can only download a project once – when the project is won - and therefore revision must be active and the status must be ‘As Sold’ or Handover Complete in EET before the download page is accessible. The above limitation implies that the interface can today not be used to download projects in pursuit; to support our capacity planning and resource forecasting; or to create a preliminary project schedule for a proposal. Emerson Process Management – Confidential and Proprietary Document based on PMO Template: GEN-WORD, Revision 0 Clarity Enterprise Project Tool User Manual For The Project Manager Emerson Doc Number Revision A8 – 2015-Mar-16 – Page 107 of 136 Project Name Project ID Operating Instructions: The interface will be operated from the EET tool. This is to ensure that you will select the right project, and can do a full review of that project before the project is exported to Clarity. These instructions will only show how the EET to Clarity interface is operated: for general instructions on EET refer to the EET user manual. If you have never used EET before, then please ask your local EET champion for a general EET training. Log in to EET (via ProcessWorld) and select the ‘Projects’ menu at the left to locate the project that needs to be downloaded. Click on the proposal number to open the proposal. You will now see the proposal header attributes, and a list of all proposal revisions that have been made. Now, ensure (check with the proposals team) what is the final revision. This revision should have the status ‘As Sold’ which can be seen from the currency icon (marked in below image) before Rev no. Note that it is the responsibility of the proposals team to make the status of the revision As Sold or Handover Complete– which means that the proposal is updated with all latest agreements with the customer and fully reflects the content of the purchase order with regards to values and scope. Emerson Process Management – Confidential and Proprietary Document based on PMO Template: GEN-WORD, Revision 0 Clarity Enterprise Project Tool User Manual For The Project Manager Emerson Doc Number Revision A8 – 2015-Mar-16 – Page 108 of 136 Project Name Project ID Click the revision ID to open the revision. You can now see the revision properties at the top, and have a series of tabs at the bottom to access the various parts of the proposal. You can open these to review the project prior to downloading it into Clarity: The ‘Revision Overview’ tab gives an overview of the scope and labour content The ‘Risk Analysis’ tab contains the risks that are identified on this project Now to export the project to Clarity – when all data has to be found in good condition – select the ‘Export’ tab. And on the Export tab, there is a sub-tab called ‘Clarity’: Emerson Process Management – Confidential and Proprietary Document based on PMO Template: GEN-WORD, Revision 0 Clarity Enterprise Project Tool User Manual For The Project Manager Emerson Doc Number Revision A8 – 2015-Mar-16 – Page 109 of 136 Project Name Project ID When you click this sub-tab, the ‘Export to Clarity’ page displays: The following information can now be filled out on this export page: Project Name: This is the name taken from EET but can be modified if required. Project ID: This is by default the EET project ID, but this shall be modified to hold the project ID in the Oracle or JDE business system. However, if this number is not known yet the project can be exported with this temporary proposal ID, as the project ID is NOT locked in Clarity after the download. It can still be overwritten with the correct project ID later (before the project is financially enabled). Description: Project description – free format text field. Project Manager: This is a browse for a Clarity user that will be the Project Manager for this project. Emerson Process Management – Confidential and Proprietary Document based on PMO Template: GEN-WORD, Revision 0 Clarity Enterprise Project Tool User Manual For The Project Manager Emerson Doc Number Revision A8 – 2015-Mar-16 – Page 110 of 136 Project Name Project ID Intent to use PCSD as the Configuration Standard: same function as available in Clarity. Project Start Date: This is a preliminary project start date, by default tomorrow’s day. Project End Date: This is the preliminary project end date, calculated based on the entered project start date and the project duration that is entered in EET. Clarity will use these dates to allocate resources to the project (allocation start and end dates). Approved and Probability of Win: These shall be set to Approved and to 100%. In the future, these fields will be used for Capacity Planning purpose (remember that today the project can only be downloaded when in status ‘As Sold’). Enterprise OBS: browse in the Clarity Enterprise OBS structure for the owning organisation of this project. Level of WBS Detail: There are two levels of detail in which the project can be created in Clarity: Detailed Level: This is the default. Each activity in EET will be a task in Clarity. Summary Level: When ‘Summary Level’ is selected, some of the lowest level activities will be rolled up into a summary level activity. This is mainly useful for smaller projects, where you want to avoid that there are work packs created from 2 or 4 hours. Refer to the data dictionary to see what codes do rollup into a summary code. You can use the ‘Save’ button to store the entered properties without yet downloading the project to Clarity. Select ‘Download’ to start the export to Clarity. The following confirmation message will appear: When you select OK, the export to Clarity is initiated. The following message is displayed: Emerson Process Management – Confidential and Proprietary Document based on PMO Template: GEN-WORD, Revision 0 Clarity Enterprise Project Tool User Manual For The Project Manager Emerson Doc Number Revision A8 – 2015-Mar-16 – Page 111 of 136 Project Name Project ID There is a large data set exported from EET to Clarity in a number of steps, and rigorous error checking is performed in each step. Therefore this process can take from 2 till more than 5 minutes. Please do not interrupt the process. When the project is successfully exported, the following message will appear: You can now close this window, and the export process is completed! Each project can only be exported once, so if the export is successfully completed and the user returns to the ‘Export to Clarity’ page in EET, then the message “Project is already Exported to Clarity” is displayed. Emerson Process Management – Confidential and Proprietary Document based on PMO Template: GEN-WORD, Revision 0 Clarity Enterprise Project Tool User Manual For The Project Manager Emerson Doc Number Revision A8 – 2015-Mar-16 – Page 112 of 136 Project Name Project ID Now the project is created in Clarity – and you can start working on the project in Clarity like on any other project. You can add properties that are not set by the EET interface, financially setup and enable the project in Clarity, tune the task structure and baseline the project. Template only Note that the interface generates a project in Clarity fully in accordance with the work breakdown structure and task structure in EET. This might not exactly be the structure in which the Project Manager wants to control the project. You should therefore realise that the downloaded project should be considered as a template only. It contains all the work packs with the relevant codes, roles, etc. so it is very helpful to build the project; but at the same time it might more be structured in accordance with proposal requirements rather than the project controls requirements. The project is therefore also not baselined when it is created in Clarity – although the total number of hours will reflect the baseline (budgeted) number of hours; the structure (WBS) in which the project will be baselined might have to be different. Error Checking Although the export functionality is initiated from the EET tool, Clarity does full error checking on the data that is received, and secures that data integrity is maintained at all times. In case an issue is identified by the Clarity tool, an error is generated and passed back to EET. The user will then – instead of the confirmation that the project is successfully exported - receive an error message on the EET screen. An example is that each project ID in Clarity needs to be unique. If a project ID is chosen in EET that already exists in Clarity, then the following error message will be displayed: Emerson Process Management – Confidential and Proprietary Document based on PMO Template: GEN-WORD, Revision 0 Clarity Enterprise Project Tool User Manual For The Project Manager Emerson Doc Number Revision A8 – 2015-Mar-16 – Page 113 of 136 Project Name Project ID Apart from the error messages, the system can also generate warnings. In this case the project might have been created but some data might not have been exported correctly. In all cases: once the project is exported to Clarity there is always the possibility to add, modify and delete data in Clarity before the project is enabled. Other data There is some other data that is transferred from EET to Clarity that is visible on some specific pages in the tool: Total Sales and Cost value – visible at the financial dashboard page. The total project Order Value and Cost Budget are added to the Key Financials portlet, and will help us to get a better view on the project handover process from Sales to Projects. It provides transparency on what the Sales team define as the As Sold situation, and how the project is booked into the project accounting system. Emerson Process Management – Confidential and Proprietary Document based on PMO Template: GEN-WORD, Revision 0 Clarity Enterprise Project Tool User Manual For The Project Manager Emerson Doc Number Revision A8 – 2015-Mar-16 – Page 114 of 136 Project Name Project ID Basically the As Sold values from EET should be the same as the As Sold values in the project accounting system. Therefore, a stoplight has been added to indicate if the As Sold values in both systems are not in sync. This will indicate that there is an issue with the project handover process. The above examples are taken from a JDE project but should work the same for projects in the Oracle business system. The financial portlet and stoplight are not available for project in Asia Pacific. Responsibilities and Access Rights: The success of this interface and the quality of the data we get out of EET is depending on the Proposals team. It is their responsibility – according to the PMO proposal processes - to make the proposal status ‘As Sold’ or ‘Handover Complete’ before the project is exported to Clarity. This is not just changing the status, but ensuring that all proposal data now reflects the agreements in the customer purchase order. Now the data is being used to create projects in our enterprise project management system, this activity has become even more important. The project manager is responsible for creating projects. Therefore the project manager or planner needs access to EET. If they do not already have access to EET, they need to obtain access via ProcessWorld. The right to export projects from EET to Clarity is a specific access right – this right will only be granted to Project Managers and Planners, not to proposal or sales roles. You will have to ask the support team to give you Project Managers rights in EET – only then this export menu will become available to you. So first thing to do – if you want to use this functionality – is to contact the support team to ask for access. Additional Timesheet Checking (Oracle users only): Currently, when timesheet entries are submitted for approval against projects administered within the Oracle business system, validation is carried out to ensure that any entered Shift or Overtime codes are valid. Where incorrect Shift or Overtime codes are detected, the timesheet entry is returned and a note is displayed in the Timesheet Notes section. This validation has been extended to ensure that: The task is defined within Oracle for the project, that it is valid for the dates entered and that it is chargeable. Any Shift Code is defined within Oracle for the project and is valid for the dates entered. Any Overtime Code is defined within Oracle for the project and is valid for the dates entered. Emerson Process Management – Confidential and Proprietary Document based on PMO Template: GEN-WORD, Revision 0 Clarity Enterprise Project Tool User Manual For The Project Manager Emerson Doc Number Revision A8 – 2015-Mar-16 – Page 115 of 136 Project Name Project ID There are some more Activity Codes; Employee Number for the resource; Project closed If any of the validation checks fail, the Timesheet entry is returned and a detailed reason is shown in the Timesheet Notes. Where multiple errors are found, each error will be reported separately with detailed explanation. The screenshot below shows examples of these notes. If such an error is reported, then the user needs to report this to the Project Manager or the Oracle Project Administrator (PA). The Project Administrator needs to add the missing code or change the valid date in Oracle. ! Note: This enhancement also implies that the current page used to enter the valid shift and overtime codes in Clarity (the page called ‘Valid Shift and overtime Codes’) is no longer required – as this check is now done with data that is directly obtained from Oracle. Emerson Process Management – Confidential and Proprietary Document based on PMO Template: GEN-WORD, Revision 0 Clarity Enterprise Project Tool User Manual For The Project Manager Emerson Doc Number Revision A8 – 2015-Mar-16 – Page 116 of 136 7 Project Name Project ID ‘TWO TIER’ SCHEDULING TECHNIQUE IN OPEN WORKBENCH The purpose of using a ‘Two Tier’ Project scheduling technique is to enable the Project Manager to provide a client view of the Gantt chart with the confidence that the deliverable dates do not creep due to unforeseen time booking instances. By ‘Fixing’ the activity and Milestone dates it will be possible for the PM to provide a definitive level of detail that will be underwritten by a series of resource driven activities that are necessary to collect project financials. It is expected that the technique will be initially utilised by the PMO Planning group, who consist of dedicated Planning Engineers who have the expert knowledge to carry out this technique. However, it is not beyond any operator who has received the formal Open Workbench training provided by the PMO. One of the main objectives of the PMO Planning Group is to provide a professional planning service and therefore limit the time required by the Project Managers/Lead Engineers on planning activities and for them to dedicate more time and energy with the client. The first stage in setting up the ‘Two Tier’ schedule is to ensure that your Open Workbench (OWB) desktop is set up with the correct views and highlights files required to carry out this technique. These views and highlight files are available from the PMO Planning Group or PMO Support Group. On receipt of these views they need to be placed in a dedicated file on your desktop. The preferred path is C:\Program Files\Open Workbench\Views. You should create a new folder called ‘2TierViews’. Copy the .rwv and .rwh files to this folder. Open the OWB application and select ‘File’, ‘Preferences’ from the menu. Select ‘Locations’ tab and select ‘Highlights File’, then select ‘Browse’. Emerson Process Management – Confidential and Proprietary Document based on PMO Template: GEN-WORD, Revision 0 Clarity Enterprise Project Tool User Manual For The Project Manager Emerson Doc Number Revision A8 – 2015-Mar-16 – Page 117 of 136 Project Name Project ID When the folder window opens, navigate from C:\Program Files\Open Workbench\Views and you will see the file ‘2TierViews’, select this and enter ‘Open’. Select the first view file and select ‘Open’ Emerson Process Management – Confidential and Proprietary Document based on PMO Template: GEN-WORD, Revision 0 Clarity Enterprise Project Tool User Manual For The Project Manager Emerson Doc Number Revision A8 – 2015-Mar-16 – Page 118 of 136 Project Name Project ID This returns you to the ‘Options’ window where you select ‘OK’. This has now loaded the new ‘Highlights File’ to your OWB desktop. Next step is to load the OWB views to the desktop. Go to ‘Project’ ‘Manage Library’. Highlight ‘Groups’, and select ‘Add’. Emerson Process Management – Confidential and Proprietary Document based on PMO Template: GEN-WORD, Revision 0 Clarity Enterprise Project Tool User Manual For The Project Manager Emerson Doc Number Revision A8 – 2015-Mar-16 – Page 119 of 136 Project Name Project ID Enter the name ‘Two Tier Views’. Highlight the folder ‘Two Tier Views’, and select ‘Add’. Navigate to C:\Program Files\Open Workbench\Views\2TierViews and select ‘Open’. Highlight the first of the .rwv files and select ‘Open’ Emerson Process Management – Confidential and Proprietary Document based on PMO Template: GEN-WORD, Revision 0 Clarity Enterprise Project Tool User Manual For The Project Manager Emerson Doc Number Revision A8 – 2015-Mar-16 – Page 120 of 136 Project Name Project ID Next step is to repeat the procedure for all views. Highlight ‘Two Tier Views’ and select ‘Add’. Then highlight each file individually until you have selected all of them. When you can see all of the views in the ‘Libraries’ window, select ‘Close’. This will have populated your OWB desktop with the ‘Two Tier’ views. Emerson Process Management – Confidential and Proprietary Document based on PMO Template: GEN-WORD, Revision 0 Clarity Enterprise Project Tool User Manual For The Project Manager Emerson Doc Number Revision A8 – 2015-Mar-16 – Page 121 of 136 Project Name Project ID The next stage in using the ‘Two Tier’ technique is to import the activities to enable the Project Manager to set durations and dates according to agreed ‘As-Sold’ hours and deliverables. There is a template project set up in the Clarity production system, project number ‘002 TIER TEMPLATE’. This project is set up as a simple DCS project with a simple sequence of activities. However, in the hands of the PMO Planning Group, this can be further enhanced to include any level of detail, depending on the PM requirements. Next step is to open this project schedule in OWB. The schedule will open in your default view, usually Gantt chart. If so, select ‘PMO Two Tier Emerson and Customer Activities’ from the ‘Two Tier Views’ menu on the left hand side Emerson Process Management – Confidential and Proprietary Document based on PMO Template: GEN-WORD, Revision 0 Clarity Enterprise Project Tool User Manual For The Project Manager Emerson Doc Number Revision A8 – 2015-Mar-16 – Page 122 of 136 Project Name Project ID The screen should then populate with a combination of activities, some in blue and others in black. If not, then the ‘Highlights File’ you loaded earlier is not yet activated. Check the procedure for setting this up before you proceed. Some details about this view; All Customer Activities are ‘Fixed’ duration and can be edited directly in the ‘Duration Days’ column. Emerson ‘Project Controls’ activities are ‘Fixed’ duration and resources are assigned ‘Contour’ loading pattern. Duration of these activities is based on final agreed project dates with the PM. All Customer activities are NOT open for time entry. All Emerson activities are marked ‘Hide Task from Customer View’. Emerson Process Management – Confidential and Proprietary Document based on PMO Template: GEN-WORD, Revision 0 Clarity Enterprise Project Tool User Manual For The Project Manager Emerson Doc Number Revision A8 – 2015-Mar-16 – Page 123 of 136 Project Name Project ID Selection of ‘Milestone Variance Required x = Yes’ will mark the milestone for the ‘Milestone Variance View’. To identify ‘Customer’ and ‘Emerson’ activities, note text field is used. These identifiers are used in the filters for all views. Selecting ‘2 Tier Resource Assignment’ view will show this screen. Some details about this view; ONLY activities in black type will have resource roles assigned at 100%. Duration of these activities will be determined by the hours assigned and the availability of the resource roles. ETC’s can be entered into the ‘ETC Hours’ column directly. Loading patterns can be edited directly for each resource in this view. ‘Project Controls’ activities that are usually project duration based must be selected as ‘Contour’. Actual hours posted will be shown in the ‘Actual’ column. Figures in the Spreadsheet side of the view will be ‘Assignment ETC’s’ for the individual resources per available time period. Resources having a ‘Fixed’ loading pattern will require the ETC to be entered directly into the time period in the spreadsheet view. Selecting ‘Customer View’ will show this screen. Emerson Process Management – Confidential and Proprietary Document based on PMO Template: GEN-WORD, Revision 0 Clarity Enterprise Project Tool User Manual For The Project Manager Emerson Doc Number Revision A8 – 2015-Mar-16 – Page 124 of 136 Project Name Project ID Some details about this view; This is a view that can be shared with the client, it indicates all of the detailed activities the Project Manager has agreed with the customer. All of these activities are ‘Fixed’ duration and can be adjusted directly in the ‘Duration Days’ column. Manual percent complete can be entered into this view directly in the ’% Complete’ column. Start and finish dates can be edited directly in this view. However, these dates will have to be set in the ‘Constraints’ window if they are to be saved. Summary percent complete will be shown in the Gantt chart activities if they are applied in the ‘% Complete’ column. Selecting ‘2 Tier Emerson Activities Only View’ will show this screen; Some details about this view; This is a view that specifically looks at ‘Emerson’ activities only. Similar to the ‘Emerson View’ but without the customer activities. This makes the schedule easier to read and update. Emerson Process Management – Confidential and Proprietary Document based on PMO Template: GEN-WORD, Revision 0 Clarity Enterprise Project Tool User Manual For The Project Manager Emerson Doc Number Revision A8 – 2015-Mar-16 – Page 125 of 136 Project Name Project ID Critical path will be shown on this view to indicate the activities that have the least or no float. This view is intended to be used primarily by the PMO Planner to analyse schedule progress and critical path analysis. Selecting ‘Milestone Variance View’ will show this screen: Some details about this view: This is a view that measures the variance between the ‘Fixed’ milestones and the ‘Floating’ milestones of the resource driven schedule. By comparing the variance between the two milestones, the Project Manager can determine what action to take to stop any schedule creep. ‘Fixed’ customer agreed milestones are shown in blue. ‘Floating’ Emerson milestones are shown in black. Customer milestone dates can be edited directly in the ‘Finish’ column. However, constraints will have to be applied in the task properties window if they need to be saved. To identify an activity or milestone as either ‘Customer’ or ‘Emerson’, follow these instructions; Highlight the activity you need to identify and select F8. This will show the Task Properties window. Select the ‘Notes’ tab and type in either ‘Emerson’ or ‘Customer’ and select ‘Add’. Emerson Process Management – Confidential and Proprietary Document based on PMO Template: GEN-WORD, Revision 0 Clarity Enterprise Project Tool User Manual For The Project Manager Emerson Doc Number Revision A8 – 2015-Mar-16 – Page 126 of 136 Project Name Project ID By identifying each activity this way will determine which view the activity will appear in. Other factors that need to be taken into consideration when developing ANY project schedule include the following; Creation of a Work Breakdown Structure to the Project Manager and customer requirements. Ensure the ‘Activity Codes’ are assigned with the appropriate selection. Ensure the correct ‘Mandatory Milestones’ are identified (Against Customer Activities). Ensure ‘Customer Survey’ stop points are allocated at the appropriate stages in the project. Ensure correct project ‘Calendar’ is selected for the country in which the project is being performed. Ensure resource allocation % is adequate enough to achieve efficient scheduling. Ensure the ‘Transfer Assignments’ tool is used when moving named resources to resource role activities. This includes moving ETC’s from named resource to named resource. Ensure activity ID’s are sequenced in such a manner that the addition of new activities can take place and the sequence remains in place. Ensure that activities that are designated for ‘Execute in BCEC’ are correctly identified and communicated to the BCEC Project Manager so the PMO Planner can assign appropriate BCEC resources to the activities. Once the schedule is underway, ensure any ‘Rework’ activities are correctly identified and the appropriate budget assigned to the activity. This list is just an indication of project schedule requirements. For further instruction on these and many other planning procedures please refer to the ‘PMO Planners Manual’. Emerson Process Management – Confidential and Proprietary Document based on PMO Template: GEN-WORD, Revision 0 Clarity Enterprise Project Tool User Manual For The Project Manager Emerson Doc Number Revision A8 – 2015-Mar-16 – Page 127 of 136 Project Name Project ID 8 OPEN WORKBENCH TO MICROSOFT PROJECT CONVERSION TOOL 8.1 Purpose This chapter sets out the method for use of the Schedule Converter tool, part of a set of tools known collectively as the ‘Clarity Toolbox’ that will support the business requirements of PSS in the management and execution of its projects. The Toolbox will support the PMO Processes in areas where a tool has been identified as needed but is not necessarily covered by core Clarity functionality. 8.2 Schedule Conversion Schedule conversion is required when a customer or other third party has a contractual requirement for supply of a project schedule in a different format to the ones currently available. The most common requests in this area are for Microsoft Project and Primavera format schedules. This tool will only produce an MSP format. The requirement is met by providing a ‘picture’ of the OWB schedule in the format specified, this requires Task and Dependency data to be present and certain criteria attached to the same. It does not include resource assignment data in this first release. For 'Open Workbench’ conversion to ‘Microsoft Project’ the sequence of operations within the Toolbox will be – 1. User selects project by name/ID. 2. Tool requests Project, Task and Dependency data from the Clarity database. 3. Tool builds new MSP XML file for required format using pre-determined data transformations. 4. Tool launches MSP and imports new XML file. 5. Tool saves file to users’ desktop as standard MSP file format. For operation 3 the individual transformations from OWB XML attributes to MSP XML attributes will be specified and built into the tool. No additional user screens and pages are foreseen for this tool. 8.3 Access to Clarity Toolbox Functionality Access to the Clarity toolbox will be granted on request from the PMO Support group. They will provide an additional tab on your Clarity ‘Overview’ screen as shown below: Emerson Process Management – Confidential and Proprietary Document based on PMO Template: GEN-WORD, Revision 0 Clarity Enterprise Project Tool User Manual For The Project Manager Emerson Doc Number Revision A8 – 2015-Mar-16 – Page 128 of 136 Project Name Project ID Once you have access to the Clarity Toolbox tab you can start to use the conversion tool. 8.4 Using the Conversion Tool After selecting the Clarity Toolbox tab you will see this screen; Select the ‘PMO Clarity Toolbox’ Icon. This will launch the Clarity Toolbox application in a different window. Emerson Process Management – Confidential and Proprietary Document based on PMO Template: GEN-WORD, Revision 0 Clarity Enterprise Project Tool User Manual For The Project Manager Emerson Doc Number Revision A8 – 2015-Mar-16 – Page 129 of 136 Project Name Project ID If you put cursor on Toolbox Home will find a short menu that contains ‘MSP Schedule Converter’, select this option to take you to the next screen; In this screen you can either type in the ‘Project Name’ or the ‘Project ID’. The fields will also accept ‘wild cards’ with the use of an asterisk (*). For example; type in *valero* in the ‘Project Name’ field. The result will filter to all projects with ‘valero’ within the project name; Here you can see the result of the wild card filter. To select the project for conversion click on the icon to the left of the ‘Project ID’. This may take a few moments as the Conversion tool gathers the data from Clarity and creates an MSP file. MSP Schedule Converter will only convert those projects which has financial department and Financial location populated in the financial properties. Financial status can be Hold or Open Emerson Process Management – Confidential and Proprietary Document based on PMO Template: GEN-WORD, Revision 0 Clarity Enterprise Project Tool User Manual For The Project Manager Emerson Doc Number Revision A8 – 2015-Mar-16 – Page 130 of 136 Project Name Project ID If the computer you are working does have MS Project installed, this window will appear; If you can see ‘Microsoft Project Document’, Select the ‘Save’ option. Then map to a directory on your local PC or server and save the file which will be in an MSP format (.mpp). If the computer you are working on does not have MS Project installed you will see the following; Emerson Process Management – Confidential and Proprietary Document based on PMO Template: GEN-WORD, Revision 0 Clarity Enterprise Project Tool User Manual For The Project Manager Emerson Doc Number Revision A8 – 2015-Mar-16 – Page 131 of 136 Project Name Project ID If you see ‘Type: Unknown File Type’ this indicates that the PC you are currently working on does not support this file type. In this instance, when you select ‘Save’ the following option MUST be selected. First, map to a directory on your local PC or server then select ‘Save as type: mpp Document’ from the drop down list. Select ‘Save’ for saving the file as an .mpp format for use on computers installed with MSP. It is advisable to check the converted MSP file before issuing to any client to ensure integrity of the data. This can only be checked on computers with the appropriate MSP licenses. Emerson Process Management – Confidential and Proprietary Document based on PMO Template: GEN-WORD, Revision 0 Clarity Enterprise Project Tool User Manual For The Project Manager Emerson Doc Number Revision A8 – 2015-Mar-16 – Page 132 of 136 Project Name Project ID If you encounter difficulties with this facility please contact the PMO support group for assistance. 8.5 Setting Up Microsoft Project Application To open and view the MSP (.mpp) file you must first have a licensed copy of Microsoft Project. Before opening a converted file in the MSP application it is advised to set up the ‘Calculation’ attribute to ‘Manual’. To do this, firstly open your MSP application in stand-alone mode, without opening any particular project. When opened navigate to ‘Tools’, ‘Options’, and select the ‘Calculation’ tab. Under ‘Calculation options for Microsoft Office Project’, ‘Option Mode’ select the ‘Manual’ radio button. Select ‘OK’. This step will ensure the converted schedule does not try to calculate using the different algorithms associated with MSP. The start date constraints will be honoured in the converted schedule if this setting is activated. 8.6 The Microsoft Project Schedule Output If you have a licensed copy of Microsoft Office Project, navigate to the directory where the conversion tool saved it to. Emerson Process Management – Confidential and Proprietary Document based on PMO Template: GEN-WORD, Revision 0 Clarity Enterprise Project Tool User Manual For The Project Manager Emerson Doc Number Revision A8 – 2015-Mar-16 – Page 133 of 136 Project Name Project ID If you select this file it will open it in MSP. 8.7 What Data Converts From OWB To MSP? In the initial conversion tool the data transferred from OWB to MSP is as follows; Visible Activities and Milestones: The only tasks that are converted are those that are not checked as ‘Hide for Customer’ in OWB. This means that if all tasks in OWB are free of this selection then all tasks will convert to MSP. The ‘Task Hide for Customer’ selection in OWB must be completed before conversion to ensure selected tasks are not converted. WBS ID and Task Name: The unique task ID as shown in OWB and the task description as shown in OWB Emerson Process Management – Confidential and Proprietary Document based on PMO Template: GEN-WORD, Revision 0 Clarity Enterprise Project Tool User Manual For The Project Manager Emerson Doc Number Revision A8 – 2015-Mar-16 – Page 134 of 136 Project Name Project ID Task Duration: The task duration as calculated by MSP from the task start date from the duration in days as shown in OWB. Task Start Date: The task start date as shown in OWB. This will now be seen as a ‘Must Start On’ constraint. This is due to MSP algorithm attempt to reschedule the OWB activities. We have therefore had to constrain all activities and milestones converted from OWB. Task Finish Date: The task finish date is calculated from the task start date by determining the task duration from OWB and showing the end date as seen in OWB. This date may vary from the one shown in OWB due to calendar settings in both OWB and MSP (see ‘Calendar’ below). % Complete: The task ‘% Complete’ column contains the same data from the ‘% Complete’ column in OWB. This is a manually entered field in OWB and is also enabled to be edited in this converted MSP schedule. In some cases it has been found that the graphical representation of ‘% Complete’ on the Gantt chart is incorrect. To correct this it is advised to enter the value again into the ‘% Complete’ column. This should return the correct graphical representation. Predecessors and Successors: The task and milestone predecessors and successors are converted to MSP as seen in OWB. Where lag has been used on these dependencies this has also converted to the MSP schedule and can be viewed in the predecessor and successor column data in MSP. Resources: The only resources converted from OWB to MSP are resource roles. These resources are not assigned to tasks and therefore not used in the MSP schedule. They are available in the ‘Resource Usage’ table in MSP if you wish to assign them after conversion. Calendar: The calendar in OWB is set by the user from pre-defined ones loaded onto Clarity by the PMO Support group. When the project gets converted to MSP it will adopt the ‘Standard’ calendar, which is without any national holidays. The conversion tool is designed to recognise task start dates and calculate end dates from the duration in days given in OWB. This ensures converted schedules maintain their start and end dates in MSP regardless of the absence of local calendars being available. Here is the Open Workbench schedule Emerson Process Management – Confidential and Proprietary Document based on PMO Template: GEN-WORD, Revision 0 Clarity Enterprise Project Tool User Manual For The Project Manager Emerson Doc Number Revision A8 – 2015-Mar-16 – Page 135 of 136 Project Name Project ID Here is the converted Microsoft Project schedule Project Name: The project name, details, Manager and company details are converted to MSP and can be viewed in MSP project properties window, see below; Emerson Process Management – Confidential and Proprietary Document based on PMO Template: GEN-WORD, Revision 0 Clarity Enterprise Project Tool User Manual For The Project Manager Emerson Doc Number Revision A8 – 2015-Mar-16 – Page 136 of 136 Project Name Project ID To show the project details on the MSP schedule output, select the ‘Page Set-Up’ option on ‘Print Preview’ and select the required fields to show on the final print out. Emerson Process Management – Confidential and Proprietary Document based on PMO Template: GEN-WORD, Revision 0


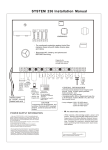


![Main lSetup l Cleanup] Parameters Locals}](http://vs1.manualzilla.com/store/data/005794368_1-f1180d1b21e5ef681561217b8f35e179-150x150.png)