1
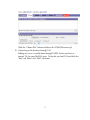
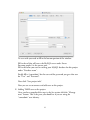
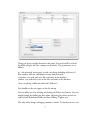
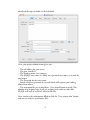
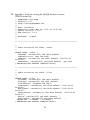
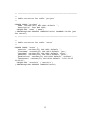
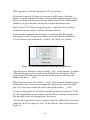
TAMS Analyzer 3 and Multi-User Projects
By Matthew Weinstein
1
I. Introduction
TAMS has always had multiple users in mind, ever since TA1 supported “signed
tags,” i.e., tags that had the coder’s initials embedded in them. This allowed
multiple users to look at the same data, but disaggregate their coding efforts.
TA3 extends this idea by allowing users to share data across multiple machines
and to synchronize their efforts. To support this there have been many changes
to the way that TA3 handles files, file locations, etc. In its initial release it should
be clear that certain features of TA3 remain the purview of the individual
including search results, code sets, file sets, result sets, and named searches and
search lists. What are shared are the codes that constitute the project and their
definitions and the data files. Acting as a repository is shared database. In this
release only one database is supported MySQL, which is by far the most popular
database on the web. Future support of other databases depends on a number of
things including demand, the availability of cocoa/gnuSTEP APIs (application
programming interfaces) and compatible licenses. You should know that
MySQL is available and can be used on most computing platforms including
Windows, Linux, and OS X.
For individual users, TAMS works as before. Users never actually need to use the
shared database, signed codes, etc. There is no upgrading of the file formats per
se, only of their arrangement in a more clearly organized directory structure.
People upgrading from earlier versions should follow the upgrade instructions in
the general User Manual. The key information used by TA3 to coordinate with
MySQL is actually held in a file separate from the general project information
called synchData.xml. This is stored in the project folder. This is only created if
a user clicks the “Save project info” button on the “Info” tab of the project
window.
Finally, some of the information that I’ll be discussing here requires fairly
sophisticated computer know-how. Furthermore, there are a lot of details the
person setting up a shared project will have to pursue elsewhere. For the person
who is not actually administrating the project, you should leap to section III,
which focuses on the client (i.e., TAMS) end of the process, and leave the
information in section II for the project administrator.
II. Setting up TA3 for multiple users
2
A. Setting up MySQL
As noted, setting up a project like this requires a comfort with complicated
computer issues, though there are some relatively friendly packages out there
to help administrators with these steps. You need to begin by either setting
up or accessing a MySQL server. It will be easiest if you can access an
existing set up and get permission to create data bases there. Most web
servers these days do have an operating version of MySQL. I do not want to
reproduce what is in multiple locations elsewhere on the web: how to install
MySQL. Here are some factors to consider when you do get access or set up
you own server:
A. Is it visible to everyone in the project? Obviously, if you can keep it
within an intranet things will be more secure than on the internet.
B. Do you want to use encrypted connections (SSL)? TA3 does support (at
least in theory) communication using SSL. You will need to make sure that
it is supported at the other end and that certificates and other details are set
up appropriately. I’m not an expert about such things so you should seek
information elsewhere about the use of SSL.
C. You need to train your researchers to understand that they will be dealing
with two levels of identity: there’s their MySQL access identity and their
TAMS identity (initials). These will very likely not be the same.
D. You must set or work with the MySQL administrator to set the
max_allowed_packet variable on the server to be large enough to handle the
biggest file you could imagine using. If you have video files in your project,
that could be a very large number. If the server goes down, they will need to
reset this value if it isn’t established in some sort of script on the server.
Furthermore your researchers will need that number to fill in on the client
end as well!
I will not go more into this, except to say that it will be VERY useful, if you
are the administrator for your project to have a copy of phpMyAdmin on
your machine, which is one of the easiest ways to create and manage MySQL
databases. Again, set up and use for this is left to you, the administrator, to
master.
3
B. Creating MySQL users
To access a MYSQL database you will need to create a variety of users with
different permissions to access the information in different ways. The first
user should be called “tamsadmin.” Unlike the other users, this name is not
optional. To get going, you must have the database administrator create this
user called “tamsadmin” with some password known only to you, the project
administrator. This user must be able to create a database and have both read
and write permissions on all of the files in the database. This user name and
password should only be used to manage the users of your project.
There are other MySQL accounts you should create. For the “researchers”
you should provide an account that has read/write access to all of the tables
of the database except “users” which should be read-only.
If this is being used in an educational setting you will want to create a
“student” account which has read-only access to all the tables in your project.
C. Creating a project database
Once you have your MySQL username and password, you can set up
phpMyAdmin. Using that web application you can connect to the MySQL
server and create a new database. Remember: One database per TAMS
project you are working on.
In phpMyAdmin database creation is done right on the home page, once
you’ve connected to your MySQL server. Simply fill in the name and click
create. Now you need to add the tables to this project. To do this click the
SQL tab on the bar across the top of your screen, that should reveal
something like the following:
4
Click the “Choose File” button and locate the TAMS3Structure.sql
D. Connecting to the database through TA3
Adding new users is actually done through TAMS. So first you have to
connect TA3 to your MySQL server. To do this you load TA3 and click the
“Info” tab. Here is the “Info” tab layout.
5
To start with you need to fill in the bottom portion of the window:
Fill in the url that will access the MySQL server under Server:
For most people 0 is the correct port.
Fill in the name you used in creating your MySQL database for this project
under “Database name”.
Finally fill in “tamsadmin” for the user and the password you gave that user
for “User” and “Password”.
Now click “Save project info”.
Now you are set to connect and add users to this project.
E. Adding TAMS users to the project
Once you have completed the steps in the last section click the “Manage
users” button. This is the pane you should see if you are using the
“tamsadmin” user identity.
6
Things are pretty straight forward at this point. You need to fill in each of
the fields and give the user a unique set of initials. The permissions are as
follows:
pi - (aka principal investigator) can do everything including add users (if
they connect with the tamsadmin account and password).
researcher - can read and write files and codes to the database.
student - has read only access to the files and codes in the database
Once everything is filled out click add “Add user”.
You should see the user appear in the list on top.
You can delete users by clicking and hitting the Delete user button. You can
modify people by clicking on their name, adjusting the values in the First
and Last and Permissions fields and then clicking “Update user”.
The only tricky thing is changing someone’s initials. To do that create a new
7
user with the new initials, and then delete the old user.
Remember to add yourself as a “pi”.
When done, click “Exit”.
F. Initializing the project
One more step is needed before other users can access this project, it needs
to be initialized. This involves you, the “tamsadmin” user, filling in the
project name and description on the “Info” tab along with the initials that
you gave yourself (with pi permissions). Remember to save this by clicking
the “Save project info” button.
This would be a good time to seed the project with any initial files or codes,
so import any files that should be the project as well as any codes you want
your researchers to start with.
Now it’s time to initialize this project with the “Synch” button at the bottom
of the “Info” tab.
Once this successfully completes, other researchers can access the database.
Remember to give them the appropriate MySQL username and password
and their initials.
You are still the holder of the files you added to the project database when
you synched. So if you want others to be able to work on these files you will
need to check them back in.
III. Working on a multi-user project with TA3 as a researcher
Section II guided the project administrator in setting up a project database. Now
that it is set up other users can connect and share their codes and files. These
operations will be covered in this section. Three critical operations are available
to researchers: synching data, checking files in, and checking them out.
A. Connecting to the database through TA3
To connect to the the database click on the Info tab of a new project. Leave
the Project Name and Description blank. The information from the project
administrator will fill in those details. You will need to get the rest of the
field information from your administrator, and there is no freedom in filling
in these fields. They must be exactly what the server is expecting. Nothing
8
outside of the top two fields can be left blank.
Once your project administrator gives you...
... The url/address for your server
... The port (usually 0)
... The database name (case matters)
... The MySQL user name (it’s likely not a personal user name, so it wont be
your name)
... The Password for that user name
... Initials which are personal to you and which will separate your coding
efforts from others
... The maximum file size in megabytes. Give yourself room to work. This
number may be quite large if you are working with audio or video files.
MySQL will crash if it doesn’t allow for file size.
Once you have this information filled in click the “Save project info” button
and you are ready to synchronize files!
9
B. Having files and holding files
TA3 system of sharing files through the central database allows users to have
access to the latest data (that researchers are willing to share) while
preventing people from overwriting each others files. The trick here is that
researchers can “have” files on their machine but they are not allowed to
monkey with them (in TA3). Monkeying means any form of editing
including correcting or coding the data. What you can do with these files is
search them so that you can examine the patterns of coding in them.
On the other hand, certain files you are the holder of, and those are the files
you are allowed to change including coding. No one else in your project can
monkey with those files. A file can only be held by one “person” at a time.
There is also a special holder of files called _lib. _lib refers to the library.
Those are, in essence, files not held by anyone and are available for being
checked out.
In fact checking in and out are simply matters of changing the holder of the
file. The files themselves are distributed through the system of researchers
connected to the project.
Finally, all files that you create are by default held by you until you check
them in.
C. Synching data
Once you have filled in the fields as described in section A. you can synch
your files with those on the server. All you have to do is click the synch
button. What you need to know here is what it does, since how to do it is so
simple.
The first thing that synch does is add any codes that the server has that you
don’t including their definitions. Next it does the reverse. It looks for codes
that you have that it doesn’t have and copies them to itself (or more
accurately TA3 sends them to the server). Finally, for the codes that both
you and the server have, TA3 goes through them and checks to see if there
are changes in the definitions that are more recent than the version you have
and sees if you have changed any code definitions since the last time you
synched. Note: once you have synched you can see the complete record of
definitions over time by going to the “Define codes” tab, clicking on a code
and clicking on the “History” button.
10
Then it goes through the files in a similar manner, though in the case of
updated files, the files on the server are replaced. First any new files on the
server are added to you. Similarly any files you’ve added to the project are
copied to the server. Each new file you receive is scanned to see if it has a
sound file attached to it and if one is that is downloaded as well (similarly in
the other direction). Then it handles the files that both you and it share. For
files you hold, it checks the modification date against the synch date, and if
they’ve changed they’re uploaded. For the files you don’t hold, if they’ve
been modified since synching you are given the new version.
Finally you can see a report of what has occurred by clicking on the “Report”
button.
Note, the holder of none of the files changes. You still hold the files you held
before the synch, etc. This is simply a way of giving and getting the latest
information.
D. Checking in and checking out files to work on
Finally, we can talk about checking in and checking out files. Remember,
this merely refers to who has the permission to modify and code files. The
files themselves are distributed throughout the system.
To allow others to work on files that you are holding you need to “Check
them in”. This is done through the “Check in” button on the Files tab.
Simply select the files you wish to check in (you must be the holder) from
the “File list” on the left side of the “Files” tab and click “Check in”. You
will see that the holder of the file will change to _lib if everything is
successful. Note that the file will also by synched with the one held by the
server so that the next person checking out the file will have the latest
version.
Checking out is only slightly more complicated. Before you check out
anything you should synch your project. Why? Because the holder of files
may have changed, and you need to know whether you have permission to
check out a file. A file must be held by “_lib” for you to check out given file.
To actually check out the file just select the files from the left file list and
click “Check out”. You should now be the holder of those files (your initials
should now appear next to those file names.
11
IV. Student accounts
The final multiuser feature that TA3 supports is a special read only account that
allows a classroom of students to get files from a server, play with them (code,
alter, create), but never return the files or new codes back to the server. The
original files will be safe.
To do this you will need to create a MySQL database as described in section II,
and create a user and password for MySQL that has only read permission from
all the tables in your database. Then add a user with “student” permissions, as
described in II.E. Now you merely have to give your students all the information
they need to connect and violà, they will have a class set of files automatically
delivered to them.
Note, depending on the server you have and the number of students/stations you
are dealing with, you may want to have the students do this in groups. I
remember days of whole classes trying to access a server and it pretty much failed
(or as we now say “got slashdotted”) right away.
12
V. Appendix 1: Future directions
A. Sharing of code and file sets
B. Memo and mail sending system
C. Personal passwords for each user
D. Encrypted file format
VI. Appendix 2: Useful websites
A. PHP for OS X (needed for phpMyAdmin):
http://www.entropy.ch/software/macosx/php/
B. phpMyAdmin: http://www.phpmyadmin.net/home_page/
C. MySQL binary installer for OS X:
http://www.entropy.ch/software/macosx/mysql/
D. MySQL home page: http://www.mysql.com/
13
VII. Appendix 3: Script for creating the MySQL database structure:
TAMS3Structure.sql
------------
phpMyAdmin SQL Dump
version 2.6.2
http://www.phpmyadmin.net
Host: localhost
Generation Time: May 04, 2005 at 03:55 PM
Server version: 4.1.11
PHP Version: 5.0.4
Database: `ttams2`
-- ---------------------------------------------------------- Table structure for table `codes`
-CREATE TABLE `codes` (
`codeName` varchar(255) NOT NULL default '',
`codeDefinition` text NOT NULL,
`codeDate` varchar(30) NOT NULL default '0000-00-00
00:00:00',
`codeAuthor` varchar(255) NOT NULL default 'gan ainm'
) ENGINE=MyISAM DEFAULT CHARSET=latin1;
-- ---------------------------------------------------------- Table structure for table `files`
-CREATE TABLE `files` (
`fileName` varchar(255) NOT NULL default '',
`fileType` varchar(25) NOT NULL default '',
`fileContents` longblob NOT NULL,
`createDate` varchar(30) NOT NULL default '0000-00-00
00:00:00',
`modifyDate` varchar(30) NOT NULL default '0000-00-00
00:00:00',
`checkoutDate` varchar(30) NOT NULL default '0000-00-00
00:00:00',
`patron` varchar(255) NOT NULL default '',
`contributor` varchar(25) NOT NULL default '',
UNIQUE KEY `fileName` (`fileName`)
) ENGINE=MyISAM DEFAULT CHARSET=latin1;
14
-- ---------------------------------------------------------- Table structure for table `project`
-CREATE TABLE `project` (
`name` varchar(255) NOT NULL default '',
`description` text NOT NULL,
UNIQUE KEY `name` (`name`)
) ENGINE=MyISAM DEFAULT CHARSET=latin1 COMMENT='Holds just
one record';
-- ---------------------------------------------------------- Table structure for table `users`
-CREATE TABLE `users` (
`userInit` varchar(25) NOT NULL default '',
`firstName` varchar(25) NOT NULL default 'gan',
`lastName` varchar(25) NOT NULL default 'ainm',
`password` varchar(255) NOT NULL default 'pass',
`permissions` varchar(20) NOT NULL default 'student',
`lastAccess` varchar(30) NOT NULL default '0000-00-00
00:00:00',
UNIQUE KEY `userInit` (`userInit`)
) ENGINE=MyISAM DEFAULT CHARSET=latin1;
15
VIII. Appendix 4: Trash Management in TA 3.70 and Later
In previous versions of TA there was no means to really remove a file from a
project. Using the traditional “Remove” button would temporarily dispose of the
file, but synching with the project database would restore the file. Administrators
would have to go in and delete the file after everyone had thrown it out.
With version 3.70 TA helps manage that process. Some parts of it are still not
automated, however, so this is still a less than ideal solution.
Removing files completely from the project is something only PI (principle
investigators) can do. The operation is done on the files tab of the work bench.
Two new buttons now sandwich the “check in” and “check out” buttons:
Figure 4.1 The trash management buttons on the workbench
Only files that are checked in (who are held by “_lib”) can be removed. To remove
a file from the project, select the files from the left file list and click the “Put in
trash” button. This will remove the file from the PI’s project, and change the
holder of the file to “__trash”.
When other users synch, files held by “__trash” will be removed from their project.
Furthermore, users cannot create or import files that have the names of trashed
files. They also cannot rename files to the names of files held by “__trash”.
TA does not keep track (yet) of who has synched and who hasn’t however. It will
be a PI’s responsibility to ask and make sure that all have synched (or removed the
files manually) in the end, through email, for instance.
Once the file is gone from everyone’s projects (which are held locally on each users
computer), the PI can empty the trash. To that click the “Show trash” button (see
Figure 4.1).
!
4-1
This will show the project trash list (see figure 4.2).
Figure 4.2 Show Trash Pane
Here is the pane where the PI can click the “Empty trash” button and purge these
files from the MySQL database. If some user hasn’t synched however, their version
of the file will be reimported.
Only PIs will see the “Undelete” and “Empty Trash” buttons. If no file is selected,
all files will be removed when the “Empty Trash” button is clicked. The PI can
also select specific files for removal.
The “Show trash” button also gives PIs a mechanism for “undeleting” files, i.e.,
changing the holder of a trashed item from “__trash” to “_lib” again. This will
make the file available to all users for “check out” and analysis.
!
4-2