1
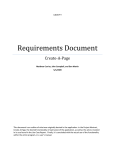
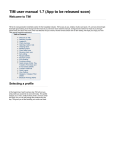
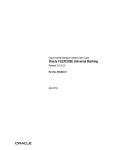
Home Inventory Project Final Presentation CIS 4398 Projects in Computer Science Thomas D Elliott Thomas Manigly Roy Zuniga 1|Page Introduction: Computer Software is currently being used in almost every area of everyday life. Cell Phones, televisions, stoves, cars and even some of our toasters use software to make them easier to use, and thereby improve life for the people that use them. With the influx of smart technology into our cars and cell phones it seems odd that the place where we spend the most time is lagging behind in this trend. Our homes are the next facet of our lives that we should improve using electronics. Imagine waking up in the morning and as soon as your alarm goes off the shower in your bathroom warms the water to a temperature of your liking. After you shower your home tells you this morning’s news and weather, at the same time sending a signal to your car to warm-up for your commute to work. All of these improvements are possible with current technology; there has just never been a strong initiative to implement them. The “Smart House” is a home that utilizes technology to make life easier for its occupants. No matter if you’re a senior citizen living alone or a college student rooming with four classmates, everyone can use technology in their homes to improve the quality of their life. Before we can build an actual smart house with have to develop the components that will be the foundation of the system. One of the components of vital importance is a way of organizing and keeping track of the items in the home. A “Home Inventory” system is a simple idea that can be used as one of the components of the smart home. Imagine that a terrible accident destroys the home of an individual; it is often the case that an exact account of the home owner’s personal belongings becomes an issue between the home owner and the insurance company. The Home Inventory solves this problem by keeping track of every item in the home; thereby making recovery of loses in an accident a much simpler process. Above we have noted some advantages of the HomeInventory. Keep in mind that the Home Inventory is only a component of a Smart House. By using your imagination you can envision many improvements that can be made to your home using technologies such as the Home Inventory. As technology advances it 2|Page won’t be long before fictional homes from some of our favorite movies, become a reality. 3|Page Home Inventory Project Report The Home Inventory project was developed for our “CIS 4339 Projects in Computer Science Course” at Temple University. The ultimate goal of the course was to allow students to utilize the fundamentals of Software Engineering in a group environment. An alternative goal for the project was to allow students to employ most of the facets of computer science they have learned in their undergraduate career in a substantial programming/research effort. My teams choose to use this experience not only to increase our knowledge of team oriented development, but also to acquire firsthand skill in technologies we had little practice in. We perceived this endeavor as more of a learning opportunity, then as an effort to develop a marketable product. The first seemingly odd design choice is the fact that the client and server in our project are written in different languages. The reason we wrote the client in C# was to allow us to gain some experience in Microsoft’s .NET framework and the Visual Studio development environment. We choose to write the Server in Java because of our familiarity with the synchronization features of the language. The final questionable design choice is the fact that we choose to develop a client/server application rather than a web app. The reason for this design choice is the fact that we planned to develop the program as a mobile application, we than wanted to deploy the software on a small portable device like a “Kindel” book reader. Neither of these ideas worked out mostly due to monetary issues and we stuck with the original design in order to stay on schedule. With the background information presented above we will now present the documentation for our project. The documentation breaks down into a requirements section, design section and a testing section. Each section contains different documents that we used to develop our project. Below we present our requirements documents. 4|Page Requirements documents Use Case Narrative User Manual 5|Page Home Inventory Use case Narrative The Home Inventory system will generally be used by two types of users, a home user and a system admin. Home users will consist of individuals who use the system for everyday inventory purposes. System Admins are a very select group of users who have access to the full system and can modify any aspect of the system. Below are the general activities attributed to each type of Actor Home User 6|Page Browse items User browses through the items in their inventory. Insert Item User inserts an item into the inventory. Delete Item User deletes an item from the inventory. Print Items User prints items. Modify Item User modifies the attributes of an item. Login Log into the system. Logout Logout of the system. Modify UserID Password User modifies their UserID and password for their system. The Admin has all the functionality of the User plus advanced administrative capabilities. Below we summarize the actions of the Admin: Admin Browse Items Admin browses through the items in Any inventory. Insert Item Admin inserts an item into Any inventory. Delete Item Admin deletes an item from Any inventory. Print Items User prints items from Any. Modify Item User modifies the attributes of an item in Any. Login Log into Any system. Logout Logout of Any system. Remove User Account Admin removes Any user account. Create User Account Admin creates Any user account. Modify User Account Admin modifies Any user account. Access system attributes Admin accesses statistical data about system and users. Print system attributes Admin prints attributes of system and users. Use Case Narratives The following definitions will be use to generally describe in a high level what each use case is trying to accomplish. The narratives are intended to add upon the brief descriptions presented in the table above. Some Narratives require prerequisites of another use case before they can be accomplished. The Use case title is displayed in blue and the Home Inventory system itself is referred to as “System”. Menus are highlighted in green. 7|Page Use Case narrative for User: 1) Login a) The User enters ID and Password into the system. b) The System verifies ID and Password. c) The System allows or denies the User entry. d) The System displays the “Welcome Menu” which contains buttons to access the “Browse Items”, “Insert Items” and “Account Settings” menus. 2) Browse Items (Prerequisite - Login) a) User accesses “Browse Items” menu. b) The System lists the items to be browsed in a display field on the screen. c) The System also lists the “Delete Items”, “Modify Items” and “Print Items” buttons. d) User browses items in System 3) Insert Items (Prerequisite - Login) a) User selects “Insert Item” menu. b) The System displays “Insert Item” menu options. c) The User can choose to insert manually or by bar code scanner. d) The User chooses bar code scanner. i) The User scans item bar code. ii) The System looks up Bar Code ID of item. iii) The System adds the item to the inventory e) The User chooses Manuel Input i) The System displays Manuel Input screen ii) The User enters in item information iii) The System adds the item to the inventory 4) Delete Items(Prerequisite – Login and Browse menu) a) The User selects the “Delete Item” button from the “Browse Menu”. b) The System prompts the User to select the item/s to delete. c) The User finds the item to be deleted in the Browse field. d) The System prompts the User to confirm the deletion. e) The User confirms the item deletion. f) The System removes the item from the inventory 5) Print Items(Prerequisite – Login and Browse menu) a) The User selects the “Print Item” button. b) The System prompts the User to select the item to print. c) The User selects items to be printed. d) The System prompts the User to confirm the print job. e) The User confirms the Print. f) The items are printed. 6) Modify Item(Prerequisite – Login and Browse menu) a) The User selects “Modify Item” menu. b) The System prompts the User to select the item to modify from the Browse field. 8|Page c) The User selects the item to modify. d) The system displays the attributes of the item. e) The User modifies the item’s Attributes. f) The System prompts the User to confirm the modification of the item’s attributes. g) The User confirms the modification. h) The System saves the attributes. 7) Modify User ID and Password (Prerequisite - Login) a) The User selects the “Account Settings” menu. b) The System Prompts the User for the User ID and Password. c) The User enters the UserID and Password. d) The System displays account information. e) The User modifies the account settings. f) The System prompts the User to confirm the new settings. g) The User confirms the settings. h) The System saves the account settings 8) Logout (Prerequisite - Login) a) User Selects Logout. b) System Logs User out. 9|Page • The User enters ID and Password into the system. • The System verifies ID and Password. • The System allows or denies the User entry. • User accesses “Browse Menu”. • The System lists the items on the screen. • User browses items in System • User selects “Insert Item” menu. • The System displays “Insert Item” menu options. • The User can choose to insert manually or by bar code scanner. • The User chooses bar code scanner. • The User scans item bar code. • The System looks up Bar Code ID of item. • The System adds the item to the inventory • The User chooses Manuel Input • The System displays Manuel Input screen • The User enters in item information • The System adds the item to the inventory Login Browse Items (Prerequisite - Login) Insert Items (Prerequisite - Login) • • • • • • • • • • • • • • The User selects the “Delete Item” menu. The System displays the items in the inventory. The User finds the item to be deleted. The User selects to deletes the item. The System removes the item from the inventory Delete Items(Prerequisite Login) The User selects “Print Item” menu. The System displays items in the inventory. The User selects items to be printed. The items are printed. Print Items(Prerequisite Login) • The User selects the “Manage Accounts” menu. • The System Prompts the User for the User ID and Password. • The User enters the UserID and Password. • The System displays account information. • The User modifies the account settings. • The System saves the account settings Modify User ID and Password (Prerequisite - Login) 10 | P a g e The User selects “Modify Item” menu. The System displays the items in the inventory. The User selects the item to modify. The system displays the attributes of the item. The User modifies the item’s Attributes. Modify Item(Prerequisite Login) • User Selects Logout. • System Logs User out. Logout (Prerequisite Login) Use Case narrative for Admin: 1) Login a. b. c. d. 2) 3) 4) 5) The Admin enters ID and Password into the system. The System verifies ID and Password. The System allows or denies the Admin entry. The System displays the “Welcome Menu” which contains buttons to access the “Browse Items”, “Insert Items”, ”System settings” and “Account Settings” menus. Browse Items (Prerequisite - Login) a. Admin accesses “Browse Items” menu. b. The System prompts the Admin for the UserID of the Account to access. c. The Admin enters the UserID of the account to access. d. The System lists the items to be browsed in a display field on the screen. e. The System also lists the “Delete Items”, “Modify Items” and “Print Items” buttons. f. Admin browses items in System. Insert Items (Prerequisite - Login) a. Admin selects “Insert Item” menu. b. The System prompts Admin to enter the UserID of the account to insert items into. c. The System displays “Insert Item” menu options. d. The Admin can choose to insert manually or by bar code scanner. e. The Admin chooses bar code scanner. i. The Admin scans item bar code. ii. The System looks up Bar Code ID of item. iii. The System adds the item to the inventory f. The admin chooses Manuel Input i. The System displays Manuel Input screen ii. The admin enters in item information iii. The System adds the item to the inventory Delete Items(Prerequisite – Login and Browse menu) a. The Admin selects the “Delete Item” menu from the “Browse Menu”. b. The System prompts the Admin to enter in UserId of the account to Delete items from. c. The Admin enters the UserID. d. The System refresh the browse field with the items of the UserID just entered. e. The System prompts the Admin to select the item/s to delete. f. The Admin finds the item to be deleted in the Browse field. g. The System prompts the Admin to confirm the deletion. h. The Admin confirms the item deletion. i. The System removes the item from the inventory Print Items(Prerequisite – Login and Browse menu) a. The Admin selects the “Print Item” menu. 11 | P a g e b. The System prompts the Admin to enter in the UserID of the account to print items from. c. The Admin enters in the UserID. d. The System prompts the Admin to select the item to print. e. The Admin selects items to be printed. f. The System prompts the Admin to confirm the print job. g. The Admin confirms the Print. h. The items are printed. 6) Modify Item(Prerequisite – Login and Browse menu) a. The Admin selects “Modify Item” menu. b. The System prompts the Admin to enter in the UserID of the account to modify the items of. c. The Admin enters in the UserID. d. The System prompts the Admin to select the item to modify from the Browse field. e. The Admin selects the item to modify. f. The system displays the attributes of the item. g. The Admin modifies the item’s Attributes. h. The System prompts the Admin to confirm the modification of the item’s attributes. i. The Admin confirms the modification. j. The System saves the attributes. 7) Modify User ID and Password (Prerequisite - Login) a. The Admin selects the “Account Settings” menu. b. The System Prompts the Admin for the User ID and Password of the account to modify. c. The Admin enters the UserID and Password of the account. d. The System displays account information. e. The Admin modifies the account settings. f. The System prompts the Admin to confirm the new settings. g. The Admin confirms the settings. h. The System saves the account settings. 8) Create User Account(Prerequisites – Welcome Menu) a. The Admin selects the “System Settings” menu. b. The System prompts the Admin for the Admin UserID and Password. c. The Admin enters the UserID and Password. d. The System confirms UserID and Password and displays “System Settings” menu with “Create account”, “Modify account”, “Delete Account” and “System Attributes” buttons. e. The Admin selects the “Create Account menu”. f. The System displays the “Create Account menu”. g. The Admin enters in the UserId and Password of the account to be created. h. The system creates the Account. 9) Create User Account(Prerequisites – Welcome Menu) a. The Admin selects the “System Settings” menu. b. The System prompts the Admin for the Admin UserID and Password. c. The Admin enters the UserID and Password. 12 | P a g e d. The System confirms UserID and Password and displays “System Settings” menu with “Create account”, “Modify account”, “Delete Account” and “System Attributes” buttons. e. The Admin selects the “Modify Account menu”. f. The System displays the “Modify Account menu”. g. The Admin enters in the UserId and Password of the account to be modified. h. The System displays the account attributes. i. The Admin modifies the account attributes. j. The System Saves the modification. 10) Create User Account(Prerequisites – Welcome Menu) a. The Admin selects the “System Settings” menu. b. The System prompts the Admin for the Admin UserID and Password. c. The Admin enters the UserID and Password. d. The System confirms UserID and Password and displays “System Settings” menu with “Create account”, “Modify account”, “Delete Account” and “System Attributes” buttons. e. The Admin selects the “Delete Account menu”. f. The System displays the “Delete Account menu”. g. The Admin enters in the UserId and Password of the account to be deleted. h. The system deletes the Account. 11) Modify System attributes(Prerequisites – Welcome Menu) a. The Admin selects the “System Settings” menu. b. The System prompts the Admin for the Admin UserID and Password. c. The Admin enters the UserID and Password. d. The System confirms UserID and Password and displays “System Settings” menu with “Create account”, “Modify account”, “Delete Account” and “System Attributes” buttons. e. The Admin selects the “System Attributes”. f. The System displays the “System Attributes”. g. The Admin modifies the System’s Attributes. h. The System saves the modification. 12) Print System attributes(Prerequisites – Welcome Menu) a. The Admin selects the “System Settings” menu. b. The System prompts the Admin for the Admin UserID and Password. c. The Admin enters the UserID and Password. d. The System confirms UserID and Password and displays “System Settings” menu with “Create account”, “Modify account”, “Delete Account” and “System Attributes” buttons. e. The Admin selects the “System Attributes”. f. The System displays the “System Attributes”. g. The Admin selects the “Print Attributes” button. h. The System prints the attributes. 13 | P a g e • • • • The Admin enters ID and Password into the system. The System verifies ID and Password. The System allows or denies the Admin entry. The System displays the “Welcome Menu” which contains buttons to access the “Browse Items”, “Insert Items”, ”System settings” and “Account Settings” menus. Login • Admin accesses “Browse Items” menu. • The System prompts the Admin for the UserID of the Account to access. • The Admin enters the UserID of the account to access. • The System lists the items to be browsed in a display field on the screen. • The System also lists the “Delete Items”, “Modify Items” and “Print Items” buttons. • Admin browses items in System. Browse Items (Prerequisite Login) • Admin selects “Insert Item” menu. • The System prompts Admin to enter the UserID of the account to insert items into. • The System displays “Insert Item” menu options. • The Admin can choose to insert manually or by bar code scanner. • The Admin chooses bar code scanner. • The Admin scans item bar code. • The System looks up Bar Code ID of item. • The System adds the item to the inventory • The admin chooses Manuel Input • The System displays Manuel Input screen • The admin enters in item information • The System adds the item to the inventory Insert Items (Prerequisite - Login) • The Admin selects the “Delete Item” menu from the “Browse Menu”. • The System prompts the Admin to enter in UserId of the account to Delete items from. • The Admin enters the UserID. • The System refresh the browse field with the items of the UserID just entered. • The System prompts the Admin to select the item/s to delete. • The Admin finds the item to be deleted in the Browse field. • The System prompts the Admin to confirm the deletion. • The Admin confirms the item deletion. • The System removes the item from the inventory • The Admin selects the “Print Item” menu. • The System prompts the Admin to enter in the UserID of the account to print items from. • The Admin enters in the UserID. • The System prompts the Admin to select the item to print. • The Admin selects items to be printed. • The System prompts the Admin to confirm the print job. • The Admin confirms the Print. • The items are printed. • The Admin selects “Modify Item” menu. • The System prompts the Admin to enter in the UserID of the account to modify the items of. • The Admin enters in the UserID. • The System prompts the Admin to select the item to modify from the Browse field. • The Admin selects the item to modify. • The system displays the attributes of the item. • The Admin modifies the item’s Attributes. • The System prompts the Admin to confirm the modification of the item’s attributes. • The Admin confirms the modification. • The System saves the attributes. Delete Items(Prerequisite – Login and Browse menu) Print Items(Prerequisite – Login and Browse menu) Modify Item(Prerequisite – Login and Browse menu) • The Admin selects the “Account Settings” menu. • The System Prompts the Admin for the User ID and Password of the account to modify. • The Admin enters the UserID and Password of the account. • The System displays account information. • The Admin modifies the account settings. • The System prompts the Admin to confirm the new settings. • The Admin confirms the settings. • The System saves the account settings. • The Admin selects the “System Settings” menu. • The System prompts the Admin for the Admin UserID and Password. • The Admin enters the UserID and Password. • The System confirms UserID and Password and displays “System Settings” menu with “Create account”, “Modify account”, “Delete Account” and “System Attributes” buttons. • The Admin selects the “Create Account menu”. • The System displays the “Create Account menu”. • The Admin enters in the UserId and Password of the account to be created. • The system creates the Account. Modify User ID and Password (Prerequisite - Login) Create User Account(Prerequisites – Welcome Menu) • The Admin selects the “System Settings” menu. • The System prompts the Admin for the Admin UserID and Password. • The Admin enters the UserID and Password. • The System confirms UserID and Password and displays “System Settings” menu with “Create account”, “Modify account”, “Delete Account” and “System Attributes” buttons. • The Admin selects the “Delete Account menu”. • The System displays the “Delete Account menu”. • The Admin enters in the UserId and Password of the account to be deleted. • The system deletes the Account. • The Admin selects the “System Settings” menu. • The System prompts the Admin for the Admin UserID and Password. • The Admin enters the UserID and Password. • The System confirms UserID and Password and displays “System Settings” menu with “Create account”, “Modify account”, “Delete Account” and “System Attributes” buttons. • The Admin selects the “System Attributes”. • The System displays the “System Attributes”. • The Admin modifies the System’s Attributes. • The System saves the modification. • The Admin selects the “System Settings” menu. • The System prompts the Admin for the Admin UserID and Password. • The Admin enters the UserID and Password. • The System confirms UserID and Password and displays “System Settings” menu with “Create account”, “Modify account”, “Delete Account” and “System Attributes” buttons. • The Admin selects the “System Attributes”. • The System displays the “System Attributes”. • The Admin selects the “Print Attributes” button. • The System prints the attributes. Modify System attributes(Prerequisites – Welcome Menu) Print System attributes(Prerequisites – Welcome Menu) Create User Account(Prerequisites – Welcome Menu) 14 | P a g e • The Admin selects the “System Settings” menu. • The System prompts the Admin for the Admin UserID and Password. • The Admin enters the UserID and Password. • The System confirms UserID and Password and displays “System Settings” menu with “Create account”, “Modify account”, “Delete Account” and “System Attributes” buttons. • The Admin selects the “Modify Account menu”. • The System displays the “Modify Account menu”. • The Admin enters in the UserId and Password of the account to be modified. • The System displays the account attributes. • The Admin modifies the account attributes. • The System Saves the modification. Create User Account(Prerequisites – Welcome Menu) User Manual 15 | P a g e Home Inventory User Manual About Home Inventory The HomeInventory Project consists of a customized front-end user application and a Java application server manipulating a MySQL database for data storage. With two types of roles, Users and Administrators, clients logged into the HomeInventory have access to a variety of commands. HomeInventory stores each user’s items safely and privately, without worry that others will see their additions. Why Home Inventory? HomeInventory allows for multiple users to store their belongings privately into a shared database. With the HomeInventory, you can track your accumulated purchases by entering Logging In: When first running the client application, you’ll be greeted with the following page. Entering your credentials will log you into the system. Be sure as to not leave either field blank. If you attempt a login with incorrect credentials, you’ll be prompted with an appropriate message. Below is an example of logging in with an invalid username. 16 | P a g e Admin Usage Navigating the Home Screen In HomeInventory, Users and Administrators have different home pages, catering to the features of each. First, we’ll take a look at the Administrative features. Below, at the Home Menu, there are four major options. 17 | P a g e Creating A New User Like most of the menus, the Create User screen is very intuitive. With this feature, Administrators supplies the new information required to create a new user. Such as below, Administrators fill in the fields and click on Confirm. 18 | P a g e Assume the username supplied, if the user does not already exist, the user will be created, granting immediate access to the system. Once a user is created, the Home Screen will refresh onto the screen. Navigating to the Browse Users screen will display the existant Users in the system. Browse Users Navigating to the Browse Users menu, the list of Users is displayed with the options to View Users Items, Remove Users, and View User Attributes. 19 | P a g e Removing Users For Remove User, the currently selected user will be deleted. All items belonging to the user will also be deleted. Viewing Users Items The Browse Users Items screen provides a great deal of information. The left side on the screen lists the items belonging to a given user. By selecting an item, the information pertinent to that item is distributed to the boxes on the right. The owner of the items displayed is shown in the User box. Deleting Items By clicking on the Delete Item button, the selected item is deleted from the user’s table. The screen is refreshed, and the item is no longer listed since it no longer exists. Modifying Items To modify any item, simply replace the text in the right-side boxes and click Modify Item 20 | P a g e Modifying Users Modifying users works in the same manner as modifying items. From the Browse Users menu, select a user and click on View User Attributes. The screen is nearly identical to the Create User menu. The users information is displayed in the fields; to modify change values and choose Confirm Modify. Inserting Items From the Home Screen, navigate to the Insert Item Menu via the Admin Insert Items button. Inserting an item into a users table consists of simply selecting a user and supplying the item information. For ease of use and consistency, using barcode lookup checks the supplied UPC code against a UPC database and retrieves the information. 21 | P a g e Users Home Screen Navigation The User Home screen is substantially more limited than the Administrator page. 22 | P a g e Browsing Items Deleting Items By clicking on the Delete Item button, the selected item is deleted from the user’s table. The screen is refreshed, and the item is no longer listed since it no longer exists. Modifying Items To modify any item, simply replace the text in the right-side boxes and click Modify Item. 23 | P a g e Inserting Items For Users, insert consists of Manual and Barcode inserts. For Barcode insertion, simply enter the UPC number and choose Barcode Insert. If the item is found in the database, it it inserted automatically. Otherwise, the item must be inserted manually. 24 | P a g e 25 | P a g e Design Documents Section Design Diagrams XML Protocol Documents 26 | P a g e General Description The purpose of the home Inventory project is to produce a software product that can be used to inventory the household items of a home. A description of the items in a home will be stored in a database on a central server that will keep track of the inventory of multiple homes. The core features of the product will include but are not limited to: 1. A networking functionality consisting of an automatic product suggestion feature that will return product suggestions based on current contents of database. The system will also interface with a central server to store the contents of a particular household. 2. A central server that store the contents of a household in a database. The database will consist of UPC codes that will precisely identify each household item by serial number. 3. A user interface that will be very intuitive to even the most novice computer user. The goal of the user interface design is to allow convenient access to the database and encourage regular use of the system. The above features are to be considered the core design goal for the project. Given the fact that new features can be thought of as the project progresses, it is entirely possible that more enhancements to the system can be made. 27 | P a g e Detailed Design As stated above the system will consist of three core features, namely, a network function, a database function and a user interface. The implementation of the system will be broken down into these three categories; each category will consist of specific task and design goals. The tools used to implement each task in different categories will vary, but in general each task will be completed using the same general tools. The general programming language used to implement the system is Microsoft C#. This particular language was chosen in order to utilize the graphical user interface feature found in .NET products. As a option the use of Java will be left open to the developers of the system, Java will only be used when specific network functionality dictates. 28 | P a g e User 1 User 2 User 3 Laptop Workstation Server Admin Data 29 | P a g e Laptop 30 | P a g e Class Diagrams The following are the class diagrams for the Client and the Server. Due to the depth of the client side code the class diagrams for the client are presented in different views. The diagrams for the client consist of a general overview of the entire project structure and different views of the code segments from both the Admin and User perspective. 31 | P a g e General Client Overview: All Classes 32 | P a g e Home Inventory Client User Overview 33 | P a g e Home Inventory Client Admin Overview 34 | P a g e Home Inventory Client Utility Classes Overview 1 35 | P a g e Home Inventory Client Utility Classes Overview 3 36 | P a g e Home Inventory Server Class Diagram 37 | P a g e Server Utility Class Diagram 38 | P a g e Design Document: XML Protocol 39 | P a g e Home Inventory Project XML Protocol The purpose of this document is to establish a basic structure for the XML to be used as a means of communication between the components of the Home Inventory Project. The XML in the project will be used to pass messages and commands between the three core components of the Home Inventory Project. The following is the basic structure for the XML to be used: <Home Inventory> <Message> <Message Type> The message type can be either a command or an object, If the Type is a command you place the command here. Such as “Insert” or “delete”. If the message type is an object you would place “object” in this tag </Message Type> <Parameter> Each message will include a tag for all of its parameters. Some parameters may be set to null <Parameter> </Parameter > <Parameter> </Parameter> </Parameter> <Message Number>234</Message Number> <Message Sender>123532</Message Sender>//ID of User who sent message </Message> </Home Inventory> Each message that we create will have a unique set of parameters that are distinct to that particular message type. When parsing the message the message type should be used to identify the tags contained in the XML. The following is the message outline for the Insert Message: 40 | P a g e Client Server Insert <Home Inventory> <Message> <Message Type> Insert</Message Type> <Parameter> <Table> Home_tablenumber </Table> <UPC>123456467</UPC> //Can be null <Description>This item is a HDTV …etc</Description> <Size>an item description</Size> </Parameter> </Message> </Home Inventory> Client Server Insert response <Home Inventory> <Message Type> Insert</Message Type> <Parameter> <status> 46534 for success, 30494 for failure</status> <reason>String representing the reason for failure</reason> </ Parameter > </Home Inventory> 41 | P a g e The Following is the message sent when the browse menu is loaded, this message is used to load the list in the browse screen with the User’s items. Client Server Load browse Menu <Home Inventory> <Message> <Message Type> LoadBrowse</Message Type> <Table> Home_tablenumber </Table> </Message> </Home Inventory> Client Server Load Browse Menu – Server Response <Home Inventory> <Message> <Message Type> LoadBrowseResponse</Message Type> <Parameter> <Item> <ID>Integer value for primary key in DB</ID> <UPC>Items UPC code, can be null</UPC> <Description>A brief description</Description> <Size>Used by DB admin</Size> <Upload Date> 23 Mar 2009<Upload Date> </Item> <Item> <ID>Integer value for primary key in DB</ID> <UPC>Items UPC code, can be null</UPC> <Description>A brief description</Description> <Size>Used by DB admin</Size> <Upload Date>Date item was added “23 Mar 2009”<Upload Date> </Item> </Parameter> </Message> </Home Inventory> 42 | P a g e Client Server login <Home Inventory> <Message> <Message Type> login</Message Type> <Parameter> <username> what’s my user name </username> <pass> don’ tell people your passwords</pass> </Parameter> </Message> </Home Inventory> Client Server login response – Server Response <Home Inventory> <Message> <Message Type> loginResponse</Message Type> <Parameter> <status> 46534 for success, 30494 for failure</status> <reason>String representing the reason for failure</reason> <usertype> 758434 for Admin, 123422 for Normal user </usertype> </ Parameter > </Message> 43 | P a g e </Home Inventory> Client Server Modify item message All attributes of an item that are NOT modified will be set to an empty string “”. <Home Inventory> <Message> <Message Type> Modify</Message Type> <Parameter> <Item> <Table> Home_tablenumber </Table> <ID>””</ID> <UPC>””</UPC> <Description> “”</Description> <Size>This attribute is changed</Size> </Item> </Parameter> </Message> </Home Inventory> Client Server Modify Item – Server Response All attributes of an item that are NOT modified will be set to NULL. <Home Inventory> <Message> <MessageType> Modify</MessageType> <Parameter> <Table> Home_tablenumber </Table> <ModifyDate> date<ModifyDate> <Result> success or failure </Result> <Reason> 46534 for success, 30494 for failure </Reason> </Parameter> </Message> </Home Inventory> 44 | P a g e Client Server Delete item message All attributes of an item that are NOT modified will be set to NULL. <Home Inventory> <Message> <Message Type> Delete</Message Type> <Parameter> <Table> Home_tablenumber </Table> <ID>item ID</ID> </Parameter> </Message> </Home Inventory> Client Server Delete item message – Server Response <Home Inventory> <Message> <Message Type> DeleteResponse</Message Type> <Parameter> <ID>item ID</ID> <Result> success or failure </Result> <Reason> 14256 for success, 235769 for failure </Reason> </Parameter> </Message> </Home Inventory> 45 | P a g e Client Server Log Out message – Client message <Home Inventory> <Message> <Message Type> LogOut</Message Type> </Message> </Home Inventory> Client Server Log Out message – Server response <Home Inventory> <Message> <Message Type> LogOut</Message Type> <Parameter> <Status>34534 for success, 785654 for failure</Status> </Parameter> </Message> </Home Inventory> 46 | P a g e Admin Server Browse Menu <Home Inventory> <Message> <Message Type> BrowseUsers</Message Type> </Message> </Home Inventory> Admin Server Browse Menu - Response <Home Inventory> <Message> <Message Type> BrowseResponse</Message Type> <UserList> <User> <table> tablename </table> <login> login </login> <firstname> first name</firstname> <lastname> last name</lastname> </User> … … </UserList> </Message> </Home Inventory> 47 | P a g e Admin Create User Message Client Server <Home Inventory> <Message> <Message Type> CreateUser</Message Type> <User> <FirstName> tablename </FirstName> <LastName> login </LastName> <Email> first name</Email> <Address> last name</Address> <PrimPhone>phone #</PrimPhone> <AltPhone>phone #</AltPhone> <UserName>user name</UserName> <Password>password</Password> <UserType>1 for Admin, 2 for regular User</UserType> </User> </Message> </Home Inventory> Admin Create User Message Server Client <Home Inventory> <Message> <Message Type> “CreateUser”Message Type> <Status>213324 for success, 576874 for failure</Status> </Message> </Home Inventory> 48 | P a g e Admin Browse User Message Server Client <Home Inventory> <Message> <Message Type> BrowseUserResponse</Message Type> <User> <UserID> ID</UserID> <UserName>username</UserName> </User> <User> <UserID> ID</UserID> <UserName>username</UserName> </User> <User> <UserID> ID</UserID> <UserName>username</UserName> </User> </Message> Admin Browse User Message Client Server <Home Inventory> <Message> <Message Type> BrowseUser</Message Type> </Message> 49 | P a g e </Home Inventory> Admin Browse User Items Client Server <Home Inventory> <Message> <Message Type> BrowseUserItems</Message Type> <Parameters> <UserName>The User Name</UserName> <UserID>The Users ID</UserID> </Parameters </Message> </Home Inventory> 50 | P a g e Admin Browse User Items Server Client <Home Inventory> <Message> <Message Type> BrowseUserItems</Message Type> <Parameters> <UserName>The User Name</UserName> <UserID>The Users ID</UserID> <Items> <Item> <UPC>The UPC</UPC> <Description>Item Description</Description> <Size>Item Size</Size> <Upload>Upload Date</Upload> </Item> … … </Items> </Parameters </Message> </Home Inventory> Admin BrowseUserItems Client -> Server <Home Inventory> <Message> <Message Type> BrowseUserItems</Message Type> <UserID> ID of the user </UserID> </Message> </HomeInventory> 51 | P a g e Admin Browse Item Menu Delete Item Client Server <Home Inventory> <Message> <Message Type> “AdminDeleteItem”</Message Type> <Parameters> <UserName>The User Name</UserName> <UserID>The Users ID</UserID> <ItemID>The Items ID</Items> </Parameters </Message> </Home Inventory> Admin Browse Item Menu Delete Item Server Client <Home Inventory> <Message> <Message Type> “AdminDeleteItem”</Message Type> <Parameters> <Status>867554 for success</Status> <Reason> reason for failure</Reason> </Parameter> </Message> </Home Inventory> 52 | P a g e Admin Browse Insert Item Client Server <Home Inventory> <Message> <Message Type>Admin InsertItem</Message Type> <Parameter> <UserID>Users ID</UserID> <UPC>123456467</UPC> //Can be null <Description>This item is a HDTV …etc</Description> <Size>an item description</Size> </Parameter> </Message> </Home Inventory> Admin Browse Insert Item Response Server Client <Home Inventory> <Message> <Message Type>Admin InsertItem</Message Type> <Parameter> <Status>32345for success, 54665 for failure</Status> <Reason>Reason for fail</Reason> </Parameter> </Message> </Home Inventory> 53 | P a g e Admin Modify User Page Loaded Client -> Server <Home Inventory> <Message> <Message Type> “ModifyUserPageLoad”</Message Type> <UserID> ID of the user </UserID> </Message> </HomeInventory> 54 | P a g e Admin Modify User Page Loaded Message Sever Client <Home Inventory> <Message> <Message Type>ModifyUserPageLoad</Message Type> <User> <FirstName> Firstname </FirstName> <LastName> LastName </LastName> <Email> email</Email> <Address> Address</Address> <PrimPhone>phone #</PrimPhone> <AltPhone>phone #</AltPhone> <UserName>user name</UserName> <Password>password</Password> <UserType>1 for Admin, 2 for regular User</UserType> </User> </Message> </Home Inventory> 55 | P a g e Admin Modify User Client Server <Home Inventory> <Message> <Message Type>ModifyUser</Message Type> <User> <FirstName> Firstname </FirstName> <LastName> LastName </LastName> <Email> email</Email> <Address> Address</Address> <PrimPhone>phone #</PrimPhone> <AltPhone>phone #</AltPhone> <UserName>user name</UserName> <Password>password</Password> <UserType>1 for Admin, 2 for regular User</UserType> </User> </Message> </Home Inventory> 56 | P a g e Admin Create User Message Sever Client <Home Inventory> <Message> <Message Type>ModifyUser</Message Type> <Status>3245575 Success, 586788 for failure</Status> </Message> </Home Inventory> Admin UPC Lookout Message Client Server <Home Inventory> <Message> <Message Type> UPC_Lookup</Message Type> <Parameter> <UPC> item upc</UPC> </Parameter> </Message> </Home Inventory> 57 | P a g e Admin UPC Lookout Message Server Client <Home Inventory> <Message> <Message Type> UPC_Lookup</Message Type> <Status>Success 65678654, Failure 1212378</Status> <Parameter> <Item> <UPC> item upc</UPC> <Description>item description</Description> <Size>item Size</Size> <Reason>item not found</Reason> </Item> </Parameter> </Message> </Home Inventory> 58 | P a g e Data Base Design Documents 59 | P a g e DATABASE SCHEMA User List Table: The master table that holds relevant information pertaining to each user making use of our inventory system. The schema is the following: ID (integer primary key) Last Name (varchar) First Name (varchar) E-Mail (varchar) Address (varchar) Phone Number (integer) Secondary Phone Number (integer or null) login name (varchar) password (varchar containing HexString of digest) user type (varchar - either admin or user) Home Inventory Table: This is created for each user separately so that everyone's data is separated from each other's. Each table's name will be Home-[User ID] and will be spawned upon the creation of a user's account. Since the table is linked directly by the User ID, there is no need to add a column for the User ID because a foreign key is not necessary for our system to link the tables. ID (integer primary key) UPC (integer - null if not applicable) <-not applicable if user opts to manually input item or item is not found Description (varchar) <- vital information used to identify product such as name and manufacturer. This is determined by the RPC. Size (varchar or null) Upload Date (varchar) 60 | P a g e Sqlite Vs MySQL Sqlite Serverless. Embedded in your code. In the public domain. Pretty much ignores types. This gives a certain type of flexibility in certain situations. Perfect for low load websites or desktop applications. Makes debugging really easy (Fire up the console on the file your application is writing to and watch the inserts/deletes/etc. as they happen. No configuration necessary and no XML parsing. No security except for native file system security on the data file. Best for single-user use (only one person accessing a database at a time). After reading the above pros and cons of Sqlite, it would be perfect for our first database model which is at the current time the following: One database stores usernames and passwords (as of right now in unencrypted form but this may change if time allows). Since the verification thread simply reads from the user database and the admin function to create username/password only writes to the user database, we will most likely not run into any problems due to multithreading. The problems would only occur when multiple writes occur at the same time. Each user has his/her own database to contain their items. Since Sqlite is so light-weight, a database is created at relatively the same cost as a regular data file. MySQL Server-based. Not embedded in your code. Not in public domain but it is open source. Perfect for high-load websites where database is accessed concurrently. Best for multi-user use (wasteful for single user access). Must be configured although the process is fairly simple from what I have been told. 61 | P a g e After reading the above pros and cons of MySQL, it would be perfect for both our first and second database model which is at the current time the following: One database for all users separated into tables linked by userid. For example, our main database will contain the relevant user information such as userid (primary key), login, password, etc. This will be linked to user tables that contain the rest of the user's information. 62 | P a g e UI Design Documents 63 | P a g e The following is a high level visual representation of the UI. In general each screen will represent a class and each button will represent a function of that class. This design does not represent the actual UI, it is only a basic design template used to simplify the latter detailed Design of the UI. Login Screen: Welcome Screen: 64 | P a g e Browse Menu: Insert Item: 65 | P a g e Modify Item: Account Settings: 66 | P a g e Testing Documents Section 67 | P a g e Home Inventory Project Software Test Plan Written by: Thomas D Elliott The purpose of this document is to specify a testing plan for the Home Inventory project of CIS 4329 Spring 2009. This document will explain in a high level the reasons and objectives of the procedures to be carried out in the actual testing of the system. This document is split into three sections, firstly it defines and explains a method of testing, secondly it lays out a schedule to perform the test so that they debugging can coincide with testing and lastly we explain the responsibilities of the testers and those of the debuggers. Part 1: Methods of Testing The testing of the Home Inventory project will not follow any formal software testing methodology, instead testing will be performed in a manner that is best suited for the time constraints and resources of the developers. The testing of the system can be best described as “Workability Testing”; in essence the objective of all software testing is to ensure that the product works for the user, Workability Testing is just a streamlined version of steps needed to achieve that goal. In testing the Workability of the system we will break the testing procedure up into three phases, namely: Casual Use phase: This phase will consist of what the developers of the system interpret as normal use of the systems functionalities. Test procedures will consist of very precise steps that intentionally don’t seek to cause anomalies in functionality of the system. Put simply, “These tests don’t seek to break the system, just to ensure that the system is not easily broken”. Freelance testing: This phase of testing will provide the freedom of the testers to implement their own improvisational testing steps. In this phase the testers should try to crash the system, all while documenting each step they take thoroughly in order to assist in debugging. Network load testing: This phase of testing has the primary objective of ensuring that the system can handle a reasonable amount of users accessing it in parallel. This is a major requirement for the success of the system since the Home Inventory project was developed with parallel use in mind. Each test phase described above will be completed in a sequential fashion. The ideal flow of testing will involve following the test procedure, test failure reporting to the developers and 68 | P a g e finally the developer resolving the failure and publishing the actions to the testers. If for some reason the developers find themselves in a squeeze for time while debugging, it is assumed that the problem at hand can be set aside while other test are performed. The objective of the test phases it to perform all of the test procedures and report failures to the developers. A test phase is considered complete when all failures have been addressed by the developers. Part 2: Schedule The testing of the home inventory project has a time frame of less than four weeks. The first three phases of the testing (Casual Use, Freelance and Network load) should each take one week, this leaves an additional week for any unforeseen issues that may arise during the testing of the system. The test phases can be further broken down into the actual components of to be tested. Each phase will be carried out with the objective of ensuring the functionality of the specific screens in the system work as expected. In this manner of thinking testing can be broken down into discrete blocks of time where each of the screens on the client side of the project are tested and debugged. A preliminary schedule can be viewed below: 69 | P a g e 13 April 2009 – Casual testing phase: Login Screen, Home Screen, Browse Menu, reports and debugging. 15 April 2009 – Casual testing phase: insert Menu, All admin menus, reports and debugging. 17 April 2009 – Casual testing phase: Finish any testing and compile reports. 20 April 2009 – Freelance testing: All User screens, reports and debugging. 22 April 2009 – Freelance testing: All Admin screens, reports and debugging. 24 April 2009 – Freelance testing: Finish any testing and compile reports. 27 April 2009 – Load testing: Run Server with many Clients. 29 April 2009 – Fix any problems that were found in testing. 1 May 2009 – Fix any problems found in testing and compile final report. Part 3: Responsibilities Each member of the development team will be responsible for an equal amount of testing and debugging. Test cases will be generated and evenly distributed between teammates, upon completion of a test case the developer may be responsible for debugging of a failure found during testing. Since certain parts of the system are best understood by those that coded that particular section of the program, certain debugging task may need to be forwarded to the developer with that specific domain knowledge. Test plan generation will be performed by all team members, no one should perform the test of a plan they wrote. Test Failure Reporting The severity of a test failure will fall into one of three categories namely, severe, functional or cosmetic failures. A failure categorized as severe is a failure that crashes the system, causes lost or unintentional modification of data or places the User in a “deadlock” situation in which they can no longer navigate from page to page. A functional test failure is a failure in which the User’s goals for using the system cannot be obtained because of some incorrect functionality of the system. An example of a functional failure is a User attempts to enter an items name in the system, perhaps the system will not accept the name for some unspecified reason. Lastly, a cosmetic failure is a flaw in the system that visually detracts from the User’s experience when using the program. An example of a cosmetic failure is a button is a different color then the other buttons in the system. When reporting test failures the tester must be sure to include the severity of the failure along with the failures test procedure name and the actual test procedure step that was being performed at the time of the failure. An example failure report is displayed below: Test Failure Severity: Severe Test Failure: 20 Apr 2009, Login screen test procedure, step 4. Description: login button doesn’t respond when clicked. 70 | P a g e Test Case Documents for Phase 1 Testing 71 | P a g e Home Inventory Test Procedure Procedure 1: Login Screen This document describes the test procedure for the Home Inventory project Login screen. This document is to be used for the “Casual Testing” phase of the testing procedure described in the Home Inventory project testing plan document. If at any point in the test procedure the system fails to act in the proper manner the tester should write down in detail what they found be following the error reporting guidelines found in the test plan document. All questions about this document should be forwarded to the development team: Login Screen Test Prerequisite: Server Up and running. 1. User starts Home Inventory client program. 2. User should verify success of program launch by being able to see the Login Screen on their monitor. (If client failed to connect to Server, User we notice a prompt box with “failure” status). 3. User enters the string “Bad username” in the Username Box. 4. User enter the string “Bad Password” in the Password Box. 72 | P a g e 5. User hits the Login button. 6. System should display a prompt box with a message informing the User that an incorrect user name or password was entered. 7. User enters the string “Admin” in the Username Box. 8. User enters the string “12345” in the Password box. 9. User hits the Login button. User should be able to view the User Homepage screen which indicates 73 | P a g e Home Inventory Test Procedure Procedure 2: User Home Menu This document describes the test procedure for the Home Inventory project User Home Menu screen. This document is to be used for the “Casual Testing” phase of the testing procedure described in the Home Inventory project testing plan document. If at any point in the test procedure the system fails to act in the proper manner the tester should write down in detail what they found be following the error reporting guidelines found in the test plan document. All questions about this document should be forwarded to the development team: User Home Menu Test Prerequisite: User logged into system 1. User views the “Home Menu”. 2. User selects the “Browse Menu” button. 3. User should be able to view “Browse Menu”. The “Browse Menu” should display a list of items in the List box of the screen. 74 | P a g e 4. 5. 6. 7. User selects the “Home” button at the top left o the browse menu. User can view the “Home Menu”. User selects the “Insert Items” button User can view the “Insert Item Menu”. 8. User selects the “Home” button in the top left of the screen. 75 | P a g e 9. User can view the “Home” Menu screen. 10. User selects the “Logout” button at the top-right of the screen. 11. User logs out of the system. 76 | P a g e Insert Screen Test Test Procedure 3 This test procedure will test the functionality and limitations of the Insert feature. The user will navigate to the Insert screen and try to insert various combinations of data into the required fields. Prerequisites: i. ii. User must have an account logged into the Home page. This test is verified, and also verifies the functionality of the Browse Screen Test. Procedure: 1. Press the Insert Item button. 2. User is now prompted for the following fields. a. UPC - the barcode of the scanner b. Description – written description of what the item is c. Size – the size 77 | P a g e 3. Fill out the fields and Press the Insert Manual button. 4. You’ll be greeted with a message saying Insert Succeeded. 5. Try the following situational tests. a. Insert the same item b. Insert a blank item. c. Insert an item with blank fields. 6. Records results. 7. Log out, or back to Home Page 78 | P a g e Browse Screen Test Test Procedure 4 The browse feature is designed to display all the items a user currently owns in the database. This feature is also used to demonstrate the functionality of the Insert, Delete and Modify features. Prerequisites: i. ii. User must be logged in. User must have entered items. 1. Press the Browse Items button. 2. View the items listed in the left panel 3. Click on any item; verify the information is correctly dispersed from the panel to the individual boxes on the right side. Verify for all items. a. b. c. 79 | P a g e UPC should be in UPC box Description should be in the Description box Size should be in the Size box 4. 5. 6. 7. 8. 9. 10. Click back to the Home Screen. Follow the User Test Procedure – Insert steps to add an item Return to Browse Screen to view the new item. Follow the User Test Procedure – Remove steps to remove an item If the new item is gone, then the browse works. Records results. Log out 80 | P a g e Remove Item Test Test Procedure 5 This test procedure will test the functionality of the Remove feature. The user will navigate to the Browse screen and try to remove an item. Prerequisites: iii. User must have an account iv. Logged into the Home page. Procedure: 8. Press the Browse button 9. Select an item to remove 10. Click on the Delete button to delete an item 81 | P a g e 11. If the item is now gone, then the Remove feature works. 12. Records results. 13. Log out, or back to Home Page 82 | P a g e Modify Feature Test Test Procedure 6 This test procedure will test the functionality and limitations of the Modify feature. The user will navigate to the Browse screen and try to modify items with various combinations of data into the required fields. Prerequisites: i. ii. User must have an account Logged in, and must have items entered. Procedure: 14. Press the Browse button. 15. User should select an item on the left. On the right, the fields will be populated a. UPC - the barcode of the scanner b. Description – written description of what the item is c. Size – the size 83 | P a g e 16. 17. 18. 19. Change the value of any field and click on Modify. User is greeted with a message saying Update successful. If the new values are now on the right, the operation succeeded. Try the following situational tests. a. Modify the same item b. Leave an item blank. c. Leave all items blank. 20. Records results. 21. Log out, or back to Home Page 84 | P a g e Test Reports 85 | P a g e Home Inventory Bug Report Test Failure Severity: Severe Test Failure: 23 Apr 2009, HomeButton not working on Modify User Page Description: Home button unresponsive Status: Fixed Test Failure Severity: Severe Test Failure: 23 Apr 2009, HomeButton not working on Browse User Page Description: Home button unresponsive Status: Fixed Test Failure Severity: Low Test Failure: 23 Apr 2009, View User Attributes Description: Click on View User Attributes takes you to Modify User. You are then forced to modify the user, and the login name must be changed (due to uniqueness rule). Status: Fixed Test Failure Severity: Severe Test Failure: 27 Apr 2009, Insert items Admin UI Description: If the Item fields are empty the system will still return success status for an attempted item insert. Status: Fixed code 86 | P a g e Test Failure Severity: Moderate Test Failure: 27 Apr 2009, Admin browse user items Description: The Item upload date displays inaccurate values. Status: User enters values prior to insert, database no longer automatically sets field. Test Failure Severity: Severe Test Failure: 27 Apr 2009, Admin modify user attributes Description: Unable to modify Users attributes due to server side error. Sever incorrectly checks for duplicate User Name value. Status: in Progress Test Failure Severity: Low Test Failure: 27 Apr 2009, Admin browse user Description: After a user is deleted from the system the screen still displays the user credentials. Status: fixed, User Name and ID are removed after removal of User. Test Failure Severity: Low Test Failure: 27 Apr 2009, Admin Create User Description: After a User is created input fields still contain values Status: fixed, fields clear after create action. 87 | P a g e Test Failure Severity: Severe Test Failure: 27 Apr 2009, Admin Browse User Items Description: System crashes if user attempts to delete an item withour selecting an item from the Item list box. Status: fixed, System will prompt User if error occurs. Test Failure Severity: Low Test Failure: 27 Apr 2009, Admin Insert Item Screen Description: Barcode lookup button and insert button labeled wrong Status: fixed. Test Failure Severity: low Test Failure: 23 Apr 2009, Enter wrong password at Login Screen Description: Message box displays wrong user name, even if the password was wrong. Status: Fixed, Message box now displays both Wrong user name and password. Test Failure Severity: low Test Failure: 23 Apr 2009, User view items menu has a print button Description: Print option was removed from System design Status: Fixed, Removed Print button. 88 | P a g e Load Test Report In order to test the ability of our server to handle multiple, simultaneous connections, a few tests had to be conducted. The steps of the tests and outcome will be listed below. The first step is universal to all test and this is running our server on babyhuey. TEST 1: 1.) Open 20 copies of our client executable on the same computer. Result: PASS. All instances of our exe caused babyhuey to spawn a new thread to handle the connection. TEST 2: 1.) Open 20 copies of our client executable on one computer. 2.) Open 10 copies on another computer. Result: PASS. All instances of our exe caused babyhuey to spawn a new thread to handle the connection. TEST 3: 1.) Open a copy of our executable on five different computers. 2.) Perform client functions at the same time to see if they all get serviced. Result: PASS. Note: Since all of our customers are assumed to only have one account and they each have their own table in the database, we assume that they will be updating/modifying/deleting items amongst themselves with no interference from the admin. The admin should only be performing these functions when the client has a problem and contacts the admin for help. Thus, the order of which their updates occur does not matter. 89 | P a g e 90 | P a g e