1
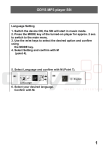
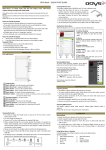
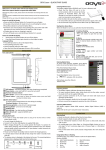
ODYS MP3-Player X26 Table of contents 2 Introduction ....................................................................3 Language Setting ...................................................................... 4 3 Getting started ...............................................................5 3.1 3.2 3.3 3.4 3.5 3.6 3.7 Controls........................................................................... 5 Battery status .................................................................. 6 Installing the driver .......................................................... 7 Load the battery via the USB connection ....................... 7 Transferring files MP3 player - PC.................................. 8 DRM Protected Files....................................................... 9 Disable the MP3 Player from the PC ............................ 12 4 Operation .....................................................................13 4.1 4.2 4.3 4.4 4.5 4.6 4.7 4.8 4.9 Switching the MP3 player on and off ............................ 13 Music mode................................................................... 15 Photo mode................................................................... 17 Text mode ..................................................................... 18 Digital audio recording (Voice mode) ........................... 18 Game mode .................................................................. 19 System settings (Settings) ............................................ 20 Direct data access (Explorer) ....................................... 24 Upgrade player (Firmware upgrade) ............................ 25 5 Troubleshooting ...........................................................26 6 Specifications...............................................................27 7 Safety instructions .......................................................28 8 Warranty conditions.....................................................30 1 EN 1 Contents of package .....................................................2 ODYS MP3-Player X26 EN 1 Contents of package Please ensure that the following items are included in the box. If the package is not complete, please contact your dealer: ODYS MP3 player X26 Warranty card 2 USB cable Headphones CD-ROM User manual ODYS MP3-Player X26 Introduction Thank you for choosing our product. Please read this manual carefully before use to make best use of all functions of the product and to guarantee that it has a long service life. Please store the manual in a safe place for later reference. This product is a portable digital audio player which allows you to play your MP3 and WMA tracks and make voice recordings or save files of any kind. The modern colour display lets you view digital pictures and videos too. Caution Please read the general safety instructions in Section 7 before using the MP3 player. Pay particular attention to the instructions on safely concluding the digital transfer between the MP3 player and computer in Section 3.7. Product properties 1.5”inch CSTN color display (128 x 128 pixels) 65,000 colours Fast data transfer thanks to USB 2.0 Supported formats: MP3, WMA, JPEG Built-in lithium ion battery Adjustable power saving functions, brightness and sleep times Can be used as mobile data medium Several repeat and equalizer modes Lyrics function Digital voice recording with the microphone with voice playback Multilingual menus available 3 EN 2 ODYS MP3-Player X26 Support EN URL: http://www.odys.de See our website for the latest information on this MP3 player, on other products by our company and on our company itself. Any firmware updates for this MP3 player are also made available on our website. If you have questions or problems, please read the FAQs on our website or contact our customer support service [email protected]. Language Setting 1. Switch the device ON, the X26 will start in the main menu. 2. Select the last option and confirm with M (point 9). 3. Select the last option again and confirm with M (Point 8). 4. Select your desired language. The languages will be shown according to its native language. Confirm with M. 4 ODYS MP3-Player X26 3 3.1 Getting started Controls EN Familiarise yourself with the controls of your MP3 player before use. Menu USB - connector next previous Play button / On/off VOL- - Microphone M Headphone connection + VOL+ Strap eye Key Functions Menu button : On/off main switch Switch to menu, selection of options/files, Hold function (press together with the Vol- button) Vol+ : Increase volume, , A/B repeat (press 2 seconds) Vol- : Reduce volume, Lyrics on/off (press 2 seconds) : Fast forward, next file : Rewind, previous file Play button: Playback, pause, On/off button (standby), leave menu On/off main switch: On/off button (Resetting the player after operating faults or malfunctions) 5 ODYS MP3-Player X26 The definition of keystroke action EN Keystroke action including three operation methods of shortly press, keep pressing, stay press and single press. It will mean the shortly press without special explaining later. Shortly press: It will go into effect once press keystroke. Keep pressing: It will go into effect even just once only pressing keystroke for more than 1 ... 2 second. Stay press: The event will go into effect time after time in definite frequency during from pressing keystroke to leaving the hand, for instance FF and FB. 3.2 Battery status The internal 3.7V battery is rechargeable. The charge state of the battery is indicated by various symbols to enable you to estimate how long the player will operate. The electricity indicating decrease with the increase of service time. Full Approx. half full Nearly empty Empty The middle of electricity icon will display empty when the electricity is almost exhausted, so you should charge up for it in time at this time. The internal battery can be charged via the USB port of the PC/USB hub or with a separate USB power supply unit/charger. The separate USB power supply unit/charger can be ordered from our website www.odys.de. Make sure to charge the battery completely before using the device. An empty battery takes approx. 3-4 hours to charge. For the first two charging cycles, you should charge the battery for approx. 8 hours. Keep in mind that the player cannot be using during the charging cycle. 6 ODYS MP3-Player X26 3.3 Installing the driver Connect the MP3 player to your PC using the USB cable. The driver installation starts. When using Windows ME, 2000, XP and Vista, the PC recognizes a new hardware device (mass storage device) and automatically installs the corresponding driver. If an error occurs during installation, remove the USB cable, restart the operating system and reconnect the USB cable to the PC. When using Windows 98SE, you must first install the correspondding driver found on the CD-ROM before connecting the MP3 player to your computer. 3.4 Load the battery via the USB connection The rechargeable internal battery can be charged using the USB connection of your computer, a USB hub with its own power supply or a USB power supply / charger unit. Before charging the player's battery for the first time, completely discharge it. Then completely charge the battery. This is the only way to gain full battery capacity. Turn on the main power switch on the player (position ON). Connect the MP3 player to the power supply using the USB cable. Charging begins automatically. Always charge the battery completely (see battery symbol in the display). The player keys do not function during recharging. The player’ s battery life is influenced by play volume; battery life is decreased significantly by loud playback. The battery life may change depending on the file type played and how often the buttons are used. Use the power saving functions to automatically shut off the display and the player (Section 4.7). 7 EN Turn on the main power switch on the player (position ON). ODYS MP3-Player X26 3.5 Transferring files MP3 player - PC EN Connect the MP3 player to your PC using the supplied USB cable. Open the Windows Explorer or double-click My Computer. Select folders or files to be transferred and drag them to the removable data storage symbol of the MP3 player (download to root directory). It is possible to create different folders for the classification of your file types in the player memory beforehand and then to save the relevant files to them. Once the transmission is complete, click the MP3 player symbol and check whether the files were completely copied. Following the same procedure, you can also copy files from the MP3 player to the PC (upload). Never disconnect the USB cable from your MP3 player during a data transfer or formatting. Keep in mind that the main directory of the player can hold a maximum of 150 entries (folders and files). To manage more data, create subfolders as appropriate. You can store as many files as desired in these subfolders. Formatting the Flash Memory Using the PC operating system: Open Windows Explorer and right click on the player’ s removable data storage symbol. Then click on the Format option in the context menu. 8 ODYS MP3-Player X26 3.6 DRM Protected Files DRM stands for “Digital Rights Management”. WMA files that are legally downloaded from the internet are generally protected by DRM. These files contain a license that directs how the file may be used. All licenses are controlled by the Windows Media® Player (version 9.0 and higher). In order to play DRM protected files, the Windows Media® Player must be used. Which Windows Media® Player Version is installed on my computer? Open the Windows Media® Player installed on your computer, click the question mark located on the menu bar and select “INFO”. The Windows Media® Player version will appear in the next window. Windows Media® Player is free and can be downloaded from the internet. We recommend using Windows Media® Player Version 10.0. Using DRM Protected Files Open the Windows Media® Player and click on the synchronization button. Browse through your computer and select a DRM protected file. Use your mouse to move the file, per drag and drop, to the left area of the Windows Media® Player window, the file should appear. If the MP3 Player is already connected to the PC, you may select the track you would like to play. If not, connect the MP3 Player at this time and press the F5 key. Click “START SYNCHRONIZATION”to start transferring the files. Note: To view the license information, right click the selected file and click on “PROPERTIES”. Copying an Audio CD Select “COPY”from the Windows Media® Player menu. All tracks must me copied to the PC when using the Windows Media® Player. The tracks should appear in the lower portion of the selected directory and can be copied to the MP3 Player. 9 EN What is a DRM file? ODYS MP3-Player X26 EN Please visit our Web Site for more information. Using Window Media Player 10, Windows XP SP2 should transfer WMA files which are protected by DRM to the MP3 player. If you use Windows XP SP2, install Windows Media Player version 10.0. A) Using Windows Media Player 9.0 (Win XP) Connect the MP3 player to your PC using the included USB cable. Start Windows Media Player 9.0 and open the desired DRM-protected WMA file. You may be required to transfer the license for the WMA file from the original website of the music provider. Click "File"; "Copy" and "Copy to Portable Device" in the Media Player window. Select the WMA file that you want to copy and the removable storage device. Click the "Copy" symbol in order to transfer the WMA file to your MP3 player. Then, safely remove the MP3 player from the PC. 10 ODYS MP3-Player X26 B) Using Windows Media Player 10.0 (Win XP SP2) EN Start Windows Media Player 10.0 and open the desired DRMprotected WMA file. Right-click and select "Add to Sync List". Choose the "Sync" option in the window that opens. In the "Sync" window, select the WMA file that you want to copy and the removable storage device. Click "Start Sync" in order to transfer the WMA file to your MP3 player. Then, safely remove the MP3 player from the PC. 11 ODYS MP3-Player X26 3.7 Disable the MP3 Player from the PC EN Disable the digital MP3 player from the operating system correctly using the “Remove Hardware Safely”option . Click the task bar on the right-hand side below the symbol and select the “Remove USB Mass Storage Device –Drive (X:)”in the following dialog window. Then the message now appears that the hardware can be removed. When using Windows 98SE, does not appear in the task bar. Once the data has been completely transferred, simply remove the USB cable. 12 ODYS MP3-Player X26 4.1 Operation Switching the MP3 player on and off Switching the MP3 player on Turn on the main power switch on the player (position ON). Hold down the Play button for approximately one second until a greeting appears on the display. The display now shows the main menu. If the device does not turn on, please load the battery using the USB connection. Mode switch in the main menu Use the main menu to access the various operation modes and player settings: Music, Photo, E-book, Record, Explorer, Game and Settings. Use the / buttons to select the desired option and confirm using the menu button. To revert to the main menu, press the menu button for approx. 1 second. Switching the MP3 player off Press and hold the Play button for approximately three seconds until the Display illumination deactivates. This is true irrespective of the current operating state of the player. The player is now in standby mode, which still uses a small amount of energy. Only use the standby function for short shutdown periods to avoid unnecessarily draining the battery. Turn off the main power switch (OFF) to shut down the player completely. 13 EN 4 ODYS MP3-Player X26 # EN Lock function You can block all buttons of your MP3 player to prevent accidental operation (Music, Video and Voice mode). Activate button lock: Press the Vol- -button and the menu button simultaneously. Button lock activated Deactivate button lock: Repeat this button combination to deactivate the button lock. Button lock deactivated Keep in mind that the player is write-protected when button lock is active (cannot save data). Reset If an error occurs, you can reset the player and restart it by turning the main switch off and on again (ON/OFF). 14 ODYS MP3-Player X26 4.2 Music mode Overview of the Display Repeat mode A-B repeat EN The Display shows a variety of information on the current track, the running time and the system settings. The symbols are explained below. Battery status A-B Elapsed playback time/ Lyrics display Track number/ Number of tracks in current folder File name / ID3 tag File format Playback Playback time graphic Bitrate track playback time EQ sound Volume Playback, forwards/back, pause, stop Insert the headphone in the headphone connection and turn the player on. Select music mode in the main menu and confirm with the menu button. Press the Play button to play the track showed. The track information is scrolled on the Display. To switch between the file name and ID3 tag, press and hold the Vol key for approximately 2 seconds. 15 EN ODYS MP3-Player X26 Press the Play button briefly to pause playback. To resume play, press the Play button again (resume function). Press and hold the / buttons during play to skip forwards or back within the track . If you briefly press the / buttons during play, pause or stop the display switches to the next or previous track respectively. Setting the volume Press Vol+ or Vol- to increase/decrease the volume. Lyrics function Your player supports synchronous lyric display when playing MP3 files. The file name of the separate lyric files (*.lrc) must coincide with the file name of the relevant mp3 file (*.mp3) and the lyric file must be in the same folder. A/B repeat (Replay) This function allows you to repeat a specific section of a music file by setting the starting and finishing point of the section during playback. Press the Vol+ button (approximately 2 seconds )during playback to mark the beginning A of the section ( ). Press the Vol+ button again (approximately 2 seconds) during playback to mark the end B of the desired section ( ). The selected section will now be repeated indefinitely until you press the Vol+ button again (approximately 2 seconds). Deleting files on your player is described in Section 4.8. You can also delete files or folders using your computer’ s file manager when the MP3 player is connected to the PC via the USB connection. 16 ODYS MP3-Player X26 4.3 Photo mode EN Implement to browse the JPEG picture and to support the format of JPEG in common use. Use the / buttons to select the photo mode in the main menu and confirm using the menu button. The display will now show the player’ s folders and image files (browser screen). If there are no visible files then the player memory is empty. Use / to navigate through the folder structure and search for the desired file. Press the menu button to open a folder. Push the Vol button to leave a folder. Confirm using the menu button again to select and play the desired picture file. Briefly press the / buttons to switch to the next or to the previous image. Briefly press the menu button to return to the browser screen. To revert to the main menu, press the menu button for approx. 1 second. The desired image file should ideally be of the 128 x 128 pixel format. Other dimensions and pixel numbers are also possible. The pictures will then not fill the entire display. Deleting files on your player is described in Section 4.8. 17 ODYS MP3-Player X26 4.4 Text mode EN Implement to support text in the format of TXT. Use the / buttons to select the Text mode in the main menu and confirm using the menu button. Text files can be selected and displayed in the same way as photos in photo mode. Briefly press the menu button to return to the browser screen. To revert to the main menu, press the menu button for approx. 1 second. 4.5 Digital audio recording (Voice mode) Your MP3 player can also be used as a digital dictaphone. This allows you to record important ideas or thoughts when away from home. Recording status Recording time Available recording time Use the / buttons to select the Voice mode in the main menu and confirm using the menu button. Voice recording Briefly press the Play button to start voice recording and speak into the microphone on the top of the player. Press the Play button to interrupt voice recording. Press the Play button again to resume voice recording. Press the menu button for approx. 1 second to stop and save voice recording. The main menu is displayed again. 18 ODYS MP3-Player X26 Voice playback If the player is in another mode, you can play your recording by switching to music mode via the main menu (as described above). Press the menu button to open the browser screen. Navigate to the internal storage and open the “VOICE”folder. You can select the desired file using / and play it with the menu button. To revert to the main menu, press the menu button again for approx. 1 second. You can also delete files or folders using your computer’ s file manager when the MP3 player is connected to the PC via the USB connection. 4.6 Game mode Use the / buttons to select the Game mode in the main menu and confirm using the menu button. Briefly press the PLAY key. Move the block to the left or right using /. Rotate the blocks with Vol+ and set them down with Vol-. To revert to the main menu, briefly press the PLAY key (pause). Press the menu button again for approx. 1 second. 19 EN The recorded files are stored in WAV format in the „VOICE“folder. Do not save any MP3 or WMA files here. ODYS MP3-Player X26 4.7 System settings (Settings) EN The mode Settings allows you to change important system settings for your MP3 player. Use the / buttons to select the Settings mode in the main menu and confirm using the menu button. The settings menu contains the sub-menu for the Music, Record, Auto Browse, Display, System, PowerOFF and Language. Use the / buttons to select the relevant sub-menu and confirm using the menu button. To revert to the main menu, press the menu button again for approx. 1 second. You can also use the Play button to switch to the next menu level. a) Music settings Repeat mode Briefly press menu button to switch to the Repeat sub-menu. Use / to select the desired mode (Once, Repeat One, Folder Once, Folder Repeat, All Once, All Repeat, Intro). Confirm using the menu button again. Once: Repeats the current file ones. Repeat One: Repeats the current file multiple times. Folder Once: Repeats all files of the current directory once. Folder Repeat: Repeats all files of the current directory multiple times. All Once: Repeats all files once. All Repeat: Repeats all files multiple times. Intro: Plays only the first 10 seconds of each track. Play Mode Briefly press menu button to switch to the Play Mode sub-menu. Use / to select the desired mode. Confirm using the menu button again 20 ODYS MP3-Player X26 Repeats the tracks according to the repeat mode in original order. Shuffle: Repeats the tracks according to the repeat mode in random order. EN Order: Equalizer settings (EQ) Briefly press menu button to switch to the EQ sub-menu. Use / to select the desired mode (Normal, 3D, Rock, Pop, Classic, Bass, Jazz, User EQ). Confirm using the menu button again. Equalizer custom settings Briefly press menu button to switch to the sub-menu. Use / to select the frequency range to be modified. Change the selected range with Vol+/Vol-. Save Equalizer custom settings: Use the / buttons to select „ “and confirm using the menu button. b) Record settings Recording Quality (REC Quality) Adjust the desired bit rate for the Voice Recording and FM Radio Recording. High Quality: Records the source in good quality (64 kbps). General Quality: Records the source in average quality (32 kbps). Volume of the recording (REC Volume) Adjust the desired volume for the Recording. Note that incorrect volume settings can disrupt the incoming signal. 21 ODYS MP3-Player X26 c) Auto Play Set EN Text Set how long it should take before the next page in text mode is shown (2 - 10 seconds). Jpeg Set how long it should take before the next picture in photo mode is shown (1 - 5 seconds). d) Display settings Automatic shutdown of the display (Backlight Time) This allows you to set whether the display is to remain on after a button is pressed and how long it stays on: 5 s, 10 s, 20 s, 30 s and “Always On”. The „Always On“setting sets the display to remain on. Brightness Allows you to set the required display brightness (5 levels). Backlight Mode Select “Normal”or “Power Save”here. e) System settings About Here you can learn more about the following system data: - Current firmware version - Date of manufacture - Total internal storage and amount used - Total external storage and amount used Firmware Upgrade Update the firmware of the player when new firmware is available. Use the / buttons to select „Yes“or „No“and confirm using the menu button. 22 ODYS MP3-Player X26 Connect the MP3 player to your PC using the USB cable. Follow the instructions in Section 4.11. EN Default Set Use this option to reset the device settings to their defaults (factory settings). Use the / buttons to select „Yes“or „No“and confirm using the menu button. By selecting Yes, you reset the device to the factory settings - by selecting „No“you cancel the dialogue. f) Automatic shutdown (PowerOFF Time) The automatic shutdown switches off the unit to save energy if during the term of the given limit (unit: minutes) no button is pressed. You can also use this function as a sleep timer. Select from the following values: 10 min., 15 min., 30 min., 120 min., and Off (standard). Confirm using the menu button. h) Language Use this option to select the required language. 23 ODYS MP3-Player X26 4.8 Direct data access (Explorer) EN In the Explorer mode you can directly delete or playback files saved on your MP3 player. Use the / buttons to select the Explorer mode in the main menu and confirm using the menu button. Use / to navigate through the folder structure and search for the file to be deleted or played. Press the menu button to open a folder. You can also use the Play-button (Shortly press) to switch to the next folder level. Briefly press the menu button to play a selected file. Using the Vol- button and /, you can now delete the marked file (Yes) or terminated the dialogue (No). Confirm using the menu button. You can also delete files or folders using your computer’ s file manager when the MP3 player is connected to the PC via the USB connection. 24 ODYS MP3-Player X26 4.9 Upgrade player (Firmware upgrade) Install the provided Firmware upgrade tool. Enable the upgrade via the corresponding option in system settings (see Section 4.9 System-Settings). Connect the MP3 player to your PC using the USB cable. Execute the upgrade tool for the MP3 player on the computer. Click on the “Open”button and select the correct firmware file. Click on “Update”and begin the firmware update. Now remove the USB cable. The firmware upgrade is used in improving and optimizing the performance of player. And it does not affect the normal run of the player without the firmware upgrade. The firmware upgrade will possibly lead to the abnormal working due to the mistake operation! So please read the instruction carefully before operating. The firmware upgrade software of the player is not suitable for other series players, vice versa. Only use additional update files from our website www.odys.de. If no firmware updates are available on the website, then no updates are needed for your device. The warranty is void if you use unsupported firmware versions. A firmware update is only required if the device is no longer working and the software error causing the problem needs to be repaired. 25 EN You may upgrade or maintain the system firmware for this player by the tool software that installed in computer. ODYS MP3-Player X26 5 Troubleshooting EN Symptoms Cause and solution Without power Whether the battery is enough. Please confirm whether turn on the player. Is the main switch turned on? Without sound inside earphone. Please confirm the volume is not in the status of Zero and the connection of earphone is ok. Please confirm the earphone is clean The broken MP3 will produce noise with different grades even cannot play music. Please confirm the complete files. Try another pair of headphones. The character on the display screen is in abnormal shape. Please confirm the language that you selected is correct. Cannot download music normally. Whether the installation of driver is OK Check whether damaged the connection of USB and the connection is OK. Check whether there’ s any empty memory space. Be sure that button lock is deactivated. No USB connection is established to the PC. Check cable/plug connection to the PC, Windows system configuration and USB driver. Restart PC, remove and reconnect the USB cable, reinstall drivers If the malfunction continues, contact customer services. The device has stopped working. Use the player’ s reset function. The player shuts off after a short time or cannot be turned on. However, the USB connection works. Fully charge the battery (3 –4 hours) If the player has not been used for an extended period of time, then the first two battery charging cycles should last 8 hours each. 26 ODYS MP3-Player X26 Specifications Internal memory 1 GB, 2 GB, 4GB Integrated flash memory Formats MP3, WMA, JPEG Voice recording Record format WAV Record time approx. 32 hours (512 MB) EN 6 Battery Lithium ion Battery life approx. 5 hours Power supply externally USB Dimensions 74 X 37 X 8[mm] Temperature range 0 to 55 °C Display 1.5 “CSTN (128 x 128 Pixel) 65.000 Colors USB type USB 2.0 S/N ratio > 90 dB Headphone output 2 x 5 mW Languages Chinese (simple), Chinese (trad.), English, Korean, Japanese, Spanish, French, German, Italian, Portuguese, Greek 27 ODYS MP3-Player X26 7 Safety instructions EN Although this product is safe, please observe the following information and warnings. Do not expose the device to direct sunlight, extreme heat or cold, damp or dusty conditions. Malfunctions and damage and can occur as a result.. Do not use the device in an extremely dry environment to avoid static electricity. Do not shake the device or subject it to hard knocks. The device may be damaged if it falls. Do not place any heavy objects on top of the device. Promptly load the device’ s internal battery. Do not use the MP3 player while driving a vehicle. Never press two buttons simultaneously and handle the display carefully. Do not carry the MP3 player with other metal objects (coins or keys) in your pocket. Clean the device only using a soft, dry cloth and do not use any volatile substances, such as solvents, to avoid damaging the surface. Do not open the casing of the device under any circumstances, and do not attempt to repair or modify the device. Never disconnect the USB cable from your MP3 player to the PC during a data transfer or formatting. Correctly disconnect the MP3 player from the operating system. Information loss and malfunctions can occur. 28 ODYS MP3-Player X26 Do not dispose of a defective MP3 player in normal household waste disposal containers (internal battery). Take the defective device to your retailer or to an appropriate waste collection site. This will ensure that the device is disposed of in an environmentally-friendly way. 29 EN Disposal ODYS MP3-Player X26 EN 8 Warranty conditions The following conditions comprise the requirements and scope of our warranty conditions and do not affect our legal and contractual warranty obligations. We offer a warranty on our products in accordance with the following conditions: 1. Odys products are covered by a 24 month warranty. We will resolve damages or defects on Odys products free of charge within 12 months of the purchase date under the following warranty conditions. For any damage or defect determined later than 12 months after the purchase date, proof of a manufacturing fault must be submitted for repair under warranty. The warranty does not cover batteries and other parts, which are considered consumables, parts that break easily such as glass or plastic or defects based on normal wear and tear. There is no warranty obligation in the event of marginal differences compared to the target appearance and workmanship provided these have a negligible effect on the product's fitness for use, in the event of damage caused by chemical or electrochemical effects, by water or generally from abnormal conditions. 2. The warranty will be performed in such a way that we shall decide whether to repair the defective parts or to replace them with working parts free of charge. AXDIA reserves the right to exchange the product for a replacement product of equal value if the product that is sent in cannot be repaired within a reasonable time or at reasonable cost. The product can also be exchanged for a different model of the same value. Requests cannot be made for repairs to be carried out on site. Parts that have been replaced or exchanged become our property. 3. The warranty claim does not apply if repairs or other work is carried out by unauthorized persons or if our products are equipped with additional parts or accessories that are not approved for our products. 4. Warranties that have been activated do not cause the warranty period to be extended, nor do they trigger a new warranty period. The warranty period for any replacement parts installed ends with the warranty period for the entire product. 5. Any other or further claims are excluded, especially those for replacement due to damage caused outside of the product, provided there is no obligatory legal liability. We therefore accept no liability for accidental, indirect or other consequential damage of any kind, which leads to usage restrictions, data loss, loss of earnings or interruption to business. Asserting a warranty claim 30 1. To make use of the warranty service, you must contact the AXDIA Service Center by e-mail, fax or phone (see below for contact details). You can also use the service form on our website or on the back of the warranty conditions. 2. AXDIA Service Center will try to diagnose and solve your problem. If it is determined that a warranty claim exists, you will be given an RMA number (Return Material Authorization) and you will be asked to send the product to AXDIA. IMPORTANT: AXDIA will only accept parcels that have an RMA number. Please observe the following when sending the product: 1. Send the product suitably packaged with carriage and insurance paid. Do not enclose any accessories with the products (no cables, CD's, memory cards, manuals, etc.), unless the AXDIA Service Centre specifies otherwise. 2. Mark the RMA number on the outside of the package in such a way that it is visible and clearly legible. 3. You must enclose a copy of the sales slip as proof of purchase. 4. Once AXDIA has received the product, it will meet its warranty obligations in accordance with the warranty conditions and will return the product to the sender with carriage and insurance paid. Service outside of warranty AXDIA can refuse any service claim made that is not covered by the warranty. If AXDIA agrees to provide a service outside the warranty, the customer will be invoiced for all repair and transport costs. AXDIA will not accept any packages that have not first been approved by AXDIA by means of an RMA (Return Material Authorization). 31 EN ODYS MP3-Player X26