1
Instruction Manual
Windows 95/98/2000/NT
MacOS
Instruction Manual
Windows 95/98/2000/NT
MacOS
Software and manual Copyright 1995-2001
Pixera Corporation
All rights reserved.
Pixera Corporation reserves all rights to trademarks, patents, and copyrights involved in Pixera
Corporation software, documentation, images, and other products and collateral.
No part of this document may be reproduced or transmitted in any form or by any means,
electronic or mechanical for any purpose, without the express permission of Pixera Corporation.
Information in this document is subject to change without notice.
This device complies with part 15 of the FCC Rules. Operation is subject to the following two
conditions: (1) This device may not cause harmful interference, and (2) this device must accept
any interference received, including interference that may cause undesired operation.
Warning: The connection of a non-shielded equipment interface cable to this equipment will
invalidate the FCC certification of this device and may cause interference levels that exceed
FCC limits. It is the responsibility of the user to obtain and use proper equipment and cables.
Changes and modifications not expressly authorized by Pixera Corporation may void warranties.
All other company and product names are trademarks or registered trademarks of their
respective owners.
The camera unit, PCI interface board and handswitch bear the CE marking because they
comply with the requirements of the directive 89/336/EEC concerning electromagnetic
compatibility.
1)
Getting Ready
1. The camera system uses precision components. Handle it with care, and avoid
subjecting it to a sudden or severe impact.
2. The image displayed on the display monitor may be affected when used near
equipment generating strong electromagnetic waves. This is not a malfunction and
will not affect the actual image being recorded. To avoid interference during
operation, keep the unit far from any source of electromagnetic waves.
3. Do not use the camera in areas where it may be subject to direct sunlight, high
temperature and humidity, dust, or vibrations. (For operating environment conditions,
see section 8, “Specifications” on page 182.)
4. When not using the camera system, keep it covered with the dust cover provided
with the microscope. Do not connect or disconnect the camera when the power of
computer is on.
2)
Maintenance and Storage
1. Be careful not to leave dirt or fingerprints on the lenses and other glass
components. If a lens is dirty, wipe it gently with a piece of gauze. To remove
fingerprints or oil smudges, wipe the lens with gauze slightly moistened with a
mixture of ether (70%) and alcohol (30%) or pure alcohol.
Since solvents such as ether and alcohol are highly flammable, they must be
handled carefully. Be sure to keep these chemicals away from open flames or
potential sources of electrical sparks -- for example, electrical equipment that
is being switched on or off. Also remember to use these chemicals only in a
well-ventilated room.
2. Parts other than the glass components should be cleaned by wiping with a clean
cloth. Do not use organic solvents to remove major stains. Use a soft cloth slightly
moistened with a neutral detergent solution.
3. To avoid any degradation in performance, do not attempt to disassemble or modify
any part of the system.
Table of Contents
1. Installing the Hardware.................................................................9
2. Installing the Software on Windows..........................................13
Installing the Device Drivers..................................................................13
Installing the Application.......................................................................16
3. Installing the Software on Macintosh........................................21
Using the Installer...................................................................................21
4. Capturing Procedure..................................................................27
5. Viewfinder Lite (Windows) / Studio Lite (Macintosh)
The Basics...............................................................................................29
Running the Viewfinder Lite Application (Windows).............................................30
Running the Studio Lite Application Macintosh)................................................31
Viewing the Preview.............................................................................................32
Capturing Images................................................................................................34
Selecting the Viewfinder Mode............................................................................36
Selecting the Capture Resolution........................................................................38
Quitting the Viewfinder Lite Application...............................................................39
Working Within the Viewfinder Lite Application Window......................................41
Manipulating Images...........................................................................................43
Adjusting the Color Balance................................................................................45
Adjusting Levels..................................................................................................51
Using Automatic Exposure..................................................................................56
Using the Spot Meter...........................................................................................58
Using Manual Exposure......................................................................................59
Adjusting Camera Sensitivity...............................................................................60
Using Online Help................................................................................................61
Using the Focusing Tool......................................................................................62
Reference................................................................................................65
Title Bar (Windows Only).....................................................................................66
Control Menu (Windows Only).............................................................................67
Menu Bar.............................................................................................................69
[Viewfinder] Menu................................................................................................70
[Options] Menu....................................................................................................74
[Help] Menu.........................................................................................................85
[Capture] Toolbar.................................................................................................87
[Exposure] Toolbar...............................................................................................91
[Options] Toolbar.................................................................................................93
[Focus] Toolbar....................................................................................................96
6. Studio Lite
The Basics...............................................................................................99
Running the Application.....................................................................................100
Creating a New Image.......................................................................................101
Selecting the Active Image Window...................................................................102
Opening Existing Images...................................................................................103
Closing an Image Window.................................................................................105
Saving Images...................................................................................................107
Correcting Mistakes...........................................................................................111
Printing an Image..............................................................................................113
Switching to Viewfinder......................................................................................117
Quitting the Studio Lite Application (Windows Only)..........................................118
Editing and Retouching Images.........................................................................119
Specifying a Region of Interest..........................................................................127
Magnifying and Reducing the View....................................................................130
Working Within the Studio Lite Application Window (Windows Only).................135
Measuring Color Values.....................................................................................137
Viewing Informational Windows.........................................................................138
Choosing the Foreground Color.........................................................................140
Choosing the Background Color........................................................................142
Viewing Images (Windows Only).......................................................................144
Using Online Help..............................................................................................145
Reference..............................................................................................147
Title Bar (Windows Only)...................................................................................148
Control Menu (Windows Only)...........................................................................149
Menu Bar...........................................................................................................151
[File] Menu.........................................................................................................152
[Edit] Menu........................................................................................................158
[View] Menu.......................................................................................................160
[Window] Menu..................................................................................................164
[Help] Menu.......................................................................................................166
Toolbar...............................................................................................................168
Toolbox..............................................................................................................172
Status Bar (Windows Only)................................................................................174
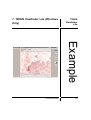
7. TWAIN Viewfinder Lite (Windows Only)
Example.................................................................................................175
Using TWAIN Viewfinder Lite (Windows Only)..................................................176
8. Studio Lite Photoshop Plugin (Macintosh Only)
Example.................................................................................................181
Using the Studio Lite Photoshop Plugin (Macintosh Only).................................182
9. Specifications............................................................................183
10. Troubleshooting......................................................................185
Installing the
Hardware
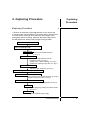
1. Installing the Hardware
Warning: Never connect or
disconnect your camera if
your computer power is
turned on.
PCI Interface Card Installation
1) Turn off the computer
and all peripherals before
beginning the hardware
installation process.
2) Remove the computer's
cover and then proceed to
install your PCI interface card.
Most computers have a
combination of PCI and other
expansion slot types (i.e.
AGP, ISA). Your computer
manual should identify the
location of the PCI slots.
To avoid damaging your
computer or the PCI
interface card, do not
attempt to install the PCI
card without first checking
the documentation for your
computer.
1
2
Before touching the
internal parts of your
computer or installing any
components, discharge
potential static electricity
by placing your hand on
any unpainted metal
surface in the computer.
3) Carefully pull out the metal
access cover behind an
empty expansion slot.
4) Remove the PCI interface
card from its anti-static bag.
Hold the card by its edges to
avoid touching its circuitry.
5) Align the connector end of
the PCI card over the empty
PCI slot. Push the card down
gently but firmly until it fits in
the slot.
6) Secure the PCI card and
replace the cover to your computer.
7) Connect the camera to the interface card using the included PCI
interface cable. If you have the external handswitch (optional),
insert the plug into the proper connector on the card.
Instruction Manual
9
Installing the
Hardware
1. Installing the Hardware (cont.)
8) Turn the computer on.
Be sure that the camera is properly connected to the PCI
interface card before you turn the power back on.
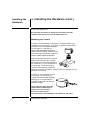
Mounting the Camera
A proper C-mount adapter is necessary to be able to attach your
camera to your microscope. In general, to optimize image quality
and field of view, an adapter designed
for use with a ½" CCD with an
appropriate magnification/reduction
factor is recommended. Please contact
your microscope equipment supplier for
specific details regarding adapters.
Most microscopes that accept camera
attachments are trinocular in design,
allowing the camera to be attached to
the center tube. If your microscope is
not trinocular, it may still accept a
camera if one of the two eyepieces
allows for C-mount conversion. Refer to the documentation for your
particular microscope.
1) Fit the C-mount adapter on your
microscope. Be sure that your
coupler has parfocalizing capability,
allowing you to synchronize the
binocular image with the camera's
viewfinder image.
Disconnect the cable from the
camera before attempting to
attach it to a microscope.
Excessive stress on the
connector may cause damage to the camera or the cable.
10
Installing the Hardware
1. Installing the Hardware (cont.)
Installing the
Hardware
2) Thread the camera onto the coupler and attach the interface
cable to the camera. Caution: DO NOT overtighten the camera
to the coupler. Doing so may damage the camera.
Other Applications
Some digital camera models feature a standard tripod screw mount
which allows you to connect the camera to standard desktop
copystands or camera tripods.
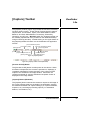
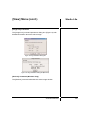
External Handswitch (Optional)
The optional external handswitch (see figure below) provides an
alternative control interface to the camera, duplicating several basic
functions of the Viewfinder Lite application.
AE LOCK
[AE Lock] Button
BUSY
[Busy] LED
EXPOSE
SPOT
[Spot] Button
[Expose] Button
External Handswitch
[Expose] Button
The [Expose] button duplicates the Capture function of the
Viewfinder Lite application by instructing the camera to capture a
still image of the current camera subject to the Studio Lite
application, applying the defined Viewfinder Lite capture settings
(i.e. capture resolution, exposure, etc.) and image processing
options (i.e. white/black balance, color balance, etc.).
Instruction Manual
11
Installing the
Hardware
1. Installing the Hardware (cont.)
[AE Lock] Button
The [AE Lock] button duplicates the AE Lock function of the
Viewfinder Lite application by toggling between the activation and
deactivation of the auto exposure lock feature of the Viewfinder Lite
application. When the AE Lock feature is enabled, the [AE Lock]
button in the [Capture] toolbar is automatically activated, fixing the
exposure time and gain at their current settings, temporarily
disabling the auto exposure function. When AE Lock is off, the
automatic exposure feature is re-enabled.
[Spot] Button
The [Spot] button allows you to select the size of the spot meter.
The sizes are specified as an area percentage of the capture area.
As the button is depressed, the spot size cycles through each of the
available spot sizes in the following order: 30%, 1%, and 0.1%.
Under automatic exposure mode, the exposure time is calculated
based on the image data present within the region defined by the
spot meter. This control is enabled only under automatic exposure
(AE) mode and is disabled under the AE Lock and manual
exposure modes.
[Busy] LED
The [Busy] LED indicates the status of the capture process. When
the LED is on, the camera is either capturing an image or
processing image data, and new commands or camera functions
are not accepted. When the LED is off, the camera is idle and
awaiting user input.
12
Installing the Hardware
2. Installing the Software on
Windows
Installing the
Software on
Windows
Installing the Device Drivers
Windows 95/98 PCI Device Driver Installation
1) Before you turn your computer on, be sure the PCI interface card
is properly installed and that your camera is connected.
2) Turn your computer on. As Windows loads, your computer will
display a New Hardware Found dialog box and detect the PCI
interface card as "PCI Multimedia Device." Press the “Next” button
to continue with the installation.
3) At the following screen, choose the bottom option and press
“Next”.
4) Choose “Other devices” from the list of devices, and press
“Next”.
Instruction Manual
13
Installing the
Software on
Windows
2. Installing the Software on
Windows (cont.)
5) Press the “Have Disk...” button.
6) Press the “Browse...” button.
7) Insert the CD-ROM into your CD-ROM drive. The device driver
files are located in the folder “Win98” for Windows98 or in the folder
“Win95” for Windows95. Specify the correct location of the files by
selecting your CD-ROM drive and choosing the “Win98” or ”Win95”
folder. When the filename “pixera.inf” is displayed, press “OK”.
8) Ensure that the proper directory for the driver is displayed in the
field “Copy manufaturer’s files from:”. If the proper directory is not
displayed, press the “Browse” button and specify the correct
directory for the driver. Press “OK”.
9) Press “Next”.
10) Windows will ask you if you are sure you want to use this driver.
Press Yes.
11) Follow the on-screen prompts to complete the installation.
Windows NT PCI Device Driver Installation
1) Before you turn your computer on, be sure the PCI interface card
is properly installed and that your camera is connected.
2) Turn your computer on and log on to Windows NT. You must
have full administrative privileges in order to successfully install the
drivers.
14
Installing the Software on Windows
2. Installing the Software on
Windows (cont.)
Installing the
Software on
Windows
3) Insert the CD-ROM into your CD-ROM drive.
4) Start the “setup.exe” program in the NT folder. Follow the onscreen instructions to complete the installation.
5) Restart the computer.
Windows 2000 PCI Device Driver Installation
1) Before you turn your computer on, be sure the PCI interface card
is properly installed and that your camera is connected.
2) Turn your computer on. As Windows loads, your computer will
display a “Digital Signature Not Found” dialog box. Press the “Yes”
button to continue with the installation.
3)At the following screen, press the “Browse...” button.
Instruction Manual
15
Installing the
Software on
Windows
4)Insert the CD-ROM into your CD-ROM drive. The device driver
files are located in the folder “Win2k” under “driver” folder for
Windows 2000. Specify the correct location of the files by selecting
your CD-ROM drive and choosing the “Win 2k” folder under “driver”
folder.
When the file name “penguin.sys” is displayed, press the “Open”
button.
5)Press the “OK” button.
Installing the Application
The camera software should be installed after the successful
installation of the camera hardware and device drivers.
To install the software applications for the camera:
1) Insert the application CD-ROM disc into your CD-ROM drive.
2) Double-click the setup.exe file located on the root level of the
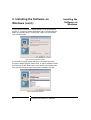
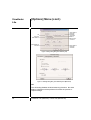
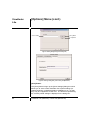
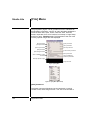
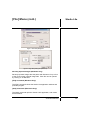
CD-ROM. This will start the installer program (Figure 1).
Figure 1: Launch Installer Program
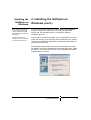
3) You will be prompted to close all currently running programs
before continuing with the installation process (Figure 2). Verify that
no other programs are running and click the Next button to
continue.
16
Installing the Software on Windows
Installing the
Software on
Windows
2. Installing the Software on
Windows (cont.)
Figure 2: Close All Active Program and Click the Next Button
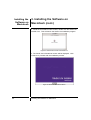
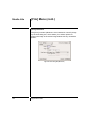
4) The Install Selection dialog box will appear (Figure 3). Select the
components which you would like installed from the following
choices: (Both installations are selectable at the same time.)
Viewfinder Lite and Studio Lite: This option will install both the
Viewfinder Lite and Studio Lite software applications.
TWAIN Module: This option will install the TWAIN driver, allowing for
direct image capture to most TWAIN-compliant applications.
Figure 3: Install Selection
Instruction Manual
17
2. Installing the Software on
Windows (cont.)
5) The Choose Destination Location dialog box will be presented
(Figure 4). Accept the default destination path or click the Browse
button to manually select a custom path. When you are finished,
click the Next button.
Figure 4: Choose Destination Location
6) The Select Program Folder dialog box will appear (Figure 5).
Accept the default program folder name, or specify a different folder
by entering a custom folder name or by selecting an existing folder.
Click the Next button to begin the program installation process.
Figure 5: Select Program Folder
18
Installing the Software on Windows
Installing the
Software on
Windows
Installing the
Software on
Windows
2. Installing the Software on
Windows (cont.)
Each camera is shipped with
a floppy diskette containing
custom characteristics data
generated by that particualar
camera unit.
7) You will be presented with the Characteristics Data Installation
dialog box (Figure 6). Select from one of the two installation
options and click the Next button to complete the software
installation process:
This data allows for the
calibration of capture settings
for maximum performance.
Install Custom Characteristics Data: The recommended choice, this
option will prompt you for the floppy disk supplied with your camera
containing characteristics data which was generated specifically for
your specific camera unit.
Install Default Characteristics Data from the CD-ROM: This option
will install a non-specific standard set of characteristics data. Select
this option if you do not have access to the original floppy diskette
supplied with your camera.
Instruction Manual
19
3. Installing the Software on
Macintosh
Installing the
Software on
Macintosh
The Studio Lite software should be installed after the successful
installation of the camera hardware. Turn on your computer, and
follow the instructions outlined below to install the Studio Lite
software and device driver extension under the MacOS operating
system. The software package is available on the Setup CD-ROM.
(the Studio Lite software and device driver extension will be
installed at the same time.)
Using the Installer
1. Insert the Setup CD-ROM disk into your CD-ROM drive.
2. Double-click the CD-ROM “Install CD” icon that appears on your
desktop to view its contents.
Figure A-1: Double-Click the CD-ROM Icon
Instruction Manual
21
Installing the
Software on
Macintosh
3. Installing the Software on
Macintosh (cont.)
3. Inside the CD-ROM’s Finder window, double-click the Studio Lite
Installer icon. This will launch the Studio Lite installation program.
Figure A-2: Double-Click the Studio Lite Installer Icon
4. The Studio Lite informational screen will be displayed. Click
Continue to proceed with the installation process.
Figure A-3: Studio Lite Informational Screen
22
Installing the Software on Macintosh
3. Installing the Software on
Macintosh (cont.)
Installing the
Software on
Macintosh
5. In order to use the Digital Microscopy Camera System from
within Adobe Photoshop (or compatible) application, you must
select “Studio Lite with Photoshop Plugin” instead of the default
“Studio Lite” when the Install Selection window is showing. This will
instruct the installer to copy the file “Viewfinder” into the Photoshop
folder.
If you are not planning to use the camera with Photoshop, select
“Studio Lite”.
Figure A-4a: Install Selection Window
6. A dialog box will appear, prompting you to select the folder into
which you would like to install the application files. You may choose
to accept the default name and location for the Studio Lite folder or
to specify a custom path. When you are finished, click Install.
Figure A-5: Destination Folder
Instruction Manual
23
Installing the
Software on
Macintosh
Each camera is shipped with
a CD-ROM labeled “Camera
Data” containing custom
characteristics data
generated by that particular
camera unit.
3. Installing the Software on
Macintosh (cont.)
7. You will be presented with the Characteristics Data Installation
dialog box. Select from one of the two installation options in the
Figure A-6 and click the Next button to complete the software
installation process.
This data allows for the
calibration of capture settings
for maximum performance.
Figure A-6: Camera Data Installation Window
Install Custom Characteristics Data: The recommended choice, this
option will prompt you for the CD-ROM supplied with your camera
containing characteristics data which was generated specifically for
your specific camera unit. Insert CD-ROM labeled “Camera Data”
into the CD-ROM Drive. Then click the OK button.
Figure A-7: Camera Data Select Confirmation Window
Install Default Characteristics Data from the CD-ROM: This option
will install a non-specific standard set of characteristics data. Select
this option if you do not have access to the original “Camera Data”
CD-ROM supplied with your camera. Click the OK button following
the instruction in the display window.
24
Installing the Software on Macintosh
3. Installing the Software on
Macintosh (cont.)
Installing the
Software on
Macintosh
8. If the Studio Lite with Photoshop Plug-in was selected in section
5, you will be presented Figure A-8. Proceed to the next step
pushing the install button. The installation will not be completed if
Quit button was selected. Repeat from section 1. to complete the
installation.
Figure A-8: Start Window for the Plugin Installation
9. You will be presented Figure A-9. Select the folder where the
Photoshop Plug-in will be set up into. Then click the Install into
“Plug-ins” button. (“Plug-ins” portion may be different depending on
the selected folder name.)
Figure A-9: Folder Select Window for the Plug-in Installation
Instruction Manual
25
Installing the
Software on
Macintosh
3. Installing the Software on
Macintosh (cont.)
10. After the installation of the Studio Lite software and driver is
completed, you will be prompted to restart your computer. Click
Restart to apply all changes to your system.
Figure A-10: Installation Completed
11. When you have restarted your computer system, the Studio Lite
files will be located in the “Digital Microscopy Camera” folder on
your desktop (default location), unless you specified a different
location during the installation process.
Figure A-11: The Studio Lite Files
26
Installing the Software on Macintosh
Capturing
Procedure
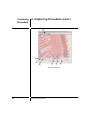
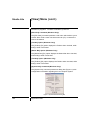
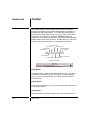
4. Capturing Procedure
Capturing Procedure
1) Perform all necessary optical adjustments on the microscope.
2) Insert an LBD color temperature conversion filter in the light path
if a bright field is observed. Then adjust the light voltage to the
photograph reference voltage. (Although the camera will perform
the WB adjustment, better quality images will be provided.)
Start Viewfider Lite application
Switch the light path of the microscope
to the camera light path
Start preview
Push Preview Start/Stop button.
(1 in Fig.1)
Set the capture mode
1)Select the bright field mode or the
fluorescent mode. (2 in Fig.1)
2)Select Auto or Manual setting. (3 in Fig.1)
3)Select the capturing image size. (4 in Fig.1)
Set the spot meter size
Select the spot meter size. (5 in Fig.1)
Adjust framing and focusing of specimen
Move spot meter and EV adjustment
Move the spot meter on the specimen. (6 in Fig.1)
Adjust the exposure value.(7 in Fig.1)
Adjust white balance and black balance
Adjust WB. If necessary, adjust BB. (8 in Fig.1)
Capturing
Capture images by pushing the capture button.
(9 in Fig.1)
Check Image
Check captured image quality.
Instruction Manual
27
Capturing
Procedure
4. Capturing Procedure (cont.)
Figure 1: Viewfinder Lite
28
Capturing Procedure
5. Viewfinder Lite (Windows) /
Studio Lite (Macintosh)
Viewfinder
Lite
The Basics
Instruction Manual
29
Viewfinder
Lite
Running the Viewfinder Lite
Application (Windows)
Taskbar
The Viewfinder Lite application is the first step in acquiring images
with the digital camera system.
The Taskbar is the bar on the
Windows desktop that
includes the Start button.
Buttons representing
programs currently running
on your computer appear on
this bar.
To run the Viewfinder Lite application:
1) Click on the Start button located on the Windows taskbar.
2) Point to Programs. The Programs menu will appear.
3) Click on Viewfinder Lite.
The Viewfinder Lite application appears with the logo displayed in
the image window.
30
Viewfinder Lite (Windows) / Studio Lite (Macintosh)
Viewfinder
Lite
Running the Studio Lite
Application (Macintosh)
Launching the Studio Lite application is the first step in acquiring
images with the digital camera system.
To run the Studio Lite application on Macintosh:
1) Find the folder where you had the Installer place the Studio Lite
files.
2) Double-click on the application icon ("Studio Lite").
The Studio Lite application appears with the logo displayed in the
preview window.
Instruction Manual
31
Viewfinder
Lite
Viewing the Preview
Much like the optical viewfinder found on most standard film
cameras, the Viewfinder Lite application presents a live "throughthe-lens" view of the camera's subject. This allows for the framing
and focusing of a subject before capturing the final image.
To start the preview:
Method A
1) Click on the [Viewfinder] menu.
2) Select the [Start Preview] command.
Method B
Windows. Use the following keyboard shortcut: Alt + S.
Macintosh. Use the following keyboard equivalent: Cmd + J.
Method C
Click the [Preview On/Off] button located in the [Capture] toolbar.
To stop the preview:
Method A
1) Click on the [Viewfinder] menu.
2) De-select the [Start Preview] command.
Method B
Windows. Use the following keyboard shortcut: Alt + S.
Macintosh. Use the following keyboard equivalent: Cmd + J.
32
Viewfinder Lite (Windows) / Studio Lite (Macintosh)
Viewing the Preview (cont.)
Viewfinder
Lite
Method C
Click the [Preview On/Off] button located in the [Capture] toolbar.
Disabling the preview covers the preview image with the splash
screen but does not discontinue power to the camera.
Instruction Manual
33
Viewfinder
Lite
Capturing Images
The primary function of the Viewfinder Lite application is to allow for
the capture of high-resolution still images with the camera system.
To capture a still image:
Method A
1) Click on the [Viewfinder] menu.
2) Select the [Capture] command.
Method B
Windows. Use the following keyboard shortcut: Alt + C.
Macintosh. Use the following keyboard equivalent: Cmd + K.
Method C
Click on the [Capture] button located in the [Capture] toolbar.
Method D
Press the [Expose] button on the external handswitch (optional).
Current Viewfinder Lite settings are automatically applied to the
captured image. Upon capture, the image is automatically sent to
the Studio Lite image editing application for post-capture
processing.
On the Macintosh the Viewfinder and Studio Lite functionality is
integrated into the single Studio Lite application, so that in what
follows in this manual the Macintosh user can ignore references to
Viewfinder and Studio being separate. On the Mac there is only
one applicatin involved. Thus when the user captures an image
using the Viewfinder window, the still image is immediately seen in
a new window right in the same application.
34
Viewfinder Lite (Windows) / Studio Lite (Macintosh)
Viewfinder
Lite
Capturing Images (cont.)
If the user wishes to preserve any still image, he/she should save it
in Studio Lite. (Windows only: If more than 20 images are
displayed at once by Studio Lite, Windows OS operations may to
become unstable and you will not able to save any images.)
Instruction Manual
35
Viewfinder
Lite
Selecting the Viewfinder Mode
Frame Rate
The Viewfinder Lite offers three selectable preview modes-Fast,
Zoom, and Full-presented within the live Viewfinder Lite image
window at a size of 640x480 pixels.
Frame rate, or refresh rate,
refers to the speed at which
the preview image within the
Viewfinder Lite image window
is updated (measured in
frames drawn per second).
In standard US NTSC
television broadcasts, 30
frames are drawn on the TV
screen per second. The more
frames drawn per second,
the more fluid the motion
shown on the screen.
Fast - The default selection, the Fast mode provides a view of the
entire camera image area. This mode is suitable for positioning the
subject, rapid focusing, and determining optimum brightness levels.
In Fast mode, the previewed effect of the camera exposure time
setting is limited to 1/4 second. While the effect of slower speeds
will be reflected in the captured image, the effect in the preview
image is simulated in the Viewfinder Lite software by intensifying
the brightness level. The Viewfinder Lite preview image may
appear of substantially lower quality than the final captured image
at exposure time settings slower than 1/4 second.
Zoom - The Zoom mode provides a view which is zoomed on the
center 25% of the camera image area. This portion of the image is
displayed at the full CCD resolution (640x480 portion of
1392x1040), providing the highest level of detail of all of the
Viewfinder Lite modes. The effect of the Sharpness setting (located
under the [Options] menu) is previewed only in the Zoom mode and
may assist in the focusing process. The frame rate of the preview
image is slower than Fast mode (same as Full mode) and is limited
by the exposure time setting.
Full - The Full mode provides a view of the entire camera image
area by scaling the CCD-resolution image into the 640x480 pixel
preview area, providing increased resolution over Fast mode, but
decreased detail over Zoom mode. The frame rate of the preview
image is slower than Fast mode (same as Zoom mode) and is
limited by the exposure time setting.
To select the Viewfinder Lite mode:
Method A
1) Click on the [Viewfinder] menu.
2) Select the [Viewfinder Mode] menu item.
36
Viewfinder Lite (Windows) / Studio Lite (Macintosh)
Selecting the Viewfinder Mode
(cont.)
Viewfinder
Lite
3) Select the desired Viewfinder Lite mode from the pull-down
menu.
Method B
Click on the button representing the desired Viewfinder Lite mode
(Fast, Zoom, or Full) in the [Options] toolbar.
While these three preview modes allow for varying degrees of
resolution, image detail, and frame rate, the resultant final captured
image will be identical regardless of the Viewfinder Lite mode used
to preview the image.
Instruction Manual
37
Viewfinder
Lite
Selecting the Capture Resolution
Resolution
The Viewfinder Lite application offers three user-selectable capture
resolutions (sizes): 640x480, 1392x1040, and 2776x2074 pixels.
Available capture resolutions are dependent upon the model of
camera being used.
The degree of sharpness of a
captured digital image. A
measure of the density of
pixels on a screen, resolution
is measured by a matrix of
two numbers, which
represent the number of
pixels available across and
down the screen (e.g.
640x480). For example, the
VGA resolution of 640x480
means 640 dots (pixels)
across each of the 480 lines.
The image file size is directly
related to capture resolution;
the higher the resolution, the
larger the file. For example,
an uncompressed 24-bit
color image captured at VGA
resolution will have a file size
of approximately 900
kilobytes. An uncompressed
24-bit color image captured
at the maximum resolution of
2776x2074 will have a file
size of approximately 16.3
megabytes.
To select the capture resolution:
Method A
1) Click on the [Viewfinder] menu.
2) Click on the Capture [Size] command.
3) Select the desired capture size from the pull-down menu.
Method B
Windows: Click on the [Capture Size] pull-down list located in the
[Capture] toolbar. Highlight one of the three predefined image
capture resolutions.
Macintosh: Locate the Capture Size popup menu located in the
controls below the image pane and select the desired image
capture resolution.
Each capture resolution setting offers varying levels of photographic
detail and image file size. In general, higher resolution images offer
increased detail in a larger file size. Uncompressed images
captured at resolutions of 640x480, 1392x1040, and 2776x2074
pixels have file sizes of approximately 900KB, 4.15MB, and
16.2MB, respectively.
The resultant effect of the capture resolution selection is not
reflected by the live image displayed in the Viewfinder Lite image
window.
38
Viewfinder Lite (Windows) / Studio Lite (Macintosh)
Quitting the Viewfinder Lite
Application
Viewfinder
Lite
To close the Viewfinder Lite application:
For Windows users.
Method A
1) Click on the [Viewfinder] menu.
2) Select the [Exit] command.
Method B
Click once on the x button located at the far right of the Viewfinder
Lite application window's title bar.
Method C
Double-click the Control Menu icon located at the far left of the
Viewfinder Lite application window's title bar.
Method D
1) Click once on Control Menu icon located at the far left of the
Viewfinder Lite application window's title bar.
2) Select the [Close] command.
Method E
Use the following keyboard shortcut: Alt + F4.
For Macintosh users.
Method A
Select "Quit" in the File menu.
Instruction Manual
39
Viewfinder
Lite
Quitting the Viewfinder Lite
Application (cont.)
Method B
Use the keyboard equivalent Cmd-Q.
40
Viewfinder Lite (Windows) / Studio Lite (Macintosh)
Working Within the Viewfinder Lite
Application Window
Viewfinder
Lite
Viewfinder Lite allows for the customization of the viewing
properties of the Viewfinder Lite application window.
For Windows users.
To display or hide the [Capture] toolbar:
1) Click the [Options] menu.
2) To display the [Capture] toolbar, place a checkmark next to the
[Capture] Toolbar option. To hide the [Capture] toolbar, remove the
checkmark.
To display or hide the [Options] toolbar:
1) Click the [Options] menu.
2) To display the [Options] toolbar, place a checkmark next to the
[Options] Toolbar option. To hide the [Options] toolbar, remove the
checkmark.
To display or hide the [Focus] toolbar:
1) Click the [Options] menu.
2) To display the [Focus] toolbar, place a checkmark next to the
[Focus] Toolbar option. To hide the [Focus] toolbar, remove the
checkmark.
To display or hide the Status Bar:
1) Click the [Options] menu.
2) To display the Status Bar, place a checkmark next to the [Status
Bar] option. To hide the Status Bar, remove the checkmark.
Instruction Manual
41
Viewfinder
Lite
Working Within the Viewfinder Lite
Application Window (cont.)
To display or hide the [Exposure] toolbar:
1) Click the [Options] menu.
2) To display the [Exposure] toolbar, place a checkmark next to the
[Exposure] Toolbar option. To hide the [Exposure] toolbar, remove
the checkmark.
For Macintosh users.
The various buttons and menus are fixed on the Macintosh
Viewfinder window and not separated into different toolbars. The
Macintosh version does not have a Status Bar.
42
Viewfinder Lite (Windows) / Studio Lite (Macintosh)
Viewfinder
Lite
Manipulating Images
The Viewfinder Lite application offers a variety of controls for
manipulating the orientation and display of the preview and
captured images.
To capture images in grayscale:
Method A
1) Click on the [Options] menu.
2) Select the [Grayscale] command.
Method B
Click the [Toggle Grayscale] button located in the [Options] toolbar.
To rotate the image:
Method A
1) Click on the [Options] menu.
2) Select the [Rotate 180] command.
Method B
Click the [Rotate 180] button located in the [Options] toolbar.
To flip the image horizontally, along the vertical axis:
Method A
1) Click on the [Options] menu.
2) Select the [Mirror] command.
Instruction Manual
43
Viewfinder
Lite
Manipulating Images (cont.)
Method B
Click the [Mirror] button located in the [Options] toolbar.
To flip the image vertically, along the horizontal axis:
Method A
1) Click on the [Options] menu.
2) Select the Flip command.
Method B
Click the [Flip] button located in the [Options] toolbar.
To Sharpen the Image
1) Click on the [Options] menu
2) Select the Sharpness option.
3) Select the desired level of sharpness.
Four distinct settings of the sharpening filter are available: Off (no
sharpening will be applied), Minimum, Medium, and Maximum, each
one applying the sharpening filter to a different degree.
These manipulations are reflected in both the preview (the effect of
Sharpening is previewed only in the Zoom Viewfinder Lite mode),
as well as the final capture.
44
Viewfinder Lite (Windows) / Studio Lite (Macintosh)
Adjusting the Color Balance
Viewfinder
Lite
Viewfinder Lite offers a wide range of operations to optimize color
reproduction and accuracy. These operations include white balance
and black balance, as well as color correction.
To enable and calibrate One-Push White Balance:
Method A
1) Click on the [Options] menu.
2) Select the [Settings] command. This will bring up the [Settings]
property sheet, or dialog box.
3) Click the [Color Balance] tab.
4) Point the camera at a white target (for microscopy applications,
remove a slide, place a blank slide on the microscope or move the
slide so that a blank or white region of the specimen is positioned
into the field of view).
5) Select One-Push White Balance.
6) Click OK to close the property sheet or dialog.
Method B
1) Click on the [Settings] button located in the [Options] toolbar.
This will bring up the [Settings] property sheet, or dialog box.
2) Repeat steps 3 through 6 above.
Method C
1) Point the camera at a white target ( for microscopy applications,
remove a slide, place a blank slide on the microscope or move the
slide so that a blank or white region of the specimen is positioned
into the field of view).
2) Click on the [Viewfinder] menu.
Instruction Manual
45
Viewfinder
Lite
Adjusting the Color Balance (cont.)
3) Select the [White Balance] command and select One-Push.
Method D
1) Point the camera at a white target ( for microscopy applications,
remove a slide, place a blank slide on the microscope or move the
slide so that a blank or white region of the specimen is positioned
into the field of view).
2) Press the [One-Push White Balance] button located in the
[Capture] toolbar
The One-Push White Balance will be calibrated according to the
target white reference used.
To enable and calibrate Auto White Balance:
Method A
1) Click on the [Options] menu.
2) Select the [Settings] command. This will bring up the [Settings]
property sheet, or dialog.
3) Click the [Color Balance] tab.
4) Select Auto White Balance.
5) Click OK to close the property sheet, or dialog box.
6) To specify a reference white area within the Viewfinder Lite
image window, Click and hold the left-mouse button at the starting
point of the selection.
7) Drag the mouse to encompass the desired region of interest.
8) Release the mouse button.
46
Viewfinder Lite (Windows) / Studio Lite (Macintosh)
Adjusting the Color Balance (cont.)
Viewfinder
Lite
Method B
1) Click on the [Settings] button located in the [Options] toolbar.
This will bring up the [Settings] property sheet, or dialog.
2) Repeat steps 3 through 8 above.
Method C
1) Click on the [Viewfinder] menu.
2) Select the [White Balance] command and select Auto.
3) Repeat steps 6 through 8 above.
Method D
1) Depress the [Auto White Balance] button located in the [Capture]
toolbar.
2) Repeat steps 6 through 8 above.
The specified region of interest will be bordered by a rectangular
frame, and the Auto White Balance will be calibrated according to
the target white reference used.
To enable and calibrate Black Balance:
Method A
1) Click on the [Options] menu.
2) Select the [Settings] command. This will bring up the Settings
property sheet, or dialog box.
3) Click the [Color Balance] tab.
4) Select the [Black Balance] checkbox.
Instruction Manual
47
Viewfinder
Lite
Adjusting the Color Balance (cont.)
5) Click OK to close the property sheet, or dialog.
6) To specify a reference black area within the Viewfinder Lite
image window, Click and hold the left-mouse button at the starting
point of the selection.
7) Drag the mouse to encompass the desired region of interest.
8) Release the mouse button.
Method B
1) Click on the [Settings] button located in the [Options] toolbar.
This will bring up the [Settings] property sheet, or dialog box.
2) Repeat steps 3 through 8 above.
Method C
1) Click on the [Viewfinder] menu.
2) Place a checkmark next to the [Black Balance On/Off] command.
3) Repeat steps 6 through 8 above.
Method D
1) Depress the Black Balance On/Off button located in the [Capture]
toolbar.
2) Repeat steps 6 through 8 above.
The specified region of interest will be bordered by a rectangular
frame, and the Black Balance will be calibrated according to the
target black reference used.
To utilize the manual color correction feature:
48
Viewfinder Lite (Windows) / Studio Lite (Macintosh)
Adjusting the Color Balance (cont.)
Viewfinder
Lite
Method A
1) Click on the [Options] menu.
2) Select the [Settings] command. This will bring up the [Settings]
property sheet, or dialog.
3) Click the [Color Balance] tab.
4) Select Manual Color Correction.
5) Adjust the color balance slider bars for each of the separate color
channels (red, green, and blue) to specify the desired color balance
levels.
6) Click the Apply button to apply the color correction settings.
7) Click OK to close the property sheet, or dialog box.
Method B
1) Click on the [Settings] button located in the [Options] toolbar.
This will bring up the [Settings] property sheet, or dialog.
2) Repeat steps 3 through 7 above.
The preview image is updated to reflect the color balance settings.
To disable all white balance operations:
Method A
1) Click on the [Options] menu.
2) Select the [Settings] command. This will bring up the [Settings]
property sheet, or dialog box.
3) Click the [Color Balance] tab.
Instruction Manual
49
Viewfinder
Lite
Adjusting the Color Balance (cont.)
4) Select Off.
5) Click OK to close the property sheet and apply the changes.
Method B
1) Click on the [Settings] button located in the [Options] toolbar.
This will bring up the [Settings] property sheet.
2) Repeat steps 3 through 5 above.
Method C
1) Click on the [Viewfinder] menu.
2) Select the [White Balance] command and select Off.
50
Viewfinder Lite (Windows) / Studio Lite (Macintosh)
Viewfinder
Lite
Adjusting Levels
The Viewfinder Lite application allows you to perform dynamic
adjustments to the histogram of the preview displayed in the
Viewfinder Lite image window.
To adjust the shadow value:
Method A
1) Click on the [Options] menu.
2) Select the [Settings] command. This will bring up the [Settings]
property sheet, or dialog.
3) Click the [Level Adjustment] tab.
4) Click on the [Channel] pull-down list, or popup menu.
5) Select the color channel upon which you would like the
adjustment performed. You may choose from the composite RGB
channel or the individual color channels (Red, Green, and Blue).
6) Windows: Adjust the [Shadow] slider bar to specify the desired
shadow level for the selected color channel.
Macintosh: Adjust the [Shadow] marker triangle (the left-hand
marker) to specify the desired shadow level for the selected color
channel.
7) Windows: Click the OK button to apply the level adjustment
settings.
Macintosh: Level adjustments are automatically applied in real time
to both the preview image and to the corresponding histogram. To
freeze the histogram so that it does not change due to noise, to
changes in the scene viewed by the camera, or to adjustments of
the markers, check the Freeze checkbox.
Method B
1) Click on the [Settings] button located in the [Options] toolbar.
Instruction Manual
51
Viewfinder
Lite
Adjusting Levels (cont.)
This will bring up the [Settings] property sheet, or dialog.
2) Repeat steps 3 through 7 above.
To adjust the gamma value:
Method A
1) Click on the [Options] menu.
2) Select the [Settings] command. This will bring up the [Settings]
property sheet, or dialog box.
3) Click the [Level Adjustment] tab.
4) Click on the [Channel] pull-down list, or popup menu.
5) Select the color channel upon which you would like the
adjustment performed. You may choose from the composite RGB
channel or the individual color channels (Red, Green, and Blue).
6) Windows: Adjust the [Gamma] slider bar to specify the desired
gamma level for the selected color channel.
Macintosh: Adjust the [Gamma] marker triangle (the middle marker)
to specify the desired gamma level for the selected color channel.
7) Windows Click the OK button to apply the level adjustment
settings.
Macintosh: Level adjustments are automatically applied in real time
to both the preview image and to the corresponding histogram. To
freeze the histogram so that it does not change due to noise, to
changes in the scene viewed by the camera, or to adjustments of
the markers, check the Freeze checkbox.
Method B
1) Click on the [Settings] button located in the [Options] toolbar.
52
Viewfinder Lite (Windows) / Studio Lite (Macintosh)
Viewfinder
Lite
Adjusting Levels (cont.)
This will bring up the [Settings] property sheet, or dialog box.
2) Repeat steps 3 through 7 above.
To adjust the highlight value:
Method A
1) Click on the [Options] menu.
2) Select the [Settings] command. This will bring up the [Settings]
property sheet, or dialog.
3) Click the [Level Adjustment] tab.
4) Click on the [Channel] pull-down list, or popup menu.
5) Select the color channel upon which you would like the
adjustment performed. You may choose from the composite RGB
channel or the individual color channels (Red, Green, and Blue).
6) Windows: Adjust the [Highlight] slider bar to specify the desired
highlight level for the selected color channel.
Macintosh: Adjust the [Highlight] marker triangle (the right-hand
marker) to specify the desired highlight level for the selected color
channel.
7) Click the OK button to apply the level adjustment settings and
close the property sheet, or dialog box.\
Macintosh: Level adjustments are automatically applied in real time
to both the preview image and to the corresponding histogram. To
freeze the histogram so that it does not change due to noise, to
changes in the scene viewed by the camera, or to adjustments of
the markers, check the Freeze checkbox.
Method B
Instruction Manual
53
Viewfinder
Lite
Adjusting Levels (cont.)
1) Click on the [Settings] button located in the [Options] toolbar.
This will bring up the [Settings] property sheet, or dialog.
2) Repeat steps 3 through 8 above.
To reset level adjustment settings:
Method A
1) Click on the [Options] menu.
2) Select the [Settings] command. This will bring up the [Settings]
property sheet, or dialog box.
3) Click the [Level Adjustment] tab.
4) Click the [Reset] button.
5) Level Adjustment level will be reset to the default settings.
6) Click OK to close the property sheet, or dialog.
Method B
1) Click on the [Settings] button located in the [Options] toolbar.
This will bring up the [Settings] property sheet, or dialog box.
2) Repeat steps 3 through 6 above.
To save user preset settings:
Method A
1) Click on the [Options] menu.
2) Select the [Settings] command. This will bring up the [Settings]
property sheet, or dialog.
54
Viewfinder Lite (Windows) / Studio Lite (Macintosh)
Viewfinder
Lite
Adjusting Levels (cont.)
3) Click the [User Preset] tab.
4) Press the [Save] button. This will bring upt he [Save Settings]
dialog box.
5) Enter a filename, and select the location to which you would like
the settings saved.
6) Click the [Save] button.
Method B
1) Click on the [Settings] button located in the [Options] toolbar.
This will bring up the [Settings] property sheet, or dialog box.
2) Repeat steps 3 trhough 6 above.
To load previously saved User Preset settings:
Method A
1) Click on the [Options] menu.
2) Select the [Settings] command. This will bring up the [Settings]
property sheet, or dialog.
3) Click the [User Preset] tab.
4) Press the [Load] button. This will bring up an [Open] dialog box.
5) Select the desired settings file.
6) Make your choice, and click the [Open] button.
Method B
1) Click on the [Settings] button located in the [Options] toolbar.
This will bring up the [Settings] property sheet, or dialog box.
2) Repeat steps 3 through 6 above.
Instruction Manual
55
Viewfinder
Lite
Using Automatic Exposure
The Viewfinder Lite application supports fully automatic exposure
(AE) control. In this mode, the Viewfinder Lite calculates the
appropriate exposure for the current scene based on the region
specified by the spot meter.
To select the automatic exposure mode:
1) Click the [Exposure Mode] pull-down list, or popup menu, located
in the [Exposure] toolbar.
2) Select Automatic. This will activate automatic exposure mode
and enable the Spot and [Exposure Adjust] pull-down lists, or popup
menus, as well as the AE Lock controls. The spot meter will be
displayed in the center of the Viewfinder Lite image window as a
square region defined by a yellow border.
There may be circumstances when a scene is under- or overexposed, or you may wish to make slight adjustments to the
exposure based on your preferences.
To incrementally adjust the automatic exposure:
1) Click the [Exposure Adjust] pull-down list, or popup menu,
located in the [Exposure] toolbar.
2) Select an increment by which you wish to increase or decrease
the exposure time.
Two indicators, Over and Under, provide feedback regarding
whether the image is over-exposed or under-exposed.
To fix the exposure time at its current setting:
Method A
1) Click on the [Viewfinder] menu.
2) Select the AE Lock command.
56
Viewfinder Lite (Windows) / Studio Lite (Macintosh)
Using Automatic Exposure (cont.)
Viewfinder
Lite
Method B
Click on the AE lock button located in the [Capture] toolbar.
Method C
Press the [AE Lock] button on the external handswitch (optional).
With the AE Lock feature enabled, the exposure time is no longer
updated automatically and is fixed at its current value.
The Viewfinder Lite application includes predefined settings for the
automatic exposure mode optimized for the unique conditions
presented by brightfield and fluorescence microscopy applications.
To optimize the automatic exposure mode for brightfield
microscopy:
Click on the Brightfield (BF) button located in the [Options] toolbar.
To optimize the automatic exposure mode for fluorescence
microscopy:
Click on the Fluorescence (FL) button located in the [Options]
toolbar. The fluorescence mode can have a different target
exposure than brightfield mode when the Viewfinder is set to
automatic exposure mode.
Exposure settings are reflected in both the preview (all Viewfinder
Lite modes) as well as the captured image. However, in Fast
mode, the previewed image with a long exposure time may different
from the captured image to keep the fast frame rate. While the
effect of longer exposure settings will be reflected in the captured
image, the effect in the Fast mode preview image is simulated in
the Viewfinder Lite software by intensifying the brightness level and
may not accurately reflect the final capture quality.
Instruction Manual
57
Viewfinder
Lite
Using the Spot Meter
The spot meter works in conjunction with the automatic exposure
feature of the Viewfinder Lite application to accurately compute the
appropriate exposure time for a given scene. The spot meter may
be repositioned within the Viewfinder Lite image window or adjusted
in size to customize the region upon which the exposure is
calculated.
To reposition the spot meter:
1) Click on the [Move Spot] button located in the [Capture] toolbar.
This will allow you to reposition the spot meter.
2) Click with the mouse (Windows: left-mouse button) somewhere
within the live image to cause the spot meter to be relocated and
the exposure time automatically recalculated based on the new
region within its borders.
Three pre-defined spot sizes are available: 30%, 1%, and 0.1%.
Each size denotes the percentage of the area which the spot region
occupies to the capturing image.
To re-center the spot meter:
Click on the [Center Spot] button located in the [Capture] toolbar.
To specify the spot size:
Method A
1) Click on the [Spot] pull-down list, or popup menu, located in the
[Exposure] toolbar.
2) Highlight one of the three predefined spot sizes.
Method B
Press the [Spot] button on the external handswitch (optional) to
cycle between the three predefined spot sizes.
58
Viewfinder Lite (Windows) / Studio Lite (Macintosh)
Viewfinder
Lite
Using Manual Exposure
The Viewfinder Lite application supports fully manual exposure
control. In this mode, the Viewfinder Lite allows for user-defined
exposure times ranging from a shortest time of 1/10000 second to a
longest exposure time of 60 seconds.
To select the manual exposure mode:
1) Click the [Exposure Mode] pull-down list, or popup menu, located
in the [Exposure] toolbar.
2) Select Manual. This will activate Exposure Time slider and
disable the Spot and [Exposure Adjust] pull-down lists, or popup
menus, as well as the AE Lock controls.
To select the exposure time:
Method A
Drag the Exposure time slider located in the [Exposure] toolbar.
Dragging the slider to the left decreases the exposure time;
dragging to the right increases it.
Method B
Click on the increment or decrement arrows located beside the
Exposure Time slider. Clicking on the left arrow decreases the
exposure time; clicking on the right arrow increases it.
Exposure settings are reflected in both the preview (all Viewfinder
Lite modes) as well as the captured image. However, in Fast
mode, the previewed effect of the exposure setting is limited to a
maximum exposure time of 1/4 second. While the effect of longer
exposure settings will be reflected in the captured image, the effect
in the Fast mode preview image is simulated in the Viewfinder Lite
software by intensifying the brightness level and may not accurately
reflect the final capture quality.
Instruction Manual
59
Viewfinder
Lite
Adjusting Camera Sensitivity
The Viewfinder Lite application allows you to control the sensitivity
of the camera by adjusting its hardware gain control. Analogous to
a standard film camera's ISO sensitivity ratings, these settings,
50/100/200/400, control the amplification of image data signals,
resulting in varying sensitivity.
To adjust the sensitivity:
1) Click on the [Sensitivity] pull-down list, or popup menu, located in
the [Exposure] toolbar.
2) Highlight one of the four predefined sensitivity settings.
High sensitivity settings may amplify unwanted noise in the image.
In general, it is recommended that a sensitivity level of 100 be
selected. If the ISO sensitivity value is increased, the noise level
will also increase.
60
Viewfinder Lite (Windows) / Studio Lite (Macintosh)
Viewfinder
Lite
Using Online Help
Viewfinder Lite offers the help topic documentation in online help,
including all of the information provided in this User's Manual.
To access online help:
1) Click on the [Help] menu.
2) Windows: Select the [Help Topics] command.
Macintosh: Select the [Studio Lite Help] menu item.
Online help is searchable by topic or keyword.
Instruction Manual
61
Viewfinder
Lite
Using the Focusing Tool
The Viewfinder Lite application offers a focusing tool which is
designed to assist you in the process of focusing on a stationary
subject.
Windows. To view the [Focus] toolbar:
1) Click on the [Options] menu.
2) Place a checkmark next to the [Focus] Toolbar option.
Macintosh. The [Focus On/Off] and [Focus Reset] buttons are
always visible.
To activate the Focus Indicator:
Method A
1) Click on the [Viewfinder] menu.
2) Select the [Focus On/Off] command.
Method B
Click on the [Focus On/Off] button located in the [Focus] toolbar.
To focus on a camera subject with the assistance of the focusing
tool:
1) First try to achieve the highest level of focus manually to bring
the camera into "rough" focus.
2) Click once using the left-mouse button on any region within the
live image window to place the Focusing Target on the area that
you wish to focus on. Selecting an area of high contrast (i.e. a
distinct edge) will optimize the accuracy of the final focus.
62
Viewfinder Lite (Windows) / Studio Lite (Macintosh)
Using the Focusing Tool (cont.)
Viewfinder
Lite
3) Observe the Current Focus Level Indicator in the [Focus] toolbar.
The Current Focus Level Indicator numerically or graphically
displays the present level of focus quality for the region currently
specified by the Focusing Target. Slowly turn the focusing knob of
the microscope (or macro lens) in one direction until the Current
Focus Level Indicator begins to steadily decline.
4) Slowly turn the focusing knob of the microscope (or macro lens)
in the direction opposite to the one you chose in Step 3. You will
notice that the Current Focus Level Indicator will begin to steadily
increase. Continue turning until the Current Focus Level Indicator
begins to steadily decline again. The Optimum Focus Level
Indicator should now be at its maximum value. The Optimum
Focus Level numerically or graphically indicates the highest level of
focus quality achieved up to the present time for the region currently
specified by the Focusing Target. The objective is to maximize the
number which represents this level.
5) Slowly turn the focusing knob of the microscope (or macro lens)
in the direction opposite to the one you chose in Step 4 (or the
same direction as Step 3). Continue turning until the Current Focus
Level Indicator equals (or is close as possible to) the Optimum
Focus Level. This indicates that the subject has reached the
Optimum Focus Level and is in focus.
If you experience difficulty matching the Current Focus Level
Indicator to the Optimum Focus Level, it may be necessary to reset
the focusing tool and repeat the above steps.
To reset the focusing tool:
Method A
1) Click on the [Viewfinder] menu.
2) Select the [Focus Reset] command.
Instruction Manual
63
Viewfinder
Lite
Using the Focusing Tool (cont.)
Method B
Click on the [Focus Reset] button located in the [Focus] toolbar.
To deactivate the Focus Indicator:
Method A
1) Click on the [Viewfinder] menu.
2) Select the [Focus On/Off] command.
Method B
Click on the [Focus On/Off] button located in the [Focus] toolbar.
64
Viewfinder Lite (Windows) / Studio Lite (Macintosh)
Viewfinder
Lite
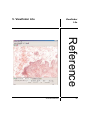
5. Viewfinder Lite
Reference
Instruction Manual
65
Viewfinder
Lite
Title Bar (Windows Only)
The strip across the top of the Viewfinder Lite application window is
called the Title Bar (Figure 2). The Viewfinder Lite program name
and icon are displayed along with buttons which represent functions
and menus that contain commands.
Control Menu / Close [Viewfinder Lite] Button
Maximize Button
Minimize Button
Close Button
Figure 2: Title Bar
Control Menu / Close [Viewfinder Lite] Button
The Viewfinder Lite icon displayed at the upper left corner of the
Viewfinder Lite application window represents the Control Menu /
Close [Viewfinder Lite] button. A single mouse-click of this button
displays the Control menu. Double-clicking this button closes the
Viewfinder Lite application window and quits the program.
Minimize Button
Clicking once on the Minimize button reduces the Viewfinder Lite
application window to an icon on the Windows taskbar.
Maximize Button
Clicking once on the Maximize button increases the size of the
Viewfinder Lite application window to fill the entire Windows
desktop.
Close Button
Clicking once on the Close button closes the Viewfinder Lite
application window and quits the program.
66
Viewfinder Lite (Windows) / Studio Lite (Macintosh)
Control Menu (Windows Only)
Viewfinder
Lite
The Control menu (Figure 3) is comprised of six commands which
control the physical aspects of the Viewfinder Lite application
window: Restore, Move, Size, Minimize, Maximize, and Close.
[Restore] Command
[Move] Command
[Size] Command
[Minimize] Command
[Maximize] Command
[Close] Command
Figure 3: Control Menu
[Restore] Command
The [Restore] command returns the Viewfinder Lite application
window to its previous state.
[Move] Command
The [Move] command allows for the manual positioning of the
Viewfinder Lite application window within the Windows desktop
using the keyboard's directional arrow keys.
[Size] Command
The [Size] command allows for the manual sizing of the Viewfinder
Lite application window using the keyboard's directional arrow keys.
[Minimize] Command
The Minimize command reduces the Viewfinder Lite Pro application
window to an icon in the Windows taskbar.
[Maximize] Command
The [Maximize] command is not available within the Viewfinder Lite
application.
Instruction Manual
67
Viewfinder
Lite
Control Menu (cont.)
[Close] Command
The [Close] command closes the Viewfinder Lite application window
and quits the program.
68
Viewfinder Lite (Windows) / Studio Lite (Macintosh)
Viewfinder
Lite
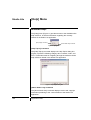
Menu Bar
For Windows.
The strip below the Title Bar is called the Menu Bar (Figure 4).
Control over the range of camera control tools offered by Viewfinder
Lite is available through the three menu selections: Viewfinder,
Options, and Help.
[Viewfinder] Menu [Help] Menu
[Options] Menu
Figure 4: Menu Bar
For Macintosh.
The strip across the top of any window is called the Title Bar (Figure
2a). The left-hand box is the Close Box, which allows you to close
the window without quitting the application. (To quit the program,
use the File menu in the Menu Bar.) As long as the Studio Lite
application is still running, you can always open the Viewfinder
window again, or bring it to the top of any other open windows, by
selecting "Viewfinder" in the [Window] menu. The box on the right
side of the Title Bar is called the Collapse Box.
Figure 2a: Viewfinder Window Title Bar (Macintosh)
When Studio Lite is the current application, its menus appear in the
Menu Bar of your computer (Figure 4a).
Figure 4a: Menu Bar (Macintosh)
Instruction Manual
69
Viewfinder
Lite
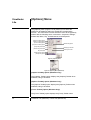
[Viewfinder] Menu
The [Viewfinder] Menu (Figure 5) duplicates the features found in
the [Capture] Toolbar, including Start Preview, Capture, Capture
Size, White Balance On/Off, Black Balance, and AE Lock. In
addition, this menu allows access to certain Focus and [Options]
toolbar features, such as Viewfinder Mode, Focus On/Off, and
Focus Reset.
[Start Preview] Command
[Capture] Command
Viewfinder Mode
[Capture Size] Command
[Focus On/Off] Command
[Focus Reset] Command
[White Balance]
Command
[Black Balance On/Off]
Command
AE Lock Command
[Exit] Command
Figure 5: [Viewfinder] Menu
[Start Preview] Command
[Capture] Command
Viewfinder Mode
[Capture Size] Command
[Focus On/Off] Command
[Focus Reset] Command
White Balance Command
AE Lock Command
[Black Balance On/Off]
Command
Figure 5a: [Viewfinder] Menu (Macintosh)
[Start Preview] Command
The [Start Preview] command (Windows - Alt+S, Macintosh Cmd+J) controls power to the camera. When selected, the camera
is powered on, displaying a constantly refreshed live image
(preview) of the current camera subject in the Viewfinder Lite image
window. When this command is not selected, the camera is
powered off, and the Viewfinder Lite splash screen is displayed in
the image window.
[Capture] Command
The [Capture] command (Windows - Alt+C, Macintosh - Cmd+K)
instructs the camera to capture a still image of the current camera
subject to the Studio Lite application, applying the defined
70
Viewfinder Lite (Windows) / Studio Lite (Macintosh)
Viewfinder
Lite
[Viewfinder] Menu (cont.)
Viewfinder Lite capture settings (i.e. capture resolution, exposure,
etc.) and image processing options (i.e. white/black balance, color
balance, etc.).
[Viewfinder Mode] Command
The [Viewfinder Mode] command allows for the selection of one of
three different preview display modes: Fast, Zoom, and Full.
Fast Mode
The default selection, the Fast mode Viewfinder Lite provides a
view of the entire camera image area. This mode is suitable for
positioning the subject, rapid focusing, and determining optimum
brightness levels. In Fast mode, the previewed effect of the camera
exposure time setting is limited to approximately 1/4 second. While
the effect of longer exposure times will be reflected in the captured
image, the effect in the preview image is simulated in the Viewfinder
Lite software by intensifying the brightness level. The Viewfinder
Lite preview image may appear of substantially lower quality than
the final captured image at exposure time settings slower than 1/4
second.
Zoom Mode
The Zoom mode Viewfinder Lite provides a view which is zoomed
on the center 25% of the camera image area. This portion of the
image is displayed at the full CCD resolution (640x480 portion of
1392x1040), providing the highest level of detail of all of the
Viewfinder Lite modes. The effect of the Sharpness setting (located
under the [Options] menu) is previewed only in the Zoom mode and
may assist in the focusing process. The frame rate of the preview
image is slower than Fast mode (same as Full mode) and is limited
by the exposure time setting.
Full Mode
The Full mode Viewfinder Lite provides a view of the entire camera
image area by scaling the CCD-resolution image into the 640x480
pixel preview area, providing increased resolution over Fast mode,
but decreased detail over Zoom mode. The frame rate of the
preview image is slower than Fast mode (same as Zoom mode)
and is limited by the exposure time setting.
Instruction Manual
71
Viewfinder
Lite
[Viewfinder] Menu (cont.)
[Capture Size] Command
The [Capture Size] command allows for the selection of one of
three image capture resolutions: 640x480, 1392x1040, and
2776x2074.
[Focus On/Off] Command
The [Focus On/Off] command switches between activation and
deactivation of the Focusing Target and Focus Indicator. When
selected, the Focus Indicator becomes enabled, displaying a
dynamic indication of the current focus level for the area specified
by the Focusing target. When this command is not selected, the
Focus Indicator feature is disabled.
[Focus Reset] Command
The [Focus Reset] command sets the Optimum Focus Level to the
Current Focus Level and is useful when you would like to calibrate
the Focus Indicator on a new region of the preview.
[White Balance] Command
The [White Balance] command allows for the selection of one of
three different white balance modes: Off, Auto, and One-Push.
Off
The Off setting disables all white balancing functions. No white
balance operations will be performed in either the preview or
captured image.
Auto
The Auto white balance setting allows the user to calibrate the white
balancing by specifying any arbitrary region in the live image that is
to be defined as the standard for white. This feature should be
selected when viewing images which have discernable regions of
true white. These settings are reflected in both the preview, as well
as the captured image.
72
Viewfinder Lite (Windows) / Studio Lite (Macintosh)
Viewfinder
Lite
[Viewfinder] Menu (cont.)
One-Push
The One-Push white balance setting calculates the white balance
based on the entire camera scene, allowing the user to calibrate the
Red, Green, and Blue (RGB) color correction coefficients by
pointing the camera at a white target or light source. The
calibration is performed immediately upon selecting this option. The
coefficients stay fixed for all subsequent captures. This setting
allows accurate adjustments for applications in which the scenes
remain relatively static and unchanged. These settings are
reflected in both the preview, as well as the captured image.
[Black Balance On/Off] Command
The [Black Balance On/Off] command switches between the
activation and deactivation of the Black Balance feature of the
Viewfinder Lite application. When selected, the Black Balance
On/Off button in the [Capture] toolbar is automatically activated,
allowing to you calibrate the black balancing by specifying any
arbitrary region in the live image that is to be defined as the
standard for black. Once this region is specified, the black
balancing is automatically updated to provide optimum color
reproduction. This feature should be selected when viewing images
which have discernable regions of true black. When this command
is not selected, the black balancing feature is disabled. These
settings are reflected in both the preview, as well as the captured
image.
AE Lock Command
Working in conjunction with the Viewfinder Lite's automatic
exposure (AE) mode, the AE Lock command switches between the
activation and deactivation of the auto exposure lock feature of the
Viewfinder Lite application. When selected, the [AE Lock] button in
the [Capture] toolbar is automatically activated, locking the
exposure time and gain at their current settings and temporarily
disabling the auto exposure function. When this command is not
selected, the automatic exposure feature is re-enabled.
[Exit] Command (Windows Only)
The [Exit] command closes the Viewfinder Lite application window
and quits the program.
Instruction Manual
73
Viewfinder
Lite
[Options] Menu
The [Options] menu (Figure 6 or 6a) allows you to select the
toolbars to be displayed within the Viewfinder Lite application
window. This menu also includes selections found in the [Options]
toolbar with the following seven commands: Grayscale, Settings,
Rotate 180, Mirror, Flip, 16 Bits/Channel, and Sharpness.
[Capture Toolbar] Option
[Options Toolbar] Option
[Focus Toolbar] Option
[Status Bar] Option
[Exposure Toolbar] Option
[Grayscale] Command
[Settings] Command
[Rotate 180] Command
[Mirror] Command
Flip Command
16 Bits/Channel Option
[Sharpness] Option
Figure 6: [Options] Menu
Figure 6a: [Options] Menu (Macintosh)
[Capture Toolbar] Option (Windows Only)
The [Capture Toolbar] option displays the [Capture] Toolbar when
selected, hiding it otherwise.
[Options Toolbar] Option (Windows Only)
The [Options Toolbar] option displays the [Options] Toolbar when
selected, hiding it otherwise.
[Focus Toolbar] Option (Windows Only)
The [Focus Toolbar] option displays the [Focus] Toolbar when
74
Viewfinder Lite (Windows) / Studio Lite (Macintosh)
Viewfinder
Lite
[Options] Menu (cont.)
selected, hiding it otherwise.
[Status Bar] Option (Windows Only)
The [Status Bar] option displays the Status Bar when selected,
hiding it otherwise.
[Exposure Toolbar] Option (Windows Only)
The [Exposure Toolbar] option displays the [Exposure] Toolbar
when selected, hiding it otherwise.
[Grayscale] Command
When selected, the [Grayscale] command converts the preview
image in the Viewfinder Lite image window from color to shades of
gray. This change is reflected in the captured image as well.
[Settings] Command
The [Settings] command brings up the [Settings] property sheet, or
dialog box, which allows you to customize the image processing
functions of Viewfinder Lite with the following tabs: Color Balance,
Level Adjustment, and User Preset.
[Settings] Dialog Box
The [Settings] property sheet allows you to customize the imageprocessing functions of Viewfinder Lite with the following tabs: Color
Balance, Level Adjustment, and User Preset.
[Color Balance] Tab
The [Color Balance] tab (Figure 7) allows you to select from one of
four white balancing schemes: Off, One-Push White Balance, Auto
White Balance, and Manual Color Correction. Black balancing may
also be applied here.
Instruction Manual
75
Viewfinder
Lite
[Options] Menu (cont.)
Show Balance
Rectangle
Checkbox
Auto White
Balance
Manual Color
Correction
Off
One-Push
White Balance
[Black Balance]
Checkbox
Show Balance
Rectangle
Checkbox
Figure 7: Setting Dialog Box ([Color Balance] Tab)
Figure 7a: Settings Dialog Box, [Color Balance] Panel (Macintosh)
Off
The Off setting disables all white balancing functions. No white
balance operations will be performed in either the preview or
captured image.
76
Viewfinder Lite (Windows) / Studio Lite (Macintosh)
Viewfinder
Lite
[Options] Menu (cont.)
Auto White Balance
The Auto White Balance setting allows the user to calibrate the
white balancing by specifying any arbitrary region in the live image
that is to be defined as the standard for white. This feature should
be selected when viewing images which have discernable regions
of true white. These settings are reflected in both the preview, as
well as the captured image.
One-Push White Balance
The One-Push White Balance setting calculates the white balance
based on the entire camera scene, allowing the user to calibrate the
Red, Green, and Blue (RGB) color correction coefficients by
pointing the camera at a white target or light source. The
calibration is performed immediately upon selecting this option. The
coefficients stay fixed for all subsequent captures. This setting
allows accurate adjustments for applications in which the scenes
remain relatively static and unchanged. These settings are
reflected in both the preview, as well as the captured image.
Manual Color Correction
The Manual Color Correction setting offers full user-control over the
color correction settings. Three separate sliders allow you to
specify custom values for the Red, Green, and Blue color correction
coefficients. Dragging to the left decreases the level; dragging to
the right increases it. The numbers above the slider display the
numerical color channel values. Values can range from 0 to 2. The
default color channel values are 1. These settings are reflected in
both the preview, as well as the captured image.
[Black Balance] Checkbox
The [Black Balance] checkbox switches between the activation and
deactivation of the Black Balance feature of the Viewfinder Lite
application. When selected, this feature allows the user to calibrate
the black balancing by specifying any arbitrary region in the live
Instruction Manual
77
Viewfinder
Lite
[Options] Menu (cont.)
image that is to be defined as the standard for black. Once this
region is specified, the black balancing is automatically updated to
provide optimum color reproduction. This feature should be
selected when viewing images which have discernable regions of
true black. When this command is not selected, the black balancing
feature is disabled. These settings are reflected in both the
preview, as well as the captured image.
[Show Balance Rectangle] Checkboxes
The [Show Balance Rectangle] checkboxes toggle between the
displaying and hiding of the balance rectangles which specify the
calibration regions for the Auto White Balance and Black Balance
operations. When selected, the selected regions are displayed in
the Viewfinder Lite image window. When this feature is not
selected, the balance rectangles are hidden from view.
[Level Adjustment] Tab
The [Level Adjustment] tab (Figure 8) allows you to perform
dynamic histogram adjustments to the preview displayed in the
Viewfinder Lite image window. Shadow, Gamma, and Highlight
values may be specified for either the individual color channels
(Red, Green, or Blue) or the composite RGB channel. The current
histogram for the live image being previewed in the Viewfinder Lite
image window is represented graphically in the center of the dialog
box. Viewfinder Lite allows you to save current level adjustment
settings as well as load any previously saved settings.
78
Viewfinder Lite (Windows) / Studio Lite (Macintosh)
Viewfinder
Lite
[Options] Menu (cont.)
[Channel] PullDown List
Input Level
[Load] Button
[Save] Button
[Update] Button
Histogram
Graph
[Reset] Button
[Shadow] Slider
[Gamma] Slider
[Highlight]
Slider
Figure 8: Setting Dialog Box ([Level Adjustment] Tab)
Figure 8a: Settings Dialog Box, [Level Adjustment] Panel (Macintosh)
[Channel] Pull-Down List, or Popup Menu
The [Channel] pull-down list, or popup menu, allows you to select
the color channel(s) on which you would like the level adjustment
operations performed. You may select any of the individual color
channels (Red, Green, or Blue) or the composite RGB channel.
Instruction Manual
79
Viewfinder
Lite
[Options] Menu (cont.)
Input Level
The Input Level displays three text boxes, indicating (from left to
right) numerical input values for the Shadow, Gamma, and Highlight
settings, respectively.
Windows:
[Shadow] Slider
The [Shadow] Slider adjusts the shadow level of the preview image
in the Viewfinder Lite image window. Dragging to the left decreases
the value; dragging to the right increases it. Values can range from
0 to 255. This setting is represented graphically on the histogram
display and reflected in the captured image.
[Gamma] Slider
The [Gamma] Slider adjusts the gamma level of the preview image
in the Viewfinder Lite image window. Dragging to the left decreases
the value; dragging to the right increases it. Values can range from
0 to 5. This setting is represented graphically on the histogram
display and reflected in the captured image.
[Highlight] Slider
The [Highlight] Slider adjusts the highlight level of the preview
image in the Viewfinder Lite image window. Dragging to the left
decreases the value; dragging to the right increases it. Values can
range from 0 to 255. This setting is represented graphically on the
histogram display and reflected in the captured image.
Macintosh:
There are three marker triangles below the histogram instead of the
three sliders that the Windows version has. The meaning and use
of these marker triangles, however, matches that of Windows’
sliders. Thus the dark left-hand marker corresponds to the
[Shadow] slider, the gray middle marker to the [Gamma] slider, and
80
Viewfinder Lite (Windows) / Studio Lite (Macintosh)
Viewfinder
Lite
[Options] Menu (cont.)
the white right-hand marker to the [Highlight] slider. See the
Windows text for further details. Moving the marker triangles
produces an immediate effect on the preview image, and likewise
the histogram is continuously updated in real-time as the camera’s
scene changes.
[Reset] Button
The [Reset] button resets the level adjustments which were
previously set by the user.
[Update] Button (Windows Only)
The [Update] button displays the histogram for the current frame of
the Viewfinder preview.
[Freeze] Checkbox (Macintosh Only)
Level adjustments are automatically applied in real time to the
preview-image histogram, so there is no need for an Update button
on the Macintosh. To freeze the histogram, however, so that it does
not change due to noise, to changes in the scene viewed by the
camera, or to adjustments of the markers, click the Freeze
checkbox. To unfreeze the histogram, click again.
[User Preset] Tab
The [User Preset] tab (Figure 9) allows you to save current
Viewfinder Lite capture settings or load previously saved settings.
All user-selected settings are saved, including: white balance mode,
frame accumulation options, sensitivity, exposure mode, spot size,
capture resolution, and exposure time.
Instruction Manual
81
Viewfinder
Lite
[Options] Menu (cont.)
[Save] Button
Current Setting
[Load] Button
Figure 9: Setting Dialog Box ([User Preset] Tab)
Figure 9a: Settings Dialog Box, [User Preset] Tab (Macintosh)
[Save] Button
The [Save] button brings up the [Save Settings] dialog box which
allows you to save current Viewfinder Lite capture settings (i.e.
capture resolution, white/black balance calibrations, etc.) so that
they may be re-applied at a later time. The filename representing
the currently saved settings is displayed in the dialog box.
82
Viewfinder Lite (Windows) / Studio Lite (Macintosh)
Viewfinder
Lite
[Options] Menu (cont.)
[Load] Button
The [Load] button brings up the [Load Settings] dialog box which
allows you to import previously saved Viewfinder Lite capture
settings (i.e. capture resolution, white/black balance calibrations,
etc.). The filename representing the currently loaded settings is
displayed in the dialog box.
[Rotate 180] Command
The [Rotate 180] command rotates the live image in the Viewfinder
Lite image window by a half turn (180°). This change is reflected in
the captured image as well.
[Mirror] Command
The [Mirror] command flips the live image in the Viewfinder Lite
image window horizontally, along the vertical (Y) axis. This change
is reflected in the captured image as well.
[Flip] Command
The [Flip] command flips the live image in the Viewfinder Lite image
window vertically, along the horizontal (X) axis. This change is
reflected in the captured image as well.
[16 Bits/Channel] Option
When selected, the [16 Bits/Channel] option allows captured
images to be processed with 16-bits of data per color channel (red,
green, and blue). The increased dynamic range offered by the
resulting 48-bit RGB images is particularly effective in increasing
image detail during accumulation operations, including frame
averaging and integration.
[Sharpness] Option
The [Sharpness] option allows you to set the use of the sharpening
filter in the Viewfinder Lite application. Four varying settings for
Instruction Manual
83
Viewfinder
Lite
[Options] Menu (cont.)
sharpening are available: Off, Minimum, Medium, and Maximum.
84
Viewfinder Lite (Windows) / Studio Lite (Macintosh)
Viewfinder
Lite
[Help] Menu
Windows Help:
The [Help] menu (Figure 10) provides access to the detailed online
help reference, as well as information regarding the current release
of the Viewfinder Lite application.
[Help Topics] Command
[About Viewfinder Lite] Command
Figure 10: [Help] Menu
[Help Topics] Command
The [Help Topics] command displays the Help Topics dialog box
(Figure 11) with the following category tabs: Contents, Index, and
Find. These tabs assist in navigating through the extensive online
help reference offered in the Viewfinder Lite application.
Figure 11: Help Topics Dialog Box
[About Viewfinder Lite] Command
The [About Viewfinder Lite] command displays version and
copyright information pertaining to the current release of the
Instruction Manual
85
Viewfinder
Lite
[Help] Menu (cont.)
Viewfinder Lite application.
Macintosh Help:
The [Help] menu (Figure 10a) provides access to detailed online
help reference.
[Studio Lite Help] Command
The [Studio Lite Help] command displays online help in a new
window.
Figure 10a: [Help] Menu (Macintosh)
The window displays the same information as this printed manual
and can be searched for specific topics or keywords.
86
Viewfinder Lite (Windows) / Studio Lite (Macintosh)
Viewfinder
Lite
[Capture] Toolbar
The [Capture] Toolbar (Figure 12) provides the functions necessary
for basic camera control. These include: Preview On/Off, Capture,
Capture Size, Accumulation, Option, Auto White Balance, Black
Balance, One-Push White Balance, Photometry, Photometry
Centering, and AE Lock. Windows only: The [Capture] toolbar can
be manually repositioned to any location on the Windows desktop
using mouse drag-and-drop. Double-clicking on the upper border of
the [Capture] toolbar will return it to the Viewfinder Lite application
window.
[Auto White Balance] Button
[Accumulation] Setting
[One-Push White Balance] Button
[Capture] Button
[Center Spot] Button
[Preview On/Off]
[Capture Size] Pull-Down List
[Option] Pull-Down List
[AE Lock] Button
[Move Spot] Button
[Black Balance] Button
Figure 12: [Capture] Toolbar
Figure 12a: [Capture] Toolbar Controls (Macintosh)
[Preview On/Off] Button
The [Preview On/Off] button controls power to the camera. When
this button is depressed, the camera is powered on, displaying a
constantly refreshed live image (preview) of the current camera
subject in the Viewfinder Lite image window. Otherwise, the
camera is powered off, and the Viewfinder Lite splash screen is
displayed in the image window.
[Capture] Button (Windows)
The [Capture] button instructs the camera to capture a still image of
the current camera subject to the Studio Lite application, applying
the defined Viewfinder Lite capture settings (i.e. capture resolution,
exposure, etc.) and image processing options (i.e. white/black
balance, color balance, etc.).
Instruction Manual
87
Viewfinder
Lite
[Capture] Toolbar (cont.)
[Capture] Button (Macintosh)
The [Capture] button instructs the camera to capture a still image of
the current camera subject and place it in a new window, applying
the defined capture settings (i.e., capture resolution, exposure, etc.)
and image-processing options (i.e., white/black balance, color
balance, etc.).
[Capture Size] Pull-Down List, or Popup Menu
The [Capture Size] pull-down list, or popup menu allows for the
selection of one of three predefined image capture resolutions:
640x480, 1392x1040, and 2776x2074.
[Accumulation] Setting
The [Accumulation] setting allows you to specify the number of
frames to be captured by the Viewfinder Lite application for frame
averaging or integration operations. You may select a value
between 1 (single capture - no accumulation) and 64 by clicking the
up.down arrows, or by typing a number in the box.
[Option] Pull-Down List, or Popup Menu
The [Option] pull-down list, or popup menu, allows you to select
either of the following two frame accumulation options: Average or
Integral.
Average
The Average operation sums (adds) the raw image data of the
specified number of accumulated frames and divides the resulting
signal by the number of frames summed. Frame averaging results
in an improvement of the signal-to-noise ratio (S/N) of the captured
image by a factor equal to the square root of the number of frames
averaged (up to sqrt[256]=16). This operation reduces the random
noise generated under low-light conditions (i.e. darkfield,
fluorescence microscopy), while maintaining contrast, brightness,
and color, and is only suitable for still subjects. The enhancement
in the captured image due to the frame averaging operation is not
88
Viewfinder Lite (Windows) / Studio Lite (Macintosh)
Viewfinder
Lite
[Capture] Toolbar (cont.)
reflected in the live image displayed in the Viewfinder Lite image
window.
Integral
The Integral operation sums (adds) the raw image data of the
specified number of accumulated frames. Frame integration
strengthens weak image signals by accumulating image data, but
also has the effect of increasing any noise which is present in the
accumulated images and is only suitable for still subjects. The
effect in the captured image due to the frame integration operation
is not reflected in the live image displayed in the Viewfinder Lite
image window.
[Auto White Balance] Button
Pressing the [Auto White Balance] button allows the user to select
with the cursor a rectangular area of the image which the
application will use to set the white balance automatically. You may
thus set any arbitrary region of the live image to be the standard by
which white is defined. This region remains in effect until a different
mode of color balancing is selected, the Focus Finder is activated,
or the Move Spot button is pressed to on. Once this region is
specified, the white balancing is automatically updated to provide
optimum color reproduction. This feature should be selected when
viewing images which have discernible regions of true white. These
settings are reflected in both the preview, as well as the captured
image.
Black Balance Button
The [Black Balance] button acts in a similar fashion to the [White
Balance] button. Pressing it permits the user to draw a rectangular
area that will be used as the standard for black. Once this region is
specified, the black balancing is automatically updated to provide
optimum color reproduction. This feature should be selected when
viewing images which have discernible regions of true black. The
setting is reflected in both the preview, as well as the captured
image., and remains in effect until a different mode of color
balancing is selected, the Focus Finder is activated, or the Move
Instruction Manual
89
Viewfinder
Lite
[Capture] Toolbar (cont.)
Spot button is pressed to on.
[One-Push White Balance] Button
The [One-Push White Balance] button calculates the white balance
based on the entire camera scene, allowing the user to calibrate the
Red, Green, and Blue (RGB) color correction coefficients by
pointing the camera at a white target or light source. The
calibration is performed immediately upon selecting this option. The
coefficients stay fixed for all subsequent captures until a different
mode of color balancing is selected, the Focus Finder is activated,
or the Move Spot button is pressed to on. This setting allows
accurate adjustments for applications in which the scenes remain
relatively static and unchanged. These settings are reflected in
both the preview, as well as the captured image.
[Move Spot] Button
The [Move Spot] button allows you to reposition the spot meter
under automatic exposure mode. When this button is depressed,
you may place the spot meter on the region of the subject under
which you would like the auto exposure calculated. By default, the
spot meter is centered in the Viewfinder Lite image window. The
effect of the spot meter position on exposure time is dynamically
updated in the preview image.
[Center Spot] Button
The [Center Spot] button relocates the spot meter to the center of
the Viewfinder preview window.
[AE Lock] Button
The [AE Lock] button switches between the activation and
deactivation of the auto exposure lock feature of the Viewfinder Lite
application. When AE Lock is selected, the exposure time and gain
are locked at their current settings, temporarily disabling the auto
exposure function. When this button is not selected, the automatic
exposure feature is re-enabled.
90
Viewfinder Lite (Windows) / Studio Lite (Macintosh)
Viewfinder
Lite
[Exposure] Toolbar
The [Exposure] Toolbar provides the functions necessary for
camera exposure control. These include: Exposure Time,
Sensitivity, Exposure Mode, Spot, and Exposure Adjust. Windows
only: The [Exposure] toolbar can be manually repositioned to any
location on the Windows desktop using mouse drag-and-drop.
Double-clicking on the upper border of the [Exposure] Toolbar will
return it to the Viewfinder Lite application window.
Exposure Time
[Exposure Mode] Pull-Down List
[Sensitivity] Pull-Down List
[Exposure Adjust] Pull-Down List
[Spot] Pull-Down List Exposure Warning Indicator
Figure 13: [Exposure] Toolbar
Figure 13a: [Exposure] Toolbar Controls (Macintosh)
Exposure Time
The Exposure Time slider enables you to control the electronic
shutter of the camera by manually selecting an exposure time.
Dragging the slider to the left decreases the value; dragging to the
right increases it. You may also adjust the exposure time by
clicking on the increment and decrement arrows beside the slider.
Available exposure times range from a shortest time of 1/10000 of a
second to a longest time of 60 seconds. This control is enabled
only under manual exposure mode and is disabled under automatic
exposure (AE) mode. These settings are reflected in both the
preview, as well as the captured image.
[Sensitivity] Pull-Down List, or Popup Menu
The [Sensitivity] pull-down list, or popup menu, allows you to
manually control the camera's hardware gain controls. Analogous
to a standard film camera's ISO sensitivity ratings, these settings,
50/100/200/400, control the amplification of image data signals,
resulting in varying sensitivity. These settings are reflected in both
the preview, as well as the captured image.
Instruction Manual
91
Viewfinder
Lite
[Exposure] Toolbar (cont.)
[Exposure Mode] Pull-Down List, or Popup Menu
The [Exposure Mode] pull-down list, or popup menu, allows you to
select between automatic and manual exposure modes.
Automatic Exposure
Under Automatic Exposure (AE) mode, the camera automatically
calculates the optimum exposure time based on the region of the
image contained within the spot meter. The Exposure Time controls
are disabled under this mode.
Manual Exposure
Under Manual Exposure mode, exposure times may be specified
manually using the Exposure Time controls. The Spot and
Exposure Adjust controls are disabled under this mode.
[Spot] Pull-Down List, or Popup Menu
The [Spot] pull-down list, or popup menu, allows you to select the
size of the spot meter. The sizes are specified as an area
percentage of the capture area. Available sizes are: 30%, 1%, and
0.1%. Under automatic exposure mode, the exposure time is
calculated based on the image data present within the region
defined by the spot meter. This control is enabled only under
automatic exposure (AE) mode and is disabled under the AE Lock
and manual exposure modes.
[Exposure Adjust] Pull-Down List, or Popup Menu
The [Exposure Adjust] pull-down list, or popup menu, allows you to
fine tune the exposure of images under automatic exposure mode.
The Exposure Adjust range is +2 EV to -2 EV by 1/3 EV steps.
Exposure Warning Indicators
Two indicators, Over and Under, feedback regarding whether an
image is over-exposed or under-exposed. This control is enabled
only under automatic exposure (AE) mode and is disabled under
manual exposure mode.
92
Viewfinder Lite (Windows) / Studio Lite (Macintosh)
Viewfinder
Lite
[Options] Toolbar
The [Options] toolbar (Figure 14) provides functions which adjust
the properties of the live image presented in the Viewfinder Lite
image window as well as the captured image. These include:
Rotate 180, Mirror, Flip, Toggle Grayscale, Settings, Brightfield,
Fluorescence, Fast, Zoom, and Full. Windows only: The [Options]
toolbar can be manually repositioned to any location on the
Windows desktop using mouse drag-and-drop. Double-clicking on
the upper border of the [Options] toolbar will return it to the
Viewfinder Lite application window.
[Settings] Button
[Rotate 180] Button [Flip] Button
[Mirror] Button
[Toggle Grayscale] Button
[Fluorescence] Button
[Zoom] Button
[Fast] Button [Full] Button
[Brightfield] Button
Figure 14: [Options] Toolbar
Figure 14a: [Options] Toolbar Controls (Macintosh)
[Rotate 180] Button
The [Rotate 180] button rotates the live image in the Viewfinder Lite
image window by a half turn (180°). This change is reflected in the
captured image as well.
[Mirror] Button
The [Mirror] button flips the live image in the Viewfinder Lite image
window horizontally, along the vertical (Y) axis. This change is
reflected in the captured image as well.
[Flip] Button
The [Flip] button flips the live image in the Viewfinder Lite image
window vertically, along the horizontal (X) axis. This change is
reflected in the captured image as well.
Instruction Manual
93
Viewfinder
Lite
[Options] Toolbar (cont.)
[Toggle Grayscale] Button
The [Toggle Grayscale] button converts the preview image in the
Viewfinder Lite image window from color to shades of gray. This
change is reflected in the captured image as well.
[Settings] Button
The [Settings] button brings up the [Settings] dialog box which
allows you to customize the image processing functions of
Viewfinder Lite with the following tabs: Color Balance, Level
Adjustment, and User Preset.
[Brightfield] Button
The [Brightfield] button (BF) works in conjunction with the automatic
exposure mode (AE) to optimize exposure settings for image
capture under brightfield microscopy.
[Fluorescence] Button
The [Fluorescence] button (FL) works in conjunction with the
automatic exposure mode (AE) to optimize exposure settings for
image capture under fluorescence microscopy. The fluorescence
mode can have a different target exposure than brightfield mode
when the Viewfinder is set to automatic exposure mode. These
parameters are defined in the file, settings.dat. If the fluorescence
parameter is lower than brightfield, it will converge on a darker
setting, causing the preview image to appear darker in FL mode.
[Fast] Button
The [Fast] button displays a view of the entire camera image area
within the Viewfinder Lite image window. Taking the image directly
from the CCD, the fastest possible frame rate is achieved by subsampling every other pixel horizontally and every fourth pixel
vertically. This mode is suitable for positioning the subject, rapid
focusing, and determining optimum brightness levels. In Fast
mode, the previewed effect of the camera exposure time setting is
94
Viewfinder Lite (Windows) / Studio Lite (Macintosh)
Viewfinder
Lite
[Options] Toolbar (cont.)
limited to approximately 1/4 second. While the effect of longer
exposure times will be reflected in the captured image, the effect in
the preview image is simulated in the Viewfinder Lite software by
intensifying the brightness level. The Viewfinder Lite preview image
may appear of substantially lower quality than the final captured
image at exposure time settings slower than 1/4 second.
[Zoom] Button
The [Zoom] button provides a live Viewfinder Lite preview which is
zoomed on the center 25% of the camera image area. This portion
of the image is displayed at the full CCD resolution (640x480
portion of 1392x1040), providing the highest level of detail of all of
the Viewfinder Lite modes. The effect of the Sharpness setting
(located under the [Options] menu) is previewed only in the Zoom
mode and may assist in the focusing process. The frame rate of
the preview image is slower than Fast mode (same as Full mode)
and is limited by the exposure time setting.
[Full] Button
The [Full] button provides a live Viewfinder Lite preview of the entire
camera image area by scaling the CCD-resolution image into the
640x480 pixel preview area, providing increased resolution over
Fast mode, but decreased detail over Zoom mode. The frame rate
of the preview image is slower than Fast mode (same as Zoom
mode) and is limited by the exposure time setting.
Instruction Manual
95
Viewfinder
Lite
[Focus] Toolbar
The [Focus] toolbar (Figure 15) gives you access to the focusing
tools in Viewfinder Lite. These include: Focus On/Off, Reset Focus,
Current Focus Level Indicator, and Optimum Focus Level Indicator.
This tool, represented by the Current Focus Level Indicator and
Optimum Focus Level, assists in the focusing process for stationary
subjects. Click once on the [Focus] toolbar with your mouse to
switch between a graphical or numerical user interface. Windows
only: The [Focus] toolbar can be manually repositioned to any
location on the Windows desktop using mouse drag-and-drop.
Double-clicking on the upper border of the [Focus] toolbar will return
it to the Viewfinder Lite application window.
Optimum Focus Level
[Focus On/Off] Button
[Focus Reset] Button
Current Focus Level
Figure 15: [Focus] Toolbar
Figure 15a: [Focus] Toolbar Controls (Macintosh)
[Focus On/Off] Button
The [Focus On/Off] button toggles between the activation and
deactivation of the Focus Indicator, as well as the Focusing Target
in the Viewfinder Lite image window.
[Focus Reset] Button
The [Focus Reset] button sets the Optimum Focus Level to the
Current Focus Level and is useful when you would like to calibrate
the Focus Indicator on a new region of the preview.
Current Focus Level
The Current Focus Level numerically or graphically displays the
present level of focus quality for the region currently specified by
96
Viewfinder Lite (Windows) / Studio Lite (Macintosh)
Viewfinder
Lite
[Focus] Toolbar (cont.)
the Focusing Target. Maximum focus is achieved as the Current
Focus Level approaches the Optimum Focus Level.
Optimum Focus Level
The Optimum Focus Level numerically or graphically indicates the
highest level of focus quality achieved up to the present time for the
region currently specified by the Focusing Target. The objective is
to maximize the number which represents this level.
Focusing Target
The Focusing Target may be placed on a region of the subject
within the Viewfinder Lite image window that you wish to focus on.
It constantly displays the edge gradient of the region and is most
suitable for use on areas of high contrast. Used in conjunction with
the Focus Indicator, this tool assists in the focusing process.
Instruction Manual
97
Studio Lite
6. Studio Lite
The Basics
Instruction Manual
99
Studio Lite
Running the Application
Taskbar
Windows:
The Taskbar is the bar on the
Windows desktop that
includes the Start button.
Buttons representing
programs currently running
on your computer appear on
this bar.
The Studio Lite application allows for the editing and analysis of
images captured with the digital camera system.
To run the Studio Lite application:
1) Click on the Start button located on the Windows taskbar.
2) Point to Programs. The Programs menu will appear.
3) Click on Studio Lite.
The Studio Lite application window will appear.
Macintosh:
On the Macintosh platform the Viewfinder and Studio Lite
functionality is integrated into the single Studio Lite application.
Therefore the Mac user can ignore references to Studio being a
separate application program the Viewfinder application, having to
be started up separately, etc. On the Macintosh when the user
captures an image using the Viewfinder, the captured image
immediately opens in a new window of the same application.
This chapter contains a number of Windows-only explanations
which the Mac user can ignore. But functionality described in this
Studio Lite chapter that is not explicitly marked as "Windows only"
is available to users of both platforms for still-image, or "Studio",
windows. Keep in mind that any open window in Studio Lite which
is not the Viewfinder window (the preview window), is here called a
Studio window.
100
Studio Lite
Studio Lite
Creating a New Image
The [New] command lets you create a blank, untitled Studio Lite
image. You can use this command to create a new image with the
exact same pixel dimensions as an image or selection that has
been copied to the Clipboard.
To create a new image:
Method A
1) Click on the [File] menu.
2) Select the [New] command.
Method B
Windows: Use the following keyboard shortcut: Ctrl + N.
Windows Clipboard
A reserved section of
memory that is used as a
temporary holding area when
you copy and paste or cut
and paste from one
application to another. After
you copy or cut data from
your application, it is
viewable in the clipboard. If
you cut data from an
application and do not paste
it into another, and you do
not save the clipboard's
contents as a file, the data
will be lost upon exiting
Windows or when the next
copy or cut operation is
performed.
Macintosh: Use the following keyboard equivalent Cmd + N.
Method C
Click the [New] button located in the Studio Lite Toolbar.
If no valid image data is stored in the Clipboard, the default
dimensions for the new image window is 320x240 pixels.
Instruction Manual
101
Studio Lite
Selecting the Active Image Window
When multiple image windows are opened, Studio Lite requires that
an active image be selected to target operations to that specific
image.
To specify the active image:
Method A
Click once anywhere within the desired image window.
Method B
Select the desired image in the Window menu.
The active image is brought to the foreground of the Studio Lite
application window, and a checkmark is placed next to the filename
of the active image in the Open Windows list located in the Window
menu.
102
Studio Lite
Studio Lite
Opening Existing Images
In Studio Lite, you can open previously saved images in a variety of
image file formats and have multiple images opened
simultaneously. The following image file format types are supported
by Studio Lite's [Open] command: Bitmap, FlashPix, JPEG,
LeadTools, Mac PICT, PCX, Photo CD, PNG, Targa, TIFF, and
Windows Metafile.
Bitmap
To open an existing image file:
FlashPix
Method A
1) Click on the [File] menu.
2) Select the [Open] command. This will bring up the Open dialog
box.
3) Windows only: Specify a file format. In the Files of Type dialog
box, choose an individual image format type to display only files
saved in that particular format. Select Images to display all
supported image files in the selected folder. Choose All Files to
display all of the files (including those with unsupported file formats)
in the selected directory.
4) Select the file.
Bitmap (*.BMP) is the
standard Windows image
format on DOS and
Windows-compatible
computers.
The FlashPix (*.FPX) format
is designed to speed the
transfer and display of large,
high-resolution files in
applications that support the
FlashPix technology.
JPEG
The Joint Photographic
Experts Group (*.JPG) format
is an ISO/ITU standard for
compressing still images that
is becoming very popular due
to its high compression
capability. Using discrete
cosine transform, it provides
lossy compression.
LeadTools
5) Double-click the file name, or highlight it and click the [Open]
button.
Method B
The Lead Compressed
(*.CMP) format results in
smaller files and better image
quality than industry-standard
formats.
1) Windows: Use the following keyboard shortcut: Ctrl + O.
Mac PICT
Macintosh: Use the following keyboard equivalent: Cmd + O.
This will bring up the Open dialog box.
2) Repeat steps 3 to 5 above.
The PICT (*.PCT) format is
the primary Macintosh
graphics file format and is the
Mac counterpart to the
Windows Metafile (WMF)
format.
Method C
PCX
1) Click the [Open] button located in the Studio Lite Toolbar. This
The PCX format is commonly
Instruction Manual
103
Studio Lite
Opening Existing Images (cont.)
used by IBM PC-compatible
computers. This format is
capable of achieving
compression ratios of
approximately 1.1:1 to 1.5:1.
will bring up the Open dialog box.
2) Repeat steps 3 to 5 above.
Method D
Photo CD
A CD imaging system from
Kodak that digitizes 35mm
slides or negatives onto a
CD-ROM disc.
PNG
A bitmapped graphics file
format endorsed by the
World Wide Web Consortium.
Windows: Using your mouse, drag one or more existing image-file
icons from the Windows file system and drop them directly within
the Studio Lite application window.
Macintosh: Using your mouse, drag one or more existing image-file
icons from the Finder and let go of the mouse button when the
arrow cursor is directly over the Studio Lite application icon and the
icon becomes highlighted.
Method E (Windows only)
Targa
The Targa (*.TGA) format is
a bitmapped graphics file
format developed by
Truevision, Inc.
TIFF
The Tagged-Image File
Format (*.TIF) is used to
exchange files between
applications and computer
platforms.
Windows Metafile
Studio Lite provides shortcuts for up to the last four (4) previously
opened image files. To open one of these images, do this: in the
[File] menu select the desired image from the list of recently opened
images.
Using one of the methods A to E will result in the selected image
appearing in a new image window. If the file does not open, the file
format may not be supported, or the file may be damaged.
Studio Lite provides shortcuts for up to the last four (4) previously
opened image files. To open one of these images:
The Windows Metafile
(*.WMF) file format that holds
vector graphics, bitmaps and
text. The Windows Metafile
is Windows'' preferred vector
format, since it contains
actual Windows commands
(GDI calls) to draw the
images. It is also used by
programs to hold data
between sessions, and,
Windows sometimes uses it
for temporary storage.
1) Click on the [File] menu.
104
Studio Lite
2) Select the desired image from the recently opened images list by
clicking once directly on the filename.
The selected image should appear in a new image window. If the
file does not open, the file format may not be supported or the file
may be damaged.
Closing an Image Window
Studio Lite
Windows:
To close a displayed image window, choose from one of the
following five methods:
Method A
1) Click once directly on the image you wish to close to make it the
active image window.
2) Click on the [File] menu.
3) Select the [Close] command.
Method B
1) Click once directly on the image you wish to close to make it the
active image window.
2) Click once on the x button located at the far right of the image
window's title bar.
Method C
1) Click once directly on the image you wish to close to make it the
active image window.
2) Double-click the Control Menu icon located at the far left of the
image window's title bar.
Method D
1) Click once directly on the image you wish to close to make it the
active image window.
2) Click once on Control Menu icon located at the far left of the
image window's title bar.
Instruction Manual
105
Studio Lite
Closing an Image Window (cont.)
3) Select the [Close] command.
Method E
1) Click once directly on the image you wish to close to make it the
active image window.
2) Use the following keyboard shortcut: Ctrl + F4.
To close all opened image windows:
1) Click on the Window menu.
2) Select the [Close All] command.
You may be prompted to save any images which have not been
saved or that have been altered since the last save operation took
place.
Macintosh:
Use the close box or file menu [Close] to close a single image
window. The keyboard equivalent Cmd + W, will also work. To
close all the image windows, hold the Option key down before using
one of the three methods for single windows.
106
Studio Lite
Studio Lite
Saving Images
Studio Lite supports a variety of file formats to suit a wide range of
output needs. Using Studio Lite's save commands, you can save
your image to any of the following formats: JPEG, Bitmap, TIFF,
TIFF (compressed), Mac PICT, and FlashPix (Windows only).
JPEG - When saving in Joint Photographic Experts Group (JPEG)
format, Studio Lite allows you to specify the image quality and
compression level. To specify image quality and compression,
enter a Quality value between 1 and 100 or drag the slider bar.
Higher-quality images use less compression (and more disk space)
than lower-quality images. In most cases, the maximum quality
option produces a result indistinguishable from the original. The
following color depths are available in JPEG mode: 256 Grays (8bits) and 16 million colors (24-bits).
Bitmap - Studio Lite allows for the selection of the following color
depths when saving images in the standard Windows bitmap
format: Monochrome (1-bit), 16 Colors (4-bits), 256 Colors (8-bits),
and 16 million colors (24-bits).
TIFF - Studio Lite allows for the selection of the following color
depths when saving images in the Tagged-Image File format:
Monochrome (1-bit), 16 Colors (4-bits), 256 Colors (8-bits), 16
million colors (24-bits), and 281 trillion colors (48-bits).
Mac PICT - Studio Lite allows for the selection of the following color
depths when saving images in the PICT format: Monochrome (1bit), 16 Colors (4-bits), 256 Colors (8-bits), and 16 million colors
(24-bits).
FlashPix - Studio Lite allows for the selection of the following color
depths when saving images in the FlashPix format: 256 Grays (8bits) and 16 million colors (24-bits).
To save a captured image file for the first time:
Method A
1) Click once on the desired image to make it the active image
Instruction Manual
Bitmap
Bitmap (*.BMP) is the
standard Windows image
format on DOS and
Windows-compatible
computers. Also known as a
"bump" file, it is a Windows
and OS/2 bitmapped
graphics file format. It is the
Windows native bitmap
format, and every Windows
application has access to the
BMP software routines in
Windows that support it. BMP
files provide formats for 2,
16, 256 or 16 million colors
(1-bit, 4-bit, 8-bit and 24-bit
color).
FlashPix
The FlashPix (*.FPX) format,
developed by Kodak, is
designed to speed the
transfer and display of large,
high-resolution files in
applications that support the
FlashPix technology.
Although Studio Lite is not a
FlashPix-optimized
application, it can open and
save FlashPix files. The
FlashPix format supports
grayscale and RGB color
modes, and does not support
alpha channels.
JPEG
The Joint Photographic
Experts Group (*.JPG) format
is an ISO/ITU standard for
compressing still images that
is becoming very popular due
to its high compression
capability. Using discrete
cosine transform, it provides
107
Studio Lite
Saving Images (cont.)
lossy compression (you lose
some data from the original
image) with ratios up to
100:1 and higher.
window.
It depends on the image, but
ratios of 10:1 to 20:1 may
provide little noticeable loss.
The more the loss can be
tolerated, the more the image
can be compressed.
Compression is achieved by
dividing the picture into tiny
pixel blocks, which are
halved over and over until
the ratio is achieved.
3) Select the [Save] command. The Save As dialog box should
appear.
Mac PICT
The PICT (*.PCT) format is
the primary Macintosh
graphics file format. It holds
QuickDraw vector images,
bitmapped images and text
and is the Mac counterpart to
the Windows Metafile (WMF)
format.
TIFF
2) Click on the [File] menu.
4) Specify a file format in which you would like the image saved. In
the "Save as Type" pull-down list (Windows), or the "File Format"
radio-button group (Macintosh), choose an individual image format
type to save the file in that particular format.
If you decide to save the image in JPEG format, you may also
select the compression factor using a slider bar. (On Macintosh the
slider appears when you click the JPEG radio button.) The lower
the compression factor (minimum value of 1), the greater the
compression, resulting in smaller image files and more image
quality degradation. The higher the compression factor (maximum
value of 100), the less the image data is compressed, resulting in
larger image files and less image quality degradation. By default,
the compression factor is set to 75 for JPEG images.
5) Specify the color depth in which you would like the image saved.
In the Colors pull-down list, , or Bit Depth popup menu, choose the
desired setting.
The Tagged-Image File
Format (*.TIF) is used to
exchange files between
applications and computer
platforms. A widely-used
bitmapped graphics file
format developed by Aldus
and Microsoft, TIFF handles
monochrome, grayscale, 8and 24-bit color.
Image File Compression
Compression is the encoding
of data to take up less
storage space. Digital data is
compressed by finding
repeatable patterns of binary
108
Figure 1a: SaveAs Dialog Box (Macintosh)
Studio Lite
Studio Lite
Saving Images (cont.)
6) Enter a filename, and select the location to which you would like
the file saved.
7) Click the [Save] button.
Method B
1) Click once on the desired image to make it the active image
window.
2) Click on the [File] menu.
3) Select the Save As command. The Save As dialog box should
appear.
4) Repeat steps 4 to 7 above.
0s and 1s. The more patterns
can be found, the more the
data can be compressed.
Graphics files can generally
be compressed to about 20%
to 90% of its original size.
Compression ratios depend
entirely on the type of file and
compression algorithm used.
The LZW (Lempel-Ziv-Welch)
compression method stems
from two techniques
introduced by Jacob Ziv and
Abraham Lempel. LZ77
creates pointers back to
repeating data, and LZ78
creates a dictionary of
repeating phrases with
pointers to those phrases.
Method C
1) Click once on the desired image to make it the active image
window.
2) Click the [Save] button located in the Studio Lite Toolbar. The
Save As dialog box should appear.
3) Repeat steps 4 to 7 above.
To save an existing image in a different file format:
1) Click once on the desired image to make it the active image
window.
2) Click on the [File] menu.
3) Select the Save As command. The Save As dialog box should
appear.
4) Repeat steps 4 to 7 above.
Instruction Manual
109
Studio Lite
Saving Images (cont.)
To save an image in its current format:
Method A
1) Click once on the desired image to make it the active image
window.
2) Click on the [File] menu.
3) Select the [Save] command.
Method B
1) Click once on the desired image to make it the active image
window.
2) Click the [Save] button located in the Studio Lite Toolbar.
After completing the save operation, the selected filename of the
saved image should be displayed in the title bar of the active image
window.
110
Studio Lite
Studio Lite
Correcting Mistakes
Studio Lite allows for the correction of mistakes made while editing
an image. Most single operations can be undone if a mistake is
made. You can also restore an altered image to its last saved state.
To reverse the last performed operation:
Method A
1) Click on the [Edit] menu.
2) Select the [Undo] command.
Method B
Use the following keyboard shortcut: Ctrl + Z.
Method C
Click the [Undo] button located in the Studio Lite Toolbar.
If an operation cannot be reversed, the [Undo] command will not be
available as an active selection.
To re-apply the previously un-done operation (Windows only):
Method A
1) Click on the [Edit] menu.
2) Select the [Redo] command.
Method B
Use the following keyboard shortcut: Ctrl + Y.
Method C
Instruction Manual
111
Studio Lite
Correcting Mistakes (cont.)
Click the [Redo] button located in the Studio Lite Toolbar.
If a previously un-done operation cannot be re-applied, the [Redo]
command will not be available as an active selection.
To reverse all changes made to an image since it was last saved:
Method A
1) Click on the [File] menu.
2) Select the [Revert] command.
Method B
Use the following keyboard shortcut: Alt + R.
112
Studio Lite
Studio Lite
Printing an Image
Studio Lite provides basic functions for outputting captured images
to a variety of printing devices. The general steps for printing an
image are: setting up the printer, previewing the image, and
performing the print operation.
To set the printer options:
1) Click on the [File] menu.
2) Windows: Select the [Print Setup] command. This will bring up
the standard Windows Print Setup dialog box.
Macintosh: Select the [Page Setup] menu item in the File menu.
This will bring up the Print Setup dialog box. You can then select
the printer and its paper size, the image’s orientation on the paper,
and the scaling percentage.
PostScript
A page description language
(PDL) from Adobe that is
used extensively on all
computer platforms. It is the
standard for electronic input
in most commercial
typesetting and printing
houses.
Aspect Ratio
The ratio of height to width of
an image. The aspect ratio
of images captured by
cameras is approximately
3:4, equal to that of standard
computer monitors and
television sets.
3) (Windows only) If more than one printer is configured on your
system, you have the option of selecting which printer you would
like to print from. To select the printer, click on the Printer pull-down
menu and highlight the desired printer.
4) (Windows only) Click the Properties button to customize printer
settings. This will bring up the dialog box for the selected printer.
Available options are dependent on the particular printer and will
vary from model to model.
5) (Windows only) Click on the Paper Size pull-down list to select
a paper size which corresponds to the particular print media that
you will be using. Available paper and media types are dependent
on the particular printer and will vary from model to model.
6) (Windows only) To select the paper source from which to print,
click on the Source button and highlight the correct paper source.
Available paper sources are dependent on the particular printer and
will vary from model to model.
7) (Windows only) Select either Portrait or Landscape to specify
the Orientation in which you would like the selected image printed.
Instruction Manual
113
Studio Lite
Printing an Image (cont.)
8) Click OK to apply the changes.
To Preview a Printed Image:
1) Click on the [File] menu.
2) Select the [Print Preview] command. A representation of the
printed image will be displayed on the screen.
3) (Windows only) If the printed image spans more than a single
page, you may use the Next Page and Prev Page buttons to view
different pages. Click on the Two Page button to view two
consecutive pages simultaneously in a split-screen view. To return
to the single-page preview, click on the One Page button.
4) (Windows only) To magnify the view, click the Zoom In button.
To decrease magnification, click the Zoom Out button.
5) Click the Close button to exit the preview mode and return to the
standard Studio Lite application window.
To Print an Image:
Method A
1) Click once on the desired image to make it the active image
window. If you would like to print only a portion of the selected
image, use the [Marquee] tool to select the desired region of
interest.
2) Click on the [File] menu.
3) Select the [Print] command. This will bring up the standard
Windows or Macintosh Print dialog box.
4) If more than one printer is configured on your system, you have
the option of selecting which printer you would like to print from. To
114
Studio Lite
Studio Lite
Printing an Image (cont.)
select the printer, click on the Printer pull-down menu and highlight
the desired printer.
5) (Windows only) Click the Properties button to customize printer
settings. This will bring up the dialog box for the selected printer.
Available options are dependent on the particular printer and will
vary from model to model.
6) To print the image to a standard PostScript (*.ps) file, click on the
Print to File checkbox (Windows), or use the Destination popup
menu (Macintosh).
7) Select the range of pages which you would like printed. To print
every page, click on the All radio button. To print a selected range
of pages, click on the Pages radio button, and enter the range in
the From: and To: boxes. Windows only: To print only the region
of interest selected earlier with the [Marquee] tool, click on the
Selection radio button.
8) Select the number of copies you would like printed of the current
image. To print multiple copies in a sorted fashion, click on the
Collate checkbox.
9) Click OK to print the image.
Method B
1) Click once on the desired image to make it the active image
window. Windows only: If you would like to print only a portion of
the selected image, use the [Marquee] tool to select the desired
region of interest.
2) Windows: Use the following keyboard shortcut: Ctrl + P.
Macintosh: Use the following keyboard equivalent: Cmd + P.
This will bring up the standard Windows or Macintosh Print dialog
box.
Instruction Manual
115
Studio Lite
Printing an Image (cont.)
3) Repeat steps 4 to 9 above.
Method C
1) Click once on the desired image to make it the active image
window. Windows only: If you would like to print only a portion of
the selected image, use the [Marquee] tool to select the desired
region of interest.
2) Click the [Print] button located in the Studio Lite Toolbar. This
will bring up the standard Windows Print dialog box.
3) Repeat steps 4 to 9 above.
Method D
1) Click once on the desired image to make it the active image
window. Windows only: If you would like to print only a portion of
the selected image, use the [Marquee] tool to select the desired
region of interest.
2) Click on the [File] menu.
3) Select the [Print Preview] command. A representation of the
printed image will be displayed on the screen.
4) Click on the [Print] button located at the top of the page. This will
bring up the standard Windows or Macintosh Print dialog box.
5) Repeat steps 4 to 9 above.
By default, Studio Lite formats the printed image to "fill" the print
media, while preserving the original aspect ratio. Print quality and
color reproduction are dependent on a number of factors, including
printer type (i.e. dye-sublimation, laser, ink-jet, etc.), printer
resolution, image resolution, and proper monitor calibration.
116
Studio Lite
Studio Lite
Switching to Viewfinder
Windows:
Studio Lite offers the capability of launching the Viewfinder Lite
application from the Studio Lite application.
To run Viewfinder Lite:
Click the [Viewfinder Lite] button located in the Studio Lite Toolbar.
The Viewfinder Lite application window will then be displayed.
Macintosh:
The functionality of Studio and Viewfinder are integrated in one
application on Macintosh. At any time when there are image
windows open, the Macintosh user can switch to the Viewfinder
window by (1) clicking on some part of the Viewfinder window itself,
(2) selecting it in the Window menu, or (3) pressing the "Viewfinder"
button on the Main Toolbar.
Instruction Manual
117
Studio Lite
Quitting the Studio Lite Application
(Windows Only)
To close the Studio Lite application:
Method A
1) Click on the [File] menu.
2) Select the [Exit] command.
Method B
Click once on the x button located at the far right of the Studio Lite
application window's title bar.
Method C
Double-click the Control Menu icon located at the far left of the
Studio Lite application window's title bar.
Method D
1) Click once on the Control Menu icon located at the far left of the
Studio Lite application window's title bar.
2) Select the [Close] command.
Method E
Use the following keyboard shortcut: Alt + F4.
You may be prompted to save any images which have not been
saved or that have been altered since the last save operation took
place.
118
Studio Lite
Editing and Retouching Images
Studio Lite offers powerful tools which simplify the editing and
retouching of captured images. Available operations include cut,
copy, paste, crop, clear, and fill functions. Most operations can only
be performed on portions of the image which lie within the visible
image window. Parts of the image which lie beyond this area may
be repositioned using the [Pan] tool or Windows scroll bars.
Images captured by 48 bits can be performed only with the crop
function.
To cut all or a portion of the active image to the clipboard:
Method A
1) Click once on the desired image to make it the active image
window.
Studio Lite
Clipboard
A reserved section of
memory that is used as a
temporary holding area when
you copy and paste or cut
and paste from one
application to another. After
you copy or cut data from
your application, it is
viewable in the clipboard. If
you cut data from an
application and do not paste
it into another, and you do
not save the clipboard's
contents as a file, the data
will be lost upon exiting the
operating system or when the
next copy or cut operation is
performed.
2) Using the [Marquee] tool, specify a region of interest
representing the portion of the image that you would like to cut.
3) Click on the [Edit] menu.
4) Select the [Cut] command.
Method B
1) Click once on the desired image to make it the active image
window.
2) Using the [Marquee] tool, specify a region of interest
representing the portion of the image that you would like to cut.
3) Click the [Cut] button located in the Studio Lite Toolbar.
Method C
1) Click once on the desired image to make it the active image
window.
2) Using the [Marquee] tool, specify a region of interest
Instruction Manual
119
Studio Lite
Editing and Retouching Images
(cont.)
representing the portion of the image that you would like to cut.
3)Windows: Use the following keyboard shortcut: Ctrl + X.
Macintosh: Use the following keyboard shortcut: Cmd + X.
Method D
1) Click once on the desired image to make it the active image
window.
2) Using the [Marquee] tool, specify a region of interest
representing the portion of the image that you would like to cut.
3) Click once directly within the specified region of interest using the
right-mouse button.
4) Select the [Cut] command.
The selected area of the image will be removed and replaced by
the current background color. The deleted image data is stored in
the clipboard and will be available for use by Studio Lite or other
Windows applications (until the clipboard data is deleted or replaced
by other data).
To copy all or a portion of the active image to the clipboard:
Method A
1) Click once on the desired image to make it the active image
window.
2) Using the [Marquee] tool, specify a region of interest
representing the portion of the image that you would like to copy.
3) Click on the [Edit] menu.
4) Select the [Copy] command.
120
Studio Lite
Editing and Retouching Images
(cont.)
Studio Lite
Method B
1) Click once on the desired image to make it the active image
window.
2) Using the [Marquee] tool, specify a region of interest
representing the portion of the image that you would like to copy.
3) Click the [Copy] button located in the Studio Lite Toolbar.
Method C
1) Click once on the desired image to make it the active image
window.
2) Using the [Marquee] tool, specify a region of interest
representing the portion of the image that you would like to copy.
3) Windows: Use the following keyboard shortcut: Ctrl + C.
Macintosh: Use the following keyboard equivalent: Cmd + C.
Method D
1) Click once on the desired image to make it the active image
window.
2) Using the [Marquee] tool, specify a region of interest
representing the portion of the image that you would like to copy.
3) Click once directly within the specified region of interest using the
right-mouse button.
4) Select the [Copy] command.
The copied image data is stored in the Windows Clipboard and will
be available for use by Studio Lite or other Windows applications
(until the Clipboard data is deleted or replaced by other data).
Instruction Manual
121
Studio Lite
Editing and Retouching Images
(cont.)
To paste the contents of the Windows Clipboard into the active
image:
Method A
1) Click once on the desired image to make it the active image
window.
2) By default, the image data is pasted into the upper-left corner of
the active image window. To denote a specific position for the
pasted data, specify a region of interest representing the destination
area using the [Marquee] tool.
3) Click the [Edit] menu.
4) Select the [Paste] command.
Method B
1) Click once on the desired image to make it the active image
window.
2) By default, the image data is pasted into the upper-left corner of
the active image window. To denote a specific position for the
pasted data, specify a region of interest representing the destination
area using the [Marquee] tool.
3) Click the [Edit] menu.
4) Click the [Paste] button located in the Studio Lite Toolbar.
Method C
1) Click once on the desired image to make it the active image
window.
2) By default, the image data is pasted into the upper-left corner of
the active image window. To denote a specific position for the
pasted data, specify a region of interest representing the destination
122
Studio Lite
Editing and Retouching Images
(cont.)
Studio Lite
area using the [Marquee] tool.
3) Windows: Use the following keyboard shortcut: Ctrl + V.
Macintosh: Use the following keyboard equivalent: Cmd + V.
Method D
1) Click once on the desired image to make it the active image
window.
2) By default, the image data is pasted into the upper-left corner of
the active image window. To denote a specific position for the
pasted data, specify a region of interest representing the destination
area using the [Marquee] tool.
3) Click the [Edit] menu.
4) Select the [Paste] command.
If no region of interest is specified as the destination area, the
image data appears at full size in the upper-left corner of the active
image window. Otherwise, the pasted image data is resized to fit
within the specified area. Valid image data must be present in the
Windows Clipboard for the [Paste] command to be available.
To create a new image from the contents of the Windows Clipboard:
1) Click the [Edit] menu.
2) Select the [Paste as New Image] command.
A new image window appears containing the contents of the
Clipboard. Valid image data must be present in the Windows
Clipboard for the [Paste as New Image] command to be available.
To crop an image:
Instruction Manual
123
Studio Lite
Editing and Retouching Images
(cont.)
Method A
1) Using the [Marquee] tool, specify a region of interest
representing the portion of the image that you would like to keep.
2) Click the [Edit] menu.
3) Select the [Crop] command.
To discard a portion of the active image:
Method A
1) Click once on the desired image to make it the active image
window.
2) Using the [Marquee] tool, specify a region of interest
representing the portion of the image that you would like to discard.
3) Click on the [Edit] menu.
4) Select the [Clear] command.
Method B (Windows only)
1) Click once on the desired image to make it the active image
window.
2) Using the [Marquee] tool, specify a region of interest
representing the portion of the image that you would like to discard.
3) Use the following keyboard shortcut: Delete.
To fill a portion of the active image with a specified color:
Method A
124
Studio Lite
Editing and Retouching Images
(cont.)
Studio Lite
1) Click once on the desired image to make it the active image
window.
2) Using the [Marquee] tool, specify a region of interest
representing the portion of the image that you would like to fill.
3) Click on the [Edit] menu.
4) Select the [Fill] command.
The selected area of the image will be filled by the current Pen &
Brush Color.
Instruction Manual
125
Studio Lite
Editing and Retouching Images
(cont.)
126
Studio Lite
Specifying a Region of Interest
Studio Lite
The region of interest (ROI) specifies the portion of the active image
upon which a number of Studio Lite operations will be applied,
including image editing, adjustment, and filtering tools.
To specify a specific region of interest:
1) Click once on the desired image to make it the active image
window.
2) Click on the Marquee button located in the Studio Lite Toolbox.
When placed over the active image, the mouse pointer will be
designated by a crosshair.
3) Click and hold the mouse button (Windows: left-hand button) at
the starting point of the selection.
4) Drag the mouse to encompass the desired region of interest.
5) Release the mouse button.
The specified region of interest will be bordered by a rectangular
frame.
To select the entire active image:
1) Click once on the desired image to make it the active image
window.
2) Click the [Edit] menu.
3) Choose the [Select All] command.
The entire active image will be specified as the region of interest
and bordered by a rectangular frame.
To remove a previously specified region of interest:
Instruction Manual
127
Studio Lite
Specifying a Region of Interest
(cont.)
Method A
1) Click once on the desired image to make it the active image
window.
2) Click the [Edit] menu.
3) Choose the [Deselect] command.
Method B
Click once using the mouse button (Windows: left-hand button)
anywhere within the active image window outside the selected
region of interest.
To reposition a previously specified region of interest:
1) Click on the Marquee button located in the Studio Lite Toolbox.
When placed over the active image, the mouse pointer will be
designated by a crosshair.
2) Click and hold the mouse button (Windows: left-hand button)
anywhere within the selected region of interest.
3) Drag the region of interest to the desired position.
4) Release the mouse button.
To resize a previously specified region of interest:
1) Click on the Marquee button located in the Studio Lite Toolbox.
When placed over the active image, the mouse pointer will be
designated by a crosshair.
2) Click and hold the mouse button (Windows: left-hand button) on
a corner or side anchor of the rectangular frame of the region of
interest.
128
Application Suite
Specifying a Region of Interest
(cont.)
Studio Lite
3) Drag the anchor to resize the region of interest as desired.
4) Release the mouse button.
Instruction Manual
129
Studio Lite
Magnifying and Reducing the View
Studio Lite allows you to magnify or reduce your view of an image
using a variety of methods. The current zoom percentage of a
displayed image is displayed in the title bar of the image at all
times.
To zoom in on an image:
Method A
1) Click once on the desired image to make it the active image
window.
2) Click the View menu.
3) Select the [Zoom In] command.
Method B
1) Click once on the desired image to make it the active image
window.
2) Windows: Use the following keyboard shortcut: +.
Method C
1) Click once on the desired image to make it the active image
window.
2) Click on the [Zoom] button located in the Studio Lite Toolbox.
When placed over the active image, the mouse pointer will be
designated by a magnifying glass.
3) Click any area within the active image area which you would like
to magnify. Each click magnifies the image to the next preset
percentage, centering the display around the point you click.
To zoom out of an image:
130
Application Suite
Magnifying and Reducing the View
(cont.)
Studio Lite
Method A
1) Click once on the desired image to make it the active image
window.
2) Click the View menu.
3) Select the [Zoom Out] command.
Method B
1) Click once on the desired image to make it the active image
window.
2) Windows: Use the following keyboard shortcut: -.
Method C
1) Click once on the desired image to make it the active image
window.
2) Click on the [Zoom] button located in the Studio Lite Toolbox.
When placed over the active image, the mouse pointer will be
designated by a magnifying glass.
3) Hold down the Shift key, and click any area within the active
image area which you would like to reduce. Each click reduces the
image to the next preset percentage, centering the display around
the point you click.
To magnify or reduce to a specified percentage:
1) Click once on the desired image to make it the active image
window.
2) Click on the [View] Menu.
3) Select the [Zoom Factor] command. This will bring up the [Zoom
Instruction Manual
131
Studio Lite
Magnifying and Reducing the View
(cont.)
Factor] dialog box.
4) Using the mouse, drag the slider to the desired preset zoom
factor.
5) Click OK to apply the change.
To display an image at 100%:
Method A
1) Click once on the desired image to make it the active image
window.
2) Click the View menu.
3) Select the [Actual Pixels] command.
Method B
1) Click once on the desired image to make it the active image
window.
2) Windows: Use the following keyboard shortcut: Home.
Method C
1) Click once on the desired image to make it the active image
window.
2) Click on the [Zoom] button located in the Studio Lite Toolbox.
When placed over the active image, the mouse pointer will be
designated by a magnifying glass.
3) Hold down the Ctrl key, and click once anywhere within the active
image window.
132
Application Suite
Magnifying and Reducing the View
(cont.)
Studio Lite
To change the view to fit the active image window:
1) Click once on the desired image to make it the active image
window.
2) Click the View menu.
3) Select the [Fit in Window] command.
This option scales the view to match the active image window size.
To change the view to fit the Studio Lite application window:
1) Click once on the desired image to make it the active image
window.
2) Click the View menu.
3) Select the [Fit to Screen] command.
This option scales the view and the active image window size to
match the Studio Lite application window size.
To change the view to fill the screen:
Method A
1) Click once on the desired image to make it the active image
window.
2) Click the View menu.
3) Select the [Full Screen] command.
Method B
1) Click once on the desired image to make it the active image
window.
Instruction Manual
133
Studio Lite
Magnifying and Reducing the View
(cont.)
2) Click the [Full Screen] button located in the Studio Lite Toolbar
This option scales the view to display the active image in the entire
screen. Press Esc to return to the previous image size.
134
Application Suite
Working Within the Studio Lite
Application Window (Windows
Only
Studio Lite
Studio Lite allows for the customization of the viewing properties of
the Studio Lite application window.
To enable the full screen view of the Studio Lite application:
Method A
1) Click the [View] menu.
2) Select the [Edit View] command.
3) Choose the Full Screen option.
Method B
Use the following keyboard shortcut: F7.
This option will enable a full screen view of the Studio Lite
application window with a menu bar, but no Title Bar or Status Bar.
To restore the default view of the Studio Lite application:
Method A
1) Click the [View] menu.
2) Select the [Edit View] command.
3) Choose the Restore option.
Method B
Use the following keyboard shortcut: F8.
To display or hide the Studio Lite Toolbar:
Method A
Instruction Manual
135
Studio Lite
Working Within the Studio Lite
Application Window (cont.)
1) Click the [View] menu.
2) To display the Toolbar, place a checkmark next to the Toolbar
command. To hide the Toolbar, remove the checkmark.
Method B
Use the following keyboard shortcut: F3. This will toggle between
displaying and hiding the Toolbar.
To display or hide the Studio Lite Status Bar:
Method A
1) Click the [View] menu.
2) To display the Status Bar, place a checkmark next to the Status
Bar command. To hide the Status Bar, remove the checkmark.
Method B
Use the following keyboard shortcut: F4. This will toggle between
displaying and hiding the Status Bar.
To display or hide the Studio Lite Toolbox:
Method A
1) Click the [View] menu.
2) To display the Toolbox, place a checkmark next to the Toolbox
command. To hide the Toolbox, remove the checkmark.
Method B
Use the following keyboard shortcut: F5. This will toggle between
displaying and hiding the Toolbox.
136
Application Suite
Studio Lite
Measuring Color Values
To measure color values within an image:
You may position your mouse pointer over any portion of the active
image window. To view the color values under each channel (red,
green, and blue) for a particular pixel, refer to the Color Channel
Values located in the Studio Lite Status Bar (Windows), or in the
Main Toolbar (Macintosh).
To view pixel coordinates within an image:
You may position your mouse pointer over any portion of the active
image window. To view the X- and Y-axis coordinates for a
particular pixel, refer to the Mouse Pointer Coordinates located in
the Studio Lite Status Bar (Windows), or in the Main Toolbar
(Macintosh).
Instruction Manual
137
Studio Lite
Viewing Informational Windows
You may view information about the active image, the Studio Lite
application, or the host computer system.
To view information about the Studio Lite application:
1) Windows: Click the Help menu.
Macintosh: Click the Apple menu.
2) Select the [About Studio Lite] command.
A "splash screen" containing current version number and copyright
information will be displayed.
To view information about the host computer system:
1) Windows: Click the [View] menu.
Macintosh: Click the Apple menu.
2) Windows: Select the [System Info] command.
Macintosh: Select the “Apple System Profiler” menu item.
The System Information dialog box containing CPU/Memory,
Operating System, and Disk Information will be displayed.
To view information about the active image:
Method A
1) Click the [View] menu.
2) Select the [Image Info] command.
138
Application Suite
Viewing Informational Windows
(cont.)
Studio Lite
The Image Information dialog box containing file size, bit depth, and
pixel dimension information will be displayed.
Instruction Manual
139
Studio Lite
Choosing the Foreground Color
Windows:
Studio Lite uses the Foreground Color for paint operations and
stroke selections using the Pencil, Brush, Line, Rectangle, and
[Ellipse] tools. The current Foreground Color is displayed in the
lower right corner of the Studio Lite application window, along with
the current Background Color.
To select the Foreground Color:
Method A
1) Click on the [Options] menu.
2) Select the [Pen & Brush Color] command. This will bring up the
standard Windows Color dialog box.
3) A list of 48 available colors are displayed. Click once on the
desired color.
4) Click OK to apply the change.
Method B
1) Double-click on the Foreground Color displayed in the lower right
corner of the Studio Lite application window. This will bring up the
standard Windows Color dialog box.
2) Repeat steps 3 and 4 above.
To select a custom Foreground Color
Method A
1) Click on the [Options] menu.
2) Select the [Pen & Brush Color] command. This will bring up the
standard Windows Color dialog box.
140
Application Suite
Choosing the Foreground Color
(cont.)
Studio Lite
3) Press the Define Custom Colors button.
4) Specify a custom color by entering either Hue, Saturation, and
Luminance values or values for the Red, Green, and Blue color
channels.
5) Press the Add to Custom Color button.
6) The specified color will be displayed under "Custom Colors."
Click once on the desired color.
7) Click OK to apply the change.
Method B
1) Double-click on the Foreground Color displayed in the lower right
corner of the Studio Lite application window. This will bring up the
standard Windows Color dialog box.
2) Repeat steps 3 to 7 above.
Macintosh:
Studio Lite uses the Foreground Color for the fill color function. The
current Foreground Color is displayed at the right-hand end of the
Main Toolbar, along with the current Background Color.
To select the Foreground Color, double-click on the Foreground
Color patch displayed on the Main Toolbar (the left-hand patch).
This will bring up the standard Macintosh Color Picker dialog box.
Instruction Manual
141
Studio Lite
Choosing the Background Color
Windows:
Studio Lite uses the Background Color to fill in erased areas of an
image. The current Background Color is displayed in the lower right
corner of the Studio Lite application window, along with the current
Pen & Brush Color.
To select the Background Color:
Method A
1) Click on the [Options] menu.
2) Select the [Background] command. This will bring up the
standard Windows Color dialog box.
3) A list of 48 available colors are displayed. Click once on the
desired color.
4) Click OK to apply the change.
Method B
1) Double-click on the Background Color displayed in the lower right
corner of the Studio Lite application window. This will bring up the
standard Windows Color dialog box.
2) Repeat steps 3 and 4 above.
To select a custom Background Color
Method A
1) Click on the [Options] menu.
2) Select the [Background] command. This will bring up the
standard Windows Color dialog box.
142
Application Suite
Choosing the Background Color
(cont.)
Studio Lite
3) Press the Define Custom Colors button.
4) Specify a custom color by entering either Hue, Saturation, and
Luminance values or values for the Red, Green, and Blue color
channels.
5) Press the Add to Custom Color button.
6) The specified color will be displayed under "Custom Colors."
Click once on the desired color.
7) Click OK to apply the change.
Method B
1) Double-click on the Background Color displayed in the lower right
corner of the Studio Lite application window. This will bring up the
standard Windows Color dialog box.
1) Repeat steps 3 to 7 above.
The current Background Color selection displayed in the lower right
corner of the Studio Lite application window will be updated to
reflect the change.
Macintosh:
Studio Lite uses the Background Color to fill in erased areas of an
image. The current Background Color is displayed at the right-hand
end of the Main Toolbar, along with the current Foreground Color.
To select the Background Color, double-click on the Background
Color patch displayed on the Main Toolbar (the right-hand patch).
This will bring up the standard Macintosh Color Picker dialog box.
Instruction Manual
143
Studio Lite
Viewing Images (Windows Only)
Studio Lite offers a wide range of options and tools for viewing
images.
To open multiple views of the same image:
1) Click once on the desired image to make it the active image
window.
2) Click the Window menu.
3) Select the [New Window] command.
A duplicate of the active image is displayed in a new image window.
To display a cascading view of all opened image windows:
1) Click the Window menu.
2) Choose the [Cascade] command.
All opened image windows are displayed stacked and cascading
from the top left to the bottom right of the Studio Lite application
window.
To display a tiled view of all opened image windows:
1) Click the Window menu.
2) Choose the [Tile] command.
All opened image windows are displayed edge to edge in the Studio
Lite application window.
To arrange all minimized image windows:
1) Click the Window menu.
2) Choose the [Arrange Icons] command.
Minimized image windows are displayed neatly along the bottom of
the Studio Lite application window.
144
Studio Lite
Studio Lite
Using Online Help
Studio Lite offers help topic documentation in online help, including
all of the information provided in this User's Manual.
To access online help:
1) Click on the [Help] menu.
2) Windows: Select the [Help Topics] command.
Macintosh: Select the [Studio Help] menu item.
Online help is searchable by topic or keyword.
Instruction Manual
145
Studio Lite
6. Studio Lite
Reference
Instruction Manual
147
Studio Lite
Title Bar (Windows Only)
The strip across the top of the Studio Lite application window is
called the Title Bar (Figure 2). The Studio Lite program name, icon,
and current filename are displayed along with buttons which
represent functions and menus that contain commands.
Control Menu / Close Studio Lite Button
Maximize Button
Minimize Button
Close Button
Figure 2: Title Bar
Control Menu / Close Studio Lite Button
The Studio Lite icon displayed at the upper left corner of the Studio
Lite application window represents the Control Menu / Close Studio
Lite button. A single mouse-click of this button displays the Control
menu. Double-clicking this button closes the Studio Lite application
window and quits the program.
Minimize Button
Clicking once on the Minimize button reduces the Studio Lite
application window to an icon on the Windows taskbar.
Maximize Button
Clicking once on the Maximize button increases the size of the
Studio Lite application window to fill the entire Windows desktop.
Close Button
Clicking once on the Close button closes the Studio Lite application
window and quits the program.
148
Application Suite
Control Menu (Windows Only)
Studio Lite
The Control menu (Figure 3) is comprised of six commands which
control the physical aspects of the Studio Lite application window:
Restore, Move, Size, Minimize, Maximize, and Close.
[Restore] Command
[Move] Command
[Size] Command
[Minimize] Command
[Maximize] Command
[Close] Command
Figure 3: Control Menu
[Restore] Command
The [Restore] command returns the Studio Lite application window
to its previous state.
[Move] Command
The [Move] command allows for the manual positioning of the
Studio Lite application window within the Windows desktop using
the keyboard's directional arrow keys.
[Size] Command
The [Size] command allows for the manual sizing of the Studio Lite
application window using the keyboard's directional arrow keys.
[Minimize] Command
The [Minimize] command reduces the Studio Lite Pro application
window to an icon in the Windows taskbar.
[Maximize] Command
The [Maximize] command increases the size of the Studio Lite
application window to fill the entire Windows desktop.
[Close] Command
Instruction Manual
149
Studio Lite
Control Menu (Windows Only)
(cont.)
The [Close] command closes the Studio Lite application window
and quits the program.
150
Application Suite
Studio Lite
Menu Bar
Windows:
The strip below the Title Bar is called the Menu Bar (Figure 4).
Control over the range of image editing tools offered by Studio Lite
is available through the six menu selections: File, Edit, View,
Options, Window, and Help.
[File] Menu
[View] Menu [Window] Menu
[Edit] Menu [Options] Menu [Help] Menu
Figure 4: Menu Bar
Macintosh:
The Menu Bar is the strip across the top of the display.
[File] Menu
[View] Menu
[Options] Menu [Help] Menu
[Edit] Menu [Viewfinder] Menu [Window] Menu
Figure 4a: Menu Bar
Instruction Manual
151
Studio Lite
[File] Menu
The [File] Menu (Figure 5 & 5a) provides access to standard file
manipulation commands, common to many Windows applications.
These include: New, Open, Close, Close All, Save, Save As,
Revert, Duplicate, Print, Print Preview, Print Setup or Page Setup,
and Exit or Quit. Windows only: The filenames of the four most
recently opened images are also displayed.
[New] Command
[Open] Command
[Close] Command
[Save] Command
[Save As] Command
[Revert] Command
[Print] Command
[Print Preview] Command
[Print Setup] Command
[Send] Command
Save As Wallpaper (Tiled)
Command
Save As Wallpaper
(Centered) Command
Recently Opened Images
[Exit] Command
Figure 5: [File] Menu
Figure 5a: [File] Menu (Macintosh)
[New] Command
The [New] command (Windows: Ctrl+N, Macintosh: Cmd+N)
creates a new, blank image window. The size of the window is
152
Application Suite
Studio Lite
[File] Menu (cont.)
determined by the dimensions of any image data which may exist in
the Windows Clipboard. By default, the window size is 320x240
pixels.
[Open] Command
The [Open] command (Windows: Ctrl+O, Macintosh: Cmd+O)
allows you to open any supported image file into a new image
window.
[Close] Command
The [Close] command (Windows: Ctrl+C, Macintosh: Cmd+W)
closes the active (current) image window.
[Close All] Command
(Macintosh only, for Windows see "Close All" in the Window menu)
The [Close All] command (Opt + Cmd + W) closes all the still-image
windows.
[Save] Command
The [Save] command (Windows: Ctrl+S, Macintosh: Cmd+S) saves
the image in the active image window to disk.
[Save As] Command
The [Save As] command allows you to save the image in the active
image window to a destination file and format other than its original
source.
[Revert] Command
The [Revert] command (Windows: Ctrl+R, Macintosh: Cmd+R)
discards all changes made to the image in the active image window
since the last save operation and reloads the source file.
Instruction Manual
153
Studio Lite
[File] Menu (cont.)
[Print] Command
The [Print] command (Windows: Ctrl+P, Macintosh: Cmd+P) brings
up the Print dialog box, which allows you to select options for
printing the image in the active image window with any accessible
printer.
Figure 5b: Print Dialog Box (Macintosh)
154
Application Suite
Studio Lite
[File] Menu (cont.)
[Print Preview] Command
The [Print Preview] command brings up the Print Preview dialog
box (Figure 6), which allows you to inspect the printed layout of the
active image on your screen.
Figure 6: Print Preview Dialog Box
Instruction Manual
155
Studio Lite
[File] Menu (cont.)
Figure 6a: Print Preview Window (Macintosh)
[Print Setup] / [Page Setup] Command
The [Print Setup] command (Windows), or [Page Setup] command
(Macintosh) brings up the setup dialog box (Figure 7 & 7a), which
allow you to specify printer properties, such as paper size and
orientation.
156
Studio Lite
Studio Lite
[File] Menu (cont.)
Figure 7: Print Setup Dialog Box
Figure 7a: Page Setup Dialog Box (Macintosh)
Recently Opened Images (Windows Only)
Recently Opened Images lists the paths and filenames of up to four
of the most recently opened image files. Each file can be opened
by clicking on its filename.
[Exit] Command (Windows Only)
The [Exit] command closes the Studio Lite application window and
quits the program.
[Quit] Command (Macintosh Only)
The [Quit] command quits the "Studio Lite" application, and closes
all its windows.
Instruction Manual
157
Studio Lite
[Edit] Menu
The [Edit] menu (Figure 8) provides access to standard file editing
commands, common to many applications. These include: Undo,
Redo, Cut, Copy, and Paste. Commands specific to Studio Lite are:
Paste as New Image, Crop, Clear (Del), Fill, Select All, and
Deselect.
[Undo] Command
[Redo] Command
[Cut] Command
[Copy] Command
[Paste] Command
[Paste as New Image]
Command
[Crop] Command
[Clear] Command
[Fill] Command
[Select All] Command
[Deselect] Command
Figure 8: [Edit] Menu
[Undo] Command
The [Undo] (Windows: Ctrl+Z, Macintosh: Cmd+Z) command
reverses the most recent operation performed on the image in the
active image window.
[Redo] Command (Windows only)
The [Redo] (Windows: Ctrl+Y) command re-applies the previously
undone action.
[Cut] Command
The [Cut] (Windows: Ctrl+X, Macintosh: Cmd+X) command
removes the selected area from the active image window and
places it in the clipboard. Studio Lite fills the empty space with the
current Background Color.
[Copy] Command
The [Copy] (Windows: Ctrl+C, Macintosh: Cmd+C) command copies
the selected area to the clipboard without removing it from the
active image window.
158
Application Suite
Studio Lite
[Edit] Menu (cont.)
[Paste] Command
The [Paste] (Windows: Ctrl+V, Macintosh: Cmd+V) command places
the image data content in the clipboard into the active image
window.
[Paste as New Image] Command
The [Paste as New Image] command places image data that is
currently in the clipboard into Studio Lite as a new image with its
own image window.
[Crop] Command
The [Crop] command allows you to remove an unwanted board
around your image by deleting all parts of the image in the active
image window that are not selected within a specified region of
interest, creating a smaller rectangular image that will retain the
portion of the image you want to keep.
[Clear] Command
The [Clear] (Del) command removes the selected (highlighted) area
from the active image window, filling the space with the current
Background Color. Use this command to delete information without
affecting the clipboard.
[Fill] Command
The [Fill] command fills the selected (highlighted) area within the
active image window with the current Foreground Color.
[Select All] Command
The [Select All] command (Macintosh: Cmd+A) selects the entire
image in the active image window as the region of interest.
[Deselect] Command
The [Deselect] command nullifies the currently selected region of
interest within the active image window.
Instruction Manual
159
Studio Lite
[View] Menu
The [View] menu (Figure 9 & 9a) allows you to control the viewing
of images and customize the user interface by showing or hiding
elements of the Studio Lite workplace. Viewing options include:
Zoom In, Zoom Out, Zoom Factor, Actual Pixels, Fit in Window, Fit
to Screen, Full Screen, Edit View, Toolbar, Status Bar, Toolbox,
System Info, Image Info, and Refresh.
[Zoom In] Command
[Zoom Out] Command
[Zoom Factor] Command
[Actual Pixels] Command
[Fit In Window] Command
[Fit to Screen] Command
[Full Screen] Command
[Edit View] Command
[Toolbar] Option
[Status Bar] Option
[Toolbox] Option
[System Info] Command
[Image Info] Command
[Refresh] Command
Figure 9: [View] Menu
Figure 9a: [View] Menu (Macintosh)
[Zoom In] Command
The [Zoom In] (Windows: +) command allows you to magnify the
active image by selecting a zoom factor ranging from 200% to
800%.
[Zoom Out] Command
The [Zoom Out] (Windows: -) command allows you to decrease the
magnification of the active image by selecting a zoom factor ranging
160
Application Suite
Studio Lite
[View] Menu (cont.)
from 12% to 50%.
[Zoom Factor] Command
The [Zoom Factor] command brings up the [Zoom Factor] dialog
box which allows you to manually select a zoom factor ranging from
6% to 1600% with a slider bar.
[Zoom Factor] Dialog Box
The [Zoom Factor] dialog box (Figure 10) allows you to manually
select a zoom factor ranging from 6% to 1600% with a slider bar.
Figure 10: [Zoom Factor] Dialog Box
[Actual Pixels] Command
The [Actual Pixels] (Home) command displays the active image at
its actual physical size (100%).
[Fit in Window] Command
The [Fit in Window] command optimizes the active image's zoom
ratio to fit within the active image window.
[Fit to Screen] Command
The [Fit to Screen] command optimizes the active image's size and
zoom ratio to fill the Studio Lite application window.
[Full Screen] Command
The [Full Screen] command hides the Studio Lite and Windows
interface, filling the screen with the current image. This enables
you to view an image without the distractions of other open
Instruction Manual
161
Studio Lite
[View] Menu (cont.)
windows or programs. To return to Windows, press Esc.
[Edit View] Command (Windows Only)
The [Edit View] command presents a sub-menu which allows you to
choose either a full screen view with menu bar (F7) or restore the
view to the default.
[Toolbar] Option (Windows Only)
The [Toolbar] (F3) option displays the Toolbar when checked, while
hiding it when unchecked.
[Status Bar] Option (Windows Only)
The [Status Bar] (F4) option displays the Status Bar when checked,
while hiding it when unchecked.
[Toolbox] Option (Windows Only)
The [Toolbox] (F5) option displays the Toolbox when checked, while
hiding it when unchecked.
[System Info] Command (Windows Only)
The [System Info] command presents a dialog box (Figure 11) with
configuration information regarding the host computer system.
Figure 11: System Information Dialog Box
162
Application Suite
Studio Lite
[View] Menu (cont.)
[Image Info] Command
The [Image Info] command presents a dialog box (Figure 12) with
detailed information about the active image.
Figure 12: Image Information Dialog Box
Figure 12a: Image Information Dialog Box (Macintosh)
[Refresh] Command (Windows Only)
The [Refresh] command refreshes the active image window.
Instruction Manual
163
Studio Lite
[Window] Menu
Windows:
The Window menu (Figure 16) controls the positioning of images
and icons within the Studio Lite application workspace. The
following commands are available: New Window, Cascade, Tile,
Arrange Icons, and Close All. The Open Windows list displays all
opened image windows by their filenames and current zoom factor.
[New Window] Command
[Tile] Command
[Cascade] Command
[Arrange Icons] Command
[Close All] Command
Open Windows List
Figure 16: [Window] Menu
[New Window] Command
The [New Window] command creates a new image window
containing a duplicate of the image in the active image window. All
manipulations made to this image will be reflected in the original
and vice-versa.
[Cascade] Command
The [Cascade] command arranges all open image windows
diagonally in the workspace from left to right and top to bottom.
[Tile] Command
The [Tile] command arranges all open image windows as nonoverlapping tiles, left to right-top to bottom.
[Arrange Icons] Command
The [Arrange Icons] command arranges icons for all minimized
images in the workspace neatly along the bottom of the workspace.
164
Application Suite
Studio Lite
[Window] Menu (cont.)
[Close All] Command
The [Close All] command closes all image windows, prompting you
to save any altered or unsaved images.
Open Windows List
The Open Windows List displays all open image windows by their
filenames and current zoom factor.
Macintosh:
Figure 16a: [Window] Menu (Macintosh)
[Viewfinder] Command
The [Viewfinder] Command will bring the Viewfinder preview
window to the top of the stack of open windows. If the Viewfinder
window is not currently open, it will be opened by this command.
Open Image-Window List
The Open Image-Windows List displays all open image windows by
their filename and current zoom factor.
Instruction Manual
165
Studio Lite
[Help] Menu
Windows Help:
The [Help] menu (Figure 17) provides access to the detailed online
help reference, as well as information regarding the currently
release of the Studio Lite application.
[Help Topics] Command
[About Studio Lite] Command
Figure 17: [Help] Menu
[Help Topics] Command
The [Help Topics] command displays the Help Topics dialog box
(Figure 18) with the following category tabs: Contents, Index, and
Find. These tabs assist in navigating through the extensive online
help reference offered in the Studio Lite application.
Figure 18: Help Topics Dialog Box
[About Studio Lite] Command
The [About Studio Lite] command displays version and copyright
information pertaining to the current release of the Studio Lite
application.
166
Application Suite
Studio Lite
[Help] Menu (cont.)
Macintosh Help:
The [Help] menu (Figure 18a) provides access to detailed online
help reference.
[Studio Lite Help] Command
The [Studio Lite Help] command displays online help in a new
window.
Figure 18a: [Help] Menu (Macintosh)
The window displays in a Browser window the same information as
this printed manual and can be searched for specific topics or
keywords.
Instruction Manual
167
Studio Lite
Toolbar
The Toolbar (Figure 19 and 19a) provides access to functions
governing all aspects of the Studio Lite application, including file
management and image editing. It is composed of the following
eleven buttons: New, Open, Save, Cut, Copy, Paste, Undo, Redo,
Viewfinder Lite, Full Screen, and Print. Windows Only: The
Toolbar can be manually repositioned to any place on the Windows
desktop using mouse drag-and-drop. Double-clicking on the upper
border of the Toolbar will return it to the application window.
[Paste] Button
[Cut] Button
[Redo] Button
[Save] Button
[Full Screen] Button
[New] Button
[Print] Button
[Open] Button
[Copy] Button
[Viewfinder Lite] Button
[Undo] Button
Figure 19: Toolbar
Figure 19a: Toolbar (Macintosh)
[New] Button
The [New] button creates a new, blank image window. The size of
the window is determined by the dimensions of any image data
which may exist in the clipboard. By default, the window size is
320x240 pixels.
[Open] Button
The [Open] button allows you to open any supported image file into
a new image window.
[Save] Button
The [Save] button saves the image in the active image window to
168
Studio Lite
Studio Lite
Toolbar (cont.)
disk.
[Cut] Button
The [Cut] button removes the selected area from the active image
window and places it in the clipboard. Studio Lite fills the empty
space with the current background color. If no region of interest is
selected, the entire image is cut.
[Copy] Button
The [Copy] button copies the selected area to the clipboard without
removing it from the active image window. If no region of interest is
selected, the entire image is copied.
[Paste] Button
The [Paste] button places the image content in the clipboard into
the active image window.
[Undo] Button
The [Undo] button reverses the most recent operation performed on
the image in the active image window.
[Redo] Button (Windows only)
The [Redo] button re-applies the previously undone action.
[Viewfinder Lite] Button
Windows: The [Viewfinder Lite] button starts up the Viewfinder Lite
application and powers up the camera, displaying a live image of
the current camera subject in the Viewfinder Lite image window.
Instruction Manual
169
Studio Lite
Toolbar (cont.)
Macintosh: The Viewfinder Lite button will bring the Viewfinder
preview window to the top of the stack of open windows. If the
Viewfinder window is not currently open, it will be opened by this
command.
[Full Screen] Button
The [Full Screen] button enlarges the active image window to
occupy the entire screen.
[Print] Button
The [Print] button brings up the Print dialog box, which allows you
to select options for printing the image in the active image window
with any accessible printer.
Macintosh only:
On the Macintosh four additional functions are located on the righthand end of the Toolbar. (On Windows machines these four
functions are placed on the Windows Status Bar.)
Mouse Pointer Coordinates
The Mouse Pointer Coordinates display the horizontal (X-axis) and
vertical (Y-axis) pixel coordinates for the current mouse pointer
position.
Color Channel Values
The Color Channel Values display the Red (R), Green (G), and Blue
(B) color channel values for the current mouse pointer pixel
position.
Foreground Color
Double-clicking on the Foreground Color patch will cause the Color
Application Suite
Studio Lite
Studio Lite
Toolbar (cont.)
dialog box to open, allowing you to select a custom color. The
Foreground Color is used with the Fill Color option.
Background Color
The Background Color displays the current color selected for the
background, pertaining to the [Cut] and [Clear] commands. Doubleclicking on the Background Color will cause the Color dialog box to
open, allowing you to select a custom color.
Instruction Manual
171
Studio Lite
Toolbox
The Toolbox (Figure 20 & 20a) provides three common tools
pertaining to image viewing, editing, and drawing. These comprise:
Marquee, Zoom, and Pan. The Toolbox can be repositioned to any
place on the Desktop with the mouse. (Windows only: Doubleclicking on the upper border of the Toolbox will return it to the
Studio Lite application window.)
[Marquee] Tool
[Zoom] Tool
[Pan] Tool
Figure 20: Toolbox
Figure20a: Toolbox (Macintosh)
[Marquee] Tool
The [Marquee] tool allows you to select any rectangular portion of
the image in the active image window as the region of interest. To
select an area, click-and-hold the mouse button (Windows: left
button) on a starting point, drag the mouse pointer to highlight the
desired area, and release the mouse button. All subsequent
operations will affect only the selected area.
[Zoom] Tool
The [Zoom] tool allows you to magnify and reduce the view of the
image in the active image window. The image window's title bar
displays the magnification or reduction percentage at all times.
Clicking on the image increases the magnification in increments of
100%. Holding down the Shift key while clicking on the image
decreases the magnification. Hold down the Control key while
clicking on the image to restore the image to its actual size (100%).
[Pan] Tool
The [Pan] tool allows you to move an image within the active image
172
Application Suite
Studio Lite
Toolbox (cont.)
window, performing the equivalent function as the side and bottom
scrollbars. To pan an image, click-and-hold the mouse button
(Windows: left button) on any region of the image and drag the
pointer in the direction that you would like the image moved.
Instruction Manual
173
Studio Lite
Status Bar (Windows Only)
The Status Bar (Figure 21) provides current information for the
active image, including Tool Status, Mouse Pointer Coordinates,
Color Channel Values, Foreground Color, and Background Color.
Tool Status
Color Channel Values
Mouse Pointer Coordinates
Foreground Color
Background Color
Figure 21: Status Bar
Tool Status
The Tool Status displays information regarding the currently
selected tool, as well as descriptions of the Toolbar and menu
options.
Mouse Pointer Coordinates
The Mouse Pointer Coordinates display the horizontal (X-axis) and
vertical (Y-axis) pixel coordinates for the current mouse pointer
position.
Color Channel Values
The Color Channel Values display the Red (R), Green (G), and Blue
(C) color channel values for the current mouse pointer pixel
position.
Foreground Color
Double-clicking on the Foreground Color patch will cause the Color
dialog box to open, allowing you to select a custom color. The
Foreground Color is used with the Fill Color option.
Background Color
The Background Color displays the current color selected for the
background, pertaining to the [Eraser] tool, as well as the [Cut] and
[Clear] commands. Double-clicking on the Background Color will
cause the Color dialog box to open, allowing you to select a custom
color.
(On Mac OS machines these last four functions are placed on the
right-hand end of the Toolbar.)
174
Studio Lite
7. TWAIN Viewfinder Lite (Windows
Only)
TWAIN
Viewfinder
Lite
Example
Instruction Manual
175
TWAIN
Viewfinder
Lite
Using TWAIN Viewfinder Lite
(Windows Only)
The TWAIN Viewfinder Lite
application is functionally and
visually identical to the
standard Viewfinder Lite
application. For more
detailed information on using
TWAIN Viewfinder Lite,
please refer to the
instructions beginning on
page 19.
The TWAIN Viewfinder Lite application provides an interface
between popular imaging or image analysis programs and your
camera system. Functionally and visually identical to the standard
Viewfinder Lite application, the TWAIN interface allows you to
capture images directly from your camera to most TWAIN-compliant
application programs.
Below is an illustrated example of accessing the TWAIN Viewfinder
Lite interface from the popular third-party image editing program,
Adobe Photoshop:
1) Start the desired third-party TWAIN-compliant application (Figure
1).
Figure 1: Run Third-Party TWAIN-Compliant Application
2) Select the correct TWAIN source device (Figures 2 and 3). The
device name for your camera is [TWAIN Viewfinder Lite].
176
TWAIN Viewfinder Lite
Using TWAIN Viewfinder Lite
(cont.)
TWAIN
Viewfinder
Lite
Figure 2: Select the TWAIN Source
Figure 3: Select [TWAIN Viewfinder Lite]
3) Acquire the selected TWAIN source (Figure 4).
Instruction Manual
177
TWAIN
Viewfinder
Lite
Using TWAIN Viewfinder Lite
(cont.)
Figure 4: Acquire TWAIN Source
The TWAIN Viewfinder Lite application window will appear (Figure
5). You can now use this application to capture images directly to
your TWAIN-compliant host application.
178
TWAIN Viewfinder Lite
Using TWAIN Viewfinder Lite
(cont.)
TWAIN
Viewfinder
Lite
Figure 5: TWAIN Viewfinder Lite
Instruction Manual
179
8. Studio Lite Photoshop Plugin
(Macintosh Only)
Studio Lite
Photoshop
Plugin
Example
Instruction Manual
181
Studio Lite
Photoshop
Plugin
Using the Studio Lite Photoshop
Plugin (Macintosh Only)
Images captured from the Digital Microscopy Camera System can
be imported by Adobe Photoshop (and compatible applications) in
two different ways.
Method A
Launch Studio Lite and capture an image (as described above in
this manual); save the captured image. Quit Studio Lite and launch
Photoshop (or simply launch Photoshop with Studio Lite still open).
Inside Photoshop, open the captured image file. Proceed to
manipulate the file as you would any other file that Photoshop can
manipulate.
Method B
Launch the Photoshop application. In Photoshop’s File menu select
the Import sub-menu and the "Viewfinder" menu item found there.
(This menu item will only appear if you have previously installed the
Studio Lite Plugin by selecting "Studio Lite with Photoshop Plugin"
when you ran the Studio Lite installer.)
The result of selecting "Viewfinder" will be the launching of the
Studio Lite application. While in this mode, Studio Lite when the
user presses the Capture button, will transfer the captured image to
Photoshop. You can continue to capture as many still images as
you want, with all of them going to Photoshop. When you wish to
return to Photoshop, use the Mac OS application menu, or simply
click on one of the Photoshop windows. When Photoshop is once
again the running application, it will terminate Studio Lite. You can
also exit Studio Lite by using "Quit" in its file menu. Proceed to
manipulate the file in Photoshop as you would any other file that
Photoshop can manipulate. After switching back to Photoshop, you
can select "Viewfinder" to perform additional image captures at any
time.
182
Studio Lite Photoshop Plugin
Specifications
9. Specifications
Specification
Single Chip CCD Color Camera with Light Swing
Electronic Cooling with Peltier Device
1/2” 1,500,000pixel single chip color CCD
No. of Total Pixels: 1434(H) x 1050(V)(1.5Mpixels)
No. of Effective Pixels:1392(H) x 1040(V)(1.45Mpixels)
Image Size
640 x 480, 1392 x 1040, 2776 x 2074 pixels
Sensitivity
ISO 50/100/200/400 equivalent
A/D Conversion
10 bits/color
Spot Meter
30%, 1% or 0.1% selectable spot size
Exposure Control
Exposure Mode: AE / Manual / AE Lock
Exposure Adjust: -2EV to +2EV
Exposure Time
1/10,000 sec to 60 sec
Frame
Mode : Average / Integral
Accumulation
Number of Accumulations : 64 frames (maximum)
White Balance
Auto White Balance
One-Push White Balance
Manual White Balance
Image Format
TIFF (8 bits / 24 bits / 48 bits), BMP (8 bits / 24 bits),
JPEG (8 bits / 24 bits), PICT (8 bits / 24 bits),
FlashPix (8 bits / 24 bits) (Windows only)
Hand Switch
Mode: EXPOSE / AE LOCK / SPOT
Interface
PCI Bus Interface
Preview Frame Rate 10 frames/sec maximum
Operating
Indoor Use
Environment
Altitude: Max 2000 meters
Ambient Temperature: 5°C - 35°C (41°F - 95°F)
Maximum relative humidity: 80% for temperature up to
31°C(88°F), decreasing linearly through 66% at 35°C
(95°F).
Power supply voltage fluctuation: Not to exceed ±10%
of normal voltage.
Pollution degree: 2 (in accordance with IEC 664)
Installation/over voltage category: II (in accordance
with IEC 664)
Item
Camera Type
Cooling System
Image Sensor
Instruction Manual
183
Troubleshooting
10. Troubleshooting
Under certain conditions, performance of the system may be
adversely affected by factors other than defects. If a problem
occurs, please review the following list and take remedial action as
needed. If you cannot solve the problem after checking the entire
list, please contact your local dealer for assistance.
Problem
Cause
Remedy
Page
The hand switch
does not work.
The hand switch cable
is not connected to the
PCI interface card.
The computer is currently
capturing or processing
an image.
Connect the hand
switch cable properly to
the PCI interface card.
Release the EXPOSE
button after previous
captured images are
processed and
displayed.
Make more than
100MB of free disk
space on Hard Disk
Drive.
Adjust the focus
correctly with the fine
focus adjustment knob.
Close the aperture iris
diaphragm a little.
9
Images are not
captured by
pressing the
EXPOSE button.
The images are
not in focus.
Free disk space
on Hard Disk Drive is
not enough (Windows
only).
The microscope is not
focused properly.
The aperture iris
diaphragm of the
condenser is open too
wide.
The field iris
diaphragm is not set
properly.
Lens components of
the microscope are
contaminated or the
cover glass on the
front side of the
camera is stained.
The images are
too dark or too
bright.
[AE lock], [Exposure
Adjust], [BF] and/or
[FL] are not set
properly.
Close the field iris
diaphragm until the
image circumscribes
the field of view.
Clean the objective
lens, photography lens,
condenser and/or
window lens, or clean
the cover glass on the
front side of the camera
if the cover glass is
stained.
Set them properly.
34
56
Instruction Manual
185
Troubleshooting
Troubleshooting (cont.)
Problem
Cause
The colors in the
images are not
correct.
The wrong color
temperature is set in
the white balance
control operation.
Error messages
occur when
Viewfinder Lite
or other
application
started.
Camera cable is not
connected properly
Device driver is not
installed.
TWAIN is not installed
(Windows Only).
Photoshop Plug-in is not
installed. (Macintosh only)
Remedy
Page
Calibrate the white
balance by specifying
the white region with a
rectangular frame of
the Auto White Balance.
Connect camera cable
properly.
46
Install the device driver
in the computer.
Install the TWAIN in the
computer properly
Install the Photoshop
Plug-in in the computer
properly.
10
13
21
18
23
Windows: If no operations can be activated by pressing any of the
buttons, restart Windows or the computer.
Macintosh: If no operations can be activated by pressing any of
the buttons or using a menu (the machine "hangs"), press Opt +
Cmd + esc to exit the program. If that does not work, restart the
computer.
186
Troubleshooting