1
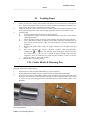
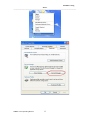
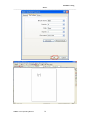
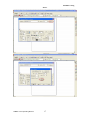
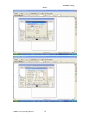
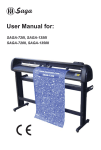
RABBIT
Cutting Plotter
Users Operating Manual
RABBIT Cutting
Plotter
_____________________________________________________________________
Dear Customer,
Thank you for choosing a RABBIT Cutting Plotter. Through a rigorous testing process we ensure
that every machine shipped is operating to its peak performance.
In order to ensure that this high performance is maintained and to guarantee many years of trouble
free and profitable use please read this manual thoroughly to familiarize yourself with the
operation of your new machine.
If there are any questions that you have after reading this manual please contact the agent from
whom you purchased your machine for clarification.
Statement by Manufacturer
1.
The Manufacturer reserves the right to alter the contents of the manual and specifications
of the product without notice.
2.
If the machine develops a fault please contact your authorized agent straight away for
prompt attention to your problem.
3.
The Manufacturer is not liable for damage to persons or property caused by improper or
unauthorized repairs or use of the machine.
4.
This manual and its entire contents including drawings are Copyright “©” Jinan RABBIT
Computer Equipment Machinery Company Limited.
5.
Windows©, Windows XP©, Roland©, WD40©, Artcut© and Cutting Master© are brand
names mentioned in this manual. These names are owned by their respective copyright©
holders. RABBIT makes no claim to these names and they are mentioned in this manual
only to assist users.
The quality assurance number of this product is: Q/0100HX001-2010
RABBIT Users Operating Manual
1
RABBIT Cutting
Plotter
_____________________________________________________________________
Contents
Packing List ……………………………………………………………………………
Notes ……………………………………………………………………………………
Routine Maintenance …………………………………………………………………
Initial Set-up ……………………………………………………………………………
4.1 Installation ………………………………………………………………………
4.2 Off-line Test
……………………………………………………………………
4.2.1 Reset ……………………………………………………………………
4.2.2 Testing the correct operation of the knife drive (Z axis) …………………
4.2.3 Test cutting speed adjustment
…………………………………………
4.2.4 Test blade pressure adjustment …………………………………………
4.2.5 Start position & Test cut …………………………………………………
4.3 Online connected to Computer (PC) ………………………………………………
4.3.1 Online Operating Sequence
……………………………………………
V
Keyboard Operating Instructions ……………………………………………………
5.1 On-line mode ……………………………………………………………………
5.2 Off-line mode ……………………………………………………………………
5.3 Protection mode …………………………………………………………………
VI Loading Paper or Vinyl …………………………………………………………………
VII
………………………………………………………
Knife Blade & Drawing Pen
VIII Trial Cut ………………………………………………………………………………
IX Technical Specifications (table) ………………………………………………………
X
Operating Schedule (table) ……………………………………………………………
I
II
III
IV
3
3
3
4
4
4
4
4
4
4
4
4
4
5
5
5
5
6
7
7
7
8
Appendices
(1)
(2)
(3)
(4)
8
Stand packing List & Assembly Instructions for Metal Stand ………………………
…………………………………………………… 9
Exploded View of the Metal Stand
10
Adjustment/Alignment of the metal drive roller ……………………………………
……………………………………………
10
Fault Diagnosis & Common Problems
1 Dolly Assembly ……………………………………………………………………
10
…………………………………………
10
………………………………………………………………………
11
……………………………………………………
11
………………………………
11
……………………………………………………………
11
Cutting inaccuracies
………………………………………………………………
11
Software problems
………………………………………………………………
12
2
Paper pressure roller & metal drive roller
3
Power supply
4
Random, unpredictable cutting
5
Not outputting any work (no action from machine)
6
Work has jagged edges
7
8
RABBIT Users Operating Manual
2
RABBIT Cutting
Plotter
_____________________________________________________________________
I.
Item
Knife Blades (3pcs/box)
Blade Holder
Penholder
Pen Refill
Serial Cable
User’s Manual
Packing List
Quantity
1
1
1
1
1
1
II.
1.
2.
3.
4.
5.
6.
7.
8.
Item
Power Cable
Fuse
Dust Cover
Alignment Ruler
Software Package
Quantity
1
1
1
1
1
Notes
Ensure the machine is placed on a stable flat surface and that there is ample room to allow
for movement of the material being cut or printed.
Never force any part of the machine, guide rollers, metal drive roller & pressure roller
latch levers. Such damage will not be covered by warranty.
Ensure that foreign objects are not allowed to fall into the gap between the machine and
the metal drive roller. This can cause inaccuracies in the work and damage to the
machine.
Do not allow any magnetic materials to come into contact with the knife dolly also never
allow the machine to be operated near strong magnetic fields (electric welders etc). In
addition never share the same power supply socket with electric welders etc.
Always raise the pressure pinch rollers when the machine is not in use to prevent
deformation to the rollers and thus possible inaccurate operation.
Disconnect machine from power source when it is not in use.
Do not move the knife dolly by hand when the power is off to avoid damage to the
pressure bar and the knife blade.
Never connect or disconnect any cables to the machine or computer with power switched
on to avoid damage to the machine & computer.
III. Routine Maintenance
1.
2.
3.
4.
Always keep the machine clean and dust free.
Please fit the dust cover when the machine is not in use.
If any foreign object happens to fall into the gap between the metal drive roller and the
machine body turn the machine off straight away and remove the object.
If the indicator LED does not illuminate when power is switched on check that the power
fuse is intact. If not replace with one of the exact type and rating. Using a larger rated fuse
can cause expensive and serious damage to the machine. Please contact your dealer if the
new fuse blows or the fuse is OK but the machine still does not work.
RABBIT Users Operating Manual
3
RABBIT Cutting
Plotter
_____________________________________________________________________
IV. Initial Set-up
4.1 Installation
Place the machine on a flat level surface and ensure it is stable. Earth the machine to a suitable
ground point to ensure reliable operation. An earth wire run to the computer cabinet is a good idea
for long term reliability.
4.2 Off-line Test
4.2.1 Reset
Plug the power cable into the socket on the machine and connect it to 220V AC and turn on the
power switch. The knife dolly will move to its home position at the right hand side of the machine
and the metal drive roller will rotate forwards and then backwards. The knife holder on the dolly
will also move up 1.5~2mm. This is the correct reset sequence.
4.2.2 Testing the correct operation of the knife drive (Z axis)
Press the “Test” key on the cutter machine keypad and the knife holder on the dolly will be driven
to the down position, release and it will be driven up (Z axis).
4.2.3
Test cutting speed adjustment
Press the “S+” or “S-” keys on the keypad and the LCD screen will display “SPEED XXXmm/s”,
This presets the machine cutting speed.
4.2.4 Test blade pressure adjustment
Press the “P+” or “P-“ buttons to adjust the blade pressure. The LCD screen will display
“PRESSURE XXXg”, this presets the blade down force (pressure).
4.2.5 Start position & Test cut
Press the “Off-line” key, the machine goes into Off-line mode and the yellow LED illuminates.
Manual paper movement can now be made using the four arrow keys.
The paper or knife dolly will move according to the button pressed. When satisfied with the paper
and knife dolly position press “Test” key and the machine will make a square test cut. This allows
for cutting pressure adjustment and knife tip protrusion adjustment.
If the sequence described above works as described then the cutting machine in working normally.
4.3 On-line with Computer
The cutting machine is connected to the computer (PC) via a serial interface using COM1 or
COM2 on the computer.
4.2.3 On-line Operating Sequence
A.
B.
C.
D.
E.
Make sure the cutter and computer are both switched off.
Connect the cutter to the serial interface of the computer (COM1 or COM2)
using the serial lead supplied.
Turn on the cutter and computer and wait for the cutters reset sequence to
complete.
Open the software for the cutting machine and ensure the correct configuration
parameters have been selected.
When the finished work is sent to the cutter it starts cutting/drawing immediately.
RABBIT Users Operating Manual
4
RABBIT Cutting
Plotter
_____________________________________________________________________
V.
Keyboard Operating Instructions
Operating modes
The cutter has three operating modes: “On-line”, “Off-line” and “Protection”.
5.1 “On-line” mode
The cutting machine enters the “On-line” mode after the reset sequence. In the “On-line” mode,
during cutting or waiting for data to be sent from the host computer adjustment of the cutting
speed and blade pressure can be made.
Use the “S+” and “S-“ keys to adjust the cutting speed up or down in 25mm/S (25 millimeters per
second) steps.
Use the “P+” and “P-“ keys to adjust the blade cutting force (pressure) up or down in 25 gram
steps.
Once the minimum or maximum levels have been reached for both speed and pressure adjustment
further key inputs will be ignored.
The “Test” key can be used in the “On-line” mode to force the blade holder onto the work. This
allows the user to adjust the blade force and the position of the pen holder in the dolly to
satisfactory levels.
During cutting if it is necessary to pause the machine for some reason press the “Pause” key once
and the machine will stop operation immediately. Press the “Pause” key again and work will
resume from where the machine stopped.
5.2 “Off-line” mode
In the “Off-line” mode or during cutting operation if the “Off-line” key is pressed the yellow LED
lights, the machine will not receive data from the computer and the knife holder is raised from the
work. The following operations can be performed in this mode:
1.
2.
Use the “ ” (S+) key or the “ ” (S-) key to move the vinyl back and forward.
Use the “ ” (P+) key or the “ ” (P-) key to move the knife dolly left and
right.
3.
4.
” key to set the origin, or start point for the operation.
Use the “
Press the “Test” key to perform a test cut from the origin position as set in step 3.
5.3 “Protection” mode
If the dolly is moved by hand or the artwork that has been sent to the cutter is beyond the size of
the cutters capability “Protection” mode will be automatically entered to save the mechanism and
circuit boards from possible damage. The yellow LED will flash rapidly and the machine will stop.
The “Reset” key must be pressed to reset the machine. Work sent to the machine from the
computer will be lost and must be re-sent once the reason for the error is determined.
RABBIT Users Operating Manual
5
RABBIT Cutting
Plotter
_____________________________________________________________________
VI. Loading Paper
1.
2.
3.
Switch on the power supply, the machine will perform a reset operation as described in
4.2.1. If the reset sequence does not occur, or there is abnormal operation (all LEDs on or
off) press the “Reset” key to manually reset the machine.
Adjust the position of the pressure rollers to suit the width of the material being used. Try
to leave the right pressure roller near the edge of the sheet and move the others to suit.
Loading paper
A.
Lift all pressure roller latch levers to the up position.
B.
Feed the sheet of paper into the machine between the metal drive roller and the
rubber pinch rollers.
C.
Move the paper to align it squarely in the machine, the ruler will assist with this.
D.
Lower the pressure rollers so that the pinch rollers clamp the material firmly in
place (never force the levers, if they are stiff something is wrong, investigate the
problem).
E.
Rotating the pinch rollers with your fingers should move the paper back and
forth.
F.
Press the “Off-line” key and the “Off-line” (yellow) LED will illuminate.
G.
Holding the “ ” or “ ” keys will feed the paper through the machine (forward
and backwards) so you can run a length of paper through and check the
alignment. Press the “Off-line” key again and the machine is ready to cut (the
paper will return to the origin position).
The machine is now ready to use.
VII. Cutter Blade & Drawing Pen
Fitting & Adjustment of Knife Blade
1.
2.
3.
Separate the two halves of the blade holder by unscrewing them.
Fit the blade into the holder and you will feel it pull into the holder magnetically.
Screw the two halves of the holder together again and adjust so that the protrusion of the
knife tip is the thickness of the vinyl to be cut. This is a very small protrusion amount and
it is best to start with less protrusion rather than more so that the knife blade is not
damaged.
Drawing Penholder
RABBIT Users Operating Manual
6
RABBIT Cutting
Plotter
_____________________________________________________________________
1.
2.
Unscrew the two halves of the pen holder.
Insert a cheap, commonly available, pen core into the holder (make sure you include the
spring) and tighten the screw.
VIII. Trial Cut
Before using the cutting machine it is wise to perform a trial cut to ensure that the knife blade
protrusion, position of the blade holder in the dolly, mounting of the drawing pen and cutting
pressure are all correct.
1.
2.
Ensure that the knife blade or drawing pen has been correctly installed.
Press the “Off-line” key (the “Off-line LED will illuminate) and then the “Test” key. The
machine will cut or draw a square.
3.
After the trail cut has finished press the “Off-line” key again and the machine enters the
“On-line” mode. A trial cut should be made when changing knife blades and with each
change of vinyl to ensure all adjustments are set correctly for the job to be made.
IX. Technical Specifications
Item
Power supply
Power consumption
Max. paper width &
max. cutting size
Knife blade
Drawing pen
Cutting speed
Cutting pressure
Resolution
Resolution of software
Repeatability precision
Drive motor types
PC interface
Byte settings
Baud rate
Language format
External dimensions
Working Temperature
Working humidity
Specification
220V AC + 10% switching power supply
60W ~ 120W (depending on mode of operation)
HX360
430mm
360 X unlimited length
HX720
720mm
630 X unlimited length
HX800
800mm
720 X unlimited length
HX960
960mm
860 X unlimited length
HX1120
1120mm
1010X unlimited length
HX1360
1360mm
1250X unlimited length
Inertia rotary style (Roland© standard type blade)
Standard water based ball point pen refill
Min. 10mm/S ~ Max.800mm/S
Min. 1g ~ Max. 400g
0.0254mm/step
0.0127, 0.0254, 0.03175mm/step
0.0127mm
Stepper motors for X & Y axis – solenoid for Z axis
RS232 serial interface and USB port
8 data bit, 0 parity bit, 1 stop bit
9600
Compatible with DM/PL and HPGL plot language
HX360
550 X 240 X 230mm
HX720
880 X 240 X 230mm
HX800
960 X 240 X 230mm
HX960
1100 X 240 X 230mm
HX1120
1280 X 240 X 230mm
HX1360
1480 X 240 X 230mm
+5° ~ +37°C
10 ~ 80%
RABBIT Users Operating Manual
7
RABBIT Cutting
Plotter
_____________________________________________________________________
X.
Item
Reset & on-line
Adjust cutter speed
Adjust blade pressure
Blade pressure test
Off-line or Pause
Loading paper
Self check
Urgent stop
Operating Schedule
Method & Procedure
Press “Reset” key
Use “S+” and “S-“ keys
Use “P+” and “P-“ keys
Press “Test” key
Press “Off-line” key, yellow LED will illuminate
In the off-line mode press “ ” or “ ” keys
In the “Off-line” mode press “Test” key (will draw a square)
During cutting press “Pause” key, the machine will stop immediately
Appendix 1. Stand packing list & assembling the metal stand
1.
The stand packing box contains the following list of parts:
Item
Leg upright
Vinyl support roller shaft
Stand cross bar
Leg base
Screws
2.
3.
4.
5.
6.
7.
Quantity
1 left & 1 right
1
1
2
1 bag
Use M6 screws to bolt the cross bar to the leg uprights (refer to the exploded diagram).
Ensure the legs are assembled the correct way around and that they are parallel with each
other when tightening the bolts.
Place the roller shaft into the support brackets and ensure it fits well and rotates freely.
This is just to ensure spacing of the brackets is correct – set it aside until the stand is fully
assembled.
Bolt the stand leg bases onto the bottom of the uprights using M6 screws. Ensure all parts
are square and tighten all bolts.
Assemble the stand to the cutting machine. The four holes underneath the machine should
align with the corresponding holes on the support brackets. Attach the cutter machine to
the stand using short M8 nuts & bolts.
Attach earthing lug to the bottom of the machine in the hole provided using M8 screws.
When the stand is square and aligned tighten all screws.
RABBIT Users Operating Manual
8
RABBIT Cutting
Plotter
_____________________________________________________________________
Appendix 2. Exploded Diagram of the metal stand
Appendix 3. Adjustment of the metal drive roller
WARNING: Do not undertake this adjustment lightly. This adjustment is made very
carefully and accurately in the factory by our highly skilled personnel and should only
be performed if the machine has been dropped or damaged in some way. Normally it
will never need to be adjusted for the life of the machine.
If your machine has suffered a major knock or perhaps a fall you might find that the paper does
RABBIT Users Operating Manual
9
RABBIT Cutting
Plotter
_____________________________________________________________________
not track correctly when the machine is cutting. This can cause inaccurate cutting and the ends of
larger cuts to not meet as desired.
Remove the bottom cover by unscrewing the 10 retaining screws. You will see the four “runout”
adjusting screws as shown in the pictures below.
Loosen the locking nuts on the adjuster screws and by very careful (and small) adjustment of these
four screws you can make a very fine adjustment to the runout.
Use a piece of new vinyl at least two meters in length and run it through the machine for the full
length backwards and forwards several times. By placing your thumb or marking the edge of the
vinyl with a piece of tape you will be able to determine how much the vinyl runs off course.
Make very small adjustments to the adjusting screws noting carefully what effect your adjustment
has on the amount of runout. This will take some time to get exactly right but it is a very critical
adjustment that determines the overall accuracy of the machine.
Once you are satisfied that the runout is less than 0.1mm over a 2 meter length you can tighten the
locking nuts and replace the bottom cover.
Appendix 4. Common problems
NOTE: If you feel uncomfortable performing any of the following procedures please
contact your agent for prompt attention to your problem.
(1) Dolly assembly
A. The knife holder is sluggish to rise: Check the copper connection plates under the dolly cover
to ensure they are well connected. This may require the use of a soldering iron to correct.
B. The Z axis drive (knife up and down): The drive solenoid winding is burnt out or the
connection wire between dolly and main PCB is broken.
C. The knife holder can be raised but not lowered: The magnetic Z drive cylinder is touching the
windings, There is a large friction somewhere impeding movement or the –12V from the
power supply is missing.
D. The dolly is jerky when moving or even falls from the guide rail: The nylon guide rollers on
the dolly are damaged or badly worn or the toothed drive belt is loose or damaged.
E. The dolly won’t move at all or will only move in one direction: X stepper motor is faulty or X
stepper motor driver IC 3955 on main board is faulty.
F. The dolly moves to one side and slams into the metal plate: The limit sensor or limit sensor
PCB is faulty or the limit sensor infra-red beam is not being correctly broken by the
interruptor arm fitted to the dolly: Adjust interruptor arm or replace faulty parts as required.
(2) Paper pressure roller & metal drive roller
A. Motors make noise but the paper is not driven correctly or at all: There is too much pressure
between the pinch rollers and the metal drive roller shaft – use one less pressure roller.
B. Paper runs off to one side while cutting: Incorrect paper installation or the pressure of the
pinch rollers is uneven, try using one pinch roller on the left and two close together on the
right side.
C. The pressure pinch roller assembly’s do not slide well on the rail: Apply a very small drop of
lubricating oil to the shaft and wipe off any excess oil as it will attract dust and make the
problem worse. DO NOT spray pressure pack oil such as WD40© or similar on the machine
at any time.
D. The pinch roller pressure is not enough to hold the paper firmly: Adjust the pressure as
required or the rubber pinch rollers are worn and require replacement.
E. The metal drive roller doesn’t move (Y axis): The stepper motor is faulty or the driver IC
3955 is faulty.
RABBIT Users Operating Manual
10
RABBIT Cutting
Plotter
_____________________________________________________________________
(3) Power supply
A. Power cuts on and off when using the machine: The power supply lead is faulty or the power
socket on the machine is damaged.
B. Power won’t turn on at all: Check the fuse or the power supply is damaged.
(4)
A.
B.
C.
D.
E.
F.
G.
(5)
A.
B.
C.
D.
E.
F.
Cutting is random and unpredictable
Connecting serial cable is damaged.
COM port of computer is faulty.
Main PCB of machine is damaged or the MAX202 IC is faulty.
The machine has not reset correctly (press manual reset).
The paper settings in software don’t match the available material.
The machine may be affected by static electricity, ensure correct earth.
Ensure all software settings are correct (this is most likely to be the problem).
Not producing any work (no action)
Connecting serial cable is faulty.
Main PCB or MAX202 on main PCB is faulty.
Port settings in software are incorrect (check these settings first).
COM port on computer is damaged.
Machine selection in software is incorrect.
If using “Cutting Master©” software the “softdog” has not been added, re-install
software.
(6) Produced work has jagged edges
A. Insufficient knife pressure.
B. Check software settings (settings of compensation parameter, closing parameter
and accuracy in cutting output parameter will all affect this).
C. The internal bearings of the knife holder may be jamming or damaged, check that
the blade can spin freely in the holder (CAUTION – sharp blade).
D. Fonts in the font database do not match with the drawing sent to the cutter.
(7) Cutting Inaccuracies
1.
2.
3.
4.
(8)
There are gaps in the produced work: The white blade pressure strip is
damaged or worn or the knife blade cannot rotate in the holder freely.
The cut depth is different on the left and right sides of the machine: The metal
roller is not square to the machine, perform adjustment as explained in
Appendix II. (CAUTION – this situation will be most unusual and would only
occur if the machine has been dropped or forced in some way).
The machine only cuts a length of, say, two metres when three have been sent
to the machine for cutting: Output setting in Artcut© (output length limitation
in compensation setting) is limiting the length of material the machine can cut.
The depth of cut varies across the work at random: Possible static electricity
interference, ensure machine is correctly earthed to PC.
Software Problems
1) Artcut© (Wentai company) operating under Windows 2000 or Win XP requires
different settings from Win 98 as follows:
RABBIT Users Operating Manual
11
RABBIT Cutting
Plotter
_____________________________________________________________________
A.
Open “My Computer”, right click the mouse and find:
properties>hardware>device manager>ports (com & LPT) >COM1 or
COM2>port settings>flow control>XON/XOFF. Ensure this is enabled.
B.
Open Artcut software and select printer output page. Click on “settings” in the
upper left hand corner>port setting>flow control. Select the check boxes
alongside XON/XOFF & RTS/CTS, remove the checkmark next to DTR/DSR
and accept these changes (shown in picture top of next page).
C.
Ensure the correct Cutting Machine is selected in artcut as follows:
2) Artcut 2005 in Windows XP or Windows 2000,parameters modified method;
RABBIT Users Operating Manual
12
RABBIT Cutting
Plotter
_____________________________________________________________________
RABBIT Users Operating Manual
13
RABBIT Cutting
Plotter
_____________________________________________________________________
RABBIT Users Operating Manual
14
RABBIT Cutting
Plotter
_____________________________________________________________________
RABBIT Users Operating Manual
15
RABBIT Cutting
Plotter
_____________________________________________________________________
RABBIT Users Operating Manual
16
RABBIT Cutting
Plotter
_____________________________________________________________________
RABBIT Users Operating Manual
17
RABBIT Cutting
Plotter
_____________________________________________________________________
RABBIT Users Operating Manual
18
RABBIT Cutting
Plotter
_____________________________________________________________________
3) USB installed method, please refer to the pictures in USB driving disc.
RABBIT Users Operating Manual
19