Transcript
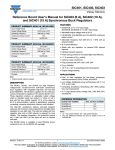
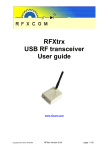
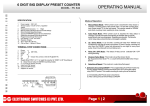
www.1byone.com
1byone Products Inc.
USER INSTRUCTIONS
www.1byone.com
www.1byone.com
Names for Parts
(H) (D) (E)
LED Moon Light
SKU: O00QS-0065
It is very important to operate this product according to the following instructions. Failure to do so
may render your guarantee void.
(B)
(A)
(C)
Accessories List
The product comes with
● 1 x Product Body
● 2 x Rubber Cushion
(I)
● 1 x Handle
● 2 x Metal Cushion
● 2 x Handle Screw
● 1 x User Instructions
(A) Light Lens
(D) Microphone
(G) Fuse
(B) Handle
(E) Frequency Knob
(H) Switch
(G) (F)
(C) Handle Screw
(F) Sound Intelligent Knob
(I) AC Power Cord
Handle Fixing
Product Body
Handle
Handle Screw
1. Put each metal cushion into each handle screw.
2. Thread the handle screws into the screw holes of the handle, with one on left and one right of
the handle
3. Put each rubber cushion into each handle screw
4. Fix the handle screws on the product by turning the handle screws clockwise into the screw holes
of the product body until fixed firmly. Note: The two screw holes are located at the left and right
of the product body.
How to Use?
Rubber Cushion
Metal Cushion
Specifications
User Instruction
● Power Sources: Input AC110-120V 60Hz
● Power Consumption: 10W
● LED Color: Red, Green, Blue
● Product Dimension: 8.58 x 8.1 x 7.32in.(218 x 206 x 186mm)
● LED Quantity: 9 super red 5mm LEDs; 12 super green 5mm LEDs; 12 super blue 5mm LEDs
● Function: color change, sound control, flash, patterns change automatically
● Working Mode: Automatic Working Mode, Sound Control Mode
1
1. Carefully put this product onto a clean, flat and solid surface - such as a table-top, or cabinet-top,
close to any power socket. Please be noted the product body is round. AVOID ROLLING. As an
alternative, you can also hang on the product with a screw
(not included) according to the following sequence.
(a) Insert the screw through the hanging hole.
(b) Fix the screw to any fixture on the ceiling as per your
personal need.
Please be noted that you can adjust the flash angle by the
handle.
2. Insert the AC plug into a correct power socket.
3. Set the switch to ON position at the back of the product. The
light will start working under Automatic Working Mode. Set
the switch to OFF position and the light will stop working.
4. To reach a good lighting effect when the product is working, you can turn the Frequency Knob to
adjust the flash speed. Turning the knob clockwise will increase the flash frequency while turning
counterclockwise will decrease.
2
5. You can change the automatic working mode to be sound control mode by the Sound Intelligent
Knob. Turn the knob clockwise until there is CLICK sound, and the light comes into the sound
control mode. Turning the knob clockwise can increase the sound sensitivity, while turning
counterclockwise will reduce the sound sensitivity. Under sound control mode, the light rotation
can be faster if the ambient music volume and sound sensitivity are higher, and vice versa. If you
keep turning the knob counterclockwise until there is CLICK sound, the light would come back to
automatic working mode. Note: Under sound control mode, you can also adjust the flash frequency
by the Frequency Knob, as point 4.
Maintenance
Fuse Replacement
If the light does not work at all when it is connected to the power socket, then it is probably that the
fuse has been broken. Please buy a new fuse and replace according to following sequence.
WARNING: Risk of electric shock and fire. Disconnect from power socket before replacing the fuse.
1. Turn the fuse knob counterclockwise to reveal the fuse.
2. Replace the fuse with the same size and type fuse: 1A, 125V
3. Insert the new fuse into the position and reinstall by turning clockwise. Be sure not to over tighten.
Note: Dispose of used fuse in accordance with the relevant legislation.
www.1byone.com
● Keep the power cord away from heated surfaces.
● Never drop or insert any object into any opening.
● Please unplug the power cord if you want to stop use of this unit for long time.
● The external flexible cable of this product cannot be replaced; if the cord is damaged, the product
shall be destroyed. Never operate this product if it has a damaged cord or plug, if it is not working
properly, if it has been dropped or damaged, or dropped into water.
WEEE Directive & Product Disposal
At the end of its serviceable life, this product should not be treated as household or general waste. It
should be handed over to the applicable collection point for the recycling of electrical and electronic
equipment.
1byone Products Inc.
2313 E,Philadelphia Street,Unit M, Ontario,CA 91761
www.1byone.com
Cleaning:
● Maintenance and cleaning shall only be done to the product cover. Unplug this product from the
power socket before cleaning.
● Do not wet any electric parts of this product. Please use a dry, soft cloth instead of sharp tools for
cleaning.
Cautions and Warnings
● Please read through this instructions manual before use.
● When you hang the product on the ceiling, please make sure the product will be firmly fixed on
the ceiling without possibility of falling off.
● Attention! Do not place the product onto wet or uneven surfaces. Accidental falls may cause fire.
● The product shall be changed if has become damaged or thermally deformed. Disconnect this
product from power immediately in case of malfunction. Do not resume use until it’s repaired.
● Do not use outdoors. It is not waterproof.
● This product is not a toy. Please keep this unit out of reach of children and pets.
● Close supervision is necessary when this product is used by invalids, or disabled persons, or near
children.
● Use this product only for its intended use as described in these instructions. Do not use
attachments not recommended by the manufacturer.
3
4