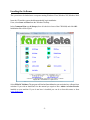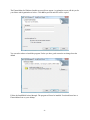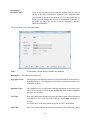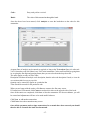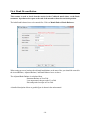
1
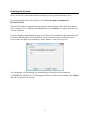
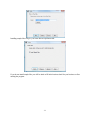
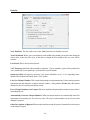
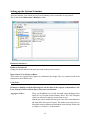
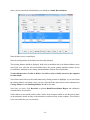
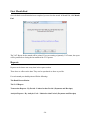
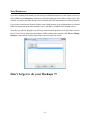
cashdata
Cash Based Recording System
Quick Start Guide
Version 7.0
Documentation and Software by farmdata Limited
© 1998-2009 farmdata Limited
-1-
Copyright Information
© 1998-2009
Farmdata Limited
Westertown
Rothienorman
Aberdeenshire
AB51 8US
The information contained in this manual and the accompanying software program are copyrighted and all rights are reserved by
Farmdata Ltd.
Farmdata Ltd reserve the right to make periodic modifications of this product without the obligation to notify any person or
entity of such revision. Copying, duplicating, selling or otherwise distributing any part of this product without the prior written
consent of an authorised representative of Farmdata Ltd are prohibited.
Information contained in this document is subject to change without notice and does not represent a commitment on the part of
Farmdata Ltd. The software described in this manual is furnished under a license agreement. The software may be used or copied
only in accordance with the terms of this agreement.
Limitations of Liability
In no event will Farmdata Ltd or any other person involved in the creation, production or distribution of the Farmdata software
be liable to you on account of any claim for any damages, including any lost profits, lost savings, or other special, incidental,
consequential, or exemplary damages, including but not limited to any damages assessed against or paid by you to any third party,
arising out of the use, inability to use, quality or performance of such Farmdata software and user manual, even if Farmdata Ltd or
any such other person or entity has been advised of the possibility of such damages, or for any claim by any other party. In
addition, Farmdata Ltd or any other person involved in the creation, production, or distribution of Farmdata software shall not be
liable for any claim by you or any other party for damages arising out of the use, inability to use quality or performance of such
Farmdata software and user manual, based upon principles of contract warranty, negligence, strict liability for the negligence of
Farmdata Ltd or other tort, branch of any statutory duty, principles of indemnity or contribution, the failure of any remedy to
achieve its essential purpose, or otherwise.
This does not affect your statutory rights.
This booklet is designed to help you get started. It should be used in conjunction with the
following manuals.
Related Documents
Cashdata Manual
Windows Manual
Windows Tutorial
-2-
Table Of Contents
The Information Required Before You Start . . . . . . . . . . . . . . . . . . . . . . . . . . . . . . . . . . . . . . . -4Loading the Software . . . . . . . . . . . . . . . . . . . . . . . . . . . . . . . . . . . . . . . . . . . . . . . . . . . . . . . . -5Starting the System . . . . . . . . . . . . . . . . . . . . . . . . . . . . . . . . . . . . . . . . . . . . . . . . . . . . . . . . . . -7Creating Your Own Business . . . . . . . . . . . . . . . . . . . . . . . . . . . . . . . . . . . . . . . . . . . . . . . . . . -9Setting up the System Structure . . . . . . . . . . . . . . . . . . . . . . . . . . . . . . . . . . . . . . . . . . . . . . . -11Start Entering Transactions . . . . . . . . . . . . . . . . . . . . . . . . . . . . . . . . . . . . . . . . . . . . . . . . . . . -14First Bank Reconciliation . . . . . . . . . . . . . . . . . . . . . . . . . . . . . . . . . . . . . . . . . . . . . . . . . . . . -16First Month End . . . . . . . . . . . . . . . . . . . . . . . . . . . . . . . . . . . . . . . . . . . . . . . . . . . . . . . . . . . -18Reports . . . . . . . . . . . . . . . . . . . . . . . . . . . . . . . . . . . . . . . . . . . . . . . . . . . . . . . . . . . . . . . . . -18New Businesses . . . . . . . . . . . . . . . . . . . . . . . . . . . . . . . . . . . . . . . . . . . . . . . . . . . . . . . . . . . -19-
-3-
The Information Required Before You Start
The system can be started with very little detail, which is as follows:
Business Name, Address, Telephone, VAT registration no. and frequency (monthly or quarterly), the
date of the LAST financial year end.
You should also have an idea of the kind of coding structure you wish to use. There are several
examples of these in the Appendices of the main manual. These can be selected at start up and
modified. Alternatively you can select a minimum list and create your own. It may be worth consulting
your accountant about this.
The Adjusted bank balance at the start of the year is required. The manual explains how to reach this.
This is the minimum requirement before you start making entries.
-4-
Loading the Software
The system has to be loaded onto a computer running Windows Vista, Windows XP, Windows 2000
Insert the CD and the system should automatically begin installation.
If not, select Start and Run from the Windows Desktop.
In the Command Line type d:\Setup (where d is the drive letter of the CD-ROM) and click OK.
Initialisation files will be copied
.
Select FINANCIALdata, The program will load as financialdata but your activation key will turn it into
cashdata. If you wish to install and view the manual you require to have Adobe Acrobat Reader
installed on your machine. If you do not have it installed you can do so from this menu or from
www.abobe.com.
-5-
The Financialdata for Windows Installer screen will now appear. A registration screen will ask you for
your Name and Organisation as below. Click OK to proceed and files will be copied.
You can select where to install the program. Unless you have good reason do not change from the
default
Follow the InstallShield wizard through. The program will now be installed. You should now have a
Financialdata Icon on your desktop.
-6-
Starting the System
Once you have the system loaded onto the computer you can go ahead and start to use it.
Use the Finacialdata Icon on the desktop or Go to Start, Programs, Farmdata and
FINANCIALdata.
If this is the first time the program has been opened an Activation Key is then asked for. Enter the
Key as written on your Certificate or Installation Sheet. It is essential to use upper and lower case
as on the certificate.
If you are installing a demonstration program you will have no Activation Key, the system will work
for 60 days and then ask for an Activation Key. No data will be lost but you will not be able to
access it until you obtain an Activation Key from Farmdata. Click Next to proceed
You will then get a screen showing you which directory the data files will be loaded into.
C:\FARMDATA\FINANCAL32\ is the suggested directory. If this is not acceptable, click Change
and select your preferred directory.
-7-
Installing sample files will give you some data to experiment with.
If you do not install sample files you will be asked to fill in the business detail for your business on first
running the program.
-8-
Creating Your Own Business
Go to File -> New Business. You will be asked if you wish to create a new business if you select yes,
you will then see the screen below.
This is your code list selection screen. Select the one which best suits your business. Minimum is a blank
list except for the few control codes which are preset and not changeable. The others are sample lists
designed for the described type of business. They give a suitable structure but will probably require
editing to individual requirements. To select the codes you wish click on the appropriate title to highlight
it and click OK.
The database will then be created.The following screen will appear after the database has been created.
Name, Address, Telephone and Fax Number of the business should be filled in as required.
VAT Registration No. Should be filled in if applicable
Leave Password blank if one is not required.
-9-
Financial
Year End Date. The date of the close of the Last Financial year should be entered.
Year End Month. Where your year end date is in the middle of the month you can select the month you
wish to have as the last in the year. In the above example the First month of the new year will be
October.
Last Period This is the last closed period.
VAT Frequency should be either monthly or quarterly. If set to monthly a report will be produced at
every month end if set to Quarterly it is produced every third month.
Quarterly Offset only applies to quarterly VAT reports. Should be set to 1, 2 or 3 depending on the
month of the financial year which starts a VAT quarter.
Last Non Cheque Number. This is used when posting recurring transactions. Each recurring payment
transaction activated must have a unique reference number. Along with the Prefix, this is the number
allocated to the last recurring transaction posted.
Force Cheque Numbers to be Unique. When set, duplicate cheque numbers cannot be entered in the
same financial year
Automatically Generate Cheque Numbers When set cheque numbers are automatically entered in
transactions incrementing one for each new entry. The last recorded number can be accessed and
changed if required.
Other Description on Reports When set the description on the first page of a transaction is also shown
on the analysis reports.
-10-
-11-
Setting up the System Structure
The basic structure is set at start up but you will probably wish to amend this to suit yourself.
This is done in the Maintenance Routines section.
Business Parameters Business & Financial
Change the detail entered on the start-up screens in the previous section.
Depreciation, Vat & Interest Rates
These entries are required before figures are calculated in the budget. They are explained in the main
manual and can be filled in later.
Code Lists Printouts or displays of all the following lists can be taken in the reports section under Code
Lists. You may wish to edit the lists to suit your own situation.
Aggregate Codes -
These are the highest level of code and make up the headings in the
Profit & Loss Account and the Balance Sheet. The Code Template
which you selected on start up creates these for you.
Should you wish to modify this list please refer to the main manual as
this determines the layout of reports. The numbers you select have to
fall within certain restrictions to maintain the correct layout. Please refer
to Chapter 1, Section 2.1 of the manual.
-12-
Payments &
Receipts Codes -
These are the equivalent of your cashbook columns. They are used in
the day to day entry of transactions. Again the Code Template which
you selected on start up creates these for you. You may modify the list
before you enter transactions. There is no requirement for numbers to
fall within any range but, for ease of use and reporting, a structure
should be maintained.
The set up of the code is described below.
Code -
Is the number selected for this column in the cashbook
Description - The name given to this code.
Aggregate Code -
The aggregate code that this payment/receipt code should be connected to for
reporting purposes. New Aggregate codes can be created but remember the
restrictions on them.
Quantity Code -
The quantities to be recorded when entering transactions to this code. New
ones can be created or select from the available list. None assumes quantities
are not to be recorded.
Vat Type -
Yes if the values entered in the code are to be added to total value of purchases
excluding VAT for a VAT report, No if they are not. Exempt only applies to
receipts.
See Appendix C in the main manual for guide on VAT Classifications.
Sub Code -
Yes if you wish to allocate the values entered in this code to Sub codes, No if
-13-
you do not.
-14-
Sub Codes -
These codes are used to identify costs or income relating to a particular item
that you wish detailed costings of. This may be a crop or a machine, a person
or building for example. The sub-code for this particular item can be applied
when entering data to any analysis code set to yes. For example a sub-code for
each crop could be applied in Seed, Fertiliser, Sprays, Contract Work and so
on. You can then draw out all the information from these analysis codes relating
to this sub-code.
Names & Addresses The names and addresses of the people you trade with. They are used when
entering payments and receipts and for reporting on. They can be added as you
make entries. If you want them to appear alphabetically by surname you should
enter them as Bloggs, Joe.
Quantity Codes -
These are used within Analysis codes for the entry of quantities.
-15-
Start Entering Transactions
Once the structure is set to your requirement you can start to enter transactions. These are entered as
you would fill in a cashbook, from the Cheque Book, the Pay-in Book, the Petty cash book and the
Bank Statement.
Detailed explanations are shown in the manual, the basics are shown here.
Select Transactions. Entries are either Payments or Receipts.
Number -
Each transaction is given a number this starts at 1 on payments and receipts
each new financial year. Each new entry is given the next available number.
Date -
Is the date on the cheque, pay-in book or bank statement.
Period -
Is the month of the financial year the entry is in. Only three periods are available
at any time. These roll through the year as each month is closed.
Name -
The name on the payment or receipt. Select from the list in the drop down list.
Blank is an option if this is a one off and the name will not appear again. In such
a case the name can form part of the description. New names can be added as
you go along by clicking on the button with three dots, to the right of the name
box.
DescriptionContra -
General description of the transaction.
The value of any deduction on the transaction. For example market charges on
a receipt for the sale of animals.
-16-
Cash -
Petty cash paid or received.
Bank -
The value of this transaction through the bank.
Once the above have been entered, click Analysis to enter the breakdown to the codes for this
transaction.
As many lines of analysis can be entered as required, as long as the To Analyse figure is 0 at the end.
VAT is entered to code 100 if there is any VAT in the transaction. Codes can be entered by typing them
in, or typing the first digit and pressing return, then you can select from the drop down list.
The same applies to entry of Sub-Codes.
Description will show the analysis code description, then the sub-code description if used, or it can be
over-written with free text as you wish.
Quantity can be entered if it applies to a particular line
Value should be entered for the particular code.
When you are happy with the entries, click Save to return to the first entry screen.
If Contras have been entered click Contra to analyse this value on the opposite side of the book.
Once all the entries are completed, click Save to store the transaction. If it does not balance, you will
be warned and adjustments will have to be made until it balances.
Click New to add another transaction.
Click Exit to leave the transaction entry screen.
Once all the payments and receipts transactions for a month have been entered you should
then be able to reconcile the bank for that month.
-17-
First Bank Reconciliation
This routine is used to check that the entries in the Cashbook match those on the Bank
statement. It produces the report at the end of the month to show the true bank position.
The initial bank balances have to be entered first. Click on Month End and Bank Balances.
When setting up a new business the adjusted bank balance at the start of the year should be entered in
the Actual Balance, Adjusted Balance, and Bank Balance boxes as above.
The Adjusted Bank Balance is calculated from
Statement Balance at Year End
Less unpresented cheques at the Year End
Plus undeposited receipts at Year End.
A detailed description of how to get this figure is shown in the main manual.
-18-
Once you have entered the initial balances you should go to Bank Reconciliation.
Enter the date you are reconciling to.
Enter the closing balance on that date from the bank statement.
The Opening balance should be displayed. In the first reconciliation this is the adjusted balance at the
start of the year. After the first reconciliation this is the actual opening statement balance for the
reconciliation, and therefore the closing statement balance from the last reconciliation.
You should then select Credits or Debits. You will see a list of all the entries on the computer
for that month.
Select those entries shown on the bank statement by clicking on them to highlight. As you select them
the running balance will change. Once you have selected all the entries shown on the statement, the
Closing balance and the Running Balance should be the same.
Once they are equal, click Reconcile to print the Bank Reconciliation Report and confirm the
selected entries as reconciled.
If the balances do not match you have either, entries on the computer which are not the same as those
on the statement, missed an entry on the statement or missed an entry on the computer. This will have
to be corrected before you can reconcile.
-19-
First Month End
Once the bank reconciliation has been completed you can close the month. In Month End, click Month
End.
The VAT Report for the month will be printed. If you are running a Quarterly VAT return, the report
will be produced on closing the last month of the VAT quarter.
Reports
Reports can be drawn out at any time in the reports section.
These have no effect on the data. They can be reproduced as often as you like.
For each month you should print and file the following:
The Bank Reconciliation
The VAT Report
Transaction Reports - By Period - Limited to that Period. (Payments and Receipts)
Analysis Reports - By Analysis Code - Limited to that Period. (Payments and Receipts)
-20-
New Businesses
If you have separate farms which you wish to keep as individual businesses on the system you have to
click on File and New Business. Alternatively click the blank page icon at the top of the screen. This
will take you back to the initial start up screen. You then follow the same routine for each new business.
If you wish to create the new business with the same coding structure as an existing business you should
follow the instructions in the main manual to save it and make it available on the template screen.
Next time you start the program you will be given the business option screen to pick from as shown
below. If you wish to swap between businesses whilst working in the program, click File and Change
Business. Alternatively click the Open folder icon at the top of the screen.
Don’t forget to do your Backups !!!
-21-