1
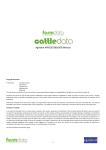
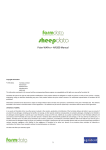
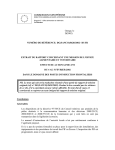
NVZ Recording System
Quick Start Guide
Version 9.0
Documentation and Software by farmdata Limited
© 1998-2015 farmdata Limited
-1-
This booklet is designed to help you get started. It should be used in conjunction with the
operating manual.
Copyright Information
© 1998-2015
Farmdata Limited
Westertown
Rothienorman
Aberdeenshire
AB51 8US
The information contained in this manual and the accompanying software program are copyrighted and all rights are reserved by Farmdata Ltd.
Farmdata Ltd reserve the right to make periodic modifications of this product without the obligation to notify any person or entity of such
revision. Copying, duplicating, selling or otherwise distributing any part of this product without the prior written consent of an authorised
representative of Farmdata Ltd are prohibited.
Information contained in this document is subject to change without notice and does not represent a commitment on the part of Farmdata Ltd.
The software described in this manual is furnished under a license agreement. The software may be used or copied only in accordance with
the terms of this agreement.
Limitations of Liability
In no event will Farmdata Ltd or any other person involved in the creation, production or distribution of the Farmdata software be liable to you
on account of any claim for any damages, including any lost profits, lost savings, or other special, incidental, consequential, or exemplary
damages, including but not limited to any damages assessed against or paid by you to any third party, arising out of the use, inability to use,
quality or performance of such Farmdata software and user manual, even if Farmdata Ltd or any such other person or entity has been advised
of the possibility of such damages, or for any claim by any other party. In addition, Farmdata Ltd or any other person involved in the creation,
production, or distribution of Farmdata software shall not be liable for any claim by you or any other party for damages arising out of the use,
inability to use quality or performance of such Farmdata software and user manual, based upon principles of contract warranty, negligence, strict
liability for the negligence of Farmdata Ltd or other tort, branch of any statutory duty, principles of indemnity or contribution, the failure of any
remedy to achieve its essential purpose, or otherwise.
This does not affect your statutory rights.
Related Documents.
nvzdata Manual
Windows Manual
Windows Turorial
-2-
Table Of Contents
The Information Needed Before You Start . . . . . . . . . . . . . . . . . . . . . . . . . . . . . . -4Loading the disks . . . . . . . . . . . . . . . . . . . . . . . . . . . . . . . . . . . . . . . . . . . . . . . . . . . -5Starting the System . . . . . . . . . . . . . . . . . . . . . . . . . . . . . . . . . . . . . . . . . . . . . . . . . -8Setting up the System Structure . . . . . . . . . . . . . . . . . . . . . . . . . . . . . . . . . . . . . . -12New Fields . . . . . . . . . . . . . . . . . . . . . . . . . . . . . . . . . . . . . . . . . . . . . . . . . . . . . . . . -16New Sub Field . . . . . . . . . . . . . . . . . . . . . . . . . . . . . . . . . . . . . . . . . . . . . . . . . . . . . -17Entering Crops in Fields . . . . . . . . . . . . . . . . . . . . . . . . . . . . . . . . . . . . . . . . . . . . -18New Stock Items . . . . . . . . . . . . . . . . . . . . . . . . . . . . . . . . . . . . . . . . . . . . . . . . . . . -20Field Operations . . . . . . . . . . . . . . . . . . . . . . . . . . . . . . . . . . . . . . . . . . . . . . . . . . . -22New Businesses . . . . . . . . . . . . . . . . . . . . . . . . . . . . . . . . . . . . . . . . . . . . . . . . . . . . -23-
-3-
The Information Needed Before You Start.
The system can be stated with very little detail. It can be as little as Field names or numbers and
sizes, the crops and varieties you grow and basic details of the fert and fym’s you are going to
apply.
What you need
Business Name. Address, telephone, farm code can be entered later.
Metric or Imperial Measurements. Which are you going to use?
Harvest Year What cropping year are you starting to enter data for?
Crops and Varieties. What are you growing?
Holdings. What are the different holdings within this business?
Field Names & Areas. OS numbers, land class, and other detail can be entered later.
Split Fields & Areas. Any fields which are being split for the current year.
Cropping Plan. What crops are in what fields for the year you are starting with and the previous
year.
Inputs. The fertiliser and manures to be applied to the crops. Each needs a name, unit of
application, pack size, and price. The quantity in stock would also be useful.
-4-
Loading the Disk
The system has to be loaded onto a computer running Windows 2000 or above.
If you receive the program on CD, place the CD in the drive and it should Auto-run.
In the Command Line type D:\Setup (where D is the letter of the drive with the disk) and click
OK.
The Setup screen will now appear.
Select Install Products and Updates. If you wish to view the manual, you will need to select
View Documents after.
-5-
Select the product to install and click Next.
-6-
An Activation Key is not required.
If a Key is not entered the program will run as an evaluation copy for 60 days from installation.
If you have purchased the product a key will have been supplied by Farmdata. Enter it at this
point. The Key is case sensitive. The install button will only become active if a valid Key is
entered or the Key is left blank.
Click Install to continue.
The installation routine will now begin.
-7-
Customer information can be set above to complete the licence information.
The default program location is set as above by default. You may change this if required. Any
subsequent program updates will have to be set likewise.
-8-
The Cropdata 8.0 settings screen will now appear. Click Install to proceed and files will be
copied.
Click Finish to complete the installation.
The process may restart in order to install the Auto Update software, this is used to pull update
for the program from the web.
You will now have a Cropdata 8.0 Icon on your desktop.
-9-
Starting the System
Once you have the system loaded onto the computer you can go ahead and start to use it.
Use the Cropdata Icon on your desktop or go to Start, Programs, Farmdata and Cropdata.
You will then get a screen showing you which directory the data files will be loaded into.
C:\FARMDATA\ARABLE32\ is the suggested directory. If this is not acceptable, click Change
and select your preferred directory.
Click next proceed.
You will be asked if you wish to install sample files. This is example data which can be installed
for demonstration purposes. It will give you an idea of how the system operates without having
to enter any data of your own. This data can be removed at a later date if you wish. You should
take care to create a new business for your own data, rather than add yours to the sample files.
-10-
If you install sample data you will then go into the program. If you don’t you will go into the
routine to set up a business.
The first time you go into the program the following screen will appear.
Name, Address, Telephone and Fax Number and Email should be filled in as required.
Holding No. should be that of the main holding as stated on the IACS return. Other code numbers
for land parcels within the business can be identified in Holdings as described later.
Leave Password blank if one is not required.
In the Harvest Tab
Units can either be Hectares or Acres depending on whether metric or imperial measures are to
be used. This applies to all areas, sprays, seeds and fertilisers. Once the system is started it is not
advisable to change this setting.
Harvest Year should be set initially to the IACS year you are going to enter details of once set
up.This year will change as you move from one year to next.
Enable Stock Control, if available, when selected will record all the detail of purchase and
application of each seed, spray and fertiliser. If not selected only the stock on hand of each item
is recorded.
Click Save to exit the screen.
-11-
The machine will then spend a short time creating the database for this business. You will then
be presented with the normal main window as shown below.
Use the manual for further explanation when required.
-12-
Setting up the System Structure.
Maintenance routines
Business Parameters are set on creation of the business but can be amended as required.
Code Lists
In each of the following sections new items can be added as you require although some may have
preset entries as a start. The routines to add, edit and delete entries are the same in all the sections.
The lists can also be updated as entries are made using the Add Button at the end of the
drop down list.
Help will bring up a screen of information which should give some detail of what is required at
any point.
To add a code - Click New on the bottom button bar. A blank form will be presented. Fill in he
new code, description and any other detail required. When you are happy click Save. To add
another click New again and repeat the procedure.
Any code can be edited by selecting it, changing it, and clicking Save. This change will then
apply to everywhere the code has been used in all the records past and current.
Delete will remove any code that is selected at the time. Care should be taken as deleting a code
may leave a blank in the history if it has been used somewhere.
Crops.
This is the list of crops grown by your business. A preset list of crops is already entered based on
details in the IACS Explanatory Leaflet. Yield, adjustments and N values may be amended as
required. Should you need to create others, Click New and fill in a code, description and
appropriate crop class, then Click Save.
-13-
Varieties.
This lists the varieties grown by your business. A list is already entered based on recommended
cereal and oilseed list. You should ensure all varieties of all crops are on the system. If you intend
to put previous crop histories on, don’t forget the varieties no longer grown.
To add a new variety, Click New and fill in the new code, description, select the crop type and the
appropriate crop class should enter automatically, then Click Save. Repeat until you have all your
varieties entered.
Observation Codes
These are not essential to starting the system but will need to be set up at some point if you wish
to use them. They are used to identify occurrences which have no cost related to them. They form
a “diary” of observations on a particular field. Disease levels, crop growth stages and any other
comment can have a code created and marked against any field at any time.
They can also be used as a basis for retrieving information and costings, for example fungicide
costs on fields with a particular disease level.
-14-
Holdings
These are the separate land parcels within the business. If a business is made up of separate
holdings and wishes to report on them individually they should be created here. Height and
Rainfall values can be set for each holding. Each field or sub-field can be allocated to a holding.
Units
These are the units in which operations are applied to fields, for example fertilisers are applied
in Kilogrammes. There is a preset list on installation but you may require to add some of your
own.
Operation Categories and Codes.
Categories are the main classes of operation used in the system for costing purposes. These should
be simple and broad. Typically, Fertiliser, Seed, Sprays, Tasks (ploughing, drilling, etc.) and Yield
(sales or outputs).
Codes can be used to subdivide the categories. For example within Sprays you may wish to split
Herbicides, Fungicides, Growth Regulators and so on.
When a stock record is created it must be allocated to a category and may be allocated to a code.
-15-
New Fields
The details of your individual fields are entered in the Field Records section. Click New to enter
the first field.
Field -
This is the name or number of the field. This has to be unique
within the business.
Type -
This is Current or Non-Current. Non Current fields can be
entered, these are fields which are no longer cropped but you
wish to retain the record. They may have been sold,
amalgamated, etc. Only Current fields show in the everyday
lists.
Size -
This is the nominal OS size of the field.
Second units & Sizes -
Only applies where Areas are defined in the Maintenance
Routines. These are the units and number of them in this field.
OS Number -
The OS Number applied to this field.
OS Map Sheet -
This used to be the sheet number of the map for this field. It is
now incorporated in the OS number but may need to be retained
for some purposes.
Holding -
The holding within this business for this field.
Comment -
Free text to use as you wish.
Once this detail has been entered click Save.
-16-
You can then access the Tabs along the top. This allows you to enter Soil Tests, Limings,
Eelworm Tests and Previous Cropping History for this individual field. These details can be
updated in field events.
After creating the first field, each time you click new you have to select if it is a new Field or
Sub-Field. Selecting field gives a blank sheet for a new field.
New Sub Field
Select New in the field record section. Select Sub Field in the above box and then select the
field you wish to split form the list of fields.
Click OK and you will go to the field record
You can then enter an Identifier for the Sub Field. This is usually two or three digits including
a year identifier. E9 and W9 could be the east and west split of a field in 1999 for example.
The area of this particular sub field can also be entered. The combined area of sub fields in any
one year should not add to more than the area of the field as a whole.
-17-
Entering Crops in Fields
This section is used, generally once each year, to allocate crops to fields. It is found in
Field Events, Crops.
Date -
Enter a date on which the work started for this particular crop. It is only
a guide.
Year -
The IACS Year that this crop falls into, generally also the year in which
it is to be harvested.
Crop -
The crop you are allocating to fields.
Type -
The Class this crop is to be allocated to.
Variety -
The variety of the crop.
Comment -
Free text for any comment you wish.
By Holding
Selecting by holding will show all fields within a selected holding. Only
fields flagged as Current in the record will appear.
Highlight the fields with this crop and variety by clicking on them, then click save.
The following detail screen will appear.
-18-
Detail -
Seed Type -
Identifies the seed type.
Management -
The Management regime for the is crop, applies to Grassland.
Expected Yield -
Adjusts from the standard yield for this crop.
Adjustment -
Adjustment which are required for intended end market.
Click OK when completed. The selected fields will then disappear from the list. Repeat for each
crop and variety in the new cropping year. You should end up with no fields at the end or fields
which have no crops in the year.
Any cropped areas which vary from the nominal OS areas can be amended in the crop section of
the field record.
-19-
New Stock Items
Once you have created your fields and put crops in them you will need the inorganic fertiliser
stock items which are applied to fields. Organic Fertiliser types are pre-entered according to
SEERAD standard figures. Create these in Stock Records. Before starting the system it is
advisable to do a physical stock check so that on hand quantities and prices can be entered.
Alternatively enter all stock a zero and “purchase” the current stock holdings in stock receipts.
To enter a new stock item click New and fill in as below.
Item -
the name of the record being created. This is free text and can be anything
you wish. Usually the name of the spray, seed or fertiliser.
Type -
Can be Current or Non-Current. A non-current item is one which is no
longer used. The item will still remain in the historical records but will not
appear on the list of usable stock when entering operations. At start up all
entires will probably be current.
Category -
Each record must be related to one of the Operation Categories as set up
in the Maintenance Section.
Sub Category -
A record may be related to one of the Operation Codes as set up in the
Maintenance Section.
Units -
This is the unit in which the item is applied to the crop. For example Kgs
where Kgs/Ha is used, Litres where Litres/ Ha is used. Units available are
those as set up in the Maintenance Section.
Standard Size -
This is the number of the above units in which the item is purchased. For
example fertiliser is generally purchased in 1000 Kg lots called a tonne.
-20-
The price used when entering purchases is the price of these lots. In the
case of sprays it may be easier to enter the standard size as 1 where pack
size may vary thus the purchase price would be so much per unit as
opposed to so much per pack.
Description -
This is the description of the pack size, ie tonne. Units available are those
as set up in the Maintenance Section.
Adjusted Cost -
This is the average cost of the stock on hand at the moment.
Stock on Hand -
This is the stock in store at the moment.
Committed Stock -
This is the quantity of stock which has been earmarked for use in planned
activities.
Comment -
This is free text and can be used as you wish.
Click Save and you will be able to access the other Tabs along the top.
Analysis -
Allows you to enter the fertiliser analysis for fertilisers. This is vital to calculating
unit usage on fields.
You now have Fields, Crops in the fields and stock items to use on the fields. Now
you can enter operations, soil analysis etc. through the standard routines.
-21-
Field Operations
The simplest and most commonly used method of operation entry is described below. This a One
Crop Operation.
Enter the Date of the operation, select the Category and/or Item to be applied. Either the
Rate of Application or the total Quantity applied can be selected and entered. Price is the
current adjusted price of the stock on hand. Comment is free text to be used as you require.
The Crop to be worked on and the Variety if required should be selected. The Year should be
set to the required harvest year.
The list of fields growing your selection in the chosen year will be displayed. Select the fields
you want by clicking on them individually, or Click Select on the bottom button bar to
highlight them all and deselect the one ones which are not treated by clicking on them.
As you select the fields the rate or total will adjust according to the total area of the fields
selected.
-22-
New Businesses
If you have separate farms which you wish to keep as individual businesses on the system you
have to click on File and New Business. Alternatively click the blank page icon at the top of
the screen. This will take you back to the initial start up screen. You then follow the same
routine for each new business.
Next time you start the program you will be given the business option screen to pick from as
shown below. If you wish to swap between businesses whist working in the program, click
File and Change Business. Alternatively click the Open folder icon at the top of the screen.
Routine occurrences can now be entered through the appropriate Occurrence Routines.
Don’t forget to do your Backups !!!
-23-