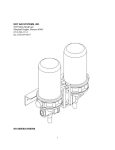
1
USER MANUAL
SAILOR 100 Satellite TV
98-136311.book Page i Friday, September 21, 2012 2:29 PM
SAILOR 100 Satellite TV
User Manual
Document number: 98-136311-A
Release date: September 21, 2012
98-136311.book Page ii Friday, September 21, 2012 2:29 PM
Disclaimer
Any responsibility or liability for loss or damage in connection with the use of this
product and the accompanying documentation is disclaimed by Thrane & Thrane. The
information in this manual is provided for information purposes only, is subject to
change without notice and may contain errors or inaccuracies.
Manuals issued by Thrane & Thrane are periodically revised and updated. Anyone
relying on this information should acquire the most current version e.g. from thrane.com
or from the distributor.
Thrane & Thrane is not responsible for the content or accuracy of any translations or
reproductions, in whole or in part, of this manual from any other source.
Copyright
© 2012 Thrane & Thrane A/S. All rights reserved. Printed in Denmark.
Trademark Acknowledgements
•
Thrane & Thrane is a registered trademark of Thrane & Thrane A/S in the European
Union and the United States.
•
SAILOR is a registered trademark of Thrane & Thrane A/S in the European Union and
the United States.
•
Product and company names mentioned in this manual may be trademarks or trade
names of their respective owners.
98-136311.book Page iii Friday, September 21, 2012 2:29 PM
Safety summary
1
The following general safety precautions must be observed during all
phases of operation, service and repair of this equipment. Failure to comply
with these precautions or with specific warnings elsewhere in this manual
violates safety standards of design, manufacture and intended use of the
equipment. Thrane & Thrane assumes no liability for the customer's failure
to comply with these requirements.
DO NOT OPERATE IN AN EXPLOSIVE ATMOSPHERE
Do not operate the equipment in the presence of flammable gases or fumes.
Operation of any electrical equipment in such an environment constitutes a
definite safety hazard.
KEEP AWAY FROM LIVE CIRCUITS
Operating personnel must not remove equipment covers. Component
replacement and internal adjustment must be made by qualified
maintenance personnel.
DO NOT SUBSTITUTE PARTS OR MODIFY EQUIPMENT
Because of the danger of introducing additional hazards, do not substitute
parts or perform any unauthorized modification to the equipment.
Failure to comply with the rules above will void the warranty!
iii
98-136311.book Page iv Friday, September 21, 2012 2:29 PM
About the manual
Intended readers
This manual is a user manual for the SAILOR 100 Satellite TV
system. This manual is intended for anyone who is using or
intends to use this system. No specific skills are required to
operate the SAILOR 100 Satellite TV. However, it is important that
you operate the system according to the guidelines in this manual.
Manual overview
Note that this manual does not cover installation of the system. For
information on installation refer to the SAILOR 100 Satellite TV
Installation manual. Part numbers for related manuals are listed in
the next section.
This manual has the following chapters:
iv
•
Introduction contains a brief description of the system.
•
Operation explains how to start up and use the system.
•
Troubleshooting contains a short troubleshooting guide and
information on service and repair.
2
98-136311.book Page v Friday, September 21, 2012 2:29 PM
Related documents
The below list shows the documents related to this manual and to
the SAILOR 100 Satellite TV system.
Title and description
Document
number
SAILOR 100 Satellite TV Installation manual
98-136280
Control Panel Installation manual (TT-6006A
and TT-6007A Message Terminal)
98-130088
SAILOR Transmodulator Installation manual
98-136455
Typography
In this manual, typography is used as indicated below:
Bold is used for the following purposes:
•
To emphasize words.
Example: “Do not touch the antenna”.
•
To indicate what the user should select in the user interface.
Example: “Select SETTINGS > LAN”.
Italic is used to emphasize the paragraph title in cross-references.
Example: “For further information, see Connecting Cables on
page...”.
v
98-136311.book Page vi Friday, September 21, 2012 2:29 PM
vi
98-136311.book Page vii Friday, September 21, 2012 2:29 PM
Table of contents
Chapter 1
Introduction
SAILOR 100 Satellite TV ....................................................... 1
User interfaces ...................................................................2
Control Panel for handling satellite profiles ..............................2
ACU display for status and system parameters ..........................2
Chapter 2
Operation
Control Panel .....................................................................3
Getting started .....................................................................3
Creating or editing a profile ...................................................5
Selecting the active profile .....................................................8
Deleting a profile ..................................................................9
Event list ........................................................................... 10
Help ................................................................................... 11
About ................................................................................. 11
Keypad and menus of the ACU ..........................................12
ACU display and keypad .......................................................12
Navigating the menus ..........................................................13
The menu tree .....................................................................14
Adjusting brightness of the display ....................................... 18
Resetting the system ........................................................... 18
Chapter 3
Troubleshooting
LEDs on the ACU ...............................................................20
Troubleshooting guide ......................................................21
Error messages ...................................................................21
Service and repair .............................................................21
Repacking for shipment ........................................................21
vii
98-136311.book Page viii Friday, September 21, 2012 2:29 PM
Table of contents
App. A
Conformity
SAILOR 100 Satellite TV .....................................................23
CE (LVD & EMC) ..................................................................23
Index
viii
.........................................................................................25
98-136311.book Page 1 Friday, September 21, 2012 2:29 PM
11111
Chapter 1
Introduction
Introduction
1
SAILOR 100 Satellite TV
The SAILOR 100 Satellite TV is a maritime satellite TV antenna for high-quality
worldwide TV reception. It consists of the following units:
•
Above Deck Unit (ADU)
•
Antenna Control Unit (ACU)
•
Control Panel
ADU
ACU
Control Panel
To TV distribution
A Multiswitch or a SAILOR Transmodulator can be connected for TV
distribution.
During installation all setup tasks are taken care of. The system is easy to use.
You only have to select a new satellite profile if you wish to watch channels on
a different satellite or you do not have coverage from the currently selected
satellite. If necessary you can add further satellite profiles to the list that has
been created during installation.
1
98-136311.book Page 2 Friday, September 21, 2012 2:29 PM
Chapter 1: Introduction
User interfaces
Control Panel for handling satellite profiles
The user interface of the SAILOR 100 Satellite TV is the Control Panel. It has a
touch screen. You can tap through settings and menus to handle satellite
profiles, show status information and system messages. The following screen
shows the Dashboard.
ACU display for status and system parameters
You can view status and system parameters in the display of the ACU.
2
User interfaces
98-136311.book Page 3 Friday, September 21, 2012 2:29 PM
22222
Chapter 2
Operation
2
•
Control Panel
•
Keypad and menus of the ACU
Operation
The SAILOR 100 Satellite TV has the following user interfaces:
There is also a web interface for installation and advanced setup. For further
details see the SAILOR 100 Satellite TV Installation manual.
Control Panel
The following sections describe how to set up and use the SAILOR 100 Satellite
TV using the Control Panel:
•
Getting started
•
Creating or editing a profile
•
Selecting the active profile
•
Deleting a profile
•
Event list
Getting started
Use the Control Panel for handling and selecting satellite profiles. The unit is
equipped with a touch screen, an external keyboard is not required.
Note
When reading status information in this application, read carefully
whether it is the status information of the ACU or the Satellite TV
application on the Control Panel.
3
98-136311.book Page 4 Friday, September 21, 2012 2:29 PM
Chapter 2: Operation
Navigation and start-up
To navigate through the user interface you have the following possibilities:
•
Icon in the top right corner to display the main menu.
•
Arrow icon (lower left corner) for back function and to collapse the onscreen keyboard when you do not need it any more.
Main menu
Back,
collapse
keyboard
To get started with the Control Panel, do as follows:
1. Make sure that it is connected to the LAN port 4 at the rear of the ACU,
possibly through a switched network.
Note
If connected directly to the ACU, make sure that the DHCP server
has been enabled on that port.
For details on ACU network configuration see the SAILOR 100 Satellite TV
Installation manual.
2. Press the on/off button. A couple of start-up screens are
displayed. Wait until the Dashboard is displayed:
4
•
ACU connection: OK
•
System: status information, e.g. TRACKING. When a yellow triangle is
displayed in the section ACU Connection the ACU is not ready for
operation.
Control Panel
98-136311.book Page 5 Friday, September 21, 2012 2:29 PM
22222
Chapter 2: Operation
3. The Dim button is used to dim the light in the Control Panel.
Push and hold to dim the display more/less. Each new push
changes direction between more and less.
Now you can create satellite profiles.
Operation
Creating or editing a profile
To create or edit a profile, i.e. satellite profile, do as follows:
1. Tap the menu icon
.
2. Select Settings.
3. Select Create profile or Edit profile.
4. Fill in or edit the satellite profile name.
Note
It is helpful to assign a name containing the location where the
Satellite profile is to be used (e.g. "Gulf of Mexico" or "North Sea")
and possibly the provider.
Control Panel
5
98-136311.book Page 6 Friday, September 21, 2012 2:29 PM
Chapter 2: Operation
5. Tap the field Satellite. A new window is displayed. Tap and scroll to find the
wanted satellite, then tap on a satellite to select it. The list is sorted as
follows: 180°W -> 0° -> 180°E.
Profile handling
Default satellite in the list
Create new profile The satellite closest to the ship’s
position is highlighted.
Edit profile
Note
The satellite currently selected for
this profile is highlighted.
At some longitudes, multiple satellites are co-located. In this case, it
is not important which is chosen as long as the longitude is correct.
The chosen satellite will be the one the system tracks, but it will
receive and forward the TV signals from all the co-located satellites.
6. Configure the tracking properties.
Automatic:
The system will automatically determine which signal to track on, based
on an automatic frequency and transponder scan of the satellite.
Note
During frequency and transponder scan, TV reception is possible.
Thus, Automatic tracking is not slower than manually configured
tracking parameters.
If the vessel moves out of coverage of the transponder currently being
tracked, the system will initiate a new frequency and transponder scan and
find another transponder to track, on the same satellite (assuming the
vessel is still in coverage of the satellite).
•
Polarisation: Select Linear or Circular depending on the polarisation
with which your provider transmits the TV signals1.
Note
1.
6
Selecting Linear when the TV signal is transmitted with Circular
polarisation, or vice versa, results in a 3 dB loss in signal strength.
Hence, this setting cannot be verified by presence of TV signal alone.
For more information see e.g. www.lyngsat.com or www.satbeams.com. Linear
signals are marked with the letter H for Horizontal or V for Vertical. Circular
signals are marked with either L for Left hand or R for Right hand.
Control Panel
98-136311.book Page 7 Friday, September 21, 2012 2:29 PM
22222
Chapter 2: Operation
•
Polarisation: Linear Horizontal, Linear Vertical, Circular Left hand or
Circular Right hand.
•
Tracking frequency: Frequency of the transponder (e.g. 11.362 GHz).
•
Symbol rate: Mega symbols per second (e.g. 27.500 MS/s).
Note
Operation
DVB-S / DVB-S2:
By selecting DVB-S / DVB-S2, it is possible to configure the system to track
a specific transponder.
It is highly recommended always to use Automatic tracking.
7. Tap Save to save the satellite profile.
8. An information window is displayed. Verify the data for the new profile and
tap OK to close the window.
Control Panel
7
98-136311.book Page 8 Friday, September 21, 2012 2:29 PM
Chapter 2: Operation
Selecting the active profile
To change the active profile, select another profile from the list of created
profiles.
Note
When you select another profile, the antenna moves to the
new position and goes through the acquisition procedure. This
may take a couple of minutes.
Do as follows:
1. Tap the menu icon
.
2. Select Activate profile.
3. From the list of existing profiles select the new profile.
4. A confirmation window is displayed. Verify activation of the selected profile
and tap OK to accept.
5. The Dashboard is displayed again and the new profile is selected. An
azimuth adjustment is made (if enabled during installation), and the
antenna turns to the new position and starts acquiring signal from the new
satellite.
8
Control Panel
98-136311.book Page 9 Friday, September 21, 2012 2:29 PM
22222
Chapter 2: Operation
Deleting a profile
You can delete profiles that you don’t use anymore. You cannot delete the
currently active profile.
To delete a profile, do as follows:
.
Operation
1. Tap the menu icon
2. Select Settings.
3. Select Delete profile.
4. Tap the profile you want to delete.
5. A confirmation window is displayed. Verify the profile name you want to
delete and press OK to accept.
Control Panel
9
98-136311.book Page 10 Friday, September 21, 2012 2:29 PM
Chapter 2: Operation
Event list
This list provides active events and history of the system. Notifications are
earlier events, they are cleared after 24 hours.
There are two ways to display the Event list:
Tap the menu icon
and tap Event list.
or
1. Tap the yellow triangle
Panel.
in the lower right corner of the Control
2. Tap Active events.
10
Control Panel
98-136311.book Page 11 Friday, September 21, 2012 2:29 PM
22222
Chapter 2: Operation
Help
Tap the menu icon
and tap Help.
Operation
Help provides a description how to handle satellite profiles. Scroll through the
help or use the links at the start to jump to a specific topic.
About
Tap the menu icon
and tap About.
About provides the following information:
•
Software version of the SAILOR 100 Satellite TV application. Software
version of the ACU is shown on the Dashboard page in the section Unit
information.
•
IP address of the Control Panel
•
Legal Notices with software licence information
Control Panel
11
98-136311.book Page 12 Friday, September 21, 2012 2:29 PM
Chapter 2: Operation
Keypad and menus of the ACU
The following sections describe how to use the keypad and view the menus of
the SAILOR 100 Satellite TV:
•
ACU display and keypad
•
Navigating the menus
•
The menu tree
•
Adjusting brightness of the display
•
Resetting the system
ACU display and keypad
In the ACU display you can see the current state of the system. You can also
see events (warnings, errors and information) and how the system has been
configured. Use the keypad to navigate through the menu tree.
1
3
2
6
7
4
8
5
Signal strength
1. Current status of the SAILOR 100 Satellite TV:
NOT READY (Waiting for input from GNSS, e.g. GPS)
READY (no satellite profile selected)
POINTING ANTENNA (Locating the satellite)
ACQUIRING SIGNAL (Acquiring the satellite signal)
TRACKING (Tracks the current satellite)
FREQUENCY SCAN (Scanning for transponders)
BLOCKING ZONE (Antenna is pointing into a blocking zone)
12
Keypad and menus of the ACU
98-136311.book Page 13 Friday, September 21, 2012 2:29 PM
22222
Chapter 2: Operation
2. Current menu. See The menu tree on page 14.
3. GPS: GPS signal is received from the GPS module, OK or —.
4. HDG: Ship heading data received from the ship’s gyro, OK or —.
5. LAN: LAN connectors used, 1, 2, 3, 4, —.
Operation
6. SAT: Satellite position of currently active satellite profile.
7. RX: RX polarisation of currently active satellite profile. H (horizontal), V
(vertical), L (left-hand) R (right-hand).
8. RX: Rx RF tracking frequency in GHz.
After 1 hour the display is dimmed to lowest intensity. Press any key to light up
the display.
Navigating the menus
Use the keypad to navigate the menus.
•
Press OK or
to select a menu item.
•
Use the arrow keys
and
to go through the menu
items or enter a number, digit by digit.
•
Use the arrow keys
and
to go through the settings
and move from one digit to the next.
•
Press OK to select a setting.
•
Press
again to move one level up. If applicable, confirm to store the
new setting by pressing OK.
Keypad and menus of the ACU
13
98-136311.book Page 14 Friday, September 21, 2012 2:29 PM
Chapter 2: Operation
The menu tree
In the menu tree you can see how the system has been configured. You can
also enter satellite information directly, if it is necessary to change the satellite
information and you cannot use a connected PC and the web interface.
MAIN
ANTENNA
NETWORK
SATELLITE
EVENTS
ANT
POINTING
POLARISATION
GPS
HEADING
VERSIONS
SERIAL NUMBERS
TV*
NET
PORT 1/2 IP
PORT 1/2 MASK
PORT 3 IP
PORT 3 MASK
PORT 4 IP
PORT 4 MASK
DEFAULT GATEWAY
SAT
POSITION
RX POLARISATION
RX FREQUENCY
EVENT
<EVENT 1>
<EVENT 2>
<EVENT ...>
<EVENT n>
14
ANT-1
ANTENNA STATE
ELEVATION
AZIMUTH
ANT-2
RX POLARISATION
ANT-3
LATITUDE
LONGITUDE
FIX TYPE
ANT-4
HEADING
ANT-5
SW VERSION
ANT-6
ACU
ADU
Keypad and menus of the ACU
98-136311.book Page 15 Friday, September 21, 2012 2:29 PM
22222
Chapter 2: Operation
Top-level menu
Top-level
menu
View with current status of the SAILOR 100 Satellite TV. This view is
displayed after a time out of 10 minutes. Press any key (except left
arrow) to enter the menu at MAIN.
Operation
MAIN
Description
New events are shown in this display. If an event is displayed, press
OK to jump directly to the menu EVENTS for viewing the currently
active events.
ANTENNA
Shows the current ADU parameters, position, software version and
serial numbers of the ADU and ACU.
NETWORK
Shows the IP addresses and netmasks of the LAN connectors of the
ACU.
SATELLITE
Current satellite information. This information is selected using the
web interface or the Control Panel.
EVENTS
View system events. Active events are shown as: X ACTIVE EVENTS
in the MAIN display. Press OK to update the list.
Menu descriptions
ANTENNA
menu
POINTING
Description
ANTENNA: Current state of the antenna
ELEVATION: Current elevation angle of the antenna
AZIMUTH: Current azimuth of the antenna, with reference to
North
POLARISATION
RX POLARISATION: Setting of polariser.
Keypad and menus of the ACU
15
98-136311.book Page 16 Friday, September 21, 2012 2:29 PM
Chapter 2: Operation
ANTENNA
menu
Description
GPS
LATITUDE: current latitude, read from GPS module.
LONGITUDE: current longitude, read from GPS module.
FIX TYPE: 3D or NONE
HEADING
Ship’s heading in degrees with reference to North, provided by
the ship’s gyro.
VERSIONS
Current software version.
SERIAL
NUMBERS
ACU: ACU serial number
ADU: Serial number of the antenna
NETWORK menu
Description
PORT 1/2 IP
Current IP address for LAN 1 and LAN 2.
MASK 1/2
Current netmask for LAN 1 and LAN 2.
PORT 3 IP
(LAN 3) Current IP address of the SAILOR 100 Satellite TV
web interface (default: 192.168.0.1).
MASK 3
(LAN 3) Current netmask of the SAILOR 100 Satellite TV
web interface (default: 255.255.255.0).
PORT 4 IP
Current IP address for LAN 4.
MASK 4
Current netmask for LAN 4.
DEFAULT GATEWAY
Current default gateway.
16
Keypad and menus of the ACU
98-136311.book Page 17 Friday, September 21, 2012 2:29 PM
22222
Chapter 2: Operation
SATELLITE menu
Description
POSITION
Position of the current satellite.
RX POLARISATION
Linear polarisation: HORIZONTAL, VERTICAL
RX FREQUENCY
EVENT
menu
<EVENT>
Operation
Circular polarisation: LEFT HAND, RIGHT HAND.
Ku band receiving frequency of the active satellite.
Description
In this menu all active events are listed. Use
through the active events.
and
to go
Events can be of the type WARNING or ERROR. For a list of events
see Event messages — overview on page 1.
If a new event occurs or there is a change in the event list while
you are in the EVENTS menu, a * is shown in the upper left corner
of the display, next to the menu name. Press OK to update the
EVENTS list, the * will be removed.
A > means the event text is longer than the display. Press > to see
the remaining text.
Example: EVENT 1/4*: This is the first event out of a list of 4 and there has
been a change in the list. EVENT 1/4 will always be shown, the *
indicates that there has been a change.
Keypad and menus of the ACU
17
98-136311.book Page 18 Friday, September 21, 2012 2:29 PM
Chapter 2: Operation
Adjusting brightness of the display
To adjust the brightness do the following:
1. Press and hold OK for a short moment until BRIGHTNESS XXX% is
displayed (XXX is the current brightness value).
2. Hold OK pressed + press
for lighter or
for darker display.
3. Release OK to leave the brightness menu.
Resetting the system
To reset the system do the following:
1. Press and hold
reboots.
and
until the ACU display shuts down and the ACU
2. Wait until the system has rebooted and is operational again. The last active
satellite profile will be used.
18
Keypad and menus of the ACU
98-136311.book Page 19 Friday, September 21, 2012 2:29 PM
33333
Chapter 3
Troubleshooting
3
•
LEDs on the ACU
•
Troubleshooting guide
•
Error messages
•
Service and repair
Troubleshooting
This chapter gives guidelines for troubleshooting and provides an overview of
the different means of status signalling. It has the following sections:
19
98-136311.book Page 20 Friday, September 21, 2012 2:29 PM
Chapter 3: Troubleshooting
LEDs on the ACU
The ACU has 3 LEDs: Power, TV Ready and Fail/Pass LED.
LED
Power
TV Ready
Fail/Pass
LED
Behavior
Description
Steady green
Power supply OK
Steady red
Power supply failure
Off
No power
Steady green
Tracking satellite.
Off
Not tracking satellite.
Steady red
A fault which prevents operation is present in
the system (ACU, ADU).
Flashing green A Power On Self Test (POST) or Person
Activated Self Test (PAST) in progress. The
current status is displayed.
20
Flashing red
Active BITE (Built In Test Equipment) failure or
warning. The event is shown in the ACU
display.
Steady green
No faults.
LEDs on the ACU
98-136311.book Page 21 Friday, September 21, 2012 2:29 PM
33333
Chapter 3: Troubleshooting
Troubleshooting guide
Error messages
Active errors are indicated by a yellow triangle on the Dashboard page of the
Control Panel. To see further info see Event list on page 10.
Troubleshooting
Service and repair
Should your Thrane & Thrane product fail, please contact your dealer or
installer, or the nearest Thrane & Thrane partner. You will find the partner
details on thrane.com where you also find the Thrane & Thrane Self Service
Center web-portal, which may help you solving the problem.
Your dealer, installer or Thrane & Thrane partner will assist you whether the
need is user training, technical support, arranging on-site repair or sending
the product for repair.
Your dealer, installer or Thrane & Thrane partner will also take care of any
warranty issue.
Repacking for shipment
Should you need to send the product for repair, please read the below
information before packing the product.
The shipping carton has been carefully designed to protect the SAILOR 100
Satellite TV and its accessories during shipment. This carton and its associated
packing material should be used when repacking for shipment. Attach a tag
indicating the type of service required, return address, part number and full
serial number. Mark the carton FRAGILE to ensure careful handling.
Note
Correct shipment is the customer’s own responsibility.
Troubleshooting guide
21
98-136311.book Page 22 Friday, September 21, 2012 2:29 PM
Chapter 3: Troubleshooting
If the original shipping carton is not available, the following general
instructions should be used for repacking with commercially available
material.
1. Wrap the defective unit in heavy paper or plastic. Attach a tag indicating
the type of service required, return address, part number and full serial
number.
2. Use a strong shipping container, e.g. a double walled carton.
3. Protect the front- and rear panel with cardboard and insert a layer of
shock-absorbing material between all surfaces of the equipment and the
sides of the container.
4. Seal the shipping container securely.
5. Mark the shipping container FRAGILE to ensure careful handling.
Failure to do so may invalidate the warranty.
22
Service and repair
98-136311.book Page 23 Friday, September 21, 2012 2:29 PM
AAAAA
Conformity
A
SAILOR 100 Satellite TV
CE (LVD & EMC)
The Thrane SAILOR 100 Satellite TV is CE certified (LVD &EMC directives) as
stated in the “Declaration of Conformity with LVD and EMC Directives”,
enclosed in copy on the next page.
23
Conformity
Appendix A
98-136311.book Page 24 Friday, September 21, 2012 2:29 PM
98-136311.book Page 25 Friday, September 21, 2012 2:29 PM
BBBBB
Index
Index
A
E
ACU
display menus and keypad, 12
ACU LEDs, 20
B
edit satellite profile, 5
error messages, 21
event list, 21
view, 10
events
display in Control Panel, 10
back function, 4
brightness in display, 18
I
C
IP address
Control panel, 11
CE compliance, 23
conformity, 23
Control Panel
IP address, 11
navigation, 4
software version, 11
coverage, 6
create satellite profile, 5
D
Declaration of Conformity, 24
delete satellite profile, 9
dim
display, 5
display
brightness, 18
dim, 5
menu descriptions, 15
menu tree, 14
menus and keypad, 12
navigation, 13
DVB-S, 7
DVB-S2, 7
Index
B
K
keyboard, 3
collapse, 4
L
LEDs on ACU, 20
light indicators in ACU, 20
M
main menu, 4
manual
order number, i
menu
descriptions, 15
tree, 14
menus
navigate, 13
menus in ACU display, 12
25
98-136311.book Page 26 Friday, September 21, 2012 2:29 PM
Index
N
navigate
Control Panel, 4
display menus, 13
O
order number
manual, i
service, 21
shipment, 21
software version
ACU, 11
control panel, 11
start-up, 4
system
ACU reset, 18
system reset, 18
T
P
packing for shipment, 21
polarisation, 6
DVB-S, 7
power on, 4
profile
create or edit, 5
delete, 9
select active, 8
R
repair, 21
reset, 18
keys on ACU, 18
system, 18
S
safety summary, iii
satellite profile
create or edit, 5
delete, 9
select active, 8
select satellite profile, 8
26
tracking properties, 6
W
warranty, 21
98-136311-A
[email protected]
•
thrane.com